Spring Boot 整合
什么是Spring Boot?
百度百科一下
创建Spring Boot项目
通过官网来创建(了解)
这里面的创建方式不做过多说明,只需要在 官网 里面创建好了,然后下载解压,就可以了,我这里直接使用编辑器创建
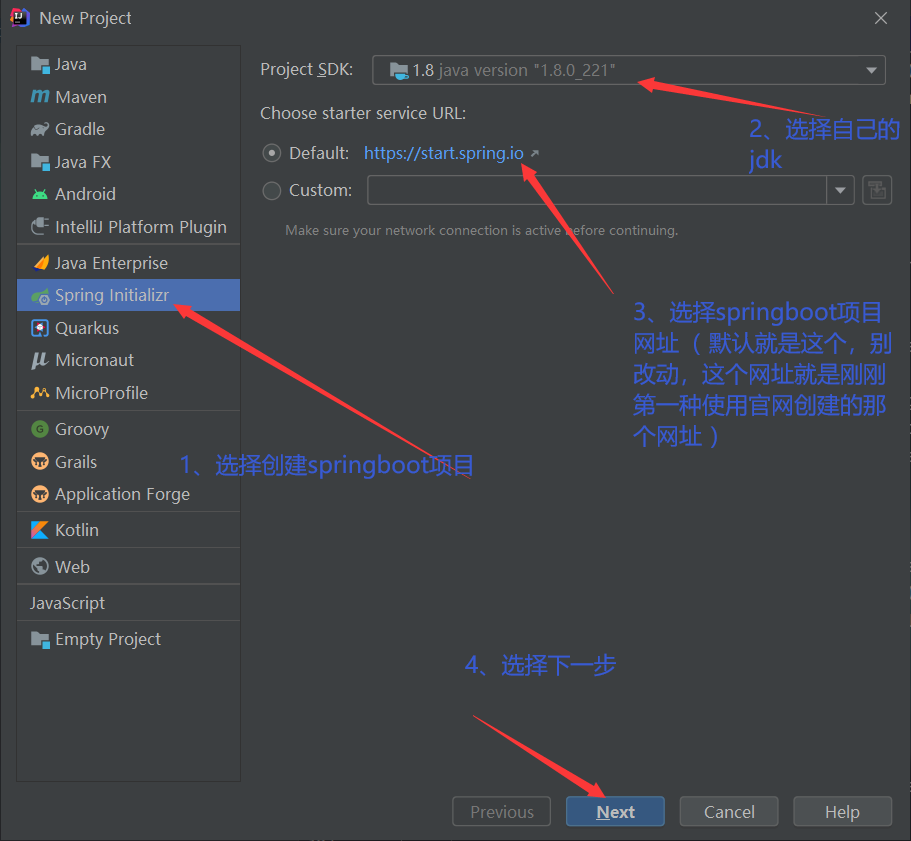
使用IDEA编辑器创建
提示:
有时会遇到使用上面的spring官网进行Spring Boot项目创建出现“链接不上“(没用魔法上网的原因),此时将上面的 start.spring.io custom自定义为阿里云的 https://start.aliyun.com 即可。
后面就是选择相应依赖,根据需要自行选择即可,然后就会自动拉取选择的依赖。
小彩蛋:banner
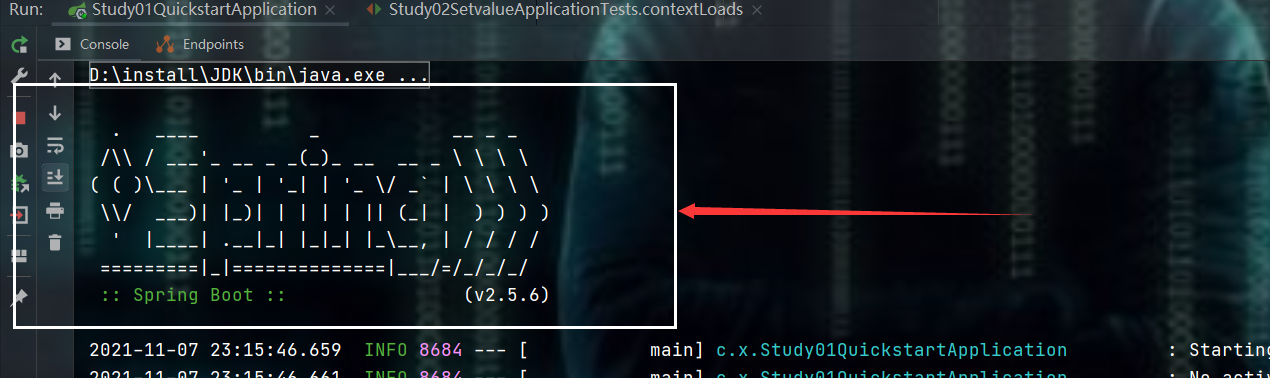
上面这玩意儿,我不想看到它。推荐一个网址:https://www.bootschool.net/ascii-art
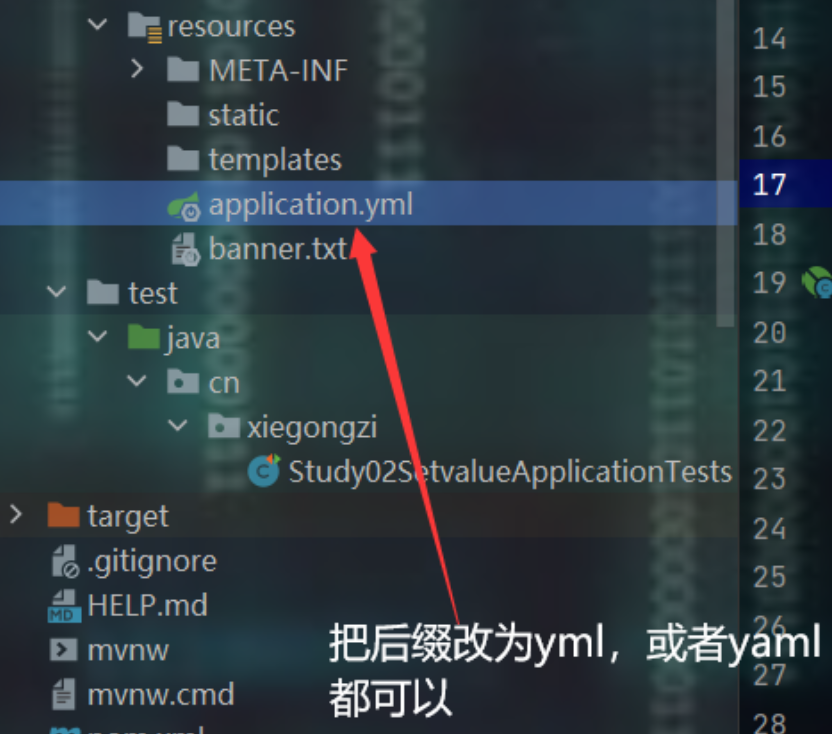
在项目的resources资源目录下,新建一个banner.txt文件粘贴上述网址中复制的内容即可。
了解YAML语法
这玩意儿的语法就像如下图的类与属性的关系一样,层层递进的。
注意:
- 使用yml语法时,每句的结尾别有空格,容易出问题。
- IDEA中采用tab缩进没问题,但是:在其他地方,如:linux中,使用yml语法时,别用tab缩进,也容易导致程序启动不起来。
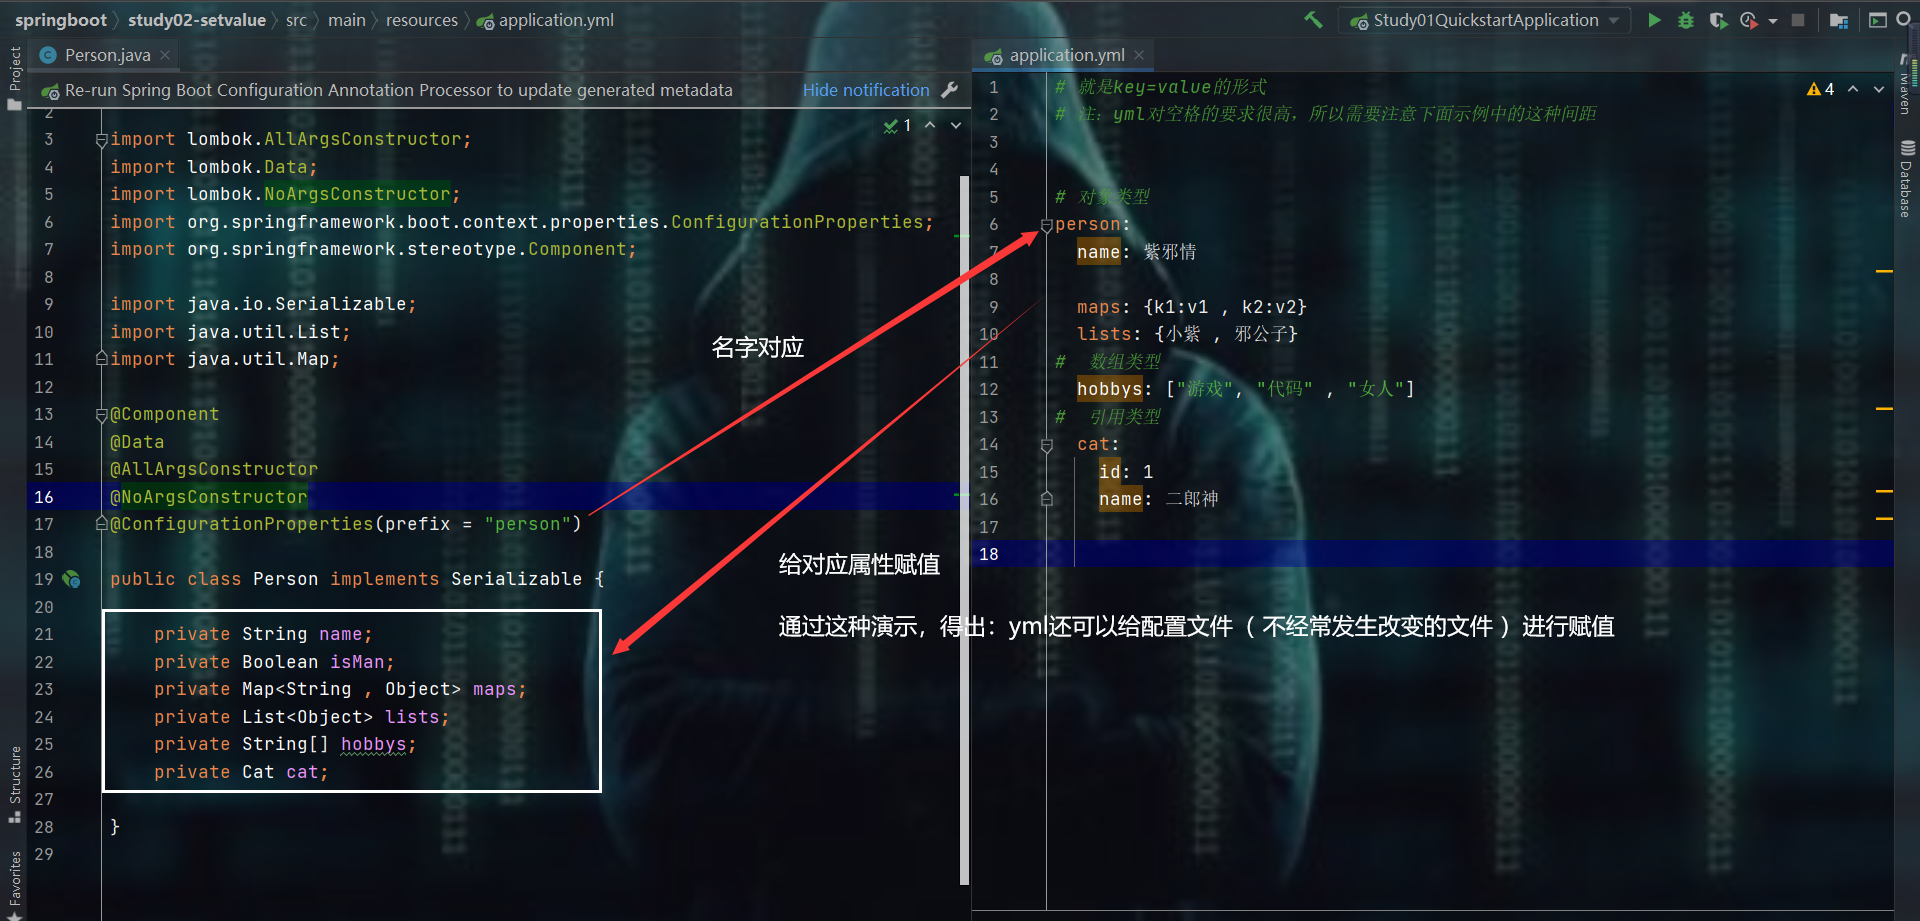
读取YAML自定义配置内容
提示:
自定义配置(读取YAML文件中内容)时可以用到这种小知识点,当然还可以使用
@value注解,看场景来使用即可。
准备工作:导入依赖
<!--这个jar包就是为了实体类中使用@ConfigurationProperties(prefix = "xxxx")这个注解而不报红-->
<dependency>
	<groupId>org.springframework.boot</groupId>
	<artifactId>spring-boot-configuration-processor</artifactId>
	<optional>true</optional>
</dependency>

<!--  也可选择不导入此依赖,而是在启动类中加入 @EnableConfigurationProperties(value = {上面那个注解所在类名.class})
	  这个注解是 org.springframework.boot.context.properties.EnableConfigurationProperties; 中的
-->
使用@ConfigurationProperties注解实现给实体类属性赋值
jsr303检验之Spring-Validation
jsr303这是数据检验的规范,基于这个的实现方式有好几个,自行百度一下,然后注解含义都是和下面列出来的差不多。
依赖
<!--校验依赖 -->
<dependency>
	<groupId>org.springframework.boot</groupId>
	<artifactId>spring-boot-starter-validation</artifactId>
</dependency>
可以搭配的注解如下:
| 检查类型 | 注解 | 解读 |
|---|---|---|
| @Validated | 使用在类上,声明该注解所在类需要使用Validation校验 | |
| 空检查 | ||
| @Null | 验证对象是否为null | |
| @NotNull | 验证对象是否不为null,无法查检长度为0的字符串 | |
| @NotBlank | 检查约束字符串是不是Null还有被Trim的长度是否大于0,只对字符串,且会去掉前后空格 | |
| @NotEmpty | 检查约束元素是否为NULL或者是EMPTY | |
| Booelan 检查 | ||
| @AssertTrue | 验证 Boolean 对象是否为 true | |
| @AssertFalse | 验证 Boolean 对象是否为 false | |
| 长度检查 | ||
| @Size(min =, max =) | 验证对象(Array,Collection,Map,String)长度是否在给定的范围之内 | |
| @Length(min =, max =) | 验证字符串长度是否在给定范围之内 | |
| 日期检查 | ||
| @Past | 验证 Date 和 Calendar 对象是否在当前时间之前,验证成立的话被注释的元素一定是一个过去的日期 | |
| @Future | 验证 Date 和 Calendar 对象是否在当前时间之后 ,验证成立的话被注释的元素一定是一个将来的日期 | |
| @Pattern(regex=, flag=) | 验证 String 对象是否符合正则表达式的规则,被注释的元素符合制定的正则表达式 regexp:正则表达式 flags:指定 Pattern.Flag 的数组,表示正则表达式的相关选项 |
|
| 数值检查 | 建议使用在Stirng、Integer类型,不建议使用在int类型上,因为表单值为“”时无法转换为int 但可以转换为Stirng为”“,Integer为null |
|
| @Min(value) | 验证 Number 和 String 对象是否大于等于指定的值 | |
| @Max(value) | 验证 Number 和 String 对象是否大于等于指定的值 | |
| @DecimalMax(value) | 被标注的值必须不大于约束中指定的最大值, 这个约束的参数是一个通过BigDecimal定义的最大值的字符串表示,小数存在精度 |
|
| @DecimalMin(value) | 被标注的值必须不小于约束中指定的最小值, 这个约束的参数是一个通过BigDecimal定义的最小值的字符串表示,小数存在精度 |
|
| @Digits | 验证 Number 和 String 的构成是否合法 | |
| @Digits(integer =, fraction =) | 验证字符串是否是符合指定格式的数字, interger指定整数精度,fraction指定小数精度 |
|
| @Range(min =, max =) | 被指定的元素必须在合适的范围内 例如 @Range(min = 10000, max = 50000, message =”range.bean.wage”) |
|
| @Valid | 递归地对关联对象进行校验, 如果关联对象是个集合或者数组,那么对其中的元素进行递归校验, 如果是一个map,则对其中的值部分进行校验(是否进行递归验证) |
|
| @CreditCardNumber | 信用卡验证 | |
| 验证是否是邮件地址,如果为null,不进行验证,算通过验证 | ||
| @ScriptAssert(lang =, script =, alias =) | 允许在验证数据时执行自定义的JavaScript或Groovy脚本。这个注解通常与@Validated一起使用 |
|
| @URL(protocol =, host =, port =, regexp =, flags =) | 是 Hibernate Validator 提供的注解,用于验证字符串是否是有效的URL如果不是有效URL,则验证失败且可能抛出 ConstraintViolationException |
@Valid和@Validated更详细的区别去这里:@陈老老老板:@Valid和@Validated的区别
@ScriptAssert(lang =, script =, alias =)示例:
import javax.validation.constraints.NotNull;
import javax.validation.constraintvalidation.ValidationMode;
import javax.validation.groups.Default;

import org.hibernate.validator.constraints.ScriptAssert;

public class User {

    @NotNull
    private String name;

    @NotNull
    private Integer age;

    // Getters and setters omitted for brevity

    @ScriptAssert(
        lang = "javascript",
        script = "java.util.Arrays.asList(18, 25, 35).contains(value.age)",
        alias = "value",
        reportOn = ValidationMode.NONE,
        separator = ";",
        groups = Default.class
   )
    public interface AgeCheck {
    }
}
@URL(protocol =, host =, port =, regexp =, flags =) 示例:
import javax.validation.constraints.NotNull;
import javax.validation.constraints.URL;

public class Website {

    @NotNull
    @URL
    private String url;

    public String getUrl() {
        return url;
    }

    public void setUrl(String url) {
        this.url = url;
    }
}
validation之groups分组校验
- 划分组:定义组接口、校验项分组
package com.zixq.entity;

import com.fasterxml.jackson.annotation.JsonFormat;
import jakarta.validation.groups.Default;
import lombok.AllArgsConstructor;
import lombok.Data;
import lombok.NoArgsConstructor;
import org.hibernate.validator.constraints.Length;
import org.hibernate.validator.constraints.Range;

import java.time.LocalDateTime;

/**
 * <p>
 * 分类实体类
 * </p>
 *
 * <p>@author : ZiXieqing</p>
 */


@Data
@NoArgsConstructor
@AllArgsConstructor
public class CategoryEntity {

    @Range(
        min = 0,
        max = Integer.MAX_VALUE,
        groups = {get.class, remove.class}
   )    // 指定当前校验项所属分组     不指定groups时,默认是default分组
    private Integer id;

    @Length(
        min = 1,
        max = 15,
        groups = {add.class, update.class}
   )
    private String categoryName;

    @Range(min = 0, max = Integer.MAX_VALUE)    // 不指定groups时,默认是default分组
    private Integer createUserId;

    @JsonFormat(shape = JsonFormat.Shape.STRING, pattern = "yyyy-MM-dd HH:mm:ss")
    private LocalDateTime createTime;

    /**
     * 分组之间可以 extends继承     继承后校验项为:父类分组所有校验项+子类分组所有校验项
     */
    public interface add extends Default {
    }

    public interface remove {
    }

    public interface update extends Default {
    }

    public interface get {
    }
}
- 校验:指定使用哪个分组
package com.zixq.controller;

import com.zixq.entity.CategoryEntity;
import com.zixq.entity.Result;
import org.springframework.validation.annotation.Validated;
import org.springframework.web.bind.annotation.PostMapping;
import org.springframework.web.bind.annotation.RequestBody;
import org.springframework.web.bind.annotation.RequestMapping;
import org.springframework.web.bind.annotation.RestController;

/**
 * <p>
 * Validation的分组校验功能
 * </p>
 *
 * <p>@author : ZiXieqing</p>
 */

@RestController
@RequestMapping("groups")
public class GroupsValidation {

    @PostMapping("/add")
    public Result add(@Validated(CategoryEntity.add.class)
                      @RequestBody CategoryEntity categoryEntity) {

        System.out.println("categoryEntity = " + categoryEntity);
        return Result.success(categoryEntity);
    }
}
validation之自定义校验
在已提供的注解中不能满足我们需要时就可以使用Validation的自定义注解校验了
- 定义注解
package com.zixq.annotation;

import com.zixq.validation.StateValidation;
import jakarta.validation.Constraint;
import jakarta.validation.Payload;

import java.lang.annotation.*;

/**
 * <p>
 * Validation之自定义校验注解
 *      message、groups、payload 这三个参数必须有
 * </p>
 *
 * <p>@author : ZiXieqing</p>
 */
@Documented
@Target({ElementType.FIELD, ElementType.PARAMETER})
@Retention(RetentionPolicy.RUNTIME)
@Constraint(
        validatedBy = {StateValidation.class}    // 指定注解逻辑是由哪个类来负责
)
public @interface State {

    /**
     * 校验错误时的提示信息
     */
    String message() default "状态只能是:发布或草稿";

    /**
     * 分组
     */
    Class<?>[] groups() default {};

    /**
     * 载荷:用来获取State注解的一些额外信息
     */
    Class<? extends Payload>[] payload() default {};
}
- 定义注解逻辑类
package com.zixq.validation;

import com.zixq.annotation.State;
import io.micrometer.common.util.StringUtils;
import jakarta.validation.ConstraintValidator;
import jakarta.validation.ConstraintValidatorContext;

/**
 * <p>
 * Validation之自定义注解 state 的逻辑编写
 *  ConstraintValidator<A, T>
 *      A 为哪个自定义注解编写逻辑
 *      T 该自定义注解判定值的类型
 * </p>
 *
 * <p>@author : ZiXieqing</p>
 */
public class StateValidation implements ConstraintValidator<State, String> {
    /**
     * 对自定义注解进行逻辑校验
     * @param value 要判定的值
     * @param context 验证器上下文
     * @return true 通过校验,false 校验失败
     */
    @Override
    public boolean isValid(String value, ConstraintValidatorContext context) {
        if (StringUtils.isBlank(value)) {
            return false;
        }
        if (value.equals("发布") || value.equals("草稿")) {
            return true;
        }
        return false;
    }
}
- 根据编写的自定义注解适用范围进行使用
package com.zixq.controller;

import com.zixq.annotation.State;
import com.zixq.entity.Result;
import org.springframework.validation.annotation.Validated;
import org.springframework.web.bind.annotation.GetMapping;
import org.springframework.web.bind.annotation.RequestMapping;
import org.springframework.web.bind.annotation.RequestParam;
import org.springframework.web.bind.annotation.RestController;

/**
 * <p>
 * Validation之自定义校验功能
 * </p>
 *
 * <p>@author : ZiXieqing</p>
 */
@RestController
@RequestMapping("custom")
@Validated
public class CustomValidation {
    @GetMapping("/validation")
    public Result validation(@RequestParam(name = "confirm", required = true)
                                 @State String confirm) {
        System.out.println("confirm = " + confirm);
        return Result.success(confirm);
    }
}
YAML多环境配置:Spring Profiles
采用 --- 分隔符
提示
此种方式不推荐使用
缺点:放在一个配置文件中,内容过多,不易修改
配置方式如下:
# 通用配置

server:
  port: 1111


spring:
  application:
    name: application-name  # 应用名称
  profiles:
    active: dev # 激活那套环境配置

# 采用 --- 分隔符分开多套配置
---

# dev开发环境配置
spring:
  config:
    activate:
      on-profile: dev # 当前环境配置叫什么名字
server:
  port: 2222

---

# test测试环境配置

server:
  port: 3333

spring:
  config:
    activate:
      on-profile: test # 当前环境配置叫什么名字

---

# prod 生产(线上)环境配置
server:
  port: 4444

spring:
  config:
    activate:
      on-profile: prod # 当前环境配置叫什么名字
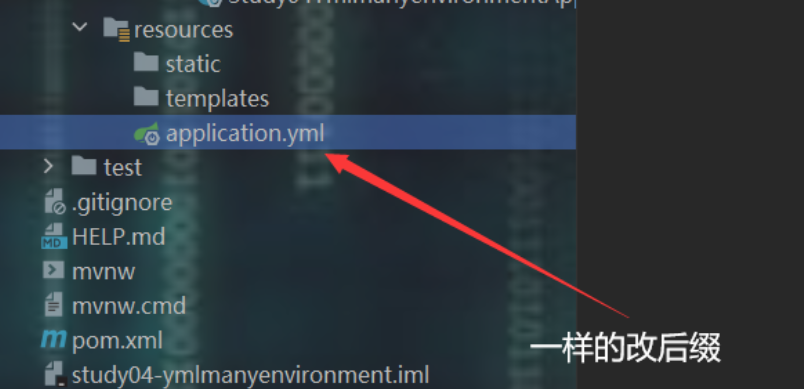
多个yml配置文件
推荐使用
application.yml公用配置,且定义使用那套环境配置(spring.profiles.active)application-test.yml测试环境配置appilication-dev.yml开发环境配置appilication-prod.yml生产环境配置
profiles之分组 group
依赖
<dependency>
    <groupId>org.springframework.boot</groupId>
    <artifactId>spring-boot-starter-web</artifactId>
</dependency>
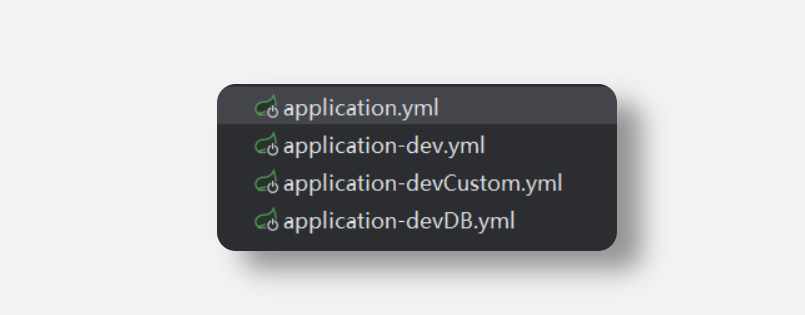
application.yml
# 通用环境配置 + 激活那一套配置(这套环境需要的另外配置文件)
spring:
  profiles:
    group:
      dev: devCustom,devDB
    active: dev
application-dev.yml
# 开发环境配置
server:
  port: 10086

spring:
  config:
    activate:
      on-profile: dev
application-devCustom.yml
# 开发环境自定义相关配置
minio:
  endpoint: http://localhost:9000
  accessKey: minioadmin
  secretKey: minioadmin
  bucketName: test-bucket
application-devDB.yml
# 开发环境的数据库相关配置
spring:
  datasource:
    driver-class-name: com.mysql.jdbc.Driver
    url: jdbc:mysql://localhost:3306/spring-boot-test?useUnicode=true&characterEncoding=utf-8&useSSL=false&serverTimezone=Asia/Shanghai
    username: root
    password: 072413
设置默认首页
这是Spring Boot + thmeleaf响应式编程的技术,现在前后端分离,这种东西其实没什么鸟用。
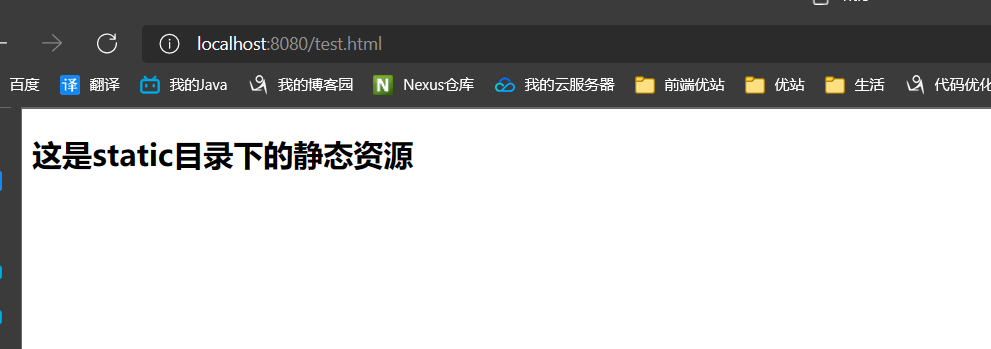
页面在static目录中时
直接在controller中编写跳转地址即可。
页面在templates模板引擎中时
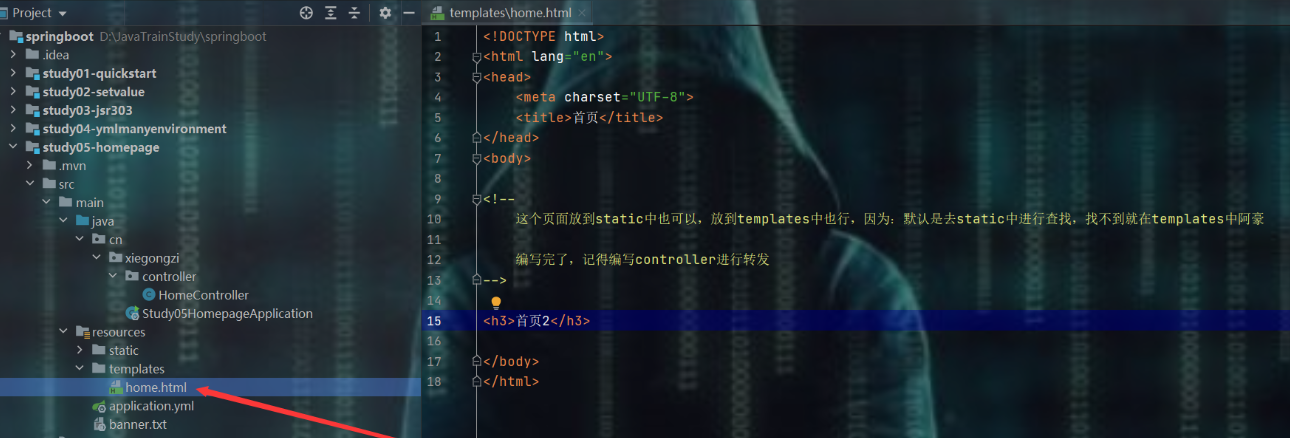
- 这种需要导入相应的启动器
<dependency>
	<groupId>org.springframework.boot</groupId>
	<artifactId>spring-boot-starter-thymeleaf</artifactId>
</dependency>
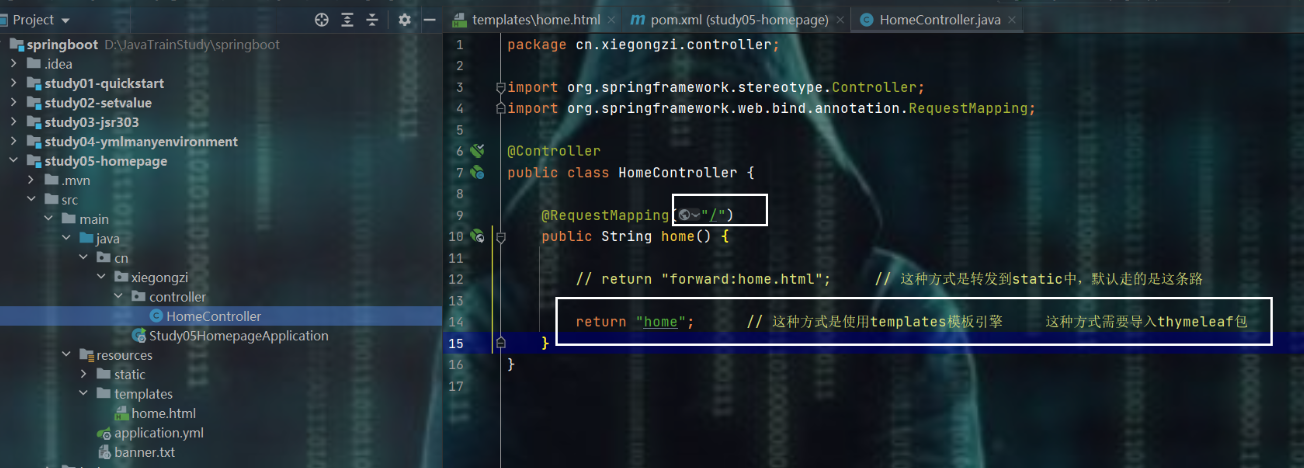
- 编写controller
简单认识thymeleaf
这是 Spring Boot + thymeleaf 响应式编程的技术,现在前后端分离,这种东西其实没什么鸟用。
官网学习地址:https://www.thymeleaf.org/doc/tutorials/3.0/usingthymeleaf.html
什么是thymeleaf?
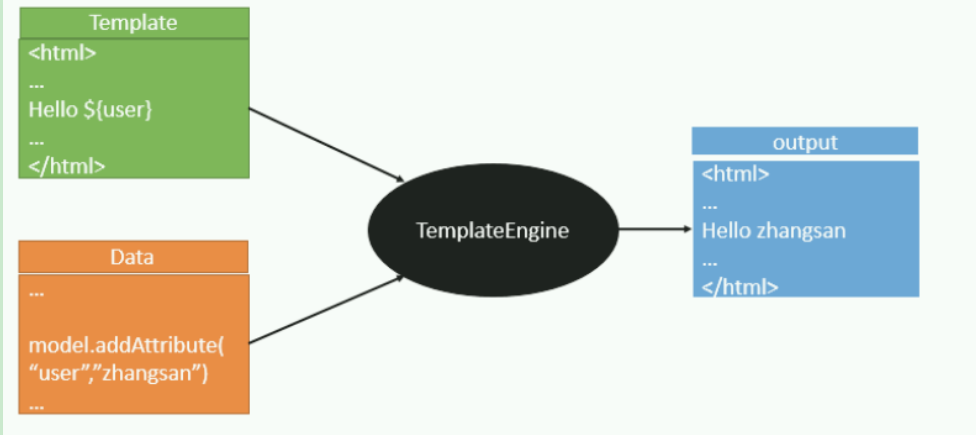
一张图看明白:
解读:
-
前端交给我们的页面,是html页面。如果是我们以前开发,我们需要把他们转成jsp页面,jsp好处就是当我们查出一些数据转发到JSP页面以后,我们可以用jsp轻松实现数据的显示,及交互等。
-
jsp支持非常强大的功能,包括能写Java代码,但是,Spring Boot是以jar的方式,不是war,第二,我们用的还是嵌入式的Tomcat,所以,Spring Boot现在默认是不支持jsp的。
-
那不支持jsp,如果我们直接用纯静态页面的方式,那给我们开发会带来非常大的麻烦,那怎么办?
Spring Boot推荐使用模板引擎:
-
模板引擎,jsp就是一个模板引擎,还有用的比较多的FreeMaker、Velocity,再多的模板引擎,他们的思想都是一样的,Spring Boot推荐使用thymeleaf。
-
模板引擎的作用就是我们来写一个页面模板,比如有些值,是动态的,我们写一些表达式。而这些值从哪来?就是我们在后台封装一些数据。然后把这个模板和这个数据交给模板引擎,模板引擎按照我们封装的数据把这表达式解析出来、填充到我们指定的位置,然后把这个数据最终生成一个我们想要的内容从而最后显示出来,这就是模板引擎。
-
不管是jsp还是其他模板引擎,都是这个思想。只不过,不同模板引擎之间,他们可能语法有点不一样。其他的就不介绍了,这里主要介绍一下Spring Boot给我们推荐的Thymeleaf模板引擎,这模板引擎,是一个高级语言的模板引擎,他的这个语法更简单。而且功能更强大。
-
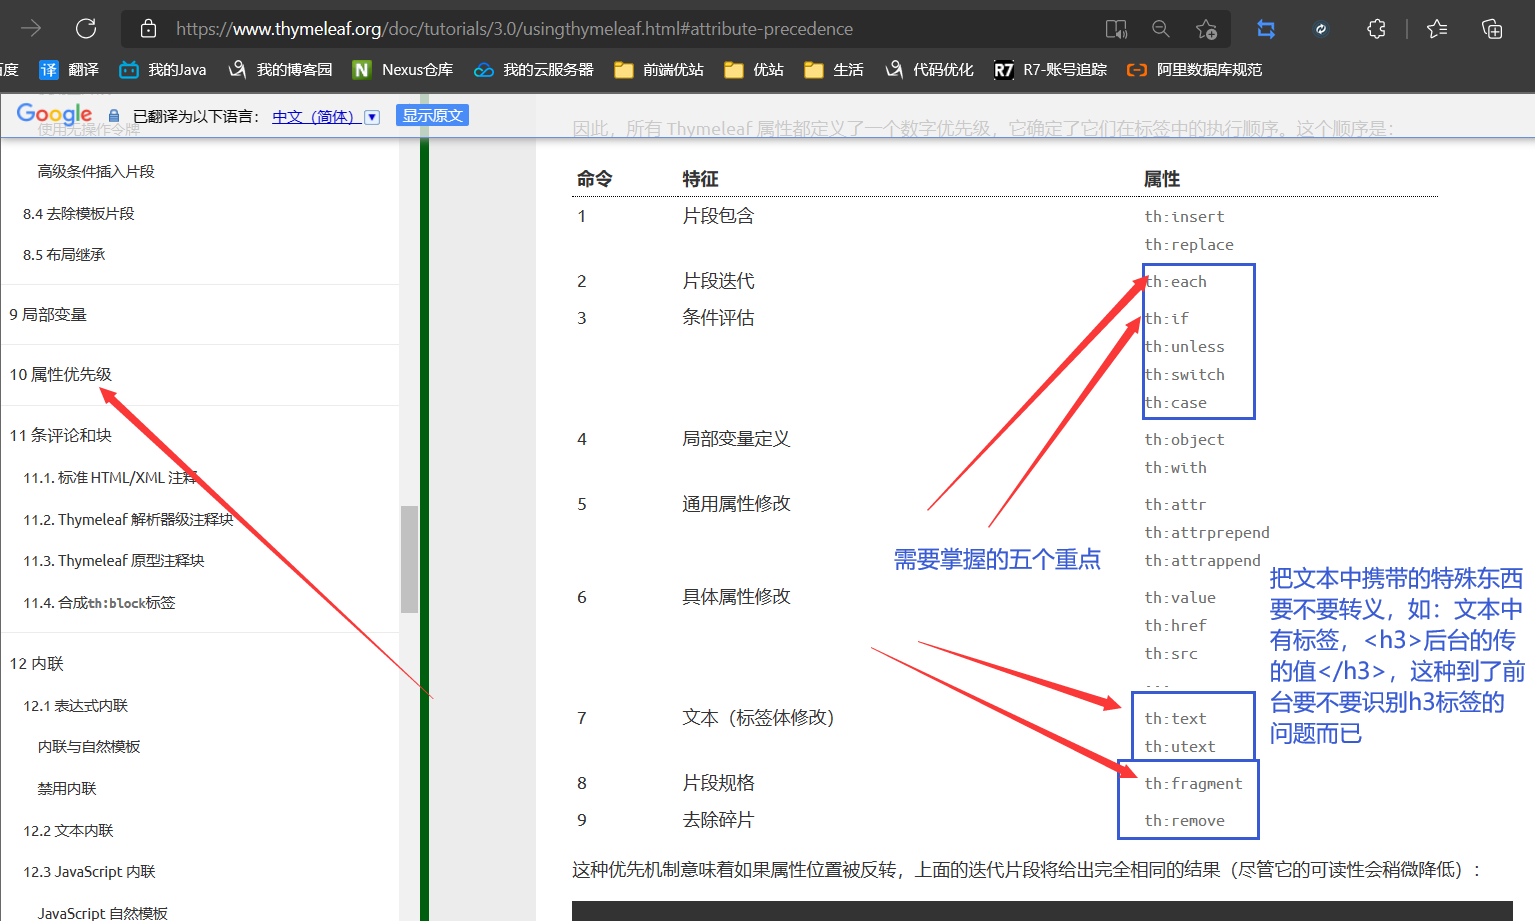
thymeleaf的取数据方式
官网中有说明
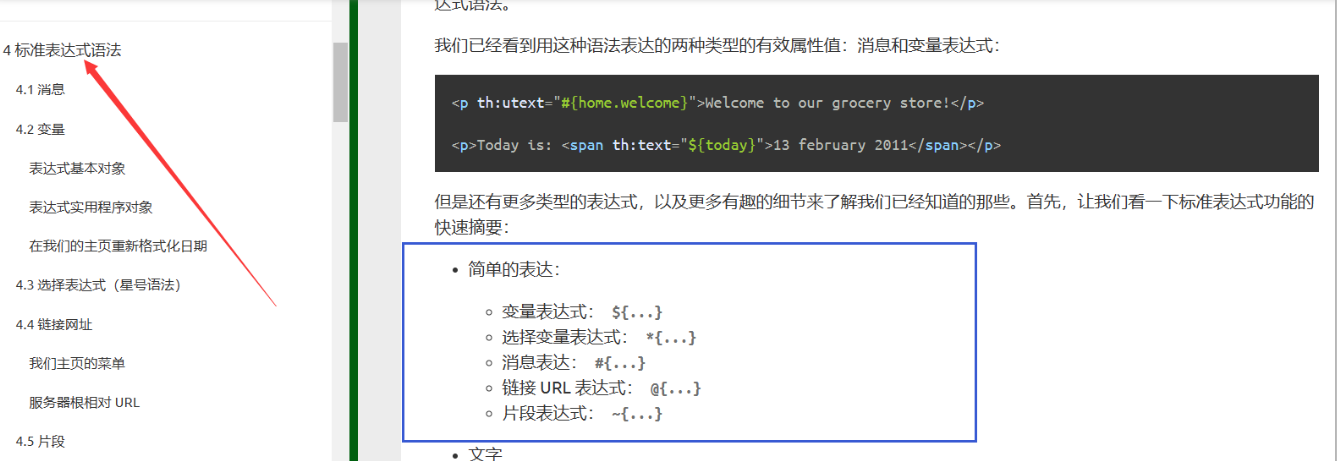
提取出来看一下,从而在Spring Boot中演示一下。
简单的表达:
	变量表达式: ${...}
	选择变量表达式: *{...}
	消息表达: #{...}
	链接 URL 表达式: @{...}
	片段表达式: ~{...}
Spring Boot中使用thymeleaf
<dependency>
	<groupId>org.springframework.boot</groupId>
	<artifactId>spring-boot-starter-thymeleaf</artifactId>
</dependency>
怎么使用thymeleaf?
这个问题换言之就是:html文件应该放到什么目录下。
前面我们已经导入了依赖,那么按照Spring Boot的原理(自行百度),底层会帮我们导入相应的东西,并做了相应的配置,那么就去看一下源码,从而知道我们应该把文件放在什么地方。
提示:
Spring Boot中和配置相关的都在
xxxxxProperties文件中、
因此:去看一下thymeleaf对应的thymeleafProperties文件。
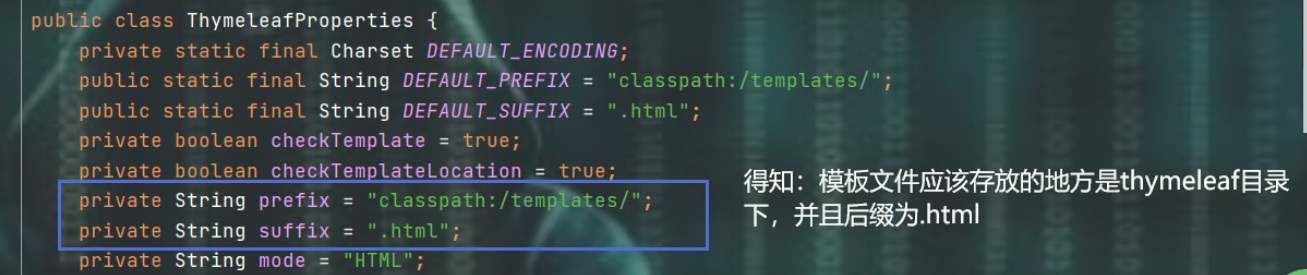
那就来建一个。

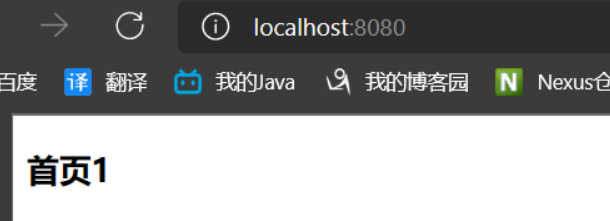
编写controller,让其跳到templates目录的页面中去。
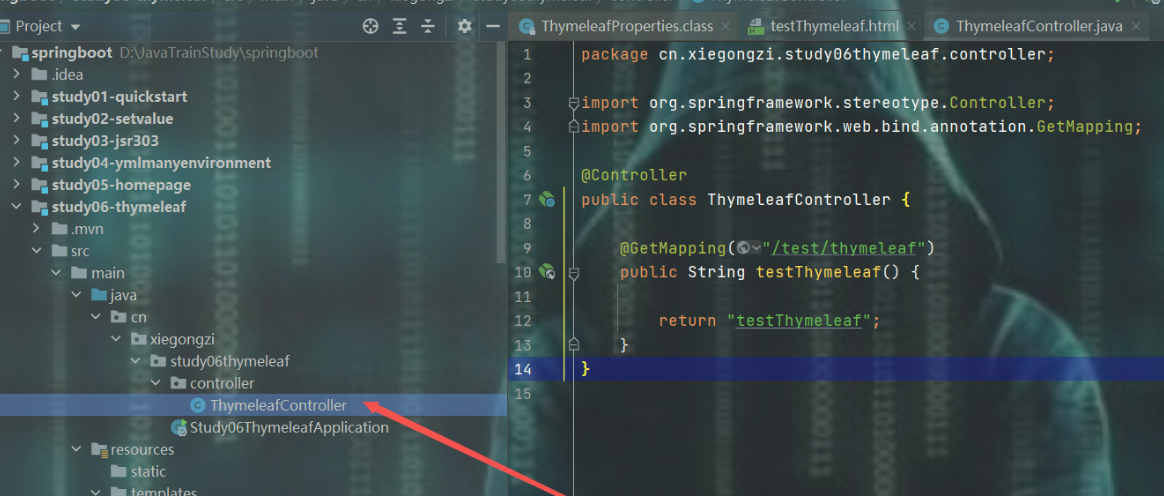
测试
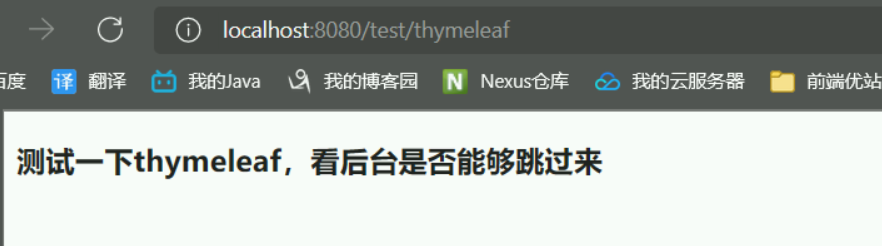
成功跳过去了
延伸:传输数据
开胃菜
参照官网来。这里只演示 变量表达式: ${...} ,其他的都是一样的原理。
简单的表达:
	变量表达式: ${...}
	选择变量表达式: *{...}
	消息表达: #{...}
	链接 URL 表达式: @{...}
	片段表达式: ~{...}
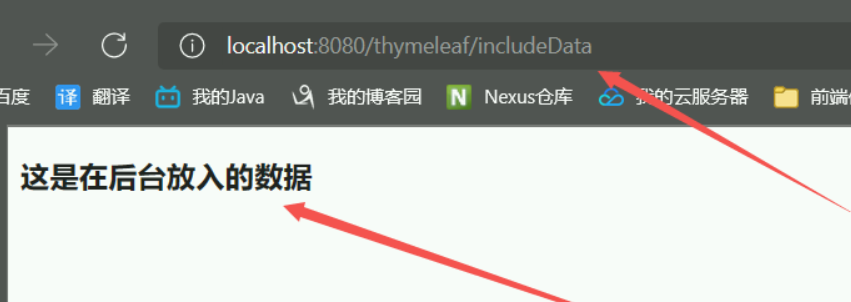
- 编写后台,存入数据

- 在前台获取数据
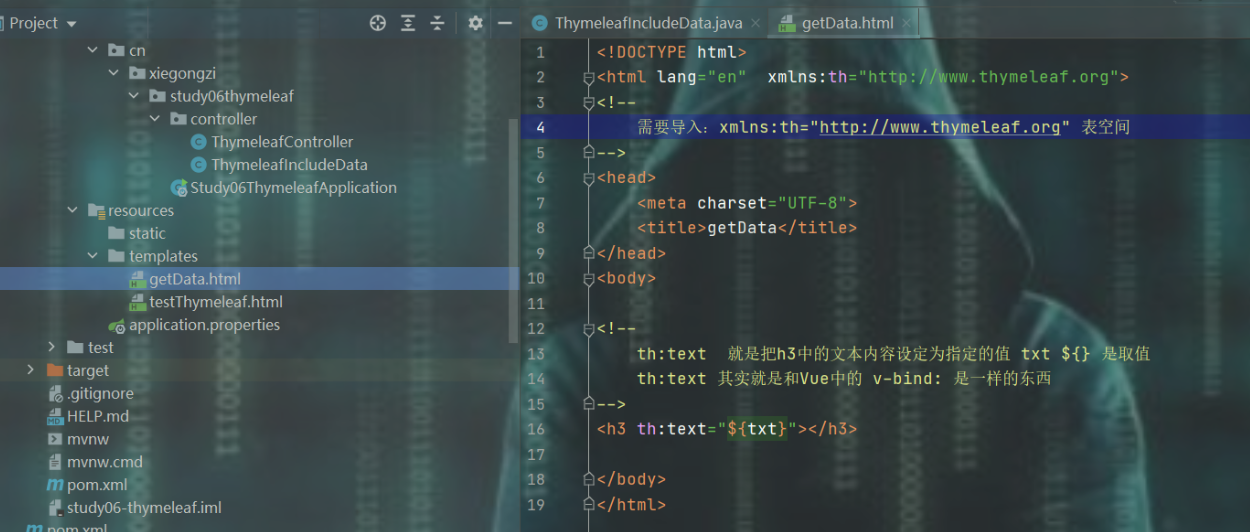
表空间约束链接如下,这个在thymeleaf官网中有。
xmlns:th="http://www.thymeleaf.org"
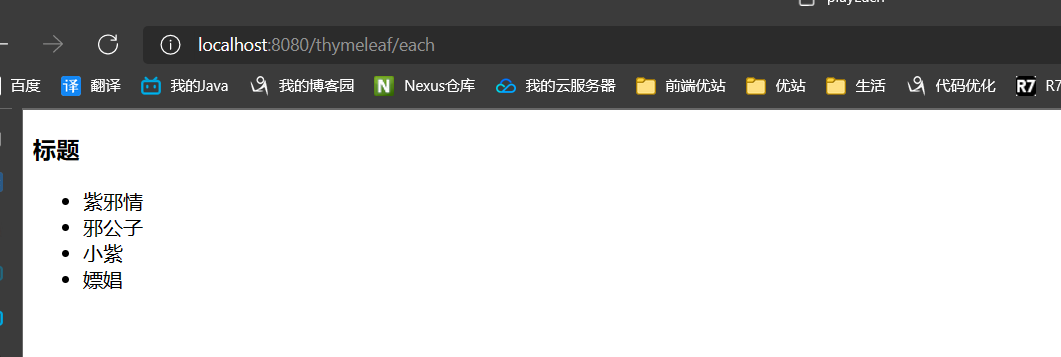
- 测试
开整
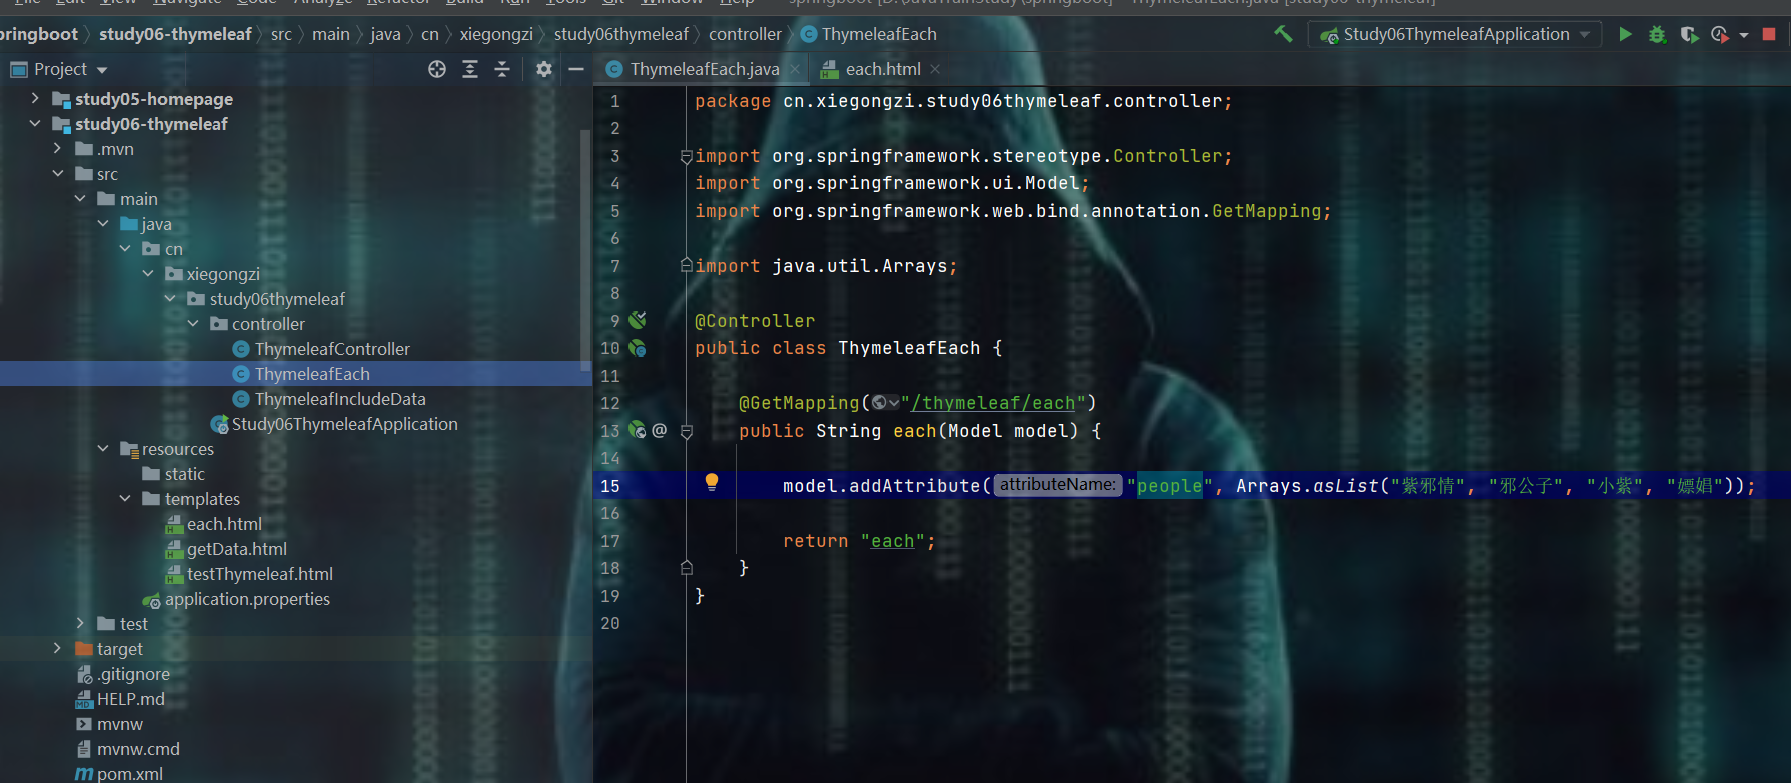
- 后台
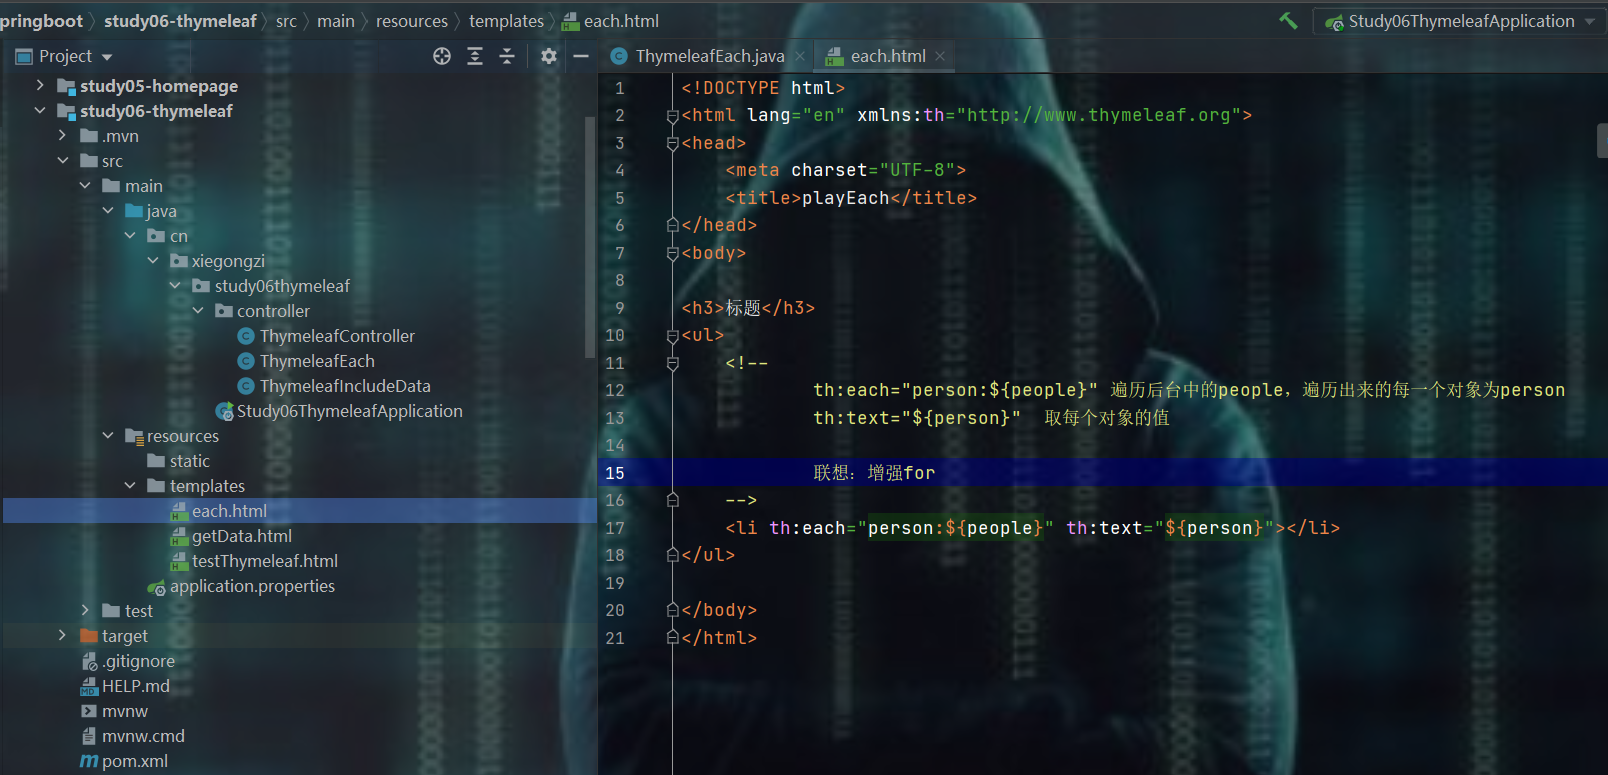
- 前台
- 测试
静态资源处理方式
在前面玩了thymeleaf,在resources中还有一个目录是static
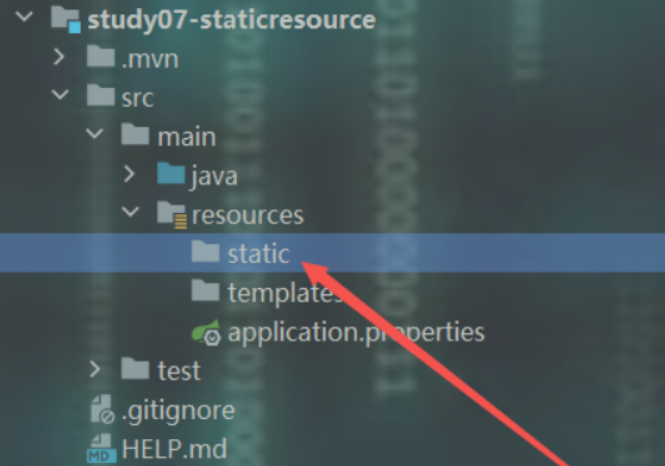
那么就来研究一下静态资源:Spring Boot底层是怎么去装配静态资源的?都在WebMvcAutoConfiguration有答案,去看一下。
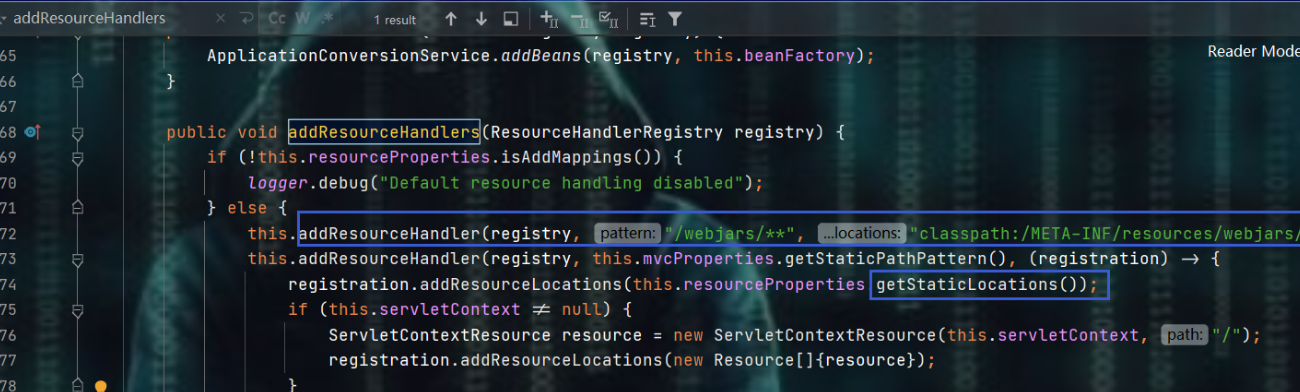
通过上述的源码发现两个东西:webjars 和 getStaticLocations()。
webjars的方式处理静态资源
webjars的官网:https://www.webjars.org/all
进去之后里面就是各种各样的jar包。
使用jQuery做演示: 导入jQuery的依赖
<dependency>
    <groupId>org.webjars</groupId>
    <artifactId>jquery</artifactId>
    <version>3.4.1</version>
</dependency>
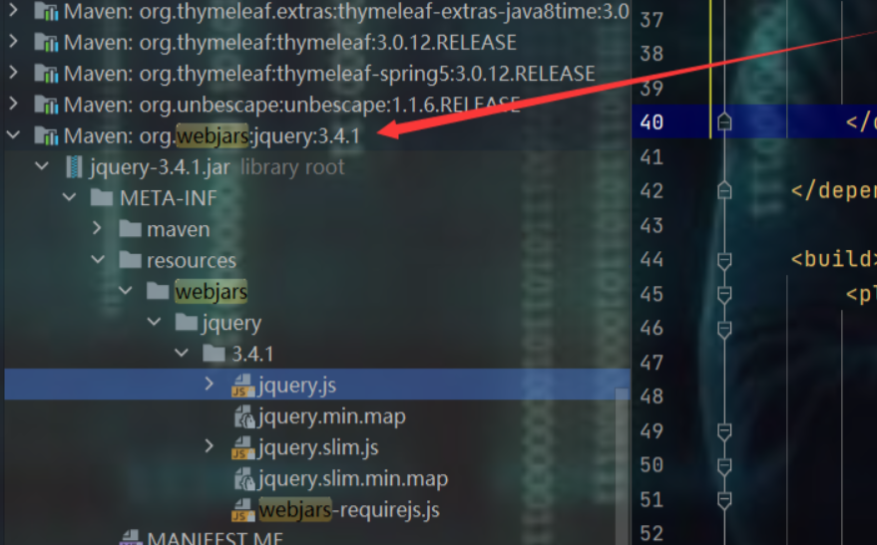
导入之后:发现多了这么一个jar包,现在我们去直接访问一下。

是可以直接访问的,为什么?
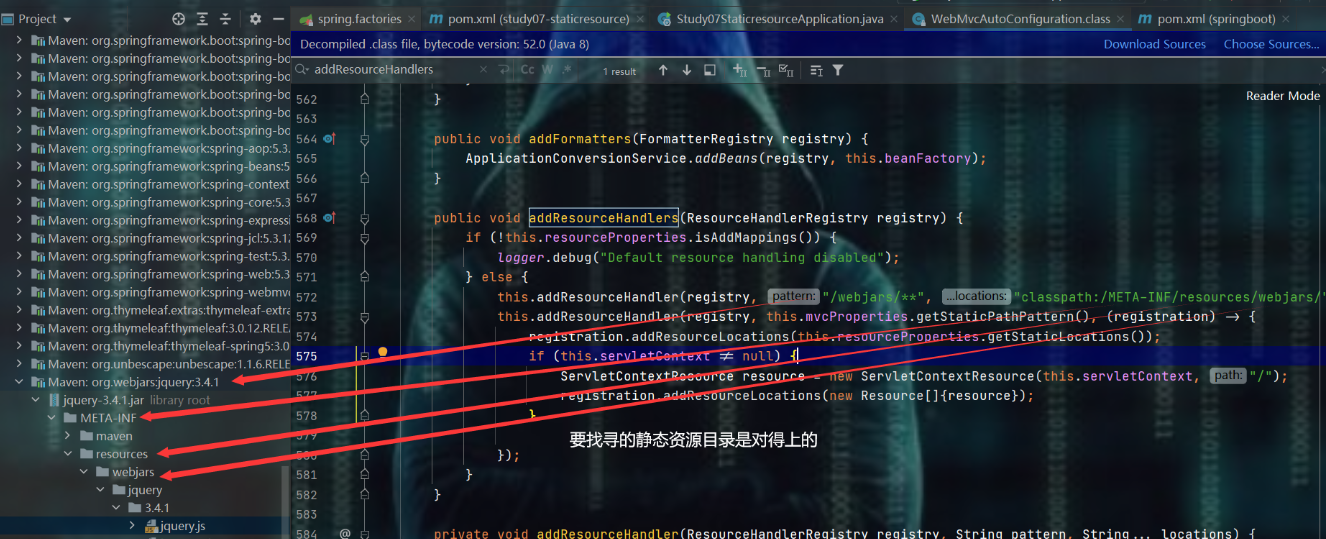
getStaticLocations()点进去看一下。发现是如下这么一个方法。
public String[] getStaticLocations() {
	return this.staticLocations;
}
查看staticLocations。
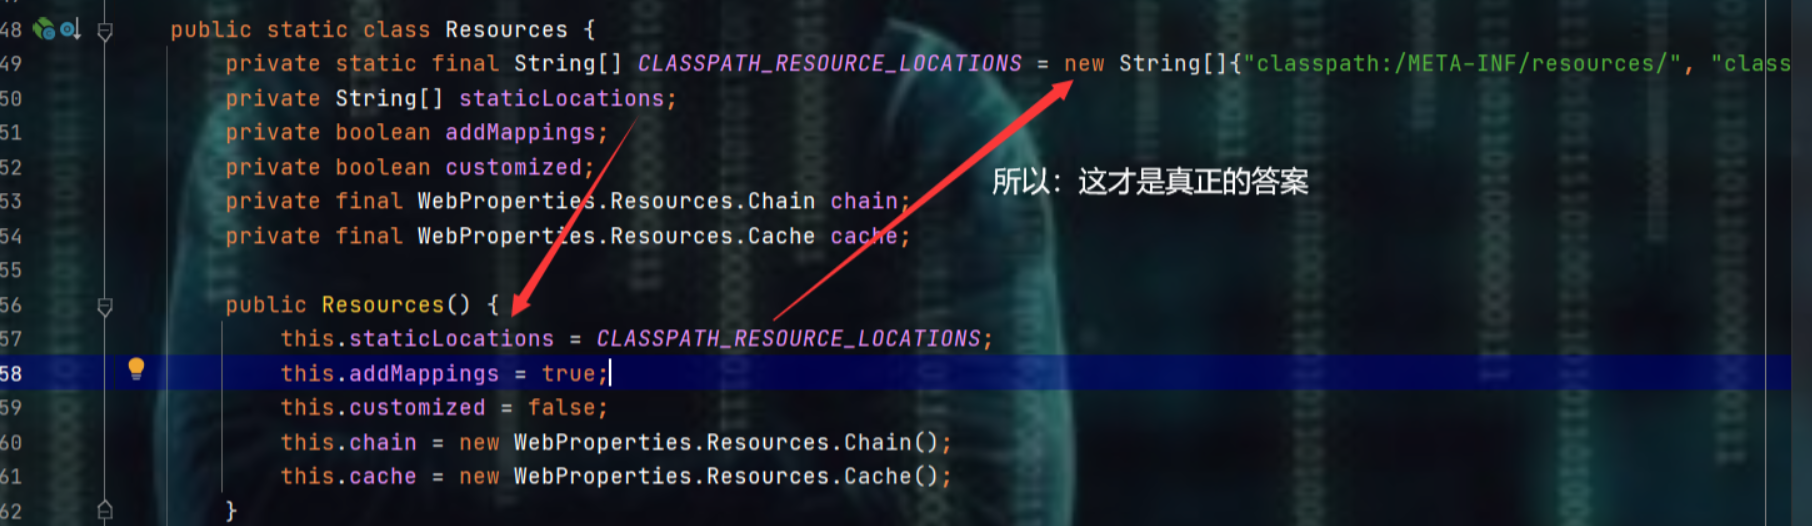

// 这个就不多说明,指的就是再建一个META-INF文件夹,里面再建一个resources目录
// 参照Java基础中的web项目目录
"classpath:/META-INF/resources/",

"classpath:/resources/",

"classpath:/static/",

"classpath:/public/"
发现有四种方式可以放静态资源,那就来测试一下。
resources / static / public的优先级
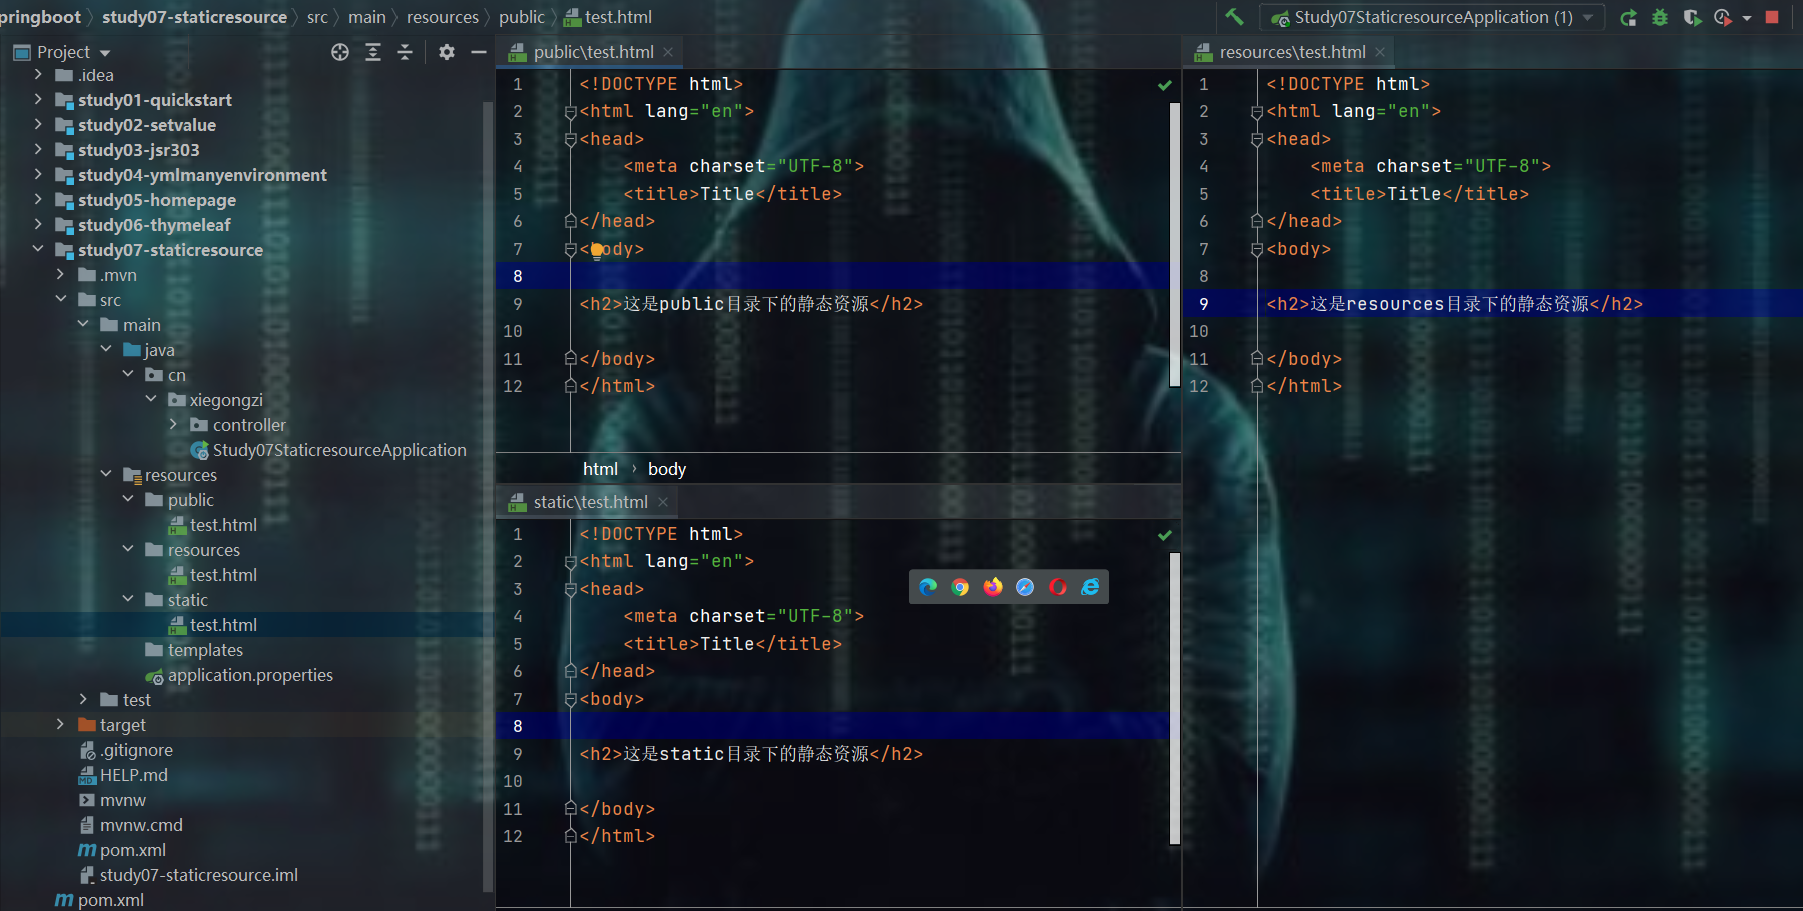
测试
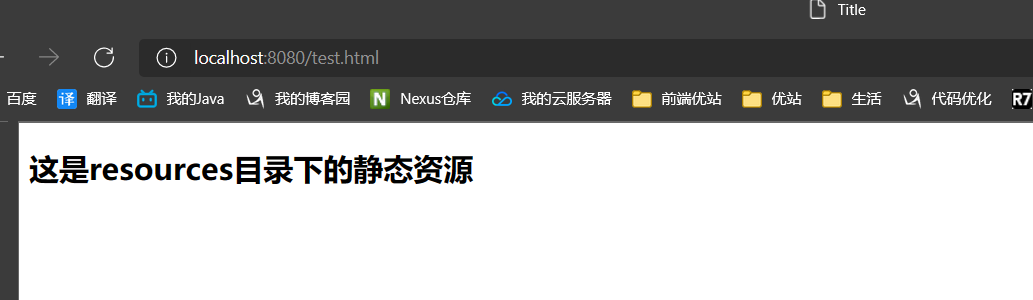
发现resources下的优先级最高。
删掉resources中的资源文件,继续测试
发现static目录其次。
总结:resources、static、public优先级
优先级为:resources > static > public
资源放置建议:
- public:放置公有的资源,如:img、js、css....
- static:放置静态访问的页面,如:登录、注册....
- resources:应该说是templates,放置动态资源,如:用户管理.....
整合JDBC、Druid、Druid实现日志监控
整合JDBC
- 依赖
<dependency>
	<groupId>org.springframework.boot</groupId>
	<artifactId>spring-boot-starter-jdbc</artifactId>
</dependency>

<dependency>
	<groupId>mysql</groupId>
	<artifactId>mysql-connector-java</artifactId>
	<scope>runtime</scope>
</dependency>


<dependency>
	<groupId>org.springframework.boot</groupId>
	<artifactId>spring-boot-starter-test</artifactId>
	<scope>test</scope>
</dependency>
- 编写
application.yml
spring:
  datasource:
    driver-class-name: com.mysql.jdbc.Driver
    url: jdbc:mysql://localhost:3306/mybatis_spring?useUnicode=true&characterEncoding=utf-8
    username: root
# 注意:在yml中,这种自己写的内容最好用字符串写法,以后玩Redis也是一样,不然有时出现坑,
# 即:密码无效 / 这里面填入的值没有解析出来,不匹配
    password: "072413"
- 测试
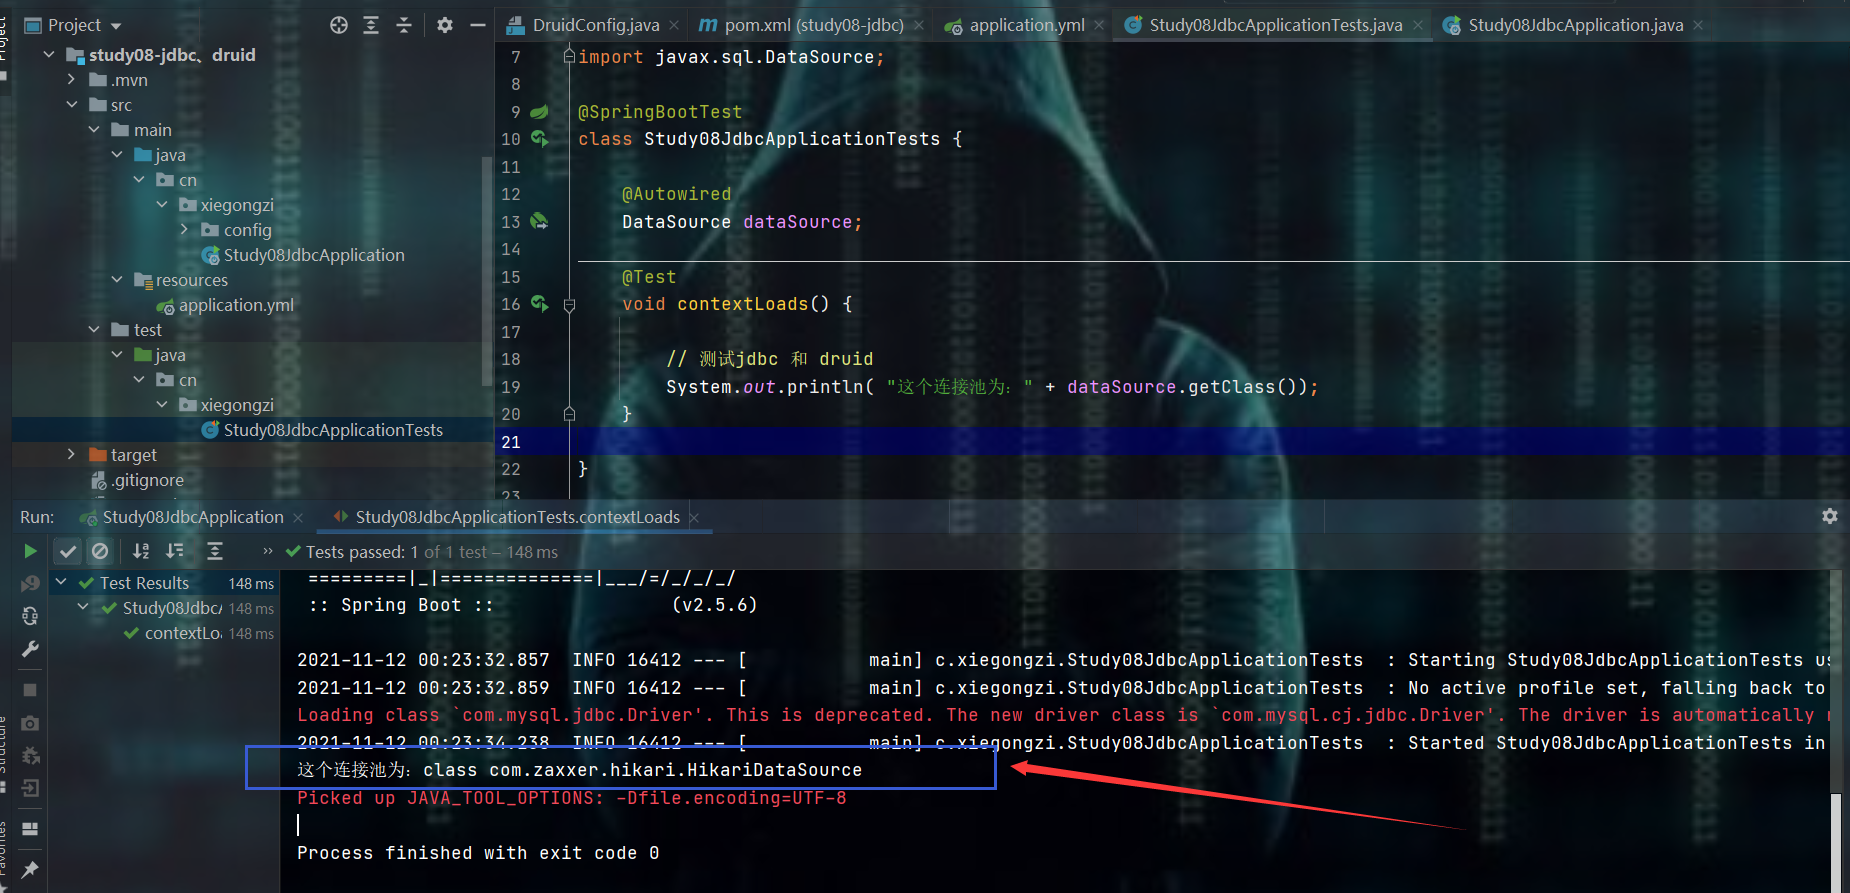
整合Druid
- 依赖
<!--要玩druid的话,需要导入下面这个依赖 -->
<dependency>
	<groupId>com.alibaba</groupId>
	<artifactId>druid-spring-boot-starter</artifactId>
	<version>1.2.8</version>
</dependency>
- 修改yml文件

spring:
  datasource:
    type: com.alibaba.druid.pool.DruidDataSource # 指定数据源类型为Druid
    driver-class-name: com.mysql.cj.jdbc.Driver # 根据你使用的数据库驱动来填写
    url: jdbc:mysql://localhost:3306/test?useUnicode=true&characterEncoding=utf8&serverTimezone=UTC
    username: your_username
    password: your_password

    # Druid 配置
    druid:
      # 初始化大小,最小连接池大小
      initial-size: 5
      # 最大活跃连接数
      max-active: 20
      # 最小空闲连接数
      min-idle: 5
      # 配置获取连接等待超时的时间
      max-wait: 60000
      # 配置间隔多久才进行一次检测,检测需要关闭的空闲连接,单位是毫秒
      time-between-eviction-runs-millis: 60000
      # 配置一个连接在池中最小生存的时间,单位是毫秒
      min-evictable-idle-time-millis: 300000
      # 打开PSCache,并且指定每个连接上PSCache的大小
      pool-prepared-statements: true
      max-pool-prepared-statement-per-connection-size: 20
      # 配置监控统计拦截的filters,去掉后监控界面sql无法统计,'wall'用于防火墙
      filters: stat,wall,log4j
      # 监控统计日志打印的格式,可以通过%format控制台输出格式
      web-stat-filter:
        enabled: true
        url-pattern: /*
        exclusions: "*.js,*.gif,*.jpg,*.png,*.css,*.ico,/druid/*"
      stat-view-servlet:
        enabled: true
        url-pattern: /druid/*
        login-username: admin
        login-password: admin
        # 允许清空StatViewServlet缓存
        reset-enable: true
- 测试
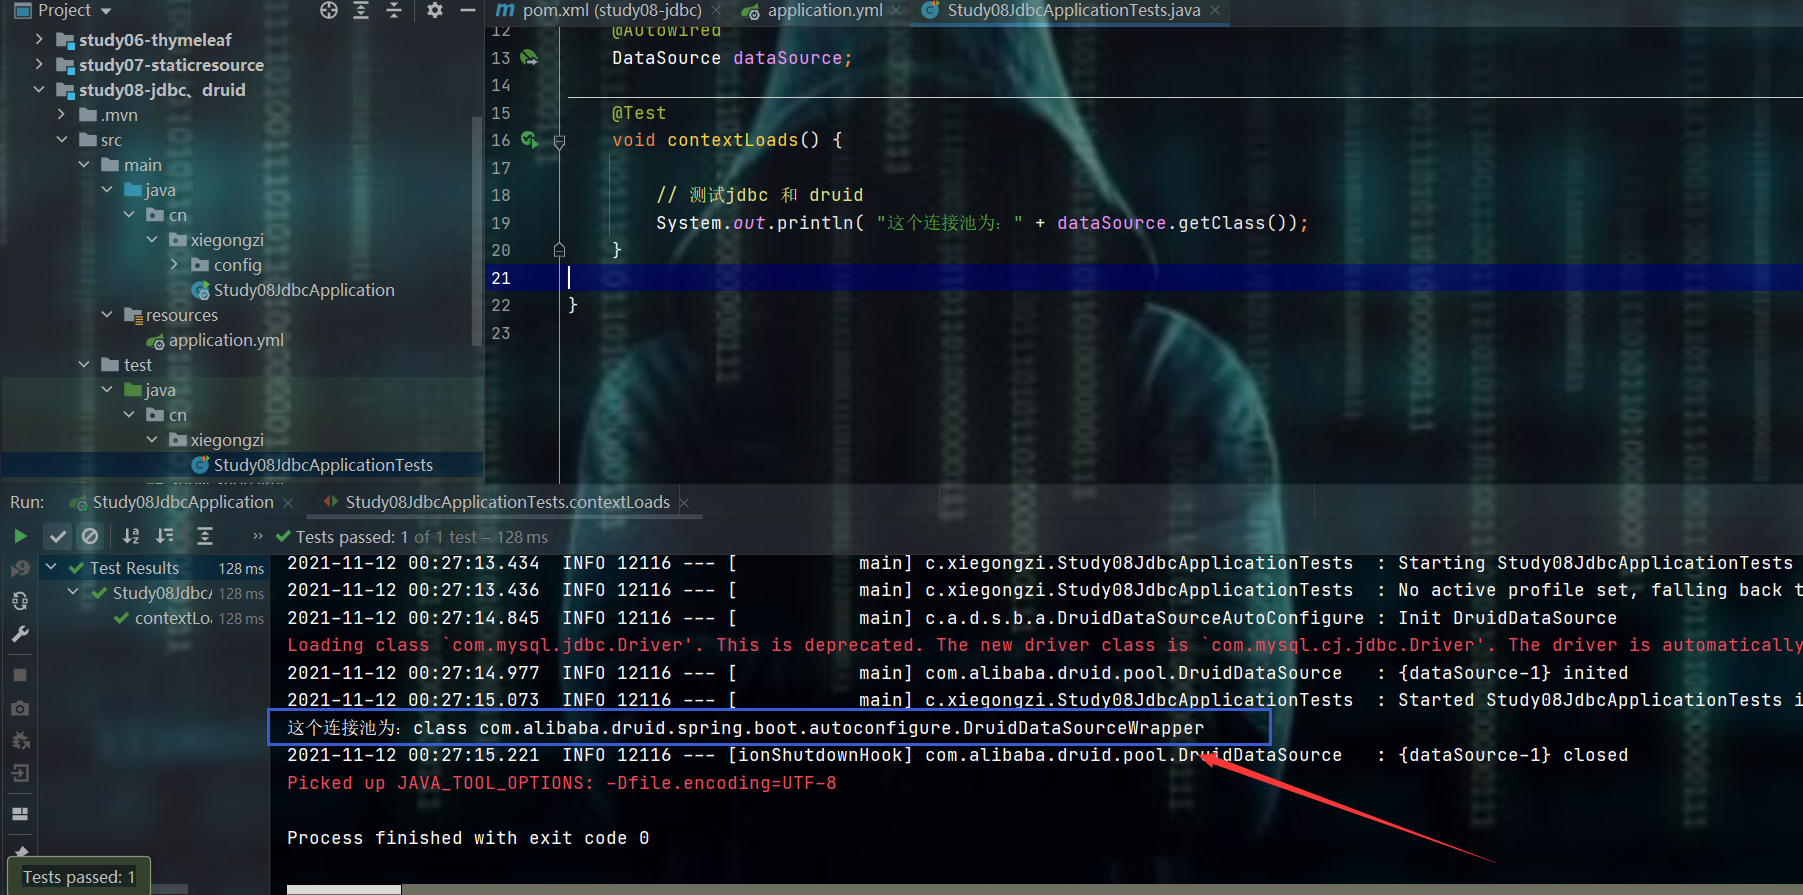
Druid实现日志监控
这个东西在上一节那个配置文件中已经弄了,这里弄的是通过代码编写的方式
重要提示:
需要web启动器支持。
<!--
	玩druid实现监控日志,需要web启动器支持,
	因为:druid的statViewServlet本质是继承了servlet
	因此:需要web的依赖支持 / servlet支持
-->
<dependency>
	<groupId>org.springframework.boot</groupId>
	<artifactId>spring-boot-starter-web</artifactId>
</dependency>
- 编写配置
import com.alibaba.druid.support.http.StatViewServlet;
import org.springframework.boot.web.servlet.ServletRegistrationBean;
import org.springframework.context.annotation.Bean;
import org.springframework.context.annotation.Configuration;

import java.util.HashMap;

/**
 * 这个类是为了延伸druid的强大功能,监控后台
 * 注意:这个需要spring的web启动器支持,即:这个监控后台的本质StatViewServlet就是servlet,所以需要servlet支持
*/

@Configuration
public class DruidConfig {

    @Bean
    public ServletRegistrationBean StatViewServlet() {

        ServletRegistrationBean bean = new ServletRegistrationBean<>(new StatViewServlet(), "/druid/*");

        HashMap<String, String> initParameters = new HashMap<>();

        /*
        * 下面这些参数可以在 com.alibaba.druid.support.http.StatViewServlet的父类
        * com.alibaba.druid.support.http.ResourceServlet 中找到
        * */

        // 登录日志监控的用户名	这些数据可以配置在YAML中读取,也可以从数据查到
        initParameters.put("loginUsername", "zixieqing");
        // 登录密码
        initParameters.put("loginPassword", "072413");
        // 允许谁可以访问日志监控	根据情况自行配置
        initParameters.put("allow", "`localhost`");

        bean.setInitParameters(initParameters);
        return bean;
    }
}
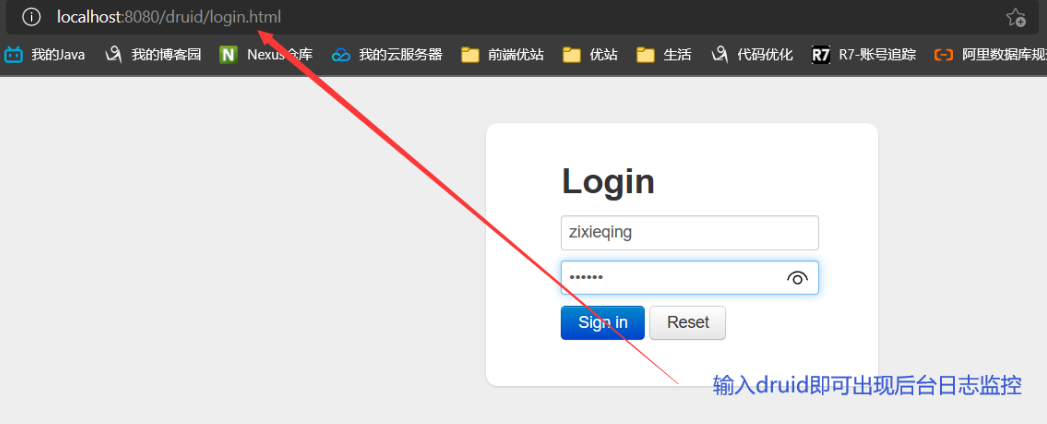
- 测试
输入用户名、密码即可进入。
整合Mybatis
xml版
- 导入依赖
<!--
	mybatis-spring-boot-starter是第三方(mybatis)jar包,不是Spring的
	Spring自己的生态是:spring-boot-stater-xxxx
-->
<dependency>
	<groupId>org.mybatis.spring.boot</groupId>
	<artifactId>mybatis-spring-boot-starter</artifactId>
	<version>1.3.2</version>
</dependency>

<dependency>
	<groupId>com.alibaba</groupId>
	<artifactId>druid-spring-boot-starter</artifactId>
	<version>1.1.10</version>
</dependency>

<dependency>
	<groupId>mysql</groupId>
	<artifactId>mysql-connector-java</artifactId>
	<version>5.1.47</version>
</dependency>

<dependency>
	<groupId>org.projectlombok</groupId>
	<artifactId>lombok</artifactId>
</dependency>
- 编写实体
import lombok.AllArgsConstructor;
import lombok.Data;
import lombok.NoArgsConstructor;

import java.io.Serializable;

@Data
@AllArgsConstructor
@NoArgsConstructor
public class User implements Serializable {

    private Integer id;
    private String username;
    private String password;
}
- 编写dao / mapper层
import cn.xiegongzi.entity.User;
import org.apache.ibatis.annotations.Mapper;

import java.util.List;

/*
*   @Mapper 这个注解是mybati-spring提供的 就是自动装配(交给Spring托管)
*   还可以用:
*       @Repository   是spring本身提供的
*
*   以及:在启动类(main)中使用 @mapperScan("xxx.xxx.mapper") 扫包	这样就不用在每个mapper中加@Mapper注解了
* */

@Mapper
public interface IUserMapper {
    List<User> findALLUser();
}
- 编写xml的sql语句
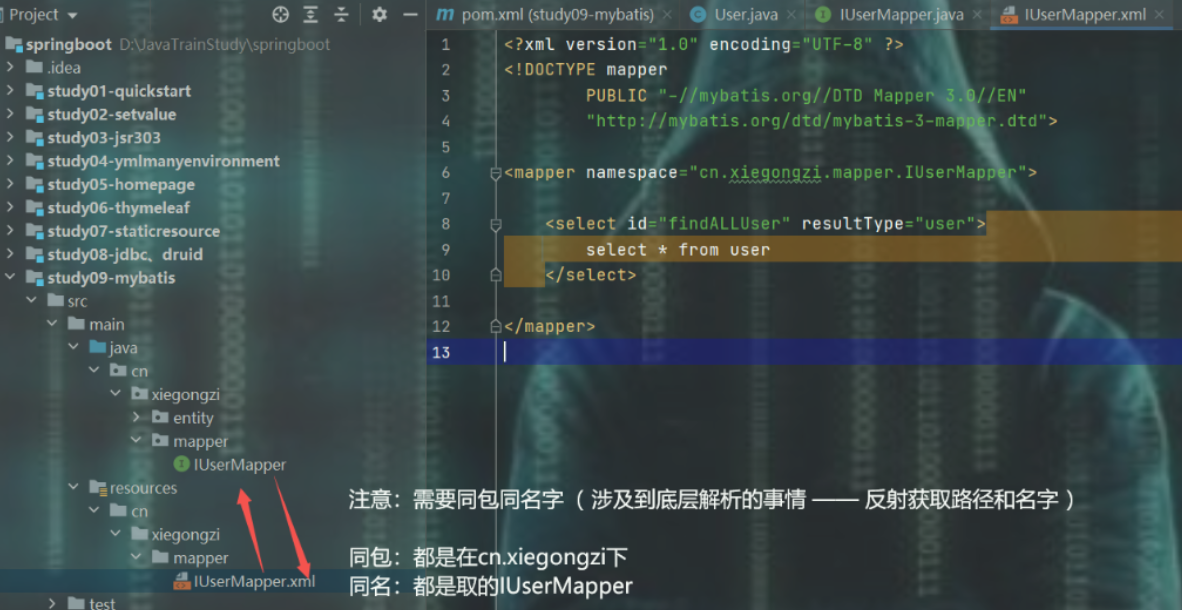
注意点:
dao层/mapper和xml的同包同名问题。
- 编写yml
# 编写连接池
spring:
  datasource:
  	# MySQL驱动,注意5.7 和 8.x的区别(com.mysql.cj.jdbc.Driver)
    driver-class-name: com.mysql.jdbc.Driver
    url: jdbc:mysql://localhost:3306/mybatis_spring?useUnicode=true&characterEncoding=utf-8
    username: root
    password: "072413"
    # 使用DruidDataSource
    type: com.alibaba.druid.pool.DruidDataSource

mybatis:
# mybatis配置了额外的信息,则集成进这个配置中来	即在resources下还有一个mybatis-config.xml
	config-location: classpath:/mybatis-config.xml
# 把实现类xml文件添加进来
  	mapper-locations: classpath:mapper/*.xml
# 给实体类配置别名
  	type-aliases-package: cn.xiegongzi.entity
  	configuration:
#   开启驼峰命名映射
    	map-underscore-to-camel-case: true

# 给日志设置级别
logging:
	level:
		cn.xiegongzi.mapper: debug
关于日志去这里:Java日志框架体系整理
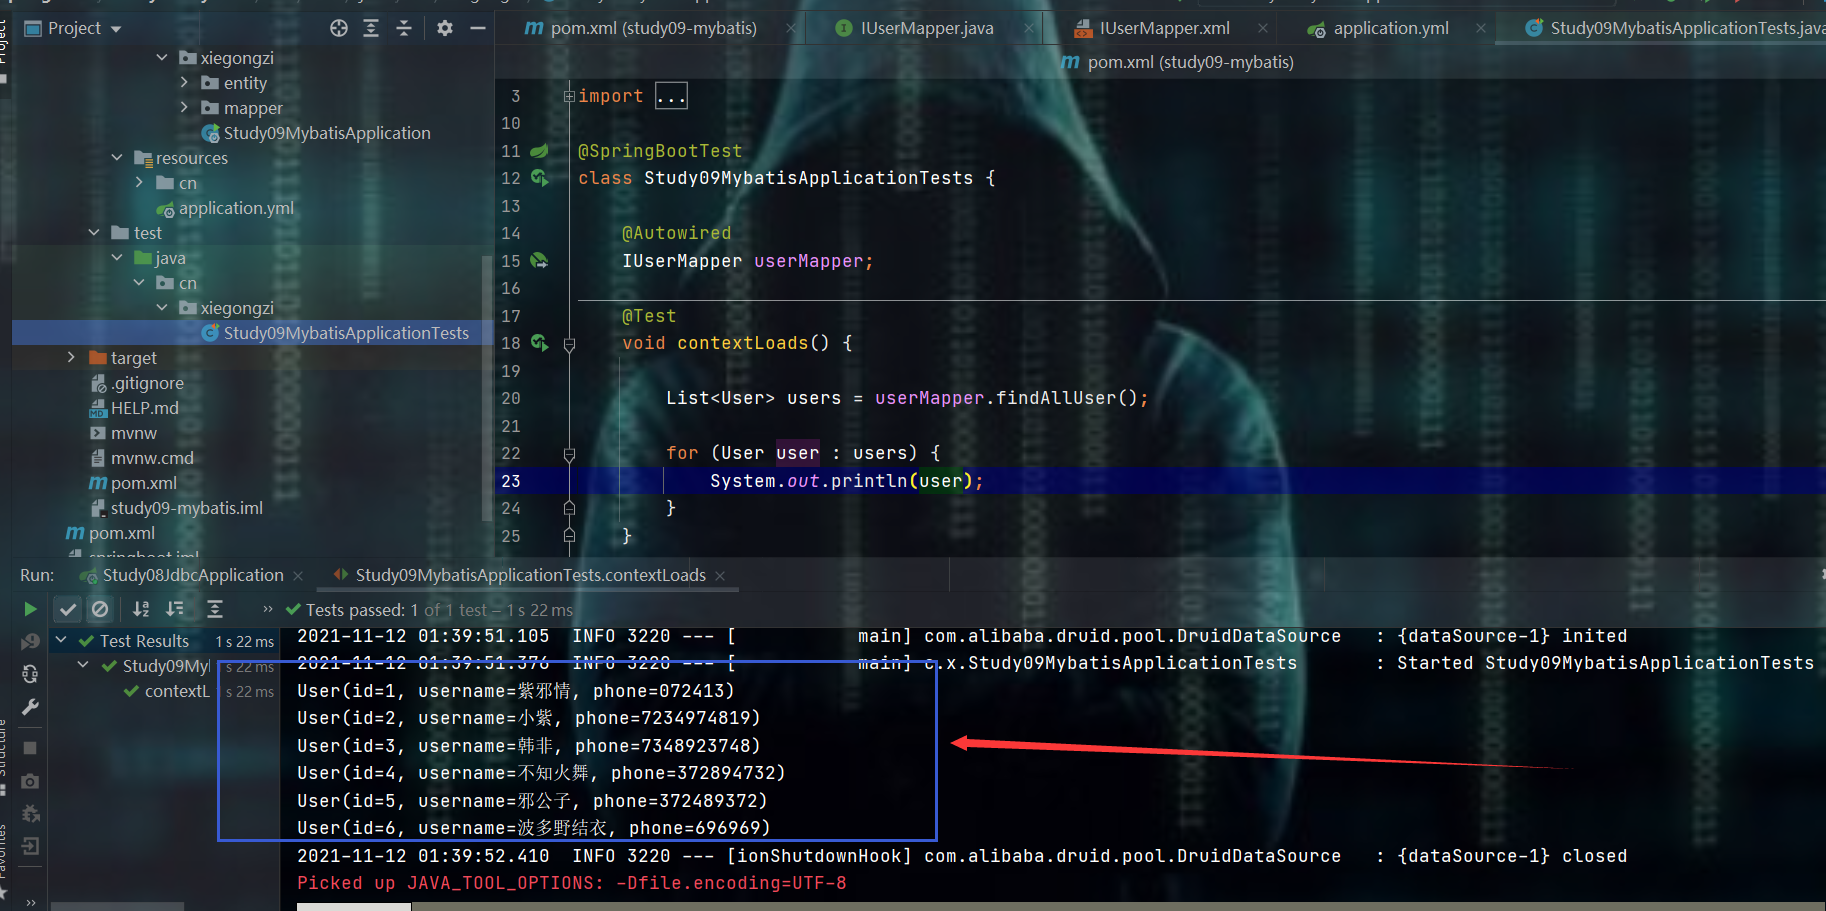
- 测试
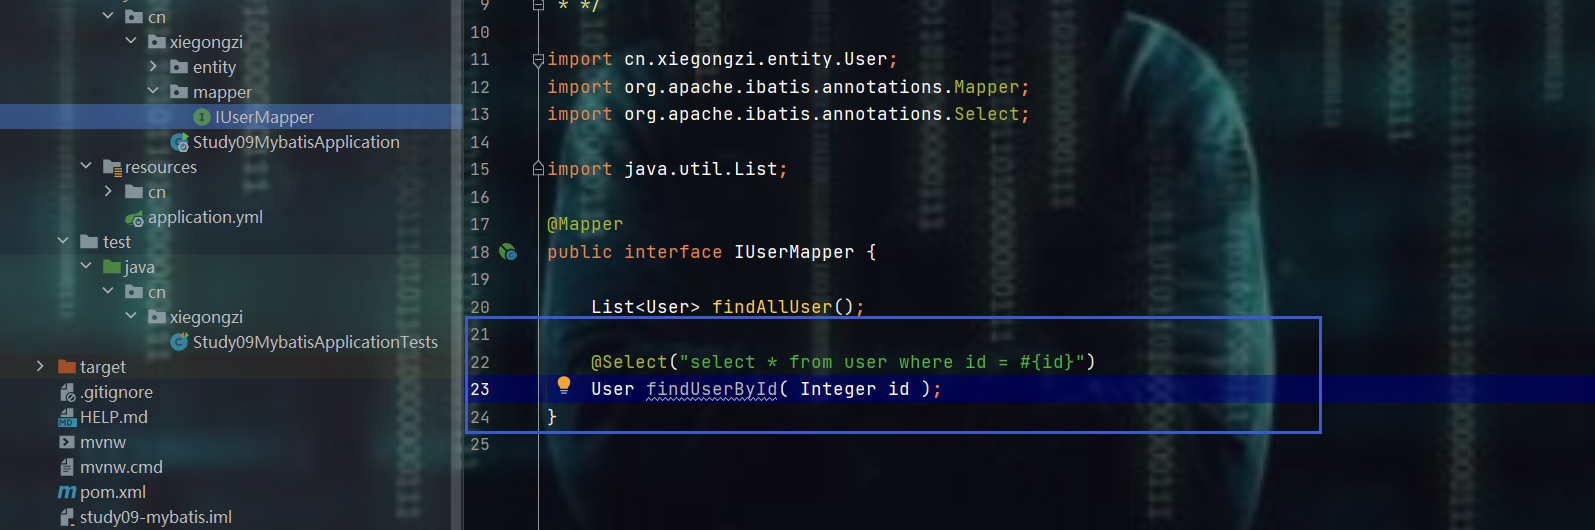
注解版
直接在dao层 / mapper的接口方法头上用
@insert("sql语句")、@delete("sql语句")、@update("sql语句")、@select("sql语句")注解。
整合PageHelper分页插件
PageHelper分页的本质:
将数据库中满足条件的所有数据查出来,然后通过配置的
startPage(page, limit)条件将数据截取出来,最后装入PageInfo对象中。
- 依赖
<dependency>
	<groupId>com.github.pagehelper</groupId>
	<artifactId>pagehelper-spring-boot-starter</artifactId>
	<version>1.2.5</version>
</dependency>
- 测试
@Test
void pageHelperTest(){
    // 设置分页		第1页 显示3条数据
    PageHelper.startPage(1, 3);

    // 查库	注意点:PageHelper.startPage() 和 Pagein 之间“只能”有一条SQL操作语句
    // 若有多条SQL操作语句,那抱歉,只有第一条有效
    List<User> users = userMapper.findAllUser();

    // 封装PageInfo对象
    PageInfo<User> pageInfo = new PageInfo<>(users);

    // .................根据需要进行操作:直接返回等等.....
}
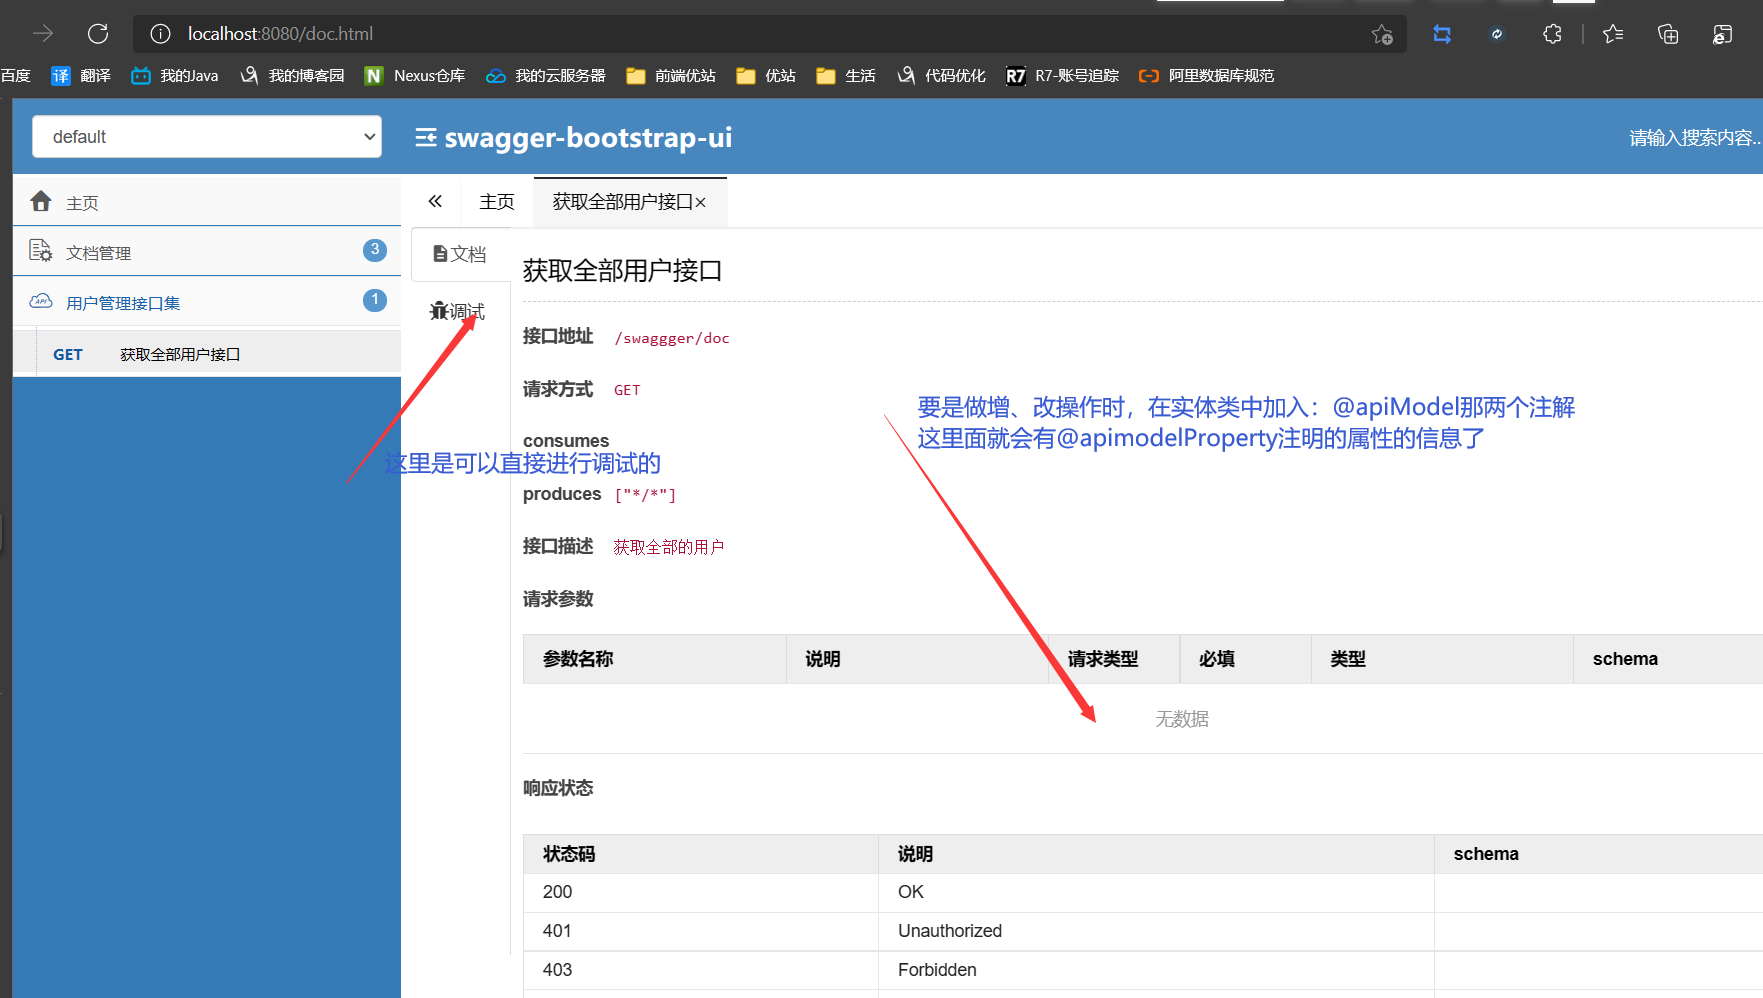
集成Swagger
理论知识滤过,自行百度百科swagger是什么。
swagger的常见注解和解读网址: https://blog.csdn.net/loli_kong/article/details/108103746
常识
是一个组织(OpenAPI Initiative),他们指定了一个如何描述HTTP API的规范(OpenAPI Specification)。既然是规范,那么谁想实现都可以,只要符合规范即可。
它是SmartBear 这个公司的一个开源项目,里面提供了一系列工具,包括著名的 swagger-ui。swagger是早于OpenApi的,某一天swagger将自己的API设计贡献给了OpenApi,然后由其标准化了。
- 导入依赖
<!--swagger所需要的依赖-->
<dependency>
	<groupId>io.springfox</groupId>
	<artifactId>springfox-swagger2</artifactId>
	<version>2.8.0</version>
</dependency>
<dependency>
	<groupId>io.springfox</groupId>
	<artifactId>springfox-swagger-ui</artifactId>
	<version>2.8.0</version>
</dependency>
<!--这个依赖是为了渲染swagger文档页面的( 为了好看一点罢了 ) ,swagger真正的依赖是上面两个-->
<dependency>
	<groupId>com.github.xiaoymin</groupId>
	<artifactId>swagger-bootstrap-ui</artifactId>
	<version>1.8.5</version>
</dependency>

<dependency>
	<groupId>mysql</groupId>
	<artifactId>mysql-connector-java</artifactId>
	<scope>runtime</scope>
</dependency>

<dependency>
	<groupId>org.mybatis.spring.boot</groupId>
	<artifactId>mybatis-spring-boot-starter</artifactId>
	<version>1.3.2</version>
</dependency>

<dependency>
	<groupId>com.alibaba</groupId>
	<artifactId>fastjson</artifactId>
	<version>1.2.75</version>
</dependency>

<dependency>
	<groupId>org.springframework.boot</groupId>
	<artifactId>spring-boot-starter-jdbc</artifactId>
</dependency>
- 编写swagger配置文件
import org.springframework.context.annotation.Bean;
import org.springframework.context.annotation.Configuration;
import springfox.documentation.builders.ApiInfoBuilder;
import springfox.documentation.builders.PathSelectors;
import springfox.documentation.builders.RequestHandlerSelectors;
import springfox.documentation.service.ApiInfo;
import springfox.documentation.service.Contact;
import springfox.documentation.spi.DocumentationType;
import springfox.documentation.spring.web.plugins.Docket;
import springfox.documentation.swagger2.annotations.EnableSwagger2;

@Configuration      // 表明当前类是一个配置类,并把当前类丢到Spring容器中去
@EnableSwagger2     // 开启swagger2功能
public class SwaggerConfig {

  @Bean
  public Docket createRestApi() {
    // http://ip地址:端口/项目名/swagger-ui.html#/
    ApiInfo apiInfo = new ApiInfoBuilder()
                    // 网站标题    即:生成的文档标题
					.title("悠忽有限公司")
					 // 网站描述     即:对生成文档的描述
					.description("这是一个很nice的接口文档")
					 // 版本
					.version("1.0")
					 // 联系人
					.contact(new Contact("紫邪情","https://www.cnblogs.com/xiegongzi/", "110"))
					 // 协议
					.license("tcp")
					// 协议url 即:进入到swagger文档页面的地址
					.licenseUrl("http://localhost:8080/")
					.build();

    // swagger版本
	return new Docket(DocumentationType.SWAGGER_2)
					// 请求映射路径	就是:controller中有一个接口,然后前台访问的那个接口路径
        			// 这个可以在生成的文档中进行调试时看到
					.pathMapping("/")
					 // 根据pathMapping去进行查询(做相应的操作)
					.select()
					// 扫描包   即:哪些地方可以根据我们的注解配置帮我们生成文档
					.apis(RequestHandlerSelectors.basePackage("cn.xiegongzi"))
					.paths(PathSelectors.any())
					.build()
					.apiInfo(apiInfo);
  }
}
- 编写yml文件
spring:
  datasource:
    # 注意这里MySQL驱动用的是8.x的
    driver-class-name: com.mysql.cj.jdbc.Driver
    url: jdbc:mysql://localhost:3306/mybatis_spring?useUnicode=true&characterEncoding=utf-8
    username: root
    password: "072413"
- 编写实体类
import io.swagger.annotations.ApiModel;
import io.swagger.annotations.ApiModelProperty;
import lombok.AllArgsConstructor;
import lombok.Data;
import lombok.NoArgsConstructor;

import java.io.Serializable;


/**
 * <p>@ApiModel(description = "描述")	表明这个实体类就是需要的数据名和类型
 *
 * 后台接收前端的参数是一个对象时使用(controller写的是@RequestBody OrderPaidDTO orderPaid)
 * 即:后端接收参数封装成了一个xxxxDTO(PO、BO、Entity、DTO、DAO含义和关系是什么,自行百度)
 *
 * 这个东西可以先不加,在做增加、修改时可以用这个测试一下,从而去swagger中看效果
 * </p>
*/
@Data
@AllArgsConstructor
@NoArgsConstructor
@ApiModel(description = "用户信息")
public class User implements Serializable {

    // 数据属性配置,
    // 这里面可以跟几个属性,常见的是value、required、dataType、hidden,在前面注解解读连接中有解释
    @ApiModelProperty
    private Integer id;

    @ApiModelProperty
    private String username;

    @ApiModelProperty
    private String phone;
}
- 编写mapper
import cn.xiegongzi.entity.User;
import org.apache.ibatis.annotations.Mapper;
import org.apache.ibatis.annotations.Select;

import java.util.List;

@Mapper
public interface IUserMapper {

    @Select("select * from user")
    List<User> findAllUser();
}
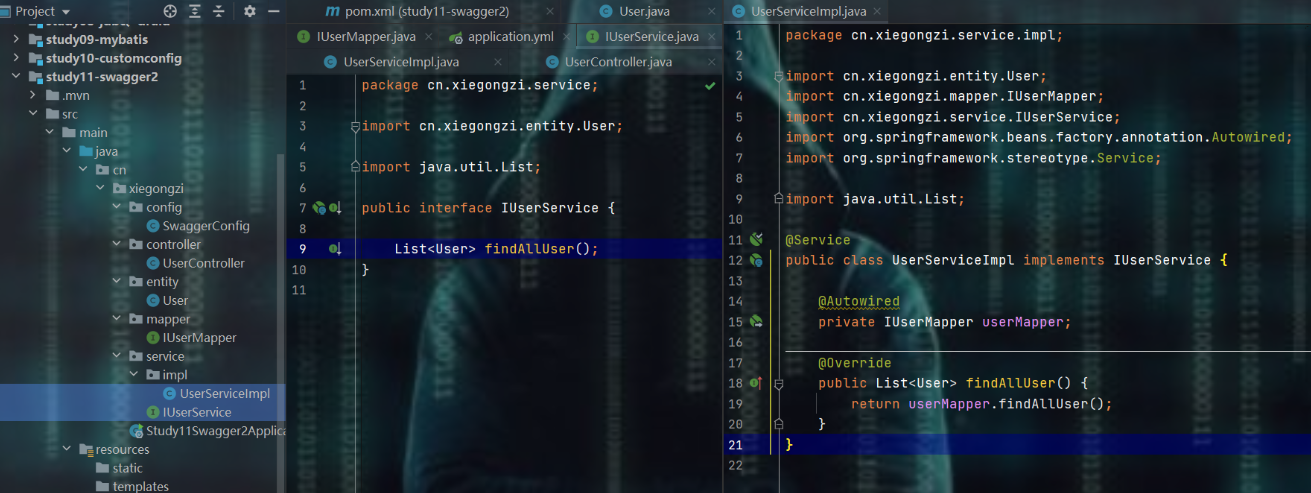
- 编写service接口和实现类
- 编写controller
package cn.xiegongzi.controller;

import cn.xiegongzi.service.IUserService;
import com.alibaba.fastjson.JSON;
import io.swagger.annotations.Api;
import io.swagger.annotations.ApiOperation;
import org.springframework.beans.factory.annotation.Autowired;
import org.springframework.web.bind.annotation.GetMapping;
import org.springframework.web.bind.annotation.RestController;


/*
 * @Api
 *   表示当前类可以被生成一个swagger文档
 *   可以跟参数tags,参数表示:这整个接口的名字(前端是接口,后端是controller控制层)
 */
@Api(tags = "用户管理接口集")
@RestController
public class UserController {

    @Autowired
    private IUserService userService;


    /*
    * @ApiImplicitParam 这个注解是对请求参数做限制用的
    *     如:请求时要求前台传递一个id,那么:在这个注解里面:就可以声明这个参数的类型
    *        对象类型中要求属性限制,可以使用 @ApiModelProperty 也可以使用 符合jsr303规范的数据检验方式
    * */
	// value这个接口的名字; notes 对这个接口的描述
    @ApiOperation(value = "获取全部用户接口" , notes = "获取全部的用户")
    // 遵循restful风格  要是使用 @RequestMapping 的话,会生成多个接口swagger文档,即:对应post、get....
    @GetMapping("/swaggger/doc")
    public String findAllUser() {

        return JSON.toJSONString(userService.findAllUser());
    }
}
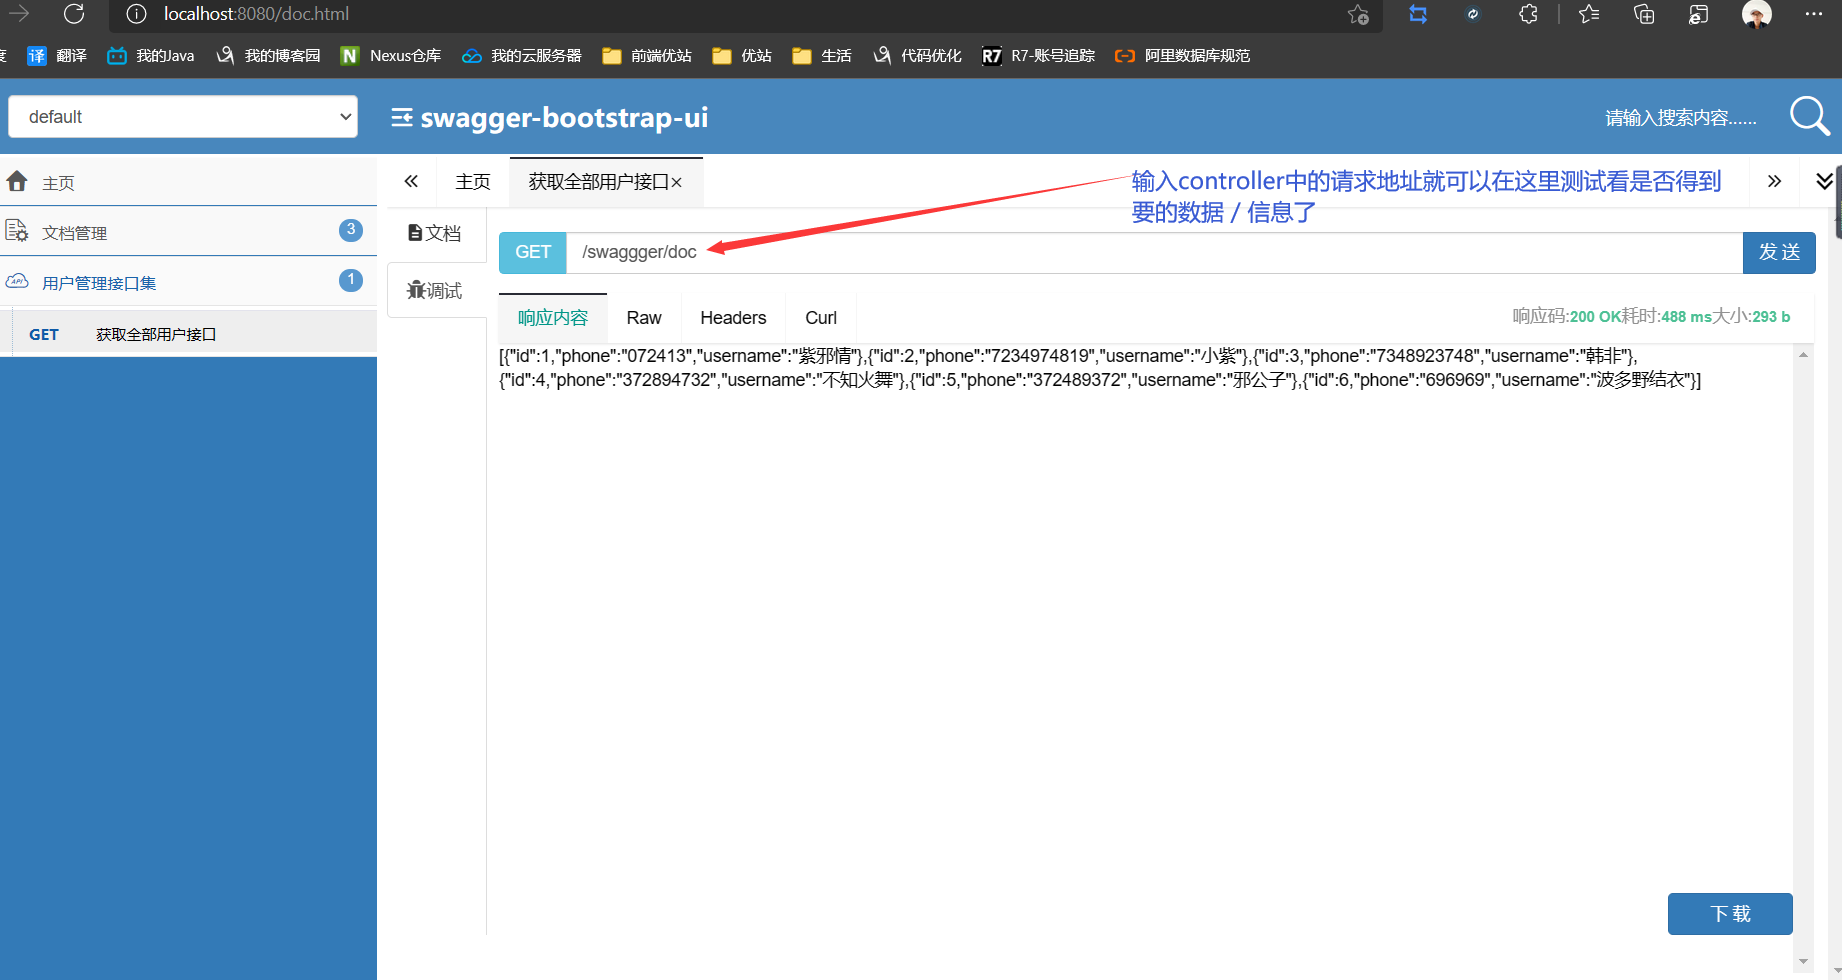
- 测试
集成Swagger增强版:Knife4j
注意:
Spring Boot版本不一样使用上有区别,本文中采用的是Spring Boot 3.x,至于Spring Boot 2.x的使用和注意事项请看上述官方文档。
对于Spring Boot 3:
- Spring Boot 3 只支持OpenAPI3规范。
- Knife4j提供的starter已经引用 springdoc-openapi 的jar,需注意避免jar包冲突。
- JDK版本必须 >= 17。
- Demo请参考:knife4j-spring-boot3-demo
安装
- Maven
<dependency>
	<groupId>com.github.xiaoymin</groupId>
	<artifactId>knife4j-openapi3-jakarta-spring-boot-starter</artifactId>
	<!-- 可以用 4.4.0 -->
	<version>4.1.0</version>
</dependency>
- Gradle
implementation("com.github.xiaoymin:knife4j-openapi3-jakarta-spring-boot-starter:4.4.0")
引入之后,其余的配置可完全参考springdoc-openapi的项目说明,Knife4j只提供了增强部分,如果要启用Knife4j的增强功能,可以在配置文件中进行开启.
配置
编写配置类
import io.swagger.v3.oas.models.OpenAPI;
import io.swagger.v3.oas.models.info.Contact;
import io.swagger.v3.oas.models.info.Info;
import org.springdoc.core.models.GroupedOpenApi;
import org.springframework.context.annotation.Bean;
import org.springframework.context.annotation.Configuration;

/**
 * <p>
 * Swagger增强版Knife4j配置类
 * </p>
 *
 * <p>@author : ZiXieqing</p>
 */

@Configuration
public class Knife4jConfig {
    @Bean
    public GroupedOpenApi adminApi() {      // 创建了一个api接口的分组
        return GroupedOpenApi.builder()
                .group("admin-api")         // 分组名称
                .pathsToMatch("/admin/**")  // 接口请求路径规则
                .build();
    }

    /**
     * 自定义接口信息
     */
    @Bean
    public OpenAPI customOpenAPI() {

        return new OpenAPI()
                .info(new Info()
                        .title("悠忽有限公司皮包骨 API接口文档")
                        .version("1.0")
                        .description("皮包骨API接口文档")
                        .contact(new Contact().name("zixieqing"))); // 设定作者
    }
}
增强功能配置
上面配置类配好之后,可以通过YAML配置文件进行Knife4j增强功能配置。
重要提示
Knife4j 自4.0版本,配置属性元数据全部改由
spring-boot-configuration-processor自动生成,因此之前版本的驼峰命名全部修改成了横杠(-)代替。
knife4j:
# 是否开启Knife4j增强模式	默认false		要使用Knife4j提供的增强则此值必须为true
  enable: true
# 是否开启一个默认的跨域配置,该功能配合自定义Host使用
  cors: false
# 是否开启生产环境保护策略		说明去看:https://doc.xiaominfo.com/docs/features/accessControl
  production: false
# 对Knife4j提供的资源提供BasicHttp校验,保护文档
  basic:
# 开启 或 关闭BasicHttp功能	即是否配置用户名、密码登录文档
    enable: false
# basic用户名
    username: test
# basic密码
    password: 12313
# 自定义文档集合,该属性是数组
  documents:
    -
      group: 2.X版本	# 所属分组
      name: 接口签名	# 类似于接口中的tag,对于自定义文档的分组
      locations: classpath:sign/*	# markdown文件路径,可以是一个文件夹(classpath:markdowns/*)		也可以是单个文件(classpath:md/sign.md)
# 前端Ui的个性化配置属性
  setting:
# Ui默认显示语言,目前主要有两种:中文(zh-CN)、英文(en-US)
    language: zh-CN
# 是否显示界面中SwaggerModel功能
    enable-swagger-models: true
# 是否显示界面中"文档管理"功能
    enable-document-manage: true
# 重命名SwaggerModel名称,默认Swagger Models
    swagger-model-name: 实体类列表
# 是否开启界面中对某接口的版本控制,如果开启,后端变化后Ui界面会存在小蓝点
    enable-version: false
# 是否在每个Debug调试栏后显示刷新变量按钮,默认不显示
    enable-reload-cache-parameter: false
# 调试Tab是否显示AfterScript功能,默认开启
    enable-after-script: true
# 具体接口的过滤类型
    enable-filter-multipart-api-method-type: POST
# 针对RequestMapping的接口请求类型,在不指定参数类型的情况下,
# 如果不过滤,默认会显示7个类型的接口地址参数,如果开启此配置,默认展示一个Post类型的接口地址
    enable-filter-multipart-apis: false
# 是否开启请求参数缓存
    enable-request-cache: true
# 是否启用Host
    enable-host: false
# HOST地址
    enable-host-text: 192.168.0.193:8000
# 是否开启自定义主页内容
    enable-home-custom: true
# 主页内容Markdown文件路径
    home-custom-path: classpath:markdown/home.md
# 是否禁用Ui界面中的搜索框
    enable-search: false
# 是否显示Footer
    enable-footer: false
# 是否开启自定义Footer
    enable-footer-custom: true
# 自定义Footer内容
    footer-custom-content: Apache License 2.0 | Copyright  2019-[浙江八一菜刀股份有限公司](https://gitee.com/xiaoym/knife4j)
# 是否开启动态参数调试功能
    enable-dynamic-parameter: false
# 启用调试
    enable-debug: true
# 显示OpenAPI规范
    enable-open-api: false
# 显示服务分组
    enable-group: true
注解示例
实体类注解:@Schema
import io.swagger.v3.oas.annotations.media.Schema;
import lombok.Data;

@Data
@Schema(description="注册对象")
public class UserRegisterDto {

    @Schema(description = "用户名")
    private String username;

    @Schema(description = "密码")
    private String password;

    @Schema(description = "昵称")
    private String nickName;

    @Schema(description = "手机验证码")
    private String code ;
}
Controller层注解:@Tag 和 @Operation 及 @Parameters
@Tag(name = "body参数接口")
@RestController
@RequestMapping("body")
public class BodyController {

   @Operation(summary = "普通body请求")
   @PostMapping("/body")
   public ResponseEntity<FileResp> body(@RequestBody FileResp fileResp){
       return ResponseEntity.ok(fileResp);
   }

   @Operation(summary = "普通body请求 + Param + Header + Path")
   @Parameters({
           @Parameter(name = "id",description = "文件id",in = ParameterIn.PATH),
           @Parameter(name = "token",description = "请求token",required = true,in = ParameterIn.HEADER),
           @Parameter(name = "name",description = "文件名称",required = true,in=ParameterIn.QUERY)
   })
   @PostMapping("/bodyParamHeaderPath/{id}")
   public ResponseEntity<FileResp> bodyParamHeaderPath(@PathVariable("id") String id,
   														@RequestHeader("token") String token,
														@RequestParam("name")String name,
														@RequestBody FileResp fileResp){

       fileResp.setName(fileResp.getName()+",receiveName:"+name+",token:"+token+",pathID:"+id);
       return ResponseEntity.ok(fileResp);
   }
}
最后,访问Knife4j的文档地址:http://ip:port/doc.html 即可查看文档。
集成SpringDoc
上面都整了Swagger、Knife4j了,那就顺便把SpringDoc也一起弄了吧。
是Spring生态的一个开源库,是Swagger与OpenApi规范的具体实现。我们使用它就可以在spring中生成API文档。以前基本上是行业标准,目前最新版本可以支持 Swagger2, Swagger3 以及 OpenAPI3 三种格式。但是其从 2020年7月14号就不再更新了,不支持springboot3,所以业界都在不断的转向我们今天要谈论的另一个库Springdoc,新项目就不要用了
算是后起之秀,带着继任Springfox的使命而来。其支持OpenApi规范,支持Springboot3,新项目就可以直接用这个。
提示:
SpringDoc支持 Java Bean Validation API 的注解,如:
@NotNull。
- 依赖:其实引入依赖访问 http://server:port/context-path/swagger-ui.html 就可以使用,如http://localhost:8080/swagger-ui.html 。只是使用的都是默认值而已。
<dependency>
   <groupId>org.springdoc</groupId>
   <artifactId>springdoc-openapi-ui</artifactId>
   <version>1.7.0</version>
</dependency>
- 配置文档信息和分组情况
@Configuration
public class SpringDocConfig {
    @Bean
    public OpenAPI myOpenAPI() {
        return new OpenAPI()
                .info(new Info()
                        .title("悠忽有限公司皮包骨API")
                        .description("程序员的大本营")
                        .version("v1.0.0")
                        .license(new License()
                                .name("许可协议")
                                .url("http://localhost:8080"))
                        .contact(new Contact()
                                .name("紫邪情")
                                .email("zixq8@qq.com")))
                .externalDocs(new ExternalDocumentation()	// 外部文档
                        .description("紫邪情博客")
                        .url("https://www.cnblogs.com/xiegongzi"));
    }

	@Bean
    public GroupedOpenApi publicApi() {
        return GroupedOpenApi.builder()
                .group("api")	// 分组:controller以/api为前缀的这一组
                .pathsToMatch("/api/**")
                .build();
    }

    @Bean
    public GroupedOpenApi adminApi() {
        return GroupedOpenApi.builder()
                .group("admin")		// 分组:controller以 /admin 为前缀的这一组
                .pathsToMatch("/admin/**")
                .build();
    }
 }
常用注解说明
| 注解 | 含义 | 示例 |
|---|---|---|
| @Tag | 用在controller类上,描述此controller的信息 | @Tag(name = "用户接口") |
| @Operation | 用在controller的方法里,描述此api的信息。@Parameter以及@ApiResponse都可以配置在它里面。 |
@Operation(summary = "添加用户") |
| @Parameter | 用在controller方法里的参数上,描述参数信息 | (@Parameter(description = "用户id")@PathVariable Integer id) |
| @Parameters | 用在controller方法里的参数上。@Parameter的批量参数添加 |  |
| @ApiResponse | 用在controller方法的返回值上 | 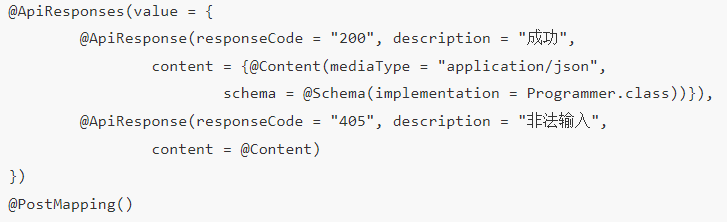 |
| @ApiResponses | 用在controller方法的返回值上 | 见@ApiResponse示例 |
| @Schema | 用于Entity / VO / DTO / BO,以及其属性上 | @Schema(description = "搜索条件实体类")或属性 @Schema(description = "结束时间")支持Bean校验注解 @NotNull @Min(18) @Max(35)等 |
| @Hidden | 用在各种地方,用于隐藏其api | |
| @ResponseStatus | 统一异常处理。 统一异常处理中,每个方法会捕捉对应的异常,只要我们使用 @ResponseStatus来标记这些方法,springdoc就会自动生成相应的文档 |
@ExceptionHandler(value = Exception.class)@ResponseStatus(HttpStatus.INTERNAL_SERVER_ERROR) |
认证
针对的是:服务需要认证后才能调用,例如使用了Spring Security,或者自己写了个Filter 来实现认证功能。
这种情况当从swagger-ui调用API时会返回401。
希望能够正常调用API:使用@SecurityScheme 定义一个安全模式。可以定义全局的,也可以针对某个controller定义类级别的。
- 启动类添加
@SecurityScheme注解。
// 定义一个名为api_token的安全模式,并指定其使用HTTP Bearer的方式
@SecurityScheme(name = "api_token",
                type = SecuritySchemeType.HTTP,
                scheme ="bearer",
                in = SecuritySchemeIn.HEADER)
@SpringBootApplication
- 使此安全模式生效。
@Configuration
public class SpringDocConfig {
    @Bean
    public OpenAPI myOpenAPI() {
        return new OpenAPI()
                .info(new Info()
                        .title("悠忽有限公司皮包骨API")
                        .description("程序员的大本营")
                        .version("v1.0.0")
                        .license(new License()
                                .name("许可协议")
                                .url("http://localhost:8080"))
                        .contact(new Contact()
                                .name("紫邪情")
                                .email("zixq8@qq.com")))
                .security(List.of(new SecurityRequirement().addList("api_token")));	// 使定义的安全模式生效
        		// 注:api_token是1中定义的name
    }
}
- 声明是否需要认证:使用
@SecurityRequirements()来设置。
默认情况下按照上面两步设置后,整个应用程序的API就会生效,但是有的API是不需要认证的,例如登录。
@RestController
@RequestMapping(value = "/admin", produces =  "application/json")
public class AuthController {
    ...
	/*	@SecurityRequirements()		不认证		属性是一个String数组,里面列出需要使用的 @SecurityScheme
	 *								不写就说明不需要任何的安全模式
	 * */
    @PostMapping("/login")
    public Result<String> login(@RequestBody LoginRequest request){
        return Result.ok("123");
    }
}
集成JPA
- 数据库信息
- 导入依赖
<!--导入jpa需要的依赖-->
<dependency>
	<groupId>org.springframework.boot</groupId>
	<artifactId>spring-boot-starter-data-jpa</artifactId>
</dependency>


<!--项目需要的依赖-->
<dependency>
	<groupId>org.springframework.boot</groupId>
	<artifactId>spring-boot-starter-jdbc</artifactId>
</dependency>

<dependency>
	<groupId>org.springframework.boot</groupId>
	<artifactId>spring-boot-starter-web</artifactId>
</dependency>

<dependency>
	<groupId>org.projectlombok</groupId>
	<artifactId>lombok</artifactId>
	<optional>true</optional>
</dependency>

<dependency>
	<groupId>org.springframework.boot</groupId>
	<artifactId>spring-boot-starter-test</artifactId>
	<scope>test</scope>
</dependency>

<dependency>
	<groupId>com.alibaba</groupId>
	<artifactId>druid-spring-boot-starter</artifactId>
	<version>1.1.10</version>
</dependency>
<dependency>
	<groupId>com.alibaba</groupId>
	<artifactId>fastjson</artifactId>
	<version>1.2.75</version>
</dependency>

<dependency>
	<groupId>org.mybatis.spring.boot</groupId>
	<artifactId>mybatis-spring-boot-starter</artifactId>
	<version>1.3.2</version>
</dependency>

<dependency>
	<groupId>mysql</groupId>
	<artifactId>mysql-connector-java</artifactId>
</dependency>
- 编写yml文件
spring:
datasource:
driver-class-name: com.mysql.cj.jdbc.Driver
url: jdbc:mysql://localhost:3306/mybatis_spring?useUnicode=true&characterEncoding=utf-8
username: root
password: "072413"
jpa:
# 这里可以不用hibernate,还可以用hikari(这个在前面整合jdbc时见过,就是当时输出的那句话)
hibernate:
# 指定为update,每次启动项目检测表结构,有变化的时候会新增字段,表不存在时会新建表
ddl-auto: update
# 如果指定create,则每次启动项目都会清空数据并删除表,再新建
# 这里面还可以跟:create-drop、create、none
naming:
# 指定jpa的自动表生成策略,驼峰自动映射为下划线格式
implicit-strategy: org.hibernate.boot.model.naming.ImplicitNamingStrategyLegacyJpaImpl # 默认就是这个
# physical-strategy: org.hibernate.boot.model.naming.PhysicalNamingStrategyStandardImpl
# 注掉的这种是:不用驼峰名字,直接把实体类的大写字母变小写就完了
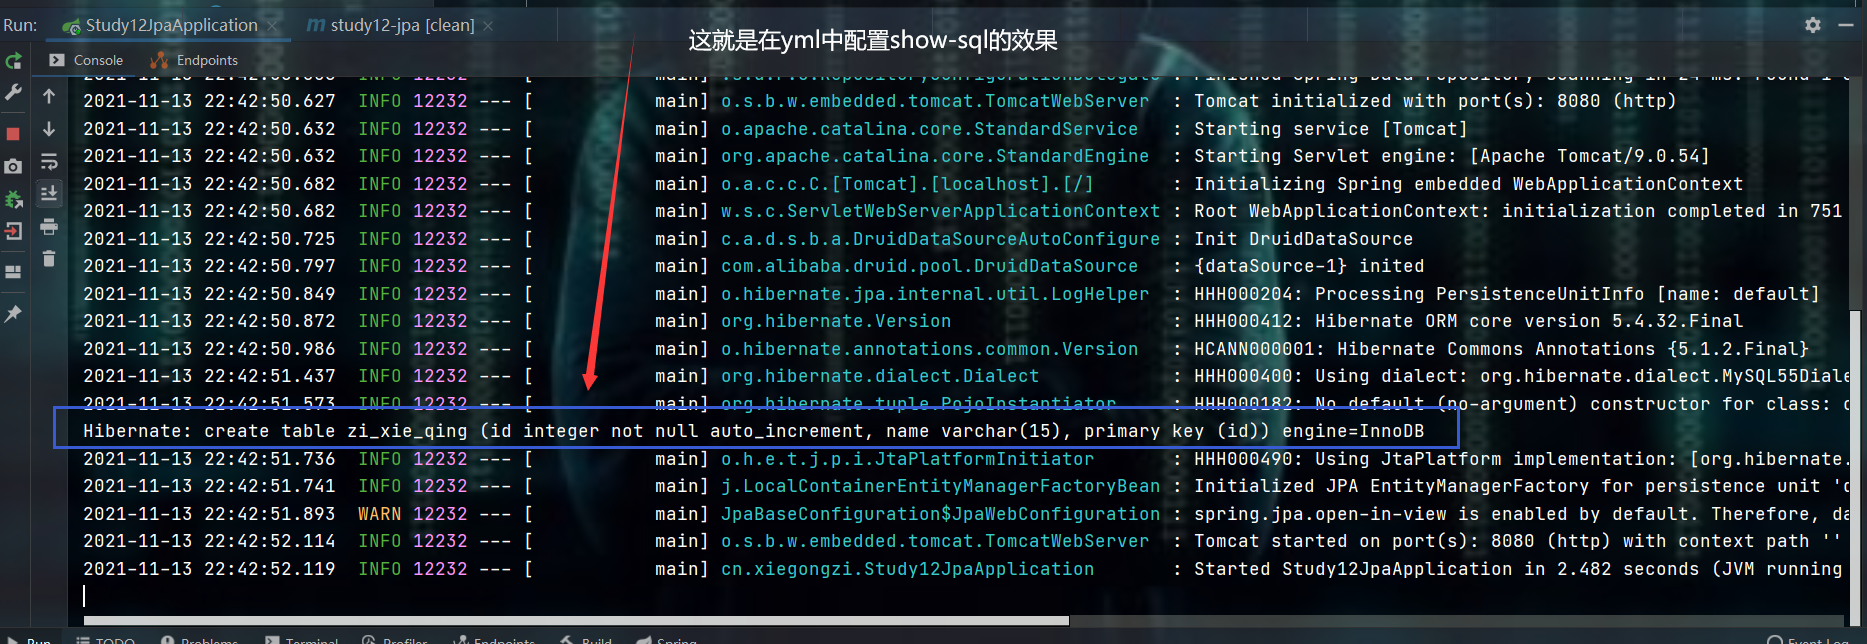
show-sql: true # 在控制台显示sql语句 不是真的sql语句,而是相当于:说明 默认是false
# 使用INNODB引擎
properties.hibernate.dialect: org.hibernate.dialect.MySQL55Dialect
database-platform: org.hibernate.dialect.MySQL55Dialect
# 使用JPA创建表时,默认使用的存储引擎是MyISAM,通过指定数据库版本,可以使用InnoDB
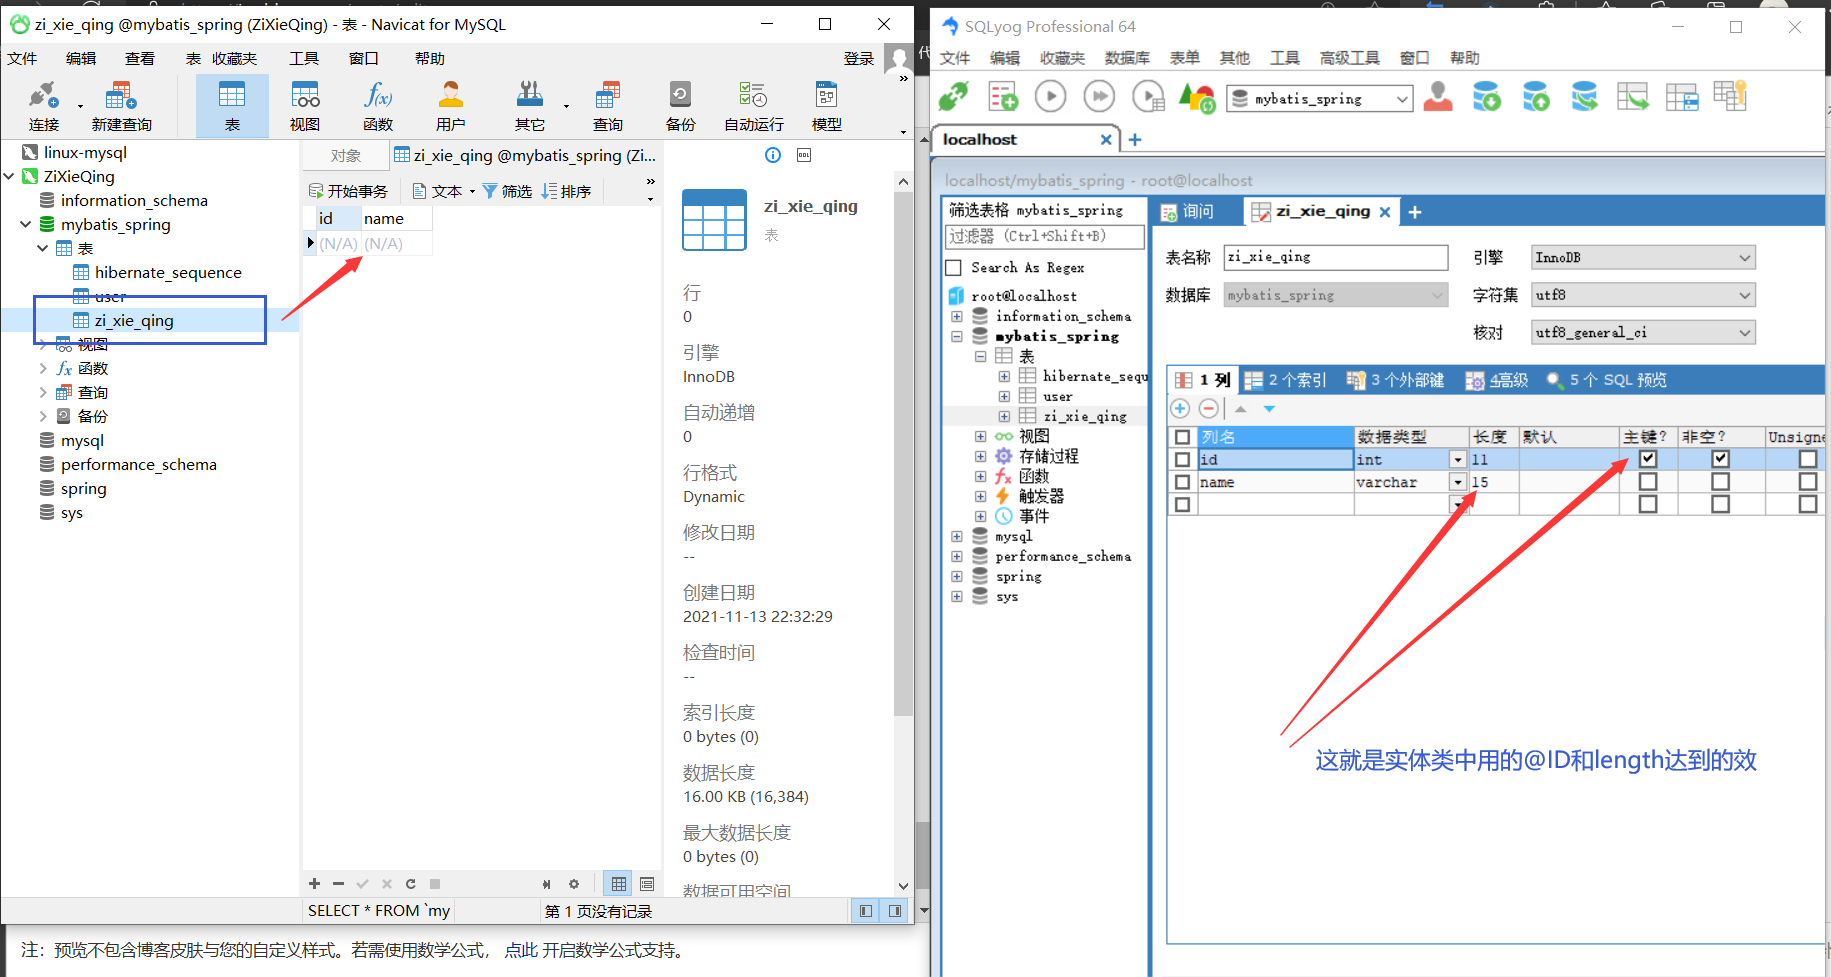
- 编写实体类
import lombok.Data;
import org.springframework.data.annotation.Id;

import javax.persistence.Column;
import javax.persistence.Entity;
import javax.persistence.GeneratedValue;
import java.io.Serializable;


/** <p>
 * @Entity	表明:当前类和数据库中的这个同类名的数据库表形成ORM映射关系
 * 			要是数据库中没有这个表,那么:根据yml配置的ddl-auto: update 就会自动帮我们生成
 * </p>
 */
@Data
@Entity
public class ZiXieQing implements Serializable {

    @javax.persistence.Id
    @Id  // 表明这个属性是数据库表中的主键
    @GeneratedValue(strategy = GenerationType.IDENTITY)     // 表示:自增  默认是auto,即:和数据库中的auto_increment是一样的
    private int id;

    // 生成数据库中的列字段,里面的参数不止这些,还可以用其他的,对应数据库列字段的那些操作
    @Column(length = 15)
    private String name;

    // public ZiXieQing() {
    // }


    public ZiXieQing(int id, String name) {
        this.id = id;
        this.name = name;
    }
}
附:@Column 注解中可以支持的属性
@Target({ElementType.METHOD, ElementType.FIELD})
@Retention(RetentionPolicy.RUNTIME)
public @interface Column {
    String name() default "";

    boolean unique() default false;

    boolean nullable() default true;

    boolean insertable() default true;

    boolean updatable() default true;

    String columnDefinition() default "";

    String table() default "";

    int length() default 255;

    int precision() default 0;

    int scale() default 0;
}
- 编写mapper
import cn.xiegongzi.entity.ZiXieQing;
import org.springframework.data.jpa.repository.JpaRepository;


/**
 * <p>
 *	这里别用 @Mapper 这个注解,因为:@mapper是mybatis提供的注解
 * 	JpaRepository相对mybatis来说就是外部的东西。因此:并不能支持@mapper注解
 * </p>
 */
@Repository
public interface ZiXieQingMapper extends JpaRepository<ZiXieQing , Integer> {

    /*
     * JpaRepository这里面有默认的一些方法,即:增删查改...
     * JpaRepository<ZiXieQing , Integer> 本来样子是:JpaRepository<T , ID>
     *     T  表示:自己编写的实体类 类型
     *     ID  表示: 实体类中id字段的类型  注:本示例中,实体类中id是int 因为要弄自增就必须为int,不然和数据库映射时对不上
     * */
}
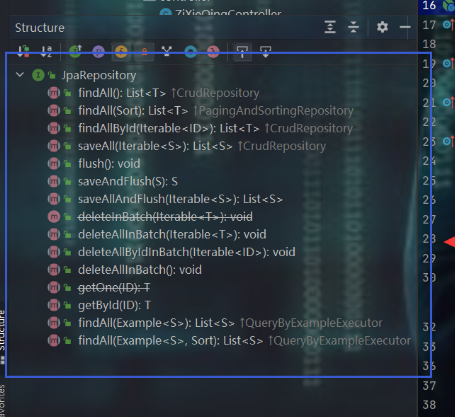
附:JpaRepository 中提供的方法。
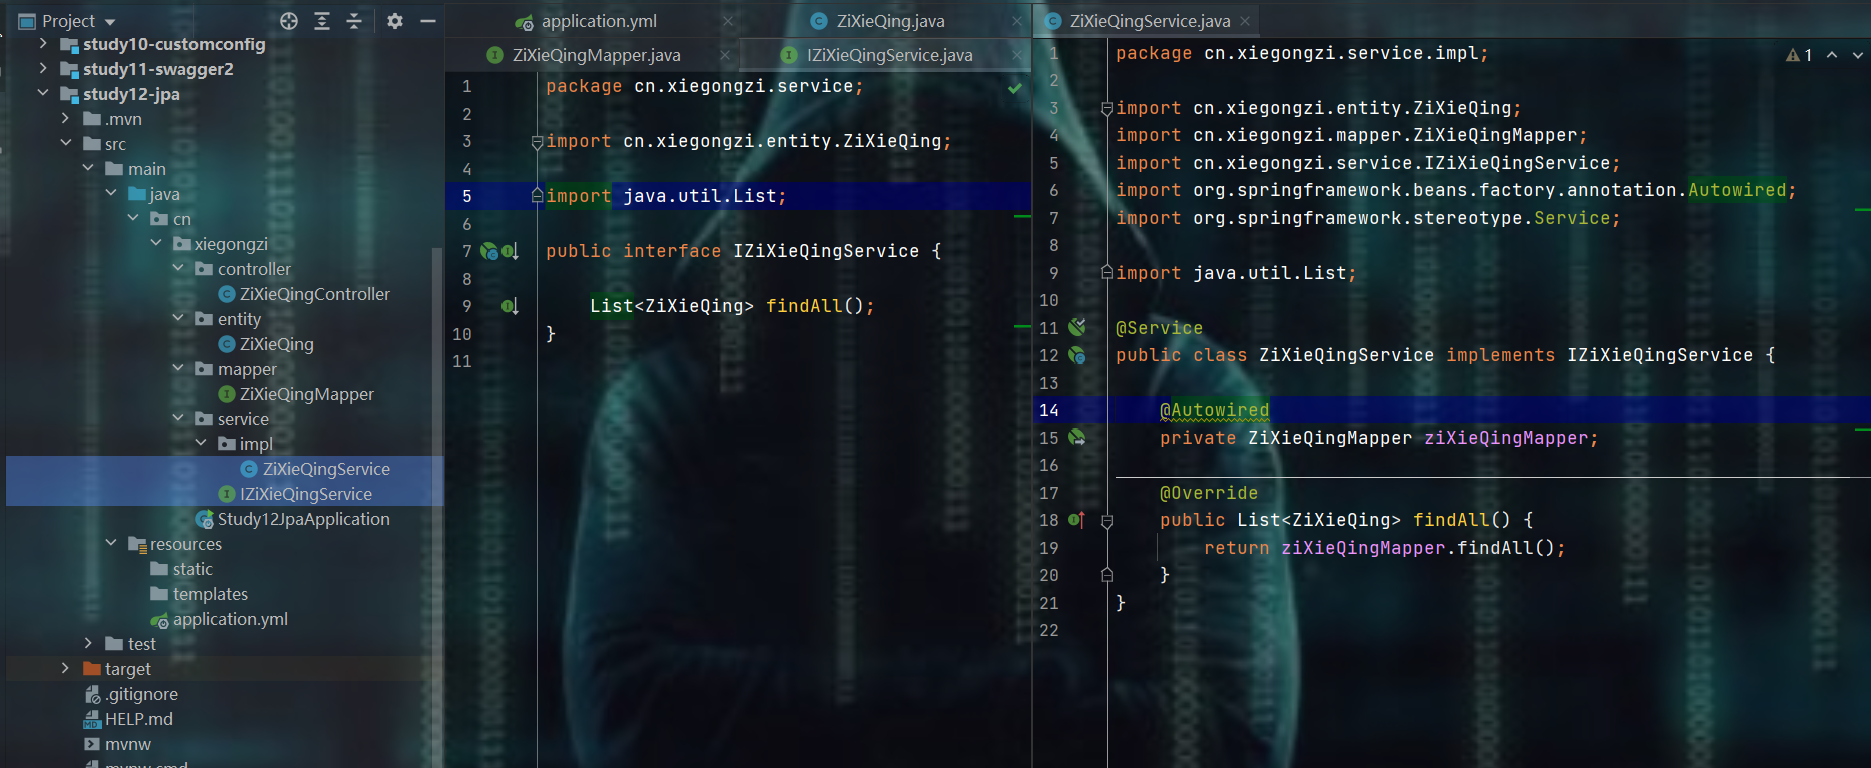
- 编写service接口和实现类
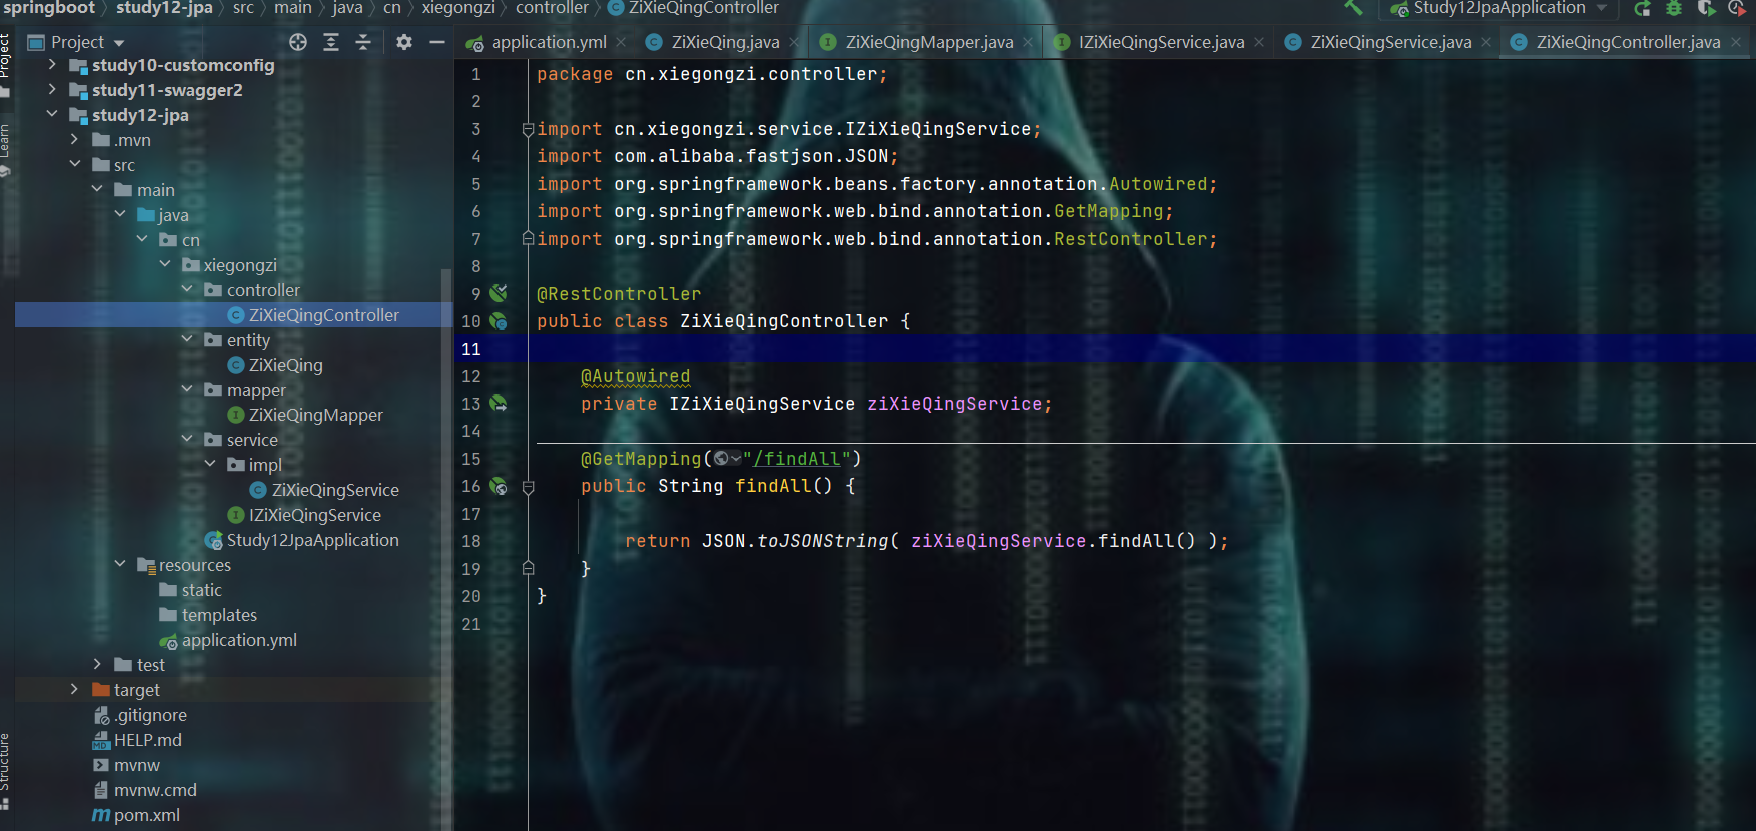
- 编写controller
- 测试
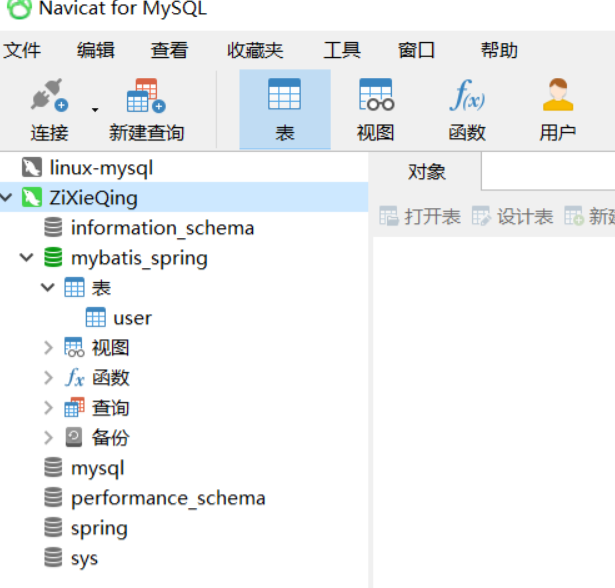
- 现在去看一下数据库
集成Mybatis-Plus
进程本地缓存技术:Ehcache
进程本地缓存:最典型的情况 项目中整一个全局map。
还有一种比较流行的是Caffeine这个东西要更简单、更好一点。
Caffeine官网GitHub地址:https://github.com/ben-manes/caffeine
Caffeine快速入手网址:http://www.mydlq.club/article/56/ 这个网址中的第二种集成方式和下面玩的Ehcache注解的含义一样,而且不需要借助xml文件,而ehcache需要借助xml文件。
Ehcache介绍
Ehacahe是一个比较成熟的Java缓存框架,最早从hibernate发展而来,是进程中的缓存系统,它提供了用内存、磁盘文件存储,以及分布式存储方式等多种灵活的cache管理方案。
Ehcache常用注解
@CacheConfig注解
用于标注在类上,可以存放该类中所有缓存的公有属性(如:设置缓存名字)。
@CacheConfig(cacheNames = "users")
public class UserService{

}
当然:这个注解其实可以使用@Cacheable来代替。
@Cacheable注解(读数据时):用得最多
应用到读取数据的方法上,如:查找数据的方法,使用了之后可以做到先从本地缓存中读取数据,若是没有,则再调用此注解下的方法去数据库中读取数据,当然:还可以将数据库中读取的数据放到用此注解配置的指定缓存中
@Cacheable(value = "user", key = "#userId")
User selectUserById(Integer userId);
@Cacheable 注解的属性:
| 属性 | 作用 | 说明 |
|---|---|---|
value、cacheNames |
用于指定缓存存储的集合名 相当于分区,相当于磁盘中建不同的文件夹 |
这两个参数其实是等同的CacheNames为Spring 4新增的,作为value的别名 |
key |
缓存对象存储在Map集合中的key值 | |
condition |
缓存对象的条件 | 只有满足这里面【配置的表达式条件,即SpEL表达式】的内容才会被缓存, 如: @Cache(key = "#userId",condition="#userId.length() < 3") 这个表达式表示只有当userId长度小于3的时候才会被缓存 |
unless |
缓存条件 | 不同于condition参数的地方在于此属性的判断时机,此注解中编写的条件是在函数被 调用之后才做判断,所以:这个属性可以通过封装的result进行判断 |
keyGenerator |
用于指定key生成器。 若需要绑定一个自定义的key生成器,我们需要去实现org.springframewart.cahce.intercceptor.KeyGenerator接口,并使用该参数来绑定 |
该参数与上面的key属性是互斥的 |
cacheManager |
指定使用哪个缓存管理器 | |
cacheResolver |
指定使用哪个缓存解析器 | 需要通过org.springframewaork.cache.interceptor.CacheResolver接口来实现自己的缓存解析器 |
@CachePut注解 (写数据时)
用在写数据的方法上,如:新增 / 修改方法,调用方法时会自动把对应的数据放入缓存,
@CachePut的参数和@Cacheable差不多。
@CachePut(value="user", key = "#userId")
public User save(User user) {
	users.add(user);
	return user;
}
@CacheEvict注解 (删除数据时)
用在删除数据的方法上,调用方法时会从缓存中移除相应的数据。
@CacheEvict(value = "user", key = "#userId")
void delete(Integer userId);
这个注解除了和 @Cacheable 一样的参数之外,还有另外两个参数:
allEntries: 默认为false,当为true时,会移除缓存中该注解该属性所在的方法的所有数据。beforeInvocation:默认为false,在调用方法之后移除数据,当为true时,会在调用方法之前移除数据。
@Cacheing组合注解:推荐
// 将userId、username、userAge放到名为user的缓存中存起来
@Caching(
	put = {
		@CachePut(value = "user", key = "#userId"),
		@CachePut(value = "user", key = "#username"),
		@CachePut(value = "user", key = "#userAge"),
	}
)
Spring Boot集成Ehcache
配置Ehcache
- 依赖
<dependency>
	<groupId>org.springframework.boot</groupId>
	<artifactId>spring-boot-starter-cache</artifactId>
</dependency>
<dependency>
	<groupId>net.sf.ehcache</groupId>
	<artifactId>ehcache</artifactId>
</dependency>
- 在
application.yml配置文件中加入配置
cache:
	ehcache:
		# 配置ehcache.xml配置文件所在地
		config: classpath:ehcache.xml
- 在主启动类开启缓存功能
@SpringBootAllication
@EnableCaching
public class Starter {
	public static void main(String[] args) {
		SpringApplication.run(Starter.class);
	}
}
- 编写
ehcache.xml配置文件。在resources目录下新建ehcache.xml,并编写如下内容:
<ehcache name="myCache">
    <!--缓存磁盘保存路径-->
    <diskStore path = "D:/test/cache"/>

    <!--默认的缓存配置
        maxElementsInMemory 缓存最大数目
        eternal 对象是否永久有效 一旦设置了,那么timeout将不再起作用
        timeToIdleSeconds 设置对象在失效前能允许的闲置时间( 单位:秒 ),默认值是0,即:可闲置时间无穷大
                            仅当eternal=“false"对象不是永久有效时使用
        timeToLiveSeconds 设置对象失效前能允许的存活时间( 单位:秒 )
                             最大时间介于创建时间和失效时间之间
        maxElementsOnDisk 磁盘最大缓存个数
        diskExpiryThreadIntervalSeconds 磁盘失效时,线程运行时间间隔,默认是120秒
        memoryStoreEvictionPolicy 当达到设定的maxElementsInMemory限制时,Ehcache将会根据指定的策略去清理内存
                                    默认策略是LRU(即:最近最少使用策略 )
                                    还可以设定的策略:
                                        FIFO    先进先出策略
                                        LFU     最近最少被访问策略
                                        LRU     最近最少使用策略
                                                    缓存的元素有一个时间戳,当缓存容量满了,同时又需要腾出地方来缓存新的元素时,
                                                    那么现有缓存元素中的时间戳 离 当前时间最远的元素将被清出缓存

        maxEntriesLocalHeap 是Ehcache配置中的一个关键参数,用于控制缓存中在JVM堆内存中最多可以存储多少个条目(entry)。
                            这个参数直接影响了Ehcache的内存管理策略,确保缓存不会无限制地占用内存资源。
                            当设置maxEntriesLocalHeap时,Ehcache会根据这个限制来决定何时从内存中移除不再使用的条目。
                            如果缓存达到这个限制并且新的条目需要被添加,Ehcache会根据其内部的淘汰策略(默认是LRU,即最近最少使用的条目优先被淘汰)来选择哪些条目应该被移除。
                                值为正整数:表示最多允许的条目数。一旦超过这个数量,新的条目将替换最不常使用的条目。
                                值为0:表示不限制在堆内存中的条目数量。这可能会导致缓存无限增长,直到耗尽所有可用内存,因此在生产环境中通常不推荐。
                                值为负数:表示不设置限制,但是请注意,这并不是真正的无限制,因为Ehcache本身和JVM都会对内存使用有自身的限制
    -->
    <defaultCache
            maxElementsInMemory="10000"
            eternal="false"
            timeToIdleSeconds="120"
            timeToLiveSeconds="120"
            maxElementsOnDisk="10000000"
            diskExpiryThreadIntervalSeconds="120"
            memoryStoreEvictionPolicy="LRU"
		   maxEntriesLocalHeap="2000"
	/>

    <!--下面的配置是自定义缓存配置,可以复制粘贴,用多套
        name 起的缓存名
        overflowToDisk 当系统宕机时,数据是否保存到上面配置的<diskStore path = "D:/test/cache"/>磁盘中
        diskPersistent 是否缓存虚拟机重启期数据
    -->
    <cache
        name="users"
        eternal="false"
        maxElementsInMemory="100"
        overflowToDisk="false"
        diskPersistent="false"
        timeToIdleSeconds="0"
        timeToLiveSeconds="300"
        memoryStoreEvictionPolicy="LRU"
    />

    <!--另外的配置项:
            clearOnFlush  内存数量最大时是否清除
            diskSpoolBufferSizeMB 设置diskStore(即:磁盘缓存)的缓冲区大小,默认是30MB
                                    每个Cache都应该有自己的一个缓冲区
    -->
</ehcache>
在项目中使用Ehcache
使用常用的@Cacheable注解举例。
- 查询条件是单个时(service实现类中直接开注解)
// 这里的value值就是前面xml中配置的哪个cache name值
@Cacheable(value="users", key = "#username")
public User queryUserByUsername(String username) {
	return userMapper.selectUserByUsername(username);
}
- 查询条件是多个时(service实现类中直接开注解)
本质:字符串的拼接
// 这里的UserDAO.username+就是封装的UserDAO,里面的属性有username、userage、userPhone
@Cache(value="users",
       key = "#UserDAO.username + '-' + #UserDAO.userage + '-' + #UserDAO.userPhone")
public User queryUserByUsername(UserDAO userDAO) {
	return userMapper.selectUserByUserDAO(userDAO);
}
集成Spring Cache + Redis
Spring Cache官网:https://docs.spring.io/spring-framework/reference/integration/cache/annotations.html
Redis缓存数据库教程去这里:https://www.cnblogs.com/zixq/p/17808492.html
Spring Cache可以集成很多种缓存,如前面的Ehcache集成就是Spring Cache + Ehcache,本质是:CacheManager ——> Cache
1、依赖
<dependency>
    <groupId>org.springframework.boot</groupId>
    <artifactId>spring-boot-starter-data-redis</artifactId>
</dependency>

<dependency>
    <groupId>org.springframework.boot</groupId>
    <artifactId>spring-boot-starter-cache</artifactId>
</dependency>
2、YAML配置
spring:
  redis:
    host: 127.0.0.1
    port: 6379
  #    password:

  cache:
    # 使用哪种缓存
    type: redis
    # 下面这些也可以直接全部在自定义配置中进行配置
    redis:
      # 是否使用key前缀 默认true
      use-key-prefix: true
      # 自定义key前缀  目的:和自己使用Redis时存的内容进行区分
      key-prefix: CACHE_
      # 放入Redis数据的TTL时间 单位 毫秒
      time-to-live: 300000
      # 是否存储空值  解决缓存穿透问题  默认 true
      cache-null-values: true
3、自定义配置:如配置key的序列化方式(默认String类型)、Value的序列化方式(默认JDK序列化)等等
import org.springframework.boot.autoconfigure.cache.CacheProperties;
import org.springframework.cache.annotation.EnableCaching;
import org.springframework.context.annotation.Bean;
import org.springframework.context.annotation.Configuration;
import org.springframework.data.redis.serializer.GenericJackson2JsonRedisSerializer;
import org.springframework.data.redis.serializer.RedisSerializationContext;

/**
 * <p>
 * Spring Cache + Redis自定义配置
 * </p>
 *
 * <p>@author : ZiXieqing</p>
 */

@Configuration
@EnableCaching	// 开启缓存功能
public class CacheConfig {

    @Bean
    public org.springframework.data.redis.cache.RedisCacheConfiguration redisCacheConfiguration(CacheProperties cacheProperties) {

        CacheProperties.Redis redisProperties = cacheProperties.getRedis();
        org.springframework.data.redis.cache.RedisCacheConfiguration config = org.springframework.data.redis.cache.RedisCacheConfiguration
                .defaultCacheConfig();

        // 指定放入Redis中value的序列化方式
        config = config.serializeValuesWith(
                RedisSerializationContext.SerializationPair.fromSerializer(new GenericJackson2JsonRedisSerializer())
        );

        // 将YAML配置文件中的东西也拿过来    不使用下面这种配置覆盖的话,那么会导致YAML中的配置失效
        if (redisProperties.getTimeToLive() != null) {
            config = config.entryTtl(redisProperties.getTimeToLive());
        }
        if (redisProperties.getKeyPrefix() != null) {
            config = config.prefixCacheNameWith(redisProperties.getKeyPrefix());
        }
        if (!redisProperties.isCacheNullValues()) {
            config = config.disableCachingNullValues();
        }
        if (!redisProperties.isUseKeyPrefix()) {
            config = config.disableKeyPrefix();
        }

        return config;
    }
}
4、要使用的注解:含义和前面的EhCache差不多
@Cacheable: Triggers cache population. 触发缓存添加数据操作	有则返回缓存中数据,无则把方法查询结果放入缓存

@CacheEvict: Triggers cache eviction.触发删除缓存数据操作

@CachePut: Updates the cache without interfering with the method execution.不影响方法执行的更新缓存数据

@Caching: Regroups multiple cache operations to be applied on a method.组合式注解,可根据需要包含上面所有缓存操作

@CacheConfig: Shares some common cache-related settings at class-level.缓存公共配置操作
原理
1、CacheAutoConfiguration
package org.springframework.boot.autoconfigure.cache;


@Configuration(proxyBeanMethods = false)
@ConditionalOnClass(CacheManager.class)
@ConditionalOnBean(CacheAspectSupport.class)
@ConditionalOnMissingBean(value = CacheManager.class, name = "cacheResolver")
@EnableConfigurationProperties(CacheProperties.class)
@AutoConfigureAfter({ CouchbaseDataAutoConfiguration.class, HazelcastAutoConfiguration.class,
		HibernateJpaAutoConfiguration.class, RedisAutoConfiguration.class })
@Import({ CacheConfigurationImportSelector.class, CacheManagerEntityManagerFactoryDependsOnPostProcessor.class })
public class CacheAutoConfiguration {

	static class CacheConfigurationImportSelector implements ImportSelector {

		@Override
		public String[] selectImports(AnnotationMetadata importingClassMetadata) {
			CacheType[] types = CacheType.values();
			String[] imports = new String[types.length];
			for (int i = 0; i < types.length; i++) {
                // 导入缓存类型
				imports[i] = CacheConfigurations.getConfigurationClass(types[i]);
			}
			return imports;
		}

    }
}
2、CacheConfigurations
package org.springframework.boot.autoconfigure.cache;


final class CacheConfigurations {

	private static final Map<CacheType, Class<?>> MAPPINGS;

    // 初始化各种缓存类型	本文使用的是Redis
	static {
		Map<CacheType, Class<?>> mappings = new EnumMap<>(CacheType.class);
		mappings.put(CacheType.GENERIC, GenericCacheConfiguration.class);
		mappings.put(CacheType.EHCACHE, EhCacheCacheConfiguration.class);
		mappings.put(CacheType.HAZELCAST, HazelcastCacheConfiguration.class);
		mappings.put(CacheType.INFINISPAN, InfinispanCacheConfiguration.class);
		mappings.put(CacheType.JCACHE, JCacheCacheConfiguration.class);
		mappings.put(CacheType.COUCHBASE, CouchbaseCacheConfiguration.class);
        // Redis缓存类型
		mappings.put(CacheType.REDIS, RedisCacheConfiguration.class);
		mappings.put(CacheType.CAFFEINE, CaffeineCacheConfiguration.class);
		mappings.put(CacheType.SIMPLE, SimpleCacheConfiguration.class);
		mappings.put(CacheType.NONE, NoOpCacheConfiguration.class);
		MAPPINGS = Collections.unmodifiableMap(mappings);
	}


	static String getConfigurationClass(CacheType cacheType) {
		Class<?> configurationClass = MAPPINGS.get(cacheType);
		Assert.state(configurationClass != null, () -> "Unknown cache type " + cacheType);
		return configurationClass.getName();
	}
}
3、RedisCacheConfiguration
/*
 * Copyright 2012-2020 the original author or authors.
 *
 * Licensed under the Apache License, Version 2.0 (the "License");
 * you may not use this file except in compliance with the License.
 * You may obtain a copy of the License at
 *
 *      https://www.apache.org/licenses/LICENSE-2.0
 *
 * Unless required by applicable law or agreed to in writing, software
 * distributed under the License is distributed on an "AS IS" BASIS,
 * WITHOUT WARRANTIES OR CONDITIONS OF ANY KIND, either express or implied.
 * See the License for the specific language governing permissions and
 * limitations under the License.
 */

package org.springframework.boot.autoconfigure.cache;

import java.util.LinkedHashSet;
import java.util.List;

import org.springframework.beans.factory.ObjectProvider;
import org.springframework.boot.autoconfigure.AutoConfigureAfter;
import org.springframework.boot.autoconfigure.cache.CacheProperties.Redis;
import org.springframework.boot.autoconfigure.condition.ConditionalOnBean;
import org.springframework.boot.autoconfigure.condition.ConditionalOnClass;
import org.springframework.boot.autoconfigure.condition.ConditionalOnMissingBean;
import org.springframework.boot.autoconfigure.data.redis.RedisAutoConfiguration;
import org.springframework.cache.CacheManager;
import org.springframework.context.annotation.Bean;
import org.springframework.context.annotation.Conditional;
import org.springframework.context.annotation.Configuration;
import org.springframework.core.io.ResourceLoader;
import org.springframework.data.redis.cache.RedisCacheManager;
import org.springframework.data.redis.cache.RedisCacheManager.RedisCacheManagerBuilder;
import org.springframework.data.redis.connection.RedisConnectionFactory;
import org.springframework.data.redis.serializer.JdkSerializationRedisSerializer;
import org.springframework.data.redis.serializer.RedisSerializationContext.SerializationPair;

/**
 * Redis cache configuration.
 *
 * @author Stephane Nicoll
 * @author Mark Paluch
 * @author Ryon Day
 */
@Configuration(proxyBeanMethods = false)
@ConditionalOnClass(RedisConnectionFactory.class)
@AutoConfigureAfter(RedisAutoConfiguration.class)
@ConditionalOnBean(RedisConnectionFactory.class)
@ConditionalOnMissingBean(CacheManager.class)
@Conditional(CacheCondition.class)
class RedisCacheConfiguration {

	@Bean
	RedisCacheManager cacheManager(CacheProperties cacheProperties, CacheManagerCustomizers cacheManagerCustomizers,
			ObjectProvider<org.springframework.data.redis.cache.RedisCacheConfiguration> redisCacheConfiguration,
			ObjectProvider<RedisCacheManagerBuilderCustomizer> redisCacheManagerBuilderCustomizers,
			RedisConnectionFactory redisConnectionFactory, ResourceLoader resourceLoader) {

		RedisCacheManagerBuilder builder = RedisCacheManager.builder(redisConnectionFactory).cacheDefaults(
				determineConfiguration(cacheProperties, redisCacheConfiguration, resourceLoader.getClassLoader()));
		List<String> cacheNames = cacheProperties.getCacheNames();
		if (!cacheNames.isEmpty()) {
			builder.initialCacheNames(new LinkedHashSet<>(cacheNames));
		}

		redisCacheManagerBuilderCustomizers.orderedStream().forEach((customizer) -> customizer.customize(builder));

		return cacheManagerCustomizers.customize(builder.build());
	}

	private org.springframework.data.redis.cache.RedisCacheConfiguration determineConfiguration(
			CacheProperties cacheProperties,
			ObjectProvider<org.springframework.data.redis.cache.RedisCacheConfiguration> redisCacheConfiguration,
			ClassLoader classLoader) {

		return redisCacheConfiguration.getIfAvailable(() -> createConfiguration(cacheProperties, classLoader));
	}

    /**
     *	上面自定义配置就是使用这里的内容进行更改的
     */
	private org.springframework.data.redis.cache.RedisCacheConfiguration createConfiguration(
			CacheProperties cacheProperties, ClassLoader classLoader) {

		Redis redisProperties = cacheProperties.getRedis();
		org.springframework.data.redis.cache.RedisCacheConfiguration config = org.springframework.data.redis.cache.RedisCacheConfiguration
				.defaultCacheConfig();

		config = config.serializeValuesWith(
				SerializationPair.fromSerializer(new JdkSerializationRedisSerializer(classLoader)));

		if (redisProperties.getTimeToLive() != null) {
			config = config.entryTtl(redisProperties.getTimeToLive());
		}
		if (redisProperties.getKeyPrefix() != null) {
			config = config.prefixCacheNameWith(redisProperties.getKeyPrefix());
		}
		if (!redisProperties.isCacheNullValues()) {
			config = config.disableCachingNullValues();
		}
		if (!redisProperties.isUseKeyPrefix()) {
			config = config.disableKeyPrefix();
		}

		return config;
	}

}
Spring Cache的一些问题
1)、读模式
- 缓存穿透:查询一个null数据。解决方案:缓存空数据,可通过
spring.cache.redis.cache-null-values=true - 缓存击穿:大量并发进来同时查询一个正好过期的数据。解决方案:加锁 ? 默认是无加锁的;,使用
sync = true属性来解决击穿问题 - 缓存雪崩:大量的key同时过期。解决:加随机时间。加上过期时间
2)、写模式:(缓存与数据库一致)
- 读写加锁
- 引入Canal,感知到MySQL的更新去更新Redis
- 读多写多,直接去数据库查询就行
3)、总结:
- 常规数据:读多写少,即时性,一致性要求不高的数据,完全可以使用Spring-Cache
- 写模式:只要缓存的数据有过期时间就足够了
- 特殊数据:特殊设计
JWT
依赖
<dependency>
  <groupId>com.auth0</groupId>
  <artifactId>java-jwt</artifactId>
  <version>4.4.0</version>
</dependency>
测试
import com.auth0.jwt.JWT;
import com.auth0.jwt.JWTVerifier;
import com.auth0.jwt.algorithms.Algorithm;
import com.auth0.jwt.interfaces.Claim;
import com.auth0.jwt.interfaces.DecodedJWT;
import org.junit.jupiter.api.Test;
import org.springframework.boot.test.context.SpringBootTest;

import java.util.Date;
import java.util.HashMap;
import java.util.Map;

/**
 * <p>
 * JWT测试
 * </p>
 *
 * <p>@author : ZiXieqing</p>
 */

@SpringBootTest
public class JwtTest {

    /**
     * 密钥
     */
    private static final String SECRET = "41327498yfduihfuie3yr789eywqrfyhefuifhsdui";

    /**
     * 生成JWT令牌
     */
    @Test
    public void createJwtTest() {
        HashMap<String, Object> claim = new HashMap<>();
        claim.put("id", 100L);
        claim.put("username", "紫邪情");

        String token = JWT.create()
                .withClaim("user", claim.toString())    // payLoad 载荷:key-value 不敏感的业务数据
                .withExpiresAt(new Date(System.currentTimeMillis() * 1000 * 3600 * 12))     // JWT 有效期
                .sign(Algorithm.HMAC256(SECRET));// sign 签名(密钥加密):验证 header + payload

        System.out.println("token = " + token);
        /*  JWT(JSON Web Token)由三部分组成
            eyJ0eXAiOiJKV1QiLCJhbGciOiJIUzI1NiJ9        // header:记录令牌类型、签名算法等  {"alg": "HS256","type":"JWT"}
            .eyJleHAiOjM2ODEyMDUxMTAwODE5MywidXNlciI6IntpZD0xMDAsIHVzZXJuYW1lPee0q-mCquaDhX0ifQ     // payload 载荷:携带不敏感的业务数据 {“id”:"username","Tom"}
            .vEvIxjJhHx3VvMhbbrz1S6COT7D4oGV4WL1KGV8XYXY    // signature 签名:防止Token被篡改(加密得来) 用head+payload+算法(secret)密钥加密
        */
    }

    /**
     * 对JWT进行解密
     */
    @Test
    public void jwtVerifyTest() {
        String token = "eyJ0eXAiOiJKV1QiLCJhbGciOiJIUzI1NiJ9" +
                ".eyJleHAiOjM2ODE5OTQ2NjYxMTM5MywidXNlciI6IntpZD0xMDAsIHVzZXJuYW1lPee0q-mCquaDhX0ifQ" +
                ".A1O6WQ4WjT4UPRfSE52-h9U8WdkGyh__9a3cuvrCIzU";

        // 通过 secret密钥 获取验证器
        JWTVerifier jwtVerifier = JWT.require(Algorithm.HMAC256(SECRET)).build();
        // 验证token
        DecodedJWT verify = jwtVerifier.verify(token);

        // 获取 head
        String header = verify.getHeader();
        System.out.println("header = " + header);   // header = eyJ0eXAiOiJKV1QiLCJhbGciOiJIUzI1NiJ9¥
        // 获取 payload
        String payload = verify.getPayload();
        System.out.println("payload = " + payload); // payload = eyJleHAiOjM2ODE5OTQ2NjYxMTM5MywidXNlciI6IntpZD0xMDAsIHVzZXJuYW1lPee0q-mCquaDhX0ifQ
        // 获取 signature
        String signature = verify.getSignature();
        System.out.println("signature = " + signature); // signature = A1O6WQ4WjT4UPRfSE52-h9U8WdkGyh__9a3cuvrCIzU

        // 获取所以 payload 载荷
        Map<String, Claim> claims = verify.getClaims();
        // 获取payload中指定key的value
        Claim claim = claims.get("user");
        System.out.println("claim = " + claim); // claim = com.auth0.jwt.impl.JsonNodeClaim@77d381e6
        System.out.println("claim.asString() = " + claim.asString());   // claim.asString() = {id=100, username=紫邪情}

        // JWTParser jwtParser = new JWTParser();
        // jwtParser.parseHeader(String json);      // 解析header
        // jwtParser.parsePayload(String json)        // 解析载荷payload
    }
}
集成 Apache Shiro
介绍
Apache Shiro官网:https://shiro.apache.org/
Github地址:https://github.com/apache/shiro
git clone https://github.com/apache/shiro.git

git checkout shiro-root-版本号
Apache Shiro 是一款 Java 安全框架,不依赖任何容器,可以运行在 Java SE 和 Java EE 项目中,它的主要作用是用来做身份认证、授权、会话管理、缓存和加密等操作
和Spring Security的作用大概是一致的,但Spring Security由于其功能丰富而复杂,多用在大型项目中,而Shiro则适用于中小型项目中,上手快
提示
本内容中采用的环境是 SpringBoot 2.3.12.RELEASE + JDK8 + shiro-spring 1.13.0
SpringBoot 3.x + JDK17 + shiro-spring 2.x 尝鲜时总会出现一些乱七八糟的问题,解决起来麻烦得要死,所以我就降了版本
核心组件
1)Subject(用户):当前的操作用户,通过Subject currentUser = SecurityUtils.getSubject()获取
2)SecurityManager(安全管理器):Shiro 的核心部分,负责安全认证与授权
3)Realms(数据源):充当与安全管理间的桥梁,查找数据源进行验证和授权操作
4)Authenticator(认证器):用于认证,从 Realm 数据源取得数据之后执行认证流程处理。AuthenticationInfo存储用户的角色信息集合,核心方法是doGetAuthenticationInfo
5)Authorizer(授权器):用户访问控制授权,决定用户是否拥有执行指定操作的权限。AuthorizationInfo存储角色的权限信息集合,核心方法是doGetAuthorizationInfo
6)SessionManager(会话管理器):支持会话管理
7)CacheManager(缓存管理器):用于缓存认证授权信息
8)Cryptography(加密组件):提供了加密解密的工具包,用于密码的加密
Shiro认证:ini方式
依赖
    <!-- shiro-spring 2.x 对应 SpringBoot 3.x -->
    <dependency>
      <groupId>org.apache.shiro</groupId>
      <artifactId>shiro-spring</artifactId>
      <version>1.13.0</version>
    </dependency>
    <dependency>
      <groupId>org.springframework.boot</groupId>
      <artifactId>spring-boot-starter-web</artifactId>
    </dependency>
    <dependency>
      <groupId>org.springframework.boot</groupId>
      <artifactId>spring-boot-starter-test</artifactId>
    </dependency>

    <dependency>
      <groupId>org.mybatis.spring.boot</groupId>
      <artifactId>mybatis-spring-boot-starter</artifactId>
      <version>2.2.2</version>
    </dependency>
    <dependency>
      <groupId>mysql</groupId>
      <artifactId>mysql-connector-java</artifactId>
      <!-- <version>5.1.47</version> -->
    </dependency>
    <dependency>
      <groupId>com.alibaba</groupId>
      <artifactId>druid-spring-boot-starter</artifactId>
      <version>1.2.15</version>
    </dependency>

    <dependency>
      <groupId>org.projectlombok</groupId>
      <artifactId>lombok</artifactId>
    </dependency>
ini文件配置
# 中括号用来标记类型     该处为:标记用户信息
[users]
紫邪情=072413
测试
import lombok.extern.log4j.Log4j2;
import org.apache.shiro.SecurityUtils;
import org.apache.shiro.authc.UsernamePasswordToken;
import org.apache.shiro.mgt.DefaultSecurityManager;
import org.apache.shiro.realm.text.IniRealm;
import org.apache.shiro.subject.Subject;
import org.junit.jupiter.api.Test;
import org.springframework.boot.test.context.SpringBootTest;

/**
 * <p>
 * 测试
 * </p>
 *
 * <p>@author : ZiXieqing</p>
 */
@Log4j2
@SpringBootTest
public class ApiTest {

    /**
     * shiro认证  ini方式
     */
    @Test
    void authIniTest() {
        // 安全管理器
        DefaultSecurityManager securityManager = new DefaultSecurityManager();
        SecurityUtils.setSecurityManager(securityManager);

        // 设置 Realm 数据源
        IniRealm iniRealm = new IniRealm("classpath:shiro-auth.ini");
        securityManager.setRealm(iniRealm);

        // 获取 Subject
        Subject subject = SecurityUtils.getSubject();

        // 登录
        log.info("============未登录前的状态:{}=====================", subject.isAuthenticated());     // false
        UsernamePasswordToken token = new UsernamePasswordToken("紫邪情", "072413");
        subject.login(token);
        log.info("============登录后的状态:{}=====================", subject.isAuthenticated());      // true

        subject.logout();
        log.info("============退出后的状态:{}=====================", subject.isAuthenticated());      // false
    }
}
分析源码
给 subject.login(token); 打断点,DEBUG启动
进入了 DelegatingSubject,本质就是 Subject,且利用了 SecurityManager
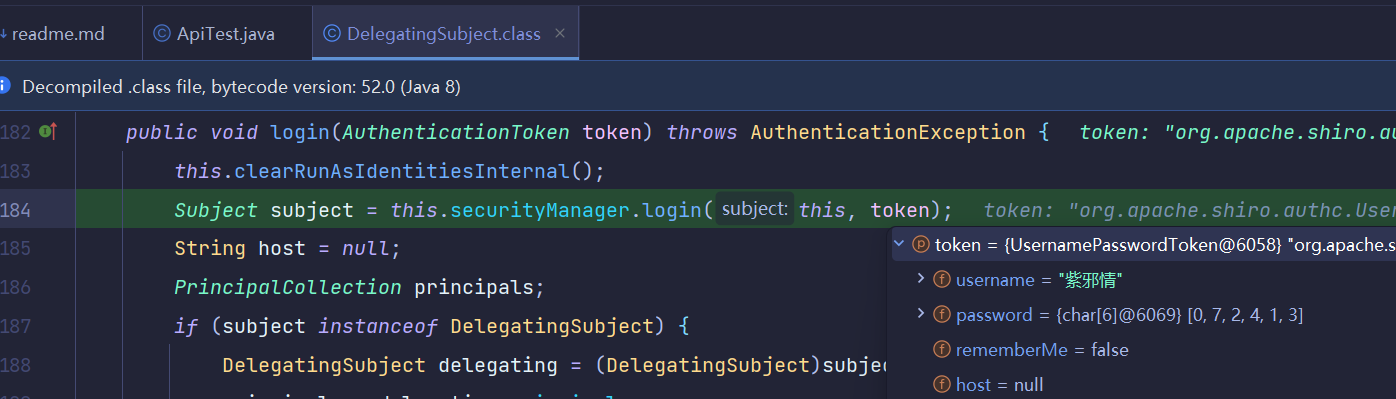
利用 DefaultSecurityManager 【这玩意儿是我们自己new的】 获取 AuthenticationInfo 这玩意儿存储了认证信息
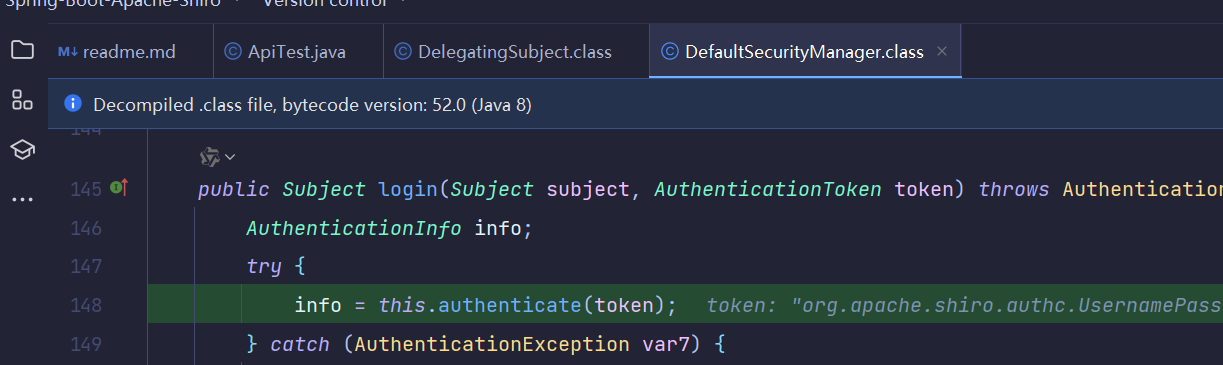
开始去做 认证的事情
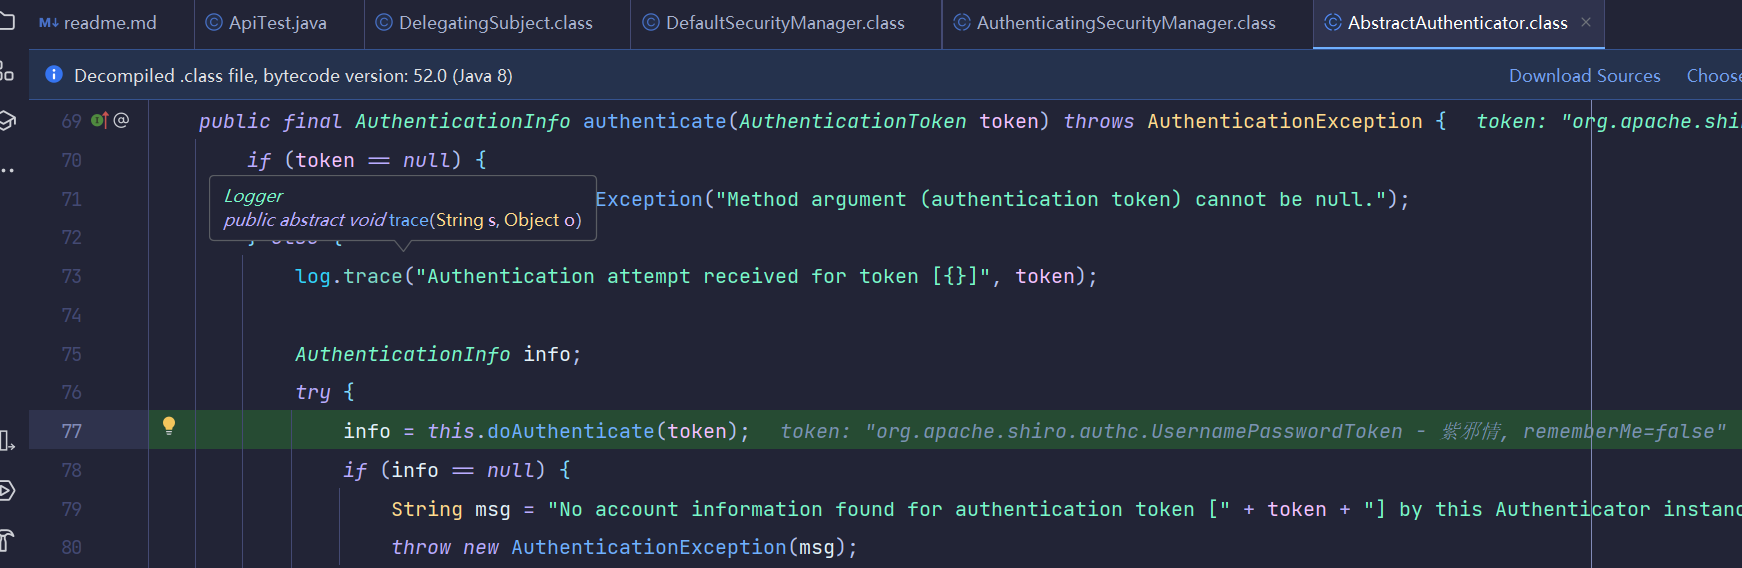
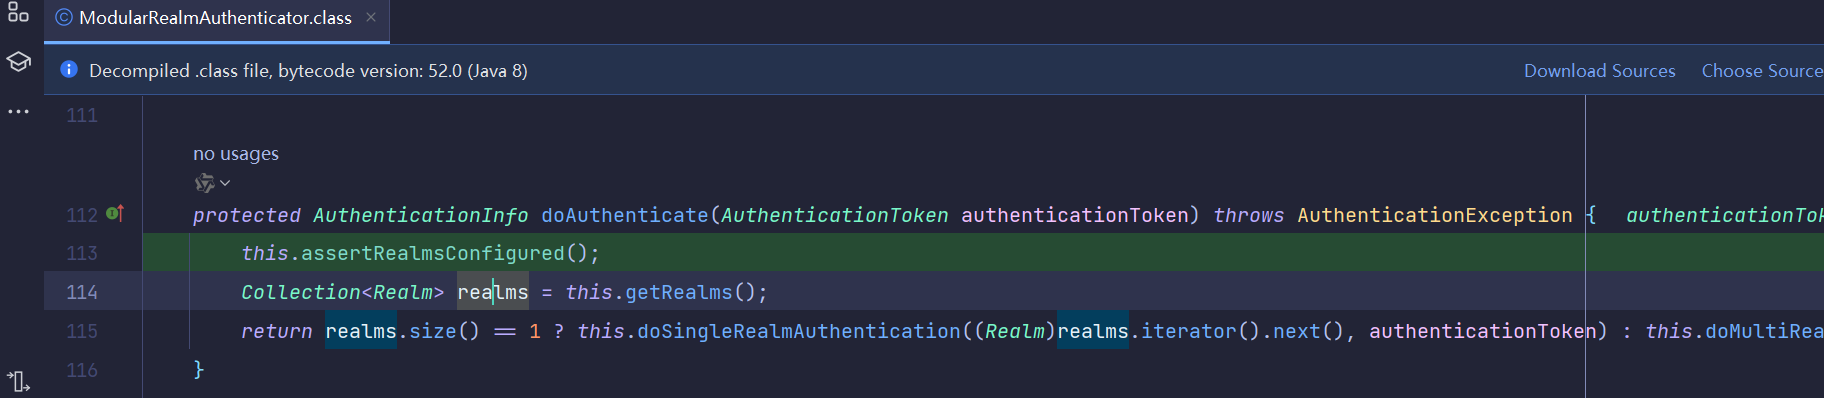
可以看到是利用了 ModularRealmAuthenticator【本质就是 Authenticator 认证器】 去做认证的事 可以看到 先获取 Realms【数据源】,然后根据获取的 Realms 数量走不同逻辑【目前ini文件是单个,因此看 doSingleRealmAuthentication 即可】
获取 AuthenticationInfo
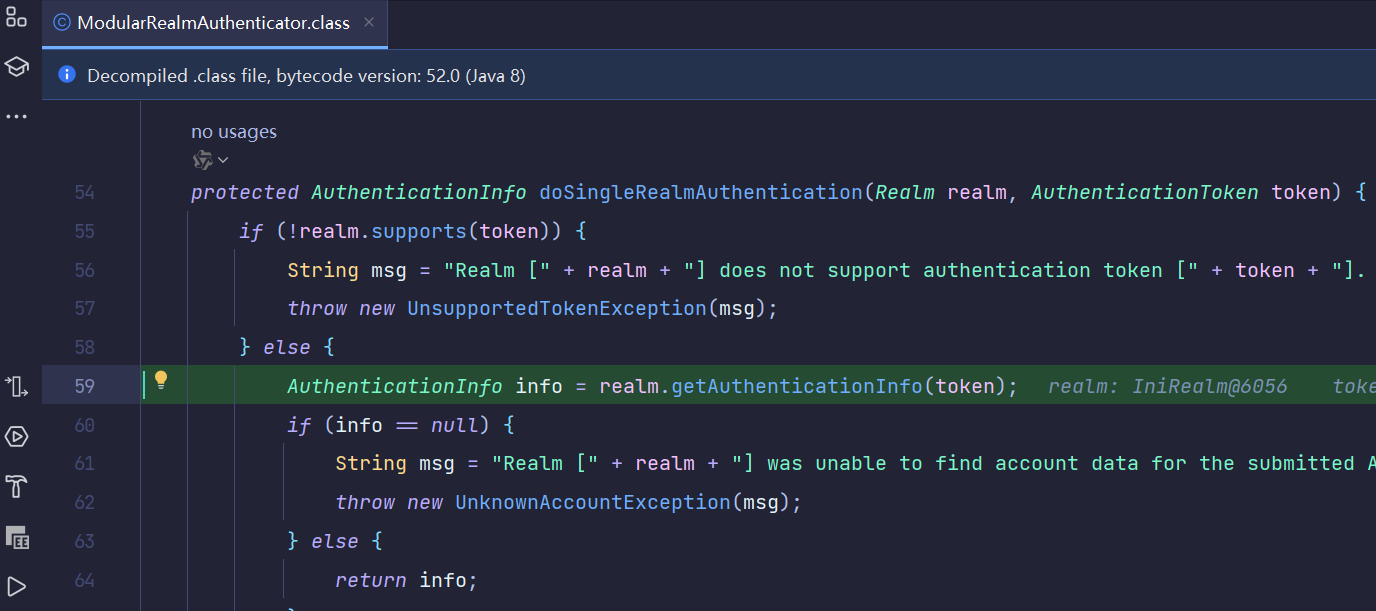
真正获取 AuthenticationInfo 的地方
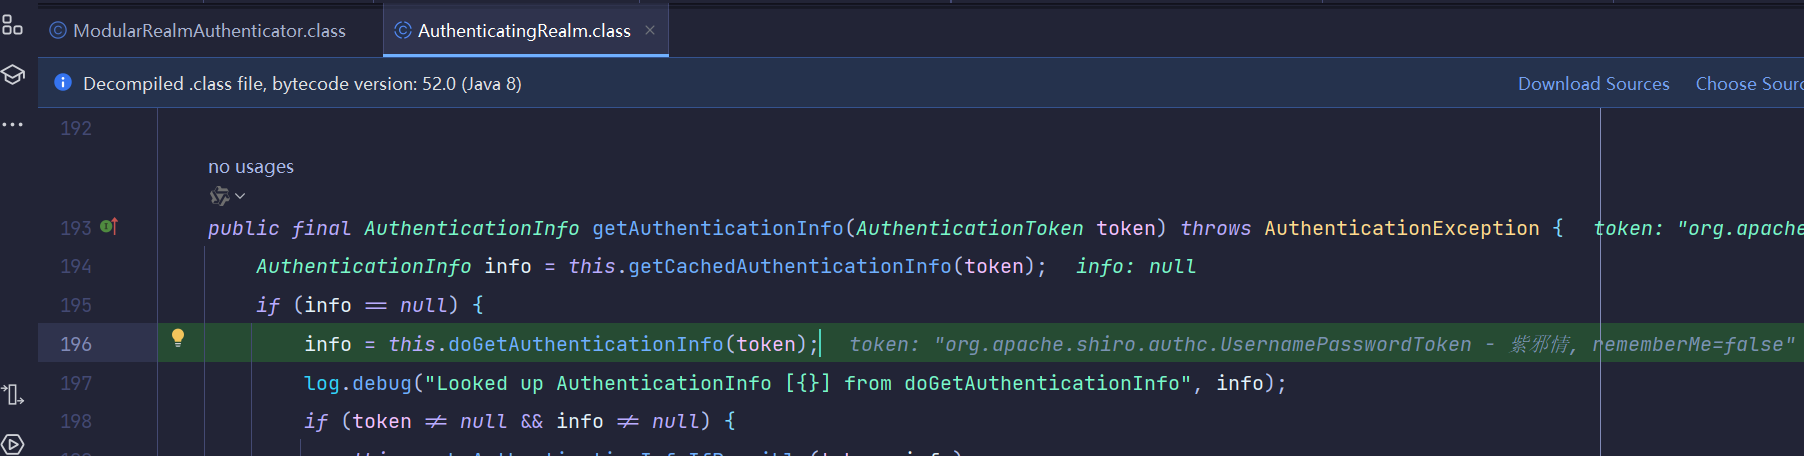
可以看到就是通过 xxxxRealm.doGetAuthenticationInfo(AuthenticationToken token) 获取AuthenticationInfo的
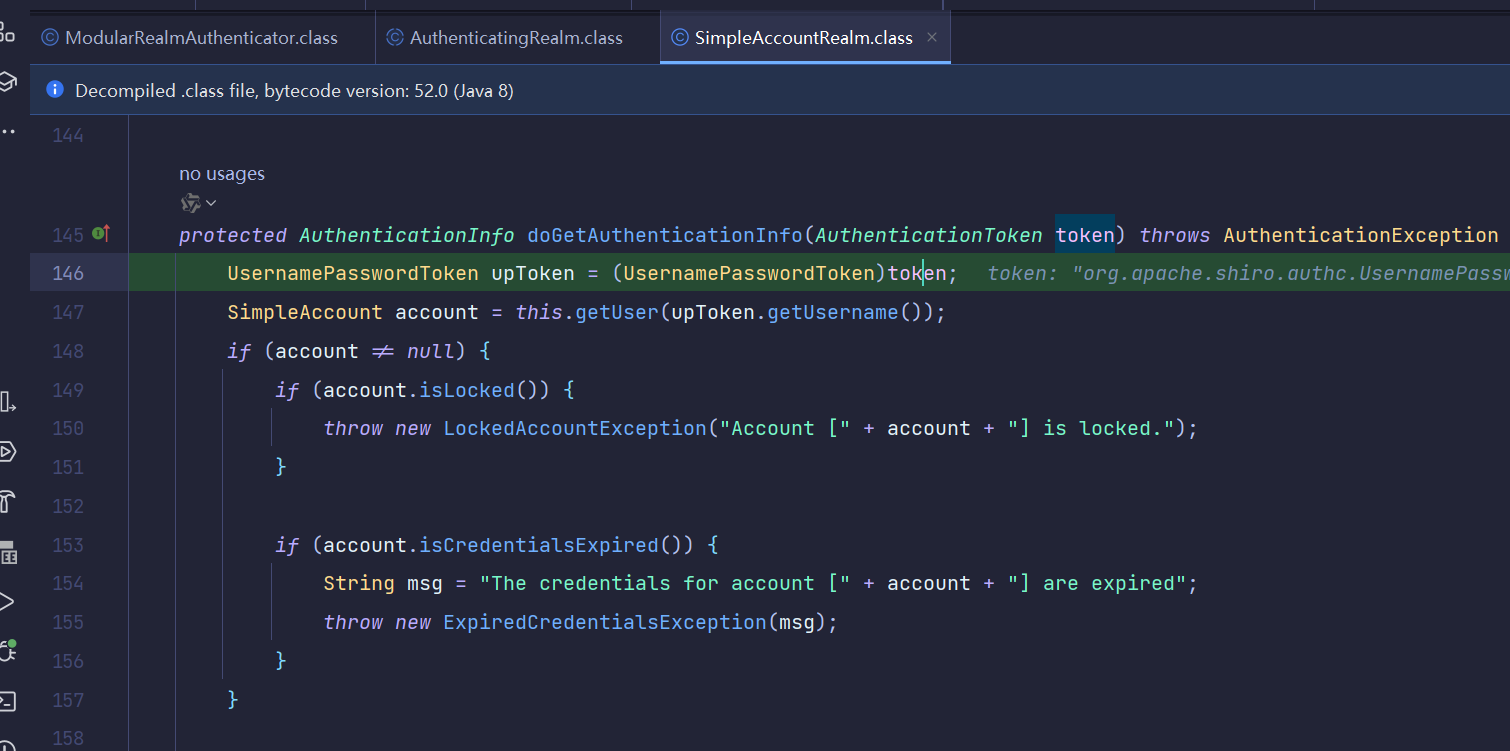
而 xxxxRealm 就是 extends AuthorizingRealm,至于 doGetAuthenticationInfo(AuthenticationToken token) 也是 AuthorizingRealm 中的

总结:shiro认证大体流程
Subject ——》SecurityManager ——》Authenticator ——》获取 Realms ——》 获取 AuthenticationInfo ——》
xxxxRealm.doGetAuthenticationInfo(AuthenticationToken token)获取AuthenticationInfo
shiro认证:自定义Realm
YAML配置
server:
  port: 8732

spring:
  datasource:
    type: com.alibaba.druid.pool.DruidDataSource
    driver-class-name: com.mysql.jdbc.Driver
    url: jdbc:mysql://localhost:3306/spring-boot-study?useUnicode=true&characterEncoding=utf-8&useSSL=false
    username: root
    password: zixieqing072413

mybatis:
  type-aliases-package: com.zixq.shiro.authentication.entity
  configuration:
    map-underscore-to-camel-case: true  # 开启驼峰命名映射  否则可能出现表和实体类对应时为null
自定义Realm
import com.zixq.shiro.authentication.entity.UserEntity;
import com.zixq.shiro.authentication.mapper.UserMapper;
import lombok.extern.log4j.Log4j2;
import org.apache.shiro.authc.*;
import org.apache.shiro.authz.AuthorizationInfo;
import org.apache.shiro.realm.AuthorizingRealm;
import org.apache.shiro.subject.PrincipalCollection;
import org.springframework.beans.factory.annotation.Autowired;

/**
 * <p>
 * 自定义 Realm
 * </p>
 *
 * <p>@author : ZiXieqing</p>
 */
@Log4j2
public class UserRealm extends AuthorizingRealm {

    @Autowired
    private UserMapper userMapper;

    // 授权   角色权限
    @Override
    protected AuthorizationInfo doGetAuthorizationInfo(PrincipalCollection principalCollection) {
        return null;
    }


    // 认证
    @Override
    protected AuthenticationInfo doGetAuthenticationInfo(AuthenticationToken token) throws AuthenticationException {

        UsernamePasswordToken upToken = (UsernamePasswordToken) token;
        String username = upToken.getUsername();
        String password = new String((char[]) upToken.getPassword());

        log.info("===============用户:{},进入了:{}#doGetAuthenticationInfo() 进行认证,密码为:{}================",
                username, this.getClass().getName(), password);

        UserEntity userEntity = userMapper.selectByUname(username);

        if (userEntity == null) {
            throw new UnknownAccountException("用户不存在");
        }
        if (password.equals(userEntity.getPassword())) {
            throw new IncorrectCredentialsException("用户名或密码错误");
        }

        log.info("==================认证完成=====================");

        // 存储认证信息   若不需要使用Redis来缓存,那么principal可以不放userEntity,而是username
        return new SimpleAuthenticationInfo(userEntity, password, userEntity.getId().toString());
    }
}
shiro config编写:将自定义Realm、SecurityManager串联起来
import com.zixq.shiro.authentication.realm.UserRealm;
import org.apache.shiro.spring.web.ShiroFilterFactoryBean;
import org.apache.shiro.web.mgt.DefaultWebSecurityManager;
import org.springframework.context.annotation.Bean;
import org.springframework.context.annotation.Configuration;

import java.util.LinkedHashMap;

/**
 * <p>
 * shiro配置
 *  配置:Realm、SecurityManager、ShiroFilterFactoryBean【根据业务情况选择】
 * </p>
 *
 * <p>@author : ZiXieqing</p>
 */
@Configuration
public class ShiroConfig {

    @Bean
    public ShiroFilterFactoryBean filterFactoryBean() {
        ShiroFilterFactoryBean filterFactoryBean = new ShiroFilterFactoryBean();
        filterFactoryBean.setSecurityManager(securityManager());
        // 未登录用户则进入登录页
        filterFactoryBean.setLoginUrl("/login");
        // 登录成功跳转的页面
        filterFactoryBean.setSuccessUrl("/index");
        /* 配置不起作用
         * 因为shiro源代码中判断了filter是否为AuthorizationFilter,只有perms,roles,ssl,rest,port才是属于AuthorizationFilter
         * 而anon,authcBasic,auchc,user是AuthenticationFilter,所以unauthorizedUrl设置后不起作用
         *
         * 解决方式:在全局异常中捕获 AuthorizationException ,然后返回指定页面即可
         *  */
        // 未授权跳转的页面
        filterFactoryBean.setUnauthorizedUrl("/403");

        // 过滤器链     编写顺序很重要,是依次执行的     所以要注意
        LinkedHashMap<String, String> filterChainMap = new LinkedHashMap<>();
        /* 常用 authc、anno   对应的是不同的过滤器  具体的可以在 org.apache.shiro.web.filter.mgt.DefaultFilter 中查看
        *
        * authc     只有认证了才能访问
        * anno      无需认证即可访问
        * perm      具有“记住我”功能才能用
        * roles     具有对应的角色才可访问
        * user      是对应的操作用户才可访问
        *
        *  */
        filterChainMap.put("/sys/*", "authc");
        filterFactoryBean.setFilterChainDefinitionMap(filterChainMap);

        return filterFactoryBean;
    }

    @Bean
    public DefaultWebSecurityManager securityManager() {
        DefaultWebSecurityManager securityManager = new DefaultWebSecurityManager();
        securityManager.setRealm(userRealm());

        return securityManager;
    }

    @Bean
    public UserRealm userRealm() {
        return new UserRealm();
    }
}
controller
import com.zixq.shiro.authentication.entity.Result;
import com.zixq.shiro.authentication.util.MD5Utils;
import org.apache.shiro.SecurityUtils;
import org.apache.shiro.authc.IncorrectCredentialsException;
import org.apache.shiro.authc.UnknownAccountException;
import org.apache.shiro.authc.UsernamePasswordToken;
import org.apache.shiro.subject.Subject;
import org.springframework.web.bind.annotation.PostMapping;
import org.springframework.web.bind.annotation.RequestMapping;
import org.springframework.web.bind.annotation.RestController;

/**
 * <p>
 * user controller
 * </p>
 *
 * <p>@author : ZiXieqing</p>
 */
@RestController
@RequestMapping("user")
public class UserController {

    @PostMapping("/login")
    public Result login(String username, String password) {

        Subject subject = SecurityUtils.getSubject();

        if (!subject.isAuthenticated()) {
            // 加密密码
            password = MD5Utils.encrypt(username, password);
            try {
                UsernamePasswordToken token = new UsernamePasswordToken(username, password);
                subject.login(token);
            } catch (UnknownAccountException e) {
                return Result.error(e.getMessage());
            } catch (IncorrectCredentialsException e) {
                return Result.error(e.getMessage());
            }
        }

        return Result.success(username + ":认证成功");
    }
}
MD5工具类
import org.apache.shiro.crypto.hash.SimpleHash;
import org.apache.shiro.util.ByteSource;

/**
 * 加密工具类		shiro中快速加密MD5Pwd API就使用的是SimpleHash类
 *
 * shiro中加密流程:程序将明文通过加密方式加密,存到数据库的是密文,
 * 				  登录时将密文取出来,再通过shiro将用户输入的密码进行加密对比,一样则成功,不一样则失败
 * 				  但是:平时加密都是自己写的算法,所以这个功能就直接提到这里来了
 */
public class MD5Utils {

	private static final String SALT = "zixieqing";

	private static final String ALGORITH_NAME = "md5";

	/**
	 * 迭代次数	类似 MD5(MD5),依次类推	次数越多越复杂越不易被破解
	 */
	private static final int HASH_ITERATIONS = 2;

	public static String encrypt(String pswd) {
		return new SimpleHash(ALGORITH_NAME, pswd, ByteSource.Util.bytes(SALT), HASH_ITERATIONS).toHex();
	}

	public static String encrypt(String username, String pswd) {

		return new SimpleHash(
				ALGORITH_NAME,
				pswd,
				ByteSource.Util.bytes(username + SALT),
				HASH_ITERATIONS
		).toHex();
	}
}
shiro 授权:ini方式
ini配置文件
[users]
紫邪情=072413,dev
# 权限表达式     资源:操作   * 代码所有      多个用 逗号, 隔开
[roles]
dev==user:select,user:delete
测试
import lombok.extern.log4j.Log4j2;
import org.apache.shiro.SecurityUtils;
import org.apache.shiro.authc.UsernamePasswordToken;
import org.apache.shiro.mgt.DefaultSecurityManager;
import org.apache.shiro.realm.text.IniRealm;
import org.apache.shiro.subject.Subject;
import org.junit.jupiter.api.Test;
import org.springframework.boot.test.context.SpringBootTest;

import java.util.LinkedList;

/**
 * <p>
 * 测试
 * </p>
 *
 * <p>@author : ZiXieqing</p>
 */

@Log4j2
@SpringBootTest
public class ApiTest {

    @Test
    void authorizationIniTest() {
        // 安全管理器
        DefaultSecurityManager securityManager = new DefaultSecurityManager();
        SecurityUtils.setSecurityManager(securityManager);

        // 设置 Realm
        IniRealm iniRealm = new IniRealm("classpath:shiro-auth.ini");
        securityManager.setRealm(iniRealm);

        // 获取 Subject
        Subject subject = SecurityUtils.getSubject();

        // 登录
        UsernamePasswordToken token = new UsernamePasswordToken("紫邪情", "072413");
        subject.login(token);

        LinkedList<String> roles = new LinkedList<>();
        roles.add("admin");
        roles.add("dev");

        log.info("==========授权校验======={}============",
                subject.isPermitted("user:select","user:delete","user:add"));    // [true, true, false]

        log.info("======角色校验======={}================", subject.hasRoles(roles));       // [false, true]
    }
}
shiro 授权:自定义Realm
YAML配置:和上面认证的配置一样
自定义 Realm
import com.zixq.shiro.authorization.entity.PermissionEntity;
import com.zixq.shiro.authorization.entity.RoleEntity;
import com.zixq.shiro.authorization.entity.UserEntity;
import com.zixq.shiro.authorization.mapper.UserMapper;
import lombok.extern.log4j.Log4j2;
import org.apache.shiro.SecurityUtils;
import org.apache.shiro.authc.*;
import org.apache.shiro.authz.AuthorizationInfo;
import org.apache.shiro.authz.SimpleAuthorizationInfo;
import org.apache.shiro.realm.AuthorizingRealm;
import org.apache.shiro.subject.PrincipalCollection;
import org.springframework.beans.factory.annotation.Autowired;

import java.util.LinkedHashSet;
import java.util.List;

/**
 * <p>
 * 自定义 Realm
 * </p>
 *
 * <p>@author : ZiXieqing</p>
 */
@Log4j2
public class UserRealm extends AuthorizingRealm {

    @Autowired
    private UserMapper userMapper;

    // 授权   角色权限
    @Override
    protected AuthorizationInfo doGetAuthorizationInfo(PrincipalCollection principalCollection) {

        SimpleAuthorizationInfo authorizationInfo = new SimpleAuthorizationInfo();

        UserEntity userEntity = (UserEntity) SecurityUtils.getSubject().getPrincipal();

        // UserEntity userEntity = userMapper.selectByUname(username);

        log.info("========授权校验==============用户:{},进入了:{},进行授权校验",
                userEntity.getUsername(), this.getClass().getName());

        // 获取角色信息
        List<RoleEntity> roleList = userMapper.selectRoleByUid(userEntity.getId());
        LinkedHashSet<String> roleSet = new LinkedHashSet<>();
        for (RoleEntity roleEntity : roleList) {
            roleSet.add(roleEntity.getRoleName());
        }

        // 获取权限信息
        List<PermissionEntity> permissionList = userMapper.selectPermissionByUid(userEntity.getId());
        LinkedHashSet<String> permissionSet = new LinkedHashSet<>();
        for (PermissionEntity permissionEntity : permissionList) {
            permissionSet.add(permissionEntity.getPName());
        }

        // 添加角色信息
        authorizationInfo.setRoles(roleSet);
        // 添加权限信息
        authorizationInfo.setStringPermissions(permissionSet);

        log.info("================授权校验完成,并已存入authorizationInfo中====================");

        return authorizationInfo;
    }


    // 认证
    @Override
    protected AuthenticationInfo doGetAuthenticationInfo(AuthenticationToken token) throws AuthenticationException {

        UsernamePasswordToken upToken = (UsernamePasswordToken) token;
        String username = upToken.getUsername();
        String password = new String((char[]) upToken.getPassword());

        log.info("===============用户:{},进入了:{}#doGetAuthenticationInfo() 进行认证,密码为:{}================",
                username, this.getClass().getName(), password);

        UserEntity userEntity = userMapper.selectByUname(username);

        if (userEntity == null) {
            throw new UnknownAccountException("用户不存在");
        }
        if (password.equals(userEntity.getPassword())) {
            throw new IncorrectCredentialsException("用户名或密码错误");
        }

        log.info("==================认证完成=====================");

        // 存储认证信息   若不需要使用Redis来缓存,那么principal可以不放userEntity,而是username
        return new SimpleAuthenticationInfo(userEntity, password, userEntity.getId().toString());
    }
}
shiro config配置
import com.zixq.shiro.authorization.realm.UserRealm;
import lombok.extern.log4j.Log4j2;
import org.apache.shiro.spring.LifecycleBeanPostProcessor;
import org.apache.shiro.spring.security.interceptor.AuthorizationAttributeSourceAdvisor;
import org.apache.shiro.spring.web.ShiroFilterFactoryBean;
import org.apache.shiro.web.mgt.DefaultWebSecurityManager;
import org.springframework.aop.framework.autoproxy.DefaultAdvisorAutoProxyCreator;
import org.springframework.context.annotation.Bean;
import org.springframework.context.annotation.Configuration;
import org.springframework.context.annotation.DependsOn;

import java.util.LinkedHashMap;

/**
 * <p>
 * shiro配置
 *  配置:Realm、SecurityManager、ShiroFilterFactoryBean【根据业务情况选择】
 * </p>
 *
 * <p>@author : ZiXieqing</p>
 */
@Log4j2
@Configuration
public class ShiroConfig {

    @Bean
    public ShiroFilterFactoryBean filterFactoryBean() {

        // 查看shiro的初始化时间    验证是否比spring快
        log.info("========进入了:{}#filterFactoryBean()", this.getClass().getName());

        ShiroFilterFactoryBean filterFactoryBean = new ShiroFilterFactoryBean();
        filterFactoryBean.setSecurityManager(securityManager());
        // 未登录用户则进入登录页
        filterFactoryBean.setLoginUrl("/login");
        // 登录成功跳转的页面
        filterFactoryBean.setSuccessUrl("/index");
        /* 配置不起作用
         * 因为shiro源代码中判断了filter是否为AuthorizationFilter,只有perms,roles,ssl,rest,port才是属于AuthorizationFilter
         * 而anon,authcBasic,auchc,user是AuthenticationFilter,所以unauthorizedUrl设置后不起作用
         *
         * 解决方式:在全局异常中捕获 AuthorizationException ,然后返回指定页面即可
         *  */
        // 未授权跳转的页面
        filterFactoryBean.setUnauthorizedUrl("/403");

        // 过滤器链     编写顺序很重要,是依次执行的     所以要注意
        LinkedHashMap<String, String> filterChainMap = new LinkedHashMap<>();
        /* 常用 authc、anno   对应的是不同的过滤器  具体的可以在 org.apache.shiro.web.filter.mgt.DefaultFilter 中查看
         *
         * authc     只有认证了才能访问
         * anno      无需认证即可访问
         * perm      具有“记住我”功能才能用
         * roles     具有对应的角色才可访问
         * user      是对应的操作用户才可访问
         *
         *  */
        filterChainMap.put("/sys/*", "authc");
        filterFactoryBean.setFilterChainDefinitionMap(filterChainMap);

        return filterFactoryBean;
    }

    @Bean
    public DefaultWebSecurityManager securityManager() {
        DefaultWebSecurityManager securityManager = new DefaultWebSecurityManager();
        securityManager.setRealm(userRealm());

        return securityManager;
    }

    @Bean
    public UserRealm userRealm() {
        return new UserRealm();
    }


    // ================================授权配置================================
    // ======== bean(DefaultAdvisorAutoProxyCreator(可选) 和 AuthorizationAttributeSourceAdvisor)即可实现此功能 ==========

    /**
     * Shiro生命周期处理器
     */
    @Bean
    public LifecycleBeanPostProcessor lifecycleBeanPostProcessor() {
        return new LifecycleBeanPostProcessor();
    }

    /***
     * 授权所用配置:开启Shiro的注解(如@RequiresRoles、@RequiresPermissions),需借助SpringAOP扫描使用Shiro注解的类,并在必要时进行安全逻辑验证
     */
    @Bean
    @DependsOn({"lifecycleBeanPostProcessor"})
    public DefaultAdvisorAutoProxyCreator getDefaultAdvisorAutoProxyCreator() {
        DefaultAdvisorAutoProxyCreator defaultAdvisorAutoProxyCreator = new DefaultAdvisorAutoProxyCreator();
        defaultAdvisorAutoProxyCreator.setProxyTargetClass(true);
        return defaultAdvisorAutoProxyCreator;
    }

    // =====================上面两个不配置也行,我使用时没配置也可以===================

    /***
     * 使授权注解起作用 不想配置可以在pom文件中加入
     * <dependency>
     *  <groupId>org.springframework.boot</groupId>
     *  <artifactId>spring-boot-starter-aop</artifactId>
     *</dependency>
     */
    @Bean
    public AuthorizationAttributeSourceAdvisor authorizationAttributeSourceAdvisor(){
        AuthorizationAttributeSourceAdvisor authorizationAttributeSourceAdvisor = new AuthorizationAttributeSourceAdvisor();
        authorizationAttributeSourceAdvisor.setSecurityManager(securityManager());
        return authorizationAttributeSourceAdvisor;
    }
}
controller
import com.zixq.shiro.authorization.entity.Result;
import com.zixq.shiro.authorization.util.MD5Utils;
import lombok.extern.log4j.Log4j2;
import org.apache.shiro.SecurityUtils;
import org.apache.shiro.authc.IncorrectCredentialsException;
import org.apache.shiro.authc.UnknownAccountException;
import org.apache.shiro.authc.UsernamePasswordToken;
import org.apache.shiro.authz.annotation.RequiresPermissions;
import org.apache.shiro.authz.annotation.RequiresRoles;
import org.apache.shiro.subject.Subject;
import org.springframework.web.bind.annotation.*;

/**
 * <p>
 * user controller
 * </p>
 *
 * <p>@author : ZiXieqing</p>
 */
@Log4j2
@RestController
@RequestMapping("user")
public class UserController {

    @PostMapping("/login")
    public Result login(@RequestParam("username") String username,
                        @RequestParam("password") String password) {

        Subject subject = SecurityUtils.getSubject();

        if (!subject.isAuthenticated()) {
            // 加密密码
            password = MD5Utils.encrypt(username, password);
            try {
                UsernamePasswordToken token = new UsernamePasswordToken(username, password);
                subject.login(token);

                // 手动调研授权校验的API
                log.info("=======授权校验================{}", subject.isPermitted("user:select"));
            } catch (UnknownAccountException e) {
                return Result.error(e.getMessage());
            } catch (IncorrectCredentialsException e) {
                return Result.error(e.getMessage());
            }
        }

        return Result.success(username + ":认证成功");
    }

    @RequiresRoles({"dev"})     // 角色
    @RequiresPermissions({"user:select","user:update"})   // 权限
    @GetMapping("/edit")
    public Result edit() {
        return Result.success("能查询和编辑用户信息");
    }
}
测试
1)、先认证
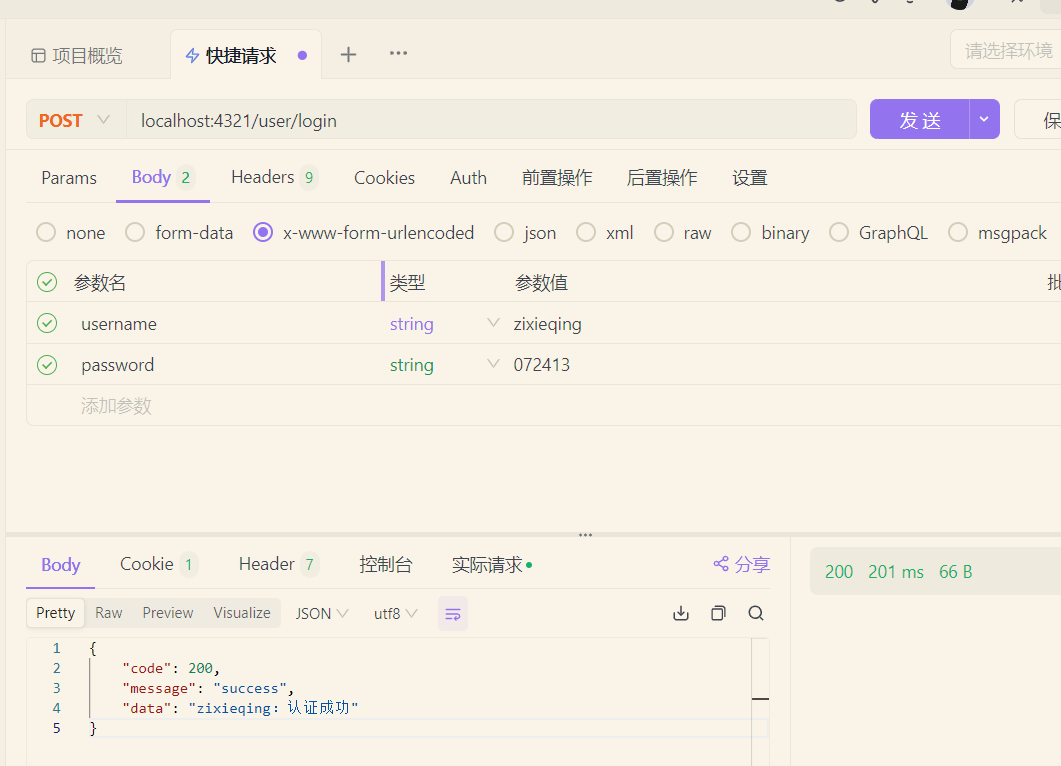
2)、再授权校验
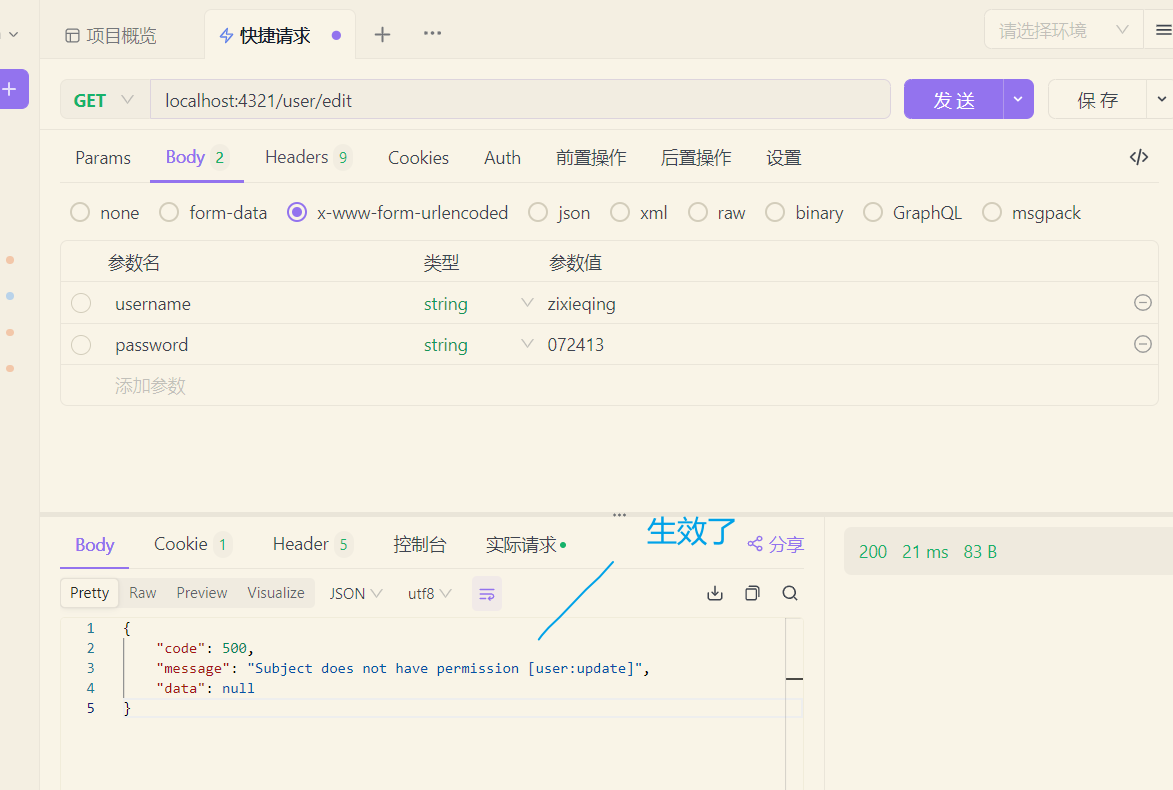
shiro使用Redis缓存
提示
当前内容是在前面认证授权的基础添加内容
依赖
    <!-- shiro-spring 2.x 对应 SpringBoot 3.x -->
    <dependency>
      <groupId>org.apache.shiro</groupId>
      <artifactId>shiro-spring</artifactId>
      <version>1.13.0</version>
      <!--  注意分析一下依赖    我这里测试通过如下方式没问题,但不排除依赖就有问题【不兼容】  -->
      <exclusions>
        <exclusion>
          <artifactId>commons-beanutils</artifactId>
          <groupId>commons-beanutils</groupId>
        </exclusion>
      </exclusions>
    </dependency>
    <!-- shiro-redis  注意版本问题  使用 shiro-redis 2.x 版本时出现了一些各种API调用的异常【不兼容】 -->
    <dependency>
      <groupId>org.crazycake</groupId>
      <artifactId>shiro-redis</artifactId>
      <version>3.1.0</version>
      <exclusions>
        <exclusion>
          <artifactId>shiro-core</artifactId>
          <groupId>org.apache.shiro</groupId>
        </exclusion>
      </exclusions>
    </dependency>
    <dependency>
      <groupId>org.springframework.boot</groupId>
      <artifactId>spring-boot-starter-data-redis</artifactId>
    </dependency>
YAML配置
server:
  port: 6575

spring:
  datasource:
    type: com.alibaba.druid.pool.DruidDataSource
    driver-class-name: com.mysql.jdbc.Driver
    url: jdbc:mysql://localhost:3306/spring-boot-study?useUnicode=true&characterEncoding=utf-8&useSSL=false
    username: root
    password: zixieqing072413
  redis:
    host: localhost
    port: 6379
    jedis:
      pool:
        max-active: 8
        max-wait: -1
        max-idle: 8
        min-idle: 0
    timeout: 0

mybatis:
  configuration:
    map-underscore-to-camel-case: true
  type-aliases-package: com.zixq.shiro.authorization.entity
shiro config:在前面认证授权的基础上加上redis相关配置,主要是利用 SecurityManager将RedisCacheManager集成进去,前面玩ini认证看源码 知道一个顺序是 Subject ——》SecurityManager ——》Realm,所以这里就好理解了
import com.zixq.shiro.redis.realm.UserRealm;
import lombok.extern.log4j.Log4j2;
import org.apache.shiro.web.mgt.DefaultWebSecurityManager;
import org.crazycake.shiro.RedisCacheManager;
import org.crazycake.shiro.RedisManager;
import org.crazycake.shiro.serializer.ObjectSerializer;
import org.springframework.context.annotation.Bean;
import org.springframework.context.annotation.Configuration;

@Log4j2
@Configuration
public class ShiroConfig {
    @Bean
    public DefaultWebSecurityManager securityManager() {
        DefaultWebSecurityManager securityManager = new DefaultWebSecurityManager();
        securityManager.setRealm(userRealm());
        // 将redis配置集成进来
        securityManager.setCacheManager(redisCacheManager());

        return securityManager;
    }


    // ============================================缓存配置===============================================
    public RedisCacheManager redisCacheManager() {
        RedisCacheManager redisCacheManager = new RedisCacheManager();
        redisCacheManager.setRedisManager(redisManager());
        // 配置缓存过期时间 单位:秒    默认:1800
        redisCacheManager.setExpire(30);
        // 设置 cache key 拼接的前缀
        redisCacheManager.setKeyPrefix("cache:");
        /* 可以篡改 value的序列化方式     shiro默认是 ObjectSerializer   即JDK序列化
         * 自定义序列化 implements RedisSerializer<T>
         * 重写  序列化 byte[] serialize(T var1) 和 反序列化 T deserialize(byte[] var1) 即可 */
        redisCacheManager.setValueSerializer(new ObjectSerializer());

        return redisCacheManager;
    }

    // 这里嫌麻烦可以直接放在上面 redisCacheManager 中new出来配置即可
    public RedisManager redisManager() {
        RedisManager redisManager = new RedisManager();
        /* 配置缓存过期时间     这个是我自己 shiro-redis 2.4.2.1-RELEASE 版本时使用的,
         * 但出现了 CacheException: tried  to access method ......returnSource() 异常
         * shiro-redis 3.x 中 这个setExpire是放到了 RedisCacheManager 中
         * */
        // redisManager.setExpire(30);

        return redisManager;
    }
}
测试
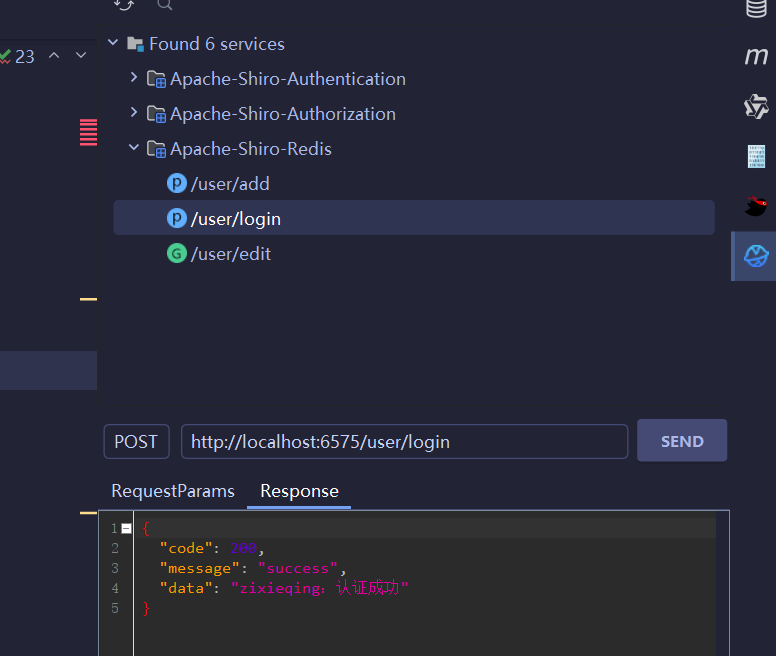
可以看到redis value的默认序列化就是JDK序列化

Spring Security
Spring Security 是一款提供认证【Authentication】、授权【Authorization】、以及针对常见(网络)攻击的防御的框架。它为保护命令式和反应式应用程序提供了一流的支持,是保护基于Spring的应用程序的事实标准
环境
Spring Boot 2.6.15 + JDK8
基本概念
认证方式
常见认证方式:
- 用户名密码认证:最基本的方式
- 基于令牌的认证:即JSON Web Token(JWT)
- 多因素认证(MFA):要求用户提供多种类型的凭证,如密码、指纹,Token
- 基于证书的认证:用户或设备必须提供一个有效的数字证书来证明其身份,证书包含用户的公钥和一些标识信息,并由受信任的证书颁发机构(CA)签发
SpringSecurity支持的认证方式:
- HTTP Basic认证:最简单的认证方式之一, Web 服务器和客户端之间进行认证的一种方式,只需要在请求头中携带相应的信息就可以认证成功。而且它是一种无状态登录,也就是 session 中并不会记录用户的登录信息。缺点:因为用户凭证(用户名/密码)只是简单的通过 Base64 编码之后就开始传送了,很容易被工具嗅探到,进而暴露用户信息。它主要适用于RESTful Web服务
- HTTP Digest认证:与Basic认证相比,Digest认证提供了更高的安全性,因为它使用摘要算法来传输凭据,而不是明文
- 表单认证:这是Web应用程序中最常见的认证方式。用户通过表单输入用户名和密码,然后这些信息被发送到服务器进行验证
- OAuth 2.0认证:一种开放标准,允许用户授权第三方应用程序访问其账户信息,而无需共享密码。常见的使用场景是社交媒体的登录。Spring Security通过集成Spring OAuth项目来支持OAuth 2.0
- OpenID Connect认证:基于OAuth 2.0的一个身份认证层,它允许应用程序通过安全的方式验证用户的身份,并获取关于用户的基本信息
- SAML 2.0认证:安全断言标记语言(SAML)是一种基于XML的开放标准,用于在身份提供者和服务提供商之间交换身份验证和授权数据。Spring Security可以与SAML 2.0兼容的身份提供商集成
- LDAP认证:轻量级目录访问协议(LDAP)是一种用于查询和修改目录服务的协议,如Active Directory。Spring Security可以通过LDAP服务器进行用户认证
- JAAS认证:Java认证和授权服务(JAAS)是Java平台的一个标准API,用于进行用户认证和访问控制。Spring Security可以与JAAS集成,以支持基于Java的认证机制
- 预身份验证:这是一种机制,其中用户的身份已经在应用程序的外部进行了验证,并且以某种方式传递给了应用程序。例如,在使用代理服务器或负载均衡器时,用户可能已经在这些组件上进行了身份验证。例如SSO. 需要继承于AbstractPreAuthenticatedProcessingFilter来获取相关认证信息进行认证
- X.509证书认证:在这种认证方式中,用户的身份通过客户端证书进行验证,该证书由受信任的证书颁发机构(CA)签发
- 自定义认证:Spring Security还允许开发人员实现自定义的认证机制,以适应特定的业务需求
授权方式
常见授权方式:
- 基于角色的访问控制(RBAC):最常见的授权方式之一。在RBAC中,权限被分配给角色,而角色则被分配给用户。例如,一个系统可能有“管理员”、“编辑”和“读者”等角色,每个角色有不同的权限集合。用户根据其被分配的角色来获得相应的权限
- 基于属性的访问控制(ABAC):访问决策基于请求者、资源、环境条件和策略的属性来动态计算的。ABAC提供了更细粒度的控制,因为它可以根据多个属性来允许或拒绝访问。例如:根据用户所属机构来授予权限
- 基于策略的访问控制(PBAC):一种灵活的授权模型,它允许管理员定义策略来控制对资源的访问。这些策略可以基于时间、位置、用户行为或其他条件
- 访问控制列表(ACL):它明确指定哪些用户或用户组可以访问特定的资源,以及他们可以执行哪些操作。ACL通常与文件系统或数据库等系统资源关联。参照Linux的文件权限管理
- 基于声明的访问控制(Claims-Based Access Control):用户Principals的身份Identities被封装在一组声明Claims中,这些声明描述了用户的属性和权限。系统根据这些声明来做出授权决策。适用于大型系统
- 能力为基础的访问控制(CapBAC):一种较新的授权模型,它强调赋予实体(如用户或进程)特定的“能力”,这些能力定义了它们可以执行的操作。CapBAC旨在减少权限管理的复杂性,并增强系统的安全性
- 强制访问控制(MAC):是一种严格的访问控制策略,通常由系统强制执行,而不是由用户或进程控制。在MAC系统中,每个用户和对象都被分配一个安全级别,系统根据这些级别来允许或拒绝访问
Spring Security支持的授权方式:通常通过RBAC和ACL来实现,但也可以结合其他模型来提供灵活的授权解决方案。Spring Security进行了抽象,主要由
UserDetailsService、UserDetails、GrantedAuthority三大接口来组织授权方式
混个脸熟
依赖
<!-- 集成Spring Security时注意Spring Boot的版本
        建议采用 SpringBoot 2.3.12.RELEASE - 2.6.15 + JDK8
 -->
<parent>
    <groupId>org.springframework.boot</groupId>
    <artifactId>spring-boot-starter-parent</artifactId>
    <version>2.6.15</version>
    <relativePath/> <!-- lookup parent from repository -->
</parent>

<dependency>
    <groupId>org.springframework.boot</groupId>
    <artifactId>spring-boot-starter-security</artifactId>
</dependency>
<dependency>
    <groupId>org.springframework.boot</groupId>
    <artifactId>spring-boot-starter-web</artifactId>
</dependency>
controller
import org.springframework.web.bind.annotation.GetMapping;
import org.springframework.web.bind.annotation.RequestMapping;
import org.springframework.web.bind.annotation.RestController;

/**
 * <p>
 * 测试 Spring Security 是否生效
 * </p>
 *
 * <p>@author : ZiXieqing</p>
 */
@RestController
@RequestMapping("user")
public class TestController {

    /**
     * 测试  导入依赖启动访问该接口即可    即使用Spring-Security的默认配置
     *
     * 默认用户:user   密码:控制台日志提供得有    Using generated security password: 6be3b121-67c5-4c77-bd23-07e5d167edeb
     */
    @GetMapping("/test")
    public String test() {
        return "Hello Spring Security";
    }
}
SpringBoot 1.x 和 SpringBoot 2.x的注意点
# SpringBoot 1.x 版本需要使用如下配置让Spring Security生效
# 2.x不需要、也不支持这么配置,而改用 Security配置类 或 启动类 中使用    @EnableWebSecurity  // 开启web security功能
#security:
#  basic:
#    enabled: true
基于内存认证
启动类开启Spring Security功能【可以直接放在Security的配置类中,但不建议】
@EnableWebSecurity // 开启web security功能
YAML配置
server:
  port: 5674

# SpringBoot 1.x 版本需要使用如下配置让Spring Security生效
# 2.x不需要、也不支持这么配置,而改用 Security配置类 或 启动类 中使用    @EnableWebSecurity  // 开启web security功能
#security:
#  basic:
#    enabled: true

spring:
  security:
    user:
      name: zixieqing
# 曾经的BUG重现:密码用字符串写法 不然登录不成功【会报Bad credentials】  SpringBoot 2.6.15 - 2.3.12.RELEASE 均有出现
      password: "072413"
      roles: dev
SecurityConfig 配置
import org.springframework.beans.factory.annotation.Value;
import org.springframework.context.annotation.Bean;
import org.springframework.context.annotation.Configuration;
import org.springframework.security.config.annotation.authentication.builders.AuthenticationManagerBuilder;
import org.springframework.security.config.annotation.method.configuration.EnableGlobalMethodSecurity;
import org.springframework.security.config.annotation.web.configuration.WebSecurityConfigurerAdapter;
import org.springframework.security.crypto.bcrypt.BCryptPasswordEncoder;
import org.springframework.security.crypto.password.PasswordEncoder;

/**
 * <p>
 * Spring Security 基础配置测试   当前这个类主要是对我们请求的url及权限规则的一些认证配置
 *
 *      WebSecurityConfigurerAdapter 抽象类,是权限管理启动的入口
 *
 *      extends WebSecurityConfigurerAdapter    我采用过的版本 SpringBoot 2.6.15 - 2.3.12.RELEASE 都可以使用这个
 *      采用 Spring Boot 2.3.12.RELEASE 时 Spring Security 登录会很慢
 * </p>
 *
 * <p>@author : ZiXieqing</p>
 */
@Configuration
// @EnableWebSecurity  // 开启web security功能  可直接放在启动类上
@EnableGlobalMethodSecurity(prePostEnabled = true)  // 开启方法安全认证【可注掉,本节还未使用】,可放在启动类上【不建议】
                                                    // 即:使用了该注解,才能让controller之类的方法上 @PreAuthorize 等注解生效
/* @PreAuthorize	@PostAuthorize等注解,为true,会拦截加了这些注解的地方 */
public class WebSecurityConfig extends WebSecurityConfigurerAdapter {

    @Value("${spring.security.user.name}")
    private String username;

    @Value("${spring.security.user.password}")
    private String password;

    @Value("${spring.security.user.roles}")
    private String roles;

    /**
     * 基于内存认证
     */
    @Override
    protected void configure(AuthenticationManagerBuilder auth) throws Exception {

        // 查看一下加密后的密码   打个断点    DEBUG进入
        System.out.println("passwordEncoder().encode(password) = " + passwordEncoder().encode(password));

        auth.inMemoryAuthentication()
                .withUser(username)
                .password(passwordEncoder().encode(password))
                .roles(roles);
    }

    @Bean
    public PasswordEncoder passwordEncoder() {
        // 使用BCrypt加密密码
        return new BCryptPasswordEncoder();
    }
}
controller
import org.springframework.web.bind.annotation.GetMapping;
import org.springframework.web.bind.annotation.RequestMapping;
import org.springframework.web.bind.annotation.RestController;

/**
 * <p>
 * 测试 Spring Security 是否生效
 * </p>
 *
 * <p>@author : ZiXieqing</p>
 */
@RestController
@RequestMapping("user")
public class TestController {

    /**
     * 基于内存认证   测试Spring Security基本配置
     */
    @GetMapping("/basicConfigTest")
    public String baseConfigTest() {
        // 也可以识别HTML标签
        return "<h1>Hi,老北鼻,恭喜你认证成功</h1>";
    }
}
自定义表单认证 + 链接数据库
依赖
    <parent>
        <groupId>org.springframework.boot</groupId>
        <artifactId>spring-boot-starter-parent</artifactId>
        <version>2.6.15</version>
    </parent>


    <dependency>
      <groupId>org.springframework.boot</groupId>
      <artifactId>spring-boot-starter-security</artifactId>
    </dependency>
    <dependency>
      <groupId>org.springframework.boot</groupId>
      <artifactId>spring-boot-starter-web</artifactId>
    </dependency>

    <dependency>
      <groupId>org.mybatis.spring.boot</groupId>
      <artifactId>mybatis-spring-boot-starter</artifactId>
      <version>2.2.2</version>
    </dependency>
    <dependency>
      <groupId>mysql</groupId>
      <artifactId>mysql-connector-java</artifactId>
    </dependency>

    <dependency>
      <groupId>org.projectlombok</groupId>
      <artifactId>lombok</artifactId>
    </dependency>
    <dependency>
      <groupId>com.fasterxml.jackson.core</groupId>
      <artifactId>jackson-databind</artifactId>
    </dependency>
    <dependency>
      <groupId>org.springframework.boot</groupId>
      <artifactId>spring-boot-starter-thymeleaf</artifactId>
    </dependency>
前端
可以自行编写 或 在网上找一个登录页面改造即可
登录 login.html
<!DOCTYPE html PUBLIC "-//W3C//DTD XHTML 1.0 Transitional//EN" "http://www.w3.org/TR/xhtml1/DTD/xhtml1-transitional.dtd">
<html lang="en" xmlns:th="http://www.thymeleaf.org">
<head>
    <meta content="text/html; charset=utf-8" />
    <title>登录</title>
    <link th:href='@{http://fonts.useso.com/css?family=Open+Sans:400,700}' rel='stylesheet' type='text/css'>
    <link rel="stylesheet" th:href="@{http://maxcdn.bootstrapcdn.com/font-awesome/4.3.0/css/font-awesome.min.css}">

    <!--可无视-->
    <link rel="stylesheet" th:href="@{static/css/normalize.css}" type="text/css" />

    <style type="text/css">
        * {
            margin: 0;
            padding: 0;
            box-sizing: border-box;
        }

        /* 注意:样式是内联添加的,因为 Prefixfree 需要访问您的样式,并且如果它们位于本地磁盘上,则必须内联! */
        body {
            font-family: "Open Sans", sans-serif;
            height: 100vh;
            background-size: cover;
        }

        @keyframes spinner {
            0% {
                transform: rotateZ(0deg);
            }
            100% {
                transform: rotateZ(359deg);
            }
        }

        .wrapper {
            display: flex;
            align-items: center;
            flex-direction: column;
            justify-content: center;
            width: 100%;
            min-height: 100%;
            padding: 20px;
            background: rgba(4, 40, 68, 0.85);
        }

        .login {
            border-radius: 2px 2px 5px 5px;
            padding: 10px 20px 20px 20px;
            width: 90%;
            max-width: 320px;
            background: #ffffff;
            position: relative;
            padding-bottom: 80px;
            box-shadow: 0px 1px 5px rgba(0, 0, 0, 0.3);
        }
        .login.loading button {
            max-height: 100%;
            padding-top: 50px;
        }
        .login.loading button .spinner {
            opacity: 1;
            top: 40%;
        }
        .login.ok button {
            background-color: #8bc34a;
        }
        .login.ok button .spinner {
            border-radius: 0;
            border-top-color: transparent;
            border-right-color: transparent;
            height: 20px;
            animation: none;
            transform: rotateZ(-45deg);
        }
        .login input {
            display: block;
            padding: 15px 10px;
            margin-bottom: 10px;
            width: 100%;
            border: 1px solid #ddd;
            transition: border-width 0.2s ease;
            border-radius: 2px;
            color: #ccc;
        }
        .login input + i.fa {
            color: #fff;
            font-size: 1em;
            position: absolute;
            margin-top: -47px;
            opacity: 0;
            left: 0;
            transition: all 0.1s ease-in;
        }
        .login input:focus {
            outline: none;
            color: #444;
            border-color: #2196F3;
            border-left-width: 35px;
        }
        .login input:focus + i.fa {
            opacity: 1;
            left: 30px;
            transition: all 0.25s ease-out;
        }
        .login a {
            font-size: 0.8em;
            color: #2196F3;
            text-decoration: none;
        }
        .login .title {
            color: #444;
            font-size: 1.2em;
            font-weight: bold;
            margin: 10px 0 30px 0;
            border-bottom: 1px solid #eee;
            padding-bottom: 20px;
        }
        .login button {
            width: 100%;
            height: 100%;
            padding: 10px 10px;
            background: #2196F3;
            color: #fff;
            display: block;
            border: none;
            margin-top: 20px;
            position: absolute;
            left: 0;
            bottom: 0;
            max-height: 60px;
            border: 0px solid rgba(0, 0, 0, 0.1);
            border-radius: 0 0 2px 2px;
            transform: rotateZ(0deg);
            transition: all 0.1s ease-out;
            border-bottom-width: 7px;
        }
        .login button .spinner {
            display: block;
            width: 40px;
            height: 40px;
            position: absolute;
            border: 4px solid #ffffff;
            border-top-color: rgba(255, 255, 255, 0.3);
            border-radius: 100%;
            left: 50%;
            top: 0;
            opacity: 0;
            margin-left: -20px;
            margin-top: -20px;
            animation: spinner 0.6s infinite linear;
            transition: top 0.3s 0.3s ease, opacity 0.3s 0.3s ease, border-radius 0.3s ease;
            box-shadow: 0px 1px 0px rgba(0, 0, 0, 0.2);
        }
        .login:not(.loading) button:hover {
            box-shadow: 0px 1px 3px #2196F3;
        }
        .login:not(.loading) button:focus {
            border-bottom-width: 4px;
        }

        footer {
            display: block;
            padding-top: 50px;
            text-align: center;
            color: #ddd;
            font-weight: normal;
            text-shadow: 0px -1px 0px rgba(0, 0, 0, 0.2);
            font-size: 0.8em;
        }
        footer a, footer a:link {
            color: #fff;
            text-decoration: none;
        }

    </style>

    <script th:src="@{static/js/prefixfree.min.js}"></script>

</head>

<body>

<div class="wrapper">
    <!-- 注意: action="@{/user/login} 这个请求地址后面配置Spring Security时需要用到-->
    <form class="login" method="POST" th:action="@{/user/login}">
        <p class="title">Log in</p>
        <!-- 注意:name="username" 这个username名字后面配置Spring Security需要用到 -->
        <input type="text" name="username" placeholder="Username" autofocus/>
        <i class="fa fa-user"></i>
        <!-- 注意:name="password" 这个password名字后面配置Spring Security需要用到 -->
        <input type="password" name="password" placeholder="Password" />
        <i class="fa fa-key"></i>
        <button>
            <i class="spinner"></i>
            <span class="state">立即登录</span>
        </button>
    </form>
    <footer><a target="blank" href="https://www.cnblogs.com/xiegongzi">@紫邪情</a></footer>
</div>


<script type="text/javascript" th:src="@{static/js/jquery.min.js}"></script>
<script type="text/javascript" th:src="@{static/js/index.js}"></script>

</body>
</html>
首页 index.html
<!DOCTYPE html>
<html lang="en">
<head>
    <meta charset="UTF-8">
    <title>首页</title>
</head>
<body>
<h1>首页</h1>
</body>
</html>
后端
启动类添加注解
@EnableWebSecurity // 开启web security功能
YAML配置
server:
  port: 7983
spring:
  datasource:
    driver-class-name: com.mysql.jdbc.Driver
    url: jdbc:mysql://localhost:3306/spring-boot-study?useUnicode=true&characterEncoding=utf-8&useSSL=false
    username: root
    password: "zixieqing072413"
mybatis:
  configuration:
    map-underscore-to-camel-case: true
三张表:用户表、角色表、用户角色表。对应的用户、角色实体类自行创建,mapper、对应SQL略过
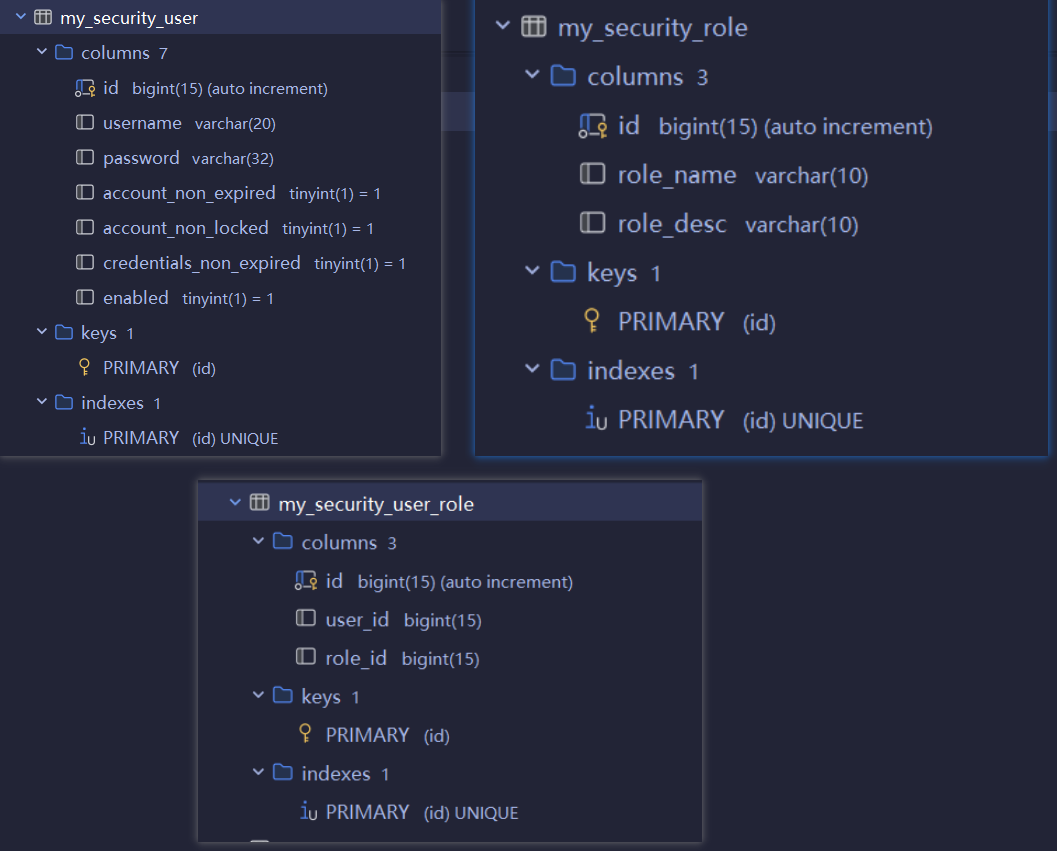
WebSecurityConfigurerAdapter 配置
WebSecurityConfigurerAdapter 抽象类是Spring Security的核心配置类,是权限管理启动的入口
package com.zixq.security.browser;

import com.zixq.handler.CustomAuthenticationAccessDeniedHandler;
import com.zixq.handler.CustomLogoutSuccessHandler;
import lombok.extern.log4j.Log4j2;
import org.springframework.beans.factory.annotation.Autowired;
import org.springframework.context.annotation.Bean;
import org.springframework.context.annotation.Configuration;
import org.springframework.security.config.annotation.method.configuration.EnableGlobalMethodSecurity;
import org.springframework.security.config.annotation.web.builders.HttpSecurity;
import org.springframework.security.config.annotation.web.configuration.WebSecurityConfigurerAdapter;
import org.springframework.security.crypto.bcrypt.BCryptPasswordEncoder;
import org.springframework.security.web.authentication.AuthenticationFailureHandler;
import org.springframework.security.web.authentication.AuthenticationSuccessHandler;

/**
 * <p>
 * security config
 * </p>
 *
 * <p>@author : ZiXieqing</p>
 */
@Log4j2
@Configuration
@EnableGlobalMethodSecurity(prePostEnabled = true)  // 让 @PreAuthorize 等注解生效    不加则会发现 使用了@PreAuthorize却没拦截
public class WebSecurityConfig extends WebSecurityConfigurerAdapter {

    @Autowired
    private AuthenticationSuccessHandler authenticationSuccessHandler;

    @Autowired
    private AuthenticationFailureHandler authenticationFailureHandler;
    @Autowired
    private CustomAuthenticationAccessDeniedHandler customAuthenticationAccessDeniedHandler;

    @Autowired
    private CustomLogoutSuccessHandler customLogoutSuccessHandler;

    /**
     * https请求拦截配置
     */
    @Override
    protected void configure(HttpSecurity http) throws Exception {

        log.info("=========进入了:{}#configure(HttpSecurity http),http = {}========", this.getClass().getName(), http);

        /* 禁用 X-Frame-Options 响应头。下面是具体解释:
         * X-Frame-Options 是一个 HTTP 响应头,用于防止网页被嵌入到其他网页的 <frame>、<iframe> 或 <object> 标签中,从而可以减少点击劫持攻击的风险
		 */
        http.headers().frameOptions().disable();

        // 1、权限认证设置
        http.authorizeRequests()
                .antMatchers("/login", "/register", "/static/**","/public/**").permitAll()  // 不拦截路由    SpringBoot默认就会从static或public中找静态资源
                .anyRequest()   // 其他的所有请求
                .authenticated()    // 都需要认证
            .and()
            // 2、form表单登录设置
            .formLogin()
                .loginPage("/login")                  // 自定义login页面的url 和后端的controller接口对应 本示例中是 MainController 中的
                .usernameParameter("username")      // 接收的用户名参数名 和html中input type=“text” name="username" 名字保持一致 UsernamePasswordAuthenticationFilter中默认值就是username
                .passwordParameter("password")      // 接收的密码参数名 和html中input type=“password” name="password" 名字保持一致  UsernamePasswordAuthenticationFilter中默认值就是password
                /* 默认回到用户来自的页面,即form中action的地址,所以该处配置只要和form中action的地址相同即可,不用再另写一个 /user/login 的controller了
                 * 因为Security不会将请求传给Spring MVC和我们的controller
                 * */
                .loginProcessingUrl("/user/login")       // 默认登录入口  对应前端form中action请求的地址
                // .defaultSuccessUrl("/index")    // 登录成功后跳转的controller地址  若 AuthenticationSuccessHandler 这里面已经重定向了,则这里就可以不用配置了
                // .failureUrl("/login?error=true")    // 认证失败请求的路径 同理 AuthenticationFailureHandler 配置,这里就可以不用配置,或者都不配置,改为响应错误信息即可
                .successHandler(authenticationSuccessHandler)               // 成功后的结果处理器
                .failureHandler(authenticationFailureHandler)               // 失败后的结果处理器
            .and()
            // 3、退出设置
            .logout()
                .logoutUrl("/logout")       // 退出url    后端接口地址
                .logoutSuccessHandler(customLogoutSuccessHandler)     // 退出成功处理器
                .permitAll()
            .and()
            // 4、自定义访问被拒绝的处理器
            .exceptionHandling()
                .accessDeniedHandler(customAuthenticationAccessDeniedHandler)
            .and()
            //默认都会产生一个hidden标签 里面有安全相关的验证 防止请求伪造 这边我们暂时不需要 可禁用掉
            .csrf().disable()
        ;
    }

    @Bean
    public BCryptPasswordEncoder passwordEncoder() {
        return new BCryptPasswordEncoder();
    }
}
上面的东西可以使用多次调用 http.xxxxxx 进行归类设置,方便阅读
配置补充说明:
@Configuration
@EnableGlobalMethodSecurity(prePostEnabled = true)  // 让 @PreAuthorize 等注解生效
											   // 不加则会发现 使用了@PreAuthorize却没拦截
public class WebSecurityConfig extends WebSecurityConfigurerAdapter {

    /**
     * anyRequest          |   匹配所有请求路径
     * access              |   SpringEl表达式结果为true时可以访问
     * anonymous           |   匿名可以访问【未登录可访问,已登录不可访问】
     * denyAll             |   无条件拒接任何形式的访问
     * fullyAuthenticated  |   只允许已经登录或者通过 remember-me 登录的用户访问
     * hasAnyAuthority     |   如果有参数,参数表示权限,则其中任何一个权限可以访问
     * hasAnyRole          |   如果有参数,参数表示角色,则其中任何一个角色可以访问
     * hasAuthority        |   如果有参数,参数表示权限,则其权限可以访问
     * hasIpAddress        |   如果有参数,参数表示IP地址,如果用户IP和参数匹配,则可以访问
     * hasRole             |   如果有参数,参数表示角色,则其角色可以访问
     * permitAll           |   用户可以任意访问【登不登录都可以访问】
     * rememberMe          |   允许通过remember-me登录的用户访问
     * authenticated       |   用户登录后可访问
     */
    @Override
    protected void configure(HttpSecurity http) throws Exception {
        http.xxxxxxxx;
    }
}
hasRole和hasAuthority容易搞混,区别去这里:hasRole和HasAuthority区别
handler 处理器:认证成功处理器、认证失败处理、退出成功处理器
AuthenticationSuccessHandler 认证成功处理器
import com.fasterxml.jackson.databind.ObjectMapper;
import lombok.extern.log4j.Log4j2;
import org.springframework.beans.factory.annotation.Autowired;
import org.springframework.security.core.Authentication;
import org.springframework.security.web.DefaultRedirectStrategy;
import org.springframework.security.web.RedirectStrategy;
import org.springframework.security.web.authentication.AuthenticationSuccessHandler;
import org.springframework.stereotype.Component;

import javax.servlet.ServletException;
import javax.servlet.http.HttpServletRequest;
import javax.servlet.http.HttpServletResponse;
import java.io.IOException;
import java.util.Enumeration;

/**
 * <p>
 * 认证成功的结果处理器
 * </p>
 *
 * <p>@author : ZiXieqing</p>
 */
@Log4j2
@Component
public class CustomAuthenticationSuccessHandler implements AuthenticationSuccessHandler {

    @Autowired
    private ObjectMapper objectMapper;

    private RedirectStrategy redirectStrategy = new DefaultRedirectStrategy();

    @Override
    public void onAuthenticationSuccess(HttpServletRequest request,
                                        HttpServletResponse response,
                                        Authentication authentication) throws IOException, ServletException {
        // 获取前端传到后端的全部参数
        Enumeration<String> enu = request.getParameterNames();
        while (enu.hasMoreElements()) {
            String paraName = (String) enu.nextElement();

            log.info("========进入了:{}#onAuthenticationSuccess(),参数-{}:{}=========",
                    this.getClass().getName(), paraName, request.getParameter(paraName));
        }

        log.info("=======进入了:{}#onAuthenticationSuccess(),登录认证成功==========", this.getClass().getName());

        // 这里写你登录成功后的逻辑,可以验证其他信息,如验证码等。
        // response.setContentType("application/json;charset=UTF-8");
        // JSONObject resultObj = new JSONObject();
        // resultObj.put("code", HttpStatus.OK.value());
        // resultObj.put("msg", "登录成功");
        // resultObj.put("authentication", objectMapper.writeValueAsString(authentication));
        // response.getWriter().write(resultObj.toString());

        // 重定向
        redirectStrategy.sendRedirect(request, response, "/index");
    }
}
AuthenticationFailureHandler 认证失败处理器
import com.fasterxml.jackson.databind.ObjectMapper;
import lombok.extern.log4j.Log4j2;
import org.springframework.beans.factory.annotation.Autowired;
import org.springframework.http.HttpStatus;
import org.springframework.security.core.AuthenticationException;
import org.springframework.security.web.DefaultRedirectStrategy;
import org.springframework.security.web.RedirectStrategy;
import org.springframework.security.web.authentication.AuthenticationFailureHandler;
import org.springframework.stereotype.Component;

import javax.servlet.ServletException;
import javax.servlet.http.HttpServletRequest;
import javax.servlet.http.HttpServletResponse;
import java.io.IOException;

/**
 * <p>
 * 认证失败的结果处理器
 * </p>
 *
 * <p>@author : ZiXieqing</p>
 */
@Log4j2
@Component
public class CustomAuthenticationFailureHandler implements AuthenticationFailureHandler {

    @Autowired
    private ObjectMapper objectMapper;

    private RedirectStrategy redirectStrategy = new DefaultRedirectStrategy();

    @Override
    public void onAuthenticationFailure(HttpServletRequest request,
                                        HttpServletResponse response,
                                        AuthenticationException exception) throws IOException, ServletException {

        log.info("========进入了:{}#onAuthenticationFailure()=========", this.getClass().getName());

        response.setStatus(HttpStatus.INTERNAL_SERVER_ERROR.value());
        response.setContentType("application/json;charset=utf-8");
        response.getWriter().print(objectMapper.writeValueAsString(exception.getMessage()));
        /* 或者重定向到错误页面
         * 若采用这种方式,那么需要在 WebSecurityConfig 中使用 HttpSecurity.failureUrl(String authenticationFailureUrl)
         * 配置失败请求的路径 需和这里的 login?error=true 保持一致*/
        // redirectStrategy.sendRedirect(request, response, "/login?error=true");
    }
}
LogoutSuccessHandler 退出成功处理器
import com.fasterxml.jackson.databind.ObjectMapper;
import lombok.extern.log4j.Log4j2;
import org.springframework.beans.factory.annotation.Autowired;
import org.springframework.http.HttpStatus;
import org.springframework.security.core.Authentication;
import org.springframework.security.web.authentication.logout.LogoutSuccessHandler;

import javax.servlet.ServletException;
import javax.servlet.http.HttpServletRequest;
import javax.servlet.http.HttpServletResponse;
import java.io.IOException;

/**
 * <p>
 * 退出成功处理器
 * </p>
 *
 * <p>@author : ZiXieqing</p>
 */

@Log4j2
@Component
public class CustomLogoutSuccessHandler implements LogoutSuccessHandler {

    @Autowired
    private ObjectMapper objectMapper;

    @Override
    public void onLogoutSuccess(HttpServletRequest request,
                                HttpServletResponse response,
                                Authentication authentication) throws IOException, ServletException {

        log.info("========进入了:{}#onLogoutSuccess,退出成功========", this.getClass().getName());

        /* 这里面写退出成功的逻辑处理,如:清除必要的缓存呐之类的 */
        response.setStatus(HttpStatus.OK.value());
        response.setContentType("application/json;charset=utf-8");
        response.getWriter().print(objectMapper.writeValueAsString("退出成功"));
    }
}
AccessDeniedHandler 访问被拒绝处理器
import org.springframework.http.HttpStatus;
import org.springframework.security.access.AccessDeniedException;
import org.springframework.security.web.access.AccessDeniedHandler;
import org.springframework.stereotype.Component;

import javax.servlet.ServletException;
import javax.servlet.http.HttpServletRequest;
import javax.servlet.http.HttpServletResponse;
import java.io.IOException;

/**
 * <p>
 * 自定义访问被拒绝的处理器
 * </p>
 *
 * <p>@author : ZiXieqing</p>
 */
@Component
public class CustomAuthenticationAccessDeniedHandler implements AccessDeniedHandler {
    /**
     * 访问被拒绝的处理器:直接重定向到指定页面也行
     * 也可以直接选择在SecurityConfig中配置 http..failureUrl()
     * 根据需要使用即可
     */
    @Override
    public void handle(HttpServletRequest request, HttpServletResponse response, AccessDeniedException accessDeniedException) throws IOException, ServletException {
        response.setStatus(HttpStatus.INTERNAL_SERVER_ERROR.value());
        response.setContentType("application/json;charset=utf-8");
        response.getWriter().write("很抱歉,您没有该访问权限");
    }
}
controller
import lombok.extern.log4j.Log4j2;
import org.springframework.security.access.prepost.PreAuthorize;
import org.springframework.stereotype.Controller;
import org.springframework.web.bind.annotation.GetMapping;

/**
 * <p>
 * main controller
 * </p>
 *
 * <p>@author : ZiXieqing</p>
 */
@Log4j2
@Controller
public class MainController {
    @GetMapping("/login")
    public String loginPage(){
        log.info("==========进入了:{}#loginPage(),请求路径为:/login,返回值为:'login'=========",
                this.getClass().getName());
        return "login";
    }

    @GetMapping("/index")
    @PreAuthorize("hasAnyRole('DEV','ADMIN')")  // 里面是一个 SpEL表达式 名字区分大小写 DEV 和 Dev不一样   源码解析去 AuthorizationManagerBeforeMethodInterceptor
    /*关于表达式的说明:
    * 1、hasAnyRole() 和 hasAnyAuthority()
    * hasAnyRole()  检查当前认证的用户是否具有指定角色中的至少一个 要求角色名称以ROLE_前缀开始,这是Spring Security的默认约定。
    *               如果未按照约定命名角色,需要通过配置调整
    *                   1、extends RoleVoter 重写 vote(),
    *                   2、SecurityConfig中注入 DefaultWebSecurityExpressionHandler,注册自定义RoleVoter 如handler.setRoleVoter(new CustomRoleVoter())
    * hasAnyAuthority() 更通用,不仅限于角色检查,也可以直接用于权限字符串的检查。它不假设任何命名约定,直接比较权限字符串
    *
    * 总结:
    *       若应用权限体系主要基于角色,并遵循ROLE_前缀约定,那么hasAnyRole()更合适
    *       如果权限设计更为灵活,包含非角色的权限字符串,应使用hasAnyAuthority()
    *
    * 2、hasPermission() 好 hasAnyAuthority()
    * hasPermission()   用于检查当前用户是否拥有特定的权限。这里的“权限”是指业务层面的权限,比如读取某个资源、修改某个记录的能力等,而非仅仅局限于角色
    *                   需要两个参数:如    @PreAuthorize("hasPermission(#resourceId, 'read')")
    *                               第一个参数通常代表要访问的资源,第二个参数代表对该资源的操作权限
    *                   同时需要自定义实现 PermissionEvaluator 接口
    * hasAnyAuthority() 用于检查当前用户是否至少拥有提供的权限列表中的一个权限。这里的权限通常指的是角色或者简单的权限字符串,如"ROLE_ADMIN", "EDIT_POST"等
    *
    * 总结:
    *       1、:hasPermission()提供了更细粒度的权限控制,适合复杂的应用场景;hasAnyAuthority()则适用于基于角色的简单权限管理
    *       2、若需要根据具体的资源和操作来控制访问(比如根据数据库中的记录ID判断是否允许读取),应使用hasPermission()并实现自定义的PermissionEvaluator
    *  */
    public String index(){
        log.info("======进入了:{}#index(),请求路径为:/index,需要的权限为:hasAnyRole('USER','ADMIN')。" +
                        "返回值为:'index'=========", this.getClass().getName());
        return "index";
    }
}
SpEL表达式不懂的,去这里:SpEL表达式详解
使用用户名和密码时:
UsernamePasswordAuthenticationToken authenticationToken = new UsernamePasswordAuthenticationToken(username, password);

AuthenticationContextHolder.setContext(authenticationToken);
// 该方法会去调用UserDetailsServiceImpl.loadUserByUsername
Authentication authentication = authenticationManager.authenticate(authenticationToken);
测试
成功示例:
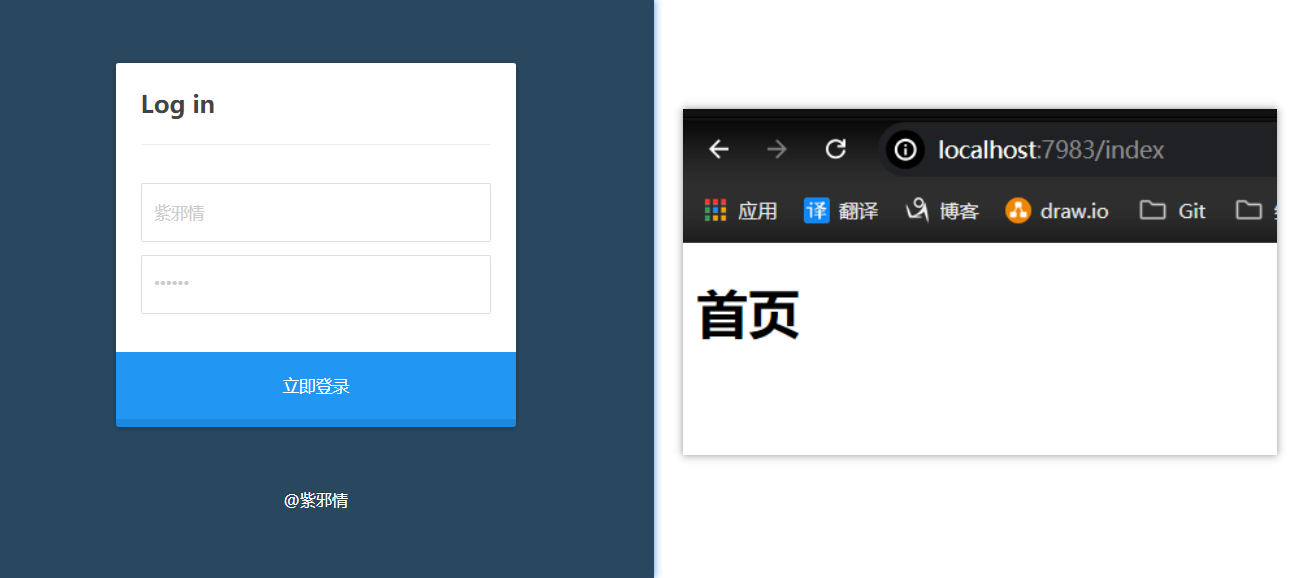
失败示例:
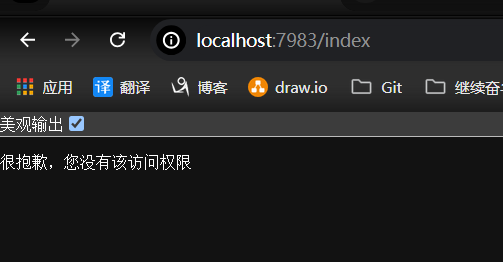
各方法注解 及其 应用场景
/**
 * 启用 @secured 注解: securedEnabled = true
 * 会导入配置:SecuredMethodSecurityConfiguration
 *
 * 启用 @PreAuthorize、@PostAuthorize、@PreFilter、@PostFilter:prePostEnabled = true
 * 会导入配置:PrePostMethodSecurityConfiguration
 *
 * 启用jsr250相关的安全注解:jsr250Enabled = true
 * 会导入配置:Jsr250MethodSecurityConfiguration
 * jsr250包括 @RolesAllowed、@PermitAll、@DenyAll
 */
@Configuration
@EnableGlobalMethodSecurity(
    securedEnabled = true,
    prePostEnabled = true,
    jsr250Enabled = true
)
public class WebSecurityConfig extends WebSecurityConfigurerAdapter {

}
各方法注解说明:
| 注解 | 应用场景 | 实现原理 |
|---|---|---|
@PreAuthorize |
用于在方法调用之前鉴权,支持方法入参作为表达式的一部分 | 基于SPEL表达式 |
@PostAuthorize |
用于在方法调用之后鉴权,支持方法返回值作为表达式的一部分 | 基于SPEL表达式 |
@PreFilter |
用于过滤方法入参 | 基于SPEL表达式 |
@PostFilter |
用于过滤方法返回值 | 基于SPEL表达式 |
@Secured |
配置需要满足的权限,可以是角色名或者权限 | 基于AuthorityAuthorizationManager |
JSR-250的@PermitAll |
任何人都可以访问 | 基于lambda表达式实现的简单的AuthorizationManager |
JSR-250的@DenyAll |
任何人都不能访问 | 基于lambda表达式实现的简单的AuthorizationManager |
JSR-250的@RolesAllowed |
配置需要满足的权限,可以是角色名或者权限。可以和@Secured相互取代 |
基于AuthorityAuthorizationManager |
AuthorizationManagerBeforeMethodInterceptor
public final class AuthorizationManagerBeforeMethodInterceptor
		implements Ordered, MethodInterceptor, PointcutAdvisor, AopInfrastructureBean {

	/**
	 * 构造器,需传入 Pointcut 和 AuthorizationManager<MethodInvocation>,以便校验权限
	 *
	 * Creates an instance.
	 * @param pointcut the {@link Pointcut} to use
	 * @param authorizationManager the {@link AuthorizationManager} to use
	 */
    public AuthorizationManagerBeforeMethodInterceptor(Pointcut pointcut,
                                                       AuthorizationManager<MethodInvocation> authorizationManager) {
        Assert.notNull(pointcut, "pointcut cannot be null");
        Assert.notNull(authorizationManager, "authorizationManager cannot be null");
        this.pointcut = pointcut;
        this.authorizationManager = authorizationManager;
    }


    /**
     * 创建负责处理 @PreAuthorize 的增强
     *
     * Creates an interceptor for the {@link PreAuthorize} annotation
     * @param authorizationManager the {@link PreAuthorizeAuthorizationManager} to use
     * @return the interceptor
     */
    public static AuthorizationManagerBeforeMethodInterceptor preAuthorize(
            PreAuthorizeAuthorizationManager authorizationManager) {

        AuthorizationManagerBeforeMethodInterceptor interceptor = new AuthorizationManagerBeforeMethodInterceptor(
                AuthorizationMethodPointcuts.forAnnotations(PreAuthorize.class), authorizationManager);
        interceptor.setOrder(AuthorizationInterceptorsOrder.PRE_AUTHORIZE.getOrder());
        return interceptor;
    }


    /**
     * 创建负责处理 @Secured
     *
     * Creates an interceptor for the {@link Secured} annotation
     * @param authorizationManager the {@link SecuredAuthorizationManager} to use
     * @return the interceptor
     */
    public static AuthorizationManagerBeforeMethodInterceptor secured(
            SecuredAuthorizationManager authorizationManager) {

        AuthorizationManagerBeforeMethodInterceptor interceptor = new AuthorizationManagerBeforeMethodInterceptor(
                AuthorizationMethodPointcuts.forAnnotations(Secured.class), authorizationManager);
        interceptor.setOrder(AuthorizationInterceptorsOrder.SECURED.getOrder());
        return interceptor;
    }


    /**
     * 创建负责处理jsr250相关注解: @RolesAllow、@PermitAll、@DenyAll
     *
     * Creates an interceptor for the JSR-250 annotations
     * @param authorizationManager the {@link Jsr250AuthorizationManager} to use
     * @return the interceptor
     */
    public static AuthorizationManagerBeforeMethodInterceptor jsr250(Jsr250AuthorizationManager authorizationManager) {
        AuthorizationManagerBeforeMethodInterceptor interceptor = new AuthorizationManagerBeforeMethodInterceptor(
                AuthorizationMethodPointcuts.forAnnotations(RolesAllowed.class, DenyAll.class, PermitAll.class),
                authorizationManager);
        interceptor.setOrder(AuthorizationInterceptorsOrder.JSR250.getOrder());
        return interceptor;
    }


    /**
	 * Determine if an {@link Authentication} has access to the {@link MethodInvocation}
	 * using the configured {@link AuthorizationManager}.
	 * @param mi the {@link MethodInvocation} to check
	 * @throws AccessDeniedException if access is not granted
	 */
    @Override
    public Object invoke(MethodInvocation mi) throws Throwable {
        // 校验权限
        attemptAuthorization(mi);
        return mi.proceed();
    }


	static final Supplier<Authentication> AUTHENTICATION_SUPPLIER = () -> {
		Authentication authentication = SecurityContextHolder.getContext().getAuthentication();
		if (authentication == null) {
			throw new AuthenticationCredentialsNotFoundException(
					"An Authentication object was not found in the SecurityContext");
		}
		return authentication;
	};

    /**
     * 授权校验
     */
    private void attemptAuthorization(MethodInvocation mi) {

        // 通过AuthorizationManager校验权限
        AuthorizationDecision decision = this.authorizationManager.check(AUTHENTICATION_SUPPLIER, mi);

        // 不通过就抛出访问拒绝异常
        if (decision != null && !decision.isGranted()) {
            throw new AccessDeniedException("Access Denied");
        }
    }
}
从源码中可以发现三类注解只需要一个MethodInterceptor。而它们的不同之处则由AuthorizationManager这个同一接口进行统一调度,对应的:
| 注解 | AuthorizationManager |
|---|---|
@PreAuthorize |
PreAuthorizeAuthorizationManager |
@Secured |
SecuredAuthorizationManager |
| jsr250的注解 | Jsr250AuthorizationManager |
至于
*AuthorizationManager*的各个实现类:SecuredAuthorizationManager、Jsr250AuthorizationManager、PreAuthorizeAuthorizationManager就自行查看了
AuthorizationManagerAfterMethodInterceptor
负责处理
@PostAuthorize
public final class AuthorizationManagerAfterMethodInterceptor
		implements Ordered, MethodInterceptor, PointcutAdvisor, AopInfrastructureBean {

	private final AuthorizationManager<MethodInvocationResult> authorizationManager;

	@Override
	public Object invoke(MethodInvocation mi) throws Throwable {
		// 先执行
		Object result = mi.proceed();
		// 再校验
		attemptAuthorization(mi, result);
		return result;
	}


    /**
     * 授权校验
     */
	private void attemptAuthorization(MethodInvocation mi, Object result) {

        // 和 AuthorizationManagerBeforeMethodInterceptor 差不多
		AuthorizationDecision decision = this.authorizationManager.check(AUTHENTICATION_SUPPLIER,
				new MethodInvocationResult(mi, result));

		if (decision != null && !decision.isGranted()) {
			throw new AccessDeniedException("Access Denied");
		}
	}
}


public final class PostAuthorizeAuthorizationManager implements AuthorizationManager<MethodInvocationResult> {

	private PostAuthorizeExpressionAttributeRegistry registry = new PostAuthorizeExpressionAttributeRegistry();


	/**
	 * Determine if an {@link Authentication} has access to the returned object by
	 * evaluating the {@link PostAuthorize} annotation that the {@link MethodInvocation}
	 * specifies.
	 * @param authentication the {@link Supplier} of the {@link Authentication} to check
	 * @param mi the {@link MethodInvocationResult} to check
	 * @return an {@link AuthorizationDecision} or {@code null} if the
	 * {@link PostAuthorize} annotation is not present
	 */
	@Override
	public AuthorizationDecision check(Supplier<Authentication> authentication, MethodInvocationResult mi) {
		ExpressionAttribute attribute = this.registry.getAttribute(mi.getMethodInvocation());
		if (attribute == ExpressionAttribute.NULL_ATTRIBUTE) {
			return null;
		}
		EvaluationContext ctx = this.expressionHandler.createEvaluationContext(authentication.get(),
				mi.getMethodInvocation());
		this.expressionHandler.setReturnObject(mi.getResult(), ctx);
		boolean granted = ExpressionUtils.evaluateAsBoolean(attribute.getExpression(), ctx);
		return new ExpressionAttributeAuthorizationDecision(granted, attribute);
	}
}
PreFilterAuthorizationMethodInterceptor
负责处理
@PreFilter注解的方法调用与
@PreAuthorize类似,只是少了一层AuthorizationManager的封装。原因是AuthorizationManager是用来鉴权的,而@PreFilter不需要鉴权,只需要过滤参数即可,因此不会抛出访问异常
public final class PreFilterAuthorizationMethodInterceptor
		implements Ordered, MethodInterceptor, PointcutAdvisor, AopInfrastructureBean {

	public PreFilterAuthorizationMethodInterceptor() {
		// 默认处理的是 @PreFilter
		this.pointcut = AuthorizationMethodPointcuts.forAnnotations(PreFilter.class);
	}

	// ...

	@Override
	public Object invoke(MethodInvocation mi) throws Throwable {

		// 从属性注册器中获取到目标方法解析好的@PreFilter的相关属性信息。
		PreFilterExpressionAttributeRegistry.PreFilterExpressionAttribute attribute = this.registry.getAttribute(mi);
		if (attribute == PreFilterExpressionAttributeRegistry.PreFilterExpressionAttribute.NULL_ATTRIBUTE) {
			return mi.proceed();
		}

		// 创建SPEL的上下文
		EvaluationContext ctx = this.expressionHandler.createEvaluationContext(AUTHENTICATION_SUPPLIER.get(), mi);

		// 从表达式上下文中获取需要过滤的目标
		Object filterTarget = findFilterTarget(attribute.getFilterTarget(), ctx, mi);
		// 根据SPEL表达式执行过滤
		expressionHandler.filter(filterTarget, attribute.getExpression(), ctx);
		// 执行目标方法
		return mi.proceed();
	}

	// ...
}
PostFilterAuthorizationMethodInterceptor
负责处理
@PostFilter
public final class PostFilterAuthorizationMethodInterceptor
		implements Ordered, MethodInterceptor, PointcutAdvisor, AopInfrastructureBean {

	/* 这个注册器与PreAuthorizeExpressionAttributeRegistry类似,都继承同一个父类。
	   只是解析的注解不一样,对应ExpressionAttribute稍稍不一样
	   		前者记录有方法参数,后者记录有方法返回值 */
	private PostFilterExpressionAttributeRegistry registry = new PostFilterExpressionAttributeRegistry();


	public PostFilterAuthorizationMethodInterceptor() {
		this.pointcut = AuthorizationMethodPointcuts.forAnnotations(PostFilter.class);
	}


	/**
	 * Filter a {@code returnedObject} using the {@link PostFilter} annotation that the
	 * {@link MethodInvocation} specifies.
	 * @param mi the {@link MethodInvocation} to check check
	 * @return filtered {@code returnedObject}
	 */
	@Override
	public Object invoke(MethodInvocation mi) throws Throwable {
		// 先执行了方法,获得返回值
		Object returnedObject = mi.proceed();
		ExpressionAttribute attribute = this.registry.getAttribute(mi);
		if (attribute == ExpressionAttribute.NULL_ATTRIBUTE) {
			return returnedObject;
		}

		// 创建SPEL的上下文
		EvaluationContext ctx = this.expressionHandler.createEvaluationContext(AUTHENTICATION_SUPPLIER.get(), mi);

		// 根据SPEL表达式执行过滤
		return expressionHandler.filter(returnedObject, attribute.getExpression(), ctx);
	}
}
Spring Security 基本原理
仅个人理解,仅供参考
主要的过滤器链,过滤器链的调度是 org.springframework.security.web.FilterChainProxy#doFilter(ServletRequest request, ServletResponse response)
在请求到来时,FilterChainProxy先遍历所有的SecurityFilterChain,然后找到匹配的SecurityFilterChain,遍历其中的Filter并调用doFilter方法,从而实现安全过滤器的逻辑
DefaultSecurityFilterChain:是FilterChainProxy的助手,同时也是一个完整的安全过滤器链条。它为FilterChainProxy提供了满足某一路径条件所有Filter

Spring Security 认证校验流程
总的说起来主要步骤就三步:
- 加载当前请求用户的用户信息【UserDetailsService#loadUserByUsername(String)】
- 若认证成功,则走认证成功处理器【AuthenticationSuccessHandler#onAuthenticationSuccess(HttpServletRequest, HttpServletResponse, Authentication)】
- 若认证失败,则走认证失败处理器【AuthenticationFailureHandler#onAuthenticationFailure(HttpServletRequest, HttpServletResponse, AuthenticationException)】
稍微详细说一下的话,就下图
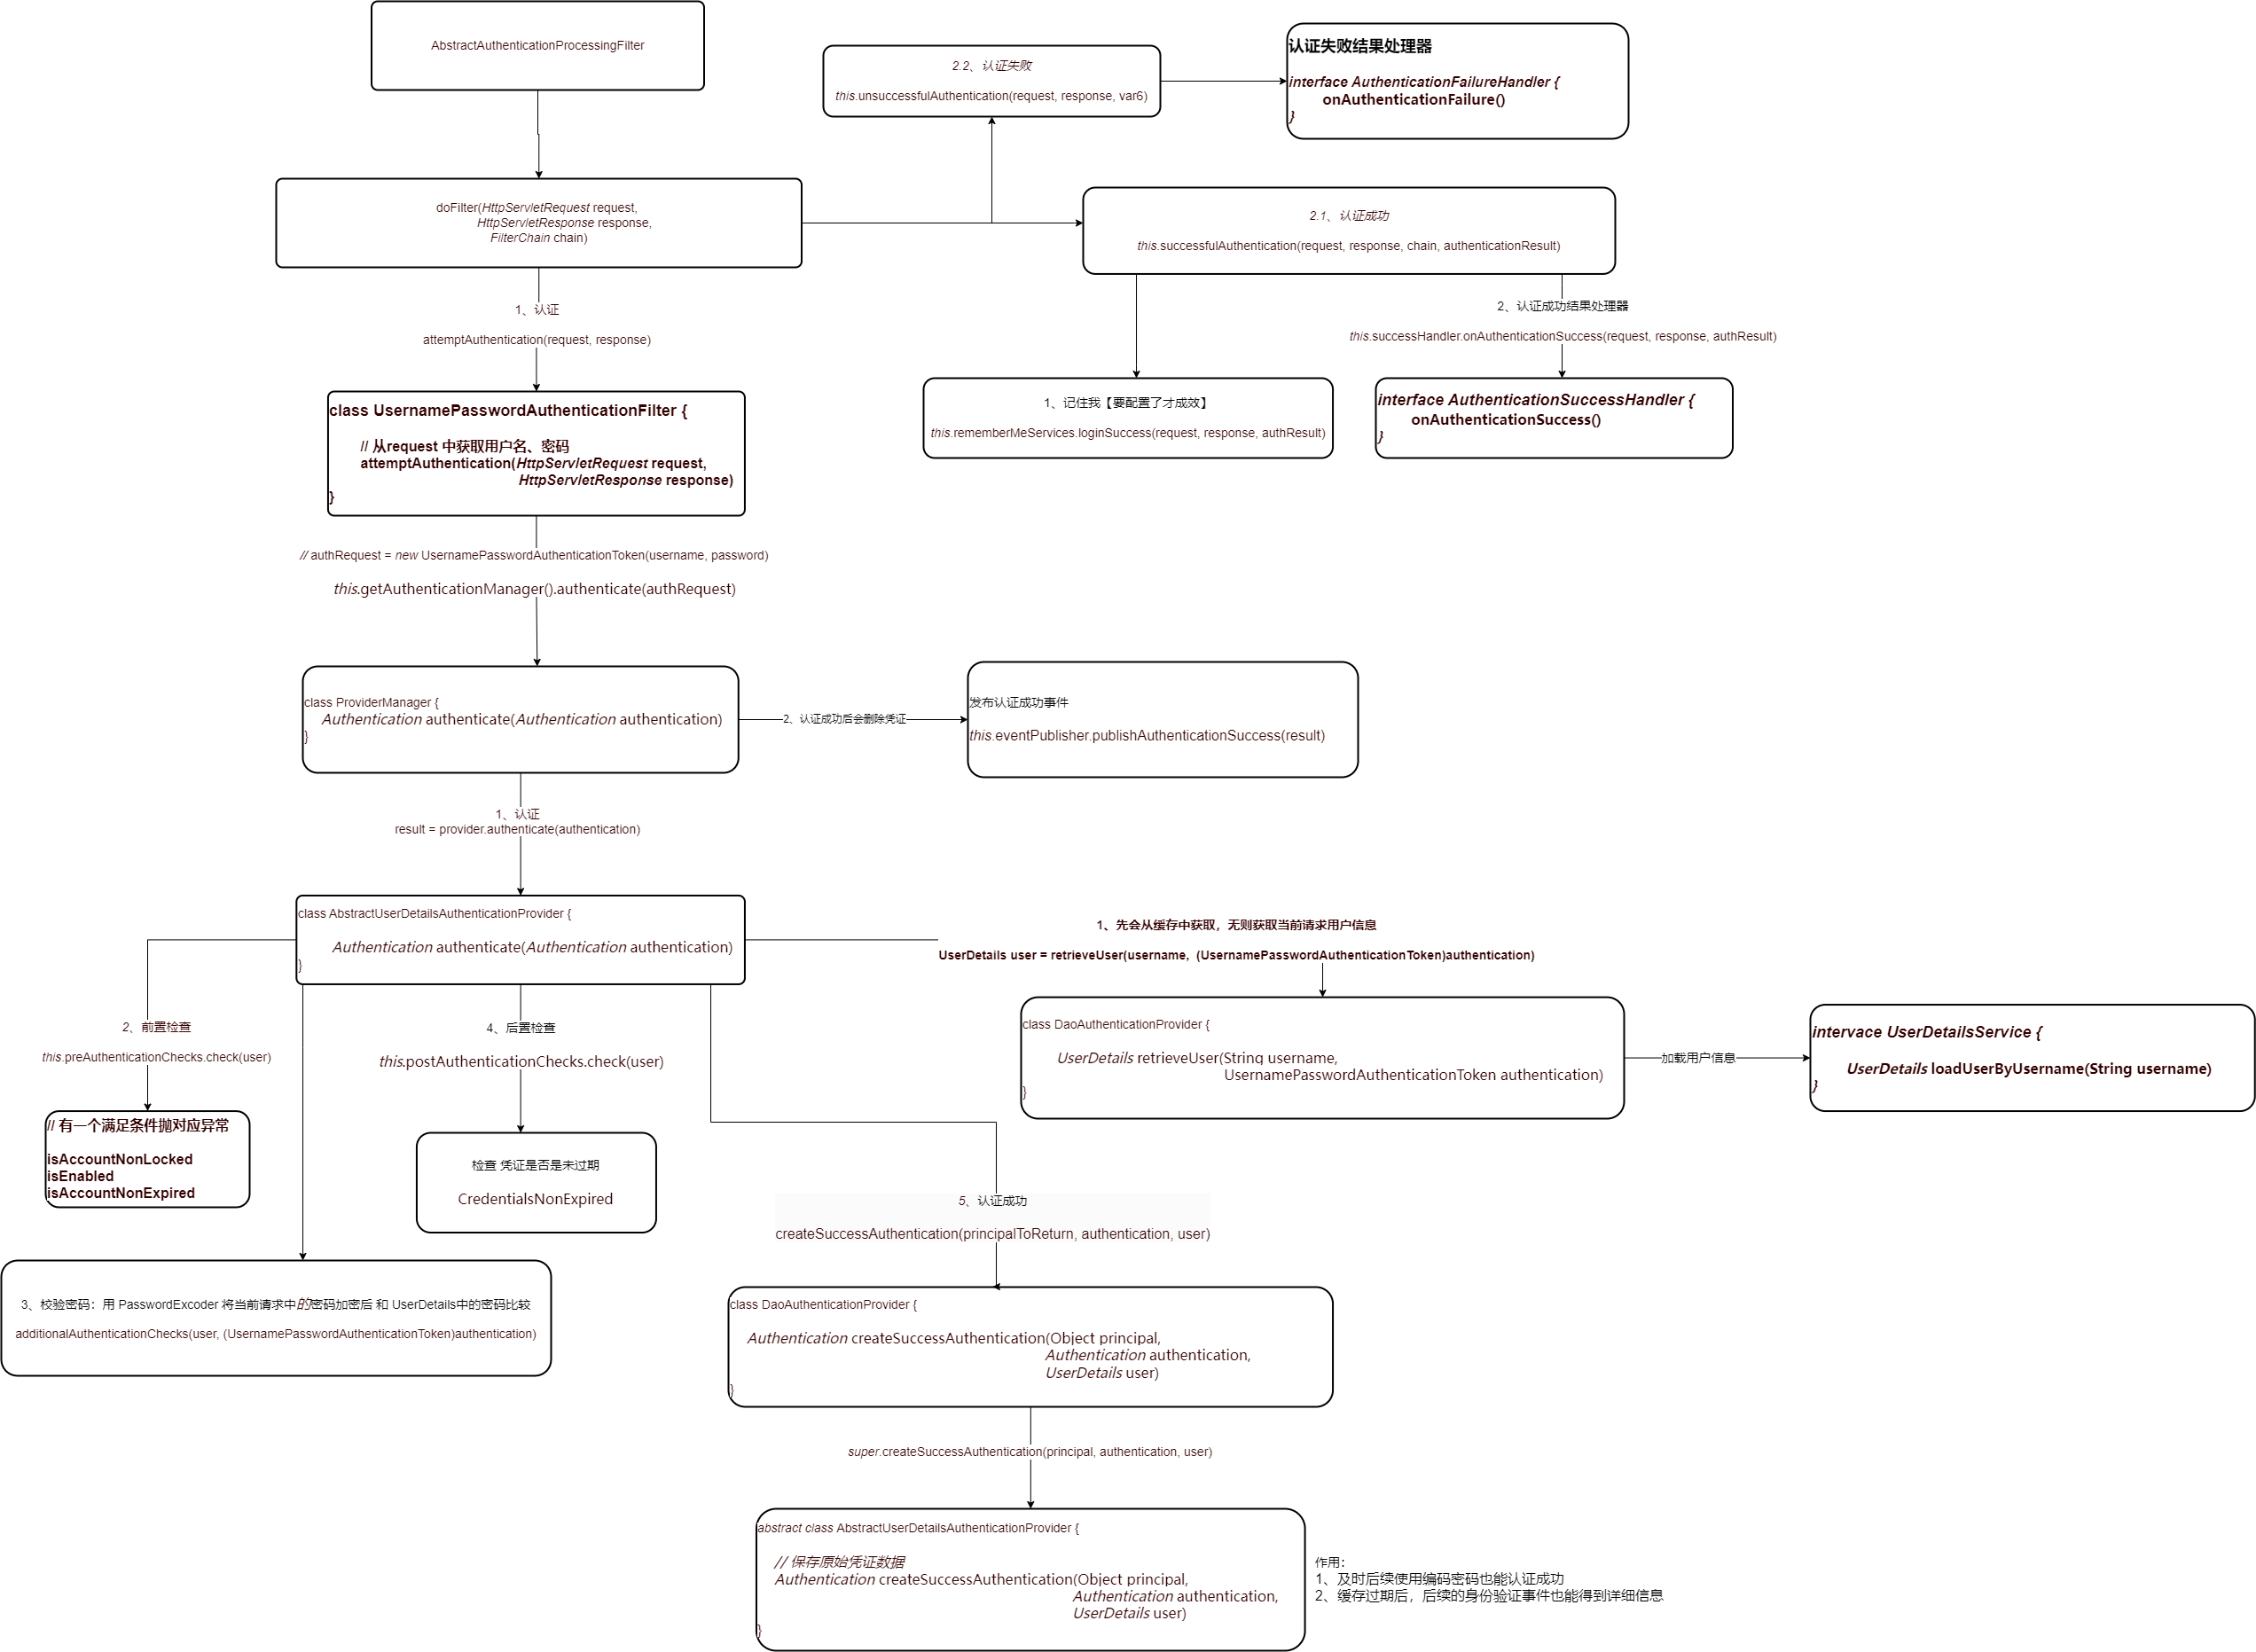
Spring Security 权限校验流程
FilterSecurityInterceptor 负责执行实际的安全拦截操作,包括权限校验。它会在每个HTTP请求上应用访问控制列表(ACL)并利用AccessDecisionManager来做出是否允许访问的决定。流程如下:
- 用户尝试访问一个受保护的资源
- FilterSecurityInterceptor 拦截该请求,并从配置中获取与请求匹配的访问规则(如URL及其对应的权限)
- 它会检查当前用户(Authentication对象)是否已经过认证
- 然后,它收集所有相关的安全配置属性(ConfigAttribute),如角色或权限要求
- 最后,FilterSecurityInterceptor 调用 AccessDecisionManager 来决定用户是否有足够的权限访问该资源
- 根据 AccessDecisionManager 的决策结果,请求被允许继续或被拒绝
权限过滤的入口:AuthorizationFilter
public class AuthorizationFilter extends GenericFilterBean {

	@Override
	public void doFilter(ServletRequest servletRequest, ServletResponse servletResponse, FilterChain chain) throws ServletException, IOException {

		HttpServletRequest request = (HttpServletRequest) servletRequest;
		HttpServletResponse response = (HttpServletResponse) servletResponse;
		// 是否需要执行鉴权
		if (this.observeOncePerRequest && isApplied(request)) {
			chain.doFilter(request, response);
			return;
		}
		// /error和异步请求不处理
		if (skipDispatch(request)) {
			chain.doFilter(request, response);
			return;
		}
		// 是否已经执行过鉴权逻辑了
		String alreadyFilteredAttributeName = getAlreadyFilteredAttributeName();
		request.setAttribute(alreadyFilteredAttributeName, Boolean.TRUE);
		try {
			// 从SecurityContextHolder中获取凭证,并通过AuthorizationManager做出决策
			this.authorizationManager.check(this::getAuthentication, request);
		}
		finally {
			// 处理完业务逻辑后,为当前请求清理标识
			request.removeAttribute(alreadyFilteredAttributeName);
		}
	}
}
RequestMatcherDelegatingAuthorizationManager
public final class RequestMatcherDelegatingAuthorizationManager implements AuthorizationManager<HttpServletRequest> {

	@Override
	public AuthorizationDecision check(Supplier<Authentication> authentication, HttpServletRequest request) {
		// 遍历每一个已经登录好的路径,找到对应的AuthorizationManager<RequestAuthorizationContext>>
		for (RequestMatcherEntry<AuthorizationManager<RequestAuthorizationContext>> mapping : this.mappings) {

			RequestMatcher matcher = mapping.getRequestMatcher();
			// 匹配当前请求
			MatchResult matchResult = matcher.matcher(request);
			if (matchResult.isMatch()) {
				// 找到匹配的AuthorizationManager就直接调用check方法并返回鉴权结果
				AuthorizationManager<RequestAuthorizationContext> manager = mapping.getEntry();
				return manager.check(authentication,
						new RequestAuthorizationContext(request, matchResult.getVariables()));
			}
		}
		// 没有匹配的AuthorizationManager则返回拒绝当前请求
		return DENY;
	}
}
在没有匹配的AuthorizationManager的情况下,默认是拒绝请求的
总结
我们在配置中配置的url被封装成RequestMatcher,而hasRole被封装成AuthorityAuthorizationManager。进行注册,在请求过来时,便通过遍历所有注册好的RequestMatch进行匹配,存在匹配就调用
AuthorizationManager<RequestAuthorizationContext>#check方法配置的链式调用,会跨越多个不同的类,最终又回到第一个对象的类型
FilterSecurityInterceptor
public class FilterSecurityInterceptor extends AbstractSecurityInterceptor implements Filter {

	public void invoke(FilterInvocation filterInvocation) throws IOException, ServletException {

		// ................

        // 获取当前请求URL应具有的权限 及 决策当前用户是否有权限访问
		InterceptorStatusToken token = super.beforeInvocation(filterInvocation);
		try {
            // 这里面的核心是:SpringMVC 那一套
			filterInvocation.getChain().doFilter(filterInvocation.getRequest(), filterInvocation.getResponse());
		}
		finally {
			super.finallyInvocation(token);
		}
		super.afterInvocation(token, null);
	}
}
Spring Security 使用验证码流程
大体流程如下:
- 生成验证码,放入
Session中
@RestController
public class ValidateController {

    private SessionStrategy sessionStrategy = new HttpSessionSessionStrategy();

    @GetMapping("/code/image")
    public void createCode(HttpServletRequest request, HttpServletResponse response) throws IOException {
        ImageCode imageCode = createImageCode();
        sessionStrategy.setAttribute(new ServletWebRequest(request), SESSION_KEY_IMAGE_CODE, imageCode);
        ImageIO.write(imageCode.getImage(), "jpeg", response.getOutputStream());
    }
}
- 校验验证码
import com.zixq.controller.ValidateController;
import org.apache.commons.lang3.StringUtils;
import org.springframework.beans.factory.annotation.Autowired;
import org.springframework.security.web.authentication.AuthenticationFailureHandler;
import org.springframework.social.connect.web.HttpSessionSessionStrategy;
import org.springframework.social.connect.web.SessionStrategy;
import org.springframework.stereotype.Component;
import org.springframework.web.bind.ServletRequestBindingException;
import org.springframework.web.bind.ServletRequestUtils;
import org.springframework.web.context.request.ServletWebRequest;
import org.springframework.web.filter.OncePerRequestFilter;

import javax.servlet.FilterChain;
import javax.servlet.ServletException;
import javax.servlet.http.HttpServletRequest;
import javax.servlet.http.HttpServletResponse;
import java.io.IOException;

@Component
public class ValidateCodeFilter extends OncePerRequestFilter {

    @Autowired
    private AuthenticationFailureHandler authenticationFailureHandler;

    private SessionStrategy sessionStrategy = new HttpSessionSessionStrategy();

    @Override
    protected void doFilterInternal(HttpServletRequest httpServletRequest,
                                    HttpServletResponse httpServletResponse,
                                    FilterChain filterChain) throws ServletException, IOException {

        if (StringUtils.equalsIgnoreCase("/login", httpServletRequest.getRequestURI())
                && StringUtils.equalsIgnoreCase(httpServletRequest.getMethod(), "post")) {

            try {
                // 校验验证码
                validateCode(new ServletWebRequest(httpServletRequest));
            } catch (ValidateCodeException e) {
                authenticationFailureHandler.onAuthenticationFailure(httpServletRequest, httpServletResponse, e);
                return;
            }
        }

        filterChain.doFilter(httpServletRequest, httpServletResponse);
    }

    private void validateCode(ServletWebRequest servletWebRequest) throws ServletRequestBindingException {
        // 从session中取出验证码
        ImageCode codeInSession = (ImageCode) sessionStrategy.getAttribute(servletWebRequest, ValidateController.SESSION_KEY_IMAGE_CODE);
        // 获取用户传递过来的验证码
        String codeInRequest = ServletRequestUtils.getStringParameter(servletWebRequest.getRequest(), "imageCode");

        if (StringUtils.isBlank(codeInRequest)) {
            throw new ValidateCodeException("验证码不能为空!");
        } else if (codeInSession == null) {
            throw new ValidateCodeException("验证码不存在!");
        } else if (codeInSession.isExpire()) {
            sessionStrategy.removeAttribute(servletWebRequest, ValidateController.SESSION_KEY_IMAGE_CODE);
            throw new ValidateCodeException("验证码已过期!");
        } else if (!StringUtils.equalsIgnoreCase(codeInSession.getCode(), codeInRequest)) {
            throw new ValidateCodeException("验证码不正确!");
        }

        sessionStrategy.removeAttribute(servletWebRequest, ValidateController.SESSION_KEY_IMAGE_CODE);
    }
}
- 让验证码过滤器生效:SecurityConfig中进行配置
@Configuration
@EnableGlobalMethodSecurity(prePostEnabled = true)
public class WebSecurityConfig extends WebSecurityConfigurerAdapter {

    @Autowired
    private ValidateCodeFilter validateCodeFilter;

    @Override
    protected void configure(HttpSecurity http) throws Exception {

        http.addFilterBefore(validateCodeFilter, UsernamePasswordAuthenticationFilter.class); // 添加验证码校验过滤器
    }
}
Spring Security 记住我功能
做一个配置就可以了
@Configuration
public class BrowserSecurityConfig extends WebSecurityConfigurerAdapter {

    @Autowired
    private ValidateCodeFilter validateCodeFilter;

    @Autowired
    private UserDetailService userDetailService;

    @Autowired
    private DataSource dataSource;

    @Bean
    public PersistentTokenRepository persistentTokenRepository() {
        JdbcTokenRepositoryImpl jdbcTokenRepository = new JdbcTokenRepositoryImpl();
        jdbcTokenRepository.setDataSource(dataSource);
        jdbcTokenRepository.setCreateTableOnStartup(false);
        return jdbcTokenRepository;
    }

    @Override
    protected void configure(HttpSecurity http) throws Exception {
        // 记住我
        http.rememberMe()
            .tokenRepository(persistentTokenRepository()) // 配置 token 持久化仓库 PersistentTokenRepository 可使用InMemory内存、Jdbc
            .tokenValiditySeconds(3600) // remember 过期时间,单为秒
            .userDetailsService(userDetailService); // 处理自动登录逻辑
    }
}
Spring Security之Session
Session超时 与 并发控制
YAML配置
# session超时设置
server:
  servlet:
    session:
      timeout: 3600	# 单位:秒
SecurityConfig配置
@Configuration
@EnableGlobalMethodSecurity(prePostEnabled = true)
public class WebSecurityConfig extends WebSecurityConfigurerAdapter {

    @Autowired
    private CustomSessionExpiredStrategy sessionExpiredStrategy;

    @Override
    protected void configure(HttpSecurity http) throws Exception {

        // 默认都会产生一个hidden标签 里面有安全相关的验证 防止请求伪造 这边我们暂时不需要 可禁用掉
        http.csrf().disable()
            // 4、Session配置
            .sessionManagement()
            .invalidSessionUrl("/session/invalid")     // session失效后跳转地址
            .maximumSessions(1) // session并发数:同一时段只能有固定数量的账户登录
            .maxSessionsPreventsLogin(true) // 当session数量达到最大session数时,不再允许同账号登录
            .expiredSessionStrategy(customSessionExpiredStrategy)   // session在并发下失效后的处理策略
    }
}
CustomSessionExpiredStrategy:session在并发下失效后的处理策略
import org.springframework.http.HttpStatus;
import org.springframework.security.web.session.SessionInformationExpiredEvent;
import org.springframework.security.web.session.SessionInformationExpiredStrategy;
import org.springframework.stereotype.Component;

import javax.servlet.ServletException;
import javax.servlet.http.HttpServletResponse;
import java.io.IOException;


@Component
public class CustomSessionExpiredStrategy implements SessionInformationExpiredStrategy {

    @Override
    public void onExpiredSessionDetected(SessionInformationExpiredEvent event) throws IOException, ServletException {
        HttpServletResponse response = event.getResponse();
        response.setStatus(HttpStatus.UNAUTHORIZED.value());
        response.setContentType("application/json;charset=utf-8");
        response.getWriter().write("您的账号已经在别的地方登录,当前登录已失效。如果密码遭到泄露,请立即修改密码!");
    }
}
失效后跳转的controller路径:/session/invalid
@RestController
public class BrowserSecurityController {

    @GetMapping("/session/invalid")
    @ResponseStatus(HttpStatus.UNAUTHORIZED)
    public String sessionInvalid(){
        return "session已失效,请重新认证";
    }
}
Session集群处理
用户在A应用上登录认证了,后续通过负载均衡可能会把请求发送到B应用,而B应用服务器上并没有与该请求匹配的认证session信息,所以用户就需要重新进行认证。要解决这个问题,我们可以把session信息存储在第三方容器里(如Redis集群)
依赖:
<dependency>
  <groupId>org.springframework.session</groupId>
  <artifactId>spring-session-data-redis</artifactId>
</dependency>
<dependency>
  <groupId>org.springframework.boot</groupId>
  <artifactId>spring-boot-starter-data-redis</artifactId>
</dependency>
YAML配置
spring:
  session:
    store-type: redis	# 配置Session存储方式为Redis	可选项可参看源码 StoreType 枚举类

# 本地环境下不配置也可以
#  redis:
#    host: 127.0.0.1
#    port: 6379
#    password: 123
#    database: 0
启动类加以下注解
@EnableRedisHttpSession
提示
存放到redis里的对象,必须是要序列化的,即必须实现 Serializable 接口,其属性如果是一个对象的话,也必须实现 Serializable 接口
Session其他操作
SessionRegistry包含了一些使用的操作Session的方法,比如:
踢出用户(让Session失效):
String currentSessionId = request.getRequestedSessionId();

sessionRegistry.getSessionInformation(sessionId).expireNow();
获取所有Session信息:
List<Object> principals = sessionRegistry.getAllPrincipals();
Spring Security + JWT
1、controller
/**
 * 登录方法
 *
 * @param loginCommand 登录信息
 * @return 结果
 */
@PostMapping("/login")
public ResponseDTO<TokenDTO> login(@RequestBody LoginCommand loginCommand) {
    // 生成令牌
    String token = loginService.login(loginCommand);
    SystemLoginUser loginUser = AuthenticationUtils.getSystemLoginUser();
    CurrentLoginUserDTO currentUserDTO = userApplicationService.getLoginUserInfo(loginUser);

    return ResponseDTO.ok(new TokenDTO(token, currentUserDTO));
}
LoginService
@Component
@Slf4j
@RequiredArgsConstructor
public class LoginService {

    private final TokenService tokenService;

	private final AuthenticationManager authenticationManager;

	/**
     * 登录验证
     *
     * @param loginCommand 登录参数
     * @return 结果
     */
    public String login(LoginCommand loginCommand) {
        // 验证码开关
        if (isCaptchaOn()) {
            validateCaptcha(loginCommand.getUsername(), loginCommand.getCaptchaCode(), loginCommand.getCaptchaCodeKey());
        }
        // 用户验证
        Authentication authentication;
        // 解密
        String decryptPassword = decryptPassword(loginCommand.getPassword());
        try {
            // 该方法会去调用UserDetailsServiceImpl#loadUserByUsername  校验用户名和密码  认证鉴权
            authentication = authenticationManager.authenticate(new UsernamePasswordAuthenticationToken(
                loginCommand.getUsername(), decryptPassword));
        } catch (BadCredentialsException e) {
            ThreadPoolManager.execute(AsyncTaskFactory.loginInfoTask(loginCommand.getUsername(), LoginStatusEnum.LOGIN_FAIL,
                MessageUtils.message("Business.LOGIN_WRONG_USER_PASSWORD")));
            throw new ApiException(e, ErrorCode.Business.LOGIN_WRONG_USER_PASSWORD);
        } catch (AuthenticationException e) {
            ThreadPoolManager.execute(AsyncTaskFactory.loginInfoTask(loginCommand.getUsername(), LoginStatusEnum.LOGIN_FAIL, e.getMessage()));
            throw new ApiException(e, ErrorCode.Business.LOGIN_ERROR, e.getMessage());
        } catch (Exception e) {
            ThreadPoolManager.execute(AsyncTaskFactory.loginInfoTask(loginCommand.getUsername(), LoginStatusEnum.LOGIN_FAIL, e.getMessage()));
            throw new ApiException(e, Business.LOGIN_ERROR, e.getMessage());
        }
        // 把当前登录用户 放入上下文中
        SecurityContextHolder.getContext().setAuthentication(authentication);
        // 这里获取的loginUser是UserDetailsServiceImpl#loadUserByUsername方法返回的LoginUser
        SystemLoginUser loginUser = (SystemLoginUser) authentication.getPrincipal();
        recordLoginInfo(loginUser);
        // 生成token
        return tokenService.createTokenAndPutUserInCache(loginUser);
    }


    /**
     * 记录登录信息
     * @param loginUser 登录用户
     */
    public void recordLoginInfo(SystemLoginUser loginUser) {
        ThreadPoolManager.execute(AsyncTaskFactory.loginInfoTask(loginUser.getUsername(), LoginStatusEnum.LOGIN_SUCCESS,
            LoginStatusEnum.LOGIN_SUCCESS.description()));

        SysUserEntity entity = redisCache.userCache.getObjectById(loginUser.getUserId());

        entity.setLoginIp(ServletUtil.getClientIP(ServletHolderUtil.getRequest()));
        entity.setLoginDate(DateUtil.date());
        entity.updateById();
    }
}
2、TokenService
import cn.hutool.core.map.MapUtil;
import cn.hutool.core.util.IdUtil;
import cn.hutool.core.util.StrUtil;
import com.zixq.common.constant.Constants.Token;
import com.zixq.common.exception.ApiException;
import com.zixq.common.exception.error.ErrorCode;
import com.zixq.domain.common.cache.RedisCacheService;
import com.zixq.infrastructure.user.web.SystemLoginUser;
import io.jsonwebtoken.Claims;
import io.jsonwebtoken.Jwts;
import io.jsonwebtoken.MalformedJwtException;
import io.jsonwebtoken.SignatureAlgorithm;
import io.jsonwebtoken.SignatureException;
import io.jsonwebtoken.UnsupportedJwtException;
import java.util.Map;
import java.util.concurrent.TimeUnit;
import javax.servlet.http.HttpServletRequest;
import lombok.Data;
import lombok.RequiredArgsConstructor;
import lombok.extern.slf4j.Slf4j;
import org.springframework.beans.factory.annotation.Value;
import org.springframework.stereotype.Component;

/**
 * token验证处理
 *
 * @author zixq
 */
@Component
@Slf4j
@Data
@RequiredArgsConstructor
public class TokenService {

    /**
     * 自定义令牌标识
     */
    @Value("${token.header}")
    private String header;

    /**
     * 令牌秘钥
     */
    @Value("${token.secret}")
    private String secret;

    /**
     * 自动刷新token的时间,当过期时间不足autoRefreshTime的值的时候,会触发刷新用户登录缓存的时间
     * 比如这个值是20,   用户是8点登录的, 8点半缓存会过期, 当过8.10分的时候,就少于20分钟了,便触发
     * 刷新登录用户的缓存时间
     */
    @Value("${token.autoRefreshTime}")
    private long autoRefreshTime;

    private final RedisCacheService redisCache;

    /**
     * 获取用户身份信息
     *
     * @return 用户信息
     */
    public SystemLoginUser getLoginUser(HttpServletRequest request) {
        // 获取请求携带的令牌
        String token = getTokenFromRequest(request);
        if (StrUtil.isNotEmpty(token)) {
            try {
                Claims claims = parseToken(token);
                // 解析对应的权限以及用户信息
                String uuid = (String) claims.get(Token.LOGIN_USER_KEY);

                return redisCache.loginUserCache.getObjectOnlyInCacheById(uuid);
            } catch (SignatureException | MalformedJwtException | UnsupportedJwtException | IllegalArgumentException jwtException) {
                log.error("parse token failed.", jwtException);
                throw new ApiException(jwtException, ErrorCode.Client.INVALID_TOKEN);
            } catch (Exception e) {
                log.error("fail to get cached user from redis", e);
                throw new ApiException(e, ErrorCode.Client.TOKEN_PROCESS_FAILED, e.getMessage());
            }

        }
        return null;
    }

    /**
     * 创建令牌
     *
     * @param loginUser 用户信息
     * @return 令牌
     */
    public String createTokenAndPutUserInCache(SystemLoginUser loginUser) {
        loginUser.setCachedKey(IdUtil.fastUUID());

        redisCache.loginUserCache.set(loginUser.getCachedKey(), loginUser);

        return generateToken(MapUtil.of(Token.LOGIN_USER_KEY, loginUser.getCachedKey()));
    }

    /**
     * 当超过20分钟,自动刷新token
     *
     * @param loginUser 登录用户
     */
    public void refreshToken(SystemLoginUser loginUser) {
        long currentTime = System.currentTimeMillis();
        if (currentTime > loginUser.getAutoRefreshCacheTime()) {
            loginUser.setAutoRefreshCacheTime(currentTime + TimeUnit.MINUTES.toMillis(autoRefreshTime));
            // 根据uuid将loginUser存入缓存
            redisCache.loginUserCache.set(loginUser.getCachedKey(), loginUser);
        }
    }


    /**
     * 从数据声明生成令牌
     *
     * @param claims 数据声明
     * @return 令牌
     */
    private String generateToken(Map<String, Object> claims) {
        return Jwts.builder()
            .setClaims(claims)
            .signWith(SignatureAlgorithm.HS512, secret).compact();
    }

    /**
     * 从令牌中获取数据声明
     *
     * @param token 令牌
     * @return 数据声明
     */
    private Claims parseToken(String token) {
        return Jwts.parser()
            .setSigningKey(secret)
            .parseClaimsJws(token)
            .getBody();
    }

    /**
     * 从令牌中获取用户名
     *
     * @param token 令牌
     * @return 用户名
     */
    private String getUsernameFromToken(String token) {
        Claims claims = parseToken(token);
        return claims.getSubject();
    }

    /**
     * 获取请求token
     *
     * @return token
     */
    private String getTokenFromRequest(HttpServletRequest request) {
        String token = request.getHeader(header);
        if (StrUtil.isNotEmpty(token) && token.startsWith(Token.PREFIX)) {
            token = StrUtil.stripIgnoreCase(token, Token.PREFIX, null);
        }
        return token;
    }
}
3、JwtAuthenticationTokenFilter
import com.zixq.infrastructure.user.AuthenticationUtils;
import com.zixq.infrastructure.user.web.SystemLoginUser;
import com.zixq.admin.customize.service.login.TokenService;
import java.io.IOException;
import javax.servlet.FilterChain;
import javax.servlet.ServletException;
import javax.servlet.http.HttpServletRequest;
import javax.servlet.http.HttpServletResponse;
import lombok.RequiredArgsConstructor;
import lombok.extern.slf4j.Slf4j;
import org.springframework.security.authentication.UsernamePasswordAuthenticationToken;
import org.springframework.security.core.context.SecurityContextHolder;
import org.springframework.security.web.authentication.WebAuthenticationDetailsSource;
import org.springframework.stereotype.Component;
import org.springframework.web.filter.OncePerRequestFilter;

/**
 * token过滤器 验证token有效性
 * 继承OncePerRequestFilter类的话  可以确保只执行filter一次, 避免执行多次
 *
 * @author valarchie
 */
@Component
@Slf4j
@RequiredArgsConstructor
public class JwtAuthenticationTokenFilter extends OncePerRequestFilter {

    private final TokenService tokenService;

    @Override
    protected void doFilterInternal(HttpServletRequest request, HttpServletResponse response, FilterChain chain)
        throws ServletException, IOException {
        SystemLoginUser loginUser = tokenService.getLoginUser(request);
        if (loginUser != null && AuthenticationUtils.getAuthentication() == null) {
            tokenService.refreshToken(loginUser);
            // 如果没有将当前登录用户放入到上下文中的话,会认定用户未授权,返回用户未登陆的错误
            putCurrentLoginUserIntoContext(request, loginUser);

            log.debug("request process in jwt token filter. get login user id: {}", loginUser.getUserId());
        }
        chain.doFilter(request, response);
    }


    private void putCurrentLoginUserIntoContext(HttpServletRequest request, SystemLoginUser loginUser) {
        UsernamePasswordAuthenticationToken authToken = new UsernamePasswordAuthenticationToken(loginUser,
            null, loginUser.getAuthorities());
        authToken.setDetails(new WebAuthenticationDetailsSource().buildDetails(request));
        SecurityContextHolder.getContext().setAuthentication(authToken);
    }
}
AuthenticationUtils#getAuthentication
/**
 * 获取Authentication
 */
public static Authentication getAuthentication() {
    return SecurityContextHolder.getContext().getAuthentication();
}
4、在SecurityConfig中配置
@Configuration
@EnableWebSecurity
@EnableGlobalMethodSecurity(prePostEnabled = true)
@RequiredArgsConstructor	// lombok
public class SecurityConfig {

    /**
     * token认证过滤器
     */
    private final JwtAuthenticationTokenFilter jwtTokenFilter;

    @Bean
    public SecurityFilterChain filterChain(HttpSecurity httpSecurity) throws Exception {

        // 基于token,所以不需要session
        httpSecurity.sessionManagement()
            .sessionCreationPolicy(SessionCreationPolicy.STATELESS).and()

        /*
         * HttpSecurity addFilterBefore(Filter filter, Class<? extends Filter> beforeFilter)
         *
         * 添加JWT filter   需要一开始就通过token识别出登录用户 并放到上下文中   所以jwtFilter需要放前面
         */
        httpSecurity.addFilterBefore(jwtTokenFilter, UsernamePasswordAuthenticationFilter.class);

        return httpSecurity.build();
    }
}
分布式文件系统:MinIO
MinIO官方学习地址:https://www.minio.org.cn/docs/minio/linux/developers/java/minio-java.html#minio-java-quickstart
MinIO-server下载地址:https://repo1.maven.org/maven2/io/minio/minio/
MinIO官网Linux单节点部署教程地址:https://www.minio.org.cn/docs/minio/linux/operations/install-deploy-manage/deploy-minio-single-node-single-drive.html
如下是Windows示例,Windows中下载 minio.exe 之后,进入下载目录运行如下命令即可启动 minio server
minio.exe server 数据文件目录
访问运行后得到的链接即可进入minio后台管理,默认用户名和密码:minioadmin / minioadmin
- 依赖
<dependency>
	<groupId>io.minio</groupId>
	<artifactId>minio</artifactId>
	<version>8.5.10</version>
</dependency>
- yml配置
minio:
  endpoint: http://localhost:9000
  accessKey: minioadmin
  secretKey: minioadmin
  bucketName: test-bucket
- 解析yml的minio配置
package com.zixq.properties;

import lombok.Data;
import org.springframework.boot.context.properties.ConfigurationProperties;
import org.springframework.stereotype.Component;

/**
 * <p>
 * 解析 mioio.properties
 * </p>
 *
 * <p>@author : ZiXieqing</p>
 */
@Data
@ConfigurationProperties(prefix = "mioio")
@Component
public class MinIOProperties {
    /**
     * minIO服务端地址
     */
    private String endpoint;
    /**
     * 用户名
     */
    private String accessKey;
    /**
     * 密码
     */
    private String secretKey;
    /**
     * 存储桶名称
     */
    private String bucketName;
}
- 服务编码:文件上传
package com.zixq.service;

import cn.hutool.core.date.DateUtil;
import com.zixq.properties.MinIOProperties;
import io.minio.BucketExistsArgs;
import io.minio.MakeBucketArgs;
import io.minio.MinioClient;
import io.minio.PutObjectArgs;
import lombok.extern.log4j.Log4j2;
import org.springframework.beans.factory.annotation.Autowired;
import org.springframework.stereotype.Service;
import org.springframework.web.multipart.MultipartFile;

import java.util.Date;
import java.util.UUID;

/**
 * <p>
 * minio文件上传
 * </p>
 *
 * <p>@author : ZiXieqing</p>
 */
@Service
@Log4j2
public class FileService {

    @Autowired
    private MinIOProperties minIOProperties;

    /**
     * 上传文件
     *
     * @param file MultipartFile
     * @return 上传后的文件URL地址
     */
    public String upload(MultipartFile file) {

        String url = "";

        try {
            // 创建MinioClient对象
            MinioClient minioClient = MinioClient.builder()
                    .endpoint(minIOProperties.getEndpoint())
                    .credentials(minIOProperties.getAccessKey(),
                            minIOProperties.getSecretKey())
                    .build();

            // 创建bucket
            boolean found = minioClient.bucketExists(
                    BucketExistsArgs.builder()
                            .bucket(minIOProperties.getBucketName())
                            .build()
           );
            if (!found) {
                // bucket不存在则创建
                minioClient.makeBucket(
                        MakeBucketArgs.builder()
                                .bucket(minIOProperties.getBucketName())
                                .build()
               );
            } else {
                log.info("Bucket {} 已经存在", minIOProperties.getBucketName());
            }

            // 获取上传文件名称
            // 1 每个上传文件名称唯一的   uuid生成 01.jpg
            // 2 根据当前日期对上传文件进行分组 20230910

            // 20230910/u7r54209l097501.jpg
            String dateDir = DateUtil.format(new Date(), "yyyyMMdd");
            String uuid = UUID.randomUUID().toString().replaceAll("-", "");
            String filename = dateDir + "/" + uuid + file.getOriginalFilename();

            // 文件上传
            minioClient.putObject(
                    PutObjectArgs.builder()
                            .bucket(minIOProperties.getBucketName())
                            .object(filename)
                            .stream(file.getInputStream(), file.getSize(), -1)
                            .build()
           );

            // 获取上传文件在minio路径
            // https://127.0.0.1:9000/test-bucket/01.jpg
            url = minIOProperties.getEndpoint() + "/" + minIOProperties.getBucketName() + "/" + filename;

        } catch (Exception e) {
            e.printStackTrace();
        }

        return url;
    }
}
文件系统:阿里云 OSS
阿里云对象存储OSS(Object Storage Service)是一款海量、安全、低成本、高可靠的云存储服务,可提供99.9999999999%(12个9)的数据持久性,99.995%的数据可用性。多种存储类型供选择,全面优化存储成本
OSS具有与平台无关的RESTful API接口,您可以在任何应用、任何时间、任何地点存储和访问任意类型的数据
您可以使用阿里云提供的API、SDK包或者OSS迁移工具轻松地将海量数据移入或移出阿里云OSS。数据存储到阿里云OSS以后,您可以选择标准存储(Standard)作为移动应用、大型网站、图片分享或热点音视频的主要存储方式,也可以选择成本更低、存储期限更长的低频访问存储(Infrequent Access)、归档存储(Archive)、冷归档存储(Cold Archive)或者深度冷归档(Deep Cold Archive)作为不经常访问数据的存储方式
支付宝/钉钉登录,搜索OSS(对象存储),初次使用按照导航立即开通即可,开通后进入控制台,创建bucket
头像 -> AccessKey管理 - > 创建AccessKey -> 获取AccessKeyId和AccessKeySecret,这两个东西写代码时需要
- Maven依赖
<!-- 阿里云OSS -->
<dependency>
    <groupId>com.aliyun.oss</groupId>
    <artifactId>aliyun-sdk-oss</artifactId>
    <version>3.15.1</version>
</dependency>
<!-- Java 9及以上的版本,需要添加JAXB相关依赖 -->
<dependency>
    <groupId>javax.xml.bind</groupId>
    <artifactId>jaxb-api</artifactId>
    <version>2.3.1</version>
</dependency>
<dependency>
    <groupId>javax.activation</groupId>
    <artifactId>activation</artifactId>
    <version>1.1.1</version>
</dependency>
<!-- no more than 2.3.3-->
<dependency>
    <groupId>org.glassfish.jaxb</groupId>
    <artifactId>jaxb-runtime</artifactId>
    <version>2.3.3</version>
</dependency>
- YML配置
aliyun:
  oss:
    endpoint: oss-cn-hangzhou.aliyuncs.com # 这个东西在bucket列表中有	概览->访问端口->外网访问
    access-key-id: LTAI5tagyw8aDSDzCADhwvjV	# 上面让保存的两个东西
    access-key-secret: 295jtyL5yjbgM2wPF6u2P8qC3sHEKD
    bucket-name: zixq-aliyun-bucket # 创建的bucket
- 获取YML配置内容
package com.zixq.properties;

import lombok.Data;
import org.springframework.boot.context.properties.ConfigurationProperties;
import org.springframework.stereotype.Component;

/**
 * <p>
 * 获取YML中的OSS配置项内容
 * </p>
 *
 * <p>@author : ZiXieqing</p>
 */
@Data
@ConfigurationProperties(prefix = "aliyun.oss")
@Component
public class OssProperties {
    private String endpoint;
    private String accessKeyId;
    private String accessKeySecret;
    private String bucketName;
}
文件上传
文件下载、文件删除.................参考官网
package com.zixq.service;

import cn.hutool.core.lang.UUID;
import com.aliyun.oss.OSS;
import com.aliyun.oss.OSSClientBuilder;
import com.aliyun.oss.OSSException;
import com.zixq.properties.OssProperties;
import org.springframework.beans.factory.annotation.Autowired;
import org.springframework.stereotype.Service;
import org.springframework.web.multipart.MultipartFile;

import java.io.IOException;
import java.time.LocalDateTime;
import java.time.format.DateTimeFormatter;

/**
 * <p>
 * 阿里云OSS服务
 * </p>
 *
 * <p>@author : ZiXieqing</p>
 */
@Service
public class OssService {

    @Autowired
    private OssProperties ossProperties;

    /**
     * OSS文件上传      这里是从官网copy过来改的
     * 官方文档:https://help.aliyun.com/zh/oss/developer-reference/getting-started?spm=a2c4g.11186623.0.0.3a2a1f49smPVqU
     *
     * @param file MultipartFile
     * @return 文件上传后的URL地址
     */
    public String fileUpload(MultipartFile file) {
        // Endpoint以华东1(杭州)为例,其它Region请按实际情况填写。
        // String endpoint = "https://oss-cn-hangzhou.aliyuncs.com";

        // 从环境变量中获取访问凭证。运行本代码示例之前,请确保已设置环境变量OSS_ACCESS_KEY_ID和OSS_ACCESS_KEY_SECRET。
        // EnvironmentVariableCredentialsProvider credentialsProvider = CredentialsProviderFactory.newEnvironmentVariableCredentialsProvider();

        // 填写Bucket名称,例如examplebucket。
        // String bucketName = "examplebucket";
        // 填写Object完整路径,例如exampledir/exampleobject.txt。Object完整路径中不能包含Bucket名称。
        // String objectName = "exampledir/exampleobject.txt";
        String fileNameSuffix = file.getOriginalFilename().substring(file.getOriginalFilename().lastIndexOf("."));
        String uuid = UUID.randomUUID().toString(true);
        String CreateDate = LocalDateTime.now().format(DateTimeFormatter.ofPattern("yyyy-MM-dd"));
        // 拼接文件路径+文件名   例如 2021-01-01/uuid.jpg
        String objectName = CreateDate + "/" + uuid + fileNameSuffix;


        // 创建OSSClient实例。
        // OSS ossClient = new OSSClientBuilder().build(ossProperties.getEndpoint(), credentialsProvider);
        OSS ossClient = new OSSClientBuilder()
                .build(ossProperties.getEndpoint(), ossProperties.getAccessKeyId(), ossProperties.getAccessKeySecret());

        // 上传后的文件URL地址  类似 https://zixq-aliyun-bucket.oss-cn-hangzhou.aliyuncs.com/42.jpg
        String url = "";

        try {
            // 上传文件
            ossClient.putObject(ossProperties.getBucketName(), objectName, file.getInputStream());

            // 拼接文件上传后的URL地址  https://examplebucket.oss-cn-hangzhou.aliyuncs.com/exampledir/exampleobject.txt
            url = "https://" + ossProperties.getBucketName() + "." + ossProperties.getEndpoint() + "/" + objectName;
        } catch (OSSException oe) {
            System.out.println("Caught an OSSException, which means your request made it to OSS, "
                    + "but was rejected with an error response for some reason.");
            System.out.println("Error Message:" + oe.getErrorMessage());
            System.out.println("Error Code:" + oe.getErrorCode());
            System.out.println("Request ID:" + oe.getRequestId());
            System.out.println("Host ID:" + oe.getHostId());
        }  catch (IOException e) {
            throw new RuntimeException(e);
        } finally {
            if (ossClient != null) {
                ossClient.shutdown();
            }
        }

        return url;
    }
}
分布式文件系统:FastDFS
直接去这里:分布式文件系统FastDFS
定时任务
小顶堆数据结构
就是一个完全二叉树,同时这个二叉树遵循一个规则,根节点存的值永远小于两个子节点存的值。
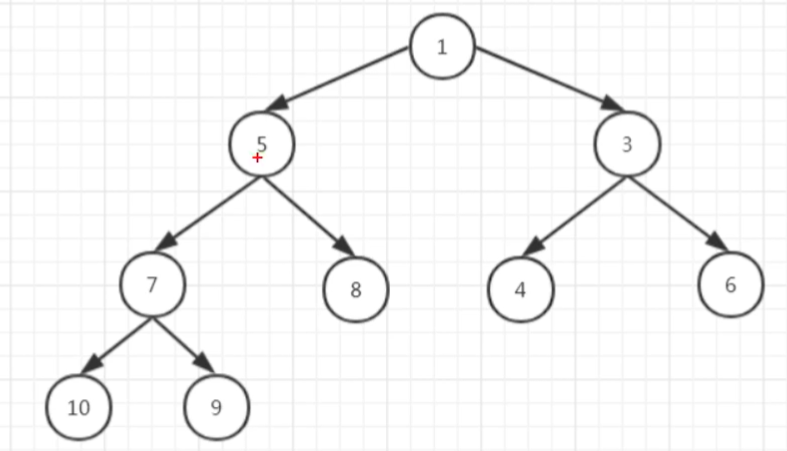
树结构只是一种逻辑结构,因此:数据还是要存起来的,而这种小顶堆就是采用了数组。

即:数组下标为0的位置不放值,然后把树结构的数据放在对应位置。
- 树结构数据转成数组数据的规律:从上到下、从左到右,即:根节点、左孩子节点、右孩子节点(对照上面两个图来看)。
- 这种存储方式找父节点也好找,就是数组中(当前数值的下标值 % 2) ,这种算法的原理:就是利用二叉树的深度 和 存放数据个数的关系【数列】,即:顶层最多可以放多少个数据?20;第二层最多可以存放多少个数据?21...........
这种小顶堆需要明白三个点:
- 存数据的方式: 上述提到了
- 取数据的方式:从底向上。即:从最底层开始,若比找寻的值小,那就找父节点,父节点也比所找寻数值小,继续找父节点的父节点.,要是比父节点大,那就找相邻兄弟节点嘛.........依次类推,最后就可以找到所找寻的数据了
- 存数据的方式:自底向上、逐渐上浮。即:从最底层开始,存的值 和 父节点相比,比父节点小的话,那存的值就是父节点存的值进行换位.....以此类推
时间轮算法
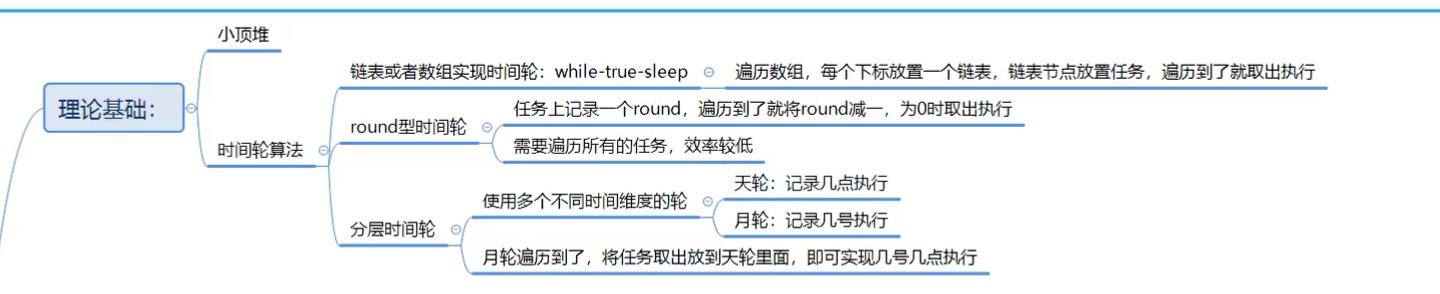
基础型时间轮
模仿时钟,24个刻度(数组,每一个刻度作为数组的下标 ),每一个刻度后面就是一个链表,这个链表中放对应的定时任务,到了指定时间点就把后面链表中的任务全部遍历出来执行
缺点:当要弄年、月、秒这种就又要再加轮子,这样就很复杂了,因此:此种方式只适合记一天24小时的定时任务,涉及到年月秒就不行了
round型时间轮
在前面基础型时间轮的基础上,在每一个刻度的位置再加一个round值( 每个刻度后面还是一个链表存定时任务 ),round值记录的就是实际需求的值,如:一周,那round值就为7,当然这个round值可以是1,也可以是30....,每一次遍历时钟数组的那24个刻度时,遍历到某一个刻度,那么就让round值减1,直到round值为0时,就表示24数组中当前这个刻度存的定时任务该执行了
缺点:需要让round值减1,那么就是需要对时间轮进行遍历,如:定时任务应该是4号执行,但是3号遍历时间轮时,定时任务并不执行,而此时也需要遍历时间轮从而让round值减1,这浪费了性能
分量时间轮
后续的定时任务框架就是基于这个做的,如:Spring中有一个@Scheduleed(cron = "x x x x ....")注解,它的这个cron时间表达式就是基于这种分量时间轮
使用多个轮子:
- 如:一个时间轮记录小时0 - 24,而另一个轮子记录天数0 - 30天
- 先遍历天伦中的刻度,若今天是0 -30中要执行定时任务的那一天,那么天轮的刻度指向的就是时轮
- 然后再去遍历时轮中对应的那个刻度,从而找到这个刻度后面的链表,将链表遍历出来,执行定时任务
JDK之Thread实现:while-true-sleep
提示
- 需要用
try...catch捕获异常,否则如果出现异常,就直接退出循环,下次将无法继续执行了- 该线程可以定义成
守护线程,在后台默默执行即可
public static void init() {
    new Thread(() -> {
        while (true) {	// 死循环
            try {
                // TODO doSameThing

                Thread.sleep(1000 * 60 * 5);
            } catch (Exception e) {
                log.error(e);
            }
        }
    }).start();
}
这种方式做的定时任务,只能周期性执行,不能支持定时在某个时间点执行,无法应对一些较为复杂的场景
场景:有时需要每隔10分钟去下载某个文件,或者每隔5分钟去读取模板文件生成静态html页面等等,一些简单的周期性任务场景
JDK之Timer实现
Timer类是JDK专门提供的定时器工具,用来在后台线程计划执行指定任务,在java.util包下,要跟TimerTask一起配合使用
底层原理就是:小顶堆,只是它的底层用了一个taskQueue任务队列来充当小顶堆中的那个数组,存取找的逻辑都是和小顶堆一样的
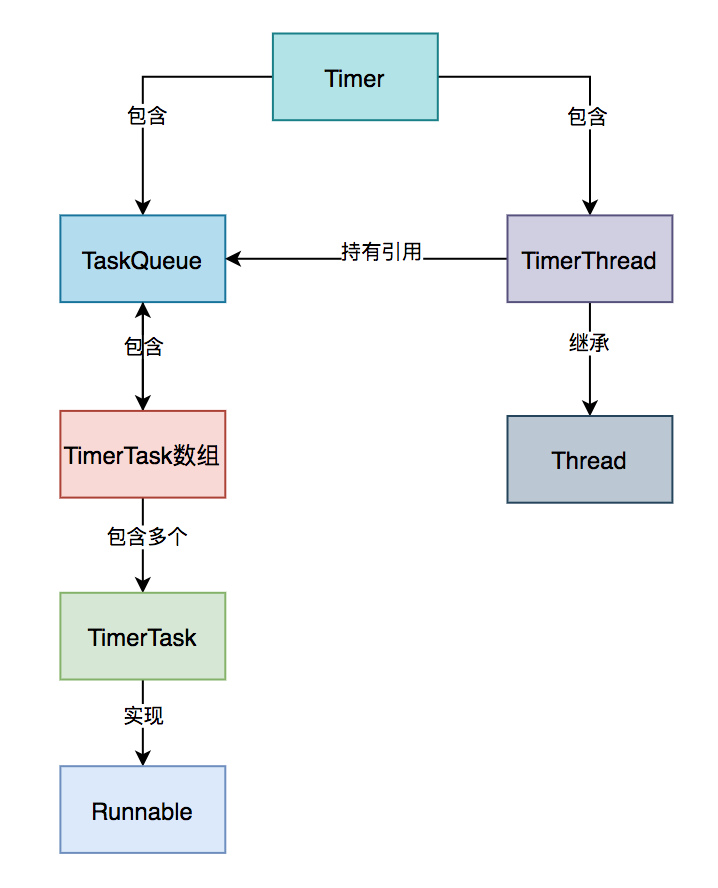
有着弊端:
schedule()API真正的执行时间 取决 上一个任务的结束时间。会出现:少执行了次数scheduleAtFixedRate()API想要的是严格按照预设时间 12:00:00 12:00:02 12:00:04,但是最终结果是:执行时间会乱- 底层调的是
run(),是单线程。缺点:任务阻塞(阻塞原因:任务超时)

import java.util.Date;
import java.util.Timer;
import java.util.TimerTask;

public class TimerTest {

    public static void main(String[] args) {

        // 任务启动
        Timer t = new Timer();
        for (int i=0; i<2; i++){
            TimerTask task = new FooTimerTask("foo"+i);
            // 任务添加   10s 5次   4 3
            t.scheduleAtFixedRate(task,new Date(),2000);
            /*
             * 预设的执行时间nextExecutorTime 12:00:00   12:00:02  12:00:04
             * schedule  真正的执行时间 取决上一个任务的结束时间  ExecutorTime   03  05  08  丢任务(少执行了次数)
             * scheduleAtFixedRate  严格按照预设时间 12:00:00   12:00:02  12:00:04(执行时间会乱)
             * 单线程  任务阻塞  任务超时
             * */
        }
    }
}


class FooTimerTask extends TimerTask {

    private String name;

    public FooTimerTask(String name) {
        this.name = name;
    }

    public void run() {
        try {
            System.out.println("name="+name+",startTime="+new Date());

            Thread.sleep(3000);

            System.out.println("name="+name+",endTime="+new Date());

            // 因为是单线程,所以解决办法:使用线程池执行
        } catch (InterruptedException e) {
            e.printStackTrace();
        }
    }
}
提示
如果
TimerTask抛出RuntimeException,Timer会停止所有任务的运行,所以阿里巴巴开发者规范中不建议使用它。
主要包含的6个方法:
schedule(TimerTask task, Date time), 指定任务task在指定时间time执行schedule(TimerTask task, long delay), 指定任务task在指定延迟delay后执行schedule(TimerTask task, Date firstTime,long period),指定任务task在指定时间firstTime执行后,进行重复固定延迟频率peroid的执行schedule(TimerTask task, long delay, long period), 指定任务task 在指定延迟delay 后,进行重复固定延迟频率peroid的执行scheduleAtFixedRate(TimerTask task,Date firstTime,long period), 指定任务task在指定时间firstTime执行后,进行重复固定延迟频率peroid的执行scheduleAtFixedRate(TimerTask task, long delay, long period), 指定任务task 在指定延迟delay 后,进行重复固定延迟频率peroid的执行
定时任务线程池:ScheduledExecutorService
ScheduledExecutorService是JDK1.5+版本引进的定时任务,是基于多线程的,该类位于java.util.concurrent并发包下。设计的初衷是为了解决Timer单线程执行,多个任务之间会互相影响的问题
原理:timer +线程池执行来做到的
如下的 Executors.newScheduledThreadPool(5); 创建线程池的方法在高并发情况下,最好别用
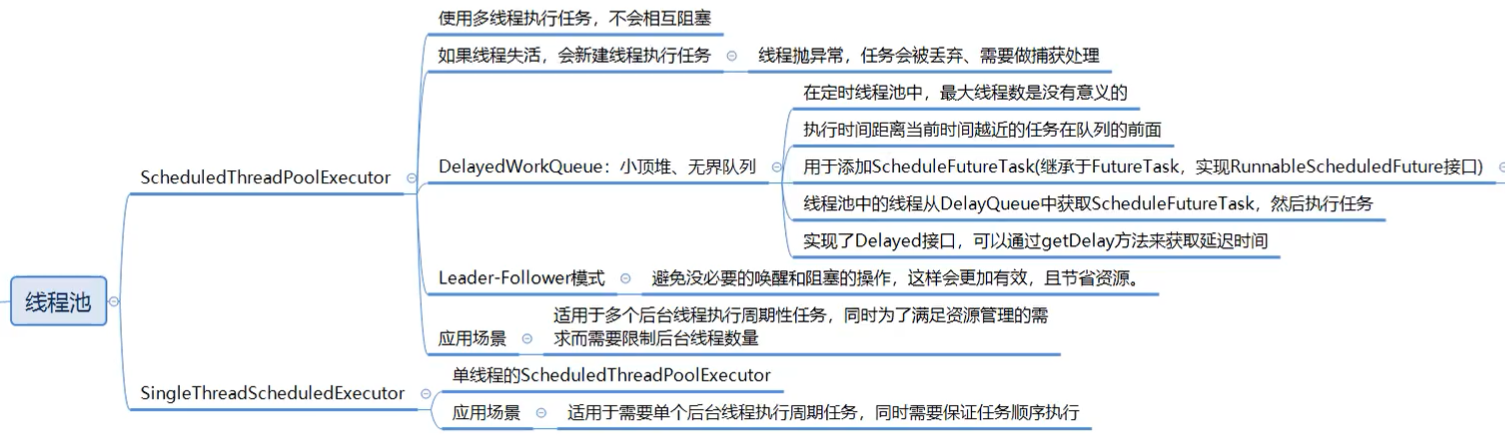
import java.util.Date;
import java.util.concurrent.Executors;
import java.util.concurrent.ScheduledExecutorService;
import java.util.concurrent.TimeUnit;

public class ScheduleThreadPoolTest {

    public static void main(String[] args) {
        /*
         * 缺点:允许的请求队列长度为 Integer.MAX_VALUE,可能会堆积大量的请求,从而导致 OOM
         *		不支持一些较复杂的定时规则
         * */
        ScheduledExecutorService scheduledThreadPool = Executors.newScheduledThreadPool(5);

        for (int i=0;i<2;i++){
            scheduledThreadPool.scheduleAtFixedRate(new Task("task-"+i),0,2, TimeUnit.SECONDS);
        }
    }
}


class Task implements Runnable{

    private String name;

    public Task(String name) {
        this.name = name;
    }

    public void run() {
        try {
            System.out.println("name="+name+",startTime="+new Date());

            Thread.sleep(3000);

            System.out.println("name="+name+",endTime="+new Date());

        } catch (InterruptedException e) {
            e.printStackTrace();
        }
    }
}
主要包含的4个方法:
schedule(Runnable command,long delay,TimeUnit unit),带延迟时间的调度,只执行一次,调度之后可通过Future.get()阻塞直至任务执行完毕schedule(Callable<V> callable,long delay,TimeUnit unit),带延迟时间的调度,只执行一次,调度之后可通过Future.get()阻塞直至任务执行完毕,并且可以获取执行结果scheduleAtFixedRate,表示以固定频率执行的任务,如果当前任务耗时较多,超过定时周期period,则当前任务结束后会立即执行scheduleWithFixedDelay,表示以固定延时执行任务,延时是相对当前任务结束为起点计算开始时间
Spring Task:@Scheduled注解实现
这玩意儿是Spring提供的,即 Spring Task
注意点:
要在相应的代码中使用
@Scheduled(cron="cron表达式")注解来进行任务配置,那么就需要在主启动类上加上@EnableScheduling // 开启定时任务注解
@Scheduled的cron表达式的值可以弄到配置文件中,然后采用如@Scheduled(cron = "${zixq.spring.task.cron}")的形式读取
缺点:默认单线程、不支持集群方式部署;其定时时间不能动态更改、不能做数据存储型定时任务,它适用于具有固定任务周期的任务
@Scheduled这个注解的几个属性
fixedRate:表示任务执行之间的时间间隔,具体是指两次任务的开始时间间隔,所以第二次任务开始时,第一次任务可能还没结束fixedDelay:表示任务执行之间的时间间隔,具体是指本次任务结束到下次任务开始之间的时间间隔initialDelay:表示首次任务启动的延迟时间cron 表达式:秒 分 小时 日 月 周 年 。这个可以直接浏览器搜索“cron表达式在线工具”,生成表达式复制粘贴
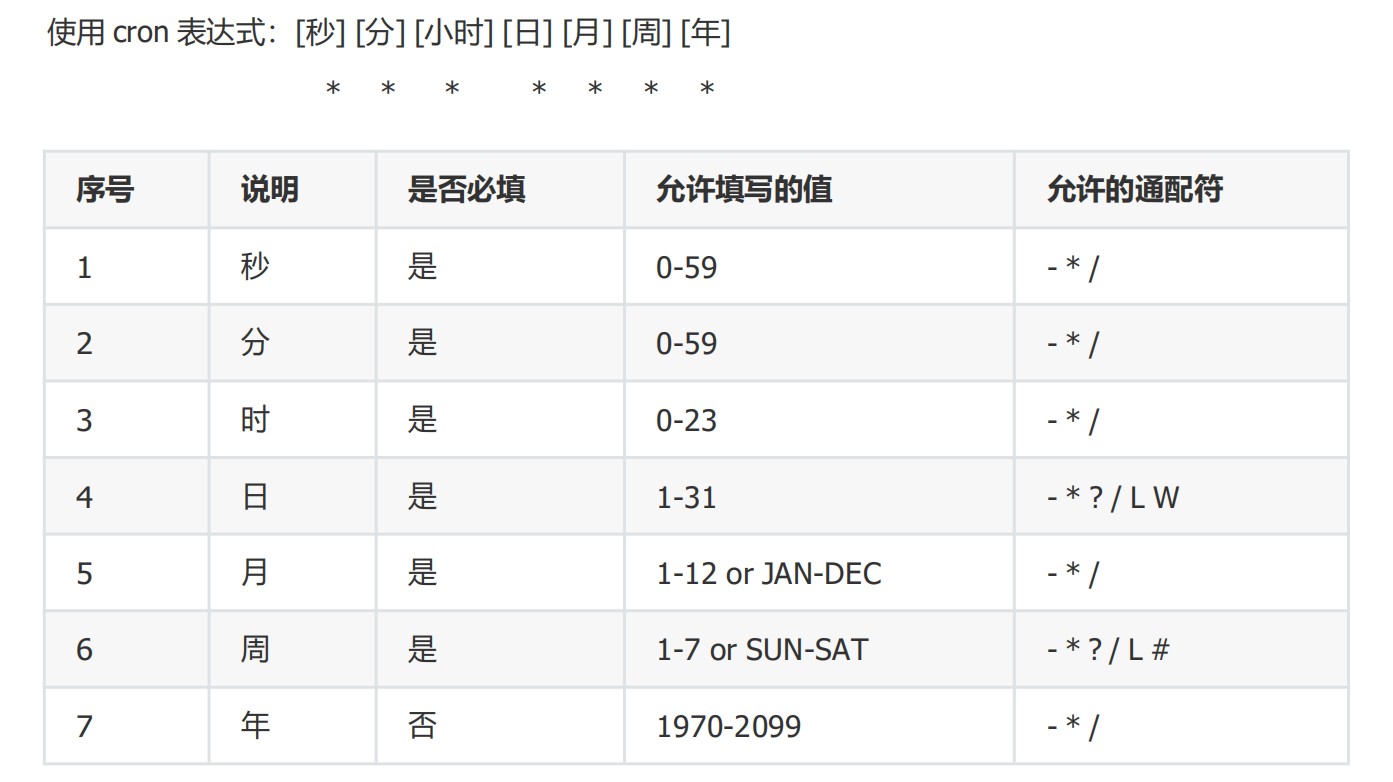
上图通配符含义
| 通配符 | 意义 |
|---|---|
? |
表示不指定值,即不关心某个字段的取值时使用 需要注意的是,月份中的日期和星期可能会起冲突,因此在配置时这两个得有一个是 ? |
* |
表示所有值,例如:在秒的字段上设置 *,表示每一秒都会触发 |
, |
用来分开多个值,例如在周字段上设置 "MON,WED,FRI" 表示周一,周三和周五触发 |
- |
表示区间,例如在秒上设置 "10-12",表示 10,11,12秒都会触发 |
/ |
用于递增触发,如在秒上面设置"5/15" 表示从5秒开始,每增15秒触发(5,20,35,50) |
# |
序号(表示每月的第几个周几),例如在周字段上设置"6#3"表示在每月的第三个周六,(用 在母亲节和父亲节再合适不过了) |
L |
表示最后的意思 在日字段设置上,表示当月的最后一天(依据当前月份,如果是二月还会自动判断是否是润年 在周字段上表示星期六,相当于"7"或"SAT"(注意周日算是第一天) 如果在"L"前加上数字,则表示该数据的最后一个。例如在周字段上设置"6L"这样的格式,则表 示"本月最后一个星期五" |
W |
表示离指定日期的最近工作日(周一至周五) 例如在日字段上设置"15W",表示离每月15号最近的那个工作日触发。如果15号正好是周六,则找最近的周五(14号)触发, 如果15号是周未,则找最近的下周一(16号)触发,如果15号正好在工作日(周一至周五),则就在该天触发 如果指定格式为 "1W",它则表示每月1号往后最近的工作日触发。如果1号正是周六,则将在3号下周一触发。(注,"W"前只能设置具体的数字,不允许区间"-") |
L 和 W组合 |
如果在日字段上设置"LW",则表示在本月的最后一个工作日触发(一般指发工资) |
周字段的设置 |
若使用英文字母是不区分大小写的 ,即 MON 与mon相同 |
cron表达式举例
“0 0 12 * * ?”				每天中午12点触发

“0 15 10 ? * *”				每天上午10:15触发
“0 15 10 * * ?”
“0 15 10 * * ? *”

“0 15 10 * * ? 2005”		2005年的每天上午10:15 触发

“0 0/5 14 * * ?”			在每天下午2点到下午2:55期间的每5分钟触发

“0 0-5 14 * * ?”			在每天下午2点到下午2:05期间的每1分钟触发

“0 10,44 14 ? 3 WED”		每年三月的星期三的下午2:10和2:44触发

“0 15 10 ? * MON-FRI”		周一至周五的上午10:15触发

“0 15 10 ? * 6L”			每月的最后一个星期五上午10:15触发

“0 15 10 ? * 6L 2002-2005”	2002年至2005年的每月的最后一个星期五上午10:15触发

“0 15 10 ? * 6#3”			每月的第三个星期五上午10:15触发

0 23-7/2,8 * * *			晚上11点到早上8点之间每两个小时,早上八点

0 11 4 * 1-3				每个月的4号和每个礼拜的礼拜一到礼拜三的早上11点
注意点:
cron表达式中“年”不可以跨年,默认是当前年执行(即:想每2年执行一次做不到),所以“年”可以不指定,即:cron表达式只写6位即可(Spring4以上的版本中,cron表达式包含6个参数)
Linux之crontab实现
crontab需要crond服务支持,crond是linux下用来周期地执行某种任务的一个守护进程,在安装linux操作系统后,默认会安装crond服务工具,且crond服务默认就是自启动的。crond进程每分钟会定期检查是否有要执行的任务,如果有,则会自动执行该任务
可以通过以下命令操作相关服务
# 查看运行状态
service crond status
# 启动服务
service crond start
# 关闭服务
service crond stop
# 重启服务
service crond restart
# 重新载入配置
service crond reload
使用crontab的优缺点:
- 优点:方便修改定时规则,支持一些较复杂的定时规则,通过文件可以统一管理配好的各种定时脚本
- 缺点:如果定时任务非常多,不太好找,而且要求操作系统必须是
linux,否则无法执行
场景:临时统计线上的数据,然后导出到excel表格或其他地方中,这种需求有时较为复杂,光靠写SQL语句是无法满足需求的,这就需要写Java代码了。然后将该程序打成一个jar包,在线上环境执行
crontab语法
crontab命令的基本格式如下:
crontab [参数] [文件名]
如果没有指定文件名,则接收键盘上输入的命令,并将它载入到crontab
参数功能对照表如下:
| 参数 | 功能 |
|---|---|
| -u | 指定用户 |
| -e | 编辑某个用户的crontab文件内容 |
| -l | 显示某个用户的crontab文件内容 |
| -r | 删除某用户的crontab文件 |
| -i | 删除某用户的crontab文件时需确认 |
以上参数,如果没有使用-u指定用户,则默认使用的当前用户。
通过crontab -e命令编辑文件内容,具体语法如下:
[分] [小时] [日期] [月] [星期] 具体任务

# 示例	每天凌晨4点,定时执行tool.jar程序,并且把日志输出到tool.log文件中
0 4 * * * /usr/local/java/jdk1.8/bin/java -jar /data/app/tool.jar > /logs/tool.log &
其中:
- 分,表示多少分钟,范围:0-59
- 小时,表示多少小时,范围:0-23
- 日期,表示具体在哪一天,范围:1-31
- 月,表示多少月,范围:1-12
- 星期,表示多少周,范围:0-7,0和7都代表星期日
还有一些特殊字符,比如:
*代表任何时间,比如:*1***表示每天凌晨1点执行。/代表每隔多久执行一次,比如:*/5 ****表示每隔5分钟执行一次。,代表支持多个,比如:10 7,9,12 ***表示在每天的7、9、12点10分各执行一次。-代表支持一个范围,比如:10 7-9 ***表示在每天的7、8、9点10分各执行一次。
Spring Quartz 任务调度
quartz是OpenSymphony开源组织在Job scheduling领域的开源项目,是由Java开发的一个开源的任务日程管理系统可以做如下事情:
- 作业调度:调用各种框架的作业脚本,例如shell,hive等
- 定时任务:在某一预定的时刻,执行你想要执行的任务
组成结构图如下:
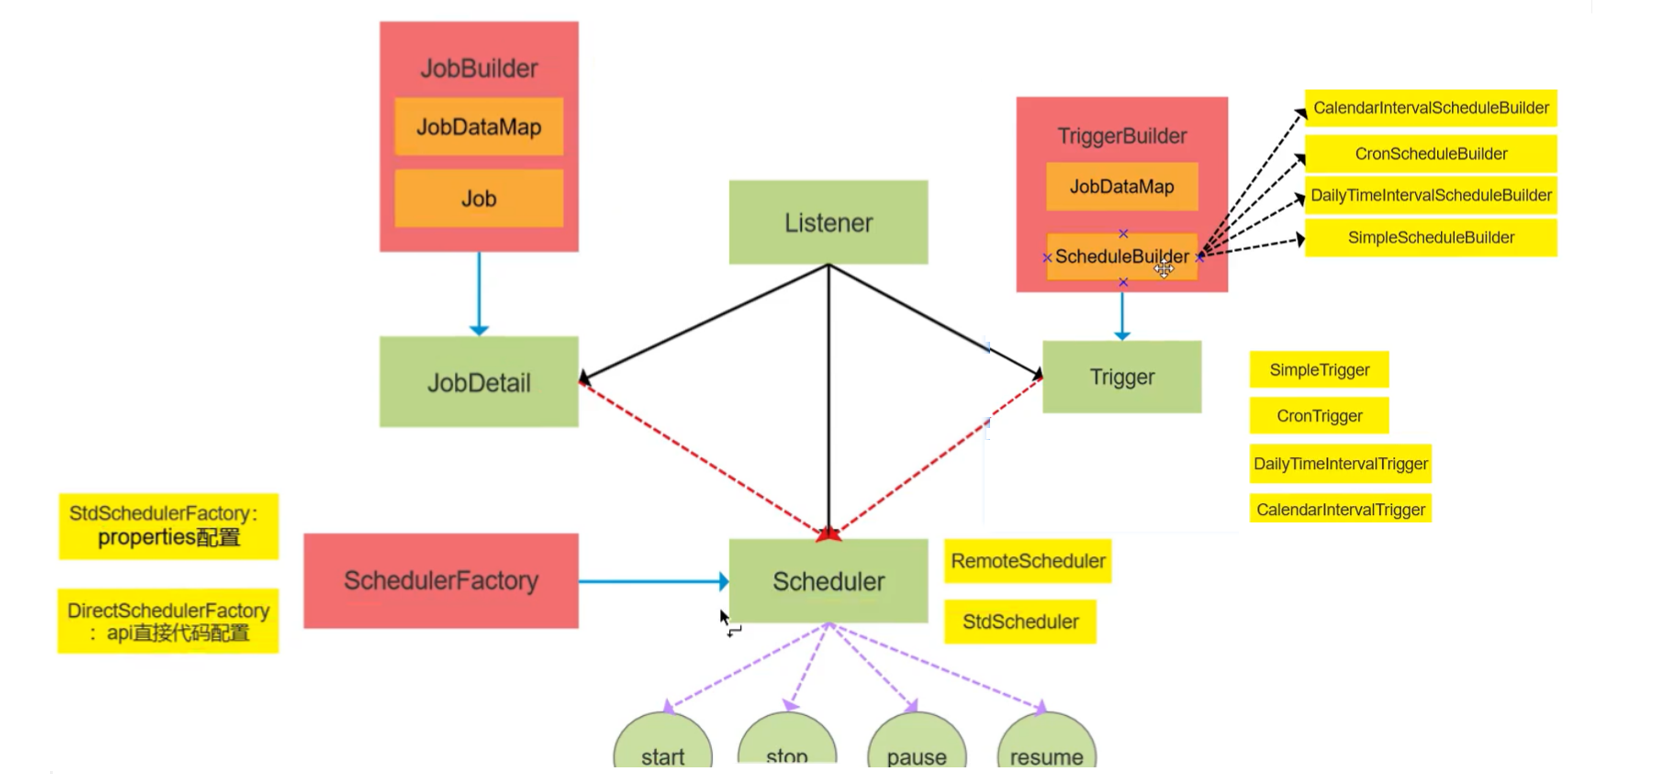
quartz包含的主要接口如下:
Scheduler代表调度容器,一个调度容器中可以注册多个JobDetail和TriggerJob代表工作,即要执行的具体内容JobDetail代表具体的可执行的调度程序,Job是这个可执行程调度程序所要执行的内容JobBuilder用于定义或构建JobDetail实例Trigger代表调度触发器,决定什么时候去调TriggerBuilder用于定义或构建触发器JobStore用于存储作业和任务调度期间的状态
使用spring quartz的优缺点:
- 优点:默认是多线程异步执行,单个任务时,在上一个调度未完成时,下一个调度时间到时,会另起一个线程开始新的调度,多个任务之间互不影响。支持复杂的
cron表达式,它能被集群实例化,支持分布式部署 - 缺点:相对于Spring Task实现定时任务成本更高,需要手动配置
Job 或 QuartzJobBean、JobDetail和Trigger等。需要引入了第三方的quartz包,有一定的学习成本。不支持并行调度,不支持失败处理策略和动态分片的策略等
示例:
1)、依赖
<dependency>
    <groupId>org.springframework.boot</groupId>
    <artifactId>spring-boot-starter-quartz</artifactId>
</dependency>
2)、定义Job:创建真正的定时任务执行类。
/**
 * 创建真正的定时任务执行类
 *
 * 还可以采用:extends QuartzJobBean,重写 executeInternal(JobExecutionContext context)
 */
public class MyJob implements Job {

    private Logger log = LoggerFactory.getLogger(MyJob.class);

	@Override
    public void execute(JobExecutionContext jobExecutionContext) throws JobExecutionException {

        SimpleDateFormat dateFormat = new SimpleDateFormat("yyyy-MM-dd HH:mm:ss");

        TriggerKey triggerKey = jobExecutionContext.getTrigger().getKey();

        log.info("触发器:{},所属组:{},执行时间:{},执行任务:{}",
                triggerKey.getName(),
                triggerKey.getGroup(),
                dateFormat.format(new Date()),
                "hello SpringBoot Quartz...");
    }
}
3)、QuartzConfig:创建调度程序JobDetail和调度器Trigger。
@Configuration
public class QuartzConfig {

    @Value("${zixq.spring.quartz.cron}")
    private String testCron;

	/**
     * 创建定时任务
     */
    @Bean
    public JobDetail jobDetail() {
        return JobBuilder.newJob(MyJob.class)
                .storeDurably()
                .build();
    }

	/**
     * 创建触发器
     */
    @Bean
    public Trigger trigger01() {
        SimpleScheduleBuilder scheduleBuilder = SimpleScheduleBuilder.simpleSchedule()
                // 每一秒执行一次
                .withIntervalInSeconds(1)
                // 永久重复,一直执行下去
                .repeatForever();

        return TriggerBuilder.newTrigger()
                /*
                 * 参数1、trigger名字;
                 * 参数2、当前这个trigger所属的组		参考时间轮存储任务,那个刻度后面是怎么存的任务
                 */
                .withIdentity("trigger01", "group1")
                .withSchedule(scheduleBuilder)
                // 哪一个job,上一个方法中bean注入
                .forJob("jobDetail")
                .build();
    }


	/**
     * 每2秒触发一次任务
     */
    @Bean
    public Trigger trigger02() {
        return TriggerBuilder
                .newTrigger()
                .withIdentity("triiger02", "group1")
                // cron时间表达式	可以弄到配置文件,然后采用 @Value 注解读取
                .withSchedule(CronScheduleBuilder.cronSchedule("0/5 * * * * ? *"))
                .forJob("jobDetail")
                .build();
    }
}
分布式定时任务:Redis实现
zset实现
逻辑
- 将定时任务存放到 ZSet 集合中,并且将过期时间存储到 ZSet 的 Score 字段中
- 通过一个无线循环来判断当前时间内是否有需要执行的定时任务,如果有则进行执行
import redis.clients.jedis.Jedis;
import utils.JedisUtils;
import java.time.Instant;
import java.util.Set;

public class DelayQueueExample {
    // zset key
    private static final String _KEY = "myTaskQueue";

    public static void main(String[] args) throws InterruptedException {
        Jedis jedis = JedisUtils.getJedis();
        // 30s 后执行
        long delayTime = Instant.now().plusSeconds(30).getEpochSecond();
        jedis.zadd(_KEY, delayTime, "order_1");
        // 继续添加测试数据
        jedis.zadd(_KEY, Instant.now().plusSeconds(2).getEpochSecond(), "order_2");
        jedis.zadd(_KEY, Instant.now().plusSeconds(2).getEpochSecond(), "order_3");
        jedis.zadd(_KEY, Instant.now().plusSeconds(7).getEpochSecond(), "order_4");
        jedis.zadd(_KEY, Instant.now().plusSeconds(10).getEpochSecond(), "order_5");
        // 开启定时任务队列
        doDelayQueue(jedis);
    }

    /**
     * 定时任务队列消费
     * @param jedis Redis 客户端
     */
    public static void doDelayQueue(Jedis jedis) throws InterruptedException {
        while (true) {
            // 当前时间
            Instant nowInstant = Instant.now();
            long lastSecond = nowInstant.plusSeconds(-1).getEpochSecond(); // 上一秒时间
            long nowSecond = nowInstant.getEpochSecond();
            // 查询当前时间的所有任务
            Set<String> data = jedis.zrangeByScore(_KEY, lastSecond, nowSecond);
            for (String item : data) {
                // 消费任务
                System.out.println("消费:" + item);
            }
            // 删除已经执行的任务
            jedis.zremrangeByScore(_KEY, lastSecond, nowSecond);
            Thread.sleep(1000); // 每秒查询一次
        }
    }
}
键空间实现
逻辑
-
给所有的定时任务设置一个过期时间
-
等到了过期之后,我们通过订阅过期消息就能感知到定时任务需要被执行了,此时我们执行定时任务即可
注意点:
默认情况下 Redis 是不开启键空间通知的,需要我们通过
config set notify-keyspace-events Ex的命令手动开启
开启之后定时任务的代码如下:
import redis.clients.jedis.Jedis;
import redis.clients.jedis.JedisPubSub;
import utils.JedisUtils;

public class TaskExample {
    public static final String _TOPIC = "__keyevent@0__:expired"; // 订阅频道名称
    public static void main(String[] args) {
        Jedis jedis = JedisUtils.getJedis();
        // 执行定时任务
        doTask(jedis);
    }

    /**
     * 订阅过期消息,执行定时任务
     * @param jedis Redis 客户端
     */
    public static void doTask(Jedis jedis) {
        // 订阅过期消息
        jedis.psubscribe(new JedisPubSub() {
            @Override
            public void onPMessage(String pattern, String channel, String message) {
                // 接收到消息,执行定时任务
                System.out.println("收到消息:" + message);
            }
        }, _TOPIC);
    }
}
分布式定时任务:xxl-job
xxl-job是大众点评(许雪里)开发的一个分布式任务调度平台,其核心设计目标是开发迅速、学习简单、轻量级、易扩展。现已开放源代码并接入多家公司线上产品线,开箱即用
xxl-job框架对quartz进行了扩展,使用mysql数据库存储数据,并且内置jetty作为RPC服务调用
主要特点如下:
- 有界面维护定时任务和触发规则,非常容易管理。
- 能动态启动或停止任务
- 支持弹性扩容缩容
- 支持任务失败报警
- 支持动态分片
- 支持故障转移
- Rolling实时日志
- 支持用户和权限管理
使用xxl-job的优缺点:
- 优点:有界面管理定时任务,支持弹性扩容缩容、动态分片、故障转移、失败报警等功能。它的功能非常强大,很多大厂在用,可以满足绝大多数业务场景
- 缺点:和
quartz一样,通过数据库分布式锁,来控制任务不能重复执行。在任务非常多的情况下,有一些性能问题
管理界面:
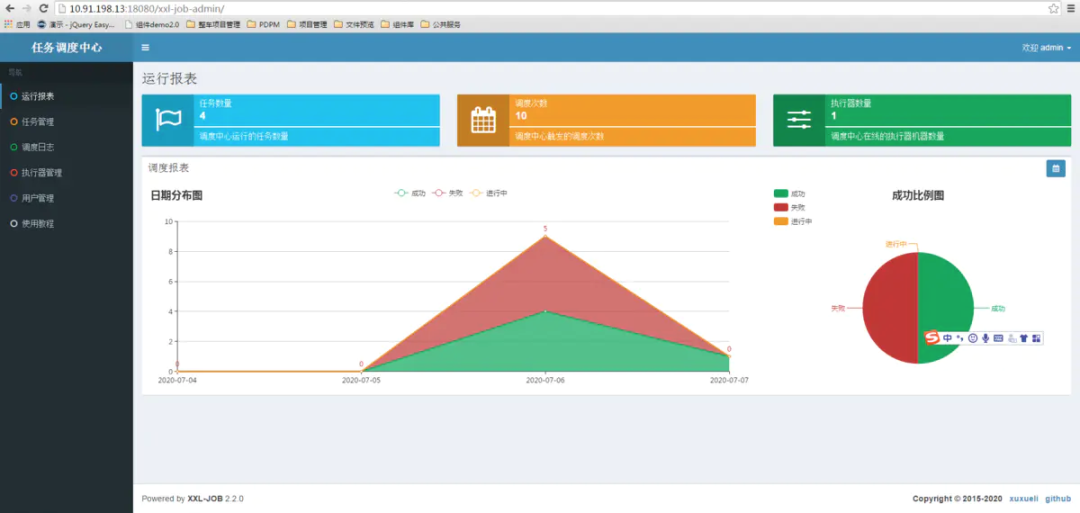
整体架构图如下: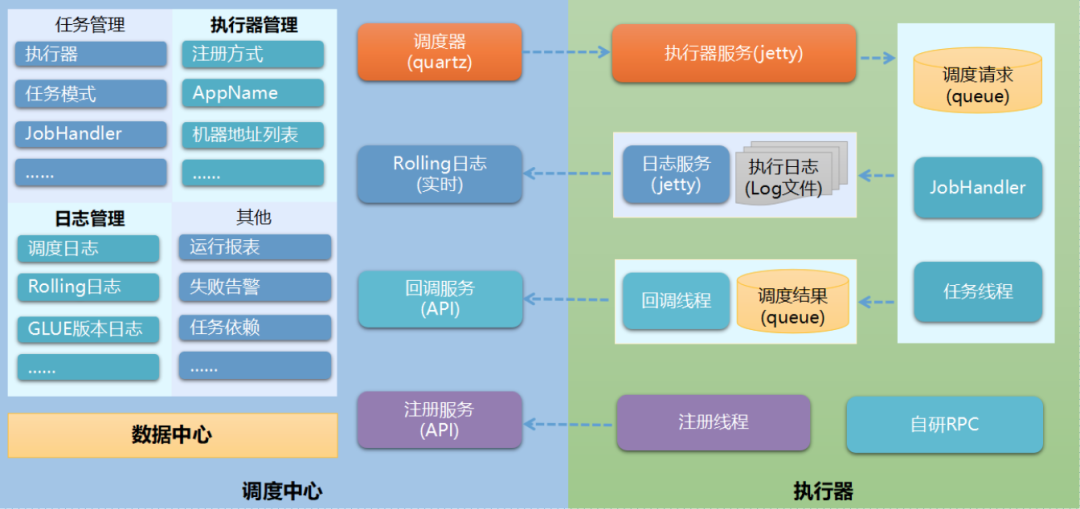
使用quartz架构图如下:
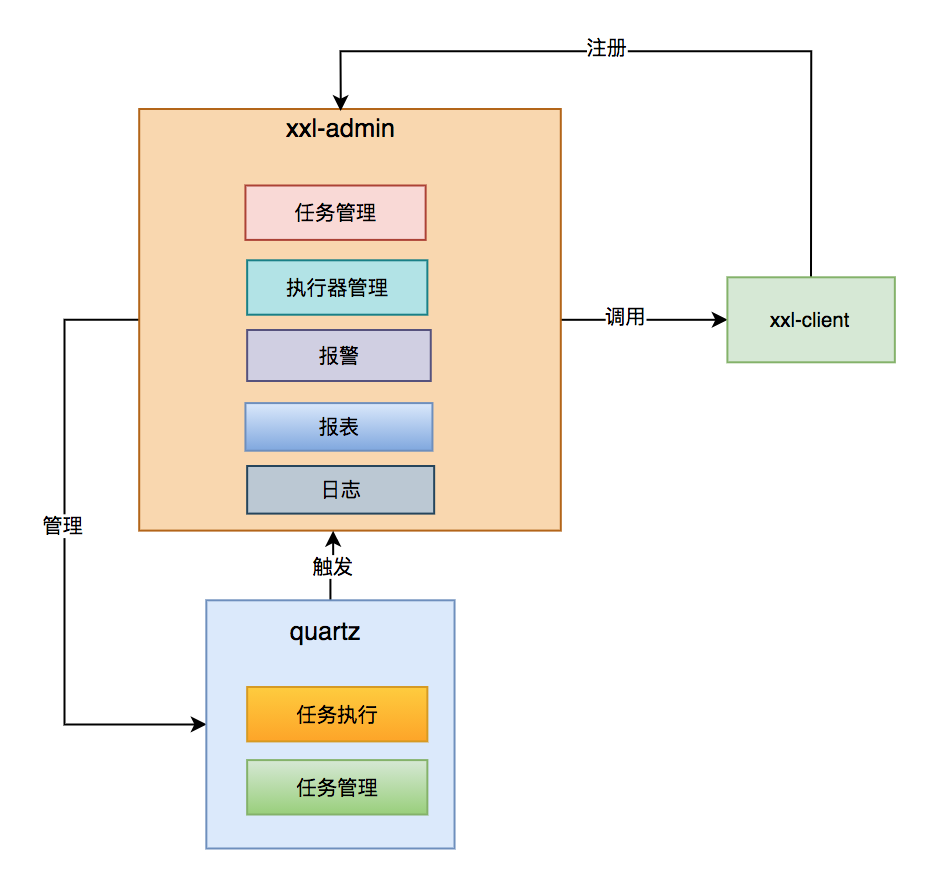
示例:
1)、xxl-admin管理后台部署和mysql脚本执行等这些前期准备工作,运维的事情
2)、依赖
<dependency>
   <groupId>com.xuxueli</groupId>
   <artifactId>xxl-job-core</artifactId>
</dependency>
3)、在applicationContext.properties文件中配置参数:
xxl.job.admin.address: http://localhost:8088/xxl-job-admin/
xxl.job.executor.appname: xxl-job-executor-sample
xxl.job.executor.port: 8888
xxl.job.executor.logpath: /data/applogs/xxl-job/
3)、创建HelloJobHandler类继承IJobHandler类:
@JobHandler(value = "helloJobHandler")
@Component
public class HelloJobHandler extends IJobHandler {

    @Override
    public ReturnT<String> execute(String param) {
        System.out.println("XXL-JOB, Hello World.");
        return SUCCESS;
    }
}
这样定时任务就配置好了。
提示
建议把定时任务单独部署到另外一个服务中,跟api服务分开。因为job大部分情况下,会对数据做批量操作,如果操作的数据量太大,可能会对服务的内存和cpu资源造成一定的影响
分布式定时任务:elastic-job
elastic-job是当当网开发的弹性分布式任务调度系统,功能丰富强大,采用zookeeper实现分布式协调,实现任务高可用以及分片。它是专门为高并发和复杂业务场景开发
elastic-job目前是apache的shardingsphere项目下的一个子项目,官网地址:http://shardingsphere.apache.org/elasticjob/。
elastic-job在2.x之后,出了两个产品线:Elastic-Job-Lite和Elastic-Job-Cloud,而我们一般使用Elastic-Job-Lite就能够满足需求。Elastic-Job-Lite定位为轻量级无中心化解决方案,使用jar包的形式提供分布式任务的协调服务,外部仅依赖于Zookeeper
主要特点如下:
- 分布式调度协调
- 弹性扩容缩容
- 失效转移
- 错过执行作业重触发
- 作业分片一致性,保证同一分片在分布式环境中仅一个执行实例
- 自诊断并修复分布式不稳定造成的问题
- 支持并行调度
使用elastic-job的优缺点:
- 优点:支持分布式调度协调,支持分片,适合高并发,和一些业务相对来说较复杂的场景
- 缺点:需要依赖于zookeeper,实现定时任务相对于
xxl-job要复杂一些,要对分片规则非常熟悉
整体架构图:
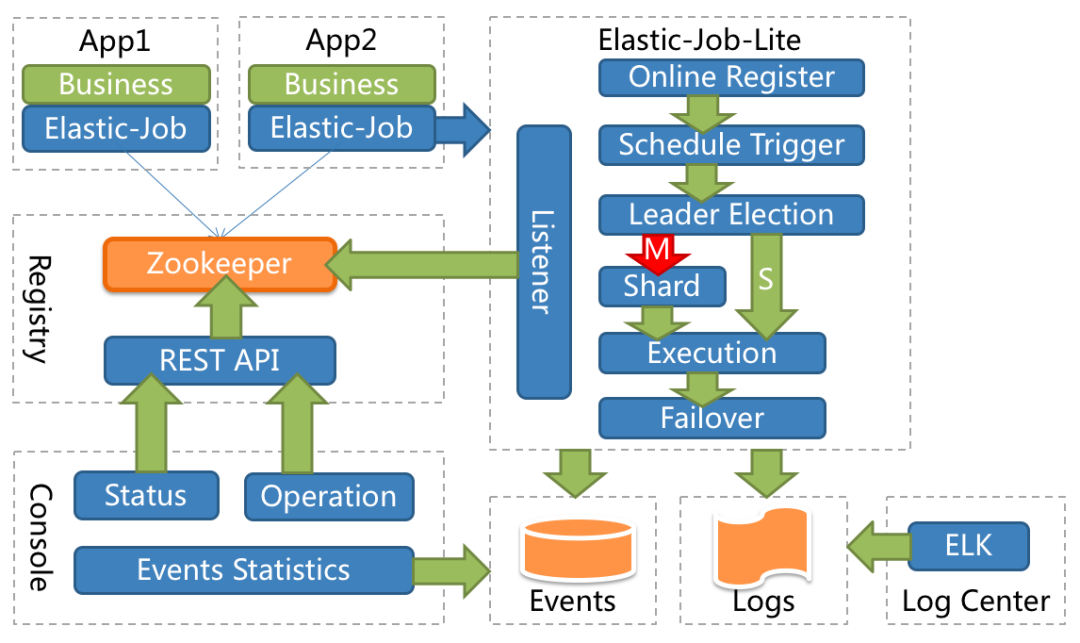
示例:
1)、依赖
<dependency>
    <groupId>com.dangdang</groupId>
    <artifactId>elastic-job-lite-core</artifactId>
</dependency>
<dependency>
    <groupId>com.dangdang</groupId>
    <artifactId>elastic-job-lite-spring</artifactId>
</dependency>
2)、在applicationContext.properties文件中配置参数:
spring.application.name=elasticjobDemo
zk.serverList=localhost:2181
zk.namespace=elasticjobDemo
zixq.spring.elatisc.cron=0/5 * * * * ?
# 定义分配项参数	一般用分片序列号和参数(用等号分隔),多个键值对用逗号分隔
# 分片序列号从0开始,不可大于或等于作业分片总数
zixq.spring.elatisc.itemParameters=0=A,1=B,2=C,3=D
# 作业自定义参数
zixq.spring.elatisc.jobParameters=test
# 定义作业分片总数
zixq.spring.elatisc.shardingTotalCount=4
3)、配置zookeeper
@Configuration
@ConditionalOnExpression("'${zk.serverList}'.length() > 0")
public class ZKConfig {

    @Bean
    public ZookeeperRegistryCenter registry(@Value("${zk.serverList}") String serverList,
                                            @Value("${zk.namespace}") String namespace) {
        return new ZookeeperRegistryCenter(new ZookeeperConfiguration(serverList, namespace));
    }
}
4)、定义Job:实现SimpleJob接口
public class TestJob implements SimpleJob {

    @Override
    public void execute(ShardingContext shardingContext){
        System.out.println("ShardingTotalCount:" + shardingContext.getShardingTotalCount());
        System.out.println("ShardingItem:" + shardingContext.getShardingItem());
    }
}
5)、配置任务
@Configuration
public class JobConfig {
    /*
     * 可以采用前面的方式
     * 类加@ConfigurationProperties(prefix = "") + 启动类加@EnableConfigurationProperties(value = {xxxProperties.class}) 读取下列值
     * */
    @Value("${zixq.spring.elatisc.cron}")
    private String cron;

    @Value("${zixq.spring.elatisc.itemParameters}")
    private  String shardingItemParameters;

    @Value("${zixq.spring.elatisc.jobParameters}")
    private String jobParameters;

    @Value("${zixq.spring.elatisc.shardingTotalCount}")
    private int shardingTotalCount;

    @Autowired
    private ZookeeperRegistryCenter registryCenter;

    @Bean
    public SimpleJob testJob() {
        return new TestJob();
    }

    @Bean
    public JobScheduler simpleJobScheduler(final SimpleJob simpleJob) {

        return new SpringJobScheduler(simpleJob,
                                      registryCenter,
                                      getConfiguration(simpleJob.getClass(),
                                                       cron,
                                                       shardingTotalCount,
                                                       shardingItemParameters,
                                                       jobParameters));
    }

    /**
     *
     * @param cron	cron表达式,定义触发规则
     * @param shardingTotalCount	定义作业分片总数
     * @param shardingItemParameters	定义分配项参数
     *									一般用分片序列号和参数(用等号分隔),多个键值对用逗号分隔
     *									分片序列号从0开始,不可大于或等于作业分片总数
     @param jobParameters	作业自定义参数
     */
    private geConfiguration getConfiguration(Class<? extends SimpleJob> jobClass,
                                             String cron,
                                             int shardingTotalCount,
                                             String shardingItemParameters,
                                             String jobParameters) {

        JobCoreConfiguration simpleCoreConfig = JobCoreConfiguration
            .newBuilder(jobClass.getName(), testCron, shardingTotalCount)
            .shardingItemParameters(shardingItemParameters)
            .jobParameter(jobParameters)
            .build();

        SimpleJobConfiguration simpleJobConfig = new SimpleJobConfiguration(
            simpleCoreConfig, jobClass.getCanonicalName()
        );

        return LiteJobConfiguration
            .newBuilder(simpleJobConfig)
            .overwrite(true)
            .build();
    }
}
集成支付宝支付
官网地址:https://open.alipay.com/api
选择自己需要的方式:本文示例选择“手机网站支付”,其他的都是差不多的
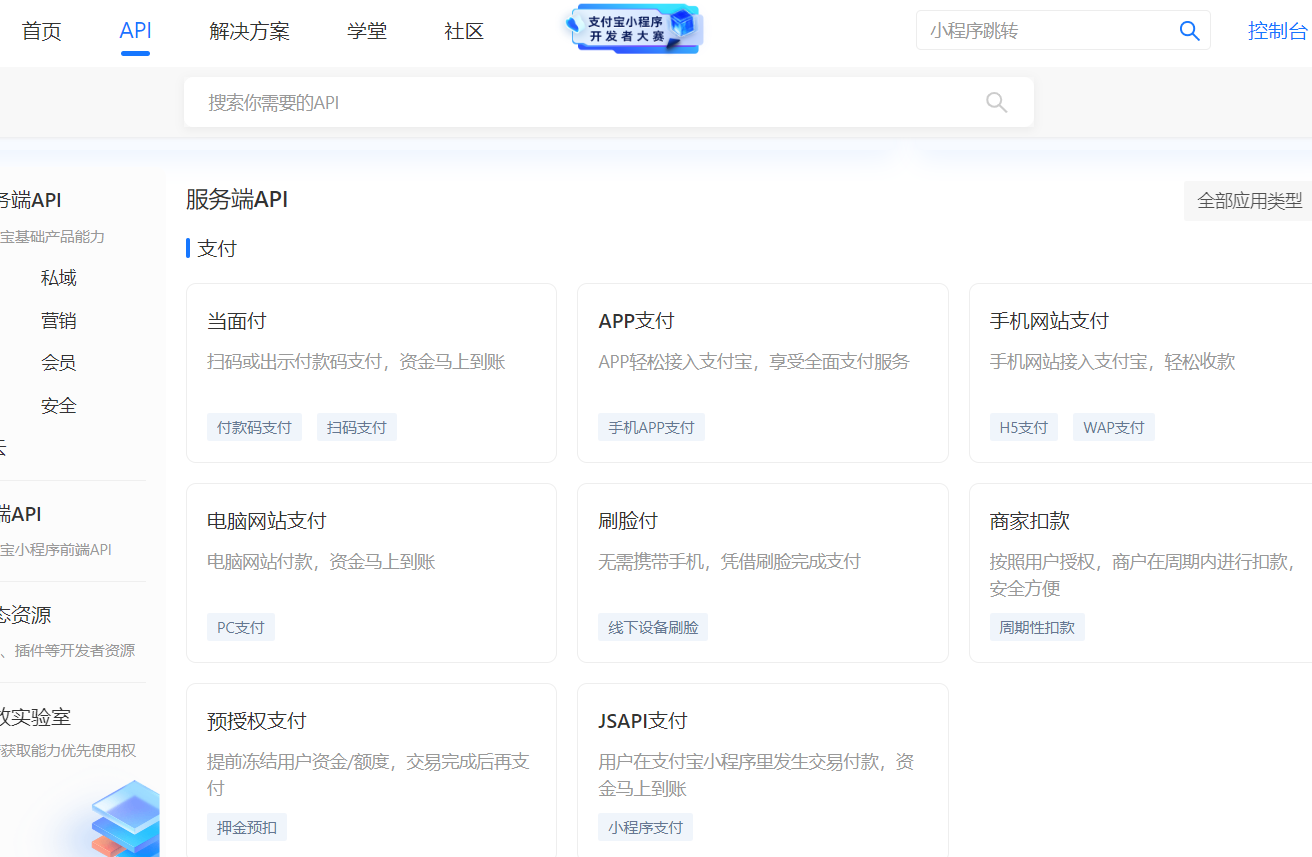
申请与其条件
签约申请提交材料要求:
- 提供网站地址,网站能正常访问且页面显示完整,网站需要明确经营内容且有完整的商品信息
- 网站必须通过 ICP 备案,且备案主体需与支付宝账号主体一致。若网站备案主体与当前账号主体不同时需上传授权函
- 个人账号申请,需提供营业执照,且支付宝账号名称需与营业执照主体一致
提示
需按照要求提交材料,若部分材料不合格,收款额度将受到限制(单笔收款 ≤ 2000 元,单日收款 ≤ 20000 元)。若签约时未能提供相关材料(如营业执照),请在合约生效后的 30 天内补全,否则会影响正常收款
费率
| 收费模式 | 费率 |
|---|---|
| 单笔收费 | 0.6%-1.0% |
特殊行业费率为 1.0%,非特殊行业费率为 0.6%。特殊行业包含:休闲游戏、网络游戏点卡、游戏渠道代理、游戏系统商、网游周边服务、交易平台、网游运营商(含网页游戏)等
接入准备
官方文档:https://opendocs.alipay.com/open/203/107084?pathHash=a33de091
整体流程:
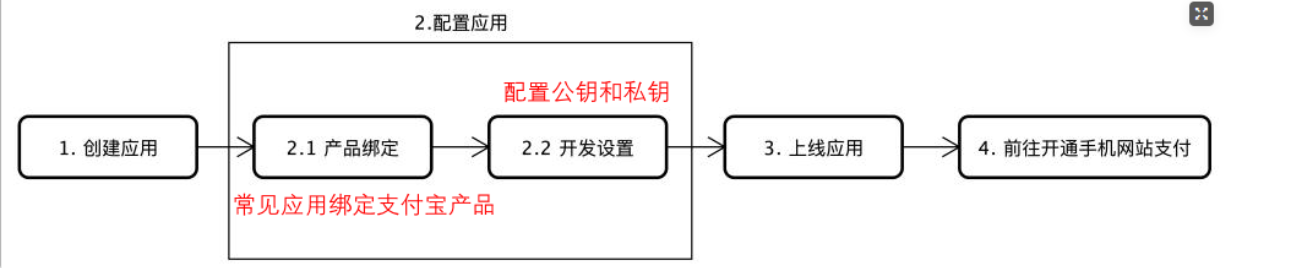
为了提供数据传输的安全性,在进行传输的时候需要对数据进行加密:
常见的加密方式:
1、不可逆加密:只能会数据进行加密不能解密
2、可逆加密:可以对数据加密也可以解密
可逆加密可以再细分为:
1、对称加密: 加密和解密使用同一个秘钥

2、非对称加密:加密和解密使用的是不同的秘钥

支付宝为了提供数据传输的安全性使用了两个秘钥对:
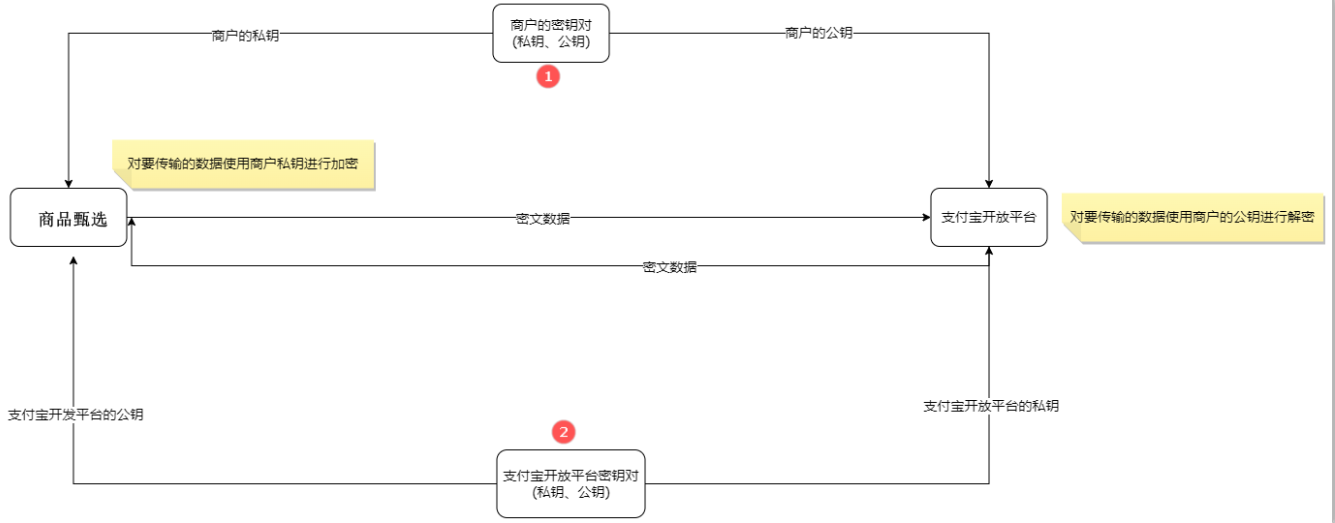
手机端网站支付接入流程
官方文档:https://opendocs.alipay.com/open/203/105285?pathHash=ada1de5b
系统交互流程图:
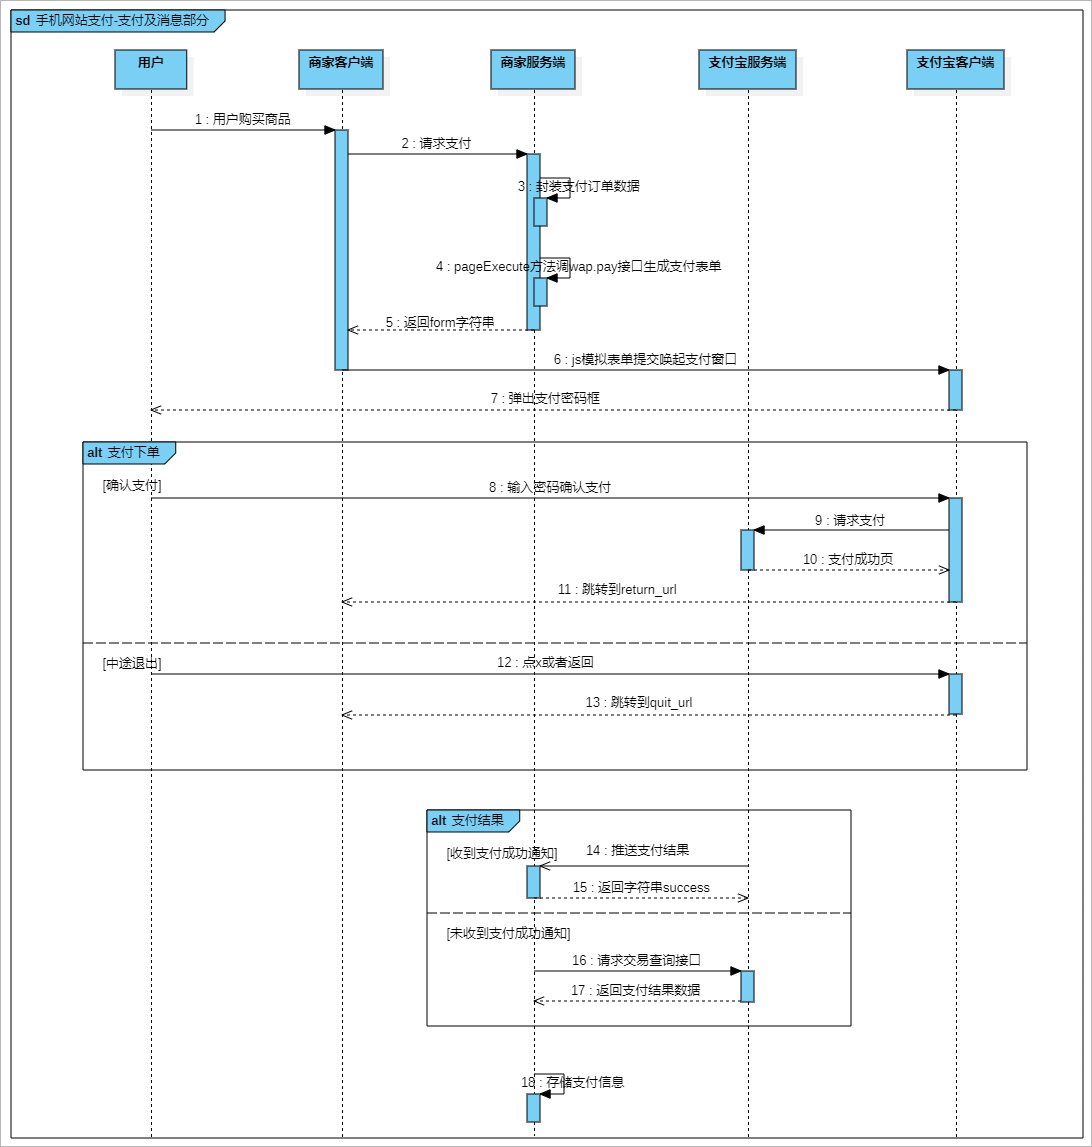
示例
支付宝支付一般都是下面这样,本文做的是简单示例
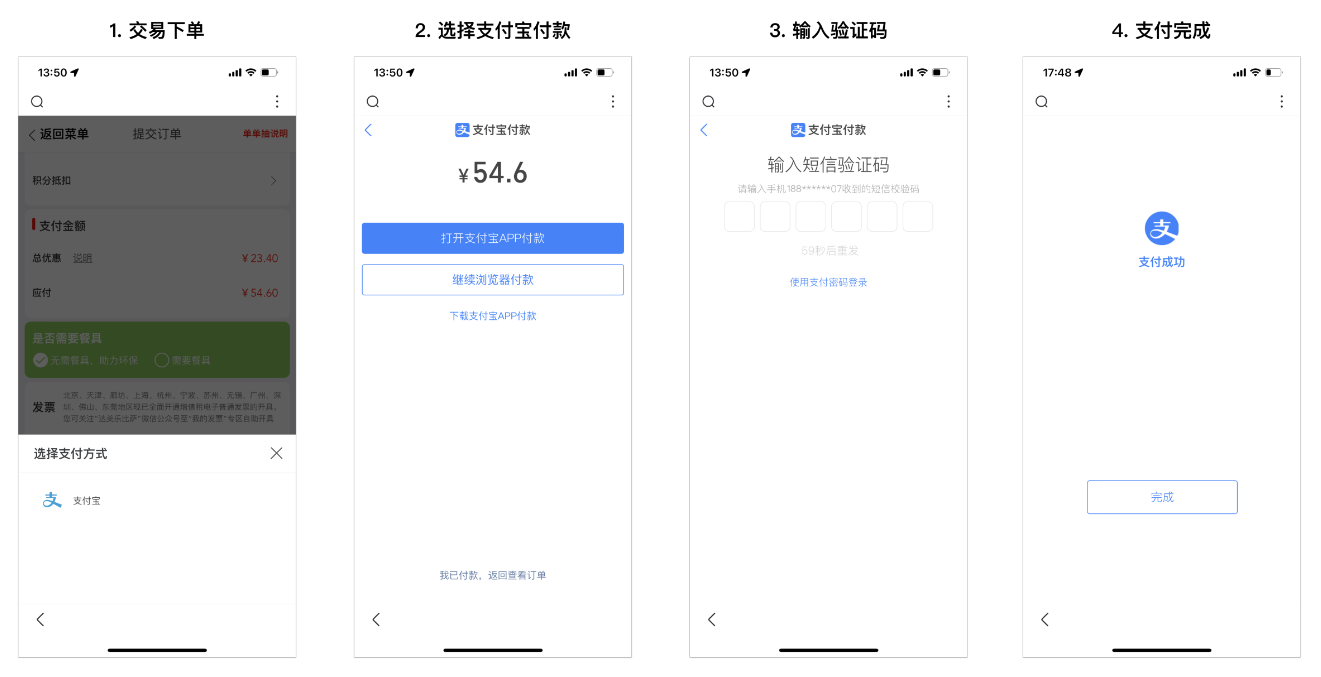
- 依赖
<dependency>
    <groupId>com.alipay.sdk</groupId>
    <artifactId>alipay-sdk-java</artifactId>
</dependency>
- YAML配置:resources目录下新建
application-alipay.yml
com:
  alipay:
    alipay_url: https://openapi.alipay.com/gateway.do	# 接入的地址
    app_id: xxxxxxxxxxxxxxx	# 这个id在前面申请后进入网页的控制台可以看到
    app_private_key: xxxxxxxxxxxxxxxxxxxxxxxxxxxxxxxxxxxxxxxxxxxxxx		# 私钥,前面申请后会有这个
    alipay_public_key: xxxxxxxxxxxxxxxxxxxxxxxxxxxxxxxxxxxxxxxxxxxxxx	# 密钥,前面申请后会有这个
    return_payment_url: http://zixieqing.demo.com/#/pages/money/paySuccess	# 支付宝支付成功或失败后,我们自己的页面地址,也叫同步回调
    notify_payment_url: http://zixieqing.demo.com/api/order/alipay/callback/notify	# 支付宝调用的我们自己服务接口的地址		也叫异步回调
关于 return_payment_url 和 notify_payment_url:这两个东西都是支付宝支付来调用我们自己的东西,这都需要使用到域名,这样支付宝支付才可以调用到,公司中使用的就是公司的域名,自己要的话要么买个域名,要么就去搞内网穿透之类的。
提示:记得在在application-dev.yml文件中导入2中的配置
spring:
  config:
    import: application-alipay.yml
- 读取
application-alipay.yml中的配置
@Data
@ConfigurationProperties(prefix = "com.alipay")
public class AlipayProperties {

    private String alipayUrl;
    private String appPrivateKey;
    public  String alipayPublicKey;
    private String appId;
    public  String returnPaymentUrl;
    public  String notifyPaymentUrl;

    public final static String format="json";
    public final static String charset="utf-8";
    public final static String sign_type="RSA2";

}
记得在启动类上加上 @EnableConfigurationProperties 注解
@EnableConfigurationProperties(value = { AlipayProperties.class })
- 配置AlipayClient
@Configuration
public class AlipayConfiguration {

    @Autowired
    private AlipayProperties alipayProperties ;

    /**
     * 配置发送请求的核心对象:AlipayClient
     */
    @Bean
    public AlipayClient alipayClient(){
        AlipayClient alipayClient = new DefaultAlipayClient(alipayProperties.getAlipayUrl() ,
                alipayProperties.getAppId() ,
                alipayProperties.getAppPrivateKey() ,
                AlipayProperties.format ,
                AlipayProperties.charset ,
                alipayProperties.getAlipayPublicKey() ,
                AlipayProperties.sign_type);

        return alipayClient;
    }
}
- 下单支付服务
/**
 * 支付服务
 */
public interface AlipayService {
    String submitAlipay(String orderNo);
}


/**
 * 支付服务实现类
 */
@Slf4j
@Service
public class AlipayServiceImpl implements AlipayService {

    @Autowired
    private AlipayClient alipayClient;

    @Autowired
    private PaymentInfoService paymentInfoService;

    @Autowired
    private AlipayProperties alipayProperties ;

	@Override
    @SneakyThrows  // lombok的注解,对外声明异常
    public String submitAlipay(String orderNo) {

        // 保存支付记录
        PaymentInfo paymentInfo = paymentInfoService.savePaymentInfo(orderNo);

        // 创建API对应的request
        AlipayTradeWapPayRequest alipayRequest = new AlipayTradeWapPayRequest();

        // 同步回调		同步调用我们自己的页面,支付成功或失败的页面路径
        alipayRequest.setReturnUrl(alipayProperties.getReturnPaymentUrl());

        /*
         * 异步回调		异步调用我们自己的服务"接口"路径
         * 			   如:更新支付记录状态(已支付 / 未支付)、更新订单状态、更新商品销量
         * */
        alipayRequest.setNotifyUrl(alipayProperties.getNotifyPaymentUrl());

        // 准备请求参数 ,声明一个map 集合
        HashMap<String, Object> map = new HashMap<>();
        // 订单编号
        map.put("out_trade_no",paymentInfo.getOrderNo());
        map.put("product_code","QUICK_WAP_WAY");
        // 支付金额
        map.put("total_amount",paymentInfo.getAmount());
        map.put("subject",paymentInfo.getContent());
        alipayRequest.setBizContent(JSON.toJSONString(map));

        // 发送请求
        AlipayTradeWapPayResponse response = alipayClient.pageExecute(alipayRequest);
        if(response.isSuccess()){		// 支付成功
            log.info("调用成功");
            // 返回form表单数据		就是平时支付宝支付成功返回的那个页面的内容
            return response.getBody();
        } else {	// 支付失败
            log.info("调用失败");
            throw new CustomException(ResultCodeEnum.DATA_ERROR);
        }
    }
}
上述涉及的PaymentInfoService:
/**
 * 支付信息服务
 */
public interface PaymentInfoService {
    PaymentInfo savePaymentInfo(String orderNo);
}


/**
 * 支付信息服务实现类
 */
@Service
public class PaymentInfoServiceImpl implements PaymentInfoService {

    @Autowired
    private PaymentInfoMapper paymentInfoMapper ;

    @Autowired
    private OrderFeignClient orderFeignClient ;

    @Override
    public PaymentInfo savePaymentInfo(String orderNo) {

        // 查询支付信息
        PaymentInfo paymentInfo = paymentInfoMapper.getByOrderNo(orderNo);
        // 若无支付信息则保存支付信息,若已经已经存在了就不用进行保存(一个订单支付失败以后可以继续支付)
        if(null == paymentInfo) {
            // OpenFeign远程(这是Spring Cloud中的内容)调用根据订单编号查询订单信息
            OrderInfo orderInfo = orderFeignClient.getOrderInfoByOrderNo(orderNo).getData();
            // 封装付款信息
            paymentInfo = new PaymentInfo();
            paymentInfo.setUserId(orderInfo.getUserId());
            paymentInfo.setPayType(orderInfo.getPayType());
            String content = "";
            for(OrderItem item : orderInfo.getOrderItemList()) {
                content += item.getSkuName() + " ";
            }
            paymentInfo.setContent(content);
            paymentInfo.setAmount(orderInfo.getTotalAmount());
            paymentInfo.setOrderNo(orderNo);
            paymentInfo.setPaymentStatus(0);

            // 保存支付信息
            paymentInfoMapper.save(paymentInfo);
        }

        // 返回支付信息
        return paymentInfo;
    }
}
要了解Spring Cloud去这里:https://www.cnblogs.com/xiegongzi/p/17858107.html
PaymentInfo实体类:
@Data
@Schema(description = "支付信息实体类")
public class PaymentInfo extends BaseEntity {	// BaseEntity是基本的id、创建时间、删除时间等

   private static final long serialVersionUID = 1L;

   @Schema(description = "用户id")
   private Long userId;

   @Schema(description = "订单号")
   private String orderNo;

   @Schema(description = "付款方式:1-微信 2-支付宝")
   private Integer payType;

   @Schema(description = "交易编号(微信或支付)")
   private String outTradeNo;

   @Schema(description = "支付金额")
   private BigDecimal amount;

   @Schema(description = "交易内容")
   private String content;

   @Schema(description = "支付状态:0-未支付 1-已支付")
   private Integer paymentStatus;

   @Schema(description = "回调时间")
   private Date callbackTime;

   @Schema(description = "回调信息")
   private String callbackContent;

}
- 在网关中记得配置支付的路由
spring:
  cloud:
    gateway:
      routes:
        - id: service-pay
          uri: lb://service-pay
          predicates:
            - Path=/api/order/alipay/**
- notify_payment_url 异步回调我们自己的服务接口
@Controller
@RequestMapping("/api/order/alipay")
public class AlipayController {

    @Autowired
    private AlipayService alipayService;

    @Autowired
    private AlipayProperties alipayProperties;

    @Autowired
    private PaymentInfoService paymentInfoService;

    /**
     * 签名校验
     *
     * @param paramMap 支付宝支付给我们返回的数据
     * @return 执行状态
     */
    @Operation(summary="支付宝异步回调")
    @RequestMapping("callback/notify")
    @ResponseBody
    public String alipayNotify(@RequestParam Map<String, String> paramMap, HttpServletRequest request) {

        log.info("AlipayController...alipayNotify方法执行了...");

        // 调用SDK验证签名
        boolean signVerified = false;
        try {
            // 让支付宝支付来校验进入当前的请求是否是支付宝支付发过来的而不是伪造的请求
            signVerified = AlipaySignature.rsaCheckV1(paramMap,
                                                      alipayProperties.getAlipayPublicKey(),
                                                      AlipayProperties.charset,
                                                      AlipayProperties.sign_type);
        } catch (AlipayApiException e) {
            e.printStackTrace();
        }

        // 交易状态
        String trade_status = paramMap.get("trade_status");

        // 合法请求
        if (signVerified) {

            /*
             * 验签成功后,按照支付结果异步通知中的描述,对支付结果中的业务内容进行二次校验
             * 校验成功后在response中返回success并继续商户自身业务处理,校验失败返回failure
             * */
            if ("TRADE_SUCCESS".equals(trade_status) || "TRADE_FINISHED".equals(trade_status)) {
                // 正常的支付成功,那么可以进行更新支付记录状态(已支付 / 未支付)、更新订单状态、更新商品销量等操作
                paymentInfoService.updatePaymentStatus(paramMap);
                // .....................
                // paramMap.get("out_trade_no")		可以获取当前支付订单的编号
                return "success";
            }

        } else {
            // 验签失败则记录异常日志,并在response中返回failure.
            return "failure";
        }

        return "failure";
    }
}
自定义starter
以前在没有使用starter时,我们在项目中需要引入新功能,步骤一般是这样的:
- 在maven仓库找该功能所需jar包
- 在maven仓库找该jar所依赖的其他jar包
- 配置新功能所需参数
以上这种方式会带来三个问题:
- 如果依赖包较多,找起来很麻烦,容易找错,而且要花很多时间
- 各依赖包之间可能会存在版本兼容性问题,项目引入这些jar包后,可能没法正常启动
- 如果有些参数没有配好,启动服务也会报错,没有默认配置
「为了解决这些问题,Spring Boot的starter机制应运而生」
starter机制带来这些好处:
- 它能启动相应的默认配置
- 它能够管理所需依赖,摆脱了需要到处找依赖 和 兼容性问题的困扰
- 自动发现机制,将spring.factories文件中配置的类,自动注入到spring容器中
- 遵循“约定大于配置”的理念
在业务工程中只需引入starter包,就能使用它的功能
一张图总结starter的几个要素:
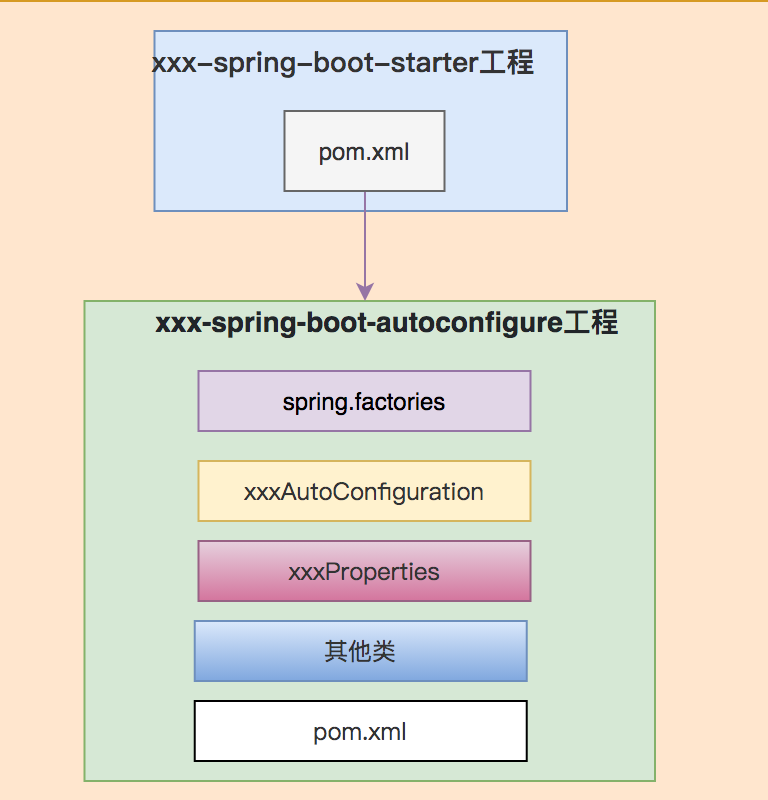
示例
- 创建id-generate-starter工程,pom配置如下:
<?xml version="1.0" encoding="UTF-8"?>

<project xmlns="http://maven.apache.org/POM/4.0.0" xmlns:xsi="http://www.w3.org/2001/XMLSchema-instance" xsi:schemaLocation="http://maven.apache.org/POM/4.0.0 http://maven.apache.org/xsd/maven-4.0.0.xsd">
    <modelVersion>4.0.0</modelVersion>

    <version>1.3.1</version>
    <groupId>com.sue</groupId>
    <artifactId>id-generate-spring-boot-starter</artifactId>
    <name>id-generate-spring-boot-starter</name>

    <dependencies>
        <!-- 只需引入自定义的自动配置模块坐标即可 -->
        <dependency>
            <groupId>com.sue</groupId>
            <artifactId>id-generate-spring-boot-autoconfigure</artifactId>
            <version>1.3.1</version>
        </dependency>
    </dependencies>
</project>
- 创建id-generate-spring-boot-autoconfigure工程
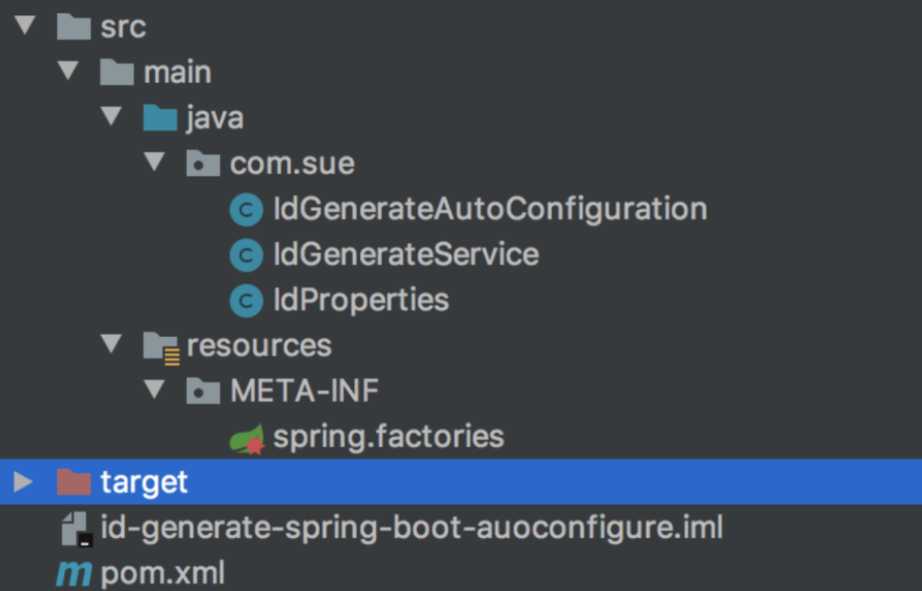
该项目当中包含:
- pom.xml
- spring.factories
- IdGenerateAutoConfiguration
- IdGenerateService
- IdProperties
pom.xml配置如下:
<?xml version="1.0" encoding="UTF-8"?>

<project xmlns="http://maven.apache.org/POM/4.0.0" xmlns:xsi="http://www.w3.org/2001/XMLSchema-instance" xsi:schemaLocation="http://maven.apache.org/POM/4.0.0 http://maven.apache.org/xsd/maven-4.0.0.xsd">

    <parent>
        <groupId>org.springframework.boot</groupId>
        <artifactId>spring-boot-starter-parent</artifactId>
        <version>2.0.4.RELEASE</version>
    </parent>
    <modelVersion>4.0.0</modelVersion>
    <version>1.3.1</version>
    <groupId>com.sue</groupId>
    <artifactId>id-generate-spring-boot-autoconfigure</artifactId>
    <name>id-generate-spring-boot-autoconfigure</name>

    <dependencies>
        <dependency>
            <groupId>org.springframework.boot</groupId>
            <artifactId>spring-boot-starter</artifactId>
        </dependency>

        <dependency>
            <groupId>org.springframework.boot</groupId>
            <artifactId>spring-boot-autoconfigure</artifactId>
        </dependency>

        <dependency>
            <groupId>org.springframework.boot</groupId>
            <artifactId>spring-boot-configuration-processor</artifactId>
            <optional>true</optional>
        </dependency>
    </dependencies>

    <build>
        <plugins>
            <plugin>
                <groupId>org.apache.maven.plugins</groupId>
                <artifactId>maven-compiler-plugin</artifactId>
                <configuration>
                    <source>1.8</source>
                    <target>1.8</target>
                </configuration>
            </plugin>
        </plugins>
    </build>
</project>
spring.factories配置如下:
org.springframework.boot.autoconfigure.EnableAutoConfiguration=com.sue.IdGenerateAutoConfiguration
IdGenerateAutoConfiguration类:
@ConditionalOnClass(IdProperties.class)
@EnableConfigurationProperties(IdProperties.class)
@Configuration
public class IdGenerateAutoConfiguration {

    @Autowired
    private IdProperties properties;

    @Bean
    public IdGenerateService idGenerateService() {
        return new IdGenerateService(properties.getWorkId());
    }
}
IdGenerateService类:
public class IdGenerateService {

    private Long workId;

    public IdGenerateService(Long workId) {
        this.workId = workId;
    }

    public Long generate() {
        return new Random().nextInt(100) + this.workId;
    }
}
IdProperties类:
@ConfigurationProperties(prefix = IdProperties.PREFIX)
public class IdProperties {


    public static final String PREFIX = "sue";

    private Long workId;

    public Long getWorkId() {
        return workId;
    }

    public void setWorkId(Long workId) {
        this.workId = workId;
    }
}
这样在业务项目中引入自定义starter依赖:
<dependency>
      <groupId>com.sue</groupId>
      <artifactId>id-generate-spring-boot-starter</artifactId>
      <version>1.3.1</version>
</dependency>
就能使用注入使用IdGenerateService的功能了
@Autowired
private IdGenerateService idGenerateService;
提示
SpringBoot 2.7以前是spring.factories,而SpringBoot 2.7 - SpringBoot 3.0是spring.factories 和 META0INF/spring/org.springframework.boot.autoconfigure.AutoConfiguration.imports二者兼容,SpringBoot 3.0以后只能通过 META0INF/spring/org.springframework.boot.autoconfigure.AutoConfiguration.imports
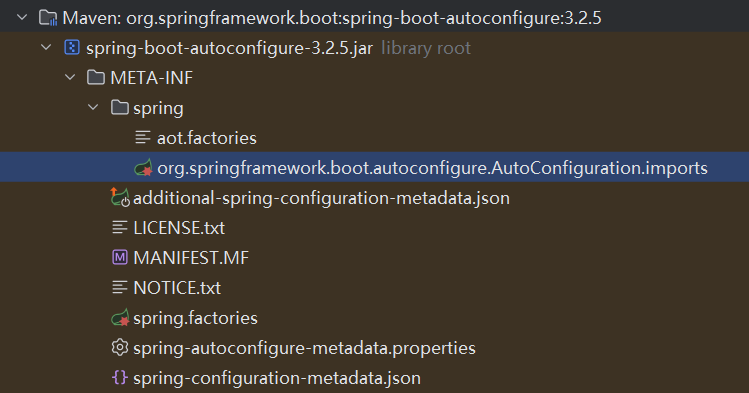
此时xxx-spring-boot-autoconfigure模块通过如下方式配置即可:
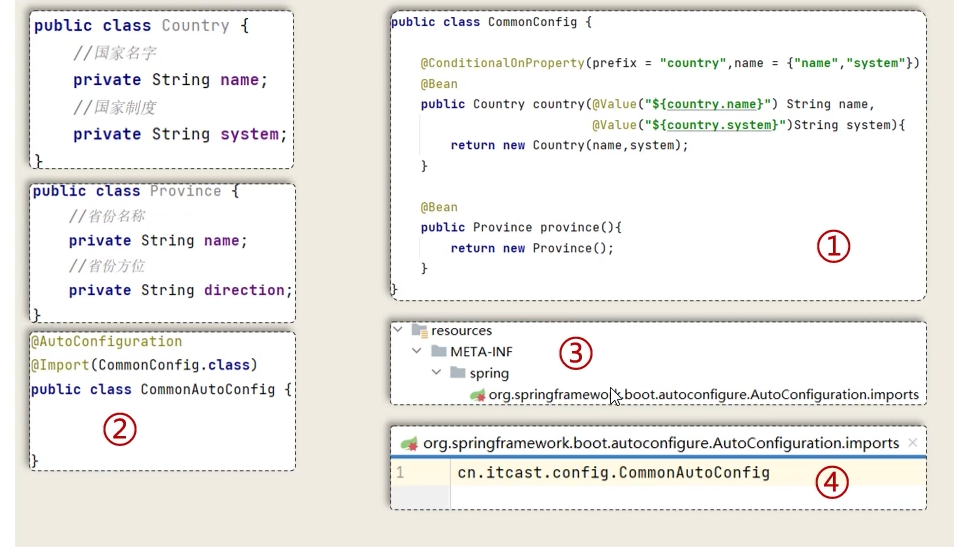
然后在xxx-spring-boot-starter模块的pom.xml中引入上面的xxx-spring-boot-autoconfigure坐标即可
项目启动时的附加功能:CommandLineRunner 与 ApplicationRunner
有时候我们需要在项目启动时定制化一些附加功能,比如:加载一些系统参数、完成初始化、预热本地缓存等,该怎么办?
好消息是Spring Boot提供了:
- CommandLineRunner 接口
- ApplicationRunner 接口
这两个接口帮助我们实现以上需求
在SpringApplication类的callRunners方法中,能看到这两个接口的具体调用:
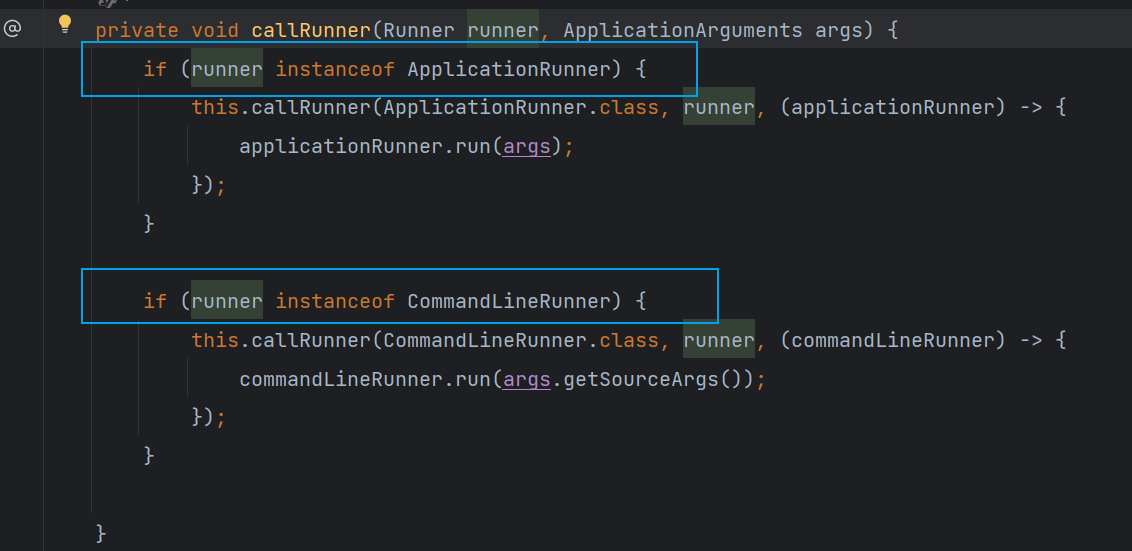
两个接口有什么区别?
- CommandLineRunner接口中run方法的参数为String数组
- ApplicationRunner中run方法的参数为ApplicationArguments,该参数包含了String数组参数 和 一些可选参数
示例:ApplicationRunner
以ApplicationRunner接口为例:
实现
ApplicationRunner接口,重写run方法,在该方法中实现自己定制化需求
@Component
public class TestRunner implements ApplicationRunner {

    @Autowired
    private LoadDataService loadDataService;

    public void run(ApplicationArguments args) throws Exception {
        loadDataService.load();
    }

}
问题:如果项目中有多个类实现了
ApplicationRunner接口,它们的执行顺序要怎么指定?
答案是使用@Order(n)注解,n的值越小越先执行。当然也可以通过@Priority注解指定顺序
Spring Boot项目启动时主要流程是这样的:
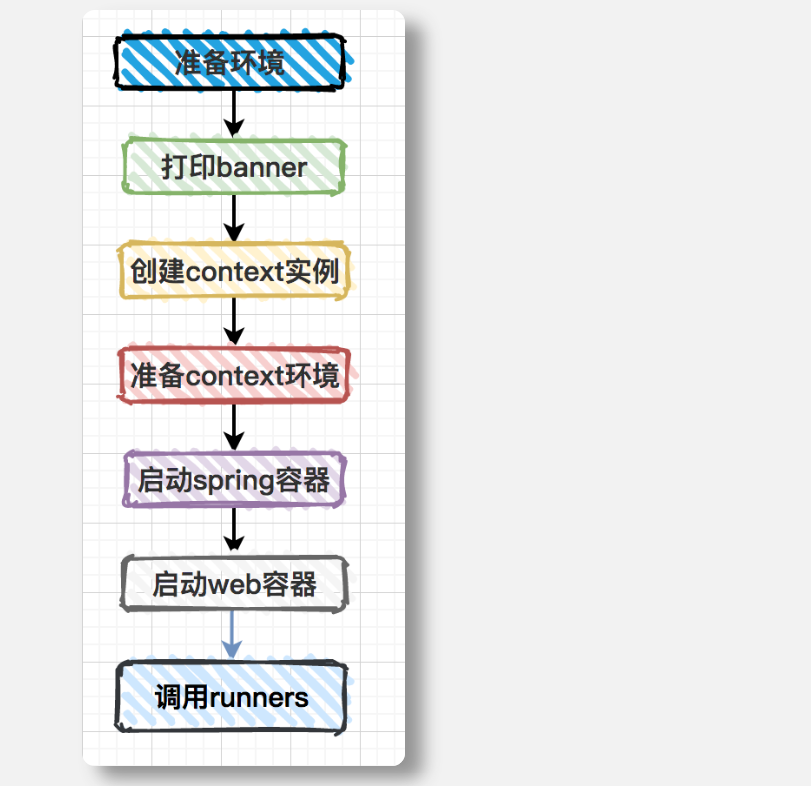
ApplicationContextInitializer
ApplicationContextInitializer:通俗理解,IOC容器对象创建完成后执行,可以对上下文环境做一些操作,通常用于需要对应用程序上下文进行编程初始化的web应用程序中,例如根据上下文环境注册属性源、激活概要文件等
实质理解:这个类的主要目的就是在ConfigurableApplicationContext类型(或者子类型)的ApplicationContext做refresh之前,允许我们对ConfigurableApplicationContext的实例做进一步的设置或者处理
实现思路:
- 自定义类,实现ApplicationContextInitializer接口,重写 initialize 方法
- 在resources/META-INF/spring.factories配置文件中配置自定义的类
自定义类:实现ApplicationContextInitializer接口,重写 initialize 方法
package com.zixq.context;

import org.springframework.context.ApplicationContextInitializer;
import org.springframework.context.ConfigurableApplicationContext;
import org.springframework.core.env.ConfigurableEnvironment;
import org.springframework.core.env.MapPropertySource;

import java.util.HashMap;

/**
 * <p>
 *  IOC容器对象创建完成后执行,对上下文环境做一些操作, 例如运行环境属性注册等
 *      自定义类,实现ApplicationContextInitializer接口,重写 initialize 方法
 *      在resources/META-INF/spring.factories配置文件中配置自定义的类
 * </p>
 *
 * <p>@author : ZiXieqing</p>
 */
public class AppContext implements ApplicationContextInitializer {
    @Override
    public void initialize(ConfigurableApplicationContext context) {
        // 要添加的环境属性
        HashMap<String, Object> envProperties = new HashMap<>();
        envProperties.put("JAVA8", "D:\\Install\\JDK\\JDK8");

        // 获取环境变量
        ConfigurableEnvironment environment = context.getEnvironment();

        // 将环境属性注入context上下文
        // addLast 加在最后、addFirst、addBefore、addAfter..........,有多个环境属性,所以可以根据情况设置顺序
        environment.getPropertySources().addLast(new MapPropertySource("JAVA_HOME", envProperties));
    }
}
resources/META-INF/spring.factories
# 类全限定名=自定义类的全限定名 ctrl + alt + 空格 可以进行补全
#
# 这个spring.factories文件不要也是可以的,  下面的key-value也可以直接放在 application.properties 中,
#       这种方式是通过DelegatingApplicationContextInitializer这个初始化类中的initialize方法获取到application.properties中
#       context.initializer.classes对应的类并执行对应的initialize方法
#
# spring.factories 这个加载过程是在SpringApplication中的getSpringFactoriesInstances()方法中直接加载并实例后执行对应的initialize方法
org.springframework.context.ApplicationContextInitializer=com.zixq.context.AppContext
除了 spring.factories 和 application.propeties 外,还有一种方式:
@SpringBootApplication
public class ConfigServer {
    public static void main(String[] args) {
        SpringApplication springApplication = new SpringApplication(ConfigServer.class);

        // 添加自定义的 ApplicationContextInitializer 实现类的实例(注册ApplicationContextInitializer)
        SpringApplication.addInitializers(new AppContext());

        ConfigurableApplicationContext context = springApplication.run(args);

        context.close();
    }
}
验证:
package com.zixq;

import org.springframework.boot.SpringApplication;
import org.springframework.boot.autoconfigure.SpringBootApplication;
import org.springframework.context.ConfigurableApplicationContext;

@SpringBootApplication
public class ApplicationContextInitializerApp {

    public static void main(String[] args) {
        ConfigurableApplicationContext context = SpringApplication.run(ApplicationContextInitializerApp.class, args);

        // 验证添加的环境属性是否成功
        String envProperties = context.getEnvironment().getProperty("JAVA_HOME");
        System.out.println("envProperties = " + envProperties);     // 结果 envProperties = D:\Install\JDK\JDK8
    }

}
ApplicationContextInitializer执行顺序
Spring Boot中自带的DelegatingApplicationContextInitializer类的排序值为0,是Spring Boot自带的ApplicationContextInitializer中排序最小,最先执行的类。(如果ApplicationContextInitializer没有实现Orderd接口,那么其排序值默认是最大,最后执行)
所以可以得到其执行顺序如下:
-
如果我们通过DelegatingApplicationContextInitializer委托来执行我们自定义的ApplicationContextInitializer,那么我们自定义的ApplicationContextInitializer的顺序一定是在系统自带的其他ApplicationContextInitializer之前执行
-
如果我们通过SpringApplication实例对象调用addInitializers方法加入自定义的ApplicationContextInitializer,那么Spring Boot自带的ApplicationContextInitializer会先按顺序执行,再执行我们手动添加的自定义ApplicationContextInitializer(按照添加顺序执行),最后执行Spring Boot自带的其他ApplicationContextInializer
-
如果我们创建自己的spring.factories文件,添加配置加入我们自定义的ApplicationContextInitializer,那么我们自定义的ApplicationContextInitializer会和Spring Boot自带的ApplicationContextInitializer放在一起进行排序执行
ApplicationListener
监听容器发布的事件,允许程序员执行自己的代码,完成事件驱动开发,它可以监听容器初始化完成(ApplicationReadyEvent)、初始化失败(ApplicationFailedEvent)等事件
通常情况下可以用于监听器加载资源、开启定时任务、获取Spring容器对象等
实现思路:
- 自定义类,实现ApplicationListener接口,重写 onApplicationEvent 方法
- 在resources/META-INF/spring.factories配置文件中配置自定义的类
自定义类:实现ApplicationListener接口,重写 onApplicationEvent 方法
package com.zixq.listener;

import lombok.extern.log4j.Log4j2;
import org.springframework.boot.context.event.ApplicationFailedEvent;
import org.springframework.boot.context.event.ApplicationReadyEvent;
import org.springframework.context.ApplicationEvent;
import org.springframework.context.ApplicationListener;
import org.springframework.context.event.ContextRefreshedEvent;
import org.springframework.web.servlet.DispatcherServlet;

/**
 * <p>
 * 监听容器发布的事件,允许程序员执行自己的代码,完成事件驱动开发,
 *      它可以监听容器初始化完成(ApplicationReadyEvent)、初始化失败(ApplicationFailedEvent)等事件
 * 通常情况下可以用于监听器加载资源、开启定时任务等
 * </p>
 *
 * <p>@author : ZiXieqing</p>
 */
@Log4j2
public class CustomAppListener implements ApplicationListener {
    @Override
    public void onApplicationEvent(ApplicationEvent event) {
        // IOC容器初始化完成后
        if (event instanceof ApplicationReadyEvent) {
            log.info("{}:初始化完成", this.getClass().getSimpleName());
        }
        // IOC容器初始化失败后
        if (event instanceof ApplicationFailedEvent) {
            log.info("{}:初始化完", this.getClass().getSimpleName());
        }
    }
}


/**
 * 还可以获取Spring IOC容器中的Bean对象,添加相应泛型即可(ContextRefreshedEvent)
 *      这种方式获取Bean是建议的,但是利用这种方式注册Bean不建议
 *
 * ContextRefreshedEvent 是一个事件,它会在 Spring容器初始化完成 之后被触发,所以监听器就会在 spring容器初始化完成之后开始监听,就是所谓的全局监听
 */
@Log4j2
class GetIocBean implements ApplicationListener<ContextRefreshedEvent> {

    /**
     * 此处为获取Spring 容器对象
     * 也可以在这里面实现定时任务    如 new Thread(new TimerRunner()).start();    TimerRunner为自定义定时任务
     * @param event 要监听的事件
     */
    @Override
    public void onApplicationEvent(ContextRefreshedEvent event) {
        DispatcherServlet DispatcherServlet = (DispatcherServlet) event.getApplicationContext().getBean("dispatcherServlet");
        log.info("{}:初始化完成", DispatcherServlet.getClass().getSimpleName());
    }
}
resources/META-INF/spring.factories
org.springframework.context.ApplicationListener=com.zixq.listener.CustomAppListener,com.zixq.listener.GetIocBean
验证结果:
[           main] com.zixq.listener.GetIocBean             : DispatcherServlet:初始化完成
[           main] com.zixq.ApplicationListenerApp          : Started ApplicationListenerApp in 1.314 seconds (process running for 1.752)
[           main] com.zixq.listener.CustomAppListener      : CustomAppListener:初始化完成
那Spring还有哪些内置事件?
| 事件 | 说明 |
|---|---|
| ContextRefreshedEvent | ApplicationContext 被初始化或刷新时,该事件被发布。这也可以在 ConfigurableApplicationContext接口中使用 refresh() 方法来发生。此处的初始化是指:所有的Bean被成功装载,后处理Bean被检测并激活,所有Singleton Bean 被预实例化,ApplicationContext容器已就绪可用 |
| ContextStartedEvent | 当使用 ConfigurableApplicationContext (ApplicationContext子接口)接口中的 start() 方法启动 ApplicationContext 时,该事件被发布。你可以调查你的数据库,或者你可以在接受到这个事件后重启任何停止的应用程序 |
| ContextStoppedEvent | 当使用 ConfigurableApplicationContext 接口中的 stop() 停止 ApplicationContext 时,发布这个事件。你可以在接受到这个事件后做必要的清理的工作 |
| ContextClosedEvent | 当使用 ConfigurableApplicationContext 接口中的 close() 方法关闭 ApplicationContext 时,该事件被发布。一个已关闭的上下文到达生命周期末端;它不能被刷新或重启 |
| RequestHandledEvent | 这是一个 web-specific 事件,告诉所有 bean HTTP 请求已经被服务。只能应用于使用DispatcherServlet的Web应用。在使用Spring作为前端的MVC控制器时,当Spring处理用户请求结束后,系统会自动触发该事件 |
监听自定义事件
实现思路:
- 自定义事件 extends ApplicationEvent
- 监听器 implements ApplicationListener
- 触发事件
自定义事件 extends ApplicationEvent
package com.zixq.event;

import lombok.Getter;
import lombok.Setter;
import org.springframework.context.ApplicationEvent;

import java.text.SimpleDateFormat;
import java.util.Date;

/**
 * <p>
 * 自定义事件 extends ApplicationEvent
 * </p>
 *
 * <p>@author : ZiXieqing</p>
 */

@Getter
@Setter
public class MyEvent extends ApplicationEvent {

    private String time = new SimpleDateFormat("hh:mm:ss").format(new Date());
    private String msg;

    public MyEvent(Object source, String msg) {
        super(source);
        this.msg = msg;
    }

    public MyEvent(Object source) {
        super(source);
    }
}
监听器 implements ApplicationListener
package com.zixq.listener;

import com.zixq.event.MyEvent;
import lombok.extern.log4j.Log4j2;
import org.springframework.boot.context.event.ApplicationFailedEvent;
import org.springframework.boot.context.event.ApplicationReadyEvent;
import org.springframework.context.ApplicationEvent;
import org.springframework.context.ApplicationListener;
import org.springframework.context.event.ContextRefreshedEvent;
import org.springframework.web.servlet.DispatcherServlet;

/**
 * <p>
 * 监听容器发布的事件,允许程序员执行自己的代码,完成事件驱动开发,
 *      它可以监听容器初始化完成(ApplicationReadyEvent)、初始化失败(ApplicationFailedEvent)等事件
 * 通常情况下可以用于监听器加载资源、开启定时任务等
 * </p>
 *
 * <p>@author : ZiXieqing</p>
 */
@Log4j2
public class CustomAppListener implements ApplicationListener {
    @Override
    public void onApplicationEvent(ApplicationEvent event) {
       // ...........................

        // 监听自定义事件
        if (event instanceof MyEvent) {
            MyEvent myEvent = (MyEvent) event;
            log.info("监听到了:{} 事件。时间:{},信息:{}",
                    myEvent, myEvent.getTime(), myEvent.getMsg());
        }
    }
}
触发事件
package com.zixq;

import com.zixq.event.MyEvent;
import org.springframework.boot.SpringApplication;
import org.springframework.boot.autoconfigure.SpringBootApplication;
import org.springframework.context.ConfigurableApplicationContext;

@SpringBootApplication
public class ApplicationListenerApp {
    public static void main(String[] args) {
        ConfigurableApplicationContext context = SpringApplication.run(ApplicationListenerApp.class, args);
        MyEvent myEvent = new MyEvent("customEvent", "道,不可道也,恒道也,顺其自然,无为即为");
        // 发布事件
        context.publishEvent(myEvent);
    }
}
还有一种触发事件的方式
@SpringBootApplication
public class TaskApplication implements CommandLineRunner {

    public static void main(String[] args) {
        SpringApplication.run(TaskApplication.class, args);
    }

    @Resource
    private ApplicationContext applicationContext;

    @Override
    public void run(String... args) throws Exception {

        MyEvent myEvent = new MyEvent("customEvent", "道,不可道也,恒道也,顺其自然,无为即为");
        // 发布事件
        applicationContext.publishEvent(event);
    }
}
结果
监听到了:com.zixq.event.MyEvent[source=customEvent] 事件。时间:05:19:14,信息:道,不可道也,恒道也,顺其自然,无为即为
@EventListener 注解:事件监听
自定义事件、事件触发都是一样的,只是将监听器写法改一下就可以了
@Log4j2
public class MyTask {
    @EventListener
    public void MyEventListener(MyEvent event) {
        MyEvent myEvent = (MyEvent) event;
        log.info("监听到了:{} 事件。事件:{},信息:{}",
                myEvent, myEvent.getTime(), myEvent.getMsg());
    }

    @EventListener
    public void ContextRefreshedEventListener(MyEvent event) {
        log.info("监听到 ContextRefreshedEvent...");
    }
}
Spring Boot启动流程
大纲流程:
new SpringApplication()
- 确认web应用的类型
- 加载ApplicationContextInitializer
- 加载ApplicationListener
- 记录主启动类(用于主启动类包扫描)
run()
- 准备环境对象Environment,用于加载系统属性等等
- 打印Banner
- 实例化容器Context
- 准备容器,为容器设置Environment、BeanFactoryPostProcessor,并加载主类对应的BeanDefinition
- 刷新容器(创建Bean实例)
- 返回容器
源码跟踪:
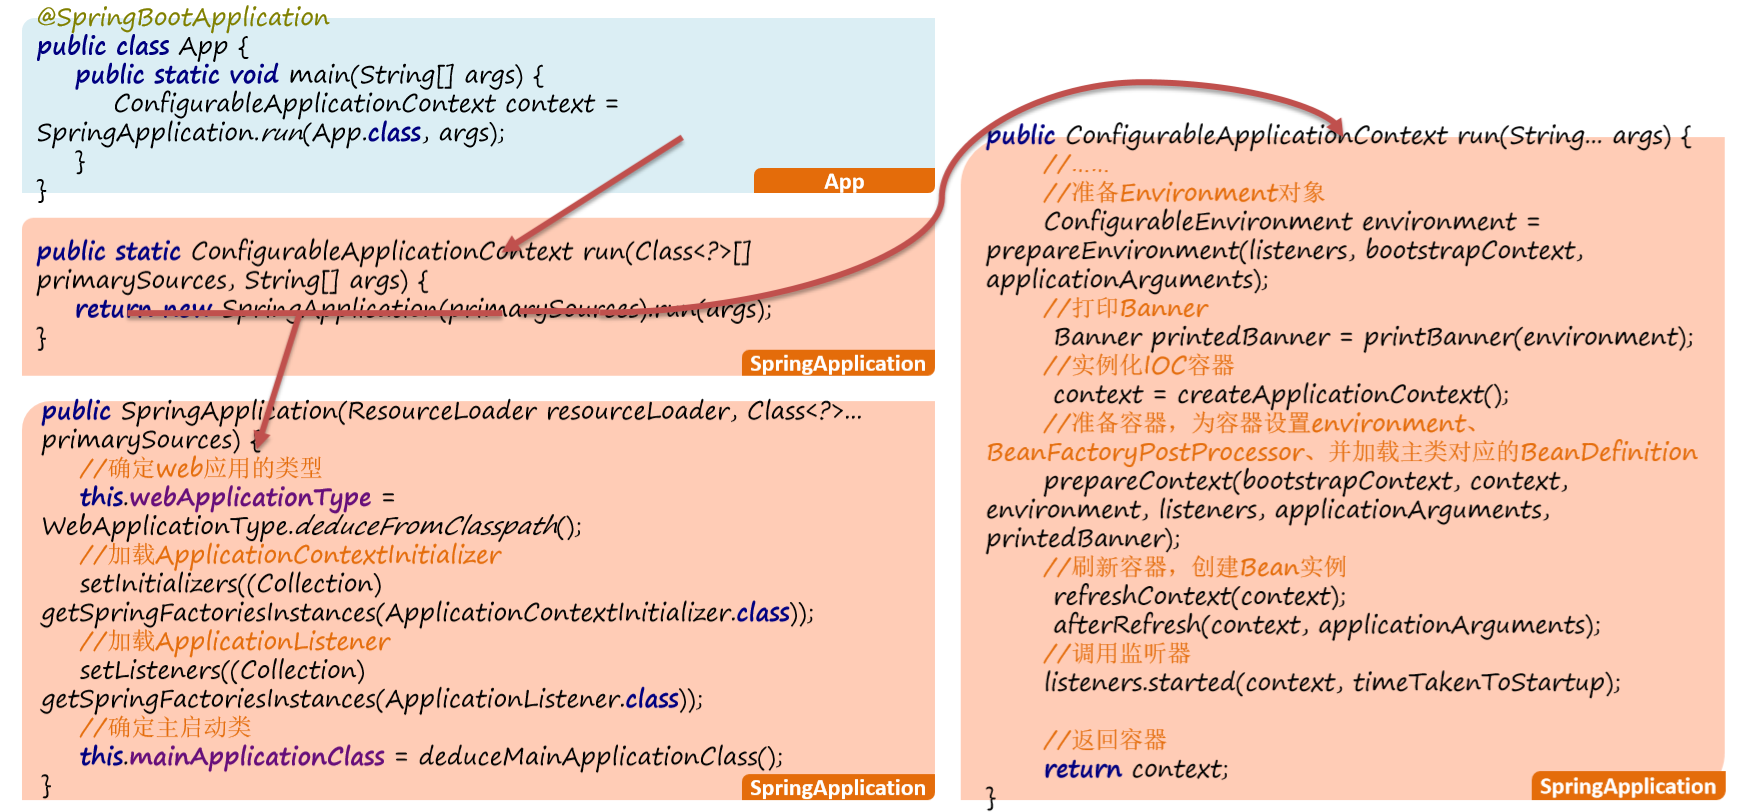
文字总结:总分总描述
总:SpringBoot启动,其本质就是加载各种配置信息,然后初始化IOC容器并返回
分:在其启动的过程中会做这么几个事情
- 首先,当我们在启动类执行SpringApplication.run这行代码的时候,在它的方法内部其实会做两个事情
1)、创建SpringApplication对象;
2)、执行run方法
public static ConfigurableApplicationContext run(Class<?>[] primarySources, String[] args) {
    return (new SpringApplication(primarySources)).run(args);
}
- 其次,在创建SpringApplication对象的时候,在它的构造方法内部主要做3个事情。
1)、确认web应用类型,一般情况下是Servlet类型,这种类型的应用,将来会自动启动一个tomcat
2)、从spring.factories配置文件中,加载默认的ApplicationContextInitializer和ApplicationListener
3)、记录当前应用的主启动类,将来做包扫描使用
public SpringApplication(ResourceLoader resourceLoader, Class<?>... primarySources) {

    // ..............................

    // 确认web应用类型
    this.webApplicationType = WebApplicationType.deduceFromClasspath();

    // ..................

    // 从spring.factories配置文件中,加载默认的ApplicationContextInitializer和ApplicationListener
    this.setInitializers(this.getSpringFactoriesInstances(ApplicationContextInitializer.class));
    this.setListeners(this.getSpringFactoriesInstances(ApplicationListener.class));

    // 记录当前应用的主启动类,将来做包扫描使用
    this.mainApplicationClass = this.deduceMainApplicationClass();
}
- 最后,对象创建好了以后,再调用该对象的run方法,在run方法的内部主要做4个事情
1)、准备Environment对象,它里面会封装一些当前应用运行环境的参数,比如环境变量等等
2)、实例化容器,这里仅仅是创建ApplicationContext对象
3)、容器创建好了以后,会为容器做一些准备工作,比如为容器设置Environment、BeanFactoryPostProcessor后置处理器,并且加载主类对应的Definition
4)、刷新容器,就是我们常说的referesh,在这里会真正的创建Bean实例
public ConfigurableApplicationContext run(String... args) {

    // .........................

    try {
        ApplicationArguments applicationArguments = new DefaultApplicationArguments(args);
        // 准备Environment对象,它里面会封装一些当前应用运行环境的参数,比如环境变量等等
        ConfigurableEnvironment environment = this.prepareEnvironment(listeners, bootstrapContext, applicationArguments);
        Banner printedBanner = this.printBanner(environment);
        // 实例化容器,这里仅仅是创建ApplicationContext对象
        context = this.createApplicationContext();
        context.setApplicationStartup(this.applicationStartup);
        // 容器创建好之后,进行准备工作
        // 为容器设置Environment、BeanFactoryPostProcessor后置处理器,并且加载主类对应的Definition
        this.prepareContext(bootstrapContext, context, environment, listeners, applicationArguments, printedBanner);
        // 刷新容器,就是常说的referesh,在这里会真正的创建Bean实例
        this.refreshContext(context);
        this.afterRefresh(context, applicationArguments);
        startup.started();

        // ............................
    } catch (Throwable var10) {
        throw this.handleRunFailure(context, var10, listeners);
    }

    try {
        if (context.isRunning()) {
            listeners.ready(context, startup.ready());
        }

        // 返回容器
        return context;
    } catch (Throwable var9) {
        throw this.handleRunFailure(context, var9, (SpringApplicationRunListeners)null);
    }
}
总:总结一下,其实SpringBoot启动的时候核心就两步,创建SpringApplication对象以及run方法的调用,在run方法中会真正的实例化容器,并创建容器中需要的Bean实例,最终返回
IOC容器初始化流程
大纲流程:核心在 AbstractApplicationContext.refresh() 中
- 准备BeanFactory(DefaultListableBeanFactory)
- 设置ClassLoader
- 设置Environment
-
扫描要放入容器中的Bean,得到对应的BeaDefinition(只扫描,并不创建)
-
注册BeanPostProcessor
-
处理国际化
-
初始化事件多播器ApplicationEventMulticaster
-
启动tomcat
-
绑定事件监听器和事件多播器
-
实例化非懒加载的单例Bean
-
扫尾工作,比如清空实例化时占用的缓存等
源码跟踪:
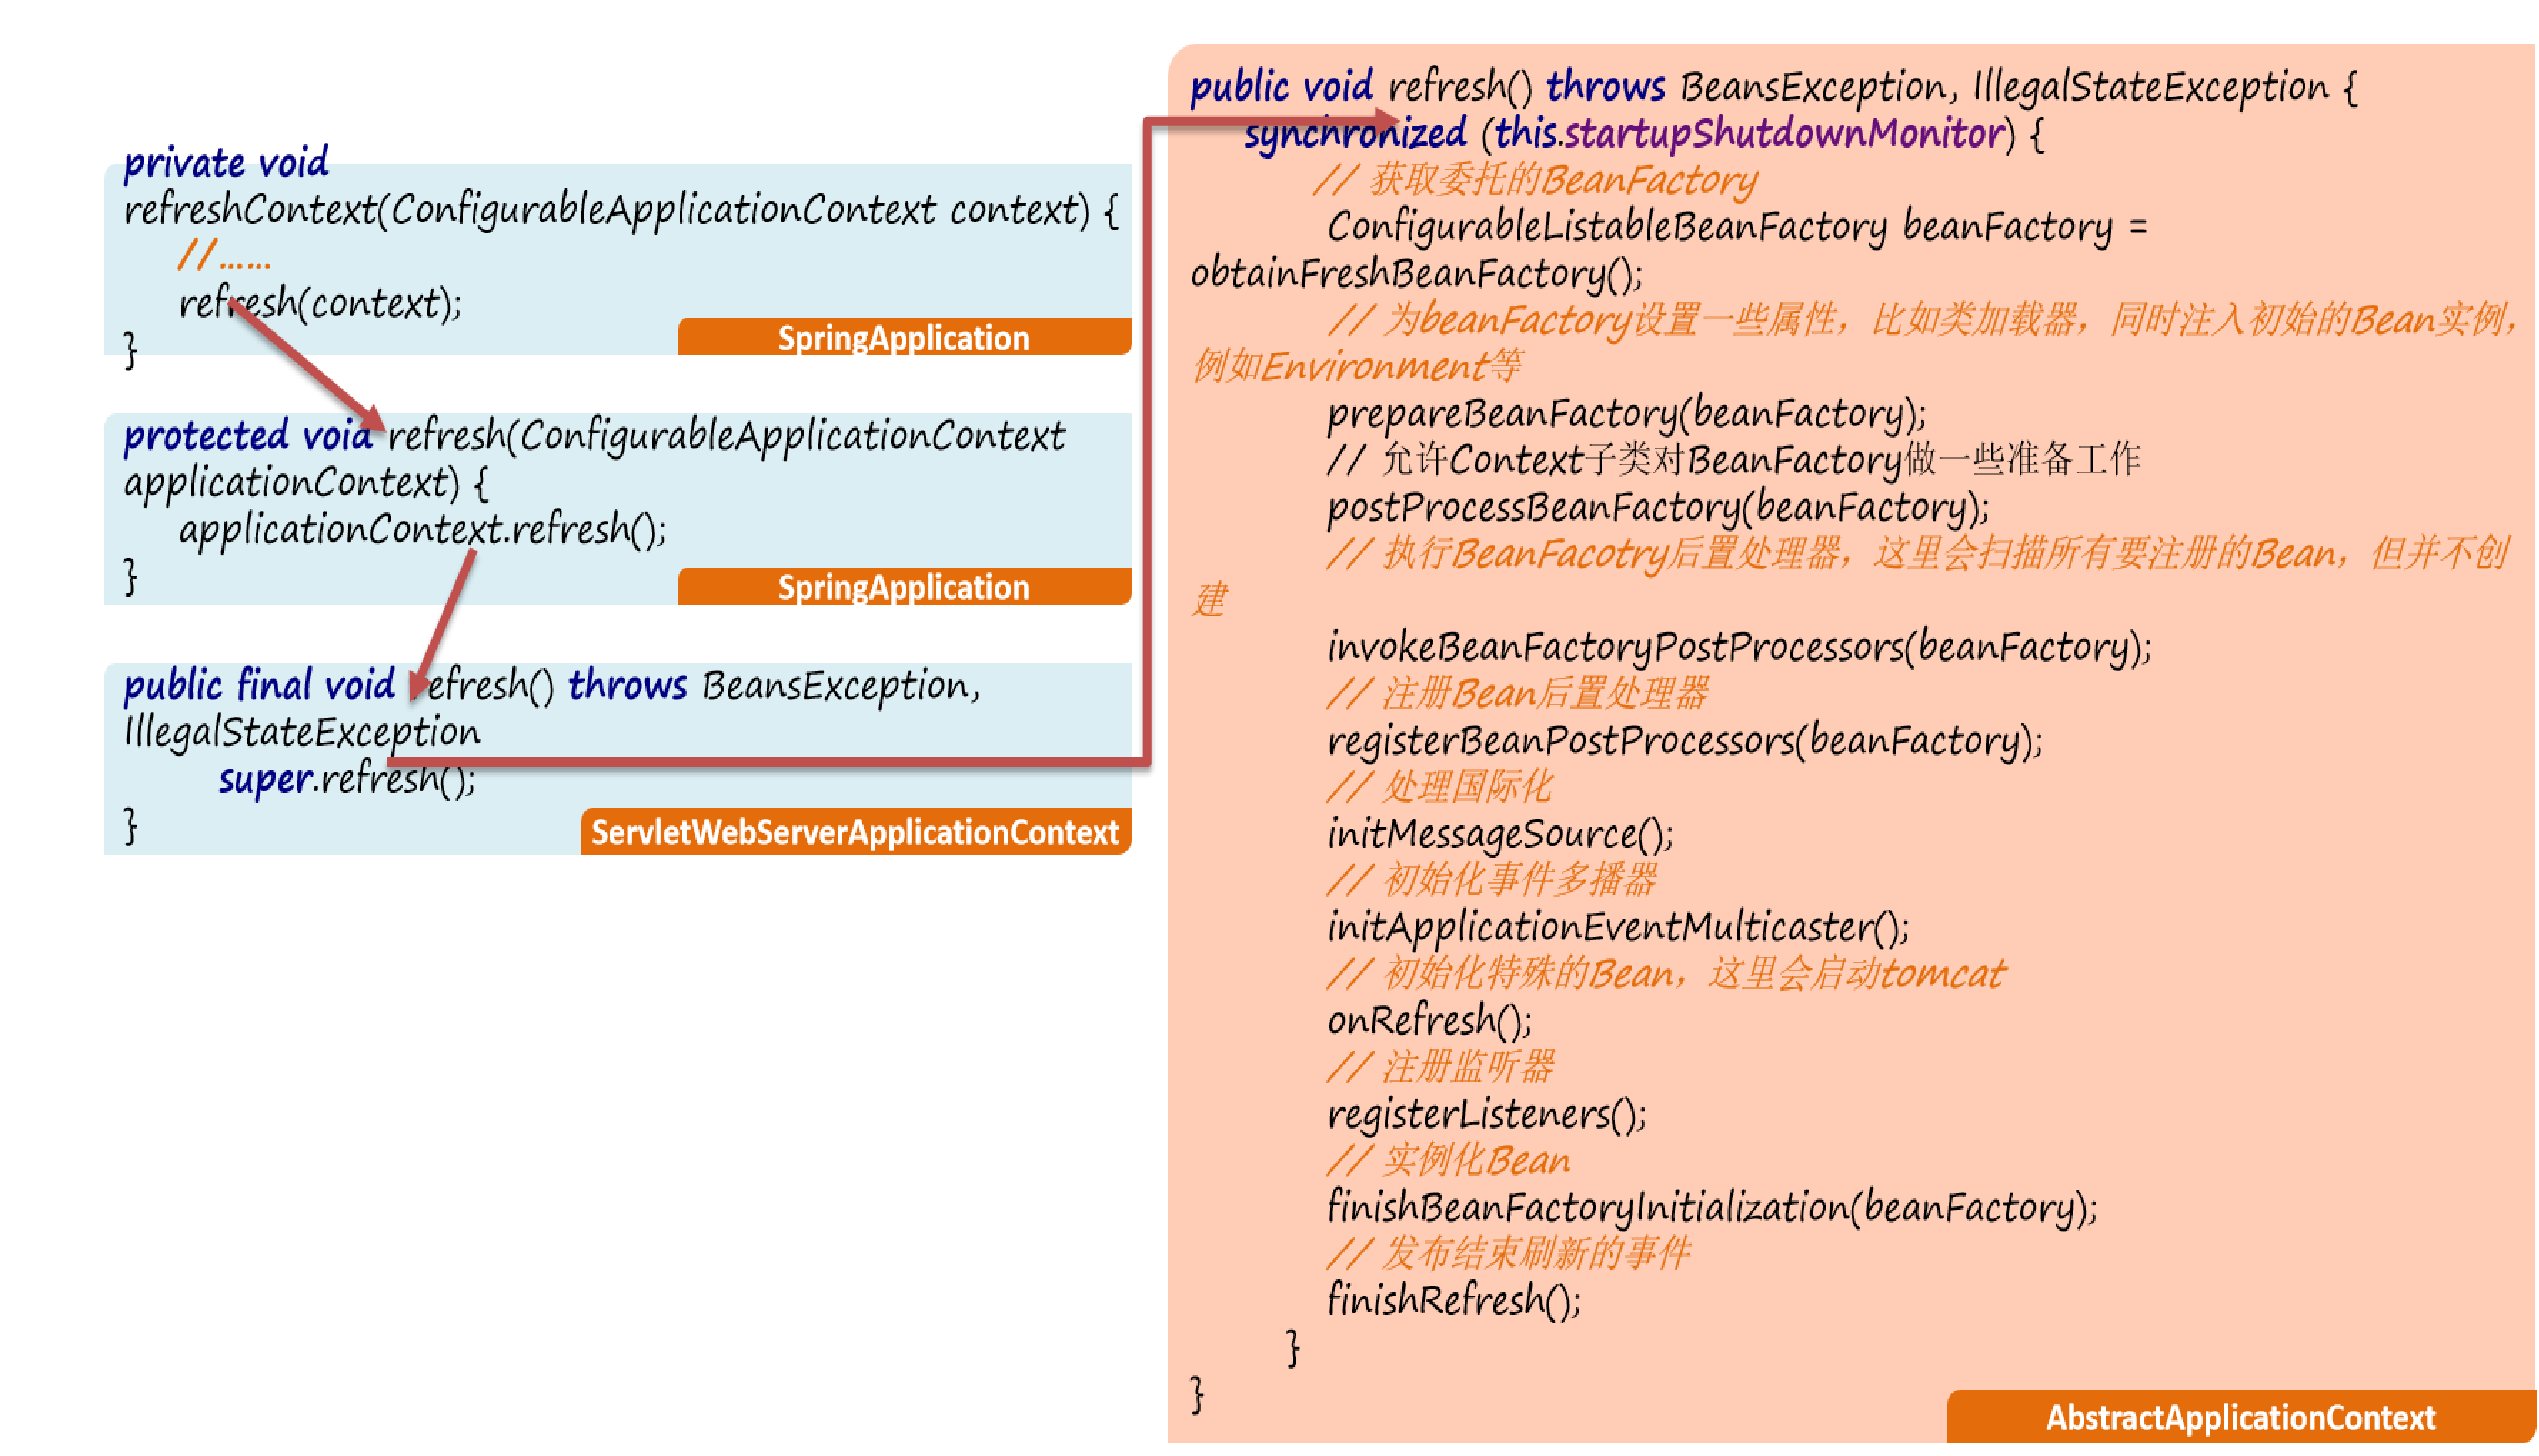
文字描述:总分总
总: IOC容器的初始化,核心工作是在AbstractApplicationContext.refresh方法中完成的
分:在refresh方法中主要做了这么几件事
1)、准备BeanFactory,在这一块需要给BeanFacory设置很多属性,比如类加载器、Environment等
2)、执行BeanFactory后置处理器,这一阶段会扫描要放入到容器中的Bean信息,得到对应的BeanDefinition(注意,这里只扫描,不创建)
3)、是注册BeanPostProcesor,我们自定义的BeanPostProcessor就是在这一个阶段被加载的, 将来Bean对象实例化好后需要用到
4)、启动tomcat
5)、实例化容器中实例化非懒加载的单例Bean, 这里需要说的是,多例Bean和懒加载的Bean不会在这个阶段实例化,将来用到的时候再创建
6)、当容器初始化完毕后,再做一些扫尾工作,比如清除缓存等
总:总结一下,在IOC容器初始化的的过程中,首先得准备并执行BeanFactory后置处理器,其次得注册Bean后置处理器,并启动tomcat,最后需要借助于BeanFactory完成Bean的实例化
Bean生命周期
Bean生命周期分为:创建对象、初始化、使用对象、销毁对象,这里着重说明创建对象和初始化
大纲流程:核心在 AbstractAutowireCapableBeanFacotry.doCreateBean() 中
- 创建对象
1)、实例化(构造方法)
2)、依赖注入
- 初始化
1)、执行Aware接口回调
2)、执行BeanPostProcessor. postProcessBeforeInitialization
3)、执行InitializingBean回调(先执行@PostConstruct)
4)、执行BeanPostProcessor. postProcessAfterInitialization
-
使用对象:每个人使用方式不同
-
销毁对象:执行DisposableBean回调(先执行
@PreDestory)
源码跟踪:
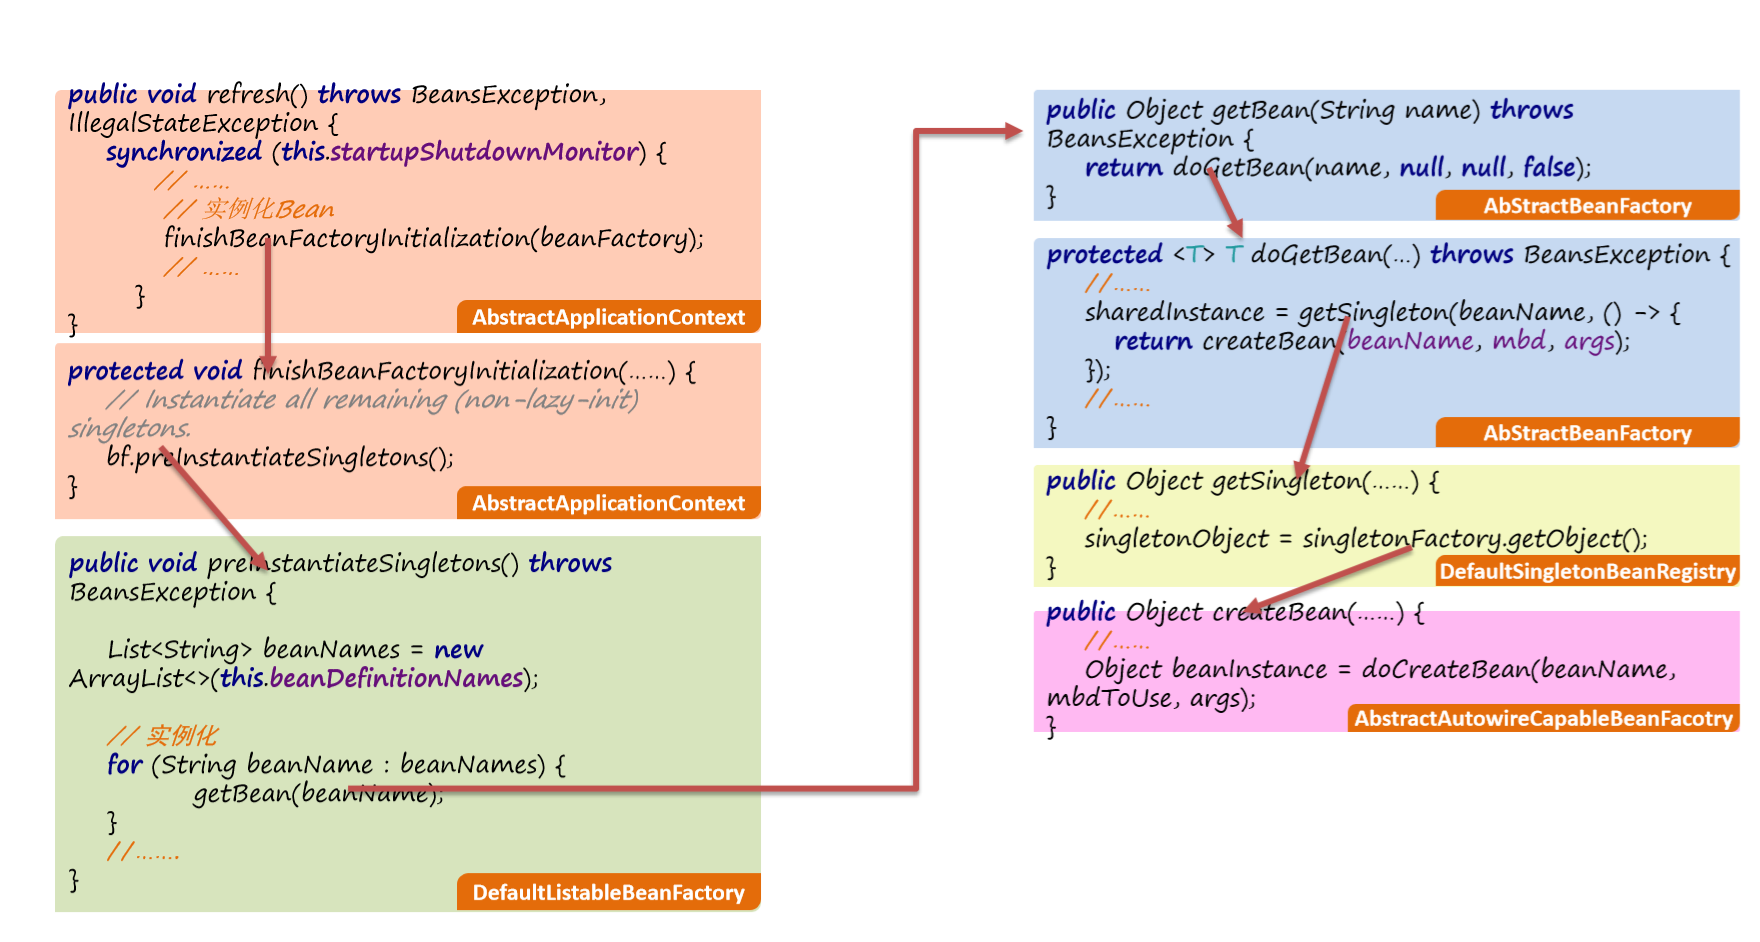
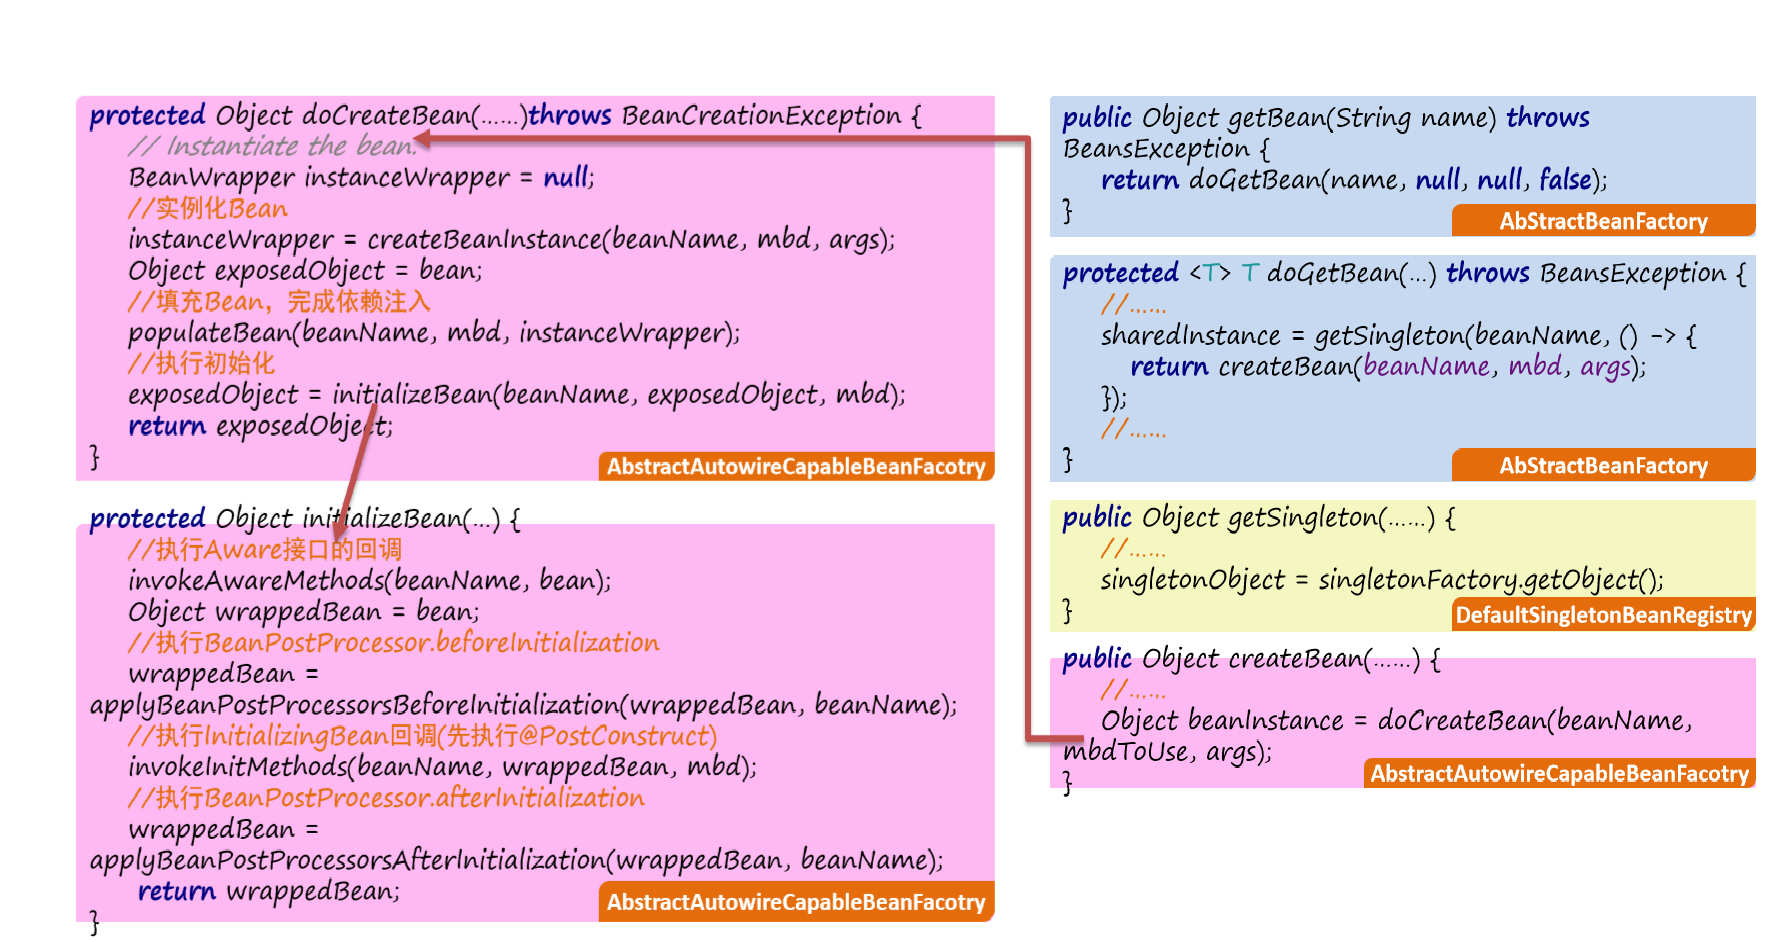
文字总结:总分总
总:Bean的生命周期总的来说有4个阶段,分别有创建对象,初始化对象,使用对象以及销毁对象,而且这些工作大部分是交给Bean工厂的doCreateBean方法完成的
分:
-
首先,在创建对象阶段,先调用构造方法实例化对象,对象有了后会填充该对象的内容,其实就是处理依赖注入
-
其次,对象创建完毕后,需要做一些初始化的操作,在这里涉及到几个扩展点
1)、执行Aware感知接口的回调方法
2)、执行Bean后置处理器的postProcessBeforeInitialization方法
3)、执行InitializingBean接口的回调,在这一步如果Bean中有标注了@PostConstruct注解的方法,会先执行它
4)、执行Bean后置处理器的postProcessAfterInitialization
把这些扩展点都执行完,Bean的初始化就完成了
-
接下来,在使用阶段就是程序员从容器中获取该Bean使用即可
-
最后,在容器销毁之前,会先销毁对象,此时会执行DisposableBean接口的回调,这一步如果Bean中有标注了@PreDestroy接口的函数,会先执行它
总:总结一下,Bean的生命周期共包含四个阶段,其中初始化对象和销毁对象我们程序员可以通过一些扩展点执行自己的代码
附加:Spring 事务失效场景
这个玩意儿是Spring的,想了想在这里也放一章节吧。
需要同时写入多张表的数据。为了保证操作的原子性(要么同时成功,要么同时失败),避免数据不一致的情况,我们一般都会用到Spring事务(也会选择其他事务框架)。
spring事务用起来贼爽,就用一个简单的注解:@Transactional,就能轻松搞定事务。而且一直用一直爽。
但如果使用不当,它也会坑人于无形。
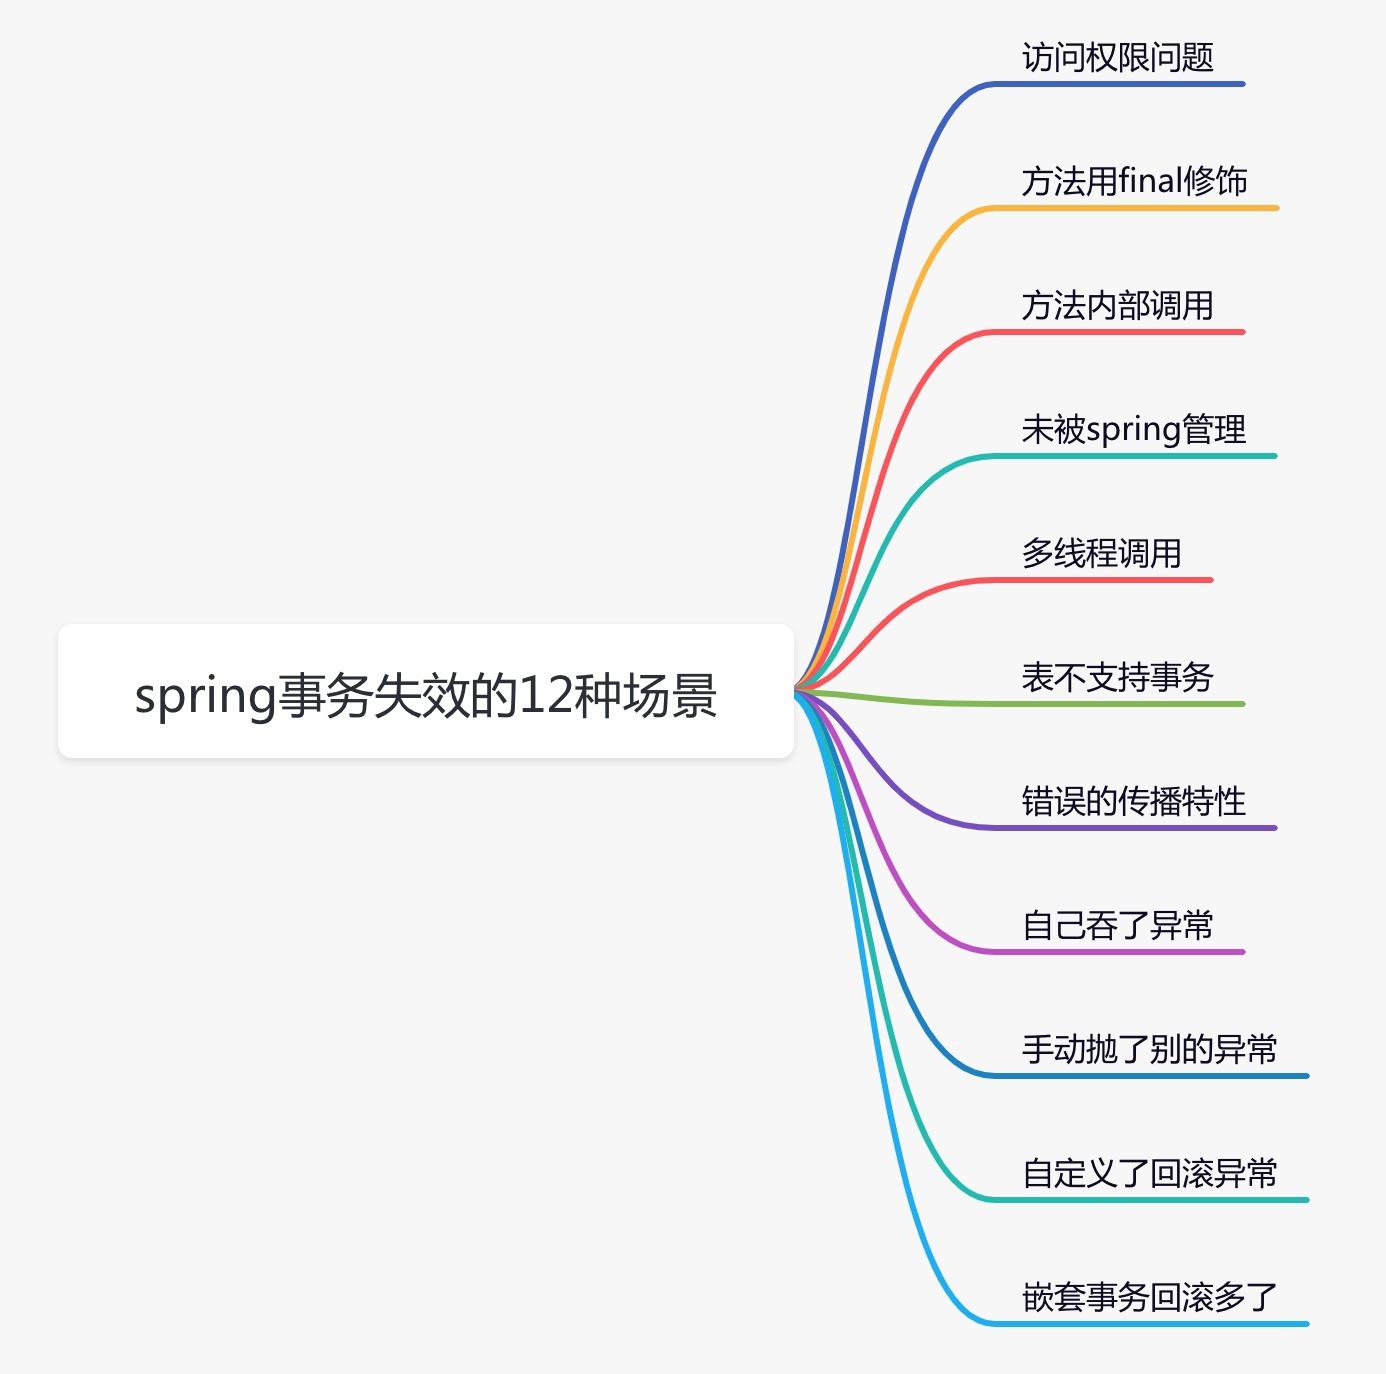
事务不生效
访问权限问题
Java的访问权限主要有四种:private、default、protected、public,它们的权限从左到右,依次变大。
在开发过程中,把某些事务方法,定义了错误的访问权限,就会导致事务功能出问题。
@Service
public class UserService {

    @Transactional
    private void add(UserModel userModel) {
         saveData(userModel);
         updateData(userModel);
    }
}
上述代码就会导致事务失效,因为Spring要求被代理方法必须是public的。
在 AbstractFallbackTransactionAttributeSource 类的 computeTransactionAttribute 方法中有个判断,如果目标方法不是public,则TransactionAttribute返回null,即不支持事务。
protected TransactionAttribute computeTransactionAttribute(Method method, @Nullable Class<?> targetClass) {
    // Don't allow no-public methods as required.
    if (allowPublicMethodsOnly() && !Modifier.isPublic(method.getModifiers())) {
      return null;
    }

    // The method may be on an interface, but we need attributes from the target class.
    // If the target class is null, the method will be unchanged.
    Method specificMethod = AopUtils.getMostSpecificMethod(method, targetClass);

    // First try is the method in the target class.
    TransactionAttribute txAttr = findTransactionAttribute(specificMethod);
    if (txAttr != null) {
      return txAttr;
    }

    // Second try is the transaction attribute on the target class.
    txAttr = findTransactionAttribute(specificMethod.getDeclaringClass());
    if (txAttr != null && ClassUtils.isUserLevelMethod(method)) {
      return txAttr;
    }

    if (specificMethod != method) {
      // Fallback is to look at the original method.
      txAttr = findTransactionAttribute(method);
      if (txAttr != null) {
        return txAttr;
      }
      // Last fallback is the class of the original method.
      txAttr = findTransactionAttribute(method.getDeclaringClass());
      if (txAttr != null && ClassUtils.isUserLevelMethod(method)) {
        return txAttr;
      }
    }
    return null;
  }
方法用final修饰
有时候,某个方法不想被子类重新,这时可以将该方法定义成final的。普通方法这样定义是没问题的,但如果将事务方法定义成final就会导致事务失效。
@Service
public class UserService {

    @Transactional
    public final void add(UserModel userModel){
        saveData(userModel);
        updateData(userModel);
    }
}
因为Spring事务底层使用了AOP帮我们生成代理类,在代理类中实现的事务功能。如果某个方法用final修饰了,那么在它的代理类中,就无法重写该方法,而添加事务功能。
重要提示
如果某个方法是static的,同样无法通过动态代理,变成事务方法。
方法内部调用
有时需要在某个Service类的某个事务方法中调用另外一个事务方法。
@Service
public class UserService {

    @Autowired
    private UserMapper userMapper;

    @Transactional
    public void add(UserModel userModel) {
        userMapper.insertUser(userModel);
        updateStatus(userModel);
    }

    @Transactional
    public void updateStatus(UserModel userModel) {
        doSomeThing();
    }
}
上述代码就会导致事务失效,因为updateStatus方法拥有事务的能力是Spring AOP生成代理对象,但是updateStatus这种方法直接调用了this对象的方法,所以updateStatus方法不会生成事务。
如果有些场景,确实想在同一个类的某个方法中,调用它自己的另外一个方法,该怎么办?
- 第一种方式:新加一个Service方法。把
@Transactional注解加到新Service方法上,把需要事务执行的代码移到新方法中。
@Servcie
public class ServiceA {
   @Autowired
   prvate ServiceB serviceB;

   public void save(User user) {
         queryData1();
         queryData2();
         serviceB.doSave(user);
   }
 }


 @Servcie
 public class ServiceB {

    @Transactional(rollbackFor=Exception.class)
    public void doSave(User user) {
       addData1();
       updateData2();
    }
 }
- 第二种方式:在该Service类中注入自己。如果不想再新加一个Service类,在该Service类中注入自己也是一种选择。
@Servcie
public class ServiceA {
   @Autowired
   prvate ServiceA serviceA;

   public void save(User user) {
         queryData1();
         queryData2();
         serviceA.doSave(user);
   }

   @Transactional(rollbackFor=Exception.class)
   public void doSave(User user) {
       addData1();
       updateData2();
    }
 }
第二种做法会不会出现循环依赖问题?
不会。Spring IOC内部的三级缓存保证了它,不会出现循环依赖问题。但有些坑,解放方式去参考:Spring:如何解决循环依赖
- 第三种方式:通过AopContent类。在该Service类中使用
AopContext.currentProxy()获取代理对象。
上面第二种方式确实可以解决问题,但是代码看起来并不直观,还可以通过在该Service类中使用AOPProxy获取代理对象,实现相同的功能。
@Servcie
public class ServiceA {
public void save(User user) {
queryData1();
queryData2();
((ServiceA)AopContext.currentProxy()).doSave(user);
}
@Transactional(rollbackFor=Exception.class)
public void doSave(User user) {
addData1();
updateData2();
}
}
未被Spring托管
使用Spring事务的前提是:对象要被Spring管理,需要创建bean实例。
通常情况下,我们通过@Controller、@Service、@Component、@Repository等注解,可以自动实现bean实例化和依赖注入的功能。
但要是噼里啪啦敲完Service类,忘了加 @Service 注解呢?
那么该类不会交给Spring管理,它的方法也不会生成事务。
多线程调用
@Service
public class UserService {
@Autowired
private UserMapper userMapper;
@Autowired
private RoleService roleService;
@Transactional
public void add(UserModel userModel) throws Exception {
userMapper.insertUser(userModel);
new Thread(() -> {
roleService.doOtherThing();
}).start();
}
}
@Service
public class RoleService {
@Transactional
public void doOtherThing() {
System.out.println("保存role表数据");
}
}
上述代码事务方法add中是另外一个线程调用的事务方法doOtherThing。
这样会导致两个方法不在同一个线程中,获取到的数据库连接不一样,从而是两个不同的事务。如果想doOtherThing方法中抛了异常,add方法也回滚是不可能的。
Spring事务其实是通过数据库连接来实现的。当前线程中保存了一个map,key是数据源,value是数据库连接。
private static final ThreadLocal<Map<Object, Object>> resources =
new NamedThreadLocal<>("Transactional resources");
我们说的同一个事务,其实是指同一个数据库连接,只有拥有同一个数据库连接才能同时提交和回滚。如果在不同的线程,拿到的数据库连接肯定是不一样的,所以是不同的事务。
表不支持事务
MySQL 5之前,默认的数据库引擎是myisam。好处是:索引文件和数据文件是分开存储的,对于查多写少的单表操作,性能比innodb更好。
但有个很致命的问题是:不支持事务。如果需要跨多张表操作,由于其不支持事务,数据极有可能会出现不完整的情况。
提示
有时候我们在开发的过程中,发现某张表的事务一直都没有生效,那不一定是spring事务的锅,最好确认一下你使用的那张表,是否支持事务。
未开启事务
有时候,事务没有生效的根本原因是没有开启事务。
看到这句话可能会觉得好笑。因为开启事务不是一个项目中,最最最基本的功能吗?为什么还会没有开启事务?
如果使用的是Spring Boot项目,那很幸运。因为Spring Boot通过 DataSourceTransactionManagerAutoConfiguration 类,已经默默的帮忙开启了事务。自己所要做的事情很简单,只需要配置spring.datasource相关参数即可。
但如果使用的还是传统的Spring项目,则需要在applicationContext.xml文件中,手动配置事务相关参数。如果忘了配置,事务肯定是不会生效的。
<!-- 配置事务管理器 -->
<bean class="org.springframework.jdbc.datasource.DataSourceTransactionManager" id="transactionManager">
<property name="dataSource" ref="dataSource"></property>
</bean>
<tx:advice id="advice" transaction-manager="transactionManager">
<tx:attributes>
<tx:method name="*" propagation="REQUIRED"/>
</tx:attributes>
</tx:advice>
<!-- 用切点把事务切进去 -->
<aop:config>
<aop:pointcut expression="execution(* com.zixieqing.*.*(..))" id="pointcut"/>
<aop:advisor advice-ref="advice" pointcut-ref="pointcut"/>
</aop:config>
注意
如果在pointcut标签中的切入点匹配规则配错了的话,有些类的事务也不会生效。
事务不回滚
错误的传播特性
在使用@Transactional注解时,是可以指定propagation参数的。
该参数的作用是指定事务的传播特性,Spring目前支持7种传播特性:
REQUIRED如果当前上下文中存在事务,那么加入该事务,如果不存在事务,创建一个事务,这是默认的传播属性值。REQUIRES_NEW每次都会新建一个事务,并且同时将上下文中的事务挂起,执行当前新建事务完成以后,上下文事务恢复再执行。NESTED如果当前上下文中存在事务,则嵌套事务执行,如果不存在事务,则新建事务。SUPPORTS如果当前上下文存在事务,则支持事务加入事务,如果不存在事务,则使用非事务的方式执行。MANDATORY如果当前上下文中存在事务,否则抛出异常。NOT_SUPPORTED如果当前上下文中存在事务,则挂起当前事务,然后新的方法在没有事务的环境中执行。NEVER如果当前上下文中存在事务,则抛出异常,否则在无事务环境上执行代码。
弄一张记忆图:
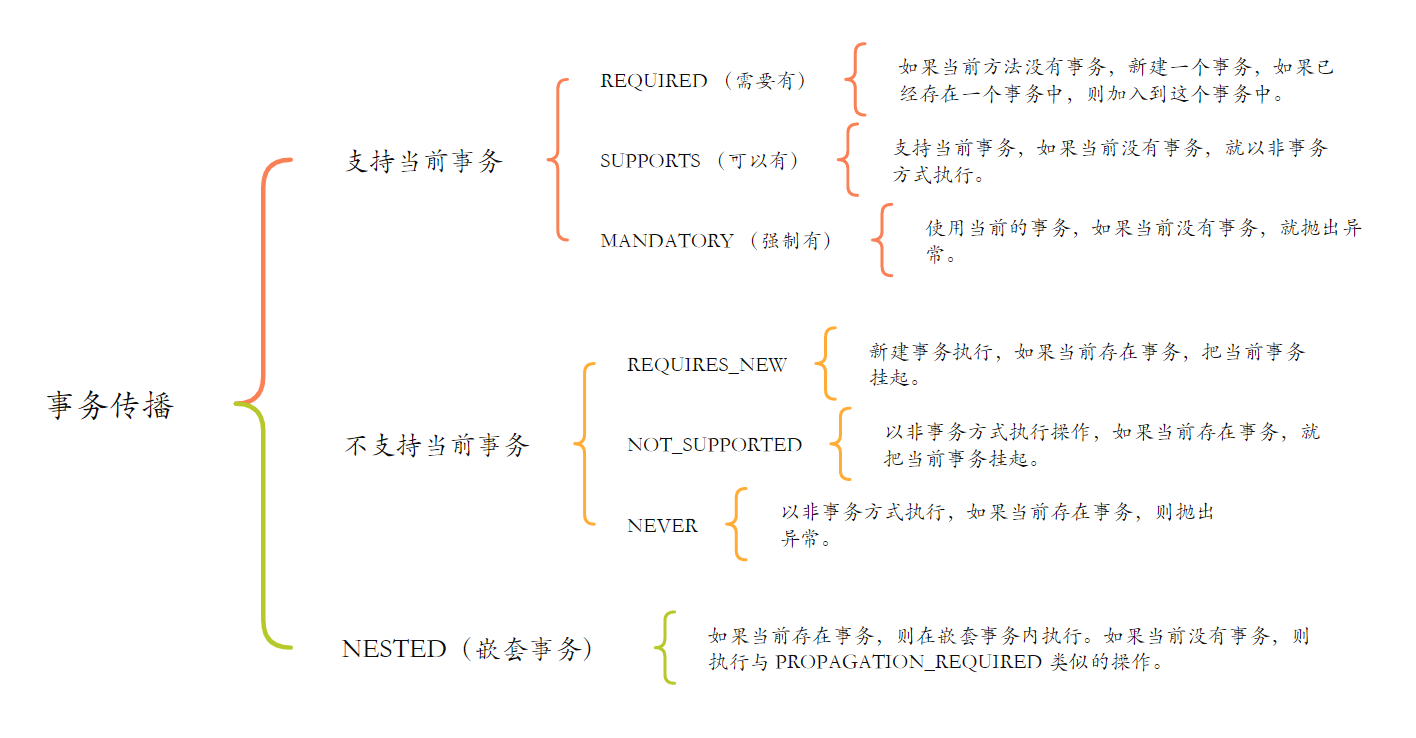
提示
加入事务(REQUIRED)和嵌套事务(NESTED)的区别:
如果当前不存在事务,那么二者的行为是一样的;但如果当前存在事务,那么加入事务的事务传播级别在遇到异常之后,会将事务全部回滚;而嵌套事务在遇到异常时,只是执行了部分事务的回滚
嵌套事务之所以能回滚部分事务,是因为数据库中存在一个保存点的概念,嵌套事务相对于新建了一个保存点,如果出现异常了,那么只需要回滚到保存点即可,这样就实现了部分事务的回滚
如果我们在手动设置propagation参数的时候,把传播特性设置错了就会出问题。
@Service
public class UserService {
// Propagation.NEVER 这种类型的传播特性不支持事务,如果有事务则会抛异常
@Transactional(propagation = Propagation.NEVER)
public void add(UserModel userModel) {
saveData(userModel);
updateData(userModel);
}
}
目前只有这三种传播特性才会创建新事务:REQUIRED,REQUIRES_NEW,NESTED。
自己吞了异常
事务不会回滚,最常见的问题是:开发者在代码中手动try...catch了异常。
@Slf4j
@Service
public class UserService {
@Transactional
public void add(UserModel userModel) {
try {
saveData(userModel);
updateData(userModel);
} catch (Exception e) {
log.error(e.getMessage(), e);
}
}
}
这种情况下Spring事务当然不会回滚,因为开发者自己捕获了异常,又没有手动抛出,换句话说就是把异常吞掉了。
如果想要Spring事务能够正常回滚,必须抛出它能够处理的异常。如果没有抛异常,则Spring认为程序是正常的
Spring 事务处理的异常类型主要是基于异常是否是运行时异常,以及开发者在
@Transactional配置中的定制。对于受检查异常,需要显式配置才会触发事务回滚。
Spring 事务处理的异常类型细分
- 默认回滚规则:
-
Spring 默认情况下,如果事务方法抛出了未检查异常(即 RuntimeException 或其子类)或者 Error,事务会自动回滚
-
对于受检查异常(即非 RuntimeException 的异常),事务通常不会自动回滚,除非在事务配置中特别指定了
- 自定义回滚规则:
-
开发者可以通过在
@Transactional注解中使用 rollbackFor 和 noRollbackFor 属性来自定义哪些异常应该触发回滚,哪些不应该 -
rollbackFor 指定一个异常类数组,当这些异常被抛出时,事务将回滚
-
noRollbackFor 指定一个异常类数组,当这些异常被抛出时,事务不会回滚
- 编程式事务管理:
- 在编程式事务管理中,你可以手动调用 TransactionTemplate 或 PlatformTransactionManager 的
setRollbackOnly()方法来指示事务应该回滚,无论是否抛出异常
- Spring MVC 异常处理:
- 在 Spring MVC 中,可以使用
@ExceptionHandler注解来处理特定的运行时异常,但这并不直接影响事务管理,除非这些异常导致了事务性的方法抛出异常
- 全局异常处理:
- 可以创建一个继承自 HandlerExceptionResolver 或 AbstractHandlerExceptionResolver 的类,或者使用
@ControllerAdvice与@ExceptionHandler结合,来集中处理所有控制器中的异常,这有助于提供更友好的用户反馈,但同样不影响事务的默认回滚规则
手动抛了别的异常
即使开发者没有手动捕获异常,但如果抛的异常不正确,Spring事务也不会回滚。
@Slf4j
@Service
public class UserService {
@Transactional
public void add(UserModel userModel) throws Exception {
try {
saveData(userModel);
updateData(userModel);
} catch (Exception e) {
log.error(e.getMessage(), e);
throw new Exception(e);
}
}
}
手动抛出了异常:Exception,事务同样不会回滚。
因为Spring事务,默认情况下只会回滚RuntimeException(运行时异常)和Error(错误),对于普通的Exception(非运行时异常),它不会回滚。
自定义了回滚异常
在使用@Transactional注解声明事务时,有时我们想自定义回滚的异常,Spring也是支持的。可以通过设置rollbackFor参数,来完成这个功能。
但如果这个参数的值设置错了,就会引出一些莫名其妙的问题,
@Service
public class UserService {
@Transactional(rollbackFor = BusinessException.class)
public void add(UserModel userModel) throws Exception {
saveData(userModel);
updateData(userModel);
}
}
如果在执行上面这段代码,保存和更新数据时,程序报错了,抛了SqlException、DuplicateKeyException等异常。而BusinessException是我们自定义的异常,报错的异常不属于BusinessException,所以事务也不会回滚。
即使rollbackFor有默认值,但阿里巴巴开发者规范中,还是要求开发者重新指定该参数。why?
因为如果使用默认值,一旦程序抛出了Exception,事务不会回滚,这会出现很大的bug。所以,建议一般情况下,将该参数设置成:Exception或Throwable。
嵌套事务回滚多了
@Service
public class UserService {
@Autowired
private UserMapper userMapper;
@Autowired
private RoleService roleService;
@Transactional
public void add(UserModel userModel) throws Exception {
userMapper.insertUser(userModel);
roleService.doOtherThing();
}
}
@Service
public class RoleService {
@Transactional(propagation = Propagation.NESTED)
public void doOtherThing() {
System.out.println("保存role表数据");
}
}
这种情况使用了嵌套的内部事务,原本是希望调用roleService.doOtherThing()方法时,如果出现了异常,只回滚doOtherThing方法里的内容,不回滚 userMapper.insertUser里的内容,即回滚保存点。。但事实是,insertUser也回滚了。why?
因为doOtherThing方法出现了异常,没有手动捕获,会继续往上抛,到外层add方法的代理方法中捕获了异常。所以,这种情况是直接回滚了整个事务,不只回滚单个保存点。
怎么样才能只回滚保存点?
将内部嵌套事务放在try/catch中,并且不继续往上抛异常。这样就能保证,如果内部嵌套事务中出现异常,只回滚内部事务,而不影响外部事务。
@Slf4j
@Service
public class UserService {
@Autowired
private UserMapper userMapper;
@Autowired
private RoleService roleService;
@Transactional
public void add(UserModel userModel) throws Exception {
userMapper.insertUser(userModel);
try {
roleService.doOtherThing();
} catch (Exception e) {
log.error(e.getMessage(), e);
}
}
}
大事务问题
在使用Spring事务时,有个让人非常头疼的问题,就是大事务问题。
通常情况下,我们会在方法上@Transactional注解,填加事务功能,
但@Transactional注解,如果被加到方法上,有个缺点就是整个方法都包含在事务当中了。
@Service
public class UserService {
@Autowired
private RoleService roleService;
@Transactional
public void add(UserModel userModel) throws Exception {
query1();
query2();
query3();
roleService.save(userModel);
update(userModel);
}
}
@Service
public class RoleService {
@Autowired
private RoleService roleService;
@Transactional
public void save(UserModel userModel) throws Exception {
query4();
query5();
query6();
saveData(userModel);
}
}
上述代码,在UserService类中,其实只有这两行才需要事务:
roleService.save(userModel);
update(userModel);
在RoleService类中,只有这一行需要事务:
saveData(userModel);
而上面的写法会导致所有的query方法也被包含在同一个事务当中。
如果query方法非常多,调用层级很深,而且有部分查询方法比较耗时的话,会造成整个事务非常耗时,从而造成大事务问题。
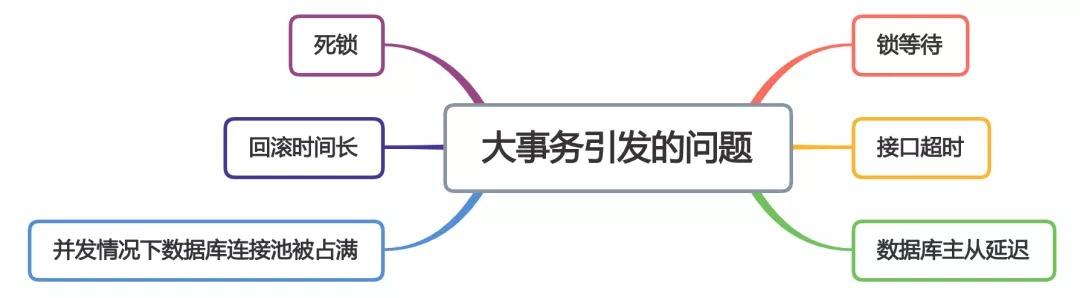
编程式事务
上面这些内容都是基于@Transactional注解的,主要说的是它的事务问题,我们把这种事务叫做:声明式事务。
其实,Spring还提供了另外一种创建事务的方式,即通过手动编写代码实现的事务,我们把这种事务叫做:编程式事务。
在Spring中为了支持编程式事务,专门提供了一个类:TransactionTemplate,在它的execute()方法中,就实现了事务的功能。
@Autowired
private TransactionTemplate transactionTemplate;
...
public void save(final User user) {
queryData1();
queryData2();
transactionTemplate.execute((status) => {
addData1();
updateData2();
return Boolean.TRUE;
})
}
相较于@Transactional注解声明式事务,我更建议大家使用,基于TransactionTemplate的编程式事务。主要原因如下:
- 避免由于Spring AOP问题,导致事务失效的问题。
- 能够更小粒度的控制事务的范围,更直观。
提示
建议在项目中少使用
@Transactional注解开启事务。但并不是说一定不能用它,如果项目中有些业务逻辑比较简单,而且不经常变动,使用@Transactional注解开启事务开启事务也无妨,因为它更简单,开发效率更高,但是千万要小心事务失效的问题。
参考
Spring的Bean循环依赖
循环依赖:就是一个或多个对象实例之间存在直接或间接的依赖关系,这种依赖关系构成了构成一个环形调用
第一种情况:自己依赖自己的直接依赖
第二种情况:两个对象之间的直接依赖
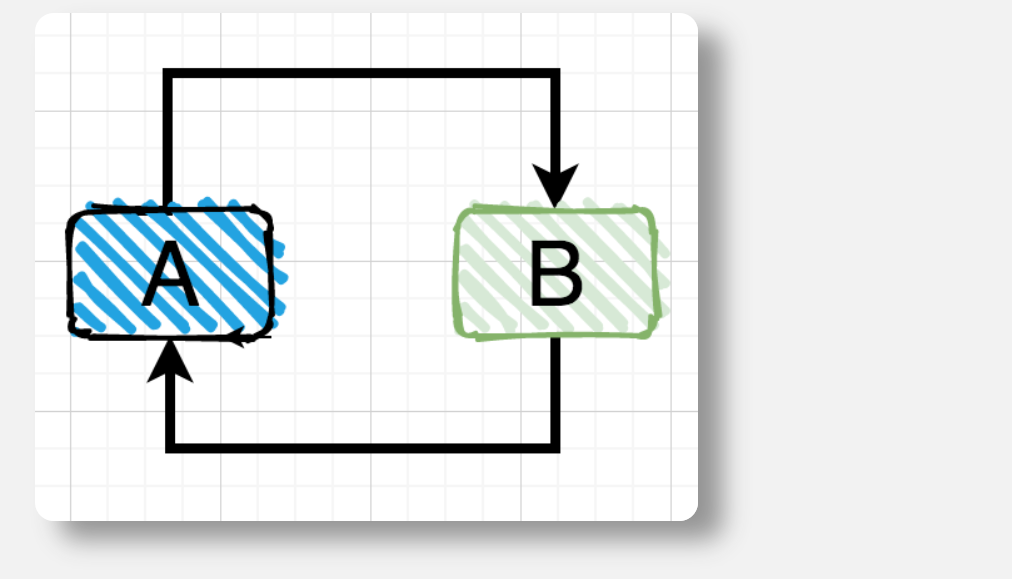
第三种情况:多个对象之间的间接依赖
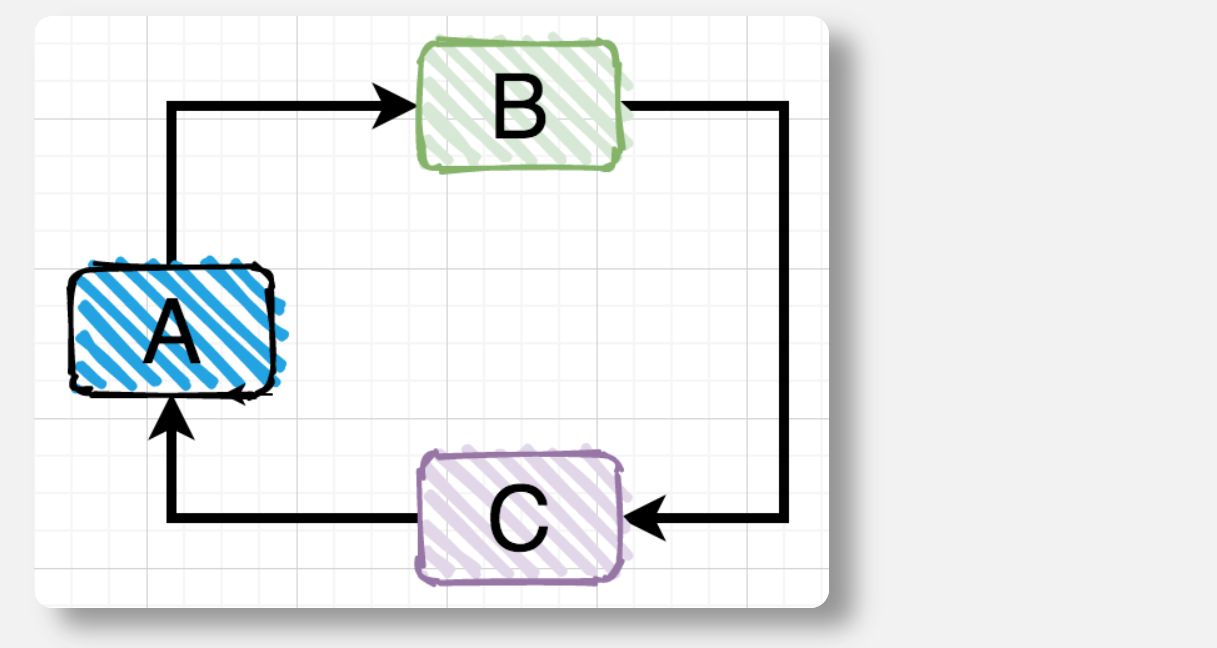
前面两种情况的直接循环依赖比较直观,非常好识别,但是第三种间接循环依赖的情况有时候因为业务代码调用层级很深,不容易识别出来。
循环依赖的N种场景
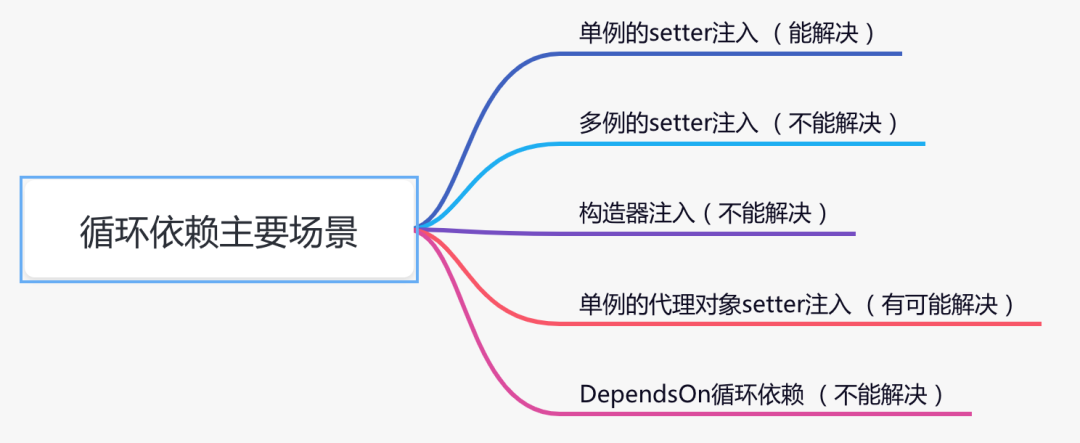
在YAML中有这么一个配置:
spring:
main:
allow-circular-references: true # 允许循环依赖,2.6.0版本开始默认不支持
以上是Spring循环依赖的一些基础知识,现在来看看源码
源码中会涉及三个容器(本质都是Map)
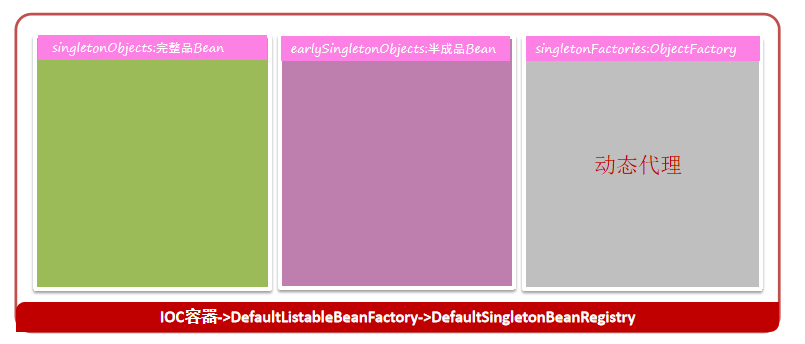
这三个容器也被称之为三级缓存,
- singletonObjects 一级缓存:完整品Bean对象,即完成实例化,依赖注入、初始化的对象
- earlySingletonObjects 二级缓存:半成品Bean对象,即完成实例化,但未完成依赖注入和初始化的对象
- singletonFactories 三级缓存:该缓存最主要的作用就是用于动态代理的需要
相关重要源码跟踪:相关重要源码跟踪:核心在 DefaultSingletonBeanRegistry 这个类中
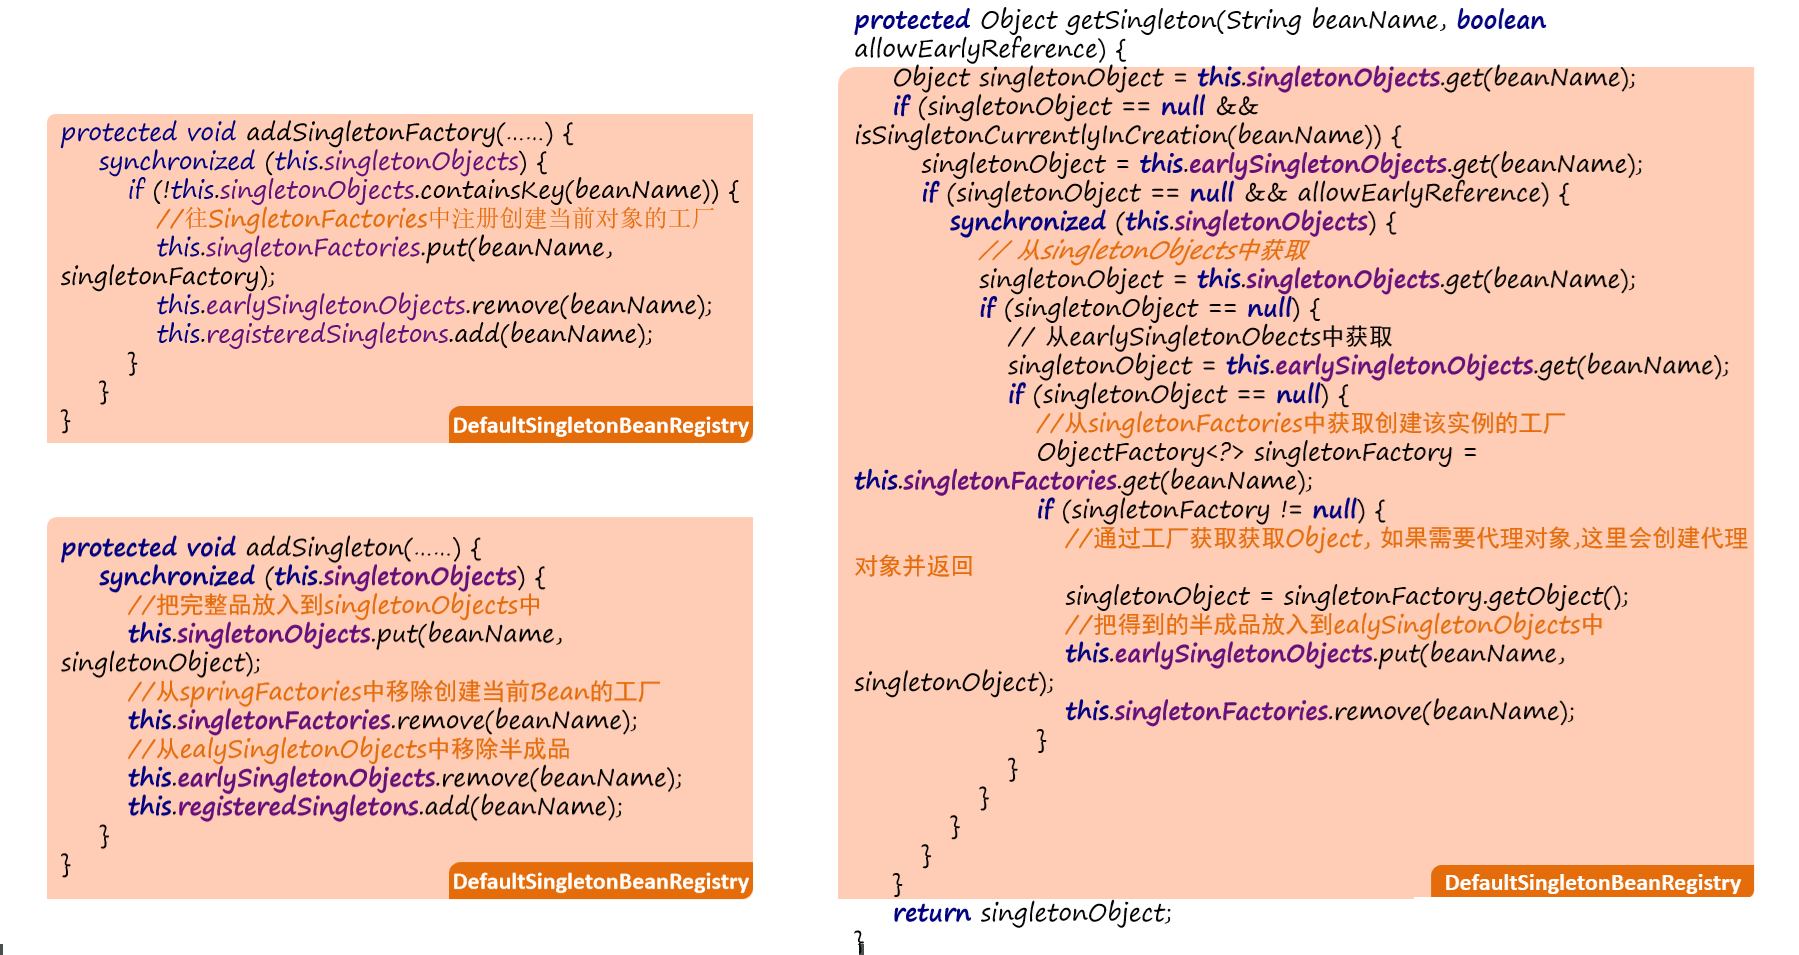
文字总结:A依赖B,B依赖举例
总:Bean的循环依赖指的是A依赖B,B又依赖A这样的依赖闭环问题,在Spring中,通过三个对象缓存区来解决循环依赖问题,这三个缓存区被定义到了DefaultSingletonBeanRegistry中,分别是singletonObjects用来存储创建完毕的Bean,earlySingletonObjecs用来存储未完成依赖注入的Bean,还有SingletonFactories用来存储创建Bean的ObjectFactory。假如说现在A依赖B,B依赖A,整个Bean的创建过程是这样的
分:
1)、首先,调用A的构造方法实例化A,当前的A还没有处理依赖注入,暂且把它称为半成品,此时会把半成品A封装到一个ObjectFactory中,并存储到springFactories缓存区
2)、接下来,要处理A的依赖注入了,由于此时还没有B,所以得先实例化一个B,同样的,半成品B也会被封装到ObjectFactory中,并存储到springFactory缓存区
3)、紧接着,要处理B的依赖注入了,此时会找到springFactories中A对应的ObjecFactory, 调用它的getObject方法得到刚才实例化的半成品A(如果需要代理对象,则会自动创建代理对象,将来得到的就是代理对象),把得到的半成品A注入给B,并同时会把半成品A存入到earlySingletonObjects中,将来如果还有其他的类循环依赖了A,就可以直接从earlySingletonObjects中找到它了,那么此时springFactories中创建A的ObjectFactory也可以删除了
4)、至此,B的依赖注入处理完了后,B就创建完毕了,就可以把B的对象存入到singletonObjects中了,并同时删除掉springFactories中创建B的ObjectFactory
5)、B创建完毕后,就可以继续处理A的依赖注入了,把B注入给A,此时A也创建完毕了,就可以把A的对象存储到singletonObjects中,并同时删除掉earlySingletonObjects中的半成品A
6)、截此为止,A和B对象全部创建完毕,并存储到了singletonObjects中,将来通过容器获取对象,都是从singletonObejcts中获取
总:总结起来就是一句话,借助于DefaultSingletonBeanRegistry的三个缓存区可以解决循环依赖问题
附加:Spring MVC执行流程
核心都在
DispatcherServlet.doDispatch(HttpServletRequest request, HttpServletResponse response)中
通用图:
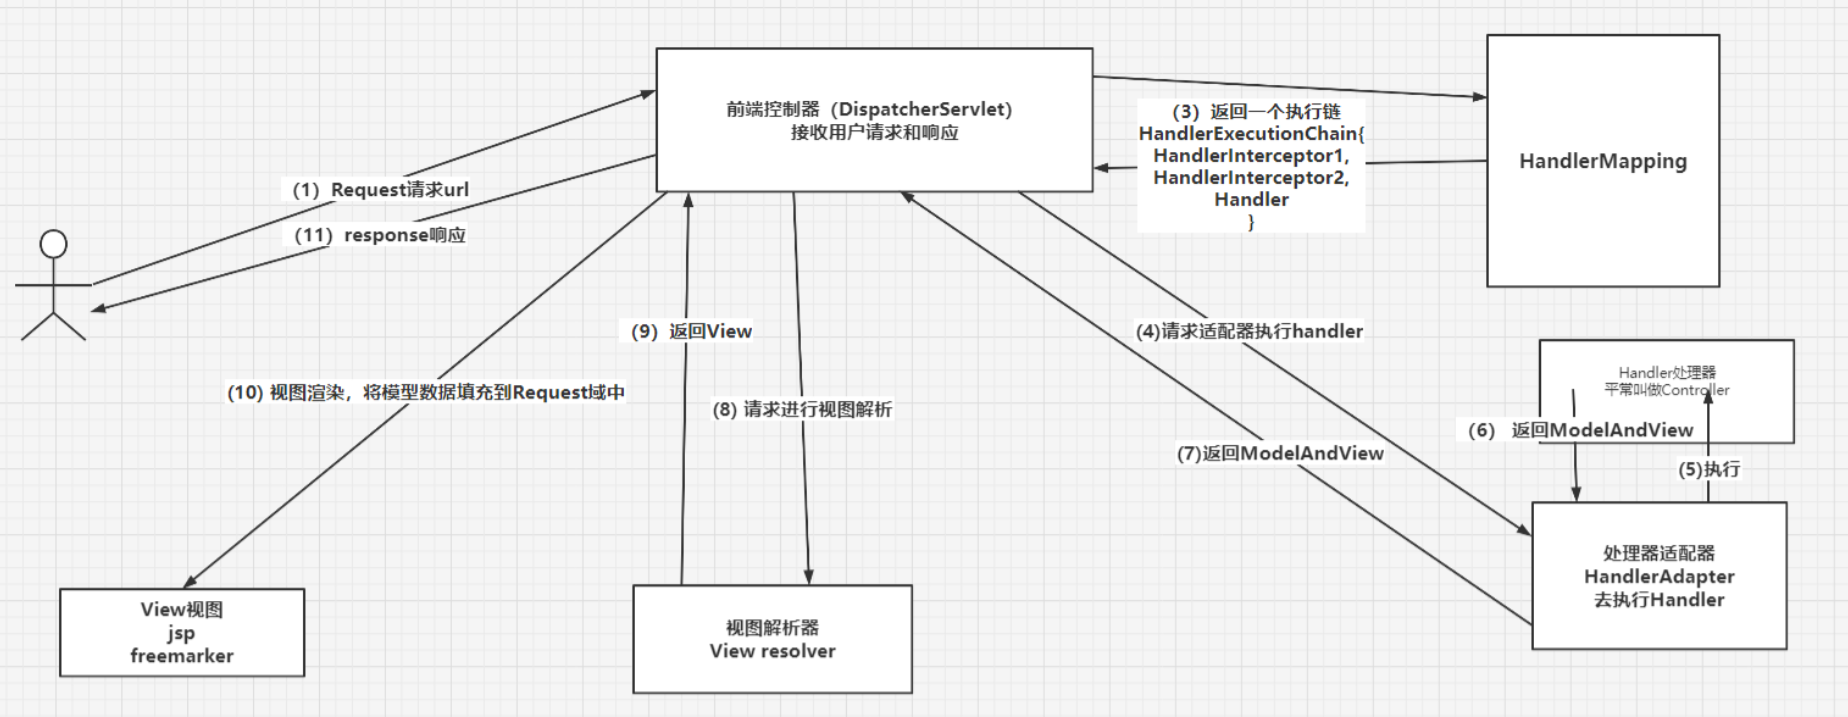
理解性记忆:夹带源码

源码跟踪:
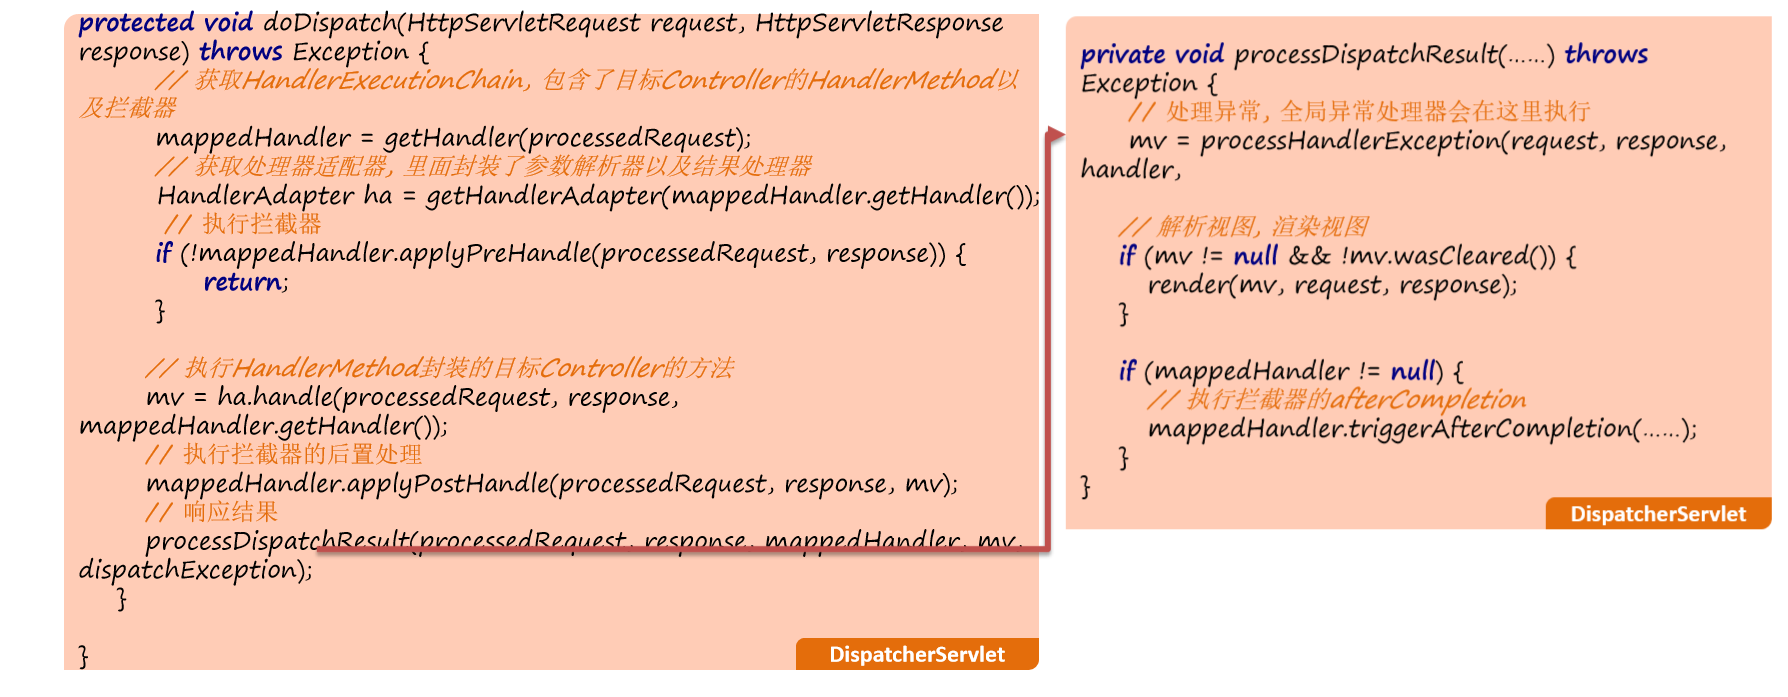
附加:Spring Boot自定义注解之AOP Log
场景:记录日志。在方法执行前 / 后 / 环绕,将一些记录插入数据库
使用Spring AOP做增强:前置增强、后置增强、环绕增强
- 依赖
<dependency>
<groupId>org.springframework.boot</groupId>
<artifactId>spring-boot-starter-aop</artifactId>
</dependency>
<dependency>
<groupId>org.springframework.boot</groupId>
<artifactId>spring-boot-starter-web</artifactId>
</dependency>
<dependency>
<groupId>org.mybatis.spring.boot</groupId>
<artifactId>mybatis-spring-boot-starter</artifactId>
<version>3.0.3</version>
</dependency>
<dependency>
<groupId>org.springframework.boot</groupId>
<artifactId>spring-boot-starter-data-jdbc</artifactId>
</dependency>
<dependency>
<groupId>mysql</groupId>
<artifactId>mysql-connector-java</artifactId>
<version>5.1.47</version>
</dependency>
<dependency>
<groupId>com.alibaba</groupId>
<artifactId>druid-spring-boot-starter</artifactId>
<version>1.1.6</version>
</dependency>
<dependency>
<groupId>org.projectlombok</groupId>
<artifactId>lombok</artifactId>
</dependency>
<dependency>
<groupId>cn.hutool</groupId>
<artifactId>hutool-all</artifactId>
<version>5.8.20</version>
</dependency>
- YAML配置
server:
port: 10010
# 项目名称配置 用于日志记录 也可以直接使用 spring.application.name
project:
name: spring-boot3-AOP-log
spring:
datasource:
type: com.alibaba.druid.pool.DruidDataSource
driver-class-name: com.mysql.jdbc.Driver
url: jdbc:mysql://localhost:3306/aop_log?useUnicode=true&characterEncoding=utf-8&useSSL=false&serverTimezone=Asia/Shanghai
username: root
password: "072413"
- 实体类
package com.zixq.entity;
import lombok.Data;
import lombok.experimental.Accessors;
import java.time.LocalDateTime;
/**
* <p>
* 日志实体类
* </p>
*
* <p>@author : ZiXieqing</p>
*/
@Data
@Accessors(chain = true)
public class LogEntity implements java.io.Serializable {
/**
* 主键
*/
private Long id;
/**
* 模块名
*/
private String module;
/**
* 用户名
*/
private String username;
/**
* 操作类型:增删改查
*/
private String operation;
/**
* 业务执行的耗时时长
*/
private Long time;
/**
* 请求的ip地址
*/
private String ip;
/**
* 请求方式(Get、Post....)、类名、方法名
*/
private String method;
/**
* 参数:参数名 参数值
*/
private String params;
/**
* 添加时间
*/
private LocalDateTime createTime;
}
- 自定义注解
package com.zixq.annotation;
import com.zixq.CustomEnum.OperatorType;
import java.lang.annotation.ElementType;
import java.lang.annotation.Retention;
import java.lang.annotation.RetentionPolicy;
import java.lang.annotation.Target;
/**
* <p>
* 自定义注解 用于方法执行前后进行日志记录
* </p>
*
* <p>@author : ZiXieqing</p>
*/
@Target(ElementType.METHOD)
@Retention(RetentionPolicy.RUNTIME)
public @interface Log {
/**
* 用户名
*/
String username() default "系统";
/**
* 操作类型 增删改查、其他
*/
OperatorType operation() default OperatorType.OTHER;
}
OperatorType枚举类:
package com.zixq.CustomEnum;
/**
* <p>
* 操作类型枚举
* </p>
*
* <p>@author : ZiXieqing</p>
*/
public enum OperatorType {
ADD, // 增
REMOVE, // 删
UPDATE, // 改
GET, // 查
OTHER // 其他
;
}
- 增强逻辑:使用环绕增强做示例
package com.zixq.aspect;
import cn.hutool.core.util.IdUtil;
import com.zixq.annotation.Log;
import com.zixq.entity.LogEntity;
import com.zixq.mapper.LogMapper;
import com.zixq.util.HttpContextUtils;
import com.zixq.util.IpUtils;
import jakarta.servlet.http.HttpServletRequest;
import org.aspectj.lang.ProceedingJoinPoint;
import org.aspectj.lang.annotation.Around;
import org.aspectj.lang.annotation.Aspect;
import org.aspectj.lang.reflect.MethodSignature;
import org.springframework.beans.factory.annotation.Autowired;
import org.springframework.beans.factory.annotation.Value;
import org.springframework.stereotype.Component;
import java.time.LocalDateTime;
/**
* <p>
* Log注解的逻辑处理
* </p>
*
* <p>@author : ZiXieqing</p>
*/
@Component
@Aspect
public class LogAspect {
@Autowired
private LogMapper logMapper;
@Value("${project.name}")
private String projectName;
/**
* 环绕增强
* 前置增强:@Before()
* 后置增强:@After()
*
* @param joinPoint joinPoint 可以获取到目标方法的参数、返回值等一系列东西
* "@annotation(com.zixq.annotation.Log)" 是切点 pointcut
*/
@Around("@annotation(com.zixq.annotation.Log)")
public void around(ProceedingJoinPoint joinPoint) throws Throwable {
long beginTime = System.nanoTime();
try {
// 执行业务方法
joinPoint.proceed();
} catch (Throwable e) {
// 防止事务失效 抛出 RuntimeException
throw new RuntimeException(e);
}
long endTime = System.nanoTime();
// 保存日志
saveLog(joinPoint, (endTime - beginTime));
}
/**
* 保存日志
*
* @param time 业务执行的时长
*/
private void saveLog(ProceedingJoinPoint joinPoint, long time) {
LogEntity logEntity = new LogEntity();
logEntity.setId(IdUtil.getSnowflakeNextId());
HttpServletRequest request = HttpContextUtils.getHttpServletRequest();
// 获取ip
String ipAddr = IpUtils.getIpAddr(request);
logEntity.setIp(ipAddr);
// 获取注解上的用户名、操作类型
MethodSignature method = (MethodSignature) joinPoint.getSignature();
Log logAnnotation = method.getMethod().getAnnotation(Log.class);
logEntity.setUsername(logAnnotation.username())
.setOperation(logAnnotation.operation().name());
// 获取请求参数 和 其值
Object[] argsValue = joinPoint.getArgs(); // 获取参数值
String[] parameterNames = method.getParameterNames();
if (argsValue != null && parameterNames != null) {
String params = "";
for (int i = 0; i < argsValue.length; i++) {
params += " " + parameterNames[i] + ": " + argsValue[i];
}
logEntity.setParams(params);
}
// 获取请求方式
String requestMethod = request.getMethod();
// 获取类名
String className = joinPoint.getTarget().getClass().getName();
// 获取方法名
String methodName = method.getName();
logEntity.setMethod(requestMethod + " " + className + "." + methodName + "()");
// 模块名、业务耗时、创建时间
logEntity.setModule(projectName)
.setTime(time)
.setCreateTime(LocalDateTime.now());
// 保存日志
logMapper.saveLog(logEntity);
}
}
提示
有时需要在如上面LogAspect中操作数据库,但又不可能在LogAspect所在模块引入数据库相关的东西,那么可以采用:
- LogAspect所在模块定义操作数据库的service接口;
- 然后在真正操作数据库的模块(如:xxx-manager)实现该接口操作数据库;
- 最后在LogAspect中
装配(@Autowired或@resource)其service接口类即可
涉及的两个工具类:
package com.zixq.util;
import jakarta.servlet.http.HttpServletRequest;
import org.springframework.web.context.request.RequestContextHolder;
import org.springframework.web.context.request.ServletRequestAttributes;
/**
* <p>
* Http工具类
* </p>
*
* <p>@author : ZiXieqing</p>
*/
public class HttpContextUtils {
/**
* 获取HttpServletRequest
*/
public static HttpServletRequest getHttpServletRequest() {
return ((ServletRequestAttributes) RequestContextHolder.getRequestAttributes()).getRequest();
}
}
package com.zixq.util;
import jakarta.servlet.http.HttpServletRequest;
/**
* <p>
* ip工具类
* </p>
*
* <p>@author : ZiXieqing</p>
*/
public class IpUtils {
/**
* 获取IP地址
*
* 使用Nginx等反向代理软件, 则不能通过request.getRemoteAddr()获取IP地址
* 如果使用了多级反向代理的话,X-Forwarded-For的值并不止一个,而是一串IP地址,X-Forwarded-For中第一个非unknown的有效IP字符串,则为真实IP地址
*/
public static String getIpAddr(HttpServletRequest request) {
String ip = request.getHeader("x-forwarded-for");
if (ip == null || ip.length() == 0 || "unknown".equalsIgnoreCase(ip)) {
ip = request.getHeader("Proxy-Client-IP");
}
if (ip == null || ip.length() == 0 || "unknown".equalsIgnoreCase(ip)) {
ip = request.getHeader("WL-Proxy-Client-IP");
}
if (ip == null || ip.length() == 0 || "unknown".equalsIgnoreCase(ip)) {
ip = request.getRemoteAddr();
}
return "0:0:0:0:0:0:0:1".equals(ip) ? "127.0.0.1" : ip;
}
}
- Mapper
package com.zixq.mapper;
import com.zixq.entity.LogEntity;
import org.apache.ibatis.annotations.Insert;
import org.apache.ibatis.annotations.Mapper;
/**
* <p>
* log Mapper 接口
* </p>
*
* <p>@author : ZiXieqing</p>
*/
@Mapper
public interface LogMapper {
/**
* 保存日志
*/
@Insert("insert into log(id,module,username,operation,time,ip,method,params,create_time)" +
"values(#{id},#{module},#{username},#{operation},#{time},#{ip},#{method},#{params},#{createTime})")
void saveLog(LogEntity logEntity);
}
- 【可选】让增强逻辑能在其他业务服务中使用
想让LogAspect这个切面类在其他的业务服务中进行使用,那么就需要该切面类纳入到Spring容器中。Spring Boot默认会扫描和启动类所在包相同包中的bean以及子包中的bean
假如LogAspect切面类不满足扫描条件,那么无法直接在业务服务中进行使用。因此此时可以通过自定义注解进行实现
@Target({ElementType.TYPE})
@Retention(RetentionPolicy.RUNTIME)
@Import(value = LogAspect.class) // 通过Import注解导入日志切面类到Spring容器中
public @interface EnableLogAspect {
}
- 使用
1)、在需要使用的业务服务中引入前面1 - 4模块所在【不在同一模块的时候】
<dependency>
<groupId>com.zixieqing</groupId>
<artifactId>common-log</artifactId>
<version>1.0-SNAPSHOT</version>
</dependency>
2)、启动类加上4中自定义的@EnableLogAspect // 开启日志增强功能
@EnableLogAspect
@SpringBootApplication
public class ManagerApplication {
public static void main(String[] args) {
SpringApplication.run(ManagerApplication.class , args) ;
}
}
3)、测试【在同一模块】
package com.zixq.controller;
import com.zixq.CustomEnum.OperatorType;
import com.zixq.annotation.Log;
import com.zixq.entity.UserEntity;
import org.springframework.web.bind.annotation.*;
/**
* <p>
* user controller
* </p>
*
* <p>@author : ZiXieqing</p>
*/
@RestController
@RequestMapping("user")
public class UserController {
@Log(
username = "zixieqing",
operation = OperatorType.GET
)
@GetMapping("/get")
public void getUser() {
System.out.println("get user");
}
@Log(
username = "zixieqing",
operation = OperatorType.ADD
)
@PostMapping("/addUser")
public void addUser(@RequestBody UserEntity userEntity) {
System.out.println("userEntity = " + userEntity);
}
}
附加:Spring Boot线程池
场景
提高一下插入表的性能优化,两张表,先插旧的表,紧接着插新的表,若是一万多条数据就有点慢了。
使用步骤
用Spring提供的 ThreadPoolExecutor 封装的线程池 ThreadPoolTaskExecutor 直接使用注解启用
- 配置
@Configuration
@EnableAsync
public class ExecutorConfig {
private static final Logger logger = LoggerFactory.getLogger(ExecutorConfig.class);
@Value("${async.executor.thread.core_pool_size}")
private int corePoolSize;
@Value("${async.executor.thread.max_pool_size}")
private int maxPoolSize;
@Value("${async.executor.thread.queue_capacity}")
private int queueCapacity;
@Value("${async.executor.thread.name.prefix}")
private String namePrefix;
@Bean(name = "asyncServiceExecutor")
public Executor asyncServiceExecutor() {
logger.info("start asyncServiceExecutor");
ThreadPoolTaskExecutor executor = new ThreadPoolTaskExecutor();
// 配置核心线程数
executor.setCorePoolSize(corePoolSize);
// 配置最大线程数
executor.setMaxPoolSize(maxPoolSize);
// 配置队列大小
executor.setQueueCapacity(queueCapacity);
// 配置线程池中的线程的名称前缀
executor.setThreadNamePrefix(namePrefix);
// rejection-policy:当pool已经达到max size的时候,如何处理新任务
// CALLER_RUNS:不在新线程中执行任务,而是有调用者所在的线程来执行
executor.setRejectedExecutionHandler(new ThreadPoolExecutor.CallerRunsPolicy());
//执行初始化
executor.initialize();
return executor;
}
}
@Value 取值配置是在 application.properties 或 application.yml 中的,如:application.properties配置的
# 异步线程配置
# 配置核心线程数
async.executor.thread.core_pool_size = 5
# 配置最大线程数
async.executor.thread.max_pool_size = 5
# 配置队列大小
async.executor.thread.queue_capacity = 99999
# 配置线程池中的线程的名称前缀
async.executor.thread.name.prefix = async-service
- Demo测试
- Service接口
public interface AsyncService {
/**
* 执行异步任务
* 可以根据需求,自己加参数拟定
*/
void executeAsync();
}
- Service实现类
@Service
public class AsyncServiceImpl implements AsyncService {
private static final Logger logger = LoggerFactory.getLogger(AsyncServiceImpl.class);
@Override
@Async("asyncServiceExecutor")
public void executeAsync() {
logger.info("start executeAsync");
System.out.println("异步线程要做的事情");
System.out.println("可以在这里执行批量插入等耗时的事情");
logger.info("end executeAsync");
}
}
- 在Controller层注入刚刚的Service即可
@Autowired
private AsyncService asyncService;
@GetMapping("/async")
public void async(){
asyncService.executeAsync();
}
使用测试工具测试即可看到相应的打印结果
摸索一下
弄清楚线程池当时的情况,有多少线程在执行,多少在队列中等待?
创建一个 ThreadPoolTaskExecutor 的子类,在每次提交线程的时候都将当前线程池的运行状况打印出来
import org.slf4j.Logger;
import org.slf4j.LoggerFactory;
import org.springframework.scheduling.concurrent.ThreadPoolTaskExecutor;
import org.springframework.util.concurrent.ListenableFuture;
import java.util.concurrent.Callable;
import java.util.concurrent.Future;
import java.util.concurrent.ThreadPoolExecutor;
public class VisiableThreadPoolTaskExecutor extends ThreadPoolTaskExecutor {
private static final Logger logger = LoggerFactory.getLogger(VisiableThreadPoolTaskExecutor.class);
private void showThreadPoolInfo(String prefix) {
ThreadPoolExecutor threadPoolExecutor = getThreadPoolExecutor();
if (null == threadPoolExecutor) {
return;
}
logger.info("{}, {},taskCount [{}], completedTaskCount [{}], activeCount [{}], queueSize [{}]",
this.getThreadNamePrefix(),
prefix,
threadPoolExecutor.getTaskCount(),
threadPoolExecutor.getCompletedTaskCount(),
threadPoolExecutor.getActiveCount(),
threadPoolExecutor.getQueue().size());
}
@Override
public void execute(Runnable task) {
showThreadPoolInfo("1. do execute");
super.execute(task);
}
@Override
public void execute(Runnable task, long startTimeout) {
showThreadPoolInfo("2. do execute");
super.execute(task, startTimeout);
}
@Override
public Future<?> submit(Runnable task) {
showThreadPoolInfo("1. do submit");
return super.submit(task);
}
@Override
public <T> Future<T> submit(Callable<T> task) {
showThreadPoolInfo("2. do submit");
return super.submit(task);
}
@Override
public ListenableFuture<?> submitListenable(Runnable task) {
showThreadPoolInfo("1. do submitListenable");
return super.submitListenable(task);
}
@Override
public <T> ListenableFuture<T> submitListenable(Callable<T> task) {
showThreadPoolInfo("2. do submitListenable");
return super.submitListenable(task);
}
}
进过测试发现: showThreadPoolInfo 方法中将任务总数、已完成数、活跃线程数,队列大小都打印出来了,然后Override了父类的execute、submit等方法,在里面调用showThreadPoolInfo方法,这样每次有任务被提交到线程池的时候,都会将当前线程池的基本情况打印到日志中
现在修改 ExecutorConfig.java 的 asyncServiceExecutor 方法,将 ThreadPoolTaskExecutor executor = new ThreadPoolTaskExecutor() 改为 ThreadPoolTaskExecutor executor = new VisiableThreadPoolTaskExecutor()
@Bean(name = "asyncServiceExecutor")
public Executor asyncServiceExecutor() {
logger.info("start asyncServiceExecutor");
// 在这里进行修改
ThreadPoolTaskExecutor executor = new VisiableThreadPoolTaskExecutor();
// 配置核心线程数
executor.setCorePoolSize(corePoolSize);
// 配置最大线程数
executor.setMaxPoolSize(maxPoolSize);
// 配置队列大小
executor.setQueueCapacity(queueCapacity);
// 配置线程池中的线程的名称前缀
executor.setThreadNamePrefix(namePrefix);
// rejection-policy:当pool已经达到max size的时候,如何处理新任务
// CALLER_RUNS:不在新线程中执行任务,而是有调用者所在的线程来执行
executor.setRejectedExecutionHandler(new ThreadPoolExecutor.CallerRunsPolicy());
//执行初始化
executor.initialize();
return executor;
}
经最后测试得到的结果:提交任务到线程池的时候,调用的是 submit(Callable task) 这个方法,当前已经提交了3个任务,完成了3个,当前有0个线程在处理任务,还剩0个任务在队列中等待
Spring Boot常用注解
结语
最后:Spring Boot还有很多内容,那些也就是整合各种框架而已,到了现在整合了这么多,那也有点门路了,其实都差不多是同样的套路:
- 引入Spring Boot整合的对应框架依赖;
- 编写对应的配置;
- 使用对应的注解 / 编写业务逻辑
对应Markdown文档:Spring Boot 整合

 浙公网安备 33010602011771号