
CentOS配置GlusterFS
1. 环境规划
|
操作系统 |
IP |
主机名 |
硬盘大小 |
|
Centos 7.8 |
10.38.1.230 |
node1 |
200G |
|
Centos 7.8 |
10.38.1.241 |
node2 |
200G |
|
Centos 7.8 |
10.38.1.244 |
node3 |
200G |
2. 环境准备
注:以下步骤所有节点均操作
1、关闭防火墙, seLinux,同步时间
关闭防火墙
systemctl stop firewalld
systemctl disable firewalld
关闭SELinux
sed 's/=permissive/=disabled/' /etc/selinux/config
setenforce 0
[root@vm104 ~]# systemctl stop firewalld

[root@vm104 ~]#

[root@vm104 ~]# systemctl disable firewalld

[root@vm104 ~]# sed 's/=permissive/=disabled/' /etc/selinux/config


# This file controls the state of SELinux on the system.

# SELINUX= can take one of these three values:

#     enforcing - SELinux security policy is enforced.

#     permissive - SELinux prints warnings instead of enforcing.

#     disabled - No SELinux policy is loaded.

SELINUX=disabled

# SELINUXTYPE= can take one of three values:

#     targeted - Targeted processes are protected,

#     minimum - Modification of targeted policy. Only selected processes are protected.

#     mls - Multi Level Security protection.

SELINUXTYPE=targeted

[root@vm104 ~]# setenforce 0

setenforce: SELinux is disabled

2、配置主机解析
[root@vm104 ~]# cat /etc/hosts

# Your system has configured 'manage_etc_hosts' as True.

# As a result, if you wish for changes to this file to persist

# then you will need to either

# a.) make changes to the master file in /etc/cloud/templates/hosts.redhat.tmpl

# b.) change or remove the value of 'manage_etc_hosts' in

#     /etc/cloud/cloud.cfg or cloud-config from user-data

#

# The following lines are desirable for IPv4 capable hosts

127.0.0.1 VM104. VM104

127.0.0.1 localhost.localdomain localhost

127.0.0.1 localhost4.localdomain4 localhost4


# The following lines are desirable for IPv6 capable hosts

::1 VM104. VM104

::1 localhost.localdomain localhost

::1 localhost6.localdomain6 localhost6


10.38.1.230 node1

10.38.1.241 node2

10.38.1.244 node3
3、对新硬盘进行分区格式化并挂载gfs磁盘

3. 安装glusterfs
注:以下步骤所有节点执行
1、安装yum源
[root@vm104 ~]# yum -y install centos-release-gluster
3、安装glusterfs
[root@vm104 ~]# yum -y install glusterfs glusterfs-fuse glusterfs-server
4、启动glusterfs
[root@vm104 ~]# systemctl start glusterd

[root@vm104 ~]# systemctl enable glusterd

Created symlink from /etc/systemd/system/multi-user.target.wants/glusterd.service to /usr/lib/systemd/system/glusterd.service.

[root@vm104 ~]#
5、组建glusterfs集群
[root@vm104 ~]# gluster peer probe node2

peer probe: success

[root@vm104 ~]# gluster peer probe node3

peer probe: success

[root@vm104 ~]#
6、查看集群状态
[root@vm104 ~]# gluster peer status

Number of Peers: 2


Hostname: node2

Uuid: 5f62e6ce-d0f7-4837-ad93-651178966e91

State: Peer in Cluster (Connected)


Hostname: node3

Uuid: 1e71502e-d468-43c5-85f1-d487e974f69b

State: Peer in Cluster (Connected)

[root@vm104 ~]#
4. 测试
1、创建分布式卷
[root@vm104 ~]# gluster volume create gv_data1 replica 3 10.38.1.230:/gfs_data/gv_data1_share 10.38.1.241:/gfs_data/gv_data1_share 10.38.1.244:/gfs_data/gv_data1_share

volume create: gv_data1: success: please start the volume to access data
2、启用卷
[root@vm104 ~]# gluster volume start gv_data1

volume start: gv_data1: success

[root@vm104 ~]#
3、配置卷
例如允许10.38.1.*网段的主机访问gv_data1
[root@vm104 ~]# gluster volume set gv_data1 auth.allow "10.38.1.*"

volume set: success

[root@vm104 ~]#
4、设置quota
[root@vm104 ~]# gluster volume quota gv_data1 enable

volume quota : success

[root@vm104 ~]#

[root@vm104 ~]# gluster volume quota gv_data1 limit-usage / 100GB

volume quota : success

[root@vm104 ~]#
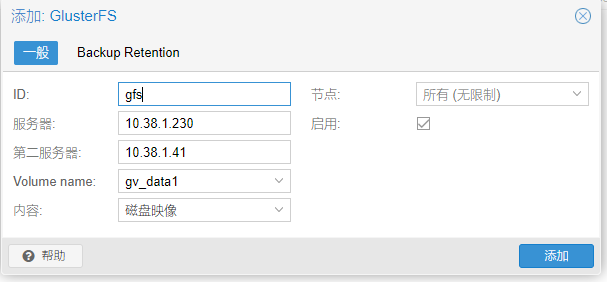
4、PVE添加gfs存储
常用命令
# 1 启停和开机启动
systemctl start  glusterd.service
systemctl enable glusterd.service
systemctl status glusterd.service

#2 为存储池添加/移除服务器节点
gluster peer probe <SERVER>
gluster peer detach <SERVER>
注意,移除节点时,需要提前将该节点上的Brick移除。

# 3查看所有节点的基本状态(不包括本节点):
gluster peer status

# 4 挂载glusterfs
mount -t glusterfs <SERVER>:/<VOLNAME><MOUNTDIR>

#5 创建/启动/停止/删除卷
gluster volume create <NEW-VOLNAME>[stripe <COUNT> \
    | replica <COUNT>] \
    [transport [tcp | rdma | tcp,rdma]] \
    <NEW-BRICK1> <NEW-BRICK2> \
    <NEW-BRICK3> <NEW-BRICK4>...

gluster volume start <VOLNAME>
gluster volume stop <VOLNAME>
gluster volume delete <VOLNAME>
注意,删除卷的前提是先停止卷。

# 6 查看卷信息
gluster volume list    #列出集群中的所有卷:
gluster volume info [all]    #查看集群中的卷信息:
gluster volume status [all]    #查看集群中的卷状态:
gluster volume status <VOLNAME> [detail| clients | mem | inode | fd]

# 7 配置卷
gluster volume set <VOLNAME> <OPTION> <PARAMETER>

# 8  扩展卷
gluster volume add-brick <VOLNAME> <NEW-BRICK>
>如果是复制卷,则每次添加的Brick数必须是replica的整数倍。

# 9 收缩卷
## 9.1 先将数据迁移到其它可用的Brick,迁移结束后才将该Brick移除:
gluster volume remove-brick <VOLNAME> <BRICK> start
>在执行了start之后,可以使用status命令查看移除进度:
gluster volume remove-brick <VOLNAME> <BRICK> status

## 9.2不进行数据迁移,直接删除该Brick:
gluster volume remove-brick <VOLNAME> <BRICK> commit
>注意,如果是复制卷或者条带卷,则每次移除的Brick数必须是replica或者stripe的整数倍。

# 10 迁移卷
>使用start命令开始进行迁移
>迁移过程中,可以使用pause命令暂停迁移:
			可以使用abort命令终止迁移:
			可以使用status命令查看迁移进度:
>在数据迁移结束后,执行commit命令来进行Brick替换:
gluster volume replace-brick <VOLNAME> <BRICK> <NEW-BRICK> start
gluster volume replace-brick <VOLNAME> <BRICK> <NEW-BRICK> pause
gluster volume replace-brick <VOLNAME> <BRICK> <NEW-BRICK> abort
gluster volume replace-brick <VOLNAME> <BRICK> <NEW-BRICK> status
gluster volume replace-brick <VOLNAME> <BRICK> <NEW-BRICK> commit

# 11 重新均衡卷
不迁移数据:
gluster volume rebalance <VOLNAME> lay-outstart
gluster volume rebalance <VOLNAME> start
gluster volume rebalance <VOLNAME> startforce
gluster volume rebalance <VOLNAME> status
gluster volume rebalance <VOLNAME> stop

# 12 磁盘配额
开启/关闭系统配额:
gluster volume quota <VOLNAME> enable | disable
设置目录配额:
gluster volume quota <VOLNAME> limit-usage <DIR> <VALUE>
查看配额:
gluster volume quota <VOLNAME> list [<DIR>]

# 13 地域复制(geo-replication):
gluster volume geo-replication <MASTER> <SLAVE> start | status | stop

# 14 IO信息查看:
gluster volume profile <VOLNAME> start | info | stop

# 15 Top监控:
>Top命令允许你查看Brick的性能,例如:read,write, file open calls, file read calls, file write calls, directory opencalls, and directory real calls。所有的查看都可以设置top数,默认100。

gluster volume top <VOLNAME> open[brick <BRICK>] [list-cnt <COUNT>]
>其中,open可以替换为read, write, opendir, readdir等。

gluster volume top <VOLNAME> read-perf [bs <BLOCK-SIZE> count <COUNT>] [brick <BRICK>] [list-cnt <COUNT>]
>其中,read-perf可以替换为write-perf等。
