eclipse+maven搭建springboot项目入门
一.下载jdk,例如(jdk1.8.171) 安装(注意仅仅安装jdk就可以了,不要安装jre,设置JAVA_HOME,配置jdk环境变量)
二.下载maven(apache-maven-3.5.3-bin.zip),解压后设置环境变量,修改配置文件。
1.D:\apache-maven-3.5.3\conf\settings.xml
<localRepository>E:/repo</localRepository> 本地文件存储位置,默认为Default: ${user.home}/.m2/repository,默认位置会占用C盘
2.修改远程仓库地址(默认仓库为mavne官方仓库,速度较慢)
在mirrors节点下添加以下信息(阿里云mavven镜像仓库,国内服务器,速度快,也可自己建立镜像仓库)
<mirror>
      <id>alimaven</id>
      <mirrorOf>central</mirrorOf>
      <name>aliyun maven</name>
      <url>http://maven.aliyun.com/nexus/content/groups/public/</url>
</mirror>
三.在eclipse配置maven工具
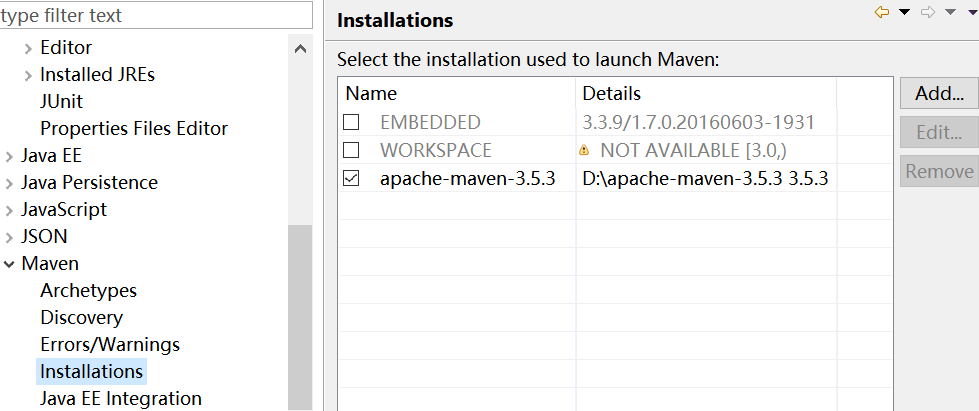
windows->Prefereces->Maven->Installations 添加maven工具

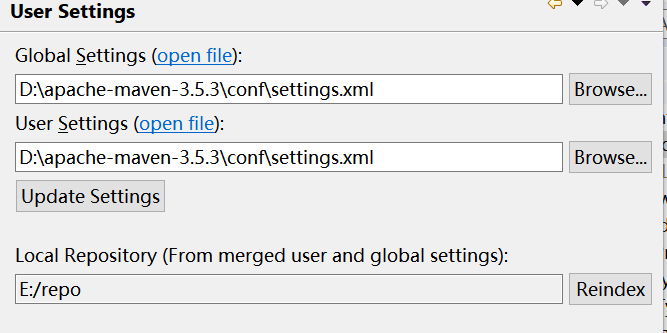
windows-->Prefereces->Maven->User Settings 将Global Settings和User settings选中为mavne中的settings.xml

四.开始创建maven项目(或者直接在http://start.spring.io/官网创建项目后下载导入)
File->New->Mavne Project
GroupId 组织名(包名) 例如 com.svc.demo
ArtifactId 项目名 springboot-demo
最终pom.xml如下(mavne是通过pom.xml来维护管理项目的,最终只要维护pom .xml即可)
<project xmlns="http://maven.apache.org/POM/4.0.0" xmlns:xsi="http://www.w3.org/2001/XMLSchema-instance"
    xsi:schemaLocation="http://maven.apache.org/POM/4.0.0 http://maven.apache.org/xsd/maven-4.0.0.xsd">
    <modelVersion>4.0.0</modelVersion>

    <groupId>com.svc.demo</groupId>
    <artifactId>springboot-demo</artifactId>
    <version>0.0.1-SNAPSHOT</version>
    <packaging>jar</packaging>

    <!--
        <name>springboot-svc-demo</name>
        <url>http://maven.apache.org</url>
        -->

    <!-- 引入springboot parent-->
    <parent>
        <groupId>org.springframework.boot</groupId>
        <artifactId>spring-boot-starter-parent</artifactId>
        <version>1.5.10.RELEASE</version>
        <relativePath/>
    </parent>

    <!-- 引入springCloud,单独springboot不需要-->
    <!--
        <dependencyManagement>
            <dependencies>
                <dependency>
                    <groupId>org.springframework.cloud</groupId>
                    <artifactId>spring-cloud-starter-parent</artifactId>
                    <version>Edgware.SR3</version>
                    <type>pom</type>
                    <scope>import</scope>
                </dependency>
            </dependencies>
        </dependencyManagement>
        -->

    <properties>
        <project.build.sourceEncoding>UTF-8</project.build.sourceEncoding>
        <project.reporting.outputEncoding>UTF-8</project.reporting.outputEncoding>
        <java.version>1.8</java.version>
        <!--swagger2组件
            <springfox-swagger2.version>2.6.0</springfox-swagger2.version>
            -->
        <!--格式化mavne时间
            <maven.build.timestamp.format>yyyyMMddHHmmss</maven.build.timestamp.format>
            -->
    </properties>

    <!-- 依赖组件-->
    <dependencies>
        <dependency>
            <groupId>org.springframework.boot</groupId>
            <artifactId>spring-boot-starter-web</artifactId>
        </dependency>
        <!--thymeleaf 模板引擎-->
        <dependency>
            <groupId>org.springframework.boot</groupId>
            <artifactId>spring-boot-starter-thymeleaf</artifactId>
        </dependency>
        <!--测试组件-->
        <dependency>
            <groupId>org.springframework.boot</groupId>
            <artifactId>spring-boot-starter-test</artifactId>
            <scope>test</scope>
        </dependency>
        <!--添加html5支持-->
        <dependency>
            <groupId>net.sourceforge.nekohtml</groupId>
            <artifactId>nekohtml</artifactId>
        </dependency>
        <!-- 热启动,便于开发
            <dependency>
                <groupId>org.springframework.boot</groupId>
                <artifactId>spring-boot-devtools</artifactId>
                <optional>true</optional>
            </dependency>
            -->
        <!--注册中心eureka组件-->
        <!--
            <dependency>
                <groupId>org.springframework.cloud</groupId>
                <artifactId>spring-cloud-starter-eureka</artifactId>
            </dependency>
            -->
        <!-- 添加Swagger2依赖,用于生成接口文档
            <dependency>
                <groupId>io.springfox</groupId>
                <artifactId>springfox-swagger2</artifactId>
                <version>${springfox-swagger2.version}</version>
            </dependency>
            <dependency>
                <groupId>io.springfox</groupId>
                <artifactId>springfox-swagger-ui</artifactId>
                <version>${springfox-swagger2.version}</version>
            </dependency>
            -->
    </dependencies>

    <build>
        <plugins>
            <!--打包插件-->
            <plugin>
                <groupId>org.springframework.boot</groupId>
                <artifactId>spring-boot-maven-plugin</artifactId>
            </plugin>
            <!-- YUI Compressor Maven js,css压缩插件,一般不需要,可删除 -->
            <plugin>
                <groupId>net.alchim31.maven</groupId>
                <artifactId>yuicompressor-maven-plugin</artifactId>
                <version>1.5.1</version>
                <executions>
                    <execution>
                        <phase>prepare-package</phase>
                        <goals>
                            <goal>compress</goal>
                        </goals>
                    </execution>
                </executions>
                <configuration>
                    <!-- 读取js,css文件采用UTF-8编码默认就是utf-8 -->
                    <encoding>UTF-8</encoding>
                    <!-- 不显示js可能的错误 -->
                    <jswarn>false</jswarn>
                    <!-- 若存在已压缩的文件,会先对比源文件是否有改动  有改动便压缩,无改动就不压缩 -->
                    <force>true</force>
                    <!-- 在指定的列号后插入新行   -->
                    <linebreakpos>-1</linebreakpos>
                    <!-- 压缩之前先执行聚合文件操作  -->
                    <preProcessAggregates>true</preProcessAggregates>
                    <!-- 压缩后保存文件后缀 无后缀 -->
                    <nosuffix>true</nosuffix>
                    <!-- 源目录,即需压缩的根目录 -->
                    <sourceDirectory>src/main/static</sourceDirectory>
                    <outputDirectory>target/classes</outputDirectory>
                    <force>true</force>
                    <!-- 压缩js和css文件  -->
                    <includes>
                        <include>*/js/**/*.js</include>
                        <include>*/css/**/*.css</include>
                    </includes>
                    <excludes>
                        <exclude>**/*.min.js</exclude>
                        <exclude>**/*-min.js</exclude>
                        <exclude>**/index/carousel.js</exclude>
                        <exclude>**/3dprint/layer/**/*.js</exclude>
                    </excludes>
                </configuration>
            </plugin>
            <!-- html页面中的 css,js添加版本号插件 -->
            <!--plugin>
                <groupId>com.google.code.maven-replacer-plugin</groupId>
                <artifactId>replacer</artifactId>
                <version>1.5.3</version>
                <executions>
                    <execution>
                        <phase>prepare-package</phase>
                        <goals>
                            <goal>replace</goal>
                        </goals>
                    </execution>
                </executions>
                <configuration>
                    <includes>
                        <include>${basedir}/target/classes/templates/*.html</include>
                        <include>${basedir}/target/classes/templates/**/*.html</include>
                    </includes>
                    <replacements>
                        <replacement>
                            <token>\.css\"</token>
                            <value>.css?v=${maven.build.timestamp}\"</value>
                        </replacement>
                        <replacement>
                            <token>\.css\'</token>
                            <value>.css?v=${maven.build.timestamp}\'</value>
                        </replacement>
                        <replacement>
                            <token>\.js\"</token>
                            <value>.js?v=${maven.build.timestamp}\"</value>
                        </replacement>
                        <replacement>
                            <token>\.js\'</token>
                            <value>.js?v=${maven.build.timestamp}\'</value>
                        </replacement>
                    </replacements>
                </configuration>
                </plugin-->
        </plugins>
    </build>
</project>
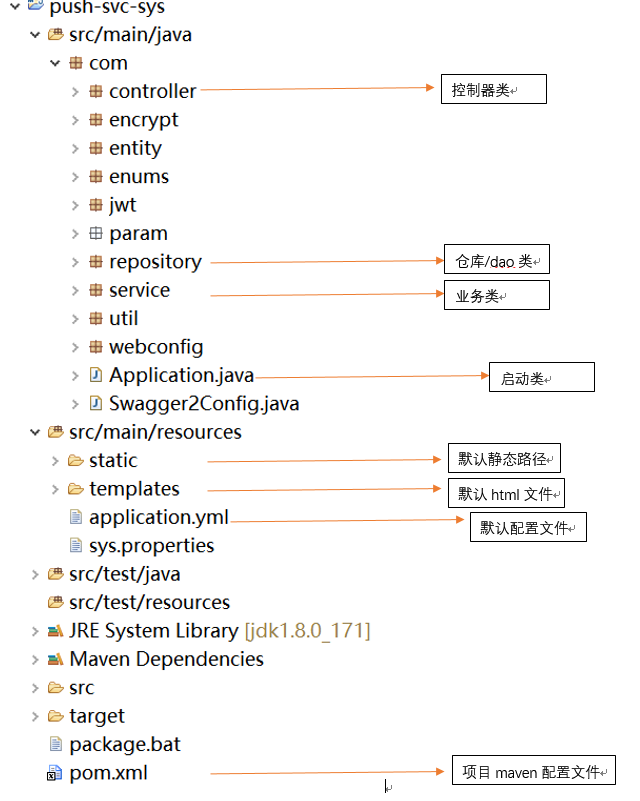
一般springboot项目目录结构如下
src
com
controller 控制器
entity/domain 实体层
repository/dao 仓库/数据库接口
service 业务服务层
Application.java 启动入口
创建启动入口以及项目结构
@SpringBootApplication
public class Application extends SpringBootServletInitializer
{
    public static void main(String[] args)
    {
        SpringApplication.run(Application.class, args);
    }

}
创建控制器
package com.controller;

import java.util.ArrayList;
import java.util.List;

import org.springframework.web.bind.annotation.DeleteMapping;
import org.springframework.web.bind.annotation.GetMapping;
import org.springframework.web.bind.annotation.PathVariable;
import org.springframework.web.bind.annotation.PostMapping;
import org.springframework.web.bind.annotation.PutMapping;
import org.springframework.web.bind.annotation.RequestBody;
import org.springframework.web.bind.annotation.RestController;

import com.model.UserInfo;

import io.swagger.annotations.Api;

@Api(tags = { "Restful API demo" })
@RestController
public class RestfulController {

    @PostMapping(value = "/v1/user")
    public void addUser(@RequestBody UserInfo userInfo) {

    }

    @DeleteMapping(value = "/v1/user/{id}")
    public void deleteUser(@PathVariable String id) {

    }

    @PutMapping(value = "/v1/user")
    public void updateUser(@RequestBody UserInfo userInfo) {

    }

    @GetMapping(value = "/v1/user")
    public List<UserInfo> getUsers() {
        List<UserInfo> users = new ArrayList<UserInfo>();
        users.add(new UserInfo("zhangsan", "123456"));
        users.add(new UserInfo("lisw", "123456"));
        users.add(new UserInfo("wangwu", "123456"));
        return users;
    }

}
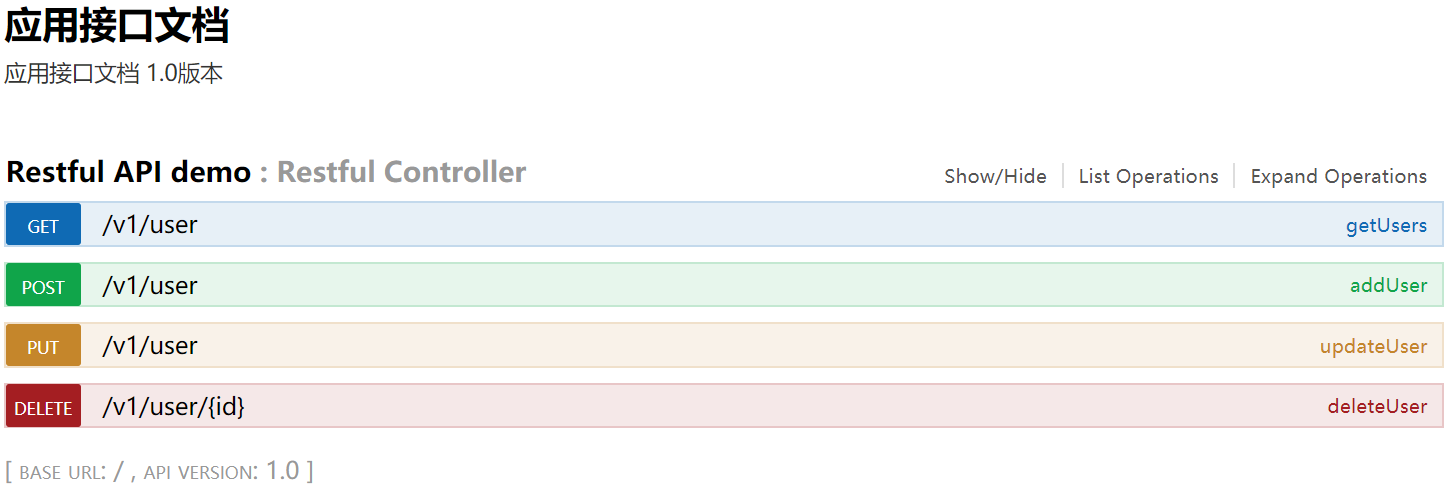
配置Swagger2后可看接口列表


application.yml关键配置
server:
  port: 8080              #tomcat启动端口
  tomcat:
    uri-encoding :  UTF-8 #tomcat编码
spring:
  application:
    name: springboot-demo #项目名称
  thymeleaf:              #thymeleaf引擎,解析html,非必配
    encoding: UTF-8
    cache: true           #是够缓存页面,开发时设置为false,否者修改页面客户端刷新后无法实时显示
    mode: LEGACYHTML5     #html5支持,默认配置不支持html5
  data:                   #mongoDB数据库配置,没有数据库可不配
    mongodb:
       host: 127.0.0.1
       port: 27017
       database: demo_db
debug: false
附一个简单的springboot restful api项目demo
https://gitee.com/zhangsike/springboot-learn/tree/master/springboot-restful


