LVS
1.lvs简介
LVS(Linux Virtual Server)即Linux虚拟服务器,是由章文嵩博士主导的开源负载均衡项目,目前LVS已经被集成到Linux内核模块中。在Linux内核中实现了基于IP的数据请求负载均衡调度方案,终端互联网用户从外部访问公司的负载均衡服务器,终端用户的Web请求会发送给LVS调度器,调度器根据自己预设的算法决定将该请求发送给后端的某台Web服务器,比如,轮询算法可以将外部的请求平均分发给后端的所有服务器,终端用户访问LVS调度器虽然会被转发到后端真实的服务器,但如果真实服务器连接的是相同的存储,提供的服务也是相同的服务,最终用户不管是访问哪台真实服务器,得到的服务内容都是一样的,整个集群对用户而言都是透明的。最后根据LVS工作模式的不同,真实服务器会选择不同的方式将用户需要的数据发送到终端用户,LVS工作模式分为NAT模式、TUN模式、以及DR模式。
2.结构体系
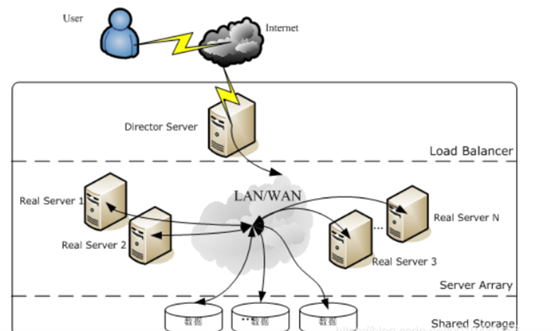
使用LVS架设的服务器集群系统有三个部分组成:最前端的负载均衡层(Loader Balancer),中间的服务器群组层,用Server Array表示,最底层的数据共享存储层,用Shared Storage表示。在用户看来所有的应用都是透明的,用户只是在使用一个虚拟服务器提供的高性能服务。
Load Balancer层:位于整个集群系统的最前端,有一台或者多台负载调度器(Director Server)组成,LVS模块就安装在Director Server上,而Director的主要作用类似于一个路由器,它含有完成LVS功能所设定的路由表,通过这些路由表把用户的请求分发给Server Array层的应用服务器(Real Server)上。同时,在Director Server上还要安装对Real Server服务的监控模块Ldirectord,此模块用于监测各个Real Server服务的健康状况。在Real Server不可用时把它从LVS路由表中剔除,恢复时重新加入。
Server Array层:由一组实际运行应用服务的机器组成,Real Server可以是WEB服务器、MAIL服务器、FTP服务器、DNS服务器、视频服务器中的一个或者多个,每个Real Server之间通过高速的LAN或分布在各地的WAN相连接。在实际的应用中,Director Server也可以同时兼任Real Server的角色。
Shared Storage层:是为所有Real Server提供共享存储空间和内容一致性的存储区域,在物理上,一般有磁盘阵列设备组成,为了提供内容的一致性,一般可以通过NFS网络文件系统共享数据,但是NFS在繁忙的业务系统中,性能并不是很好,此时可以采用集群文件系统,例如Red hat的GFS文件系统,oracle提供的OCFS2文件系统等。
从整个LVS结构可以看出,Director Server是整个LVS的核心,目前,用于Director Server的操作系统只能是Linux和FreeBSD,linux2.6内核不用任何设置就可以支持LVS功能,而FreeBSD作为 Director Server的应用还不是很多,性能也不是很好。对于Real Server,几乎可以是所有的系统平台,Linux、windows、Solaris、AIX、BSD系列都能很好的支持
3.lvs工作模式及原理
NAT模式
通过网络地址转换实现的虚拟服务器
大并发访问时,调度器的性能成为瓶颈
NAT模式原理
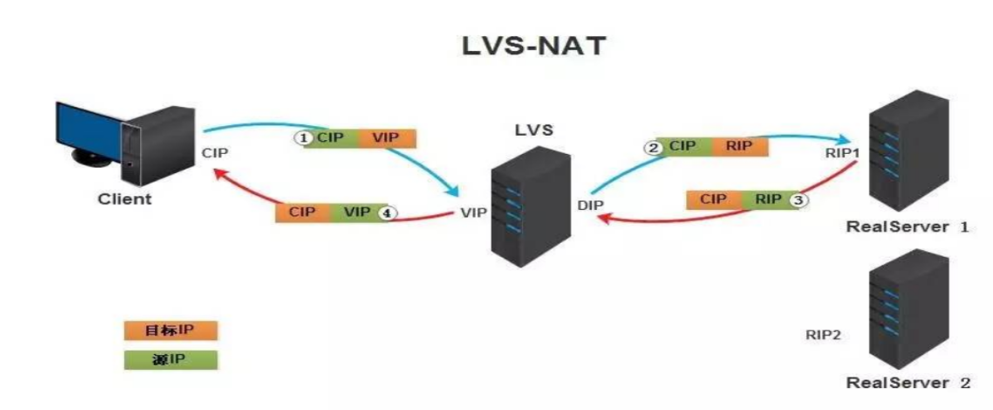
这个是通过网络地址转换的方法来实现调度的。首先调度器(LB)接收到客户的请求数据包时(请求的目的IP为VIP),根据调度算法决定将请求发送给哪个后端的真实服务器(RS)。然后调度就把客户端发送的请求数据包的目标IP地址及端口改成后端真实服务器的IP地址(RIP),这样真实服务器(RS)就能够接收到客户的请求数据包了。真实服务器响应完请求后,查看默认路由(NAT模式下我们需要把RS的默认路由设置为LB服务器。)把响应后的数据包发送给LB,LB再接收到响应包后,把包的源地址改成虚拟地址(VIP)然后发送回给客户端。
注意事项:
在NAT模式中,Real Server的网关必须指向LVS,否则报文无法送达客户端
DR模式
直接使用路由技术实现虚拟服务器
节点服务器需要配置VIP,注意MAC地址广播
DR模式原理
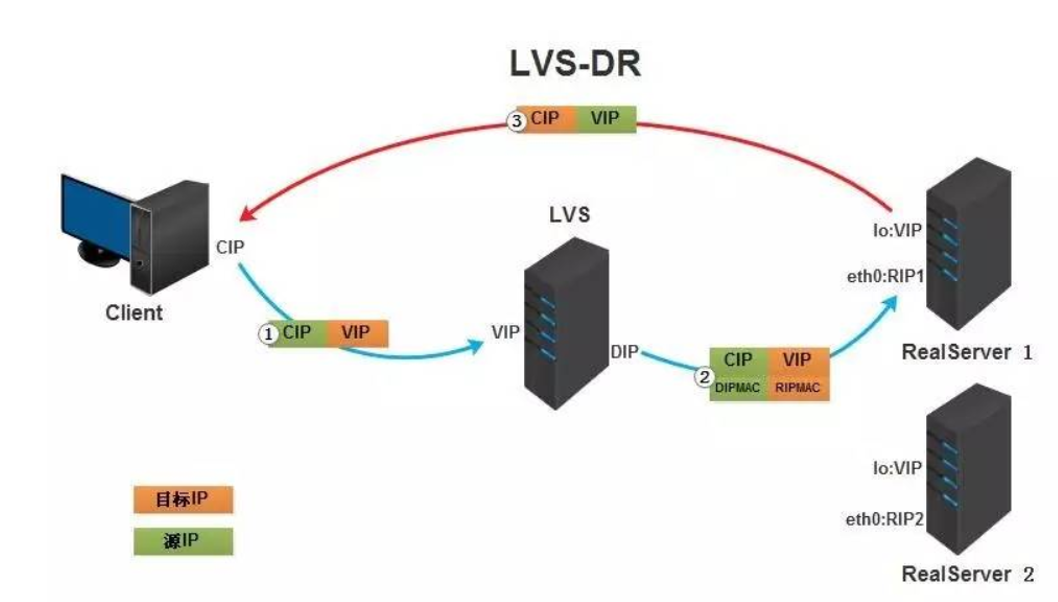
DR模式是通过改写请求报文的目标MAC地址,将请求发给真实服务器的,而真实服务器响应后的处理结果直接返回给客户端用户。同TUN模式一样,DR模式可以极大的提高集群系统的伸缩性。而且DR模式没有IP隧道的开销,对集群中的真实服务器也没有必要必须支持IP隧道协议的要求。但是要求调度器LB与真实服务器RS都有一块网卡连接到同一物理网段上,必须在同一个局域网环境
1、客户端将请求发往前端的负载均衡器,请求报文源地址是CIP,目标地址为VIP。
2、负载均衡器收到报文后,发现请求的是在规则里面存在的地址,那么它将客户端请求报文的源MAC地址改为自己DIP的MAC地址,目标MAC改为了RIP的MAC地址,并将此包发送给RS
3、RS发现请求报文中的目的MAC是自己,就会将此报文接收下来,处理完请求报文后,将响应报文通过lo接口送给eth0网卡直接发送给客户端。
注意事项:
需要设置lo接口的VIP不能响应本地网络内的arp请求,这个IP就直接设置为32位的网络位即可。
TUN模式
通过隧道方式实现虚拟服务
和NAT模式不同的是,它在LB和RS之间的传输不用改写IP地址。而是把客户请求包封装在一个IP tunnel里面,然后发送给RS节点服务器,节点服务器接收到之后解开IP tunnel后,进行响应处理。并且直接把包通过自己的外网地址发送给客户不用经过LB服务器
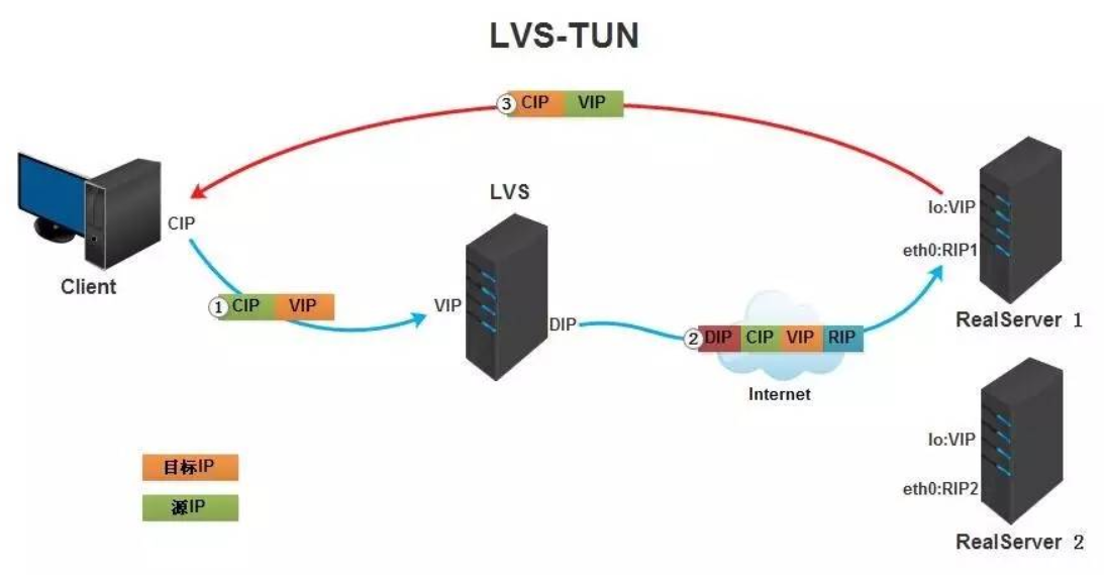
1、客户端将请求发往前端的负载均衡器,请求报文源地址是CIP,目标地址为VIP。
2、负载均衡器收到报文后,发现请求的是在规则里面存在的地址,那么它将在客户端请求报文的首部再封装一层IP报文,将源地址改为DIP,目标地址改为RIP,并将此包发送给RS。
3、RS收到请求报文后,会首先拆开第一层封装,然后发现里面还有一层IP首部的目标地址是自己lo接口上的VIP,所以会处理此请求报文,并将响应报文通过lo接口送给eth0网卡直接发送给客户端
4.配置lvs
4.1 部署lvs-nat模式的httpd负载集群---http协议
环境说明
| 主机名称 | 网卡信息(ens33为net,ens36为仅主机) | 安装应用 | 系统 |
|---|---|---|---|
| client客户端 | 192.168.169.145(ens33) | 无 | centos8 |
| DR | DIP:192.168.169.139(ens33) VIP:192.168.234.140(ens36) |
ipvsadm | centos8 |
| RS1 | RIP:192.168.169.140(ens33)---gw:192.168.169.139 | httpd | centos8 |
| RS2 | RIP:192.168.169.142(ens33)---gw:192.168.169.139 | httpd | centos8 |
//首先添加一块网卡,仅主机模式,然后进行设置
[root@DR ~]# nmcli connection add con-name ens36 ifname ens36 type ethernet
Connection 'ens36' (4c647d67-77ba-4d93-8ead-e50086a9b95e) successfully added.
[root@DR ~]# nmcli connection show
NAME                UUID                                  TYPE      DEVICE
ens33               db7a9ccd-85c1-42a1-bbfa-3a0975b5f071  ethernet  ens33
Wired connection 1  a226711e-700f-3ad7-95b4-099e72ecfb4e  ethernet  ens36
ens36               4c647d67-77ba-4d93-8ead-e50086a9b95e  ethernet  --
[root@DR ~]# cd /etc/sysconfig/network-scripts/
[root@DR network-scripts]# ls
ifcfg-ens33  ifcfg-ens36
[root@DR network-scripts]# nmcli connection modify ens36 ipv4.addresses 192.168.234.140/24 ipv4.method manual connection.autoconnect yes
[root@DR network-scripts]# nmcli connection up ens36
Connection successfully activated (D-Bus active path: /org/freedesktop/NetworkManager/ActiveConnection/3)
[root@lDR network-scripts]# nmcli connection show
NAME                UUID                                  TYPE      DEVICE
ens33               db7a9ccd-85c1-42a1-bbfa-3a0975b5f071  ethernet  ens33
ens36               4c647d67-77ba-4d93-8ead-e50086a9b95e  ethernet  ens36
Wired connection 1  a226711e-700f-3ad7-95b4-099e72ecfb4e  ethernet  --


//将RS1,RS2的网关改为192.168.169.139,也就是DR的IP地址,然后在手动配置yum源

//DR、RS1、RS2三台主机都关闭防火墙和selinux
[root@DR ~]# systemctl disable --now firewalld.service
Removed /etc/systemd/system/multi-user.target.wants/firewalld.service.
Removed /etc/systemd/system/dbus-org.fedoraproject.FirewallD1.service.
[root@DR ~]# sed -ri '/^SELINUX=/s/(SELINUX=).*/\1disabled/g' /etc/selinux/config
[root@DR ~]# reboot


//RS1和RS2部署WEB服务器
RS1
[root@DR1 ~]# dnf -y install httpd
[root@DR1 ~]# echo RS1 > /var/www/html/index.html
[root@DR1 ~]# systemctl enable --now httpd
Created symlink /etc/systemd/system/multi-user.target.wants/httpd.service → /usr/lib/systemd/system/httpd.service.
RS2
[root@RS2 ~]# dnf -y install httpd
[root@RS2 yum.repos.d]# echo RS2 > /var/www/html/index.html
[root@RS2 yum.repos.d]# systemctl enable --now httpd
Created symlink /etc/systemd/system/multi-user.target.wants/httpd.service → /usr/lib/systemd/system/httpd.service.

//配置DR
//开启IP转发功能
[root@localhost ~]# vim /etc/sysctl.conf
net.ipv4.ip_forward = 1
[root@localhost ~]# sysctl -p
net.ipv4.ip_forward = 1

//安装ipvsadm并添加规则
[root@localhost ~]# dnf -y install ipvsadm
[root@localhost ~]# ipvsadm -A -t 192.168.234.140:80 -s rr
[root@localhost ~]# ipvsadm -a -t 192.168.234.140:80 -r 192.168.169.140:80 -m
[root@localhost ~]# ipvsadm -a -t 192.168.234.140:80 -r 192.168.169.142:80 -m
[root@localhost ~]# ipvsadm -Sn > /etc/sysconfig/ipvsadm
[root@localhost ~]# systemctl enable --now ipvsadm.service
Created symlink /etc/systemd/system/multi-user.target.wants/ipvsadm.service → /usr/lib/systemd/system/ipvsadm.service.

//在客户端进行测试
[root@client ~]# curl http://192.168.234.140
RS2
[root@client ~]# curl http://192.168.234.140
RS1
[root@client ~]# curl http://192.168.234.140
RS2
[root@client ~]# curl http://192.168.234.140
RS1
4.2 部署lvs-dr模式的负载均衡集群——http协议
| 主机名称 | 网卡信息 | 安装应用 |
|---|---|---|
| DR | DIP:192.168.169.139 VIP:192.168.169.200 |
ipvsadm |
| RS1 | DIP:192.168.169.140 VIP:192.168.169.200 |
httpd |
| RS2 | DIP:192.168.169.142 VIP:192.168.169.200 |
httpd |
| client | 192.168.169.145 | 无 |
//DR、RS1、RS2三台主机都关闭防火墙和selinux
[root@DR ~]# systemctl disable --now firewalld.service
Removed /etc/systemd/system/multi-user.target.wants/firewalld.service.
Removed /etc/systemd/system/dbus-org.fedoraproject.FirewallD1.service.
[root@DR ~]# sed -ri '/^SELINUX=/s/(SELINUX=).*/\1disabled/g' /etc/selinux/config
[root@DR ~]# reboot

//RS1和RS2部署WEB服务器
RS1
[root@DR1 ~]# dnf -y install httpd
[root@DR1 ~]# echo RS1 > /var/www/html/index.html
[root@DR1 ~]# systemctl enable --now httpd
Created symlink /etc/systemd/system/multi-user.target.wants/httpd.service → /usr/lib/systemd/system/httpd.service.
RS2
[root@RS2 ~]# dnf -y install httpd
[root@RS2 yum.repos.d]# echo RS2 > /var/www/html/index.html
[root@RS2 yum.repos.d]# systemctl enable --now httpd
Created symlink /etc/systemd/system/multi-user.target.wants/httpd.service → /usr/lib/systemd/system/httpd.service.

//DR添加ip
[root@DR ~]# dnf -y install net-tools
[root@DR ~]# ifconfig lo 192.168.169.200/32 broadcast 192.168.169.200 netmask 255.255.255.255 up
[root@DR ~]# ip a
1: lo: <LOOPBACK,UP,LOWER_UP> mtu 65536 qdisc noqueue state UNKNOWN group default qlen 1000
    link/loopback 00:00:00:00:00:00 brd 00:00:00:00:00:00
    inet 192.168.169.200/0 brd 192.168.169.200 scope global lo
       valid_lft forever preferred_lft forever
    inet6 ::1/128 scope host
       valid_lft forever preferred_lft forever
2: ens33: <BROADCAST,MULTICAST,UP,LOWER_UP> mtu 1500 qdisc fq_codel state UP group default qlen 1000
    link/ether 00:0c:29:f1:77:ce brd ff:ff:ff:ff:ff:ff
    inet 192.168.169.139/24 brd 192.168.169.255 scope global dynamic noprefixroute ens33
       valid_lft 997sec preferred_lft 997sec
    inet6 fe80::ac0:aa7e:f1b9:248e/64 scope link noprefixroute
       valid_lft forever preferred_lft forever


//RS1和RS2配置内核并添加ip,一定要先配置内核在添加ip,否则会形成广播风暴
RS1
[root@RS1 ~]# vim /etc/sysctl.conf
net.ipv4.conf.all.arp_ignore = 1
net.ipv4.conf.all.arp_announce = 2
net.ipv4.conf.lo.arp_ignore = 1
net.ipv4.conf.lo.arp_announce = 2
[root@RS1 ~]# sysctl -p
net.ipv4.conf.all.arp_ignore = 1
net.ipv4.conf.all.arp_announce = 2
net.ipv4.conf.lo.arp_ignore = 1
net.ipv4.conf.lo.arp_announce = 2
[root@RS1 ~]# dnf -y install net-tools
[root@RS1 ~]# ifconfig lo 192.168.169.200/32 broadcast 192.168.169.200 netmask 255.255.255.255 up

RS2
[root@RS2 ~]# vim /etc/sysctl.conf
net.ipv4.conf.all.arp_ignore = 1
net.ipv4.conf.all.arp_announce = 2
net.ipv4.conf.lo.arp_ignore = 1
net.ipv4.conf.lo.arp_announce = 2
[root@RS2 ~]# sysctl -p
net.ipv4.conf.all.arp_ignore = 1
net.ipv4.conf.all.arp_announce = 2
net.ipv4.conf.lo.arp_ignore = 1
net.ipv4.conf.lo.arp_announce = 2
[root@RS2 ~]# dnf -y install net-tools
[root@RS2 ~]# ifconfig lo 192.168.169.200/32 broadcast 192.168.169.200 netmask 255.255.255.255 up

//添加路由信息
RS1
[root@RS1 ~]# route add -host 192.168.169.200/32 dev lo
RS2
[root@RS2 ~]# route add -host 192.168.169.200/32 dev lo

//在DR添加并保存规则
[root@DR ~]# dnf -y install ipvsadm
[root@DR ~]# ipvsadm -A -t 192.168.169.200:80 -s rr
[root@DR ~]# ipvsadm -a -t 192.168.169.200:80 -r 192.168.169.140:80 -g
[root@DR ~]# ipvsadm -a -t 192.168.169.200:80 -r 192.168.169.142:80 -g
[root@DR ~]# ipvsadm -Sn > /etc/sysconfig/ipvsadm
[root@DR ~]# systemctl enable --now ipvsadm.service
Created symlink /etc/systemd/system/multi-user.target.wants/ipvsadm.service → /usr/lib/systemd/system/ipvsadm.service.

//客户端进行验证
[root@client ~]# curl 192.168.169.200
RS2
[root@client ~]# curl 192.168.169.200
RS1
[root@client ~]# curl 192.168.169.200
RS2
[root@client ~]# curl 192.168.169.200
RS1
[root@client ~]# curl 192.168.169.200
RS2
[root@client ~]# curl 192.168.169.200
RS1
4.3 部署lvs-dr模式的负载均衡集群——https协议
| 主机名称 | 网卡信息 | 安装应用 |
|---|---|---|
| DR | DIP:192.168.169.139 VIP:192.168.169.200 |
ipvsadm |
| RS1 | DIP:192.168.169.140 VIP:192.168.169.200 |
httpd |
| RS2 | DIP:192.168.169.142 VIP:192.168.169.200 |
httpd |
| client | 192.168.169.145 | 无 |
//DR、RS1、RS2三台主机都关闭防火墙和selinux
[root@DR ~]# systemctl disable --now firewalld.service
Removed /etc/systemd/system/multi-user.target.wants/firewalld.service.
Removed /etc/systemd/system/dbus-org.fedoraproject.FirewallD1.service.
[root@DR ~]# sed -ri '/^SELINUX=/s/(SELINUX=).*/\1disabled/g' /etc/selinux/config
[root@DR ~]# reboot

//RS1和RS2部署WEB服务器
RS1
[root@DR1 ~]# dnf -y install httpd
[root@DR1 ~]# echo RS1 > /var/www/html/index.html
[root@DR1 ~]# systemctl enable --now httpd
Created symlink /etc/systemd/system/multi-user.target.wants/httpd.service → /usr/lib/systemd/system/httpd.service.
RS2
[root@RS2 ~]# dnf -y install httpd
[root@RS2 yum.repos.d]# echo RS2 > /var/www/html/index.html
[root@RS2 yum.repos.d]# systemctl enable --now httpd
Created symlink /etc/systemd/system/multi-user.target.wants/httpd.service → /usr/lib/systemd/system/httpd.service.

//DR添加ip
[root@DR ~]# dnf -y install net-tools
[root@DR ~]# ifconfig lo 192.168.169.200/32 broadcast 192.168.169.200 netmask 255.255.255.255 up
[root@DR ~]# ip a
1: lo: <LOOPBACK,UP,LOWER_UP> mtu 65536 qdisc noqueue state UNKNOWN group default qlen 1000
    link/loopback 00:00:00:00:00:00 brd 00:00:00:00:00:00
    inet 192.168.169.200/0 brd 192.168.169.200 scope global lo
       valid_lft forever preferred_lft forever
    inet6 ::1/128 scope host
       valid_lft forever preferred_lft forever
2: ens33: <BROADCAST,MULTICAST,UP,LOWER_UP> mtu 1500 qdisc fq_codel state UP group default qlen 1000
    link/ether 00:0c:29:f1:77:ce brd ff:ff:ff:ff:ff:ff
    inet 192.168.169.139/24 brd 192.168.169.255 scope global dynamic noprefixroute ens33
       valid_lft 997sec preferred_lft 997sec
    inet6 fe80::ac0:aa7e:f1b9:248e/64 scope link noprefixroute
       valid_lft forever preferred_lft forever


//RS1和RS2配置内核并添加ip,一定要先配置内核在添加ip,否则会形成广播风暴
RS1
[root@RS1 ~]# vim /etc/sysctl.conf
net.ipv4.conf.all.arp_ignore = 1
net.ipv4.conf.all.arp_announce = 2
net.ipv4.conf.lo.arp_ignore = 1
net.ipv4.conf.lo.arp_announce = 2
[root@RS1 ~]# sysctl -p
net.ipv4.conf.all.arp_ignore = 1
net.ipv4.conf.all.arp_announce = 2
net.ipv4.conf.lo.arp_ignore = 1
net.ipv4.conf.lo.arp_announce = 2
[root@RS1 ~]# dnf -y install net-tools
[root@RS1 ~]# ifconfig lo 192.168.169.200/32 broadcast 192.168.169.200 netmask 255.255.255.255 up

RS2
[root@RS2 ~]# vim /etc/sysctl.conf
net.ipv4.conf.all.arp_ignore = 1
net.ipv4.conf.all.arp_announce = 2
net.ipv4.conf.lo.arp_ignore = 1
net.ipv4.conf.lo.arp_announce = 2
[root@RS2 ~]# sysctl -p
net.ipv4.conf.all.arp_ignore = 1
net.ipv4.conf.all.arp_announce = 2
net.ipv4.conf.lo.arp_ignore = 1
net.ipv4.conf.lo.arp_announce = 2
[root@RS2 ~]# dnf -y install net-tools
[root@RS2 ~]# ifconfig lo 192.168.169.200/32 broadcast 192.168.169.200 netmask 255.255.255.255 up

//添加路由信息
RS1
[root@RS1 ~]# route add -host 192.168.169.200/32 dev lo
RS2
[root@RS2 ~]# route add -host 192.168.169.200/32 dev lo


//在DR中生成一堆秘钥
[root@DR ~]# mkdir  -p  /etc/pki/CA/private
[root@DR ~]# cd /etc/pki/CA/
[root@DR CA]# (umask 077;openssl genrsa -out private/cakey.pem 2048)
Generating RSA private key, 2048 bit long modulus (2 primes)
...+++++
.............................+++++
e is 65537 (0x010001)
[root@DR CA]# openssl rsa -in private/cakey.pem -pubout
writing RSA key
-----BEGIN PUBLIC KEY-----
MIIBIjANBgkqhkiG9w0BAQEFAAOCAQ8AMIIBCgKCAQEA0sIC5ISsnT9FyQwx1BwF
gVYC7WHfEmMpTSvFtLeBRcHqgDCjeFSEa/QMWvBIfnHzhZv00E3j6oAniGEznEk3
HfQrtUXCXtPMohhDiYgKodV1D5El86EqZGdUjmiU4yQgo8SzmBUUbbowLkx3Kuu5
MPU/zlfuVWI696GRlUsKxVsm0Zumcx8X4X4btuAKm54dBAXCbtSOKAjoE788AT8N
rjWdQubeBU4WA9jSXVFyEQjjD97uvYVhMlU8Alcpe4lLLeHPDXSvDhxO0j/tqAH1
XB6gm0YHGfS9glkoMPWG02gFpvX2JvykYvheEdlZ/LUrYrwwU7GPWkyYzeWyCmQZ
VQIDAQAB
-----END PUBLIC KEY-----
[root@DR CA]# openssl req -new -x509 -key private/cakey.pem -out cacert.pem -days 1024
You are about to be asked to enter information that will be incorporated
into your certificate request.
What you are about to enter is what is called a Distinguished Name or a DN.
There are quite a few fields but you can leave some blank
For some fields there will be a default value,
If you enter '.', the field will be left blank.
-----
Country Name (2 letter code) [XX]:CN
State or Province Name (full name) []:HB
Locality Name (eg, city) [Default City]:WH
Organization Name (eg, company) [Default Company Ltd]:twt
Organizational Unit Name (eg, section) []:zzd
Common Name (eg, your name or your server's hostname) []:zzd
Email Address []:zzd@example.com
[root@DR CA]# touch index.txt && echo 01 > serial

//在RS1中生成证书签署请求,并发送给CA
[root@RS1 ~]# yum -y install mod_ssl
[root@RS1 ~]# mkdir -p /etc/httpd/ssl
[root@RS1 ~]# cd /etc/httpd/ssl
[root@RS1 ssl]# (umask 077;openssl genrsa -out httpd.key 2048)
Generating RSA private key, 2048 bit long modulus (2 primes)
...+++++
...................+++++
e is 65537 (0x010001)
[root@RS1 ssl]# openssl req -new -key httpd.key -days 1024 -out httpd.csr
Ignoring -days; not generating a certificate
You are about to be asked to enter information that will be incorporated
into your certificate request.
What you are about to enter is what is called a Distinguished Name or a DN.
There are quite a few fields but you can leave some blank
For some fields there will be a default value,
If you enter '.', the field will be left blank.
-----
Country Name (2 letter code) [XX]:CN
State or Province Name (full name) []:HB
Locality Name (eg, city) [Default City]:WH
Organization Name (eg, company) [Default Company Ltd]:twt
Organizational Unit Name (eg, section) []:zzd
Common Name (eg, your name or your server's hostname) []:zzd
Email Address []:zzd@example.com

Please enter the following 'extra' attributes
to be sent with your certificate request
A challenge password []:
An optional company name []:

[root@RS1 ssl]# ls
httpd.csr  httpd.key

//将以上两个文件发送给DR
[root@RS1 ssl]# scp httpd.csr httpd.key root@192.168.169.139:/root

//在CA签署证书并发给RS1
[root@DR CA]# mkdir /etc/pki/CA/newcerts
[root@DR CA]# touch /etc/pki/CA/index.txt
[root@DR CA]# echo "01" > /etc/pki/CA/serial
[root@DR CA]# openssl ca -in /root/httpd.csr -out /root/httpd.crt -days 1024
Using configuration from /etc/pki/tls/openssl.cnf
Check that the request matches the signature
Signature ok
Certificate Details:
        Serial Number: 1 (0x1)
        Validity
            Not Before: Sep 27 05:08:19 2022 GMT
            Not After : Jul 17 05:08:19 2025 GMT
        Subject:
            countryName               = CN
            stateOrProvinceName       = HB
            organizationName          = twt
            organizationalUnitName    = zzd
            commonName                = zzd
            emailAddress              = zzd@example.com
        X509v3 extensions:
            X509v3 Basic Constraints:
                CA:FALSE
            Netscape Comment:
                OpenSSL Generated Certificate
            X509v3 Subject Key Identifier:
                87:B3:BB:35:44:1E:35:08:5B:70:85:33:F8:66:63:BA:64:81:78:B4
            X509v3 Authority Key Identifier:
                keyid:62:AF:53:D5:EC:E7:B7:BC:51:FF:BB:11:CB:E3:A7:60:C5:81:9D:1F

Certificate is to be certified until Jul 17 05:08:19 2025 GMT (1024 days)
Sign the certificate? [y/n]:y


1 out of 1 certificate requests certified, commit? [y/n]y
Write out database with 1 new entries
Data Base Updated

//将CA签署的证书httpd.crt和服务器的证书cacert.pem发送给RS1
[root@DR CA]# scp  /root/httpd.crt /etc/pki/CA/cacert.pem  root@192.168.169.140:/etc/httpd/ssl


//RS2配置https
[root@RS2 ~]# dnf -y install mod_ssl
[root@RS2 ~]# mkdir -p /etc/httpd/ssl

//RS1中把RS1的证书和密钥发送给RS2
[root@RS1 ssl]# scp /etc/httpd/ssl/{cacert.pem,httpd.crt,httpd.key} root@192.168.169.142:/etc/httpd/ssl


//在RS1中修改https的配置文件
[root@RS1 ssl]# vim /etc/httpd/conf.d/ssl.conf
SSLCertificateFile /etc/httpd/ssl/httpd.crt
SSLCertificateKeyFile /etc/httpd/ssl/httpd.key
SSLCACertificateFile /etc/httpd/ssl/cacert.pem
[root@RS1 ssl]# systemctl restart httpd

//在RS2中修改https的配置文件
[root@RS2 ssl]# vim /etc/httpd/conf.d/ssl.conf
SSLCertificateFile /etc/httpd/ssl/httpd.crt
SSLCertificateKeyFile /etc/httpd/ssl/httpd.key
SSLCACertificateFile /etc/httpd/ssl/cacert.pem
[root@RS2 ssl]# systemctl restart httpd

//在DR中添加规则
[root@DR ~]# dnf -y install ipvsadm
[root@DR ~]# ipvsadm -A -t 192.168.169.200:443 -s rr
[root@DR ~]# ipvsadm -a -t 192.168.169.200:443 -r 192.168.169.140 -g
[root@DR ~]# ipvsadm -a -t 192.168.169.200:443 -r 192.168.169.142 -g
[root@DR ~]# ipvsadm -Sn > /etc/sysconfig/ipvsadm
[root@DR ~]# systemctl enable --now ipvsadm.service
Created symlink /etc/systemd/system/multi-user.target.wants/ipvsadm.service → /usr/lib/systemd/system/ipvsadm.service.

//客户端测试
[root@client ~]# curl -k https://192.168.169.200:443
RS1
[root@client ~]# curl -k https://192.168.169.200:443
RS2
[root@client ~]# curl -k https://192.168.169.200:443
RS1
[root@client ~]# curl -k https://192.168.169.200:443
RS2
4.4 部署lvs-tun模式的负载均衡集群——http协议
//DR、RS1、RS2三台主机都关闭防火墙和selinux
[root@DR ~]# systemctl disable --now firewalld.service
Removed /etc/systemd/system/multi-user.target.wants/firewalld.service.
Removed /etc/systemd/system/dbus-org.fedoraproject.FirewallD1.service.
[root@DR ~]# sed -ri '/^SELINUX=/s/(SELINUX=).*/\1disabled/g' /etc/selinux/config
[root@DR ~]# reboot

//RS1和RS2部署WEB服务器
RS1
[root@DR1 ~]# dnf -y install httpd
[root@DR1 ~]# echo RS1 > /var/www/html/index.html
[root@DR1 ~]# systemctl enable --now httpd
Created symlink /etc/systemd/system/multi-user.target.wants/httpd.service → /usr/lib/systemd/system/httpd.service.
RS2
[root@RS2 ~]# dnf -y install httpd
[root@RS2 yum.repos.d]# echo RS2 > /var/www/html/index.html
[root@RS2 yum.repos.d]# systemctl enable --now httpd
Created symlink /etc/systemd/system/multi-user.target.wants/httpd.service → /usr/lib/systemd/system/httpd.service.

//DR配置内核,开启ip转发并添加ip
[root@DR ~]# vim /etc/sysctl.conf
net.ipv4.ip_forward = 1
[root@DR ~]# sysctl -p
net.ipv4.ip_forward = 1

[root@DR ~]# dnf -y install net-tools
[root@DR ~]# ifconfig tunl0 192.168.169.55 broadcast 192.168.169.55 netmask 255.255.255.255 up


//RS1和RS2添加ip并启用ipip模块
RS1
[root@RS1 ~]# dnf -y install net-tools
[root@RS1 ~]# modprobe ipip
[root@RS1 ~]# ifconfig tunl0 192.168.169.55 broadcast 192.168.169.55 netmask 255.255.255.255 up

RS2
[root@RS2 ~]# dnf -y install net-tools
[root@RS2 ~]# modprobe ipip
[root@RS2 ~]# ifconfig tunl0 192.168.169.55 broadcast 192.168.169.55 netmask 255.255.255.255 up

//RS1,RS2修改内核
RS1
[root@RS1 ~]# vim /etc/sysctl.conf
net.ipv4.conf.tunl0.arp_ignore = 1
net.ipv4.conf.tunl0.arp_announce = 2
net.ipv4.conf.all.arp_ignore = 1
net.ipv4.conf.all.arp_announce = 2
net.ipv4.conf.tunl0.rp_filter = 0
net.ipv4.conf.all.rp_filter = 0
[root@RS1 ~]# sysctl -p
net.ipv4.conf.tunl0.arp_ignore = 1
net.ipv4.conf.tunl0.arp_announce = 2
net.ipv4.conf.all.arp_ignore = 1
net.ipv4.conf.all.arp_announce = 2
net.ipv4.conf.tunl0.rp_filter = 0
net.ipv4.conf.all.rp_filter = 0

RS2
[root@RS2 ~]# vim /etc/sysctl.conf
net.ipv4.conf.tunl0.arp_ignore = 1
net.ipv4.conf.tunl0.arp_announce = 2
net.ipv4.conf.all.arp_ignore = 1
net.ipv4.conf.all.arp_announce = 2
net.ipv4.conf.tunl0.rp_filter = 0
net.ipv4.conf.all.rp_filter = 0
[root@RS2 ~]# sysctl -p
net.ipv4.conf.tunl0.arp_ignore = 1
net.ipv4.conf.tunl0.arp_announce = 2
net.ipv4.conf.all.arp_ignore = 1
net.ipv4.conf.all.arp_announce = 2
net.ipv4.conf.tunl0.rp_filter = 0
net.ipv4.conf.all.rp_filter = 0

//DR上添加规则
[root@DR ~]# dnf -y install ipvsadm
[root@DR ~]# ipvsadm -A -t 192.168.169.55:80 -s rr
[root@DR ~]# ipvsadm -a -t 192.168.169.55:80 -r 192.168.169.140:80 -i
[root@DR ~]# ipvsadm -a -t 192.168.169.55:80 -r 192.168.169.142:80 -i
[root@DR ~]# ipvsadm -Sn > /etc/sysconfig/ipvsadm
[root@DR ~]# systemctl enable --now ipvsadm.service
Created symlink /etc/systemd/system/multi-user.target.wants/ipvsadm.service → /usr/lib/systemd/system/ipvsadm.service.

//客户端进行验证
[root@client ~]# curl 192.168.169.55
RS2
[root@client ~]# curl 192.168.169.55
RS1
[root@client ~]# curl 192.168.169.55
RS2
[root@client ~]# curl 192.168.169.55
RS1

 浙公网安备 33010602011771号