javaweb 3、Maven详解
Maven
为什么要学Maven
- 在javaweb中需要使用大量的jar包,我们需要手动去导入
- 如何能够让一个东西自动帮我们导入和配置这些jar包
- 由此,Maven诞生了
Maven项目架构管理工具
我们目前用来就是方便导入jar包的
Maven的核心思想:约定大于配置
- 有约束,不要去违反
Maven会规定好你如何去编写好我们的java代码,必须要按照这个规范来
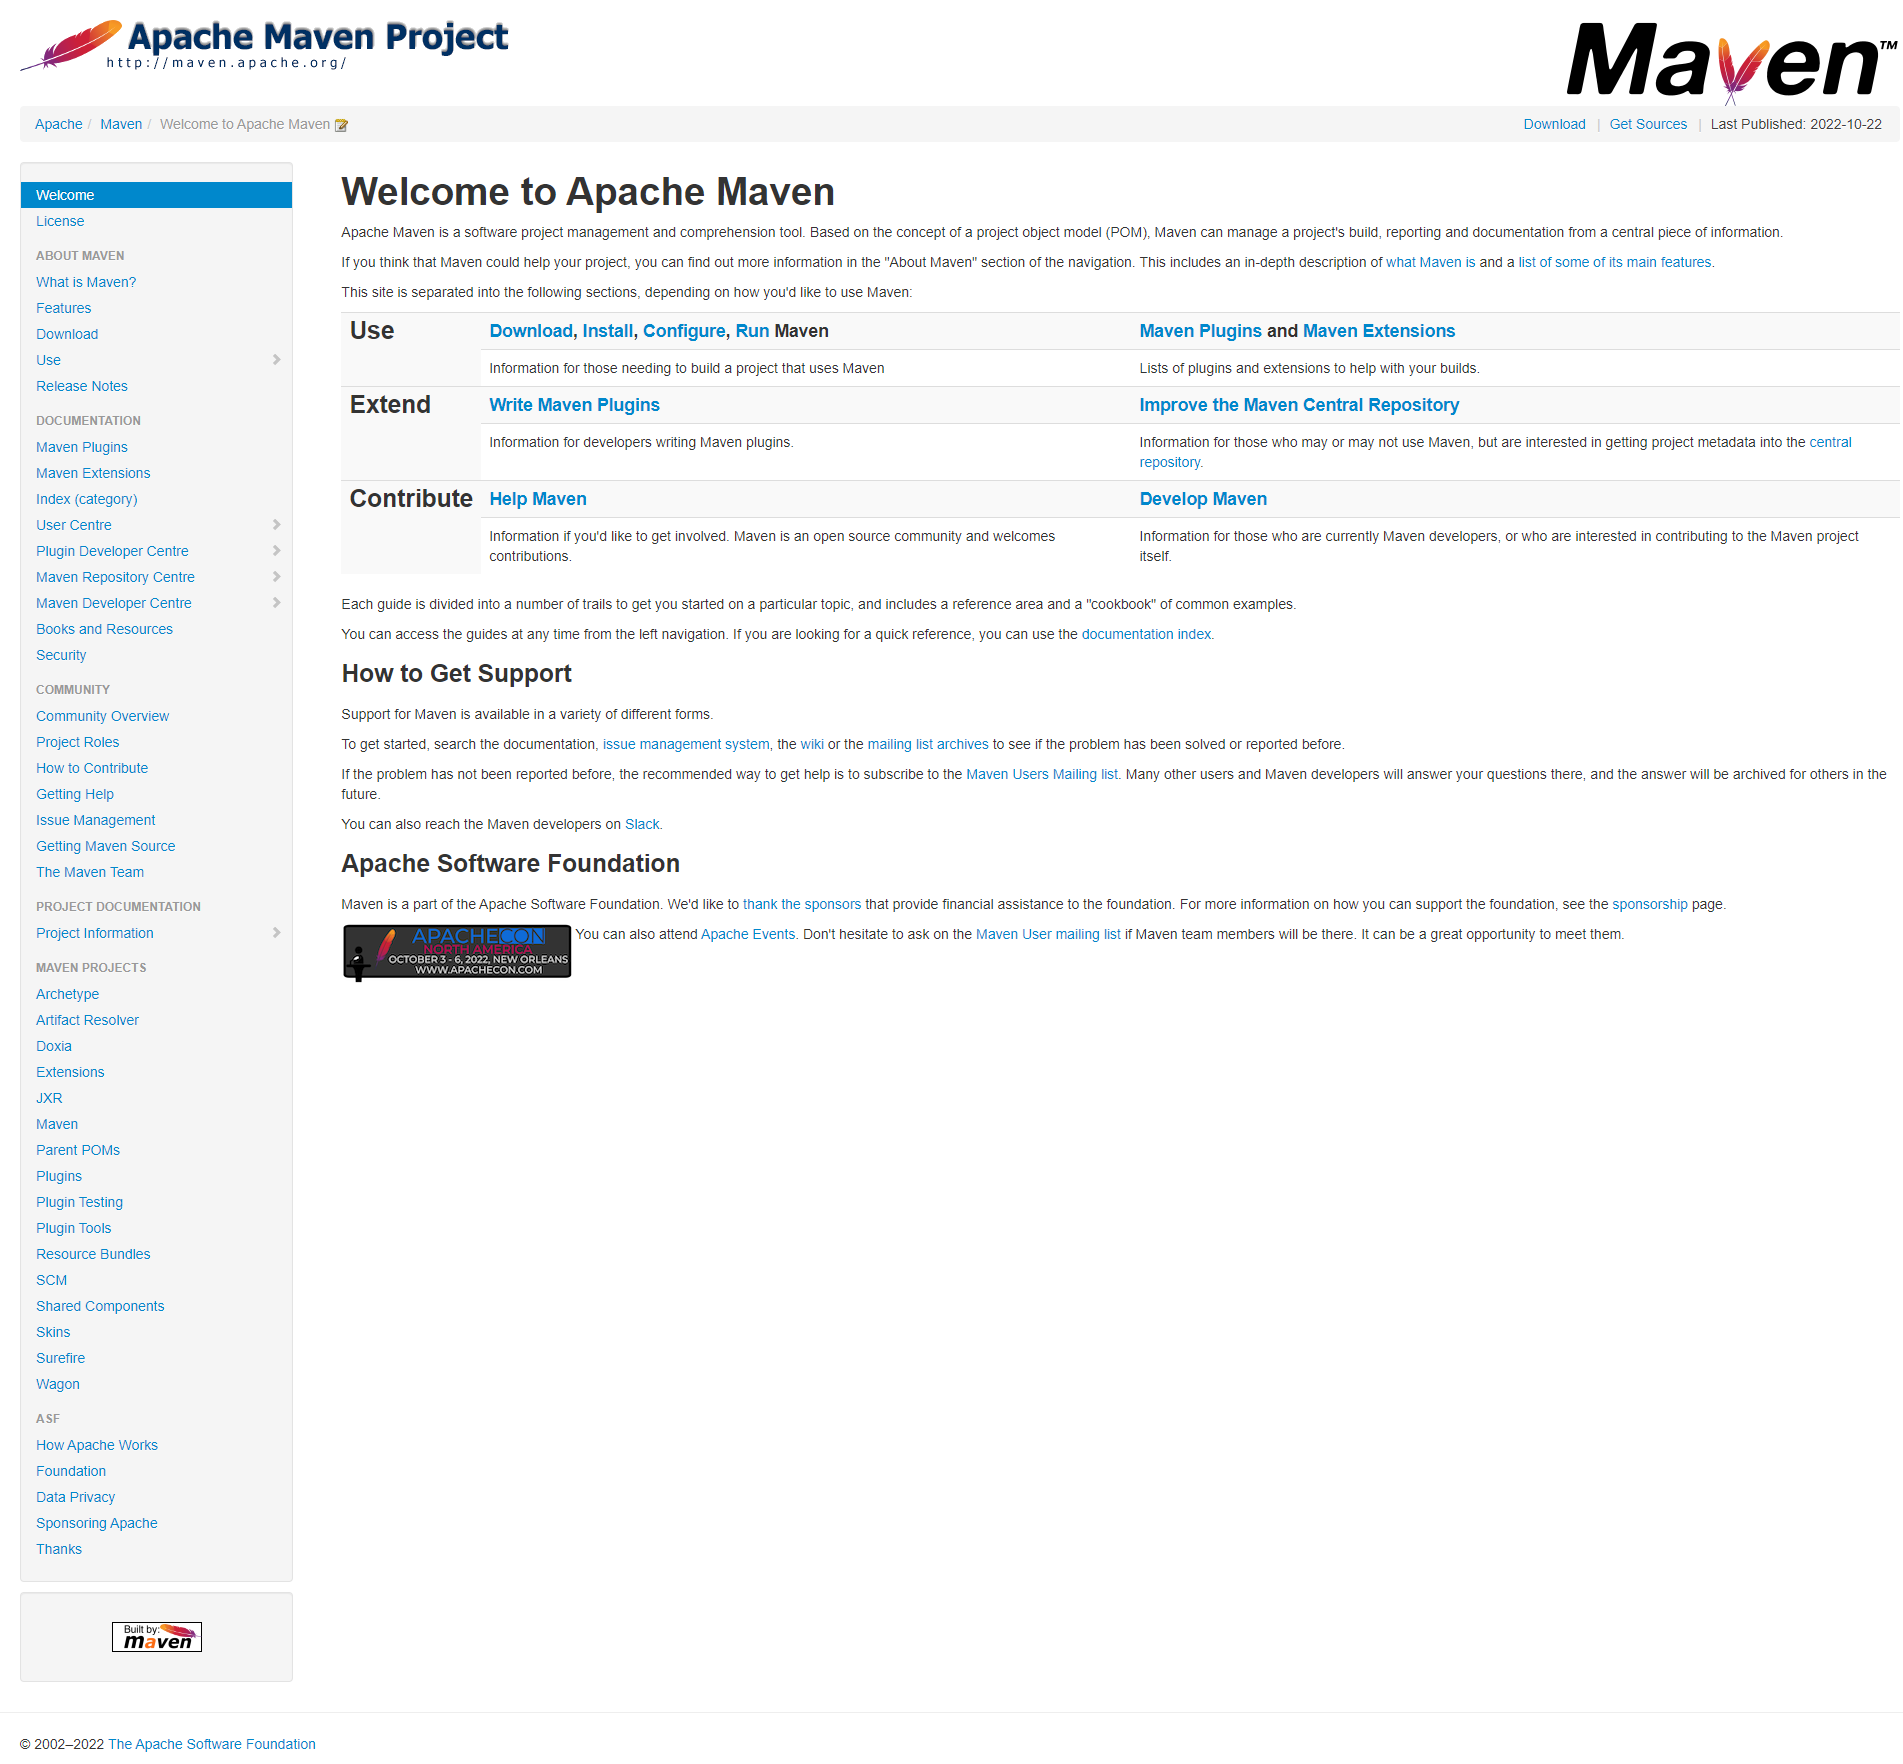
下载安装Maven
官网:https://maven.apache.org/
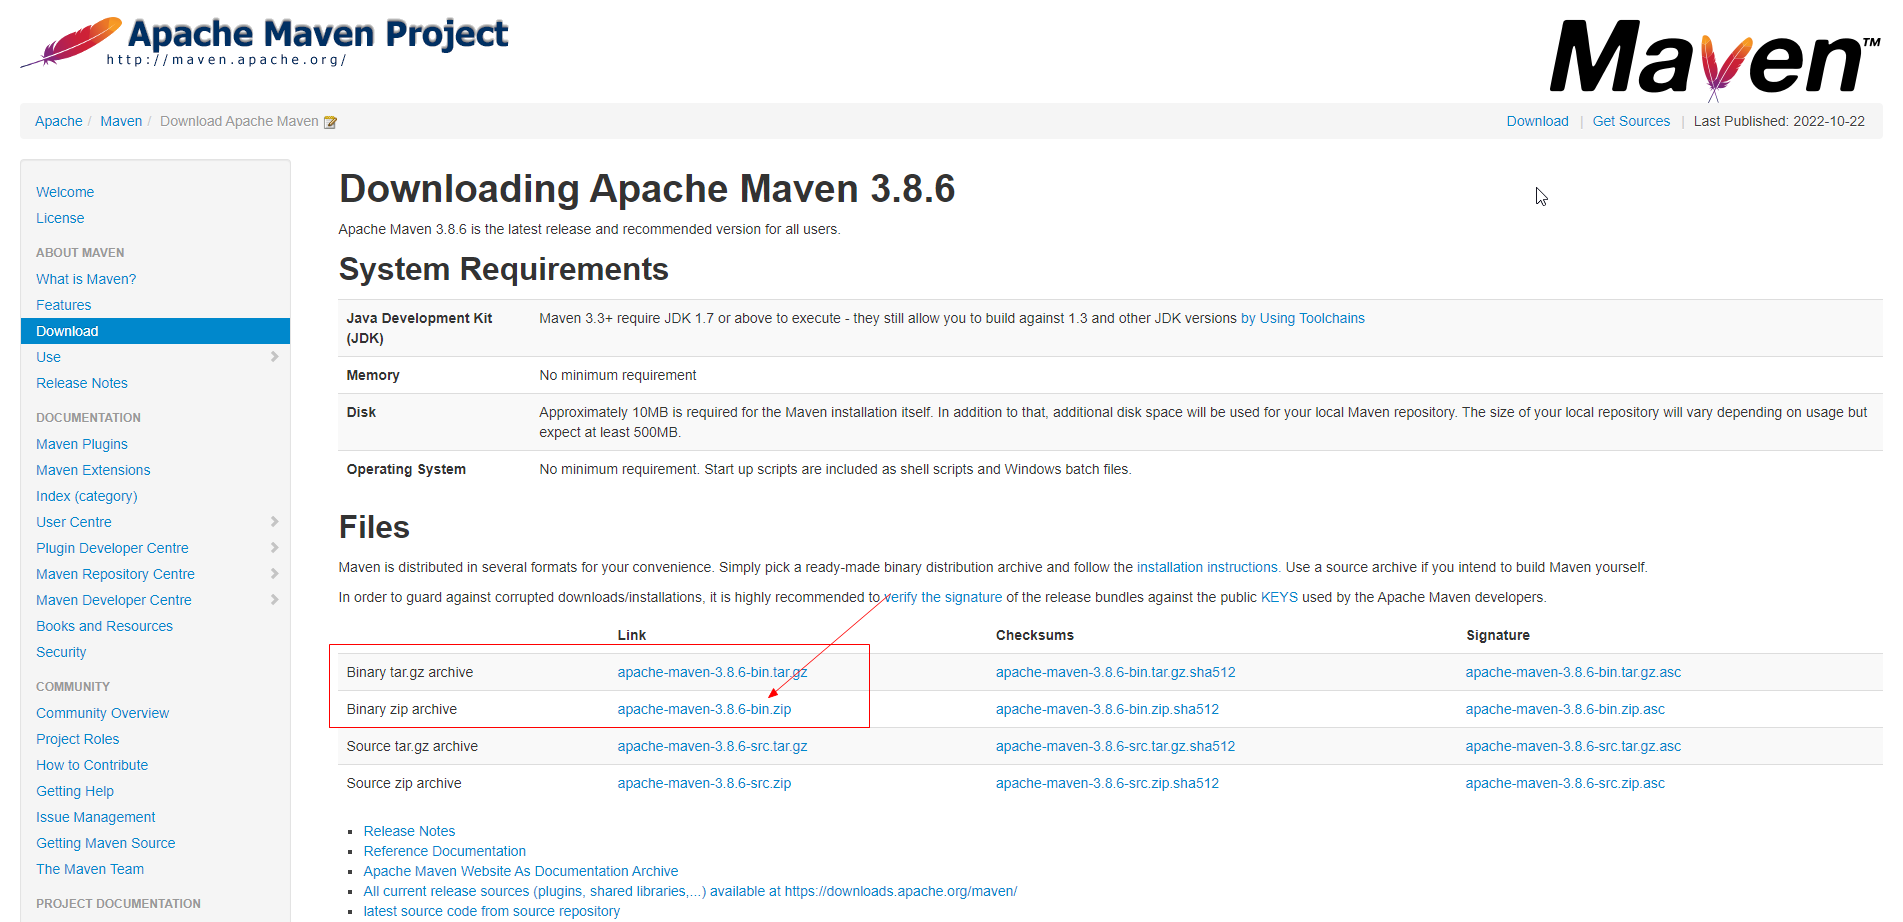
下载
配置环境变量
在我们的环境变量中
配置如下:
- M2_HOME maven目录下的bin目录
- MAVEN_HOME maven的目录
- 在系统的path中配置 %MAVEN_HOME%\bin
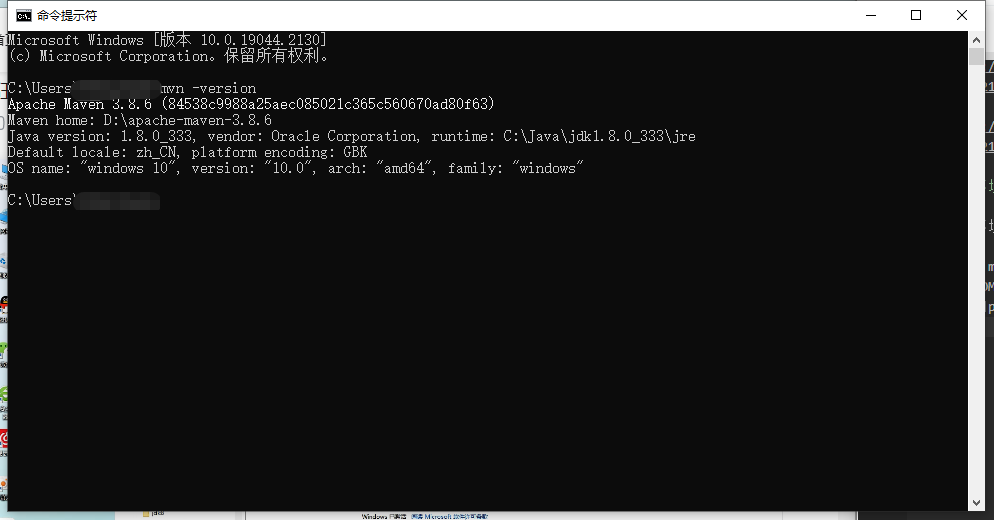
测试Maven安装成功
修改配置(阿里云镜像)
-
镜像:mirrors
- 作用,加速我们的下载
-
国内建议使用阿里云的镜像
复制代码
<mirror>
  <id>alimaven</id>
  <name>aliyun maven</name>
	  <url>http://maven.aliyun.com/nexus/content/groups/public/</url>
	  <mirrorOf>central</mirrorOf>
</mirror>
conf目录下settings.xml文件
找到mirrors
张贴进去
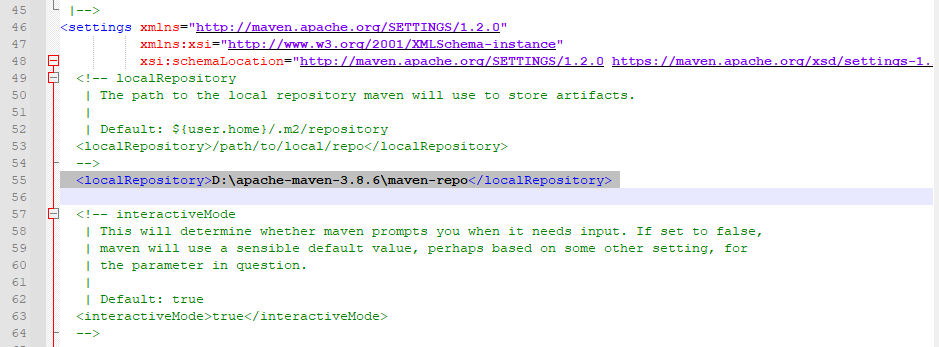
本地仓库
建立一个仓库
在maven安装目录下创建一个文件夹maven-repo
把仓库路径加入到配置文件settings.xml里
在IDEA中使用maven
-
启动IDEA
-
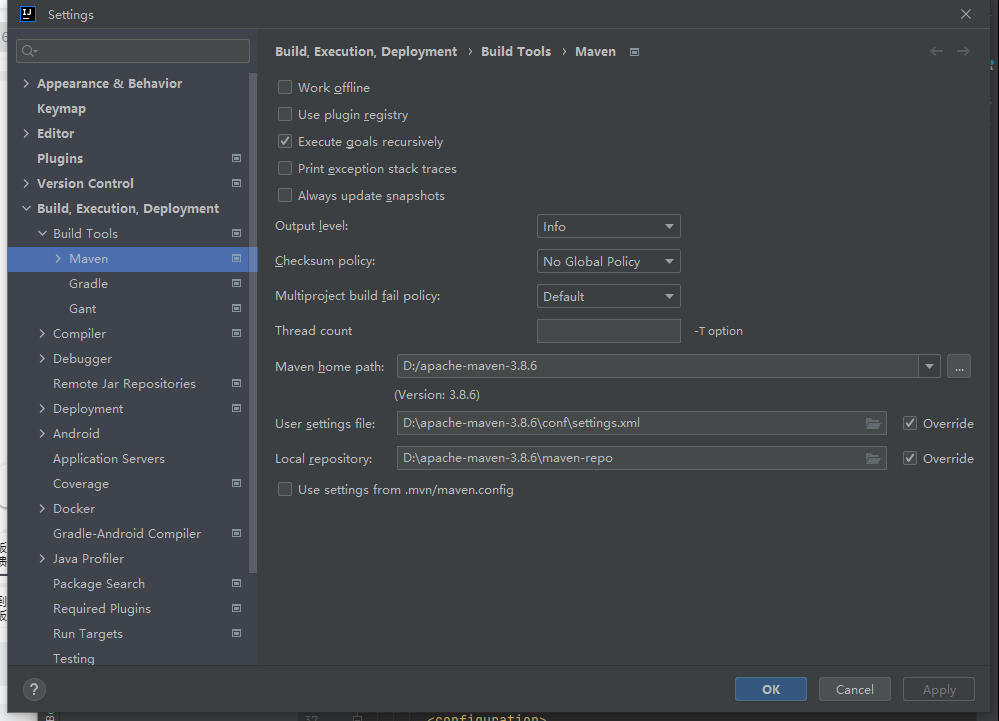
创建项目前,需先配置好maven环境
-
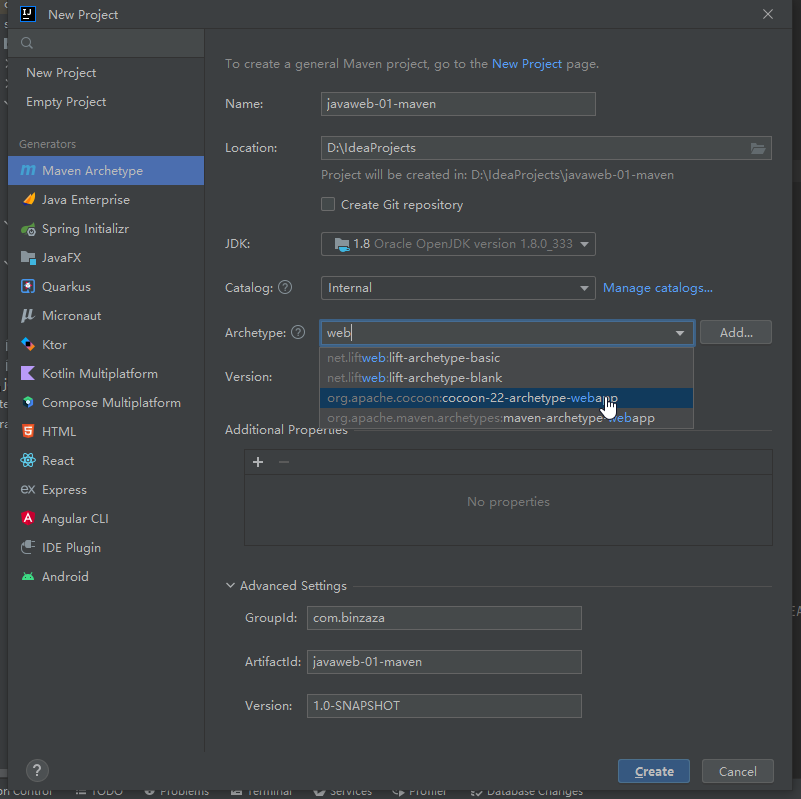
创建一个Maven项目
-
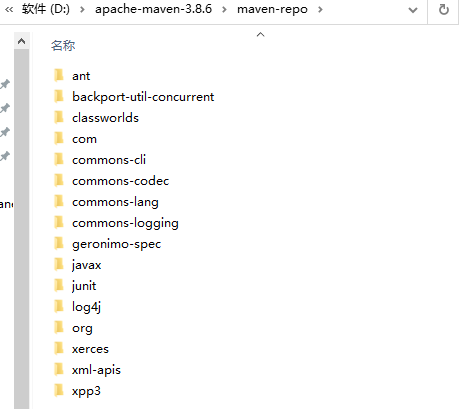
观察maven仓库
-
IDEA中maven的配置
IDEA创建项目成功后,看一眼maven配置

创建一个普通maven项目
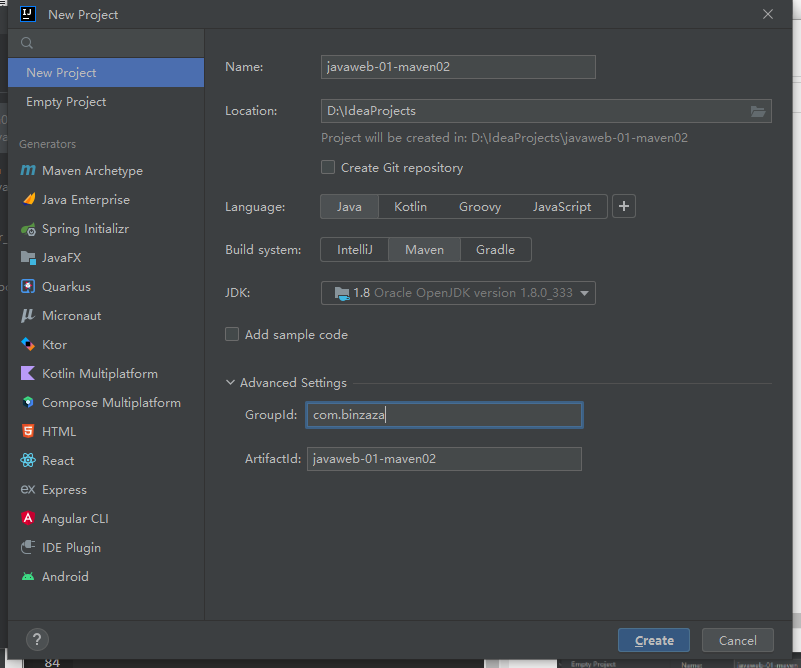
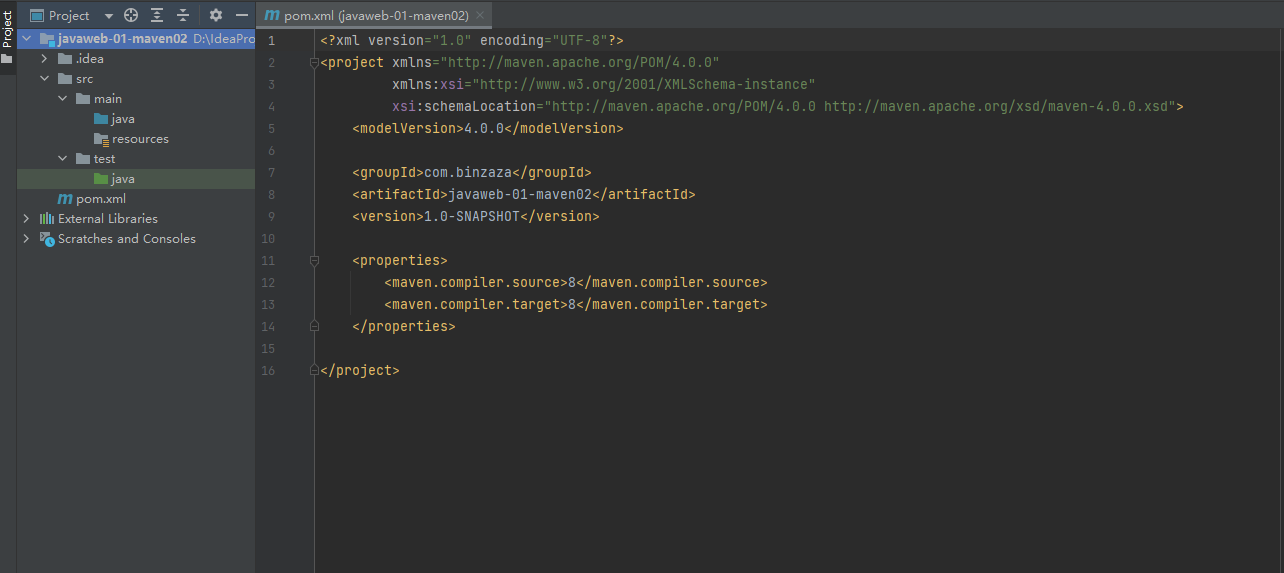
<?xml version="1.0" encoding="UTF-8"?>
<project xmlns="http://maven.apache.org/POM/4.0.0"
         xmlns:xsi="http://www.w3.org/2001/XMLSchema-instance"
         xsi:schemaLocation="http://maven.apache.org/POM/4.0.0 http://maven.apache.org/xsd/maven-4.0.0.xsd">
    <modelVersion>4.0.0</modelVersion>

    <groupId>com.binzaza</groupId>
    <artifactId>javaweb-01-maven02</artifactId>
    <version>1.0-SNAPSHOT</version>

    <properties>
        <maven.compiler.source>8</maven.compiler.source>
        <maven.compiler.target>8</maven.compiler.target>
    </properties>

</project>
因为javaweb-01-maven是一个不完整的项目
我们参照javaweb-01-maven02补全javaweb-01-maven的缺陷
标记目录
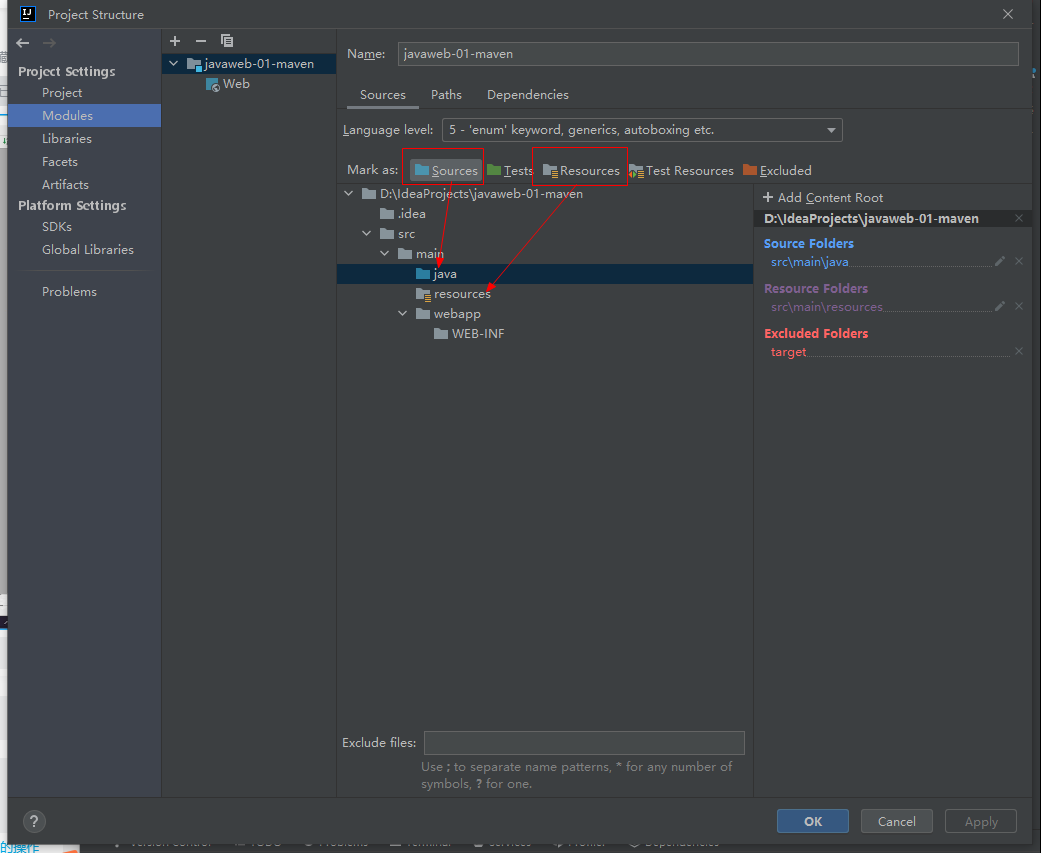
补全webapps文件夹
- src
    - main
        - java
        - resources
    - test
        - java
- webapps
    WEB-INF
        - web.xml
    index.html


web.xml
```xml
<?xml version="1.0" encoding="UTF-8"?>
<!--
 Licensed to the Apache Software Foundation (ASF) under one or more
  contributor license agreements.  See the NOTICE file distributed with
  this work for additional information regarding copyright ownership.
  The ASF licenses this file to You under the Apache License, Version 2.0
  (the "License"); you may not use this file except in compliance with
  the License.  You may obtain a copy of the License at

      http://www.apache.org/licenses/LICENSE-2.0

  Unless required by applicable law or agreed to in writing, software
  distributed under the License is distributed on an "AS IS" BASIS,
  WITHOUT WARRANTIES OR CONDITIONS OF ANY KIND, either express or implied.
  See the License for the specific language governing permissions and
  limitations under the License.
-->
<web-app xmlns="https://jakarta.ee/xml/ns/jakartaee"
  xmlns:xsi="http://www.w3.org/2001/XMLSchema-instance"
  xsi:schemaLocation="https://jakarta.ee/xml/ns/jakartaee
                      https://jakarta.ee/xml/ns/jakartaee/web-app_5_0.xsd"
  version="5.0"
  metadata-complete="true">

  <display-name>Welcome to Tomcat</display-name>
  <description>
     Welcome to Tomcat
  </description>

</web-app>
<!DOCTYPE html>
<html lang="en">
<head>
    <meta charset="UTF-8">
    <title>Title</title>

  <style>
      body{
          font-family: "Microsoft YaHei UI","Arial Black";
          color: #1c1c1b;
      }
      img{
          width: 800px;
      }
    #title{
      font-size: 40px;
    }
    #sub-title{
        font-size: 20px;
        font-weight: bold;
    }

  </style>
</head>
<body>

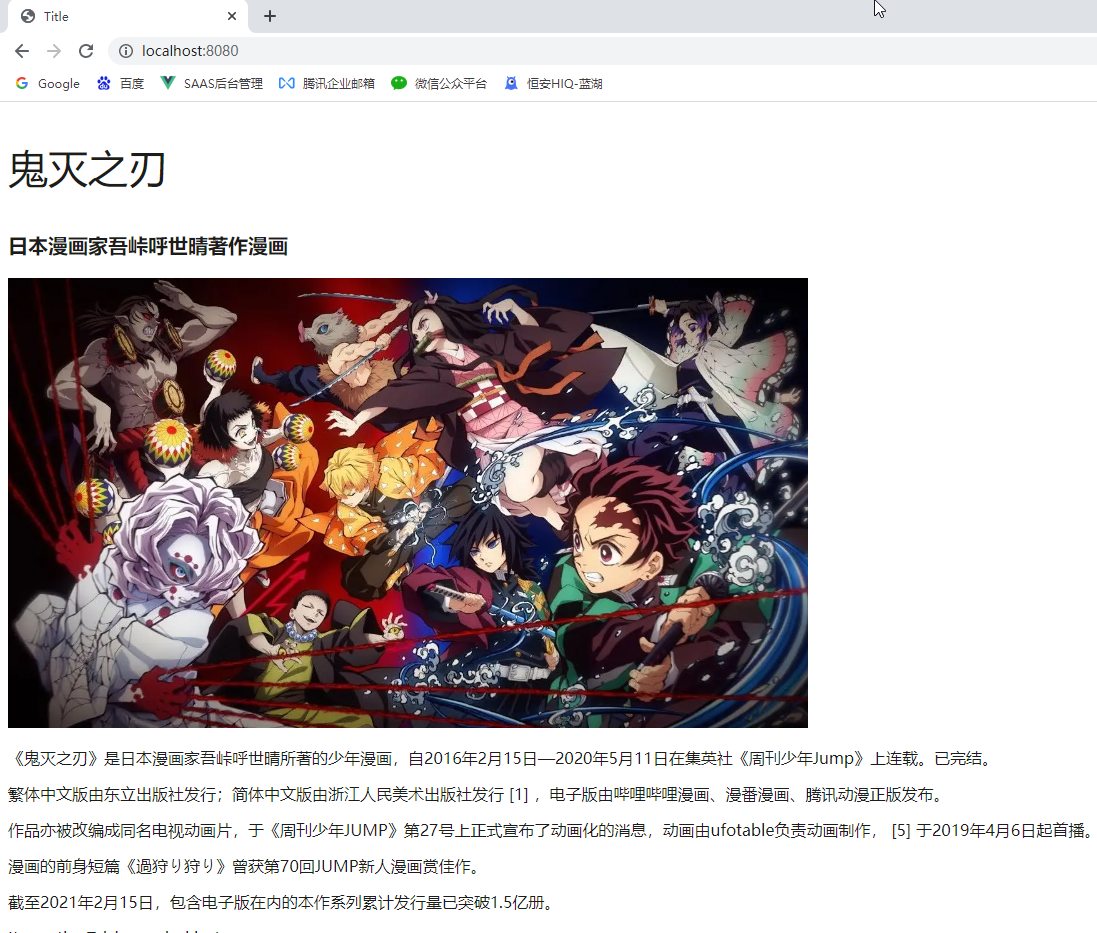
<p id="title">鬼灭之刃</p>
<p id="sub-title">日本漫画家吾峠呼世晴著作漫画</p>
<img src="https://gimg2.baidu.com/image_search/src=http%3A%2F%2Fpic2.zhimg.com%2Fv2-c544281c52cf60f3eefe26902e0c0abd_r.jpg&refer=http%3A%2F%2Fpic2.zhimg.com&app=2002&size=f9999,10000&q=a80&n=0&g=0n&fmt=auto?sec=1661134338&t=c7a9ad6e9bc7f1c5e0e988f0aceef9a4" alt="">
<p>《鬼灭之刃》是日本漫画家吾峠呼世晴所著的少年漫画,自2016年2月15日—2020年5月11日在集英社《周刊少年Jump》上连载。已完结。</p>
<p>繁体中文版由东立出版社发行;简体中文版由浙江人民美术出版社发行 [1]  ,电子版由哔哩哔哩漫画、漫番漫画、腾讯动漫正版发布。</p>
<p>作品亦被改编成同名电视动画片,于《周刊少年JUMP》第27号上正式宣布了动画化的消息,动画由ufotable负责动画制作, [5]  于2019年4月6日起首播。</p>
<p>漫画的前身短篇《過狩り狩り》曾获第70回JUMP新人漫画赏佳作。</p>
<p>截至2021年2月15日,包含电子版在内的本作系列累计发行量已突破1.5亿册。</p>

<p>It was the Taisho period in Japan.</p>
<p>Legend has it that after the sun goes down, evil spirits haunt and eat people. There are also ghost hunters who kill evil spirits and protect people.</p>

</body>
</html>
在IDEA中配置Tomcat
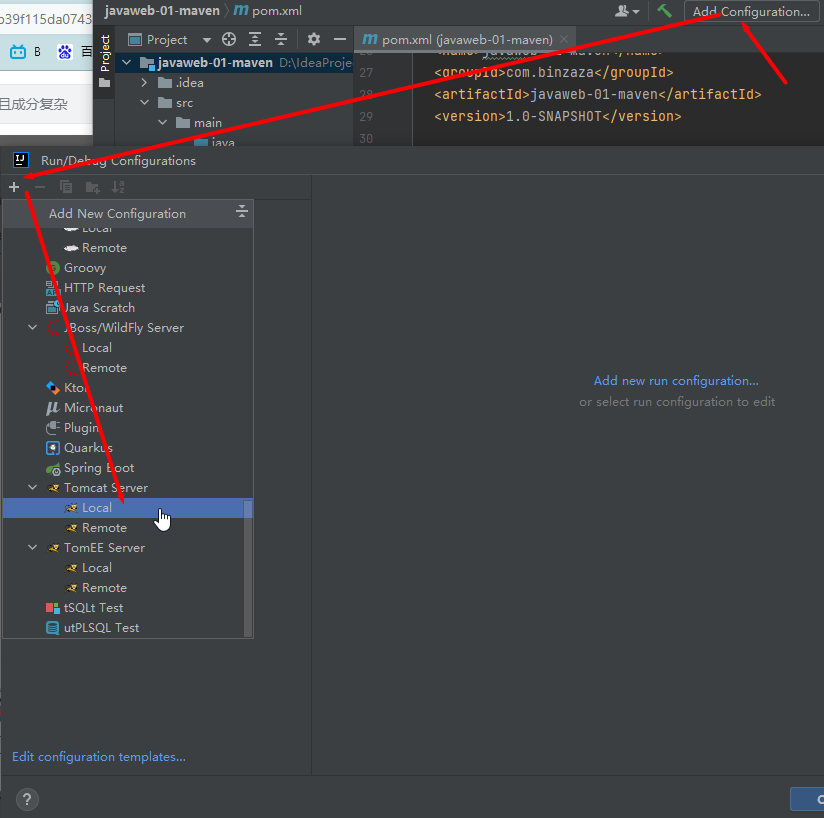
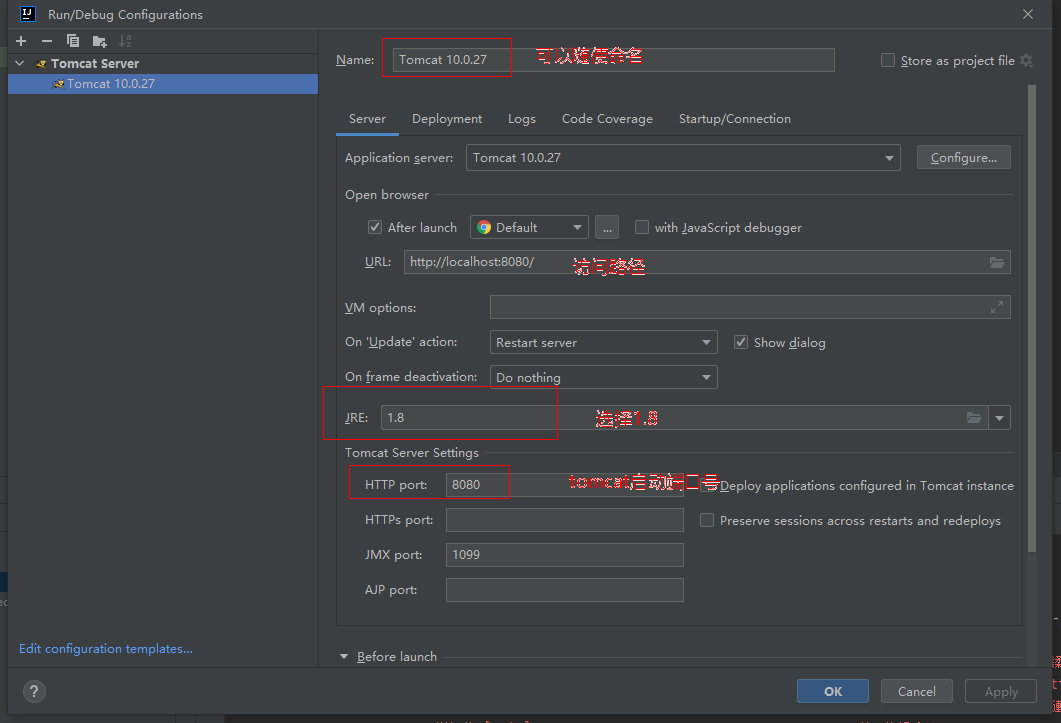
配置artifact
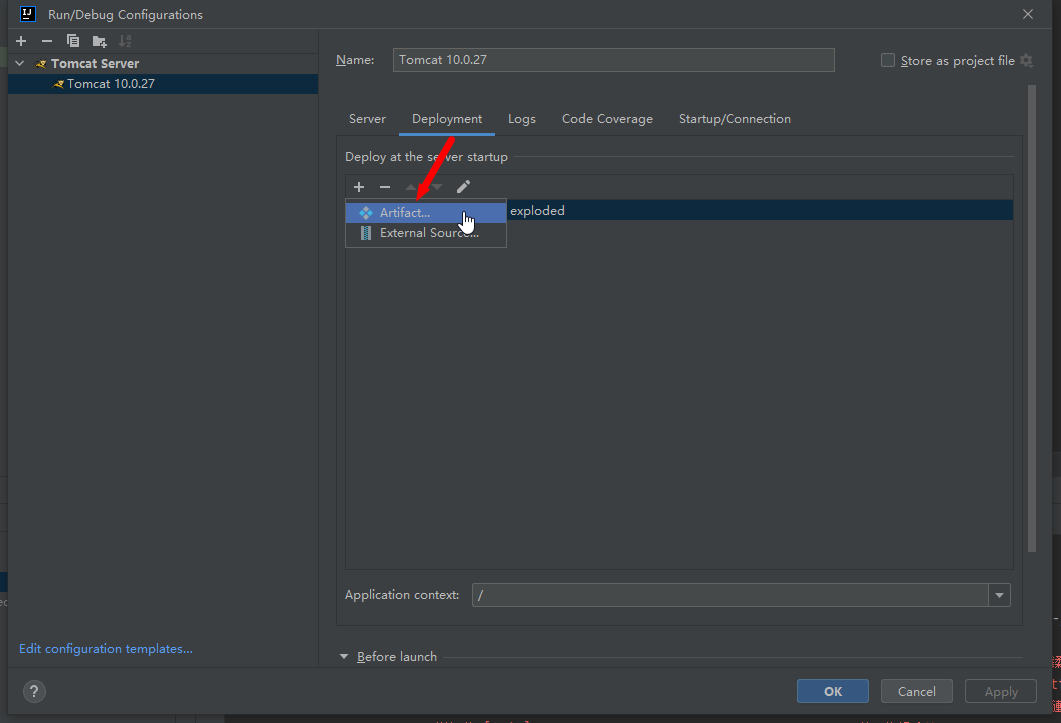
如果artifact不存在,得通过Project Structure来创建 File > Project Structure
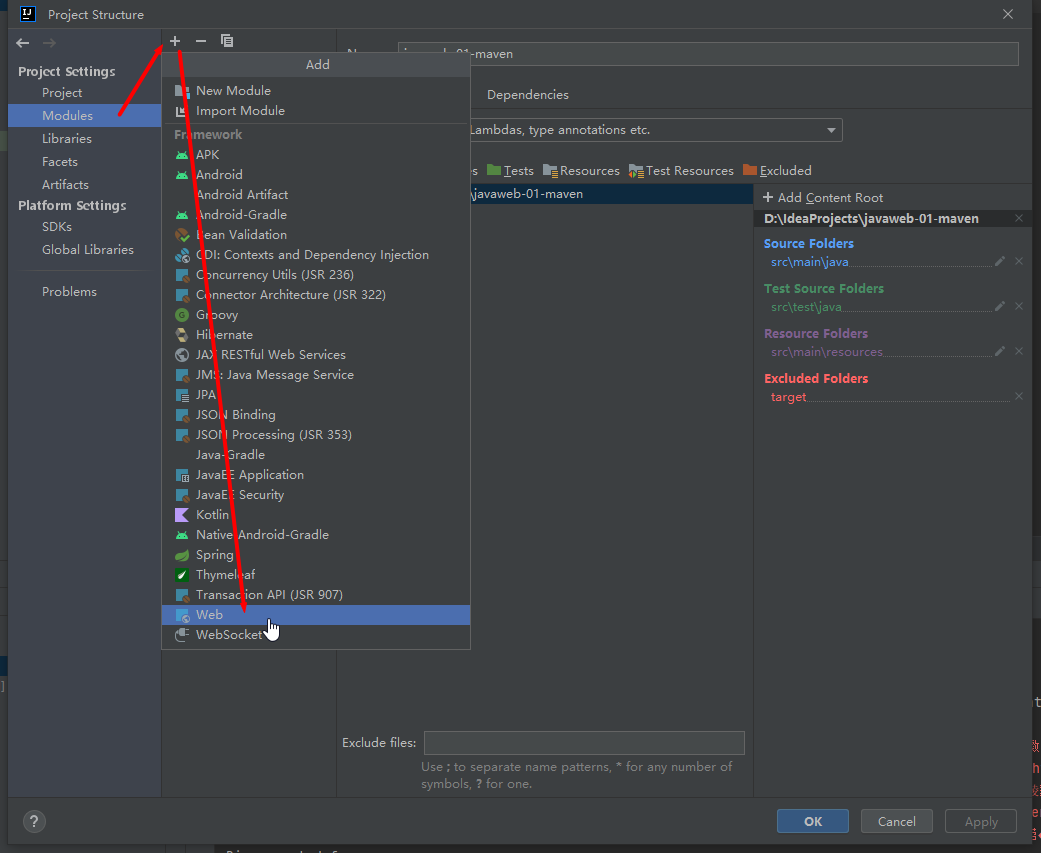
创建web后,配置resource路径
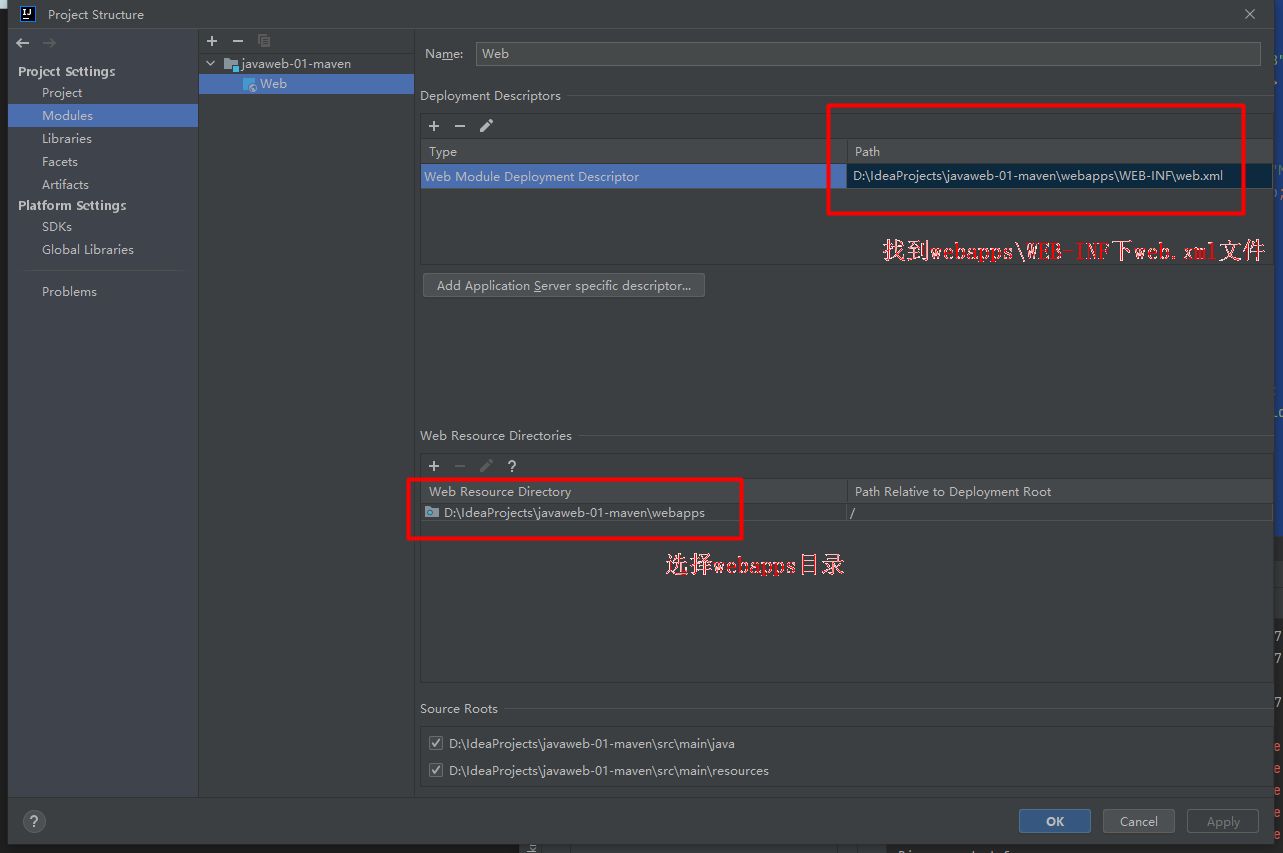
右下角创建artifact

新建artifact
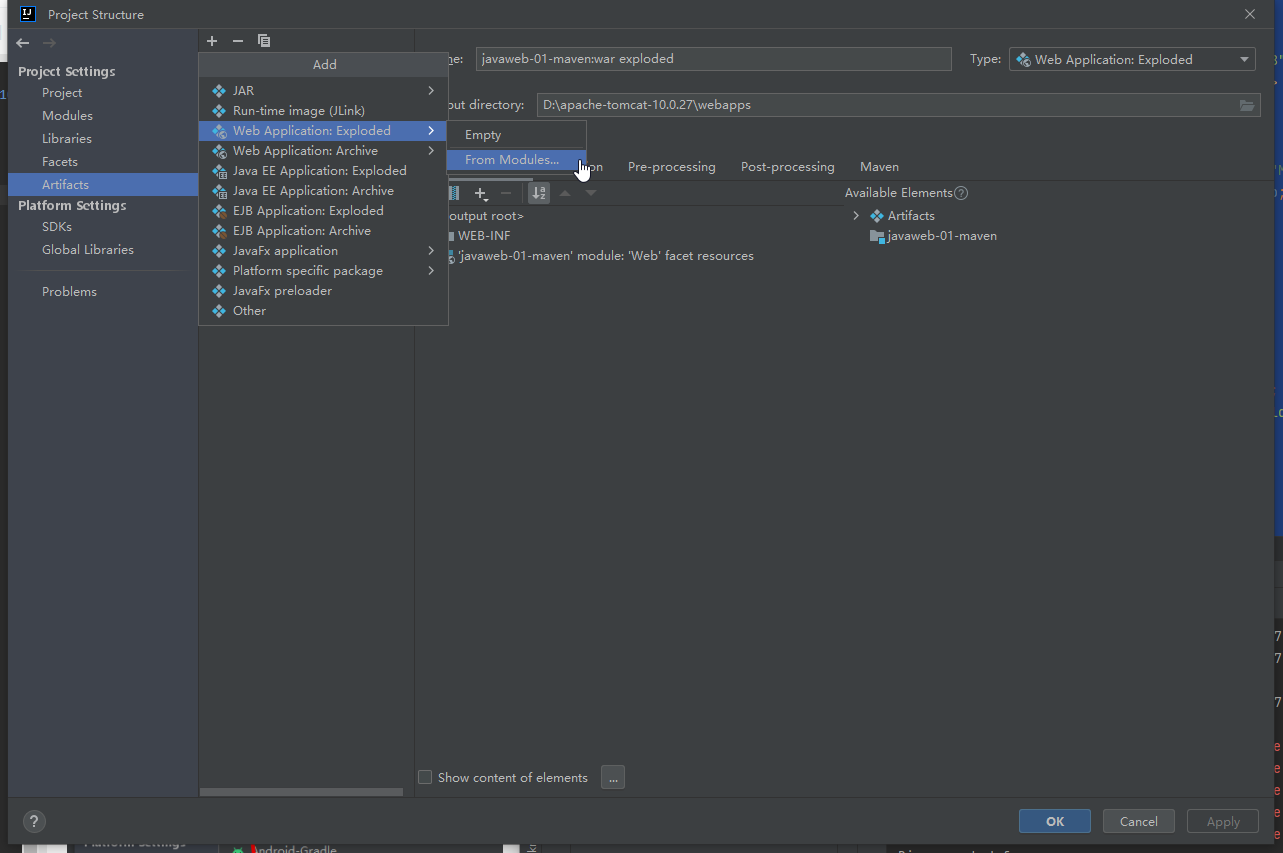
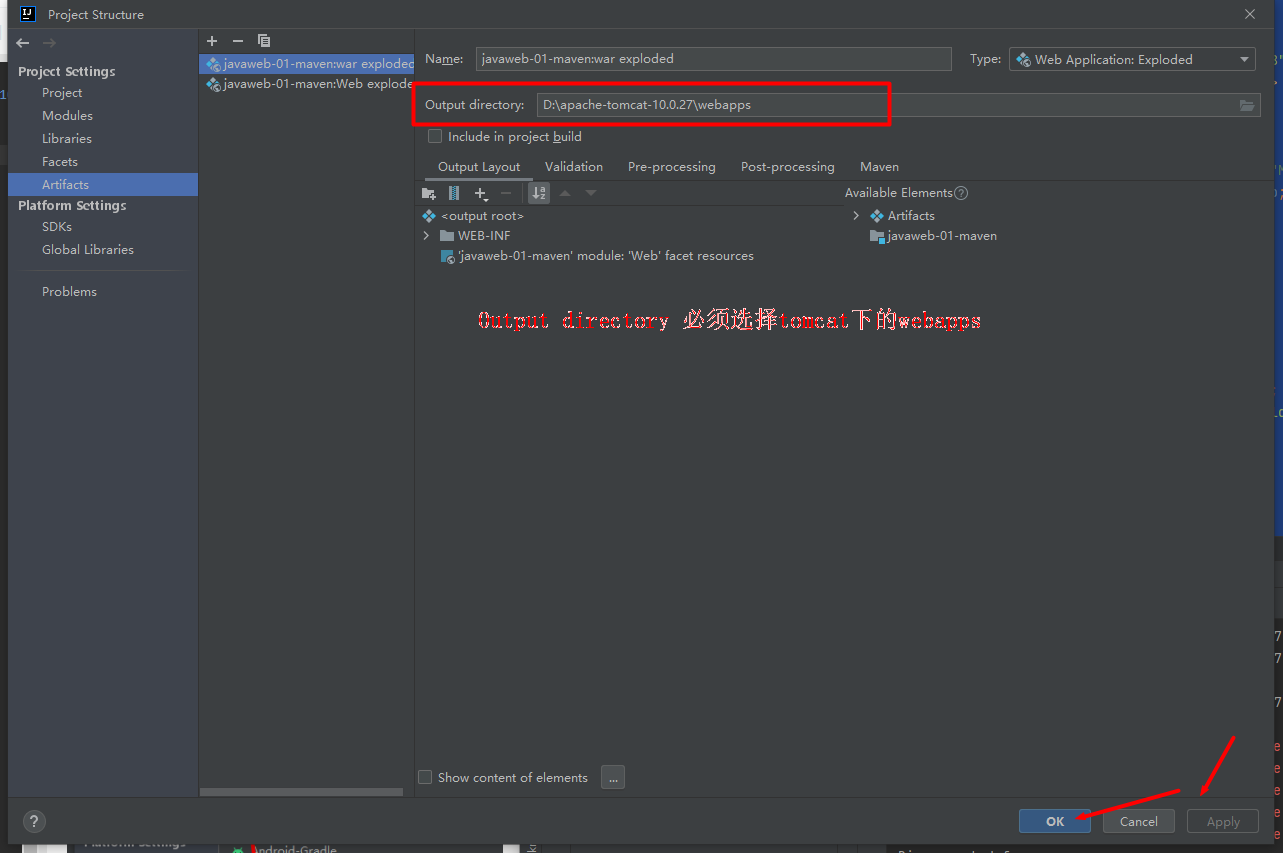
回到Edit Configurations
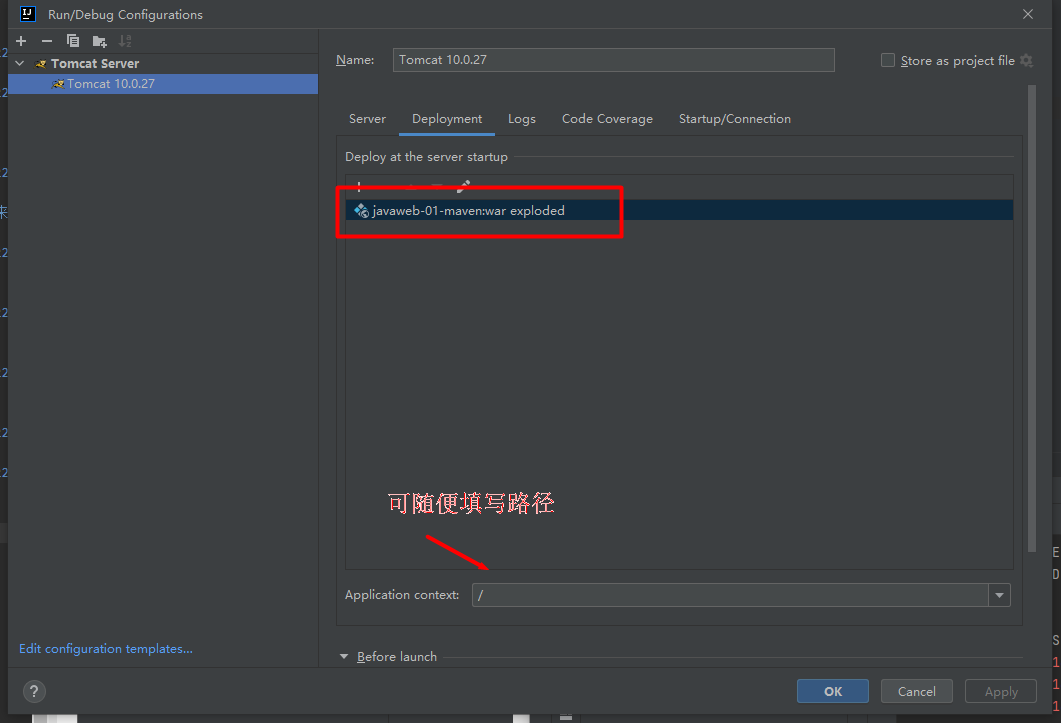
启动Tomcat
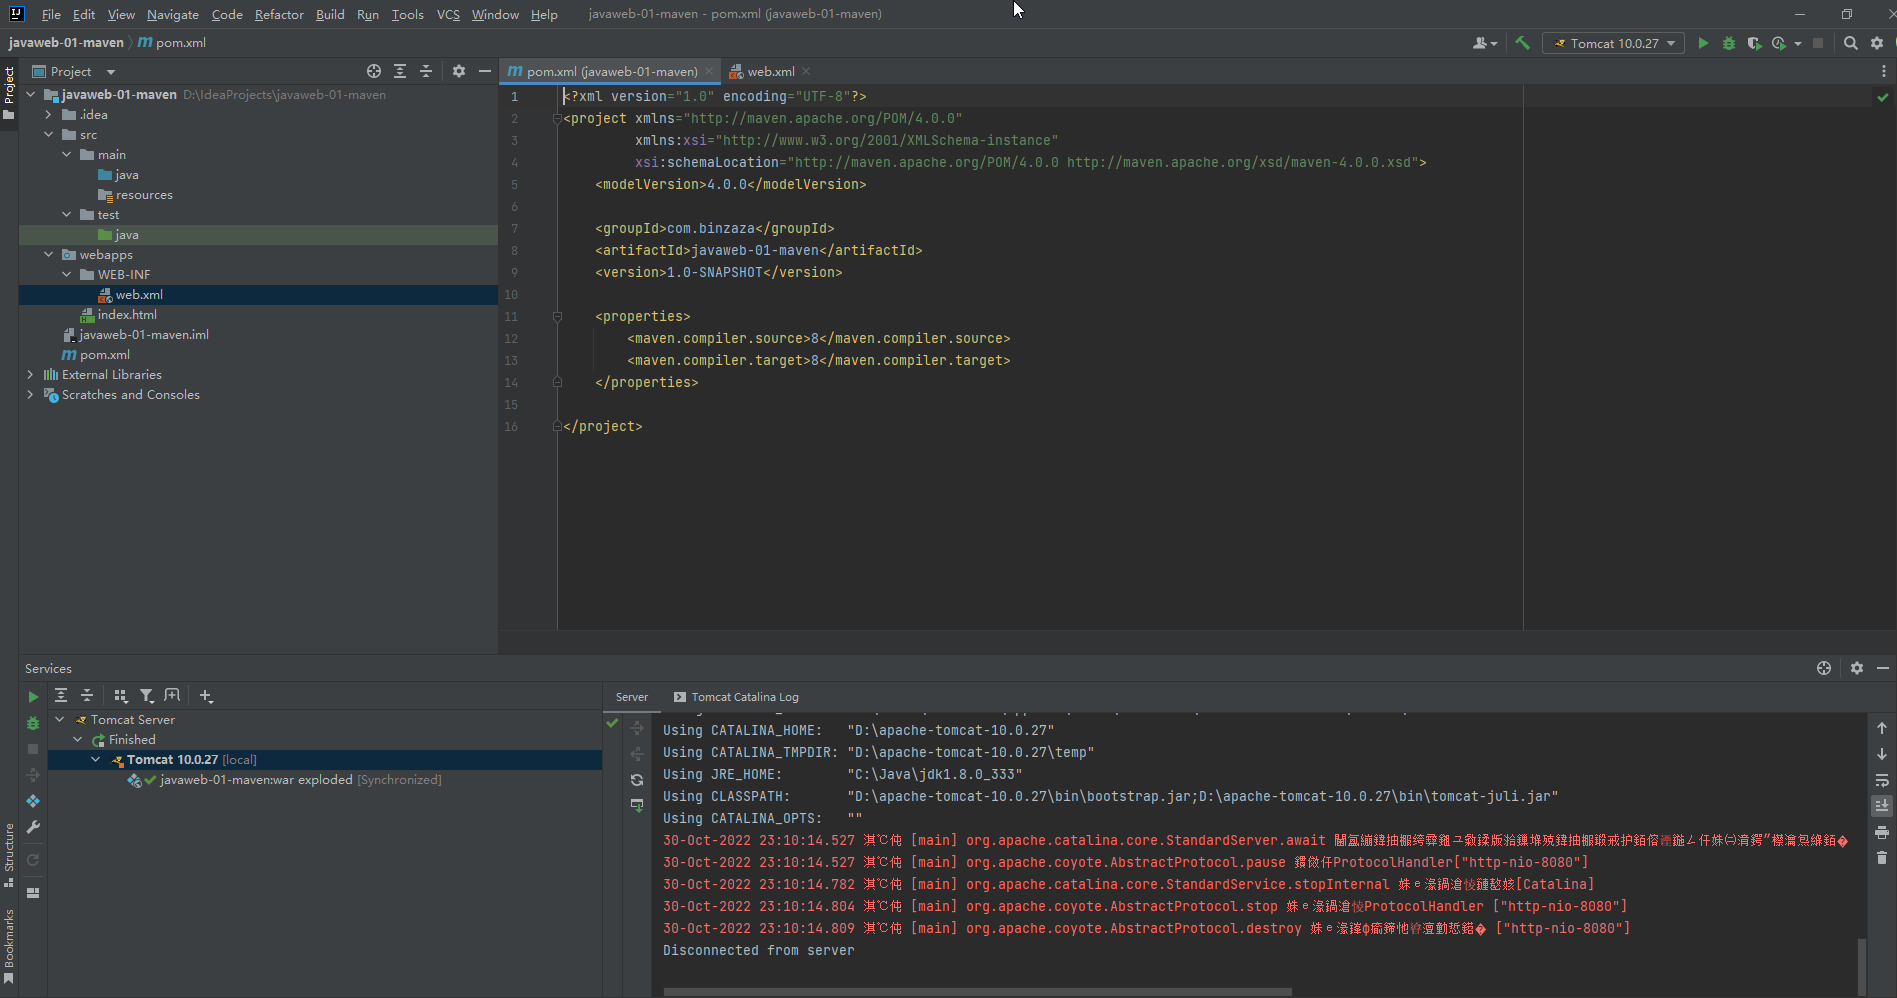
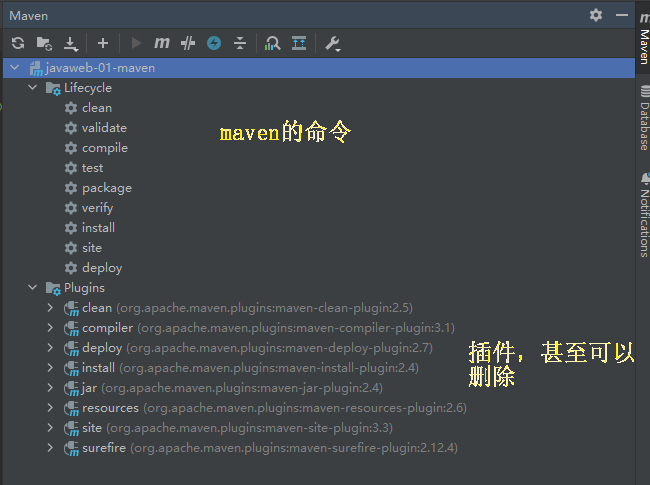
maven工具栏
pom文件
pom.xml 文件是tomcat的核心配置文件
<?xml version="1.0" encoding="UTF-8"?>

<!--Maven版本和头文件-->
<project xmlns="http://maven.apache.org/POM/4.0.0"
         xmlns:xsi="http://www.w3.org/2001/XMLSchema-instance"
         xsi:schemaLocation="http://maven.apache.org/POM/4.0.0 http://maven.apache.org/xsd/maven-4.0.0.xsd">
    <modelVersion>4.0.0</modelVersion>

<!--这里就是我们刚才配置的GAV-->
    <groupId>com.binzaza</groupId>
    <artifactId>javaweb-01-maven</artifactId>
    <version>1.0-SNAPSHOT</version>

    <!--Package: 项目打包方式
    jar: java应用
    war: javaweb应用
    -->
    <packaging>war</packaging>

    <properties>
        <!--项目默认的构建编码-->
        <project.build.sourceEncoding>UTF-8</project.build.sourceEncoding>
        <!--编码版本-->
        <maven.compiler.source>8</maven.compiler.source>
        <maven.compiler.target>8</maven.compiler.target>
    </properties>

    <!--项目依赖-->
    <dependencies>
        <!--具体依赖的jar包配置文件-->
        <dependency>
            <groupId>junit</groupId>
            <artifactId>junit</artifactId>
            <version>4.11</version>
        </dependency>
    </dependencies>

</project>
maven由于他的约定大于配置,我们之后可能遇到写的配置文件,无法被导出生效的问题,解决方案:
    <!--在build中配置resources,来房子我们资源导出失败的问题-->
    <build>
        <resources>
            <resource>
                <directory>src/main/resources</directory>
                <excludes>
                    <exclude>**/*.properties</exclude>
                    <exclude>**/*.xml</exclude>
                </excludes>
                <filtering>false</filtering>
            </resource>
            <resource>
                <directory>src/main/java</directory>
                <includes>
                    <include>**/*.properties</include>
                    <include>**/*.xml</include>
                </includes>
                <filtering>false</filtering>
            </resource>
        </resources>
    </build>
解决常见问题
IDEA中每次都要重复配置maven
在IDEA的全局默认配置中去配置

- 在左侧搜索框内搜索maven
- 更改Mavenhome path,目录为解压后文件位置,根目录即可
- 更改User setting file,使用配置好的xml文件,修改后点击右侧Override

修改后,点击下方APPLY(应用),至此,我们已经将IDEA的全局Maven配置成功
Maven 仓库的使用
创建个maven空项目:hello2
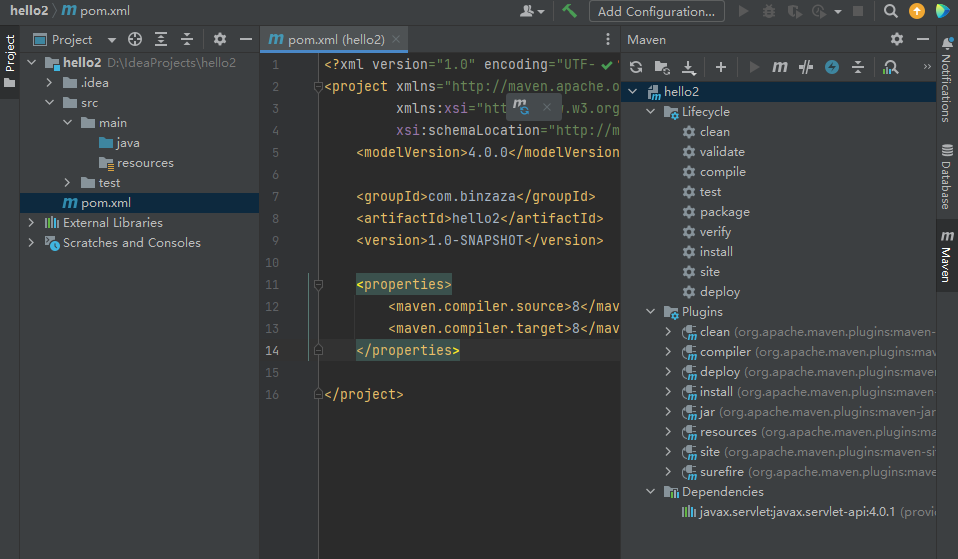
创建一个servlet java文件
HelloServlet.java
public class HelloServlet extends HttpServlet {
}
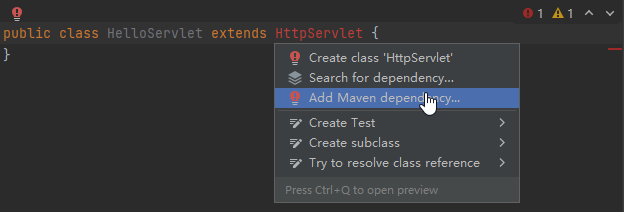
进入maven仓库网页:
https://mvnrepository.com/
搜索:servlet-api
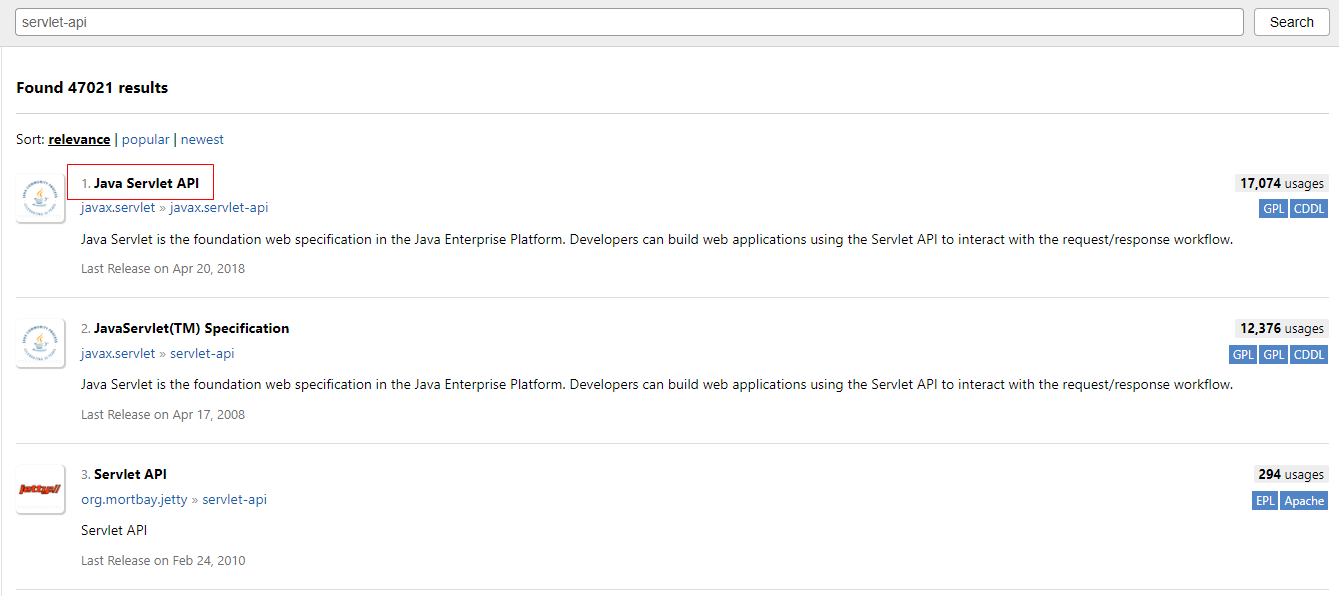
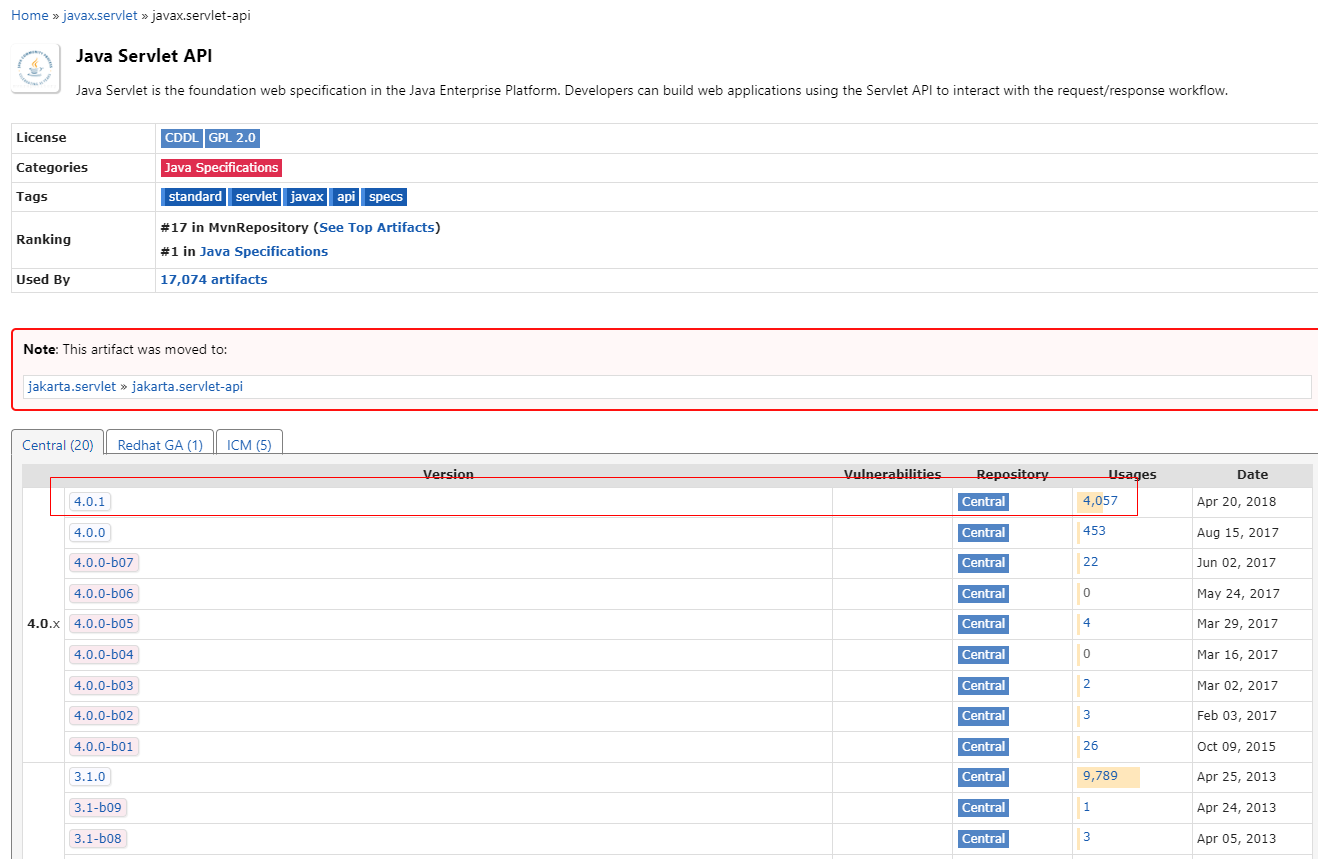
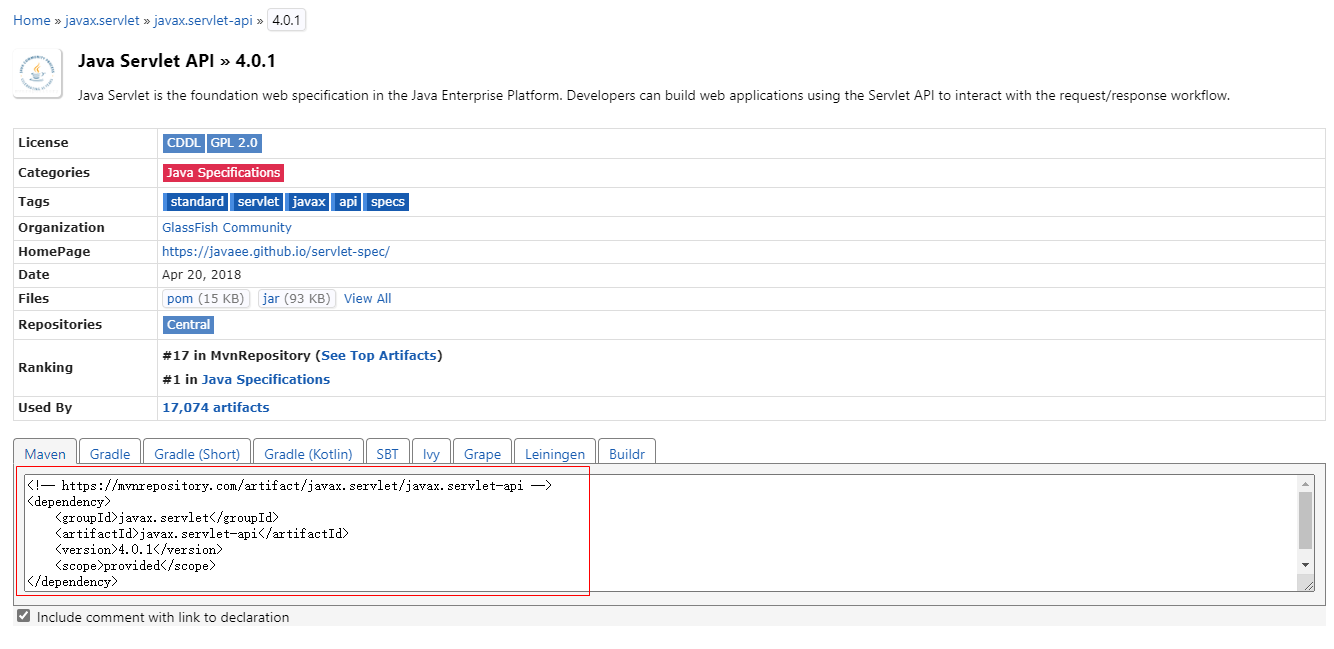
把代码添加到pom.xml里
<?xml version="1.0" encoding="UTF-8"?>
<project xmlns="http://maven.apache.org/POM/4.0.0"
         xmlns:xsi="http://www.w3.org/2001/XMLSchema-instance"
         xsi:schemaLocation="http://maven.apache.org/POM/4.0.0 http://maven.apache.org/xsd/maven-4.0.0.xsd">
    <modelVersion>4.0.0</modelVersion>

    <groupId>com.binzaza</groupId>
    <artifactId>hello2</artifactId>
    <version>1.0-SNAPSHOT</version>

    <properties>
        <maven.compiler.source>8</maven.compiler.source>
        <maven.compiler.target>8</maven.compiler.target>
    </properties>

    <dependencies>
        <!-- https://mvnrepository.com/artifact/javax.servlet/javax.servlet-api -->
        <dependency>
            <groupId>jakarta.servlet</groupId>
            <artifactId>jakarta.servlet-api</artifactId>
            <version>5.0.0</version>
        </dependency>

        <dependency>
            <groupId>jakarta.servlet.jsp</groupId>
            <artifactId>jakarta.servlet.jsp-api</artifactId>
            <version>3.0.0</version>
        </dependency>
    </dependencies>

</project>
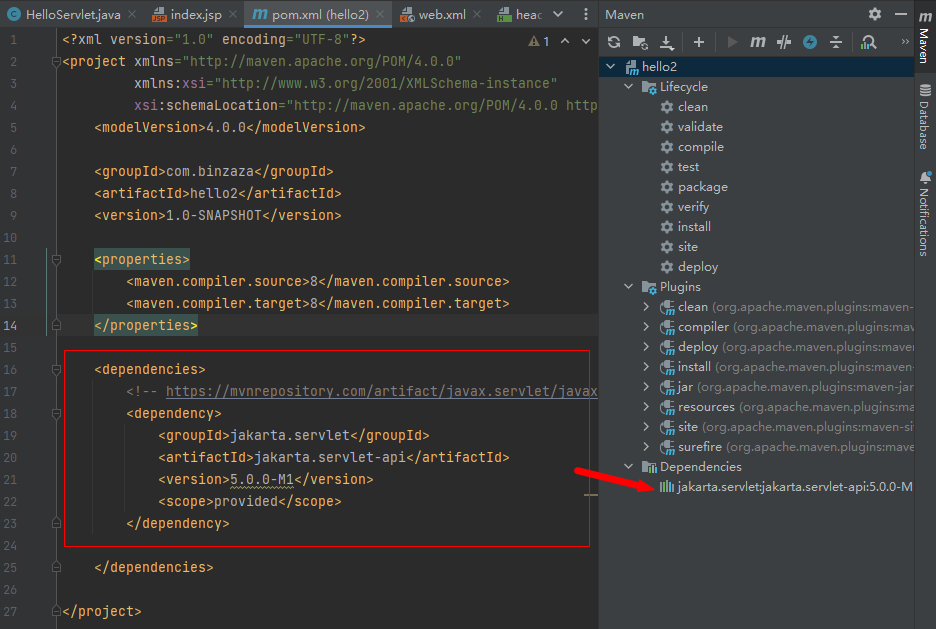
IDEA 重写方法快捷键:Ctrl + O
HelloServlet.java
package com.binzaza;

import jakarta.servlet.ServletException;
import jakarta.servlet.http.HttpServlet;
import jakarta.servlet.http.HttpServletRequest;
import jakarta.servlet.http.HttpServletResponse;
import java.io.IOException;
import java.io.PrintWriter;

public class HelloServlet extends HttpServlet {

    // Ctrl + O 重写方法快捷键
    @Override
    protected void doGet(HttpServletRequest req, HttpServletResponse response) throws ServletException, IOException {
        // 响应的类型 html
        response.setContentType("text/html");

        // 获取响应的输出源
        PrintWriter out = response.getWriter();
        out.println("<html>");
        out.println("<head>");
        out.println("<title>Hello World!</title>");
        out.println("</head>");
        out.println("<body>");
        out.println("<h1>Hello World!</h1>");
        out.println("</body>");
        out.println("</html>");
    }

    @Override
    protected void doPost(HttpServletRequest req, HttpServletResponse resp) throws ServletException, IOException {
        doGet(req, resp);
    }
}
配置web.xml
<?xml version="1.0" encoding="UTF-8"?>

<web-app xmlns="https://jakarta.ee/xml/ns/jakartaee"
  xmlns:xsi="http://www.w3.org/2001/XMLSchema-instance"
  xsi:schemaLocation="https://jakarta.ee/xml/ns/jakartaee
                      https://jakarta.ee/xml/ns/jakartaee/web-app_5_0.xsd"
  version="5.0"
  metadata-complete="true">

<!--  <display-name>Welcome to Tomcat</display-name>-->
<!--  <description>-->
<!--     Welcome to Tomcat-->
<!--  </description>-->

    <!--web.xml 中是配置我们web的核心应用-->
    <!--注册servlet-->
    <servlet>
        <servlet-name>helloServlet</servlet-name>
        <servlet-class>com.binzaza.HelloServlet</servlet-class>
    </servlet>

    <!--一个servlet对应一个Mapping:映射-->
    <servlet-mapping>
        <servlet-name>helloServlet</servlet-name>
        <!--请求路径-->
        <url-pattern>/hello</url-pattern>
    </servlet-mapping>

</web-app>
在webapp文件夹下创建一个header.html文件
<!DOCTYPE html>
<html lang="en">
<head>
    <meta charset="UTF-8">
    <title>Title</title>

</head>
<body>
<h1>我是标题h1</h1>
</body>
</html>
启动tomcat
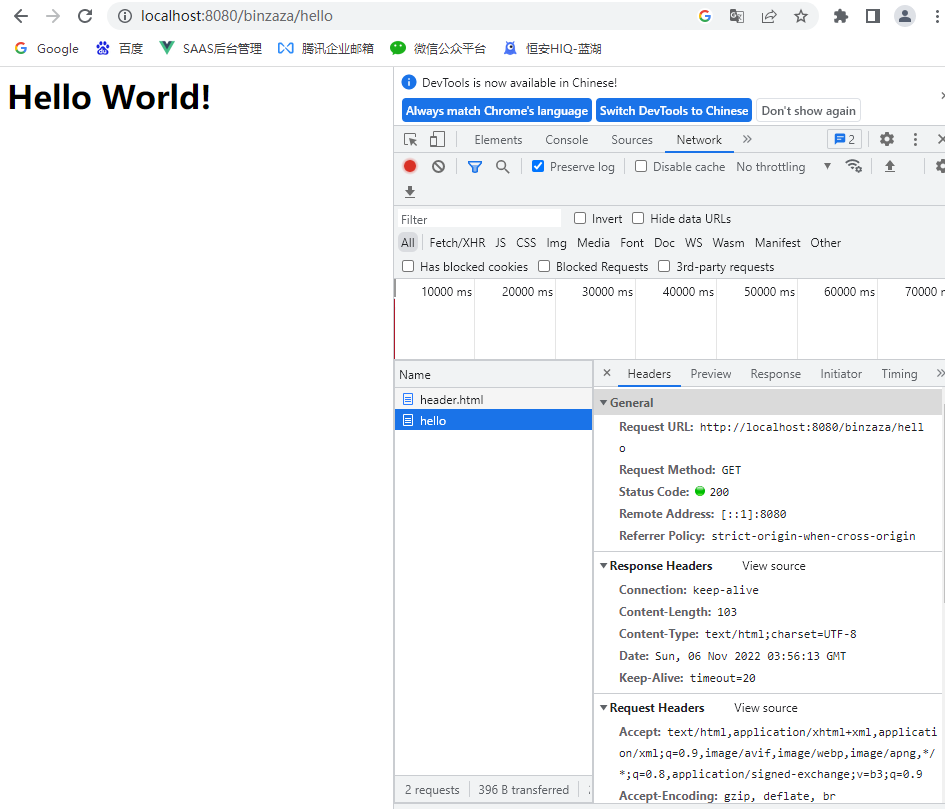
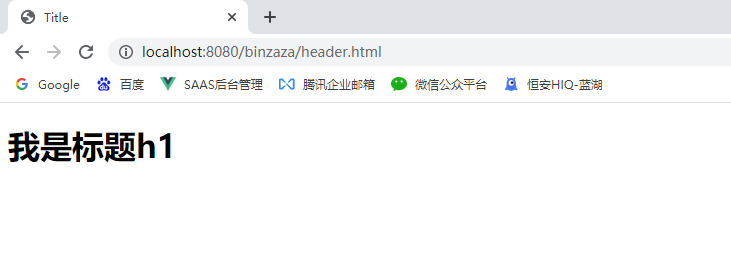
访问静态资源: http://localhost:8080/binzaza/header.html
访问jsp资源: http://localhost:8080/binzaza/hello
