Leafer 插件开发教程
前言
Leafer 是新开源的一个 2D 图形绘制库,目前已经有了 1.1k 的 Star 数,成长趋势非常不错,本篇不对 Leafer 过多介绍,不了解的同学可以直接阅读官网介绍,或者阅读我在之前写的 LeaferJS 尝鲜 及 应用数学 文章中也做了简单的介绍
由于目前 Leafer 尚在成长期,现在仍然还只是一个单纯的 图引擎,许多功能可能还需要社区来支持,前段时间写了一个 Leafer 插件,整理了一下 Leafer 插件的开发方法,本篇主要是教大家如何为 Leafer 实现一个简单的 Tooltip 插件,以供社区开发者参考。
本来本篇文章应当更早一些就发出来了,但是为了保证严谨,一边阅读 Leafer 插件的源码,一遍撰写,在撰写过程中发现了一个问题,排查了很久才确定,提交 issue 后才继续撰写本文,这也就导致了延期发布。
插件系统介绍
插件系统是现在开源库很多都会实现的一种能力,为了方便社区提供更灵活的功能,插件系统必不可少。
在 Leafer 发布 v1.0.0-beta.8 发布之前,Leafer 插件具有很大的限制,一个实例只能使用一个插件,但在 beta.8 中,加入了全局实例的生命周期钩子,不必单独在实例中指定,如此灵活性得到了大幅提升。
创建插件
如果要将插件发布 npm 包,则约定命名方式为 leafer-xxx-plugin , 这样方便后续其他开发者进行搜索。
插件属性
| 属性 | 说明 | 类型 | 默认值 |
|---|---|---|---|
| name | 可选参数,插件的 npm 包名 | string | - |
| import | 指定需要从 leafer-ui 中导入的方法 |
string[] | [] |
| importVersion | 当前使用的 leafer-ui 版本号,用于检查用户 leafer-ui 版本是否兼容 |
string | - |
插件方法
| 方法 | 说明 | 回调参数 |
|---|---|---|
| run | 插件的主程序,自动运行, 支持传入配置对象 config。 |
LeaferUI: IObject, config?: IObject |
| onLeaefer | leafer 实例创建钩子,当 leafer 实例创建完成后,会调用 | leafer: ILeafer |
创建示例
创建插件
@leafer-ui/interface 包含了所有类的接口,如 ILeafer 对应 Leafer,需要单独安装。
run函数是插件的主函数- 第一个参数
LeaferUI: 是import属性中声明导入的方法和类 - 第二个参数
config: 是用户使用插件时传入的参数,插件可以指定需要哪些参数。
- 第一个参数
onLeafer函数是Leafer创建时的生命周期钩子- 该函数是为了解决插件无法获取所有
Leafer实例的问题 - 参数
leafer传入的是当前创建的Leafer实例
- 该函数是为了解决插件无法获取所有
import { IPlugin, IObject, ILeafer } from '@leafer-ui/interface' export const plugin: IPlugin = { importVersion: '1.0.0.beta.2', import: ['Leafer'], run(LeaferUI: IObject, config?: IObject): void { console.log(LeaferUI, config) // { Leafer }, { } }, onLeafer(leafer: ILeafer): void { console.log(leafer) // on created leafer } }
使用插件
- 使用插件时只需要拿到 plugin 对象,并通过
usePlugin()传入插件对象和自定义参数即可。
import { usePlugin, Leafer } from 'leafer-ui' import { plugin } from './create' const config = {} usePlugin(plugin, config) new Leafer({ view: window })
usePlugin 源码
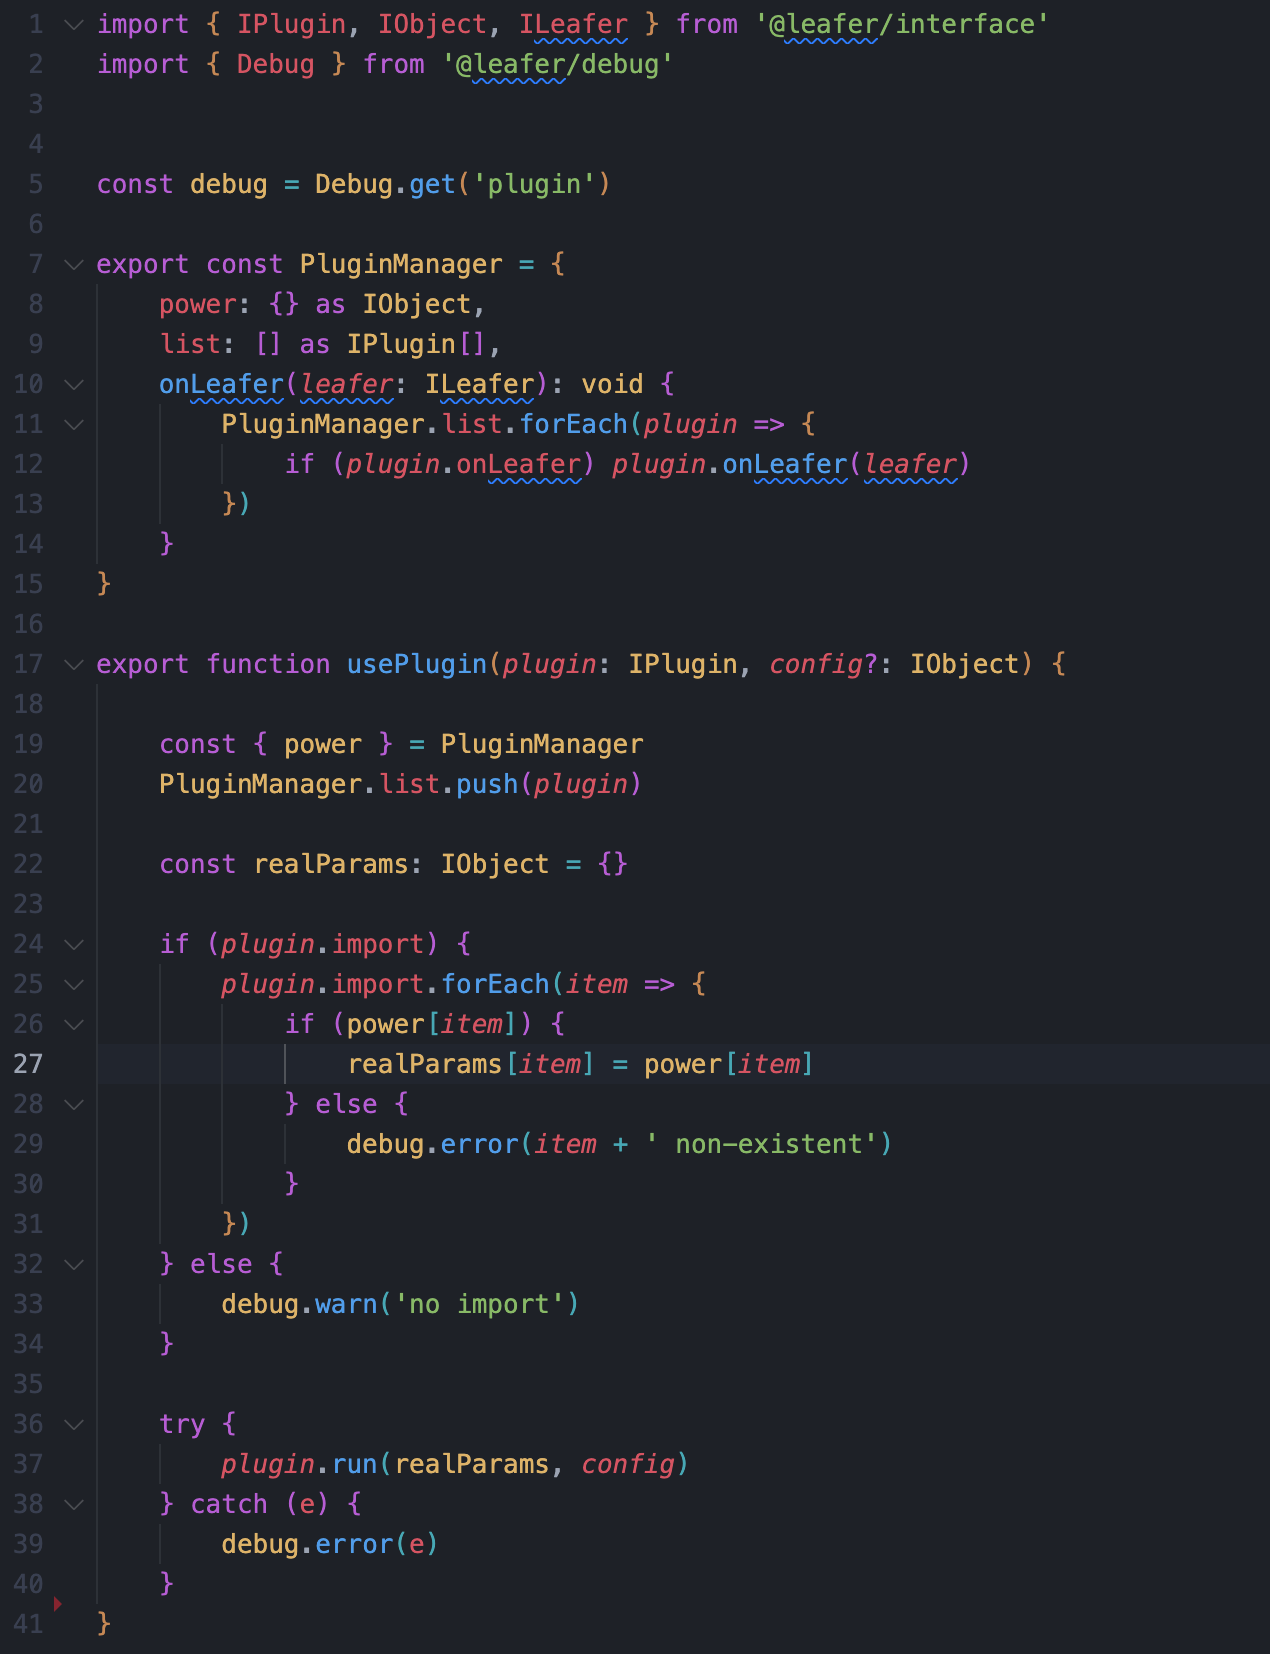
以下是 usePlugin 中的实现

PluginManager
PluginManager 是维护了全局的插件
power: Leafer 中所有的方法list: 当前已注册的插件onLeafer: leafer create 钩子
这里就不贴注入 PluginManager.power 与调用 PluginManager.onLeafer 的方法了,有兴趣的可以在 leafer-ui 仓库中自行查阅。
usePlugin
在 usePlugin 中,首先将 plugin 注册到 PluginManager.list 中,要注意到这时 PluginManager 其实就是一个简单的发布-订阅模式,由 usePlugin 进行订阅,在 leafer 创建时执行 PluginManager.onLeafer(leafer) 进行通知发布。
PluginManager.power 在程序运行一开始就被注入了平台相关的所有能力,如 web 端注入了 @leafer-ui/web, node 端注入了 /packages/platform/node 相关能力。
通过 plugin.import 获取插件开发者所需依赖,将 Leafer 方法按需将依赖注入到 realParams 中转换为真实参数,再调用 plugin.run 传入转换后的真实参数和用户配置。
实现一个提示框插件
接下来,将会讲解如何实现一个提示框插件。
在正式开始前,我们先介绍一个方法:LeaferTypeCreator
LeaferTypeCreator
LeaferTypeCreator 是用于提供 Leafer 实例额外的能力,其实类似与插件。
创建一个 LeaferType
下面注册了一个名为 background 的 LeaferType, 当有 Leafer 类型指定为 background 时,会调用 backgroundType 这个方法。
import { LeaferTypeCreator } from '@leafer/interface' LeaferTypeCreator.register('background', backgroundType) function backgroundType(leafer: ILeafer) { leafer.fill = 'red'; }
使用 LeaferType
在实例化 Leafer 时,指定 type 为 background, 此时 Leafer 背景色会变为 红色。
const leafer = new Leafer({ view: window, type: 'background' })
可以看到,我们通过 LeaferTypeCreator 也可以实现类似于插件的能力,但缺点是每个 Leafer 只能指定一个类型,不能同时作用于多个 LeaferType。
实现提示框
我将整个实现过程分为三步进行讲解,让大家更容易理解这个插件具体要做的事情。
1. 需求分析
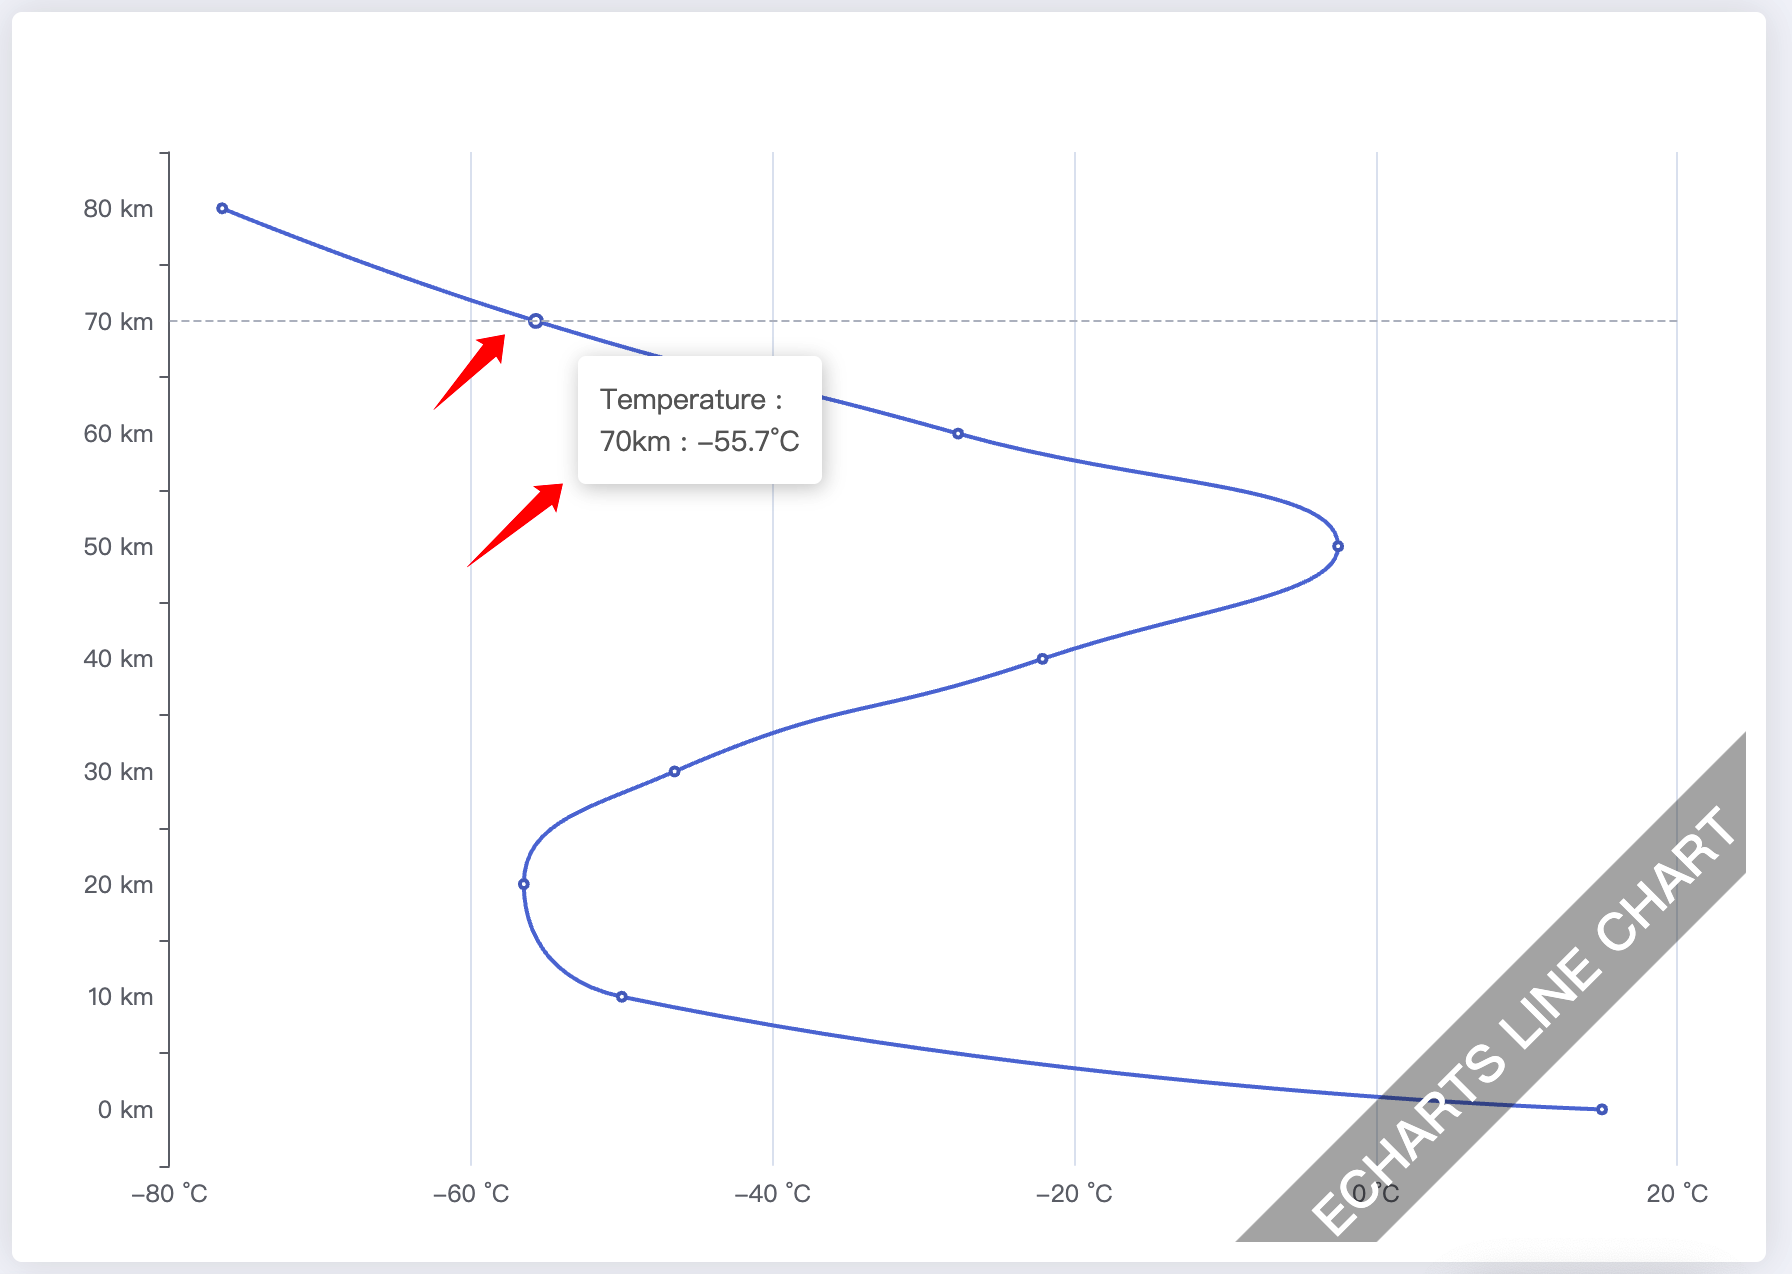
一个很常见的场景,一个页面中有很多元素,要展示各种各样的信息,为了避免画布上文字过多,且不易于直观阅读,我们需要一个小工具,使我们能在数据悬浮时展示相应的信息。
如下图是一个 Echarts 示例,鼠标放到数据点上,展示当前点位更详细的信息。

2. 实现思路
提示框可以完全使用 Leafer 实现,但使用 HTML 实现更加通用,且更容易控制样式。
我们可以监听用户鼠标在 Leafer 实例当前的位置,同时监听 Leafer.view 鼠标移动事件,这样,当我们确定要触发事件时,只需要使用 dom 位置即可,不需要再进行位置换算。
如下图,我们只需要拿到 pageX 与 pageY , 就能确定当前鼠标的位置,如果只依赖 Leafer 坐标则还需要进行大量的判断如:画布平移、缩放等等。

3. 具体实现
我们实例只实现关键部分,不对扩展功能进行具体实现。
创建 Plugin 对象
在上面我们讲了,onLeafer 会在所有的 Leafer 实例创建时调用,而 LeaferTypeCreator 可以指定 Leafer 使用时才生效,这样,我们就可以根据用户参数,判断这个插件是需要全局生效还是指定的 Leafer 实例生效。
这样做的好处是,插件的作用域是可控的,不会因此导致所有的 Leafer 都必须使用插件。
由于我们只有在 run 函数中才能接收到插件调用者传入的 config, 所以当我们想在 onLeafer 中使用 用户传入的 config 与 LeaferUI 时,必须将 LeaferUI 与 config 挂载到当前对象上。
import { ILeafer, IObject, IPlugin, IUI } from '@leafer-ui/interface'; // 用户配置参数类型 type UserConfig = { type?: registerType, getContent: (node: IUI) => string, } export const plugin: IPlugin = { name: 'tooltip-plugin', importVersion: '1.0.0-beta.8', import: ['LeaferTypeCreator', 'LeaferEvent', 'PointerEvent'], config: null, LeaferUI: {}, run(LeaferUI: IObject, config: UserConfig): void { // 将 config 与 导入的 LeaferUI 挂载到当前插件对象 this.config = config; this.LeaferUI = LeaferUI; // 如果用户传入了自定义的注册类型,则注册一个类型插件 if (config.type) { const LeaferTypeCreator = LeaferUI.LeaferTypeCreator; LeaferTypeCreator.register(config.type, (leafer: ILeafer) => tooltipPluginType(leafer, LeaferUI, config) ); } }, onLeafer(leafer: ILeafer) { // 只有当用户没有传入类型时才会全局生效 if (!this.config?.type) { tooltipPluginType(leafer, this.LeaferUI, this.config); } }, };
tooltipPluginType
通过 PointerEvent.MOVE 可以监听 leafer 中的鼠标移动事件,我们可以根据这个事件捕获画布上的元素。
通过 LeaferEvent.VIEW_READY 可以监听 Leafer 实例化时的事件,这时可以通过 event.view 拿到画布的DOM 元素,我们可以直接监听 DOM 的鼠标移动事件,当 PointerEvent.MOVE 捕获到画布元素时进行展示 Tooltip。
/** * @param { ILeafer } leafer leafer 实例 * @param { IObject } LeaferUI Leafer UI * @param { UserConfig } config 用户自定义配置 */ function tooltipPluginType( leafer: ILeafer, LeaferUI: IObject, config: UserConfig ) { const { PointerEvent, LeaferEvent } = LeaferUI; const domId = Math.random().toString(32).slice(2, 10); let mouseoverNode: IUI | null = null; // leafer 鼠标移动事件,用于捕获节点 leafer.on(PointerEvent.MOVE, (evt) => { const node = evt.target; // 如果是 Leaefer 实例,则不进行展示,同时隐藏弹窗 if (node.isLeafer) { mouseoverNode = null; const tooltipDOM = document.getElementById(domId); if (tooltipDOM) { tooltipDOM.style.display = 'none'; } return; } mouseoverNode = node; }); // 挂载画布事件 leafer.on(LeaferEvent.VIEW_READY, () => { if (!(leafer.view instanceof HTMLElement)) return; // 监听 dom 鼠标移动事件,如果同时 leafer 中捕获到了元素,则进行展示。 leafer.view.addEventListener('mousemove', (event: MouseEvent) => { if (!mouseoverNode) return; createTooltip(domId, event, mouseoverNode, config); }); }); }
createTooltip
创建弹框的部分就比较简单了,这里就不展开讲了,代码中关键步骤都加入了注释。
/** * 创建提示元素 * @param { string } domID dom id * @param { MouseEvent } event DOM 事件 * @param { IUI } node 触发事件的元素 * @param { UserConfig } config 用户传入的配置 * @returns */ function createTooltip( domId: string, event: MouseEvent, node: IUI, config: UserConfig ) { // 拿到需要显示的 html 字符串 const content = config.getContent(node); // 判断当前插件是否生成 dom, 如果生成了,则复用之前的,否则就创建一个 let container: HTMLElement | null = document.getElementById(domId); const isExists = container !== null; if (!isExists) { container = document.createElement('div'); } if (container === null) return; container.setAttribute('id', domId); container.innerHTML = content; // 添加样式 const cssStyle = { display: 'block', position: 'absolute', left: event.pageX + 4 + 'px', top: event.pageY + 4 + 'px', padding: '8px 10px', backgroundColor: '#fff', borderRadius: '2px', boxShadow: '0 0 4px #e2e2e2', } Object.keys(cssStyle).forEach((prop: any) => { container.style[prop] = cssStyle[prop]; }); // 如果之前不存在,则将创建的 dom 追加到 body if (!isExists) { document.body.appendChild(container); } }
至此,一个简单的 Tooltip 弹框插件就实现好了,不过这个示例缩减了部分功能和逻辑判断,更完整的实现在文末给出。
一个重复注册插件引发血案
这是在撰写本文时发现的一个问题,同一个插件 重复注册 会引起一个 bug。
在上文中我们已经知道了,我们只有在 run 函数中才能拿到用户传入的 config, 如果我们在 onLeafer 中想要使用,只能通过挂载到当前插件对象上实现。
示例代码
export const plugin: IPlugin = { name: PLUGIN_NAME, importVersion: '1.0.0-beta.8', import: ['LeaferTypeCreator', 'LeaferEvent', 'PointerEvent'], config: null, run(LeaferUI: IObject, config: UserConfig): void { // config 挂载到当前对象 this.config = config; }, onLeafer(leafer: ILeafer) { // onLeafer 中拿到 config console.log(this.config) }, };
如果这个插件只会使用一次没有问题,如果当注册多次时会覆盖之前的插件参数
异常代码
下面提供了一个示例代码, 插件接收一个 myType 参数, 当连续注册多个相同插件时,最后一次注册的插件参数会覆盖前面的参数。
// 模拟一个插件 export const plugin: IPlugin = { importVersion: '1.0.0-beta.8', import: ['LeaferTypeCreator', 'LeaferEvent', 'PointerEvent'], config: null, run(LeaferUI: IObject, config: UserConfig): void { this.config = config; }, onLeafer(leafer: ILeafer) { console.log(this.config) }, }; // 第一次注册插件: usePlugin(plugin, { myType: 'plugin-1', }); // 此时打开控制台,检查 `PluginManager.list` , config 为: { myType: 'plugin-1' } // ----------------------------------------------------------------------------- // 第二次注册插件:参数发生修改 usePlugin(plugin, { myType: 'plugin-2', }); // 此时打开控制台,检查 `PluginManager.list` 会发现第一个插件的 `config` 变为第二个注册的参数
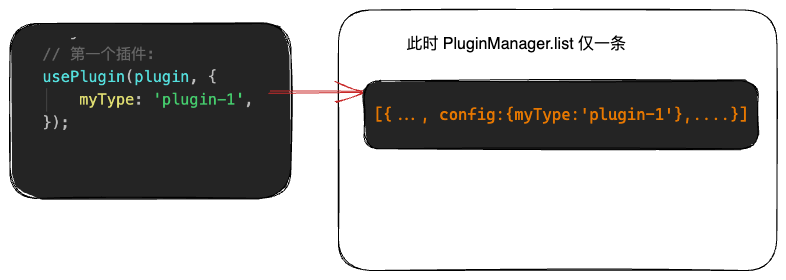
注册第一个插件
PluginManager.list 仅有一条,同时 config 为插件注册的 {myType:'plugin-1'}

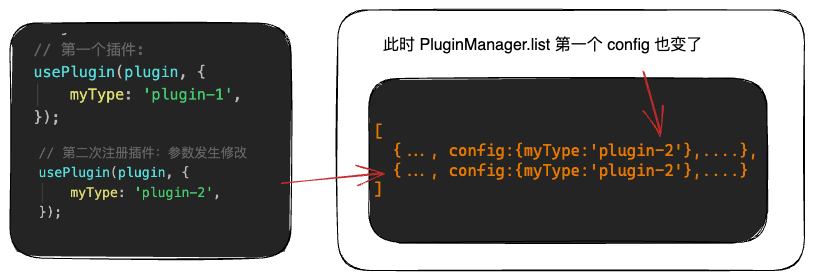
注册第二个插件
PluginManager.list 有两条数据,两个插件的 config 都是第二个插件注册的 {myType:'plugin-2'}

原因及解决方法
其实产生这个问题的原因很简单,就是由于在 plugin 实现中,直接使用了用户传入的插件对象,在 run 函数执行时所有相同插件对象的 this 指向的都是同一个,这就造成了即便 config 不同,也只有最后配置一个生效的问题。
如我们需要解决这个问题,也很简单,当注册多个相同的插件时,每次注册都对当前的对象进行浅拷贝即可
// 第一次注册插件: usePlugin(plugin, { myType: 'plugin-1', }); const plugin2 = { ...plugin }; // 第二次注册插件 usePlugin(plugin2, { myType: 'plugin-2', }); //...注册多次相同插件... const pluginMore = { ...plugin }; // 第 n 次注册插件 usePlugin(pluginMore, { myType: 'plugin-more', });
对于该问题,已向 leafer 提交了 pr ,在注册插件时,使其内部浅拷贝解决,但根据 leafer 在 issue 的回复,这块的逻辑可能会进一步修改。
- 在线可复现地址:https://codesandbox.io/p/sandbox/leafer-plugin-use-bug-jft8t6?file=%2Fsrc%2FApp.vue%3A22%2C34
- issue 地址:https://github.com/leaferjs/ui/issues/42
- pr 地址:https://github.com/leaferjs/leafer/pull/3
结语
这篇文章的主要目的是为弥补官网插件示例过于简单的问题,同时将我在开发插件时的一些思考整理成文章以供社区开发者参阅。
- 完整插件代码:https://github.com/Alessandro-Pang/leafer-tooltip-plugin
- 在线演示地址:https://alexpang.cn/leafer-tooltip-plugin/
- 基于 Leafer 社区实现的折线图 + Tooltip 实际使用案例:https://codesandbox.io/p/sandbox/great-frog-w7mkz8
本文来自博客园,作者:子洋丶,转载请注明原文链接:https://www.cnblogs.com/zi-yang/p/17621750.html


【推荐】国内首个AI IDE,深度理解中文开发场景,立即下载体验Trae
【推荐】编程新体验,更懂你的AI,立即体验豆包MarsCode编程助手
【推荐】抖音旗下AI助手豆包,你的智能百科全书,全免费不限次数
【推荐】轻量又高性能的 SSH 工具 IShell:AI 加持,快人一步
· 被坑几百块钱后,我竟然真的恢复了删除的微信聊天记录!
· 没有Manus邀请码?试试免邀请码的MGX或者开源的OpenManus吧
· 【自荐】一款简洁、开源的在线白板工具 Drawnix
· 园子的第一款AI主题卫衣上架——"HELLO! HOW CAN I ASSIST YOU TODAY
· Docker 太简单,K8s 太复杂?w7panel 让容器管理更轻松!