大数据平台学习(三)----spark核心编程
spark架构原理
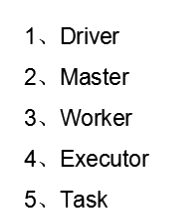
原理图:

创建RDD
一是使用程序中的集合创建RDD,主要用于进行测试,可以实际部署到集群运行之前,
自己使用集合构造测试数据,来测试后面的spark应用的流程;
二是使用本地文件创建RDD,主要用于的场景为在本地临时性地处理一些存储了大量数据的文件;
三是使用HDFS文件创建RDD,主要用于针对HDFS上存储的大数据,进行离线批处理操作
操作RDD
转化操作:

行为操作:

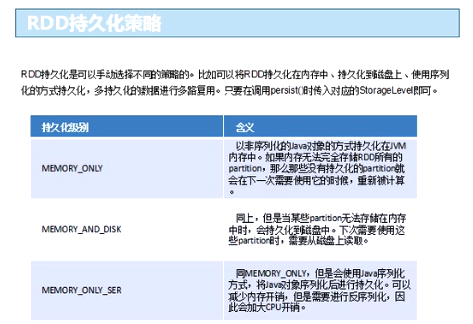
RDD持久化
为什么要执行RDD持久化?

RDD持久化策略是什么?
Spark内核源码深度剖析
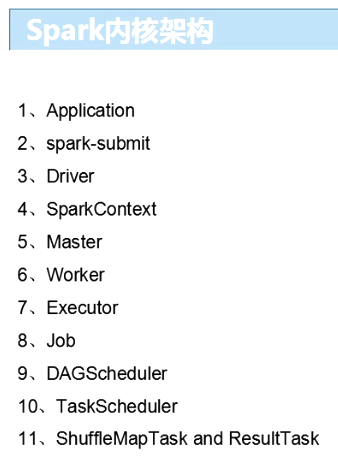
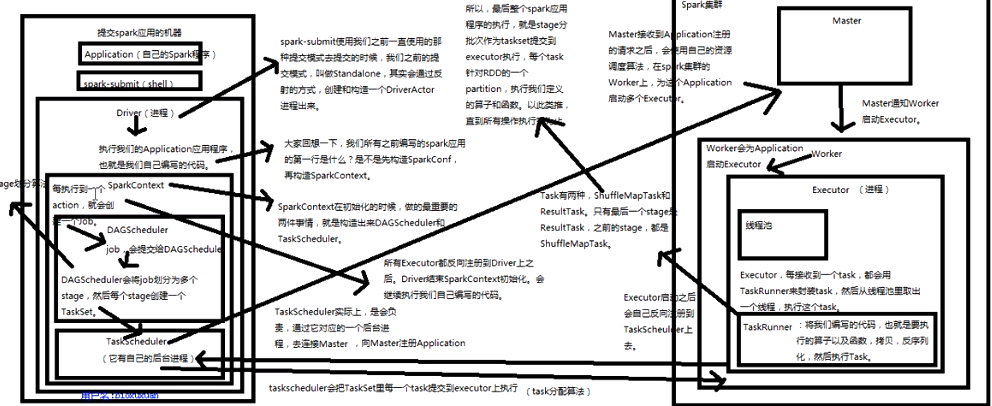
原理图:
宽依赖和窄依赖
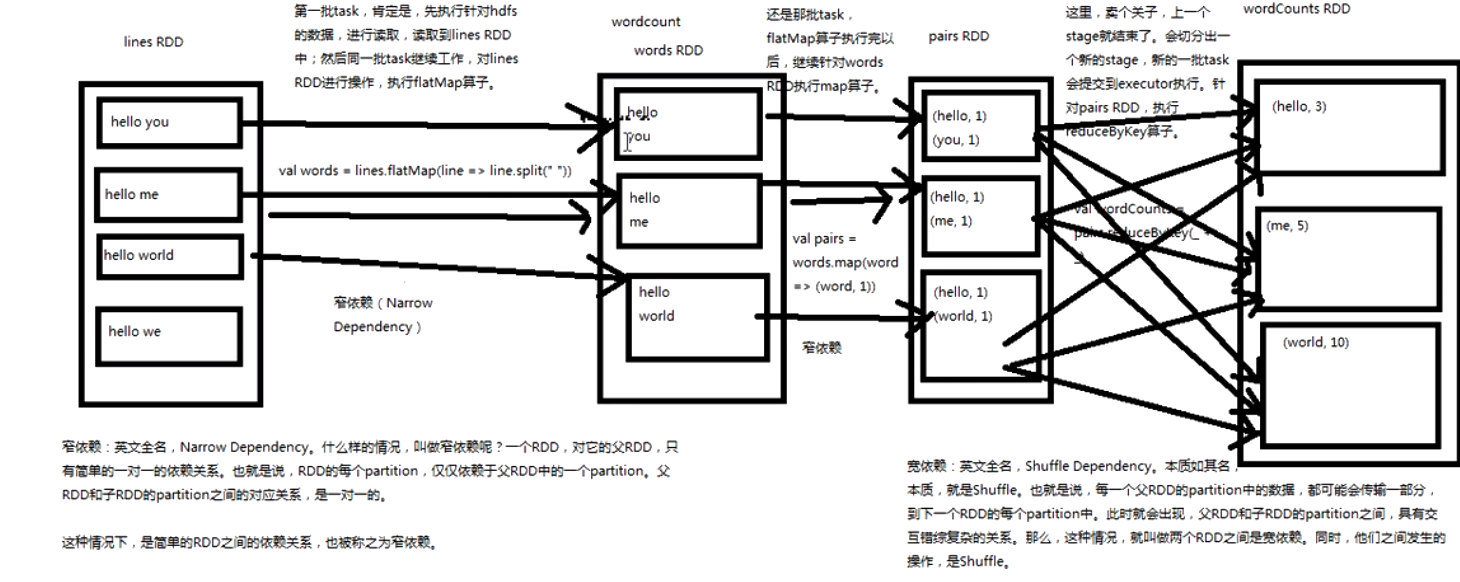
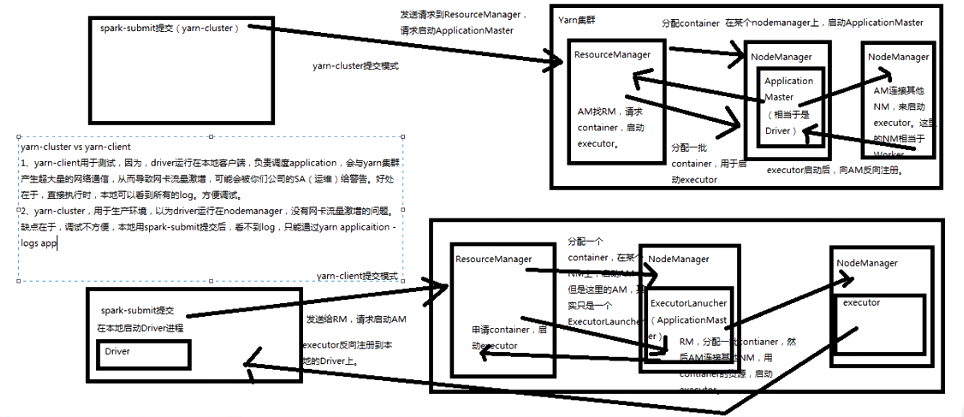
基于yarn的两种提交模式
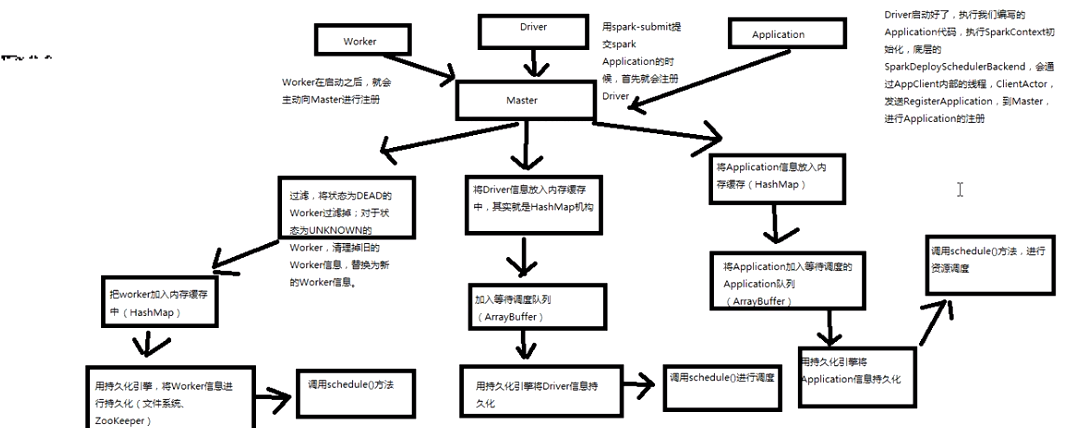
sparkcontext原理剖析

master原理剖析与源码分析

资源调度机制十分重要(两种资源调度机制)
主备切换机制原理图:

注册机制原理图:
master资源调度算法原理:
master是通过schedule方法进行资源调度,告知worker启动executor,,,
1,schedule方法

2,startExecutorOnWorkers在woker上开启executor进程

3, scheduleExecutorsOnWorker在每一个worker上调度资源
判断该worker能否分配一个或者多个executor,能则分配相应的executor所需要的CPU核数;
4, allocateWorkerResourceToExecutor在worker上分配的具体资源

五、launchDriver发起driver
六、launchExecutor发起executor
worker原理剖析:

job触发流程原理剖析:
其实最终是调用了SparkContext之前初始化时创建的DAGSchdule的runjob方法;
DAGSchdule原理剖析:
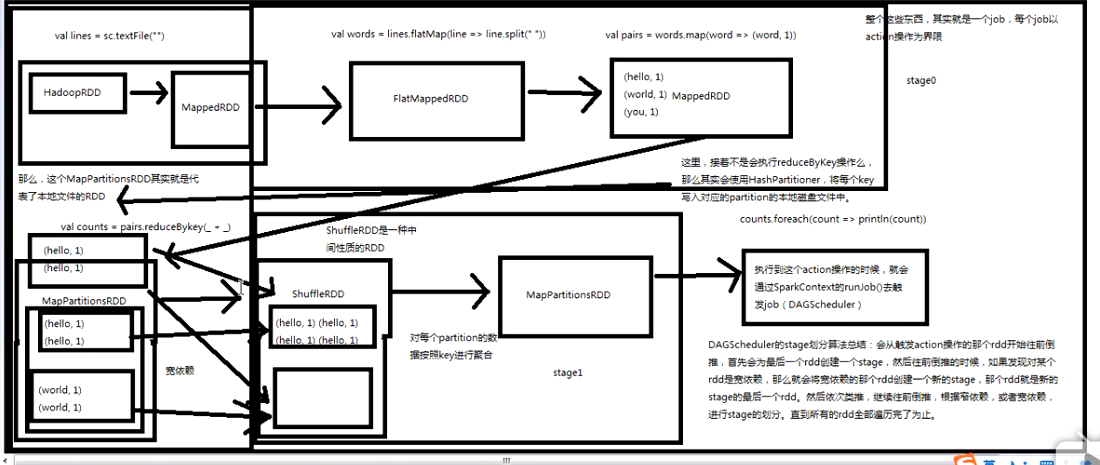
注:reduceByKey的作用就是对相同key的数据进行处理,最终每个key只保留一条记录;
其作用对象是(key, value)形式的RDD;
Taskschedule原理分析

注:本地化级别种类:
PROCESS_LOCAL:进程本地化,rdd和partition和task在同一个executor中;
NODE_LOCAL:rdd的parttion和task,不在一个同一个executor中,但在同一个节点中;
NO_PREF:没有本地化级别;
RACK_LOCAL:机架本地化,至少rdd的parttion和task在一盒机架中;
ANY:任意本地化级别;
Executor原理剖析与源码分析
1、work为application启动的executor,实际上是启动了CoarseGrainedExecutorBackend进程;
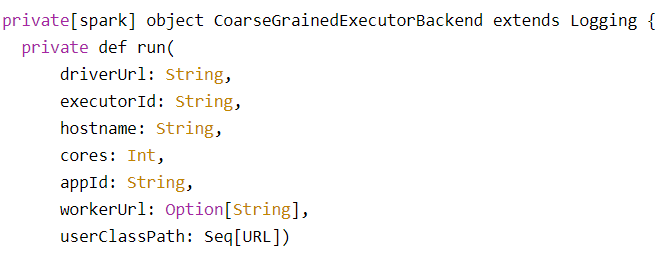
2、获取driver的actor,向driver发送RegisterExecutor信息

3、dirver注册executor成功之后,会发送RegisteredExecutor信息
(此时CoarseGrainedExecutorBackend会创建Executor执行句柄,大部分功能都是通过Executor实现的)
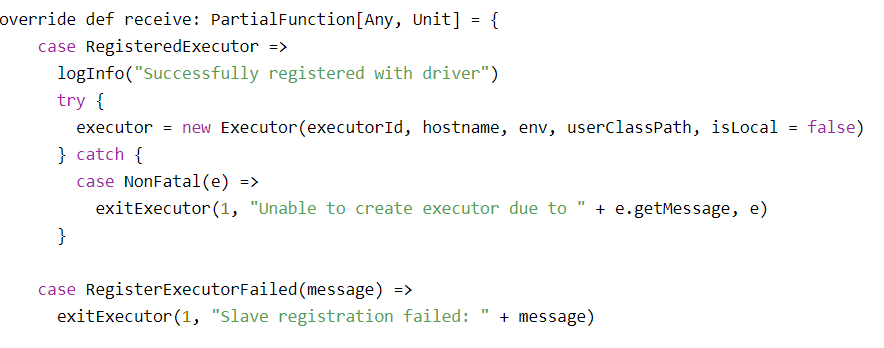
4、启动task,反序列化task,调用Executor执行器的launchTask()启动一个task;

5、对每个task都会创建一个TaskRunner,将TaskRunner放入内存缓存中;
(将task封装在一个线程TaskRunner),将线程丢入线程池中,然后执行线程池是自动实现了排队机制的

Task原理剖析

1、task是封装在一个线程中(taskRunner)
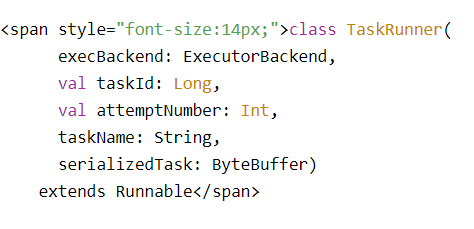
2、调用run(),对序列化的task数据进行反序列化,然后通过通络通信,将需要的文件,资源,jar文件拷贝过来,
通过反序列化操作,调用updateDependencies() 将整个Task数据反序列化回来;
 1 <span style="font-size:14px;">override def run(): Unit = {
 2       val threadMXBean = ManagementFactory.getThreadMXBean
 3       val taskMemoryManager = new TaskMemoryManager(env.memoryManager, taskId)
 4       val deserializeStartTime = System.currentTimeMillis()
 5       val deserializeStartCpuTime = if (threadMXBean.isCurrentThreadCpuTimeSupported) {
 6         threadMXBean.getCurrentThreadCpuTime
 7       } else 0L
 8       Thread.currentThread.setContextClassLoader(replClassLoader)
 9       val ser = env.closureSerializer.newInstance()
10       logInfo(s"Running $taskName (TID $taskId)")
11       execBackend.statusUpdate(taskId, TaskState.RUNNING, EMPTY_BYTE_BUFFER)
12       var taskStart: Long = 0
13       var taskStartCpu: Long = 0
14       startGCTime = computeTotalGcTime()
15
16       try {
17         //对序列化的task数据进行反序列化
18         val (taskFiles, taskJars, taskProps, taskBytes) =
19           Task.deserializeWithDependencies(serializedTask)
20
21         // Must be set before <span style="color:#ff0000;">updateDependencies</span>() is called, in case fetching dependencies
22         // requires access to properties contained within (e.g. for access control).
23         Executor.taskDeserializationProps.set(taskProps)
24         //然后通过网络通信,将需要的文件,资源呢、jar拷贝过来
25         updateDependencies(taskFiles, taskJars)
26         //通过反序列化操作,将整个Task的数据反序列化回来
27        task = ser.deserialize[Task[Any]](taskBytes, Thread.currentThread.getContextClassLoader)
28         task.localProperties = taskProps
29         task.setTaskMemoryManager(taskMemoryManager)
30
31         // If this task has been killed before we deserialized it, let's quit now. Otherwise,
32         // continue executing the task.
33         if (killed) {
34           // Throw an exception rather than returning, because returning within a try{} block
35           // causes a NonLocalReturnControl exception to be thrown. The NonLocalReturnControl
36           // exception will be caught by the catch block, leading to an incorrect ExceptionFailure
37           // for the task.
38           throw new TaskKilledException
39         }
40
41         logDebug("Task " + taskId + "'s epoch is " + task.epoch)
42         env.mapOutputTracker.updateEpoch(task.epoch)
43
44         // Run the actual task and measure its runtime.
45         //计算task的开始时间
46         taskStart = System.currentTimeMillis()
47         taskStartCpu = if (threadMXBean.isCurrentThreadCpuTimeSupported) {
48           threadMXBean.getCurrentThreadCpuTime
49         } else 0L
50         var threwException = true
51         val value = try {
52         调用task的run()
53           val res = task.run(
54             taskAttemptId = taskId,
55             attemptNumber = attemptNumber,
56             metricsSystem = env.metricsSystem)
57           threwException = false
58           res
59         } finally {
60           val releasedLocks = env.blockManager.releaseAllLocksForTask(taskId)
61           val freedMemory = taskMemoryManager.cleanUpAllAllocatedMemory()
62
63           if (freedMemory > 0 && !threwException) {
64             val errMsg = s"Managed memory leak detected; size = $freedMemory bytes, TID = $taskId"
65             if (conf.getBoolean("spark.unsafe.exceptionOnMemoryLeak", false)) {
66               throw new SparkException(errMsg)
67             } else {
68               logWarning(errMsg)
69             }
70           }
71
72           if (releasedLocks.nonEmpty && !threwException) {
73             val errMsg =
74               s"${releasedLocks.size} block locks were not released by TID = $taskId:\n" +
75                 releasedLocks.mkString("[", ", ", "]")
76             if (conf.getBoolean("spark.storage.exceptionOnPinLeak", false)) {
77               throw new SparkException(errMsg)
78             } else {
79               logWarning(errMsg)
80             }
81           }
82         }
83         val taskFinish = System.currentTimeMillis()
84         val taskFinishCpu = if (threadMXBean.isCurrentThreadCpuTimeSupported) {
85           threadMXBean.getCurrentThreadCpuTime
86         } else 0L
87
88         // If the task has been killed, let's fail it.
89         if (task.killed) {
90           throw new TaskKilledException
91         }    </span>
92
3、updateDependencies() 主要是获取hadoop的配置文件,使用了java的synchronized多线程访问方式,
task是以java线程的方式,在一个CoarseGrainedExecutorBackend进程内并发运行的,因此在执行一些业务逻辑
的时候,需要访问一些共享资源,就会出现多线程并发访问的安全问题;
 1 <span style="font-size:14px;"> private def updateDependencies(newFiles: HashMap[String, Long], newJars: HashMap[String, Long]) {
 2     //获取hadoop的配置文件
 3     lazy val hadoopConf = SparkHadoopUtil.get.newConfiguration(conf)
 4     //使用了java的synchronized多线程并发访问方式
 5     //task是以java线程的方式,在一个CoarseGrainedExecutorBackend进程内并发运行的
 6     //因此在执行一些业务逻辑的时候,需要访问一些共享资源,就会出现多线程并发访问安全问题
 7     synchronized {
 8       // Fetch missing dependencies
 9       //遍历要拉取的文件
10       for ((name, timestamp) <- newFiles if currentFiles.getOrElse(name, -1L) < timestamp) {
11         logInfo("Fetching " + name + " with timestamp " + timestamp)
12         // Fetch file with useCache mode, close cache for local mode.
13         //通过Utils的fetchFile(),通过网络通信,从远程拉取文件
14        Utils.fetchFile(name, new File(SparkFiles.getRootDirectory()), conf,
15           env.securityManager, hadoopConf, timestamp, useCache = !isLocal)
16         currentFiles(name) = timestamp
17       }
18       //遍历要拉取得jar
19       for ((name, timestamp) <- newJars) {
20         val localName = name.split("/").last
21         val currentTimeStamp = currentJars.get(name)
22           .orElse(currentJars.get(localName))
23           .getOrElse(-1L)
24         if (currentTimeStamp < timestamp) {
25           logInfo("Fetching " + name + " with timestamp " + timestamp)
26           // Fetch file with useCache mode, close cache for local mode.
27           Utils.fetchFile(name, new File(SparkFiles.getRootDirectory()), conf,
28             env.securityManager, hadoopConf, timestamp, useCache = !isLocal)
29           currentJars(name) = timestamp
30           // Add it to our class loader
31           val url = new File(SparkFiles.getRootDirectory(), localName).toURI.toURL
32           if (!urlClassLoader.getURLs().contains(url)) {
33             logInfo("Adding " + url + " to class loader")
34             urlClassLoader.addURL(url)
35           }
36         }
37       }
38     }
39   }    </span>
40
4、task的run方法,创建了Taskcontext,里面记录了task的一些全局性的数据,还包括task重试了几次,task属于
哪个stage,task处理的是rdd的哪个parttion,然后调用抽象方法runTask();
 1 <span style="font-size:14px;">final def run(
 2       taskAttemptId: Long,
 3       attemptNumber: Int,
 4       metricsSystem: MetricsSystem): T = {
 5     SparkEnv.get.blockManager.registerTask(taskAttemptId)
 6     //创建了Taskcontext,里面记录了task的一些全局性的数据
 7     //包括task重试了几次,task属于哪个stage,task处理的是rdd的哪个partition
 8     context = new TaskContextImpl(
 9       stageId,
10       partitionId,
11       taskAttemptId,
12       attemptNumber,
13       taskMemoryManager,
14       localProperties,
15       metricsSystem,
16       metrics)
17     TaskContext.setTaskContext(context)
18     taskThread = Thread.currentThread()
19
20     if (_killed) {
21       kill(interruptThread = false)
22     }
23
24     new CallerContext("TASK", appId, appAttemptId, jobId, Option(stageId), Option(stageAttemptId),
25       Option(taskAttemptId), Option(attemptNumber)).setCurrentContext()
26
27     try {
28     //调用抽象方法runTask()
29       runTask(context)
30     } catch {
31       case e: Throwable =>
32         // Catch all errors; run task failure callbacks, and rethrow the exception.
33         try {
34           context.markTaskFailed(e)
35         } catch {
36           case t: Throwable =>
37             e.addSuppressed(t)
38         }
39         throw e
40     } finally {
41       // Call the task completion callbacks.
42       context.markTaskCompleted()
43       try {
44         Utils.tryLogNonFatalError {
45           // Release memory used by this thread for unrolling blocks
46           SparkEnv.get.blockManager.memoryStore.releaseUnrollMemoryForThisTask(MemoryMode.ON_HEAP)
47           SparkEnv.get.blockManager.memoryStore.releaseUnrollMemoryForThisTask(MemoryMode.OFF_HEAP)
48           // Notify any tasks waiting for execution memory to be freed to wake up and try to
49           // acquire memory again. This makes impossible the scenario where a task sleeps forever
50           // because there are no other tasks left to notify it. Since this is safe to do but may
51           // not be strictly necessary, we should revisit whether we can remove this in the future.
52           val memoryManager = SparkEnv.get.memoryManager
53           memoryManager.synchronized { memoryManager.notifyAll() }
54         }
55       } finally {
56         TaskContext.unset()
57       }
58     }
59   }</span>
60
5、抽象方法runTask(),需要Task的子类去实现,ShuffleMapTask、ResaultTask;
1 <span style="font-size:14px;">def runTask(context: TaskContext): T</span>
6、一个ShuffleMapTask会将一个个Rdd元素切分为多个bucket基于在一个ShuffleDependency的中指定的partitioner,
 1 <span style="font-size:14px;">private[spark] class ShuffleMapTask(
 2     stageId: Int,
 3     stageAttemptId: Int,
 4     taskBinary: Broadcast[Array[Byte]],
 5     partition: Partition,
 6     @transient private var locs: Seq[TaskLocation],
 7     metrics: TaskMetrics,
 8     localProperties: Properties,
 9     jobId: Option[Int] = None,
10     appId: Option[String] = None,
11     appAttemptId: Option[String] = None)
12   extends Task[MapStatus](stageId, stageAttemptId, partition.index, metrics, localProperties, jobId,
13     appId, appAttemptId)
14   with Logging</span>
7、runTask有MapStatus返回值,对task要处理的数据做一些反序列化操作,然后通过广播变量拿到要处理rdd那部分
数据,获取shuffleManager,调用rdd的iterator(),并且传入了当前要执行的哪个parttion,rdd的iterator(),实现
了针对rdd的某个parttion执行我们定义的算子,之后返回的数据通过ShuffleWriter,经过Hashpartioner后,写入自己对应
bucket中,最后返回mapstatus,里面封装了计算后的数据,存储在Blockmanager中;
 1 <span style="font-size:14px;">override def runTask(context: TaskContext): MapStatus = {
 2     // Deserialize the RDD using the broadcast variable.
 3     val threadMXBean = ManagementFactory.getThreadMXBean
 4     val deserializeStartTime = System.currentTimeMillis()
 5     val deserializeStartCpuTime = if (threadMXBean.isCurrentThreadCpuTimeSupported) {
 6       threadMXBean.getCurrentThreadCpuTime
 7     } else 0L
 8     //对task要处理的数据做一些反序列化操作
 9     //通过广播变量拿到要处理的rdd那部分数据
10     val ser = SparkEnv.get.closureSerializer.newInstance()
11     val (rdd, dep) = ser.deserialize[(RDD[_], ShuffleDependency[_, _, _])](
12       ByteBuffer.wrap(taskBinary.value), Thread.currentThread.getContextClassLoader)
13     _executorDeserializeTime = System.currentTimeMillis() - deserializeStartTime
14     _executorDeserializeCpuTime = if (threadMXBean.isCurrentThreadCpuTimeSupported) {
15       threadMXBean.getCurrentThreadCpuTime - deserializeStartCpuTime
16     } else 0L
17
18     var writer: ShuffleWriter[Any, Any] = null
19     try {
20     //获取shuffleManager
21       val manager = SparkEnv.get.shuffleManager
22       //从shuffleManager中获取writer
23       writer = manager.getWriter[Any, Any](dep.shuffleHandle, partitionId, context)
24         //调用了rdd的iterator(),并且传入了当前要执行的哪个partition
25      //rdd的iterator(),实现了针对rdd的某个parttion执行我们自己定义的算子
26      //执行完我们自己定义的算子,返回的数据通过ShuffleWriter,经过Hashpartioner后,写入自己对应的分区bucket中
27      writer.write(rdd.iterator(partition, context).asInstanceOf[Iterator[_ <: Product2[Any, Any]]])
28       //最后返回MapStatus,里面封装了计算后的数据,存储在Blockmanager中
29       writer.stop(success = true).get
30     } catch {
31       case e: Exception =>
32         try {
33           if (writer != null) {
34             writer.stop(success = false)
35           }
36         } catch {
37           case e: Exception =>
38             log.debug("Could not stop writer", e)
39         }
40         throw e
41     }
42   } </span>
8、MapPartitionsRDD
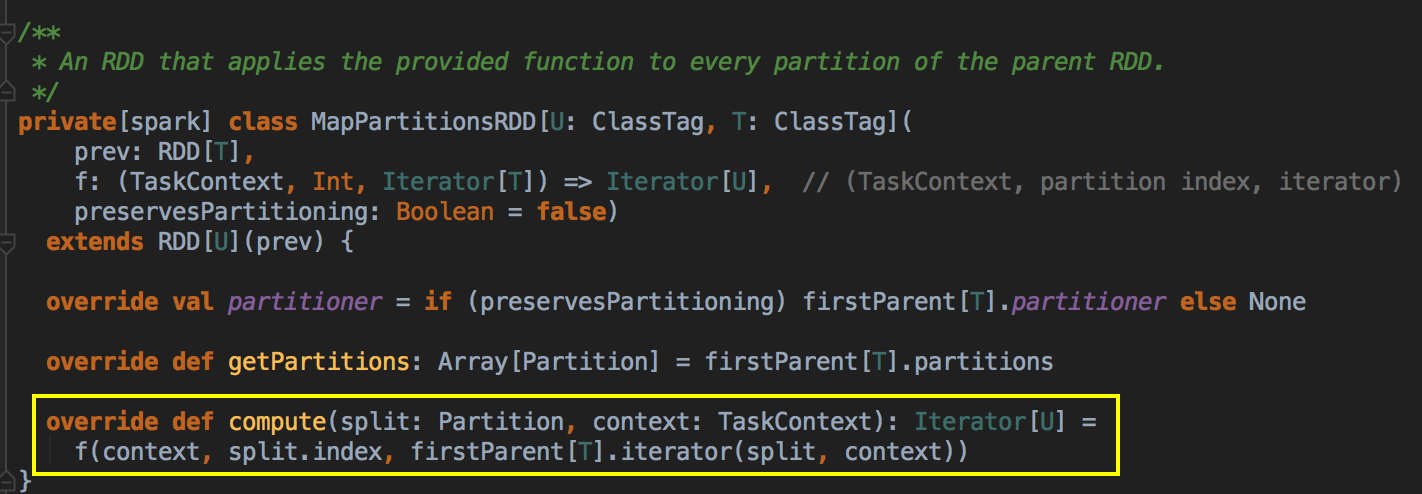
针对RDD的某个partition,执行我们给定的算子或者函数;
(注:可以理解成自己定义的算子或者函数,spark对其进行了封装,这里针对rdd的parttion,执行自定义的计算
操作,并返回新的rdd的parttion的数据)
 1 <span style="font-size:14px;">private[spark] class MapPartitionsRDD[U: ClassTag, T: ClassTag](
 2     var prev: RDD[T],
 3     f: (TaskContext, Int, Iterator[T]) => Iterator[U],  // (TaskContext, partition index, iterator)
 4     preservesPartitioning: Boolean = false)
 5   extends RDD[U](prev) {
 6
 7   override val partitioner = if (preservesPartitioning) firstParent[T].partitioner else None
 8
 9   override def getPartitions: Array[Partition] = firstParent[T].partitions
10 //针对rdd的某个partiton,执行我们给定的算子或者函数
11   //f:可以理解成自己定义的算子或者函数,spark内部进行了封装
12   //这里针对rdd的partition,执行自定义的计算操作,并返回 新的rdd的partition的数据
13   override def compute(split: Partition, context: TaskContext): Iterator[U] =
14     f(context, split.index, firstParent[T].iterator(split, context))
15
16   override def clearDependencies() {
17     super.clearDependencies()
18     prev = null
19   }
20 }</span>
9、statusUpdate()是个抽象方法
1 <span style="font-size:14px;">execBackend.statusUpdate(taskId, TaskState.FINISHED, serializedResult)
2  // statusUpdate
3  override def statusUpdate(taskId: Long, state: TaskState, data: ByteBuffer) {
4     val msg = StatusUpdate(executorId, taskId, state, data)
5     driver match {
6       case Some(driverRef) => driverRef.send(msg)
7       case None => logWarning(s"Drop $msg because has not yet connected to driver")
8     }
9   } </span>
10、调用TaskSchedulerImpl的statusUpdate(),获取对应的taskset,task结束了,从内存移除;
 1 <span style="font-size:14px;">def statusUpdate(tid: Long, state: TaskState, serializedData: ByteBuffer) {
 2     var failedExecutor: Option[String] = None
 3     var reason: Option[ExecutorLossReason] = None
 4     synchronized {
 5       try {
 6         taskIdToTaskSetManager.get(tid) match {
 7           获取对应的taskSet
 8           case Some(taskSet) =>
 9             if (state == TaskState.LOST) {
10               // TaskState.LOST is only used by the deprecated Mesos fine-grained scheduling mode,
11               // where each executor corresponds to a single task, so mark the executor as failed.
12               val execId = taskIdToExecutorId.getOrElse(tid, throw new IllegalStateException(
13                 "taskIdToTaskSetManager.contains(tid) <=> taskIdToExecutorId.contains(tid)"))
14               if (executorIdToRunningTaskIds.contains(execId)) {
15                 reason = Some(
16                   SlaveLost(s"Task $tid was lost, so marking the executor as lost as well."))
17                 removeExecutor(execId, reason.get)
18                 failedExecutor = Some(execId)
19               }
20             }
21             if (TaskState.isFinished(state)) {
22             //task结束了从内存中移除
23              cleanupTaskState(tid)
24               taskSet.removeRunningTask(tid)
25               if (state == TaskState.FINISHED) {
26                 taskResultGetter.enqueueSuccessfulTask(taskSet, tid, serializedData)
27               } else if (Set(TaskState.FAILED, TaskState.KILLED, TaskState.LOST).contains(state)) {
28                 taskResultGetter.enqueueFailedTask(taskSet, tid, state, serializedData)
29               }
30             }
31           case None =>
32             logError(
33               ("Ignoring update with state %s for TID %s because its task set is gone (this is " +
34                 "likely the result of receiving duplicate task finished status updates) or its " +
35                 "executor has been marked as failed.")
36                 .format(state, tid))
37         }
38       } catch {
39         case e: Exception => logError("Exception in statusUpdate", e)
40       }
41     }
42     // Update the DAGScheduler without holding a lock on this, since that can deadlock
43     if (failedExecutor.isDefined) {
44       assert(reason.isDefined)
45       dagScheduler.executorLost(failedExecutor.get, reason.get)
46       backend.reviveOffers()
47     }
48   } </span>
普通Shuffle操作的原理剖析

(注:什么是shuffle过程,它分为map中的和reduce中的
首先看map中的:

再看reduce端的shuffle
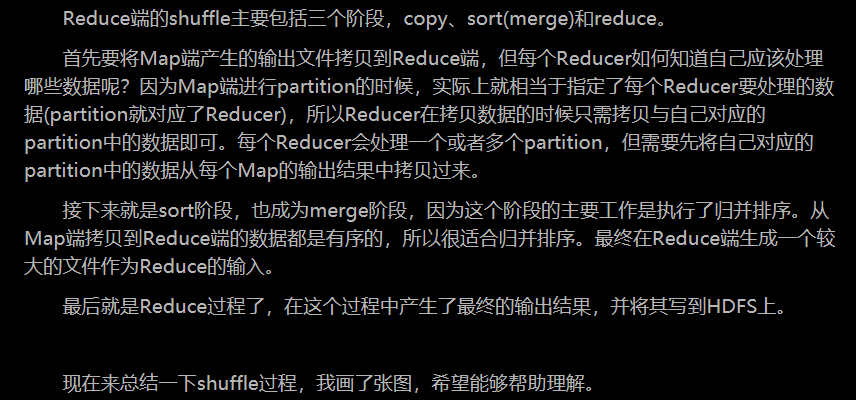
shuffle的过程:
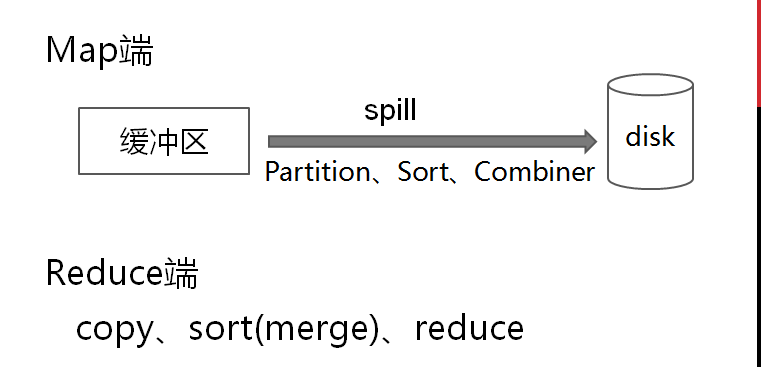
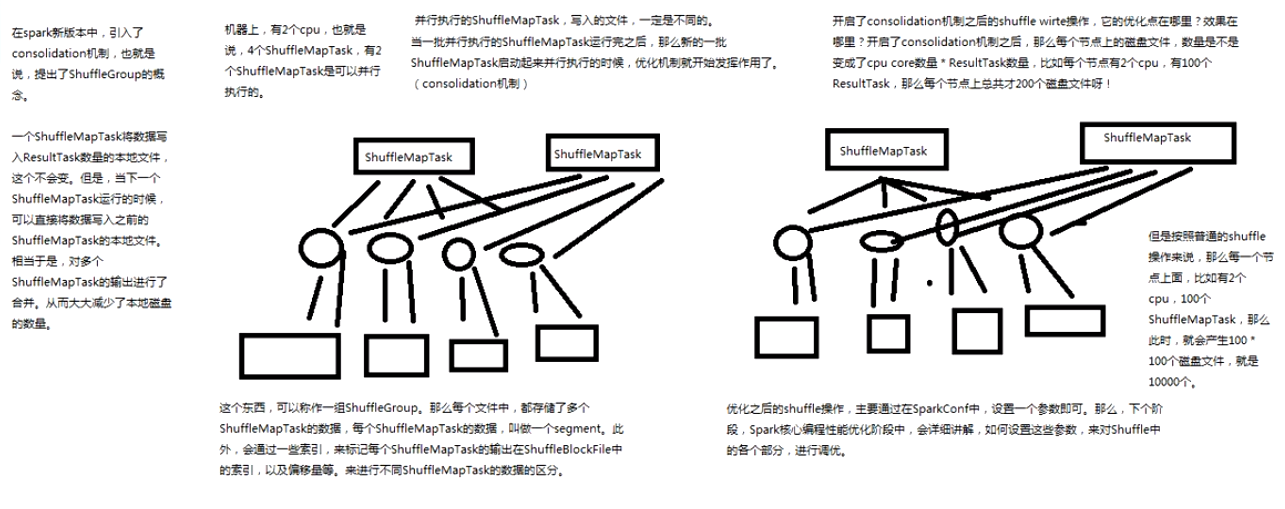
优化过后的shuffle操作的原理剖析
BlockManager原理剖析:
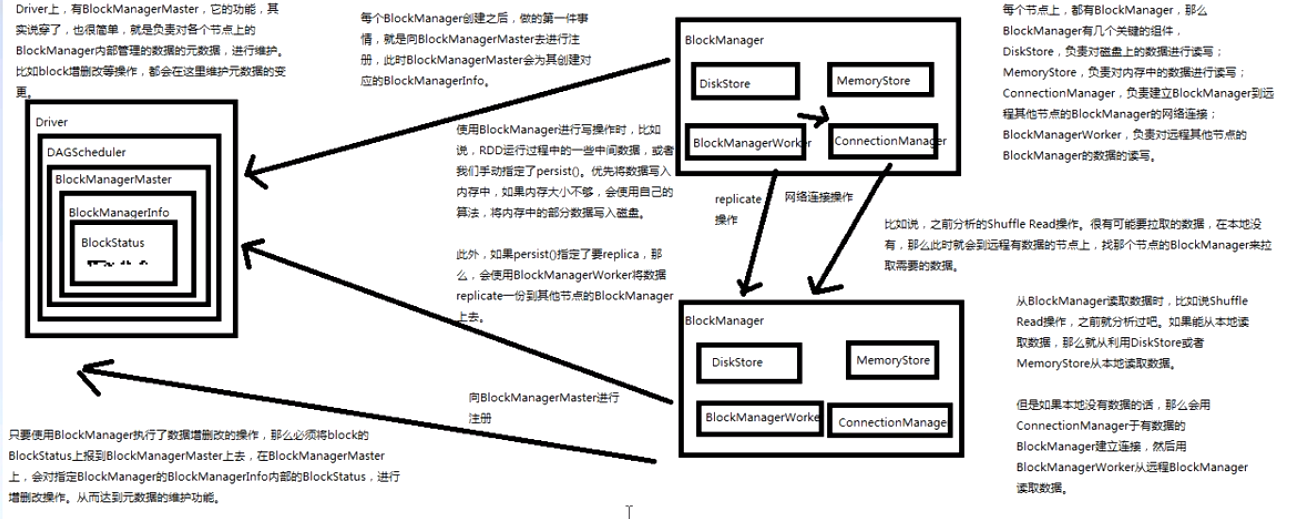
1、Diver上有BlockManagerMaster,负责对各个节点上的BlockManager内部管理的元数据进行维护;
2、每个节点的BlockManager有几个关键组件,DiskStore负责对磁盘上的数据进行读写,MemoryStore负责对内存中的数据进行读写,ConnectionManager负责建立BlockManager到远程其他节点的
BlockManager的网络连接,BlockTransferService负责对远程其他节点的BlockManager数据读写;
3、每个BlockManager创建之后,会向BlockManangerMaster进行注册,BlockManagerMaster会为其创建对应的BlockManagerInfo;
4、BlockManager进行读写时,比如RDD运行过程中的一些中间数据,或者指定的persist(),会优先将数据写入内存,如果内存大小不够,再将内存部分数据写入磁盘;
5、如果persist() 指定了要replica,那么会使用BlockTransferService将数据replica一份到其他节点的BlockManager上去;
6、BlockManager进行读操作时,就会用ConnectionManager与有数据的BlockManager建立连接,然后用BlockTransferService从远程BlockManager读写数据;
7、只要使用了BlockManager执行了数据增删改的操作,那么就必须将block的BlockStatus上报到BlockManagerInfo内部的BlockStatus进行增删改操作,从而对元数据进行维护;
cacheManager原理剖析:
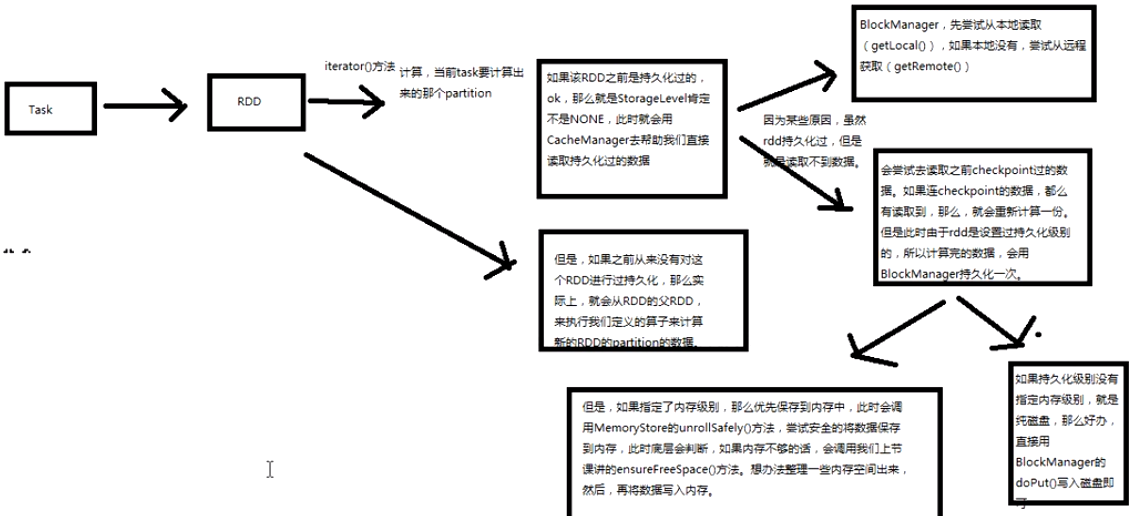
CacheManager 源码解析 :
1、cacheManager管理的是缓存中的数据,缓存可以是基于内存的缓存,也可以是基于磁盘的缓存;
2、cacheManager需要通过BlockManager 来操作数据;
3、每当Task运行的时候回调用RDD的compute方法进行计算,而compute方法会调用iterator方法;
compute方法是final级别不能覆写但可以被子类去使用,可以看见RDD是优先使用内存的,如果存储级别
不等于NONE的情况下,程序会先找CacheManager 获得数据,否则的话会看有没有进行checkpoint;

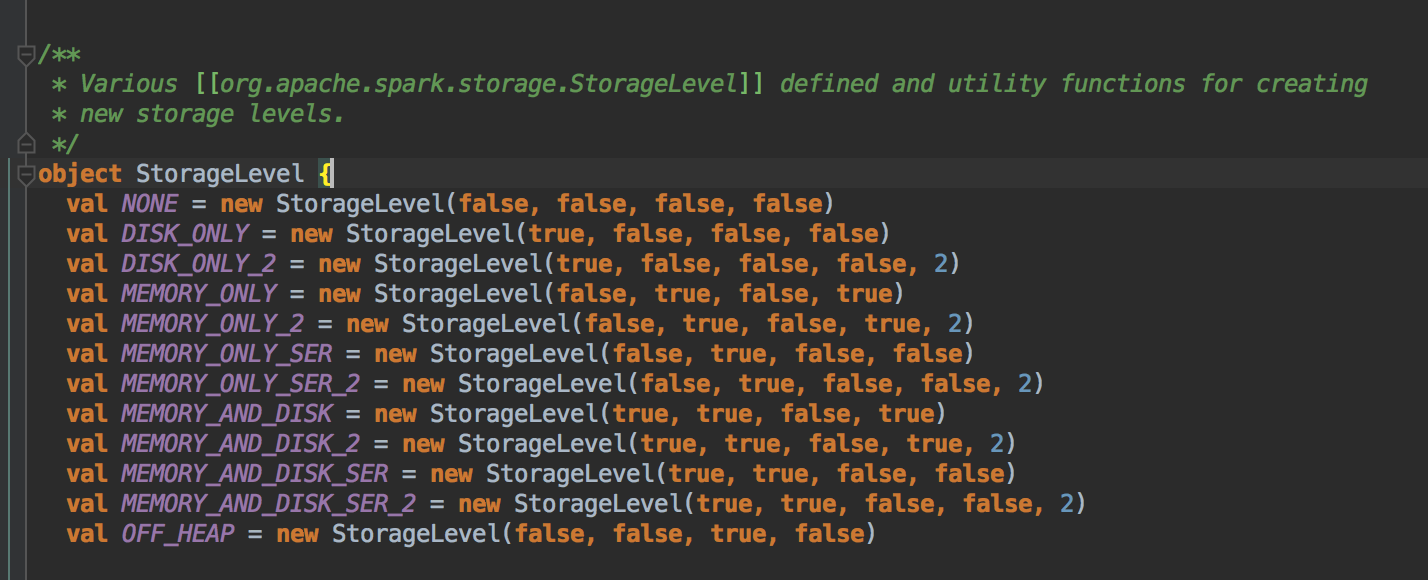
4、cache在工作的时候会最大化的保留数据,但是数据不一定绝对完整,因为当前的计算机如果需要内存空间的话,那么内存中的数据必须让出空间,这是因为执行比缓存重要,此时如何在RDD持久化的时候同时指定了可以把数据放左Disk上,那么部分cache的数据可以从内存转入磁盘,否则的话,数据就会丢失;
在进行Cache时,BlockManager会帮你进行管理,我们可以通过key到BlockManager中找出曾经缓存的数据;


如果有BlockManager.get()方法没有返回任何数据,就调用acquireLockForPartition 方法,因为会有可能多条线程在操作数据,spark有一个东西叫慢任务StraggleTask 推迟,StraggleTask 推迟的时候一般都会运行两个任务在两台机器上;

最后还是通过 BlockManager.get 来获得数据

5、具体cacheManager在获得缓存数据的时候会通过BlockManager 来抓到数据,优先在本地找数据或者远程抓数据;
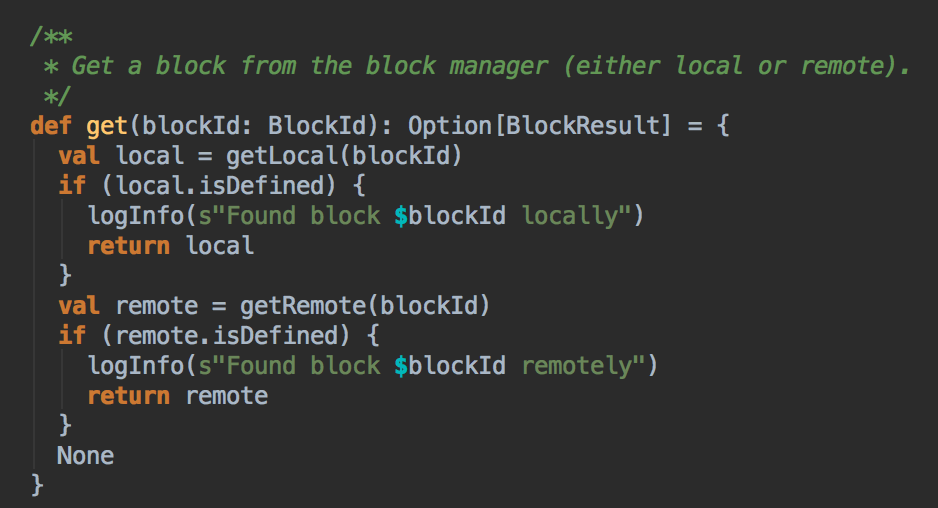
BlockManger.getLocal然后转过来调用doGetLocal方法,在doGetLocal的实现中看到缓存其实不一定在内存中,
缓存可以在存在、磁盘、也可以在offHeap(Tachyon)中;

6、在上一步调用了getLocal方法后转过调用了doGetLocal


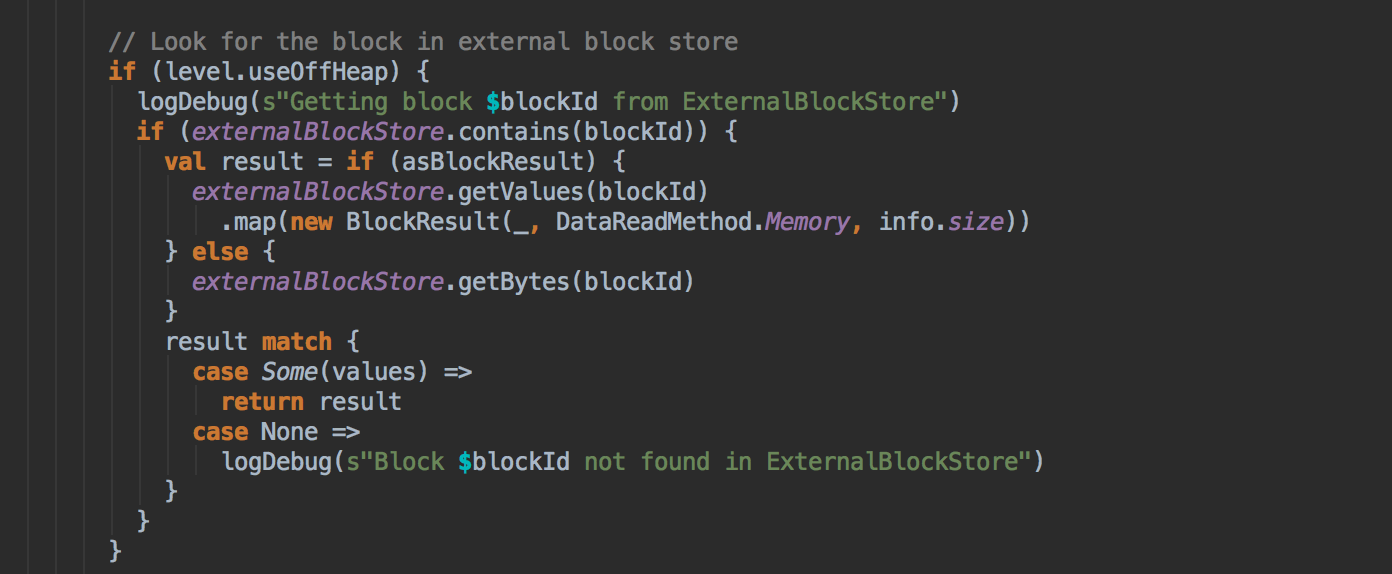


7、在第5步中如果本地没有缓存的话,就调用getRemote方法从远程抓取数据;


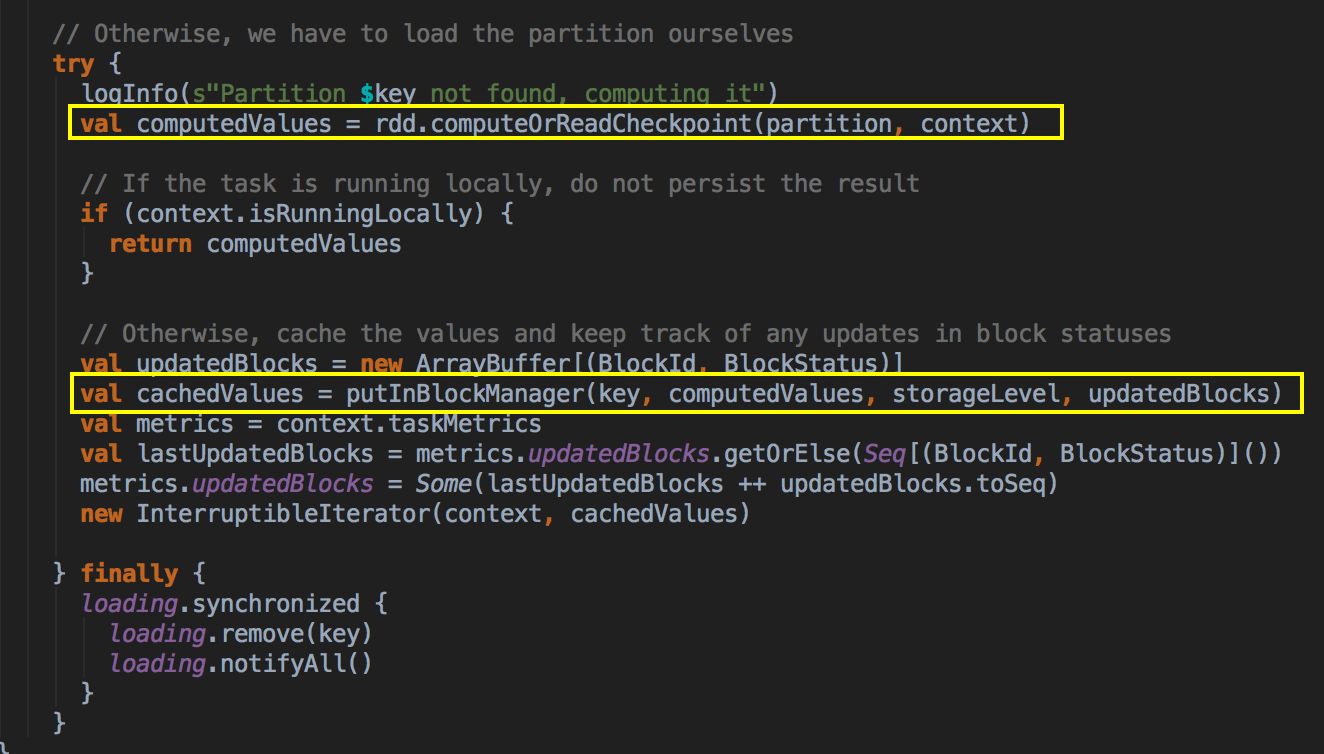
8、如果cacheManager没有通过BlockManager 获得缓存内容的话,其实会通过RDD的computeOrReadCheckpoint ()方法来获得数据;

首先需要检查看当前的RDD是否进行了CheckPoint,如果进行了话就直接读取checkpoint的数据,否则的话就必需进行计算;
checkpoint本身很重要,计算之后通过putInBlockManager 会把数据按照StorageLevel 重新缓存起来;

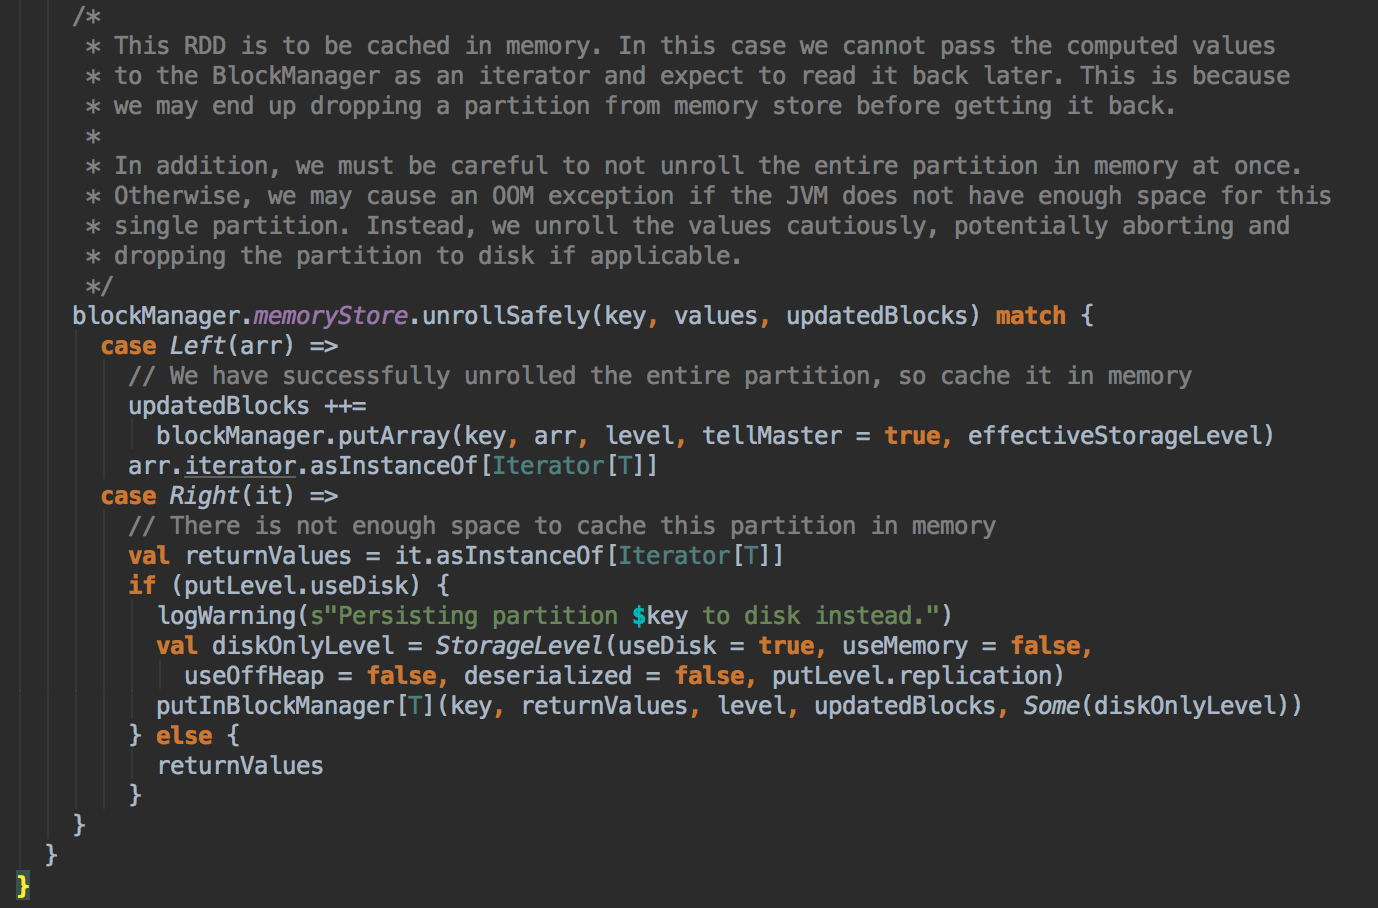
9、如果数据缓存的空间不够,此时会调用memoryStore中的unrollSafety方法,里面有一个循环在内存中放数据;

CheckPoint原理:

原理分析:
1、SparkContext的setCheckpointDir 设置了一个checkpoint 目录
 1 def setCheckpointDir(directory: String) {
 2
 3     // If we are running on a cluster, log a warning if the directory is local.
 4     // Otherwise, the driver may attempt to reconstruct the checkpointed RDD from
 5     // its own local file system, which is incorrect because the checkpoint files
 6     // are actually on the executor machines.
 7     if (!isLocal && Utils.nonLocalPaths(directory).isEmpty) {
 8       logWarning("Spark is not running in local mode, therefore the checkpoint directory " +
 9         s"must not be on the local filesystem. Directory '$directory' " +
10         "appears to be on the local filesystem.")
11     }
12     //利用hadoop的api创建了一个hdfs目录
13     checkpointDir = Option(directory).map { dir =>
14       val path = new Path(dir, UUID.randomUUID().toString)
15       val fs = path.getFileSystem(hadoopConfiguration)
16       fs.mkdirs(path)
17       fs.getFileStatus(path).getPath.toString
18     }
19   }
2、RDD核心的CheckPoint方法
def checkpoint(): Unit = RDDCheckpointData.synchronized {
    // NOTE: we use a global lock here due to complexities downstream with ensuring
    // children RDD partitions point to the correct parent partitions. In the future
    // we should revisit this consideration.
    if (context.checkpointDir.isEmpty) {
      throw new SparkException("Checkpoint directory has not been set in the SparkContext")
    } else if (checkpointData.isEmpty) {
      //创建ReliableRDDCheckpointData指向的RDDCheckpointData的实例
      checkpointData = Some(new ReliableRDDCheckpointData(this))
    }
  }
3、创建了一个ReliableRDDCheckpointData
//ReliableRDDCheckpointData 的父类RDDCheckpointData
private[spark] class ReliableRDDCheckpointData[T: ClassTag](@transient private val rdd: RDD[T])
  extends RDDCheckpointData[T](rdd) with Logging {

......

}
4、父类RDDCheckpointData
/**
 * RDD 需要经过
 *
 * [ Initialized  --> CheckpointingInProgress--> Checkpointed ]
 * 这几个阶段才能被 checkpoint
 *
 */
private[spark] abstract class RDDCheckpointData[T: ClassTag](@transient private val rdd: RDD[T])
  extends Serializable {

  import CheckpointState._

  // The checkpoint state of the associated RDD.
  //标识CheckPoint的状态,第一次初始化时是Initialized
  protected var cpState = Initialized

......

}
checkpoint写入数据:
1、Spark job运行最终会调用SparkContext的runJob方法将任务提交给Executor去执行;
 def runJob[T, U: ClassTag](
      rdd: RDD[T],
      func: (TaskContext, Iterator[T]) => U,
      partitions: Seq[Int],
      resultHandler: (Int, U) => Unit): Unit = {
    if (stopped.get()) {
      throw new IllegalStateException("SparkContext has been shutdown")
    }
    val callSite = getCallSite
    val cleanedFunc = clean(func)
    logInfo("Starting job: " + callSite.shortForm)
    if (conf.getBoolean("spark.logLineage", false)) {
      logInfo("RDD's recursive dependencies:\n" + rdd.toDebugString)
    }
    dagScheduler.runJob(rdd, cleanedFunc, partitions, callSite, resultHandler, localProperties.get)
    progressBar.foreach(_.finishAll())
    //在生产环境下会调用ReliableRDDCheckpointData的doCheckpoint方法
    rdd.doCheckpoint()
  }
2、rdd.doCheckpoint()方法
private[spark] def doCheckpoint(): Unit = {
    RDDOperationScope.withScope(sc, "checkpoint", allowNesting = false, ignoreParent = true) {
      if (!doCheckpointCalled) {
        doCheckpointCalled = true
        if (checkpointData.isDefined) {
          if (checkpointAllMarkedAncestors) {
            // TODO We can collect all the RDDs that needs to be checkpointed, and then checkpoint
            // them in parallel.
            // Checkpoint parents first because our lineage will be truncated after we
            // checkpoint ourselves
            dependencies.foreach(_.rdd.doCheckpoint())
          }
          checkpointData.get.checkpoint()
        } else {
          //遍历依赖的rdd,调用每个rdd的doCheckpoint方法
          dependencies.foreach(_.rdd.doCheckpoint())
        }
      }
    }
  }
3、checkpointData类型是RDDCheckpointData中的doCheckpoint()方法;
 final def checkpoint(): Unit = {
    // Guard against multiple threads checkpointing the same RDD by
    // atomically flipping the state of this RDDCheckpointData
    RDDCheckpointData.synchronized {
      if (cpState == Initialized) {
        //1、标记当前状态为正在checkpoint中
        cpState = CheckpointingInProgress
      } else {
        return
      }
    }
    //2 这里调用的是子类的doCheckpoint()
    val newRDD = doCheckpoint()

    // Update our state and truncate the RDD lineage
     // 3 标记checkpoint已完成,清空RDD依赖
    RDDCheckpointData.synchronized {
      cpRDD = Some(newRDD)
      cpState = Checkpointed
      rdd.markCheckpointed()
    }
  }
4、子类ReliableRDDCheckpointData的doCheckpoint()方法;
 1 protected override def doCheckpoint(): CheckpointRDD[T] = {
 2     /**
 3      * 为该 rdd 生成一个新的依赖,设置该 rdd 的 parent rdd 为 CheckpointRDD
 4      * 该 CheckpointRDD 负责以后读取在文件系统上的   checkpoint 文件,生成该 rdd 的 partition
 5      */
 6     val newRDD = ReliableCheckpointRDD.writeRDDToCheckpointDirectory(rdd, cpDir)
 7
 8     // Optionally clean our checkpoint files if the reference is out of scope
 9     // 是否清除checkpoint文件如果超出引用的资源范围
10     if (rdd.conf.getBoolean("spark.cleaner.referenceTracking.cleanCheckpoints", false)) {
11       rdd.context.cleaner.foreach { cleaner =>
12         cleaner.registerRDDCheckpointDataForCleanup(newRDD, rdd.id)
13       }
14     }
15
16     logInfo(s"Done checkpointing RDD ${rdd.id} to $cpDir, new parent is RDD ${newRDD.id}")
17     //  将新产生的RDD返回给父类
18     newRDD
19   }
5、ReliableCheckpointRDD.writeRDDToCheckpointDirectory(rdd, cpDir)方法
 /**
   * Write RDD to checkpoint files and return a ReliableCheckpointRDD representing the RDD.
   *
   * 触发runJob 来执行当前的RDD 中的数据写到Checkpoint 的目录中,同时会产生ReliableCheckpointRDD 实例
   */
  def writeRDDToCheckpointDirectory[T: ClassTag](
      originalRDD: RDD[T],
      checkpointDir: String,
      blockSize: Int = -1): ReliableCheckpointRDD[T] = {
    val checkpointStartTimeNs = System.nanoTime()

    val sc = originalRDD.sparkContext

    // Create the output path for the checkpoint
    //把checkpointDir设置我们checkpoint的目录
    val checkpointDirPath = new Path(checkpointDir)
    // 获取HDFS文件系统API接口
    val fs = checkpointDirPath.getFileSystem(sc.hadoopConfiguration)
    // 创建目录
    if (!fs.mkdirs(checkpointDirPath)) {
      throw new SparkException(s"Failed to create checkpoint path $checkpointDirPath")
    }

    // Save to file, and reload it as an RDD
    // 将配置文件信息广播到所有节点
    val broadcastedConf = sc.broadcast(
      new SerializableConfiguration(sc.hadoopConfiguration))
    // TODO: This is expensive because it computes the RDD again unnecessarily (SPARK-8582)
    //  核心代码
     /**
      * 此处新提交一个Job,也是对RDD进行计算,那么如果原有的RDD对结果进行了cache的话,
      * 那么是不是减少了很多的计算呢,这就是为啥checkpoint的时候强烈推荐进行cache的缘故
      */
    sc.runJob(originalRDD,
      writePartitionToCheckpointFile[T](checkpointDirPath.toString, broadcastedConf) _)

    // 如果rdd的partitioner不为空,则将partitioner写入checkpoint目录
    if (originalRDD.partitioner.nonEmpty) {
      writePartitionerToCheckpointDir(sc, originalRDD.partitioner.get, checkpointDirPath)
    }

    val checkpointDurationMs =
      TimeUnit.NANOSECONDS.toMillis(System.nanoTime() - checkpointStartTimeNs)
    logInfo(s"Checkpointing took $checkpointDurationMs ms.")

    // 创建一个CheckpointRDD,该分区数目应该和原始的rdd的分区数是一样的
    val newRDD = new ReliableCheckpointRDD[T](
      sc, checkpointDirPath.toString, originalRDD.partitioner)
    if (newRDD.partitions.length != originalRDD.partitions.length) {
      throw new SparkException(
        "Checkpoint RDD has a different number of partitions from original RDD. Original " +
          s"RDD [ID: ${originalRDD.id}, num of partitions: ${originalRDD.partitions.length}]; " +
          s"Checkpoint RDD [ID: ${newRDD.id}, num of partitions: " +
          s"${newRDD.partitions.length}].")
    }
    newRDD
  }
最后,会返回新的CheckpointRDD ,父类将它复值给成员cpRDD,最终标记当前状态为Checkpointed并清空当RDD的依赖链;到此Checkpoint的数据就被序列化到HDFS上了;
checkpoint读出数据
1、RDD的iterator()
 1 /**
 2    * 先调用presist(),再调用checkpoint()
 3    * 先执行到rdd的iterator()的时候,storageLevel != StorageLevel.NONE,就会通过CacheManager获取数据
 4    * 此时发生BlockManager获取不到数据,就会第一次计算数据,在通过BlockManager进行持久化
 5    *
 6    * rdd的job执行结束,启动单独的一个job,进行checkpoint,
 7    * 下一次又运行到rdd的iterator()方法就会发现持久化级别不为空,默认从BlockManager中读取持久化数据(正常情况下)
 8    *
 9    * 在非正常情况下,就会调用computeOrReadCheckpoint方法,判断如果isCheckpoint为ture,
10    * 就会调用父rdd的iterator(),从外部文件系统中读取数据
11    */
12   final def iterator(split: Partition, context: TaskContext): Iterator[T] = {
13     if (storageLevel != StorageLevel.NONE) {
14       getOrCompute(split, context)
15     } else {
16       //进行RDD的partition计算
17       computeOrReadCheckpoint(split, context)
18     }
19   }
2、继续调用computeOrReadCheckpoint
1 private[spark] def computeOrReadCheckpoint(split: Partition, context: TaskContext): Iterator[T] =
2   {
3     if (isCheckpointedAndMaterialized) {
4       firstParent[T].iterator(split, context)
5     } else {
6       //抽象方法,找具体实现类,比如MapPartitionsRDD
7       compute(split, context)
8     }
9   }
调用rdd.iterator() 去计算rdd的partition的时候,会调用computeOrReadCheckpoint(split: Partition)去查看该rdd是否被checkPoint过了,
如果是,就调用rdd的parent rdd的iterator()也就是CheckpointRDD.iterator(),否则直接调用该RDD的compute
3、CheckpointRDD(ReliableCheckpointRDD)的compute
1  //Path上读取我们的CheckPoint数据
2   override def compute(split: Partition, context: TaskContext): Iterator[T] = {
3     val file = new Path(checkpointPath, ReliableCheckpointRDD.checkpointFileName(split.index))
4     ReliableCheckpointRDD.readCheckpointFile(file, broadcastedConf, context)
5   }
4、readCheckpointFile方法
 1  def readCheckpointFile[T](
 2       path: Path,
 3       broadcastedConf: Broadcast[SerializableConfiguration],
 4       context: TaskContext): Iterator[T] = {
 5     val env = SparkEnv.get
 6     // 用hadoop API 读取HDFS上的数据
 7     val fs = path.getFileSystem(broadcastedConf.value.value)
 8     val bufferSize = env.conf.getInt("spark.buffer.size", 65536)
 9     val fileInputStream = {
10       val fileStream = fs.open(path, bufferSize)
11       if (env.conf.get(CHECKPOINT_COMPRESS)) {
12         CompressionCodec.createCodec(env.conf).compressedInputStream(fileStream)
13       } else {
14         fileStream
15       }
16     }
17     val serializer = env.serializer.newInstance()
18     val deserializeStream = serializer.deserializeStream(fileInputStream)
19
20     // Register an on-task-completion callback to close the input stream.
21     context.addTaskCompletionListener[Unit](context => deserializeStream.close())
22     //反序列化数据后转换为一个Iterator
23     deserializeStream.asIterator.asInstanceOf[Iterator[T]]
24   }


 浙公网安备 33010602011771号