Java线程池详解
1 使用线程池的好处
- 降低资源消耗:通过重复利用已创建的线程降低线程创建和销毁造成的消耗;
- 提高响应速度:当任务到达时,任务可以不需要等到线程创建就能立即执行;
- 提高线程的可管理性:线程是稀缺资源,如果无限制的创建,不仅会消耗系统资源,还会降低系统的稳定性,使用线程池可以进行统一的分配,调优和监控。
2 任务执行单元
2.1 Runnable接口
Runnable task=new Runnable() {
	public void run() {
		System.out.println("run()");
	}
};
2.2 Callable接口
import java.util.concurrent.Callable;

Callable task2=new Callable() {
	public Object call() throws Exception {
		System.out.println("call()");
		return null;
	}
};
注意:call()方法相较于run()方法,可能会抛出异常,并且有返回值。
3 阻塞队列(BolckingQueue)
线程池使用的任务队列是阻塞队列。
3.1 阻塞队列与非阻塞队列的区别
入队:
- 非阻塞队列:当队满时,放入数据,数据丢失;
- 阻塞队列:当队满时,放入数据,进行等待,直到有数据出队,或超过等待时间就丢弃。
出队:
- 非阻塞队列:当队空时,取数据,返回null;
- 阻塞队列:当队空时,取数据,进行等待,直到有数据入队。
3.2 BolckingQueue接口的实现类
ArrayBlockingQueue
LinkedBlockingQueue
PriorityBlockingQueue
DelayQueue
LinkedBlockingDeque
4 线程池
4.1 任务执行流程
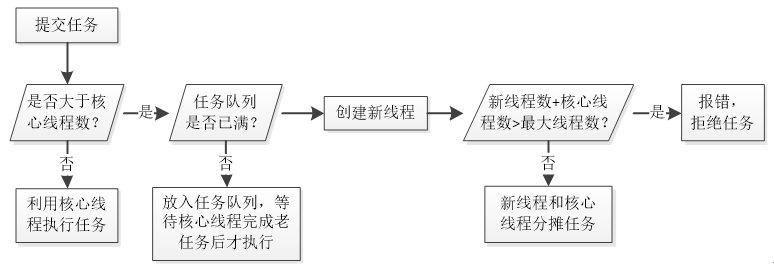
执行任务调用 execute() 方法或 submit() 方法,它们的区别如下:
- execute() 方法:用于提交不需要返回值的任务,所以无法判断任务是否被线程池执行成功,;
- submit() 方法:提交需要返回值的任务。线程池会返回一个 future 类型的对象,通过 future 对象的 get() 方法可以判断任务是否执行成功。当调用 get() 方法时,会阻塞当前线程,直到任务完成;而使用 get(long timeout,TimeUnitunit)方法会阻塞当前线程一段时间后立即返回,这时候任务可能没有执行完。
public void execute(Runnable command)

public Future<?> submit(Runnable task)
public <T> Future<T> submit(Callable<T> task)
注意:execute() 方法只接受实现 Runnable 接口的对象。
4.2 Executor框架
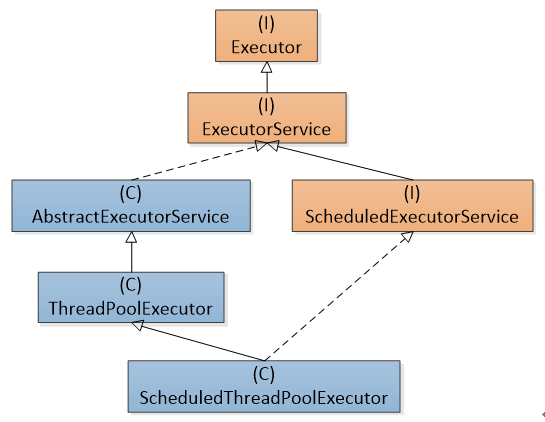 Executor框架
4.3 创建线程池的方式
(1)使用 ThreadPoolExecutor 的构造方法创建
ThreadPoolExecutor(
    int corePoolSize,  //核心线程数
    int maxinumPoolSize, //最大线程数
    long keepAliveTime,  //线程最大空闲时间
    TimeUnit unit,  //时间单位
    BlockingQueue<Runnable> workQueue, //线程等待队列
    ThreadFactory threadFactory,  //线程创建工厂
    RejectedExecutionHandler handler  //拒绝策略
)
ThreadPoolExecutor 的常用构造方法
ThreadPoolExecutor(int,int,long,TimeUnit,BlockingQueue<Runnable>)
ThreadPoolExecutor(int,int,long,TimeUnit,BlockingQueue<Runnable>,ThreadFactory)
ThreadPoolExecutor(int,int,long,TimeUnit,BlockingQueue<Runnable>,RejectedExecutionHandler)
ThreadPoolExecutor(int,int,long,TimeUnit,BlockingQueue<Runnable>,ThreadFactory,RejectedExecutionHandler)
拒绝策略:
ThreadPoolExecutor.AbortPolicy //丢弃任务并抛出RejectedExecutionException异常。
ThreadPoolExecutor.DiscardPolicy //也是丢弃任务,但是不抛出异常。
ThreadPoolExecutor.DiscardOldestPolicy //丢弃队列最前面的任务,然后重新尝试执行任务(重复此过程)
ThreadPoolExecutor.CallerRunsPolicy //由调用线程处理该任务
(2)使用 Executors 的静态工厂方法创建
使用 Executors 创建线程池,容易造成资源耗尽的风险,具体如下:
- SingleThreadExecutor 和 FixedThreadPool :允许请求的队列长度为 Integer.MAX_VALUE,可能堆积大量请求,从而导致OOM(Out of Memory);
- CachedThreadPool 和 ScheduledThreadPool:允许创建的线程数量为Integer.MAX_VALUE,可能会创建大量线程,从而导致OOM。
1. newSingleThreadExecutor() 方法
创建只有一个线程的线程池
public static ExecutorService newSingleThreadExecutor() {
   return new FinalizableDelegatedExecutorService
       (new ThreadPoolExecutor(1, 1,0L, TimeUnit.MILLISECONDS,
                               new LinkedBlockingQueue<Runnable>()));
}
2. newFixedThreadPool(int nThreads) 方法
创建一个有固定数量线程数的线程池
public static ExecutorService newFixedThreadPool(int nThreads) {
    return new ThreadPoolExecutor(nThreads, nThreads,0L, TimeUnit.MILLISECONDS,
                                  new LinkedBlockingQueue<Runnable>());
}
3. newCachedThreadPool() 方法
创建可根据实际情况调整线程数量的线程池
public static ExecutorService newCachedThreadPool() {
    return new ThreadPoolExecutor(0, Integer.MAX_VALUE,60L, TimeUnit.SECONDS,
                                  new SynchronousQueue<Runnable>());
}
4. newScheduledThreadPool(int corePoolSize) 方法
创建一个线程池,它可安排在给定延迟后运行命令或者定期地执行。
public static ScheduledExecutorService newScheduledThreadPool(int corePoolSize) {
     return new ScheduledThreadPoolExecutor(corePoolSize);
}
5 线程池简单案例
5.1 使用 ThreadPoolExecutor 的构造方法创建线程池
import java.util.concurrent.Callable;
import java.util.concurrent.Future;
import java.util.concurrent.LinkedBlockingQueue;
import java.util.concurrent.ThreadPoolExecutor;
import java.util.concurrent.TimeUnit;

public class Main {
	public static void main(String[] args) {
		ThreadPoolExecutor threadPool=new ThreadPoolExecutor(3,5,0L,TimeUnit.MILLISECONDS,
			    			    new LinkedBlockingQueue<Runnable>(3));
		Runnable task1=new Runnable() {
			public void run() {
				System.out.println("task1");
			}
		};
		Callable task2=new Callable() {
			public String call() throws Exception {
				System.out.println("task2");
				return "success";
			}
		};
		threadPool.execute(task1);
		threadPool.submit(task1);
		Future<String> future=threadPool.submit(task2);
		try {
			System.out.println(future.get());
		} catch (Exception e) {
			e.printStackTrace();
		}
	}
}
5.2 使用 Executors 的静态工厂方法创建线程池
import java.util.concurrent.Callable;
import java.util.concurrent.ExecutorService;
import java.util.concurrent.Executors;
import java.util.concurrent.Future;

public class Main {
	public static void main(String[] args) {
		ExecutorService threadPool=Executors.newSingleThreadExecutor();
		Runnable task1=new Runnable() {
			public void run() {
				System.out.println("task1");
			}
		};
		Callable task2=new Callable() {
			public String call() throws Exception {
				System.out.println("task2");
				return "success";
			}
		};
		threadPool.execute(task1);
		threadPool.submit(task1);
		Future<String> future=threadPool.submit(task2);
		try {
			System.out.println(future.get());
		} catch (Exception e) {
			e.printStackTrace();
		}
	}
}
声明:本文转自Java线程池详解

 浙公网安备 33010602011771号