tomcat发布web service教程
1、下载jax-ws依赖包
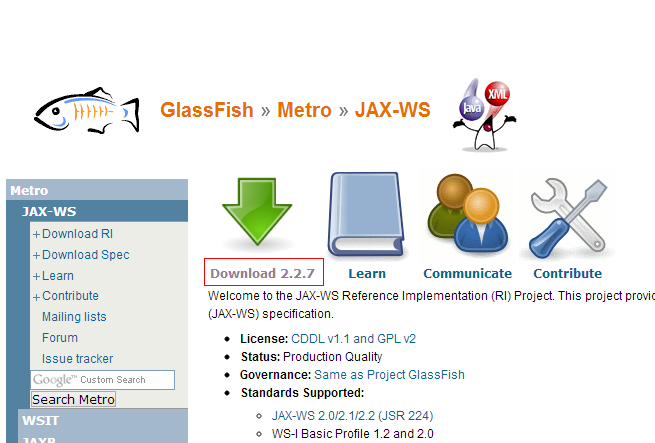
因tomcat没有jax-ws所需的依赖环境,所以第一步先下载Jax-ws RI,即jax-ws reference implemantation, 地址:http://jax-ws.java.net。

2、安装jax-ws RI到tomcat服务器
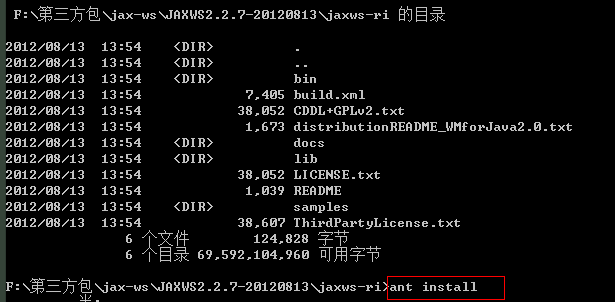
先下载ant与tomcat,设置环境变量ANT_HOME与CATALINA_HOME,然后在path下引入各自的bin目录打开命令提示符,在jax-ws ri包的目录下运行ant install。

此命令会直接把需要的包导入到${tomcat}\shared\lib目录下,其实也就是把jaxws RI lib下的包复制到了tomcat安装目录下shared\lib里面。
3、设置Eclipse中的tomcat
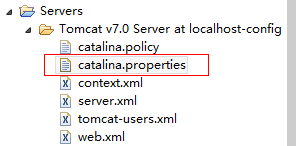
由于eclipse是自己定义的tomcat配置文件,所以需要加些东西,把shared\lib加入进来,打开ctalina.properties文件。

打开后为(节选):
- # Licensed to the Apache Software Foundation (ASF) under one or more
- # contributor license agreements. See the NOTICE file distributed with
- # this work for additional information regarding copyright ownership.
- # The ASF licenses this file to You under the Apache License, Version 2.0
- # (the "License"); you may not use this file except in compliance with
- # the License. You may obtain a copy of the License at
- #
- # http://www.apache.org/licenses/LICENSE-2.0
- #
- # Unless required by applicable law or agreed to in writing, software
- # distributed under the License is distributed on an "AS IS" BASIS,
- # WITHOUT WARRANTIES OR CONDITIONS OF ANY KIND, either express or implied.
- # See the License for the specific language governing permissions and
- # limitations under the License.
- #
- # List of comma-separated packages that start with or equal this string
- # will cause a security exception to be thrown when
- # passed to checkPackageAccess unless the
- # corresponding RuntimePermission ("accessClassInPackage."+package) has
- # been granted.
- package.access=sun.,org.apache.catalina.,org.apache.coyote.,org.apache.tomcat.,org.apache.jasper.
- #
- # List of comma-separated packages that start with or equal this string
- # will cause a security exception to be thrown when
- # passed to checkPackageDefinition unless the
- # corresponding RuntimePermission ("defineClassInPackage."+package) has
- # been granted.
- #
- # by default, no packages are restricted for definition, and none of
- # the class loaders supplied with the JDK call checkPackageDefinition.
- #
- package.definition=sun.,java.,org.apache.catalina.,org.apache.coyote.,org.apache.tomcat.,org.apache.jasper.
- #
- #
- # List of comma-separated paths defining the contents of the "common"
- # classloader. Prefixes should be used to define what is the repository type.
- # Path may be relative to the CATALINA_HOME or CATALINA_BASE path or absolute.
- # If left as blank,the JVM system loader will be used as Catalina's "common"
- # loader.
- # Examples:
- # "foo": Add this folder as a class repository
- # "foo/*.jar": Add all the JARs of the specified folder as class
- # repositories
- # "foo/bar.jar": Add bar.jar as a class repository
- common.loader=${catalina.home}/shared/lib/*.jar,${catalina.home}/shared/lib,${catalina.base}/lib,${catalina.base}/lib/*.jar,${catalina.home}/lib,${catalina.home}/lib/*.jar
找到common.loader配置项增加${catalina.home}/shared/lib/*.jar,${catalina.home}/shared/lib 这两个路径即可
4、建立项目
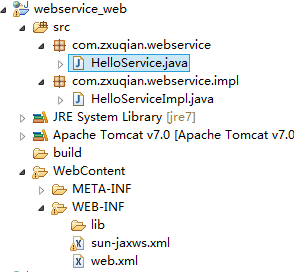
新建一个web项目,webservice_web,目录结构如下

HelloService.java是提供web service的一个接口,代码如下:
- package com.zxuqian.webservice;
- import javax.jws.WebMethod;
- import javax.jws.WebService;
- @WebService
- public interface HelloService {
- @WebMethod
- String greetings (String name);
- }
HelloServiceImpl.java是实现类,代码如下:
- package com.zxuqian.webservice.impl;
- import javax.jws.WebService;
- import com.zxuqian.webservice.HelloService;
- @WebService (endpointInterface = "com.zxuqian.webservice.HelloService" )
- public class HelloServiceImpl implements HelloService {
- @Override
- public String greetings(String name) {
- return "Hello: " + name;
- }
- }
5、添加sun-jaxws.xml
sun-jaxws.xml是通过web方式发布web service应用的描述文件,内容如下:
- <?xml version="1.0" encoding="UTF-8"?>
- <endpoints xmlns="http://java.sun.com/xml/ns/jax-ws/ri/runtime" version="2.0">
- <endpoint name="HelloWorld" implementation="com.zxuqian.webservice.impl.HelloServiceImpl"
- url-pattern="/hello" />
- </endpoints>
各个节点的具体说明请参考下载的jaxws ri包里面的docs文档,在这里简单说明一下,endpoint需要指定
web service服务的接口和实现类,以及它的url相对路径
6、配置web.xml
内容如下:
- <?xml version="1.0" encoding="UTF-8"?>
- <web-app xmlns:xsi="http://www.w3.org/2001/XMLSchema-instance" xmlns="http://java.sun.com/xml/ns/javaee" xmlns:web="http://java.sun.com/xml/ns/javaee/web-app_2_5.xsd" xsi:schemaLocation="http://java.sun.com/xml/ns/javaee http://java.sun.com/xml/ns/javaee/web-app_2_5.xsd" id="WebApp_ID" version="2.5">
- <display-name>webservice_web</display-name>
- <listener>
- <listener-class>com.sun.xml.ws.transport.http.servlet.WSServletContextListener</listener-class>
- </listener>
- <servlet>
- <servlet-name>hello</servlet-name>
- <servlet-class>com.sun.xml.ws.transport.http.servlet.WSServlet</servlet-class>
- <load-on-startup>1</load-on-startup>
- </servlet>
- <servlet-mapping>
- <servlet-name>hello</servlet-name>
- <url-pattern>/hello</url-pattern>
- </servlet-mapping>
- </web-app>
7、测试
启动tomcat,在浏览器中输入web service地址 http://localhost:8088/webservice_web/hello我的tomcat的端口号是8088,大家根据自己的端口号进行相应的修改。
 8、参考文献
http://www.mkyong.com/webservices/jax-ws/deploy-jax-ws-web-services-on-tomcat/

 8、参考文献

【推荐】国内首个AI IDE,深度理解中文开发场景,立即下载体验Trae
【推荐】编程新体验,更懂你的AI,立即体验豆包MarsCode编程助手
【推荐】抖音旗下AI助手豆包,你的智能百科全书,全免费不限次数
【推荐】轻量又高性能的 SSH 工具 IShell:AI 加持,快人一步
· 如何编写易于单元测试的代码
· 10年+ .NET Coder 心语,封装的思维:从隐藏、稳定开始理解其本质意义
· .NET Core 中如何实现缓存的预热?
· 从 HTTP 原因短语缺失研究 HTTP/2 和 HTTP/3 的设计差异
· AI与.NET技术实操系列:向量存储与相似性搜索在 .NET 中的实现
· 地球OL攻略 —— 某应届生求职总结
· 周边上新:园子的第一款马克杯温暖上架
· Open-Sora 2.0 重磅开源!
· .NET周刊【3月第1期 2025-03-02】
· [AI/GPT/综述] AI Agent的设计模式综述
2014-11-25 xcode .h文件编译时 版本不正确