
JavaEE基础02-spring4(AOP+web应用)
AOP的功能先从一个例子开始。

加减乘除的一个功能,需要在每个方法开始和结束时打印东西。(就是需求一)
方法一(非常不推荐):


package com.guigu.spring2;

/**
 * Created by Zhuxiang on 2020/5/18.
 */
public class ArithmeticCalculatorImpl implements ArithmeticCalculator{

    @Override
    public int add(int a, int b) {
        System.out.println("日志开始了:"+a+"加"+b);
        int add=a+b ;
        System.out.println(add);
        return add;
    }

    @Override
    public int sub(int a, int b) {
        System.out.println("日志开始了:"+a+"减"+b);
        int sub=a-b;
        System.out.println(sub);
        return sub ;
    }
}
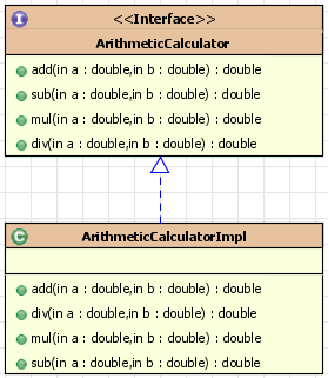
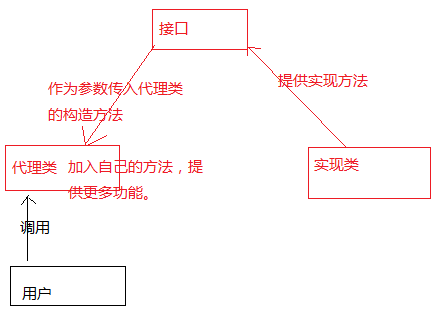
方法二:使用静态代理(不推荐)(但是需要复习一下代理的思想)
下图中被代理类是接口的实现类,代理类也需要实现接口,这样才能提供方法。
package com.guigu.spring2;

/**
 * Created by Zhuxiang on 2020/5/18.
 */
public class ArithmeticCalculatorImpl implements ArithmeticCalculator{

    @Override
    public int add(int a, int b) {
        int add=a+b ;
        System.out.println(add);
        return add;
    }

    @Override
    public int sub(int a, int b) {
        int sub=a-b;
        System.out.println(sub);
        return sub ;
    }
}
package com.guigu.spring2;

/**
 * Created by Zhuxiang on 2020/5/18.
 */
public class StaticProxy implements ArithmeticCalculator{
    private ArithmeticCalculator ar;
    public StaticProxy(ArithmeticCalculator ar) {
        this.ar=ar;
    }
    @Override
    public int add(int a, int b) {
        String s="加";
        noQueue(a,b,s);
        int add = ar.add(a, b);
        return add;
    }

    @Override
    public int sub(int a, int b) {
        String s="减";
        noQueue(a,b,s);
        int sub = ar.sub(a, b);
        return sub;
    }
    // 代理类本身自带功能;
    public void noQueue(int a,int b,String s) {
        System.out.println("日志开始了:"+a+s+b);
    }
}
package com.guigu.spring2;

/**
 * Created by Zhuxiang on 2020/5/18.
 */
public class main {
    public static void main(String[] args) {
        ArithmeticCalculator a2 = new StaticProxy(new ArithmeticCalculatorImpl());
        a2.add(2,1);
        a2.sub(2,1);
    }
}
//日志开始了:2加1
//3
//日志开始了:2减1
//1
方法三:使用动态代理(详细内容去java基础反射复习)(可以用,但是和aop比起来麻烦得多)
package com.guigu.spring2;

import java.lang.reflect.InvocationHandler;
import java.lang.reflect.Method;
import java.lang.reflect.Proxy;
import java.util.Arrays;

/**
 * Created by Zhuxiang on 2020/5/18.
 */
public class LoggingProxy {
    //要代理的对象
    private  ArithmeticCalculator target;

    public LoggingProxy(ArithmeticCalculator target) {
        this.target = target;
    }
    public ArithmeticCalculator getLoggingProxy(){
        //代理对象由哪一个类加载器进行加载
        ClassLoader loader=target.getClass().getClassLoader();
        //代理对象的类型,即其中有哪些方法
        Class<?>[] interfaces=new Class[]{ArithmeticCalculator.class};
        //当调用代理对象其中的方法时,会执行的代码
        InvocationHandler h=new InvocationHandler() {
            /**
             * proxy: 正在返回的那个代理对象,一般情况下,invoke方法里不使用(调用里面的方法会导致死循环)
             * method: 正在被调用的方法
             * args: 传入的参数
             */
            @Override
            public Object invoke(Object proxy, Method method, Object[] args) throws Throwable {
                String methodName=method.getName();
                System.out.println("日志:"+methodName+"begins with"+ Arrays.asList(args));
                //执行方法
                Object result = method.invoke(target, args);
                System.out.println("日志:"+methodName+"ends with"+ result);
                return result;
            }
        };
        ArithmeticCalculator proxy = (ArithmeticCalculator) Proxy.newProxyInstance(loader, interfaces, h);
        return proxy;
    }
}
public class main {
    public static void main(String[] args) {
        ArithmeticCalculator a1 = new ArithmeticCalculatorImpl();
        ArithmeticCalculator a2 = new LoggingProxy(a1).getLoggingProxy();
        a2.add(2,1);
        a2.sub(2,1);
    }
}
//日志:addbegins with[2, 1]
//3
//日志:addends with3
//日志:subbegins with[2, 1]
//1
//日志:subends with1
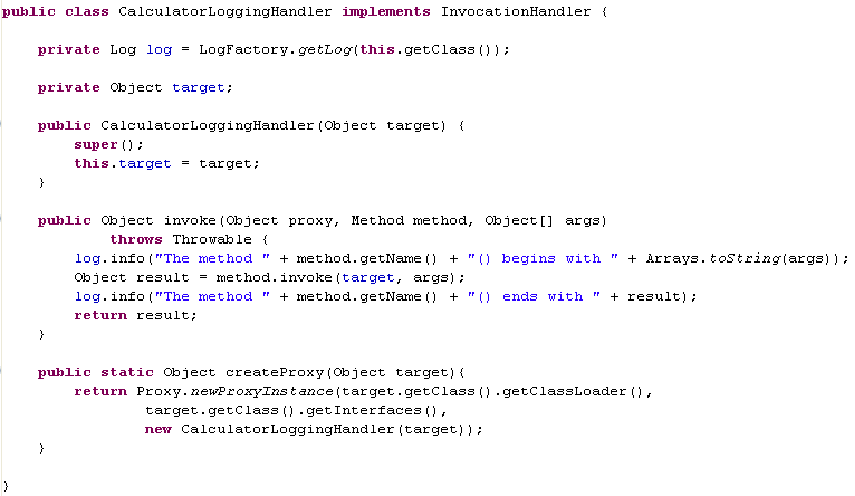
上面是自己写的,下面是ppt里的。对比着看吧,反正效果一样的,log先忽视掉。

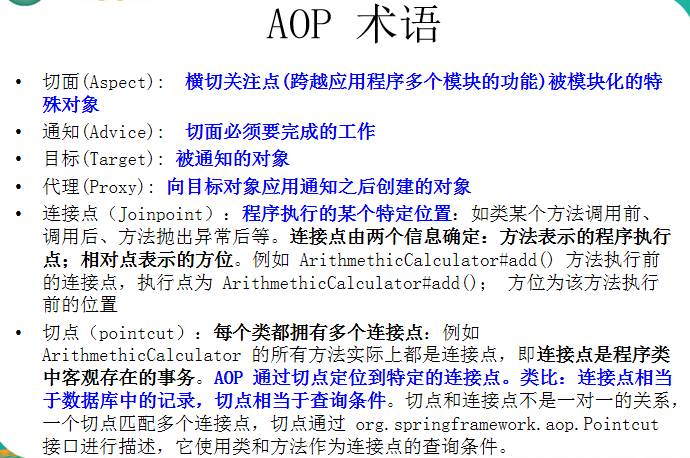
了解了上面的内容,springAop正式开始。(重点)
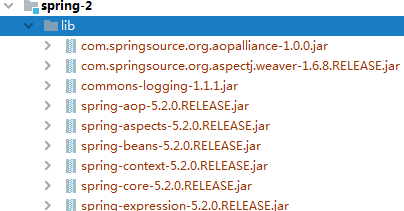
1,加入jar包
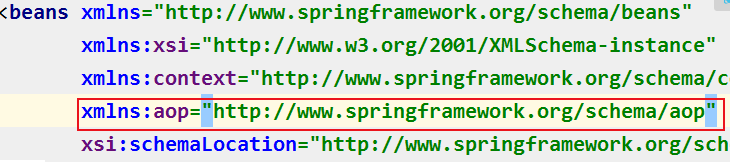
2,在配置文件中加入aop的命名空间
3,基于注解的方式
①在配置文件中加入
<!--使Aspect注解起作用,自动匹配的类生成代理对象-->
<aop:aspectj-autoproxy></aop:aspectj-autoproxy>
②把横切关注点的代码抽象到切面的类中。
切面首先是一个ioc中的bean,即加入@component 注解
切面还需要加入@Aspect 注解
③在类中声明各种通知
声明一个方法
在方法前加上@......注解,在注解后加上具体的类(具体看下面代码)
④可以在通知方法中声明一个类型为joinpoint的参数。然后就能访问链接细节。如方法名称和参数值
------------------------------具体代码-------------------------------
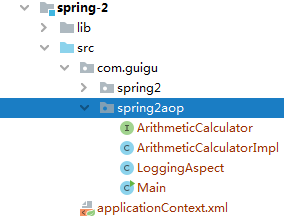
package com.guigu.spring2aop;

import org.springframework.stereotype.Component;

/**
 * Created by Zhuxiang on 2020/5/18.
 */
@Component
public class ArithmeticCalculatorImpl implements ArithmeticCalculator {

    @Override
    public int add(int a, int b) {
        int add=a+b ;
        System.out.println(add);
        return add;
    }

    @Override
    public int sub(int a, int b) {
        int sub=a-b;
        System.out.println(sub);
        return sub ;
    }
}
package com.guigu.spring2aop;

import org.aspectj.lang.JoinPoint;
import org.aspectj.lang.annotation.After;
import org.aspectj.lang.annotation.Aspect;
import org.aspectj.lang.annotation.Before;
import org.springframework.stereotype.Component;

import java.util.Arrays;
import java.util.List;

/**
 * Created by Zhuxiang on 2020/5/18.
 */
//把类声明为切面    1,放入ioc容器 2,声明为切面
@Aspect
@Component
public class LoggingAspect {
    //声明该方法是一个前置
    @Before("execution(public int com.guigu.spring2aop.ArithmeticCalculator.*(int,int))")
    public void beforeMethod(JoinPoint joinPoint){
        String name = joinPoint.getSignature().getName();
        List<Object> args= Arrays.asList(joinPoint.getArgs());
        System.out.println("日志开始了 "+name+" 参数 "+args);
    }
    @After("execution(* com.guigu.spring2aop.*.*(int,int))")
    public void afterMethod(){
        System.out.println("日志结束了");
    }
}
package com.guigu.spring2aop;

import org.springframework.context.ApplicationContext;
import org.springframework.context.support.ClassPathXmlApplicationContext;

/**
 * Created by Zhuxiang on 2020/5/18.
 */
public class Main {
    public static void main(String[] args) {
        ApplicationContext c = new ClassPathXmlApplicationContext("applicationContext.xml");
        ArithmeticCalculator ari=(ArithmeticCalculator)c.getBean("arithmeticCalculatorImpl");
        ari.add(3,1);
    }
}
<?xml version="1.0" encoding="UTF-8"?>
<beans xmlns="http://www.springframework.org/schema/beans"
       xmlns:xsi="http://www.w3.org/2001/XMLSchema-instance"
       xmlns:context="http://www.springframework.org/schema/context"
       xmlns:aop="http://www.springframework.org/schema/aop"
       xsi:schemaLocation="http://www.springframework.org/schema/beans http://www.springframework.org/schema/beans/spring-beans.xsd http://www.springframework.org/schema/context https://www.springframework.org/schema/context/spring-context.xsd http://www.springframework.org/schema/aop https://www.springframework.org/schema/aop/spring-aop.xsd">
    <context:component-scan
            base-package="com.guigu.spring2aop">
    </context:component-scan>
    <!--使Aspect注解起作用,自动匹配的类生成代理对象-->
    <aop:aspectj-autoproxy></aop:aspectj-autoproxy>
</beans>
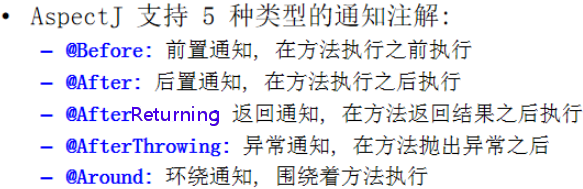
-----------------------五种通知---------------------------
环绕通知不常用看看就行。
以动态代理里的方法为例,看懂各个通知所在的位置。
            @Override
            public Object invoke(Object proxy, Method method, Object[] args) throws Throwable {
                String methodName=method.getName();
                System.out.println("日志:"+methodName+"begins with"+ Arrays.asList(args));
                Object result = null;
                try {
                    //前置通知的位置
                    //执行方法
                    result = method.invoke(target, args);
                    //返回通知的位置
                } catch (Exception e) {
                    e.printStackTrace();
                    //异常通知的位置
                }
                //后置通知的位置,因为可能会出异常,所以不能访问到方法的返回值。
                System.out.println("日志:"+methodName+"ends with"+ result);
                return result;
            }
回到aspect介绍五种通知。
@Aspect
@Component
public class LoggingAspect {
    @Before("execution(* com.guigu.spring2aop.*.*(..))")
    public void beforeMethod(JoinPoint joinPoint){
        String name = joinPoint.getSignature().getName();
        List<Object> args= Arrays.asList(joinPoint.getArgs());
        System.out.println("日志开始了 "+name+" 参数 "+args);
    }
    //后置通知:在目标方法执行后(无论是否发生异常),都会执行
    //不能访问目标方法执行的结果。结果在返回通知里。
    @After("execution(* com.guigu.spring2aop.*.*(..))")
    public void afterMethod(){
        System.out.println("日志结束了");
    }
    //返回通知:方法正常结束受执行的代码。可以访问到方法的返回值。
    @AfterReturning(value = "execution(* com.guigu.spring2aop.*.*(..))",returning = "result")
    public void afterReturning(JoinPoint joinPoint,Object result){
        String name = joinPoint.getSignature().getName();
        System.out.println("The method "+ name + " ends with "+result);
    }
    //异常通知:方法出现异常时会执行的代码。可以访问到异常对象,可以指定特定异常出现时再执行。
    @AfterThrowing(value = "execution(* com.guigu.spring2aop.*.*(..))",throwing = "ex")
    public void afterThrowing(JoinPoint joinPoint,Exception ex){
        String name = joinPoint.getSignature().getName();
        System.out.println("The method "+ name + " occurs exception: with "+ex);
    }
    /**(不常用,看看就行)
     * 环绕通知,需要携带ProceedingJoinPoint类型的参数。
     * 类似于动态代理的全过程:ProceedingJoinPoint类型的参数可以决定是否执行目标方法。
     * 且环绕通知必须有返回值,返回值即为目标方法的返回值。
     */
//    @Around("execution(* com.guigu.spring2aop.*.*(..))")
//    public Object aroundMethod(ProceedingJoinPoint pjd){
//        Object result =null;
//        String name = pjd.getSignature().getName();
//        //执行目标方法
//        try {
//            System.out.println("前置通知 "+name+" begins with "+Arrays.asList(pjd.getArgs()));
//            result = pjd.proceed();
//            System.out.println("返回通知 "+name+" result "+result);
//        } catch (Throwable throwable) {
//            throwable.printStackTrace();
//            System.out.println("异常通知 "+name+" occurs exception: "+ throwable);
//        }
//        System.out.println("后置通知 "+name+" ends with "+Arrays.asList(pjd.getArgs()));
//        return result;
//    }
}
--------------1优先级,2重用切点表达式------------
//1.优先级。用@order注解来表明优先级,数字越低,优先级越高,不声明就是任意优先级(最低)
@Order(2)
@Aspect
@Component
public class ValidationAspect {
    @Before("LoggingAspect.declareJoinPointExpression()")
    public void validationMethod(){
        System.out.println("--->验证");
    }
}
//---------上面验证类,下面日志类---------
@Aspect
@Component
public class LoggingAspect {
    //2.定义一个方法,用于声明切入点表达式。一般该方法中不添加其他代码。
    //在本类中调用看下面,在其他类中调用的例子看验证类(ValidationAspect)
    @Pointcut("execution(* com.guigu.spring2aop.*.*(..))")
    public void declareJoinPointExpression(){}
    @Before("declareJoinPointExpression()")
    public void beforeMethod(JoinPoint joinPoint){
        String name = joinPoint.getSignature().getName();
        List<Object> args= Arrays.asList(joinPoint.getArgs());
        System.out.println("日志开始了 "+name+" 参数 "+args);
    }
-----------------以上是基于注解,下面是基于xml文件------------------(看一看)
实现过程就是,把类的注解删了,然后加入xml文件。
<?xml version="1.0" encoding="UTF-8"?>
<beans xmlns="http://www.springframework.org/schema/beans"
       xmlns:xsi="http://www.w3.org/2001/XMLSchema-instance"
       xmlns:aop="http://www.springframework.org/schema/aop"
       xsi:schemaLocation="http://www.springframework.org/schema/beans http://www.springframework.org/schema/beans/spring-beans.xsd http://www.springframework.org/schema/context https://www.springframework.org/schema/context/spring-context.xsd http://www.springframework.org/schema/aop https://www.springframework.org/schema/aop/spring-aop.xsd">
    <bean id="arithmeticCalculator" class="com.guigu.spring2aop.ArithmeticCalculatorImpl">
    </bean>
    <!--配置切面的bean-->
    <bean id="loggingAspect" class="com.guigu.spring2aop.LoggingAspect">
    </bean>

    <bean id="validationAspect" class="com.guigu.spring2aop.ValidationAspect">
    </bean>
    <!--配置aop-->
    <aop:config>
        <!--配置切点表达式-->
        <aop:pointcut expression="execution(public int com.guigu.spring2aop.*.*(..))"
                      id="pointcut"></aop:pointcut>
        <!--配置切面及通知-->
        <aop:aspect ref="loggingAspect" order="2">
            <aop:before method="beforeMethod" pointcut-ref="pointcut"></aop:before>
            <aop:after method="afterMethod" pointcut-ref="pointcut"></aop:after>
            <aop:after-returning method="afterReturning" pointcut-ref="pointcut" returning="result"></aop:after-returning>
            <aop:after-throwing method="afterThrowing" pointcut-ref="pointcut" throwing="ex"></aop:after-throwing>
        </aop:aspect>
        <aop:aspect ref="validationAspect">
            <aop:before method="validationMethod" pointcut-ref="pointcut"></aop:before>
        </aop:aspect>
    </aop:config>
</beans>
经过配置,效果就一样了。
-----------------spring对jdbc的支持------------------(看一看就行)
一,JdbcTemplate插件


//看的顺序是从最下面的test往上看。
public class JdbcTest {
    private ApplicationContext c = null;
    JdbcTemplate jdbcTemplate;

    {
        c = new ClassPathXmlApplicationContext("applicationContext.xml");
        jdbcTemplate = (JdbcTemplate) c.getBean("jdbcTemplate");
    }

    //获取单个列的值,或做统计查询
    @Test
    public void testQueryForObject2() {
        String sql="select count(id) from admin";
        long count=jdbcTemplate.queryForObject(sql,long.class);
        System.out.println(count);
    }

    //查到实体类的集合
    //调用query方法
    @Test
    public void testQueryForList() {
        String sql = "select * from admin where id>?";
        RowMapper<Admin> rowmapper = new BeanPropertyRowMapper<>(Admin.class);
        List<Admin> admins = jdbcTemplate.query(sql, rowmapper, 1);
        System.out.println(admins);
    }

    /**
     * 查到实体类
     * 不是调用queryForObject(String var1, Class<T> var2, object...args)
     * 而是调用queryForObject(String var1, RowMapper<> rowMapper, object...args)
     * 1.其中RowMapper 指定如何去映射结果集的行,常用的实现类为BeanPropertyRowMapper
     * 2.使用sql中的别名完成类名(表里的列名)和类的属性名(bean里的)的映射。
     * 3.不支持级联属性,JdbcTemplate只是jdbc工具,而不是orm框架。
     */
    @Test
    public void testQueryForObject() {
        String sql = "select * from admin where id=?";
        RowMapper<Admin> rowMapper = new BeanPropertyRowMapper<>(Admin.class);
        Admin admin = jdbcTemplate.queryForObject(sql, rowMapper, 1);
    }

    //批量更新:批量地inset,update,delete
    //最后一个参数是object[] 的list类型:因为修改一条需要一个object的数组,那么多条就要多个object的数组。
    @Test
    public void testBatchUpdate() {
        String sql = "insert into admin(username,password) values(?,?)";
        List<Object[]> batchArgs = new ArrayList<>();
        batchArgs.add(new Object[]{"AA", "123"});
        batchArgs.add(new Object[]{"BB", "123"});
        batchArgs.add(new Object[]{"CC", "123"});
        jdbcTemplate.batchUpdate(sql, batchArgs);
    }

    @Test
    public void testUpdate() {
        String sql = "update admin set username=? where id=?";
        jdbcTemplate.update(sql, "锤子", 1);
    }

    //连接数据库
    @Test
    public void test() throws Exception {
        DataSource dataSource = (DataSource) c.getBean("dataSource");
        Connection connection = dataSource.getConnection();
        System.out.println(connection);
    }
}
url=jdbc:mysql://localhost:3306/girls
username=root
password=
driverClassName=com.mysql.jdbc.Driver
<?xml version="1.0" encoding="UTF-8"?>
<beans xmlns="http://www.springframework.org/schema/beans"
       xmlns:xsi="http://www.w3.org/2001/XMLSchema-instance"
       xmlns:context="http://www.springframework.org/schema/context"
       xsi:schemaLocation="http://www.springframework.org/schema/beans http://www.springframework.org/schema/beans/spring-beans.xsd http://www.springframework.org/schema/context https://www.springframework.org/schema/context/spring-context.xsd">

<!--    <context:property-placeholder location="classpath:dd.properties"/>-->
    <bean class="org.springframework.beans.factory.config.PropertyPlaceholderConfigurer">
        <property name="location" value="classpath:dd.properties"></property>
    </bean>
    <bean id="dataSource" class="com.alibaba.druid.pool.DruidDataSource">
        <property name="username" value="${username}"></property>
        <property name="password" value="${password}"></property>
        <property name="driverClassName" value="${driverClassName}"></property>
        <property name="url" value="${url}"></property>
    </bean>

    <bean id="jdbcTemplate" class="org.springframework.jdbc.core.JdbcTemplate">
        <property name="dataSource" ref="dataSource"></property>
    </bean>
    <bean id="namedParameterJdbcTemplate" class="org.springframework.jdbc.core.namedparam.NamedParameterJdbcTemplate">
    <constructor-arg ref="dataSource"></constructor-arg>
    </bean>

</beans>
在开发中怎么用?(使用了注解记得去xml文件里进行配置)
@Component
public class AdminDao {
    @Autowired
    private JdbcTemplate jdbcTemplate;
    //主要说明的是开发中实现增删改查,所以简化了连接池部分,
    // 不要这样搞连接。开发中写一个专门的连接类。
    {
        ApplicationContext c = new ClassPathXmlApplicationContext("applicationContext.xml");
        jdbcTemplate = (JdbcTemplate) c.getBean("jdbcTemplate");
    }
    public Admin testQueryForObject(int id) {
        String sql = "select * from admin where id=?";
        RowMapper<Admin> rowMapper = new BeanPropertyRowMapper<>(Admin.class);
        Admin admin = jdbcTemplate.queryForObject(sql, rowMapper, id);
        return admin;
    }
}
二,NamedParameterJdbcTemplate具名参数(看一看)
其他步骤(xml文件连接数据库,得到NamedParameterJdbcTemplate类)的编写同上。
    <bean id="namedParameterJdbcTemplate" class="org.springframework.jdbc.core.namedparam.NamedParameterJdbcTemplate">
        <constructor-arg ref="dataSource"></constructor-arg>
    </bean>
第一种方法:
好处是:若有多个参数,则不用再去对应位置,直接对应参数名,便于维护
缺点是:较为麻烦
@Test
public void testNamedParameterJdbcTemplate(){
String sql =" insert into admin(username,password) values(:un,:pw)";
Map<String,Object> paramMap=new HashMap<>();
paramMap.put("un","小米");
paramMap.put("pw","123");
namedParameterJdbcTemplate.update(sql,paramMap);
}
第二种方法:
    @Test
    public void testNamedParameterJdbcTemplateUpdate(){
        String sql="insert into admin(username,password) values(:username,:password)";
        Admin admin = new Admin();
        admin.setUsername("xiaomi");
        admin.setPassword("123");
        BeanPropertySqlParameterSource b = new BeanPropertySqlParameterSource(admin);
        n.update(sql, b);
    }
------------spring中的事务管理------------(重点看)
复习一下,四个关键属性(ACID):原子性(atomicity),一致性(consistency),隔离性(isolation),持久性(durability)。
以前学过jdbc的事物管理,重复代码很多,不易于维护。
现在aop来进行事物管理,将事务管理代码从业务方法中分离出来, 以声明的方式来实现事务管理.
以用户买书为例:用户买一本书,账户金额减掉书的价格,书的库存减少1。作为一个事务。
准备工作:数据库里3个表,用户账户表,书表,书的库存表。
第一步:分别写出,1)用户买的书的价格。2)用户账户金额减书的价格。3)书的库存减少1

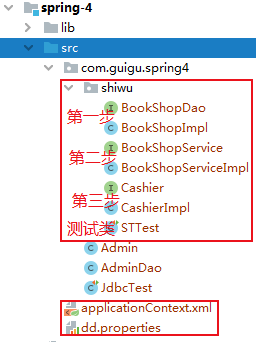
package com.guigu.spring4.shiwu;

/**
 * Created by Zhuxiang on 2020/5/21.
 */
public interface BookShopDao {
    //根据书号获取书的单价
    public int findBookPriceByIsbn(int isbn);

    //更新库存,书号对应的库存减一
    public void updateBookStock(int isbn);

    //更新用户的账户余额:使 username 的 balance-price
    public void updateUserAccount(String username ,int price);
}
package com.guigu.spring4.shiwu;

import org.springframework.beans.factory.annotation.Autowired;
import org.springframework.jdbc.core.JdbcTemplate;
import org.springframework.stereotype.Repository;

/**
 * Created by Zhuxiang on 2020/5/21.
 */
@Repository("bookShop")
public class BookShopImpl implements BookShopDao {
    @Autowired
    private JdbcTemplate jdbcTemplate;

    @Override
    public int findBookPriceByIsbn(int isbn) {
        String sql = "select price from book where isbn=?";
        return jdbcTemplate.queryForObject(sql, Integer.class, isbn);
    }

    @Override
    public void updateBookStock(int isbn) {
        //检查书的库存是否够,不够就抛出异常。
        String sql2 = "select stock from book_stock where isbn=?";
        int stock = jdbcTemplate.queryForObject(sql2, Integer.class, isbn);
        if (stock <= 0) throw new RuntimeException("库存不足");
        String sql = "update book_stock set stock = stock-1 where isbn=?";
        jdbcTemplate.update(sql, isbn);
    }

    @Override
    public void updateUserAccount(String username, int price) {
        //检查用户余额是否够,不够就抛出异常。
        String sql2 = "select balance from account where username=?";
        int stock = jdbcTemplate.queryForObject(sql2, Integer.class, username);
        if (stock < price) throw new RuntimeException("余额不足");
        String sql = "update account set balance = balance-? where username=?";
        jdbcTemplate.update(sql, price, username);
    }
}
第二步:使用注解的方法加上事务。
package com.guigu.spring4.shiwu;

/**
 * Created by Zhuxiang on 2020/5/21.
 */
public interface BookShopService {
    public void purchase (String username,int isbn);
}
package com.guigu.spring4.shiwu;

import org.springframework.beans.factory.annotation.Autowired;
import org.springframework.stereotype.Service;
import org.springframework.transaction.annotation.Transactional;

/**
 * Created by Zhuxiang on 2020/5/21.
 */
@Service("bookShopService")
public class BookShopServiceImpl implements BookShopService{
    @Autowired
    private BookShopDao bookShopDao;
    //添加事务注解.
    @Transactional
    @Override
    public void purchase(String username, int isbn) {
        //获取书的单价
        int bp = bookShopDao.findBookPriceByIsbn(isbn);
        //更新书的库存
        bookShopDao.updateBookStock(isbn);
        //更新用户余额
        bookShopDao.updateUserAccount(username,bp);
    }
}
<?xml version="1.0" encoding="UTF-8"?>
<beans xmlns="http://www.springframework.org/schema/beans"
       xmlns:xsi="http://www.w3.org/2001/XMLSchema-instance"
       xmlns:context="http://www.springframework.org/schema/context" xmlns:tx="http://www.springframework.org/schema/tx"
       xsi:schemaLocation="http://www.springframework.org/schema/beans http://www.springframework.org/schema/beans/spring-beans.xsd http://www.springframework.org/schema/context https://www.springframework.org/schema/context/spring-context.xsd http://www.alibaba.com/schema/stat http://www.alibaba.com/schema/stat.xsd http://www.springframework.org/schema/tx http://www.springframework.org/schema/tx/spring-tx.xsd">

<!--    <context:property-placeholder location="classpath:dd.properties"/>-->
    <bean class="org.springframework.beans.factory.config.PropertyPlaceholderConfigurer">
        <property name="location" value="classpath:dd.properties"></property>
    </bean>
    <bean id="dataSource" class="com.alibaba.druid.pool.DruidDataSource">
        <property name="username" value="${username}"></property>
        <property name="password" value="${password}"></property>
        <property name="driverClassName" value="${driverClassName}"></property>
        <property name="url" value="${url}"></property>
    </bean>

    <bean id="jdbcTemplate" class="org.springframework.jdbc.core.JdbcTemplate">
        <property name="dataSource" ref="dataSource"></property>
    </bean>
    <context:component-scan base-package="com.guigu.spring4.shiwu">
    </context:component-scan>
    <!--配置事务管理器-->
    <bean id="dataSourceTransactionManager" class="org.springframework.jdbc.datasource.DataSourceTransactionManager">
        <property name="dataSource" ref="dataSource"/>
    </bean>
    <!--启动事务注解-->
    <tx:annotation-driven transaction-manager="dataSourceTransactionManager"></tx:annotation-driven>

</beans>
package com.guigu.spring4.shiwu;

import org.junit.Test;
import org.springframework.context.ApplicationContext;
import org.springframework.context.support.ClassPathXmlApplicationContext;

/**
 * Created by Zhuxiang on 2020/5/21.
 */
public class STTest {
    private ApplicationContext a=null;
    private BookShopDao bookShopDao =null;
    private BookShopService bookShopService=null;
    {
        a=new ClassPathXmlApplicationContext("applicationContext.xml");
        bookShopDao =(BookShopDao)a.getBean("bookShop");
        bookShopService=(BookShopService)a.getBean("bookShopService");
    }
    @Test
    public void test04(){
        bookShopService.purchase("小明",1002);
    }
    @Test
    public void test01(){
        System.out.println(bookShopDao.findBookPriceByIsbn(1001));
    }
    @Test
    public void test02(){
        bookShopDao.updateBookStock(1001);
    }
    @Test
    public void test03(){
        bookShopDao.updateUserAccount("小明",100);
    }
}
第三步:事务里的事务如何处理。
package com.guigu.spring4.shiwu;

import java.util.List;
/**
 * Created by Zhuxiang on 2020/5/21.
 */
public interface Cashier {
    //一个人买多本书
    public void checkout(String username, List<Integer> isbns);
}
package com.guigu.spring4.shiwu;

import org.springframework.beans.factory.annotation.Autowired;
import org.springframework.transaction.annotation.Transactional;

import java.util.List;

/**
 * Created by Zhuxiang on 2020/5/21.
 */
public class CashierImpl implements Cashier {
    @Autowired
    private BookShopService bookShopService;
    @Transactional
    @Override
    public void checkout(String username, List<Integer> isbns) {
        for (int isbn : isbns) {
            bookShopService.purchase(username,isbn);
        }
    }
}
package com.guigu.spring4.shiwu;
import org.springframework.beans.factory.annotation.Autowired;
import org.springframework.stereotype.Service;
import org.springframework.transaction.annotation.Propagation;
import org.springframework.transaction.annotation.Transactional;
/**
* Created by Zhuxiang on 2020/5/21.
*/
@Service("bookShopService")
public class BookShopServiceImpl implements BookShopService{
@Autowired
private BookShopDao bookShopDao;
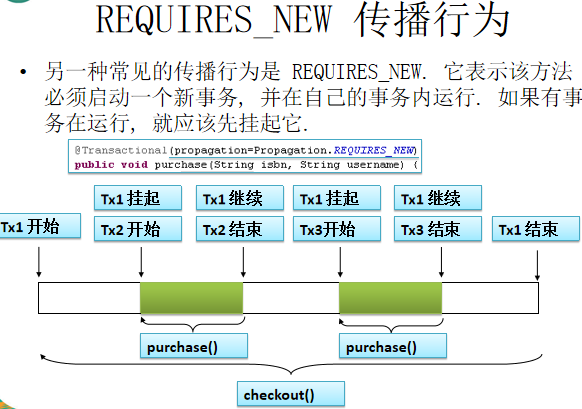
//添加事务注解,使用propagation指定事务的传播行为,即当前的事务方法被另一个事务方法调用时,
//如何使用事务,一,默认值为required,即使用调用方法的事务。(看图理解)
//二,使用自己的事务REQUIRES_NEW,调用的事务方法的事务被挂起。(看图理解)
@Transactional(propagation = Propagation.REQUIRED)
@Override
public void purchase(String username, int isbn) {
//获取书的单价
int bp = bookShopDao.findBookPriceByIsbn(isbn);
//更新书的库存
bookShopDao.updateBookStock(isbn);
//更新用户余额
bookShopDao.updateUserAccount(username,bp);
}
}
默认情况图:CashierImpl里的事务是Tx1,BookShopServiceImpl里的事务是图中的purchase().

新建情况图:
如何使用事务,事务的其他属性(和上面的一样重要)
//添加事务注解,使用propagation指定事务的传播行为,即当前的事务方法被另一个事务方法调用时,
    //如何使用事务,一,默认值为required,即使用调用方法的事务。(看图理解)
    //二,使用自己的事务REQUIRES_NEW,调用的事务方法的事务被挂起。(看图理解)
    //三,指定隔离级别,isolation = Isolation.READ_COMMITTED(读已提交)
    //四,虽然默认异常后全回滚,但是也可以自己设置(通常情况不会去设置)。
    // 比如设置在账户余额不回滚 : noRollbackFor=UserAccountException.class,
    // 结果就是继续执行下面的方法,把库存减1。
    //五,使用readOnly=true指定事务为只读。只能查。
    //六,使用timeout 指定强制回滚之前事务可以占用的时间。如timeout = 3就是
    // 给事务3秒时间,如果在时间内没有完成就强制回滚。可以让程序睡4秒测试一下:Thread.sleep(4000)。
    @Transactional(propagation = Propagation.REQUIRED,noRollbackFor=UserAccountException.class)
为了测试4,我们多加一个异常类 UserAccountException ,如果余额不足就进入这个异常类,它继承了runtimeException类。

最后,不使用注解作配置,而使用xml文件配置,达到同样的效果。具体操作时记得把注解删了,还要加上引用类的set方法。
<?xml version="1.0" encoding="UTF-8"?>
<beans xmlns="http://www.springframework.org/schema/beans"
       xmlns:xsi="http://www.w3.org/2001/XMLSchema-instance"
       xmlns:context="http://www.springframework.org/schema/context" xmlns:tx="http://www.springframework.org/schema/tx"
       xmlns:aop="http://www.springframework.org/schema/aop"
       xsi:schemaLocation="http://www.springframework.org/schema/beans http://www.springframework.org/schema/beans/spring-beans.xsd http://www.springframework.org/schema/context https://www.springframework.org/schema/context/spring-context.xsd http://www.alibaba.com/schema/stat http://www.alibaba.com/schema/stat.xsd http://www.springframework.org/schema/tx http://www.springframework.org/schema/tx/spring-tx.xsd http://www.springframework.org/schema/aop https://www.springframework.org/schema/aop/spring-aop.xsd">

<!--    <context:property-placeholder location="classpath:dd.properties"/>-->
    <bean class="org.springframework.beans.factory.config.PropertyPlaceholderConfigurer">
        <property name="location" value="classpath:dd.properties"></property>
    </bean>
    <bean id="dataSource" class="com.alibaba.druid.pool.DruidDataSource">
        <property name="username" value="${username}"></property>
        <property name="password" value="${password}"></property>
        <property name="driverClassName" value="${driverClassName}"></property>
        <property name="url" value="${url}"></property>
    </bean>

    <bean id="jdbcTemplate" class="org.springframework.jdbc.core.JdbcTemplate">
        <property name="dataSource" ref="dataSource"></property>
    </bean>
    <!--配置bean-->
    <bean id="bookShopImpl" class="com.guigu.spring4.shiwu.BookShopImpl">
        <property name="jdbcTemplate" ref="jdbcTemplate"></property>
    </bean>
    <bean id="bookShopServiceImpl" class="com.guigu.spring4.shiwu.BookShopServiceImpl">
        <property name="bookShopImpl" ref="bookShopImpl"></property>
    </bean>
    <bean id="cashierImpl" class="com.guigu.spring4.shiwu.CashierImpl">
        <property name="bookShopServiceImpl" ref="bookShopServiceImpl"></property>
    </bean>
    <!--1.配置事务管理器-->
    <bean id="dataSourceTransactionManager" class="org.springframework.jdbc.datasource.DataSourceTransactionManager">
        <property name="dataSource" ref="dataSource"/>
    </bean>
    <!--2.配置事务属性-->
    <tx:advice id="txAdvice" transaction-manager="dataSourceTransactionManager">
        <tx:attributes>
            <tx:method name="purchase" propagation="REQUIRED" timeout="5"/>
            <tx:method name="get*" read-only="true"/>
            <tx:method name="find*" read-only="true"/>
            <tx:method name="*"/>
        </tx:attributes>
    </tx:advice>
    <!--3.配置事务切入点,以及把事务切入点和事务属性关联起来-->
    <aop:config>
        <aop:pointcut id="txPointCut" expression="execution(* com.guigu.spring4.shiwu.*.*(..))"/>
        <aop:advisor advice-ref="txAdvice" pointcut-ref="txPointCut"></aop:advisor>
    </aop:config>
</beans>
------------------spring在web应用的使用------------------(重要)
一,第一种方式:核心步骤,自己用代码把web应用和spring关联起来。
1. Spring 如何在 WEB 应用中使用 ?
1). 需要额外加入的 jar 包:
spring-web-4.0.0.RELEASE.jar
spring-webmvc-4.0.0.RELEASE.jar
2). Spring 的配置文件, 没有什么不同
3). 如何创建 IOC 容器 ?
①. 非 WEB 应用在 main 方法中直接创建
②. 应该在 WEB 应用被服务器加载时就创建 IOC 容器:
在 ServletContextListener#contextInitialized(ServletContextEvent sce) 方法中创建 IOC 容器.
③. 在 WEB 应用的其他组件中如何来访问 IOC 容器呢 ?
在 ServletContextListener#contextInitialized(ServletContextEvent sce) 方法中创建 IOC 容器后, 可以把其放在
ServletContext(即 application 域)的一个属性中.
④. 实际上, Spring 配置文件的名字和位置应该也是可配置的! 将其配置到当前 WEB 应用的初始化参数中较为合适.
二,第二种方式:核心步骤,调用spring里已经为开发者准备好的监听器与web应用关联。
4). 在 WEB 环境下使用 Spring
①. 需要额外加入的 jar 包:
spring-web-4.0.0.RELEASE.jar
spring-webmvc-4.0.0.RELEASE.jar
②. Spring 的配置文件, 和非 WEB 环境没有什么不同
③. 需要在 web.xml 文件中加入如下配置:
<!-- 配置 Spring 配置文件的名称和位置 -->
<context-param>
<param-name>contextConfigLocation</param-name>
<param-value>classpath:applicationContext.xml</param-value>
</context-param>
<!-- 启动 IOC 容器的 ServletContextListener -->
<listener>
<listener-class>org.springframework.web.context.ContextLoaderListener</listener-class>
</listener>
---------------------------代码------------------------------
第一种的代码,主要看思想。
记得导服务器里的servlet包


public class Listener implements ServletContextListener,
        HttpSessionListener, HttpSessionAttributeListener {

    // Public constructor is required by servlet spec
    public Listener() {
    }

    // -------------------------------------------------------
    // ServletContextListener implementation
    // -------------------------------------------------------
    public void contextInitialized(ServletContextEvent sce) {
      /* This method is called when the servlet context is
         initialized(when the Web application is deployed).
         You can initialize servlet context related data here.
      */
        //获取spring配置文件的名称。
        ServletContext servletContext = sce.getServletContext();
        String initParameter = servletContext.getInitParameter("contextConfigLocation");
        //创建ioc容器
        ApplicationContext ac=new ClassPathXmlApplicationContext(initParameter);
        //把ioc容器放在servletContext的一个属性里。
        servletContext.setAttribute("ac",ac);
    }
public class Person {
    String name;

    public void setName(String name) {
        this.name = name;
    }

    @Override
    public String toString() {
        return "Person{" +
                "name='" + name + '\'' +
                '}';
    }
}
public class Servlet extends HttpServlet {
    protected void doPost(HttpServletRequest request, HttpServletResponse response) throws ServletException, IOException {

    }

    protected void doGet(HttpServletRequest request, HttpServletResponse response) throws ServletException, IOException {
        ServletContext servletContext =getServletContext();
        ApplicationContext a=(ApplicationContext) servletContext.getAttribute("ac");
        Person person =(Person) a.getBean("person");
        System.out.println(person);
    }
}
    <bean id="person" class="com.guigu.spring6.web.Person">
        <property name="name" value="zx"></property>
    </bean>
applicationContext.xml
<?xml version="1.0" encoding="UTF-8"?>
<web-app xmlns="http://xmlns.jcp.org/xml/ns/javaee"
         xmlns:xsi="http://www.w3.org/2001/XMLSchema-instance"
         xsi:schemaLocation="http://xmlns.jcp.org/xml/ns/javaee http://xmlns.jcp.org/xml/ns/javaee/web-app_4_0.xsd"
         version="4.0">
    <!--加入监听器-->
    <listener>
        <listener-class>com.guigu.spring6.web.Listener</listener-class>
    </listener>
    <!--和spring配置文件建立联系-->
    <context-param>
        <param-name>contextConfigLocation</param-name>
        <param-value>classpath:applicationContext.xml</param-value>
    </context-param>
    <!--需要一个servlet做测试-->
    <servlet>
        <servlet-name>Servlet</servlet-name>
        <servlet-class>com.guigu.spring6.web.Servlet</servlet-class>
    </servlet>
    <servlet-mapping>
        <servlet-name>Servlet</servlet-name>
        <url-pattern>/servlet</url-pattern>
    </servlet-mapping>

</web-app>
index.jsp
<a href="servlet">test</a>
第二种的代码,进行了简化(不用自己写监听器了)。
    <!--加入spring包准备好的监听器-->
    <listener>
        <listener-class>org.springframework.web.context.ContextLoaderListener</listener-class>
    </listener>
    <!--和spring配置文件建立联系-->
    <context-param>
        <param-name>contextConfigLocation</param-name>
        <param-value>classpath:applicationContext.xml</param-value>
    </context-param>
spring的配置文件applicationcontext.xml 不变。
person类 不变。
public class Servlet extends HttpServlet {
    protected void doPost(HttpServletRequest request, HttpServletResponse response) throws ServletException, IOException {

    }

    protected void doGet(HttpServletRequest request, HttpServletResponse response) throws ServletException, IOException {
        ServletContext servletContext =getServletContext();
//        ApplicationContext a=(ApplicationContext) servletContext.getAttribute(WebApplicationContext.class.getName() + ".ROOT");
        //和上面写的效果一样,spring给了我们对应的工具类,叫WebApplicationContextUtils
        ApplicationContext a=WebApplicationContextUtils.getWebApplicationContext(servletContext);
        Person person =(Person) a.getBean("person");
        System.out.println(person);
    }
}
index.jsp 不变
--------------------spring带的监听器ContextLoaderListener的源码理解------------------
在web里配的监听器ContextLoaderListener,进入初始化方法看一看。

进入源码里,找到这个方法:
servletContext.setAttribute(WebApplicationContext.ROOT_WEB_APPLICATION_CONTEXT_ATTRIBUTE, this.context);

这个方法存储ioc容器的key为:
WebApplicationContext.ROOT_WEB_APPLICATION_CONTEXT_ATTRIBUTE
点进去看,具体叫什么?

所以在servlet里这样的行为得到ioc容器是可以的:
ApplicationContext a=(ApplicationContext) servletContext.getAttribute(WebApplicationContext.class.getName() + ".ROOT");
但是我们的spring已经封装了这个功能,和上面写的效果一样,spring给了我们对应的工具类,叫WebApplicationContextUtils
ApplicationContext a=WebApplicationContextUtils.getWebApplicationContext(servletContext);
走入这个工具类的getWebApplicationContext方法的源码。

进入源码。上面这个方法return了下面这个方法。

本质上还是通过那个一大串字符串作为key,来获得ioc容器。spring通过封装使代码简洁。

 浙公网安备 33010602011771号