
SpringCloud Alibaba整合Sentinel
阿里开源组件之SpringCloud接入sentinel
一、概述
Sentinel: 分布式系统的流量防卫兵.
Sentinel 以流量为切入点,从流量控制、熔断降级、系统负载保护等多个维度保护服务的稳定性。
当你决定选用Sentinel的时候,应该已经明白Sentinel是干什么的,有什么作用,Sentinel主要用于微服务的流量防卫,而如今我们最熟知的微服务无外乎SpringCloud和Dubbo。
本篇就SpringCloud接入Sentinel进行简单的描述。SpringCloud接入其实就等于是SpringBoot接入,如果实在不想用SpringCloud的依赖,那就只能按照Servlet的接入方式了,这种方式对所有web项目都适用的,
如果大家正在寻找一个java的学习环境,或者在开发中遇到困难,可以加入我们的java学习圈,点击即可加入,共同学习,节约学习时间,减少很多在学习中遇到的难题。
代码可以在https://www.pomit.cn/java/spring/aliwork.html中的sentinel组件下载即可。
二、Dashboard的部署
2.1 简介
在Sentinel的官方文档中,介绍了控制台,讲了很多,反而让人看不懂。
其实它的意思就是,你别自己下载了,来用我们的阿里云控制台吧,名字叫AHAS Sentinel 控制台。
但是最好自己下载跑起来,绝对比阿里云这个快。下面讲述怎么玩。
在控制台地址下载sentinel-dashboard.jar,我下载的是sentinel-dashboard-1.7.2.jar。
2.2 部署
端口按照自己的意愿改不改都行。
java -Dserver.port=8080 -Dcsp.sentinel.dashboard.server=localhost:8080 -Dproject.name=sentinel-dashboard -jar sentinel-dashboard.jar
注意,如果你在windows上测试,powershell运行这个命令可能不成功,用cmd运行即可。
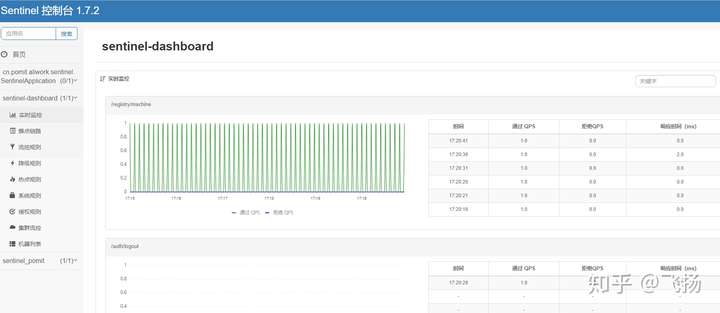
执行完成后,输入127.0.0.1:8080打开页面即可。注意端口。
界面如下:
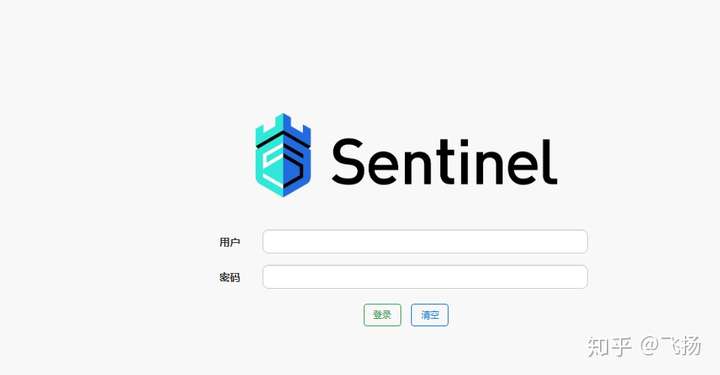
用户名密码都是sentinel
三、客户端接入
当你的web项目接入了dashboard,才代表你的web项目可以被监控流量。
3.1 引入依赖
需要引入spring-boot-starter-web、spring-cloud-starter-alibaba-sentinel.
依赖如下:
<dependencies>
    <dependency>
        <groupId>org.springframework.boot</groupId>
        <artifactId>spring-boot-starter-web</artifactId>
    </dependency>
    <dependency>
        <groupId>com.alibaba.cloud</groupId>
        <artifactId>spring-cloud-starter-alibaba-sentinel</artifactId>
    </dependency>
</dependencies>
这里,spring-boot-starter-web版本是2.1.5.RELEASE,spring-cloud-starter-alibaba-sentinel是2.1.0.RELEASE。
但是注意,我这里的版本管理dependencyManagement是这样写的:
<dependencyManagement>
    <dependencies>
        <dependency>
            <groupId>org.springframework.boot</groupId>
            <artifactId>spring-boot-dependencies</artifactId>
            <version>2.1.5.RELEASE</version>
            <type>pom</type>
            <scope>import</scope>
        </dependency>
        <dependency>
            <groupId>com.alibaba.cloud</groupId>
            <artifactId>spring-cloud-alibaba-dependencies</artifactId>
            <version>2.1.0.RELEASE</version>
            <type>pom</type>
            <scope>import</scope>
        </dependency>
    </dependencies>
</dependencyManagement>
3.2 配置文件
这里使用properties文件写配置,配置文件application.properties:
application.properties:
server.port=8080

spring.application.name: sentinel_pomit

spring.cloud.sentinel.transport.port=8719
spring.cloud.sentinel.transport.dashboard=localhost:8880
这里
- 应用名称为sentinel_pomit,如果不指定,在dashboard上就会显示你的包路径,很丑。
- spring.cloud.sentinel.transport.port是本地启的端口,与dashboard进行数据交互。官方文档是这样写的:这里的 spring.cloud.sentinel.transport.port 端口配置会在应用对应的机器上启动一个 Http Server,该 Server 会与 Sentinel 控制台做交互。比如 Sentinel 控制台添加了一个限流规则,会把规则数据 push 给这个 Http Server 接收,Http Server 再将规则注册到 Sentinel 中。
- spring.cloud.sentinel.transport.dashboard是指明了dashboard的地址。
3.3 客户端启动
使用main直接启动即可。无需其他配置。
SentinelApplication:
package cn.pomit.aliwork.sentinel;

import org.springframework.boot.SpringApplication;
import org.springframework.boot.autoconfigure.SpringBootApplication;

@SpringBootApplication
public class SentinelApplication {
    public static void main(String[] args) {
        SpringApplication.run(SentinelApplication.class, args);
    }
}
3.4 普通的web接口
下面建一个普通的web接口,来调用一个IpInfoService,获取ip地址,这个IpInfoService接入了Sentinel,并被Sentinel监控。
SentinelRest如下:
package cn.pomit.aliwork.sentinel.web;

import org.springframework.beans.factory.annotation.Autowired;
import org.springframework.web.bind.annotation.RequestMapping;
import org.springframework.web.bind.annotation.RequestMethod;
import org.springframework.web.bind.annotation.RestController;

import cn.pomit.aliwork.sentinel.model.ResultModel;
import cn.pomit.aliwork.sentinel.service.IpInfoService;

@RestController
@RequestMapping("/")
public class SentinelRest {
    @Autowired
    IpInfoService ipInfoService;

    @RequestMapping(value = "/ip", method = { RequestMethod.GET })
    public ResultModel welCome() {
        return ipInfoService.getIpInfo();
    }
}
3.5 Sentinel监控的Service
IpInfoService是业务逻辑处理类,其中逻辑处理方法getIpInfo被注解@SentinelResource(value = "ip_info", blockHandler = "exceptionHandler")包围。
这个注解@SentinelResource(value = "ip_info", blockHandler = "exceptionHandler")表示: 1. 注解表明了它需要被Sentinel监控。 2. blockHandler指明了如果被Sentinel阻止了该返回啥。
IpInfoService:
package cn.pomit.aliwork.sentinel.service;

import java.net.InetAddress;
import java.net.UnknownHostException;

import org.springframework.stereotype.Service;

import com.alibaba.csp.sentinel.annotation.SentinelResource;
import com.alibaba.csp.sentinel.slots.block.BlockException;

import cn.pomit.aliwork.sentinel.model.ResultModel;

@Service
public class IpInfoService {

    @SentinelResource(value = "ip_info", blockHandler = "exceptionHandler")
    public ResultModel getIpInfo() {
        String result = "";
        try {
            InetAddress address = InetAddress.getLocalHost();
            result = address.getHostAddress();
        } catch (UnknownHostException e) {
            e.printStackTrace();
        }
        return ResultModel.ok(result);
    }

    // Block 异常处理函数,参数最后多一个 BlockException,其余与原函数一致.
    public ResultModel exceptionHandler(BlockException ex) {
        ex.printStackTrace();
        return ResultModel.error("请求过于频繁");
    }
}
3.6 过程中用到的其他实体和工具
ResultModel :
package cn.pomit.aliwork.sentinel.model;

import java.io.Serializable;

/**
 * @author cff
 */
public class ResultModel implements Serializable{

    /**
     *
     */
    private static final long serialVersionUID = 7066077006430348190L;
    private String errorCode;
    private String message;
    private Object data;

    public ResultModel() {

    }

    public ResultModel(String errorCode, String message) {
        this.errorCode = errorCode;
        this.message = message;
    }

    public ResultModel(String errorCode, String message, Object data) {
        this.errorCode = errorCode;
        this.message = message;
        this.data = data;
    }

    public String geterrorCode() {
        return errorCode;
    }

    public void seterrorCode(String errorCode) {
        this.errorCode = errorCode;
    }

    public String getMessage() {
        return message;
    }

    public void setMessage(String message) {
        this.message = message;
    }

    public Object getData() {
        return data;
    }

    public void setData(Object data) {
        this.data = data;
    }

    public static ResultModel ok() {
        return new ResultModel("0000","成功");
    }

    public static ResultModel ok(Object data) {
        return new ResultModel("0000","成功", data);
    }

    public static ResultModel error() {
        return new ResultModel("1111","失败");
    }

    public static ResultModel error(String msg) {
        return new ResultModel("1111","失败", msg);
    }

    public static ResultModel error(String msg, Object data) {
        return new ResultModel("1111", msg, data);
    }
}
四、测试过程
4.1 流控规则
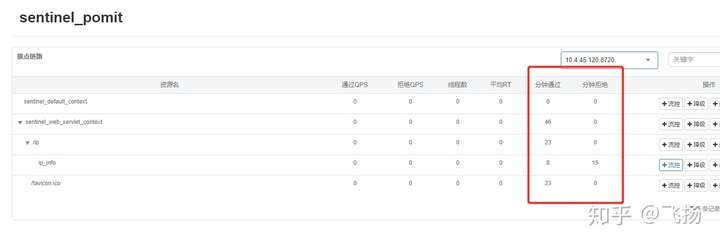
找到自己的应用,以及要限流的路径,我这里找到的是/ip路径:
点击右侧的流控,并设置规则:
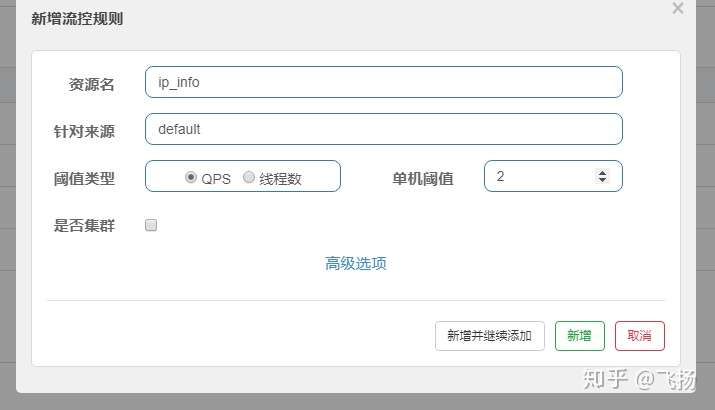
阈值自己设置,设置完成后,就可以测试了。
4.2 测试频次
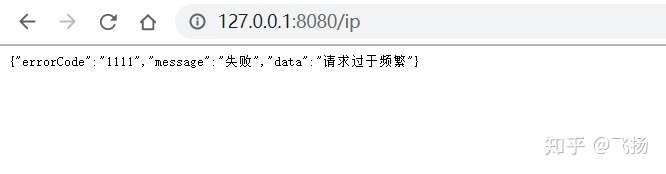
在浏览器上访问http://127.0.0.1:8080/ip, 点的快一点,就会出现:
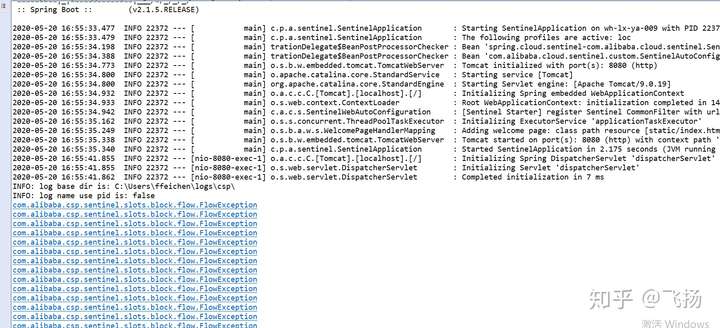
这时候,控制台上也会出现异常:
再看流控规则那块,已经有分钟通过和分钟拒绝的数据了:
作者:鲁班快跑
出处:https://www.cnblogs.com/zhusf/p/15875572.html
版权:本文版权归作者和博客园共有
转载:您可以随意转载、摘录,但请在文章内注明作者和原文链接。

 浙公网安备 33010602011771号