


vue3使用知识点笔记大全
vue3使用知识点笔记大全
一、vue3 项目搭建
npm 6.x
npm init vite@latest myvue3 --template vue

vue 3.2.26
使用 element plus ui 框架
npm i -S element plus
//全部引入
import ElementPlus from 'element-plus';
import 'element-plus/dist/index.css';
const Vue = createApp(App);
Vue.use(ElementPlus);
使用 scss
1 2 3 | npm install --save-dev sass-loadernpm install --save-dev node-sassnpm install --save-dev sass |
vite.config
1 2 3 4 5 6 7 8 9 10 11 12 13 14 15 16 | import { defineConfig } from 'vite';import vue from '@vitejs/plugin-vue';// https://vitejs.dev/config/export default defineConfig({ publicPath: './', //打包路径 css: { //配置scss全局变量和方法 preprocessorOptions: { scss: { additionalData: "@use './src/assets/scss/style.scss' as *;" } } }, plugins: [vue()]}); |
二、vu3 语法部分
生命周期
| vue2 | vue3 |
|---|---|
| beforeCreate | setup |
| created | setup |
| beforeMount | onBeforeMount |
| mounted | onMounted |
| beforeUpdate | onBeforeUpdate |
| updated | onUpdated |
| beforeDestory | onBeforeUnmount |
| destoryed | onUnmounted |
路由
1 2 3 4 | import { useRoute,useRouter } from 'vue-router';const router = useRouter();const route = useRoute(); |
状态管理

reactive
返回对象的响应式副本
注意:
reactive 返回的对象,重新赋值丢失响应式
reactive 返回的对象不可以解构
1 2 3 4 5 6 7 | const form = reactive({ name: 'aa', age: 20});const { name, age } = form; //通过解构 此时name,age会丢失响应 要想让它具有响应式 需要通过toRefs处理const { name, age } = toRefs(form); //此时name,age具有响应 |
ref
所有通过 ref 创建的数据 需要通过 xxx.value 取它的值, 在模板中无需通过.value。
可以简单地把 ref(obj) 理解为这个样子 reactive({value: obj})
1 2 3 4 5 6 7 8 9 10 11 12 13 14 15 16 17 18 19 20 21 22 23 24 25 26 27 28 29 30 31 32 33 | import { ref } from "vue";const count = ref(1);console.log(cout.value); //1ref获取单个dom元素<div ref="root"></div>import { ref } from "vue";const root = ref(null);onMounted(() => { console.log(root.value) //dom元素}),ref获取v-for中dom元素<ul> <li :ref="setLiDom" v-for="(item, index) in state.list" :key="index"> {{ item }} </li></ul>import { ref, reactive } from "vue";const state = reactive({ list: [1, 2, 3, 4]})const refList = ref([]);const setLiDom = (el) => { if(el){ liItem.value.push(el); }};onMounted(() => { console.log(root.value) //Proxy {0: li, 1: li, 2: li, 3: li}}), |
toRef 和 toRefs
-
12345678910111213141516171819
toRef 用来为源响应式对象上的某个 property 新创建一个ref。conststate = reactive({foo: 1,bar: 2});//目的使state对象中的foo属性保持响应式连接,修改其中一个都会同步修改那个属性constfooRef = toRef(state,'foo');toRefs 将响应式对象转换为普通对象,其中结果对象的每个 property 都是指向原始对象相应 property 的ref。//toRefs常用于 es6 的解构赋值操作,保持每个属性的都为响应式setup(){letdata = reactive({name:'张三',age: 18});return{...toRefs(data)}}
toRaw 、markRaw
通过toRaw获取到原始对象,改变原始对象的值会同时改变响应式对象的值,但不会更新视图
1 2 3 4 5 6 | const foo = {}const reactiveFoo = reactive(foo)//reactiveFoo 和 foo 是引用的同一个地址console.log(toRaw(reactiveFoo) === foo) // true |
通过markRaw包裹的原始对象,使其永远不会转换为响应式对象,也就是说转换之后修改值并不会更新视图
1 2 | const foo = markRaw({})console.log(isReactive(reactive(foo))) // false |
unref
如果参数是一个 ref,则返回内部值,否则返回参数本身
1 2 3 4 5 | let obj = ref({ a: 1, b: 2 });let reult = isRef(obj) ? obj.value : obj;//等价于let reult = unref(obj); |
shallowRef 和 triggerRef
1 2 3 4 5 6 7 8 9 10 11 12 13 14 15 16 17 18 19 20 | setup() { //shallowRef创建一个比ref更浅的响应式对象,改变其属性值,不会触发监听 const foo = shallowRef({ a: 1111, b: 2222 }); setTimeout(() => { foo.value.a = 3333; triggerRef(foo); //需要手动触发才能改变a的值 }, 2000); watchEffect(() => { console.log(foo.value.a); //1111 3333 }); return { foo };} |
defineProps 和 defineEmits
在 <script setup> 中必须使用 defineProps 和 defineEmits API 来声明 props 和 emits
1 2 3 4 5 6 7 | <script setup>const props = defineProps({ foo: String})const emit = defineEmits(['change', 'delete'])</script>立即触发回调函数 |
defineExpose
使用 <script setup> 的组件是默认关闭的,也就是说通过 ref 和$parent 是无法访问到的
解决办法:
1 2 3 4 | import { ref } from 'vue';const a = 1;const b = ref(2);defineExpose({ a, b }); |
computed
vue3中不再支持filter过滤器,vue2 中的filter 使用计算属性computed或者方法代替
1 2 3 4 5 6 7 8 9 10 11 12 13 | import { computed, ref } from "vue";const count = ref(1);const total = computed(()=>{ //需要根据传递的参数进行计算 // return (val)=>{ // return val + count.value; // } return count.vallue;})setInterval(() => { count.value ++;}, 1000); |
watch、watchEffect
与选项式 API 中的 watch 完全等效
语法:watch(source, callback, [options])
options: deep(深度监听) 、immediate(立即触发回调函数)
1 2 3 4 5 6 7 8 9 10 11 12 13 14 15 16 17 18 19 20 | // 侦听一个 getterconst state = reactive({ count: 0 });watch( () => state.count, (count, prevCount) => { /* ... */ });// 直接侦听一个 refconst count = ref(0);watch(count, (count, prevCount) => { /* ... */});//侦听多个数据//注意多个同步更改只会触发一次侦听器。watch([fooRef, barRef], ([foo, bar], [prevFoo, prevBar]) => { /* ... */}); |
与watch的区别:
1、不需要指定监听的值,回调仅在侦听源发生变化时被调用
2、初始化会执行一次
3、watchEffect只能拿到变化后的值
1 2 3 4 | import { watchEffect } from 'vue';watchEffect(() => { /* ... */}) |
watchEffect 与 watch 的区别:
provide、inject
依赖注入,用来实现深层次组件之间的数据传递
1 2 3 4 5 6 7 8 9 10 11 12 13 14 15 16 17 18 19 20 21 22 23 24 25 | //parentimport { reactive, readonly, provide } from 'vue';const updateInfo = () => { baseInfo.name = '李四'; baseInfo.age = 20;};const baseInfo = reactive({ name: '张三', age: 12, updateInfo: updateInfo}); //此时的baseInfo是响应式的, 添加readonly是为了防止孙子组件直接修改值provide('baseInfo', readonly(baseInfo));//sonimport { inject } from 'vue';const info = inject('baseInfo');console.log(info); //{ name:"张三", age:12, updateInfo: function }const changeValue = () => { info.updateInfo();}; |
slot (vue 内置组件)
属性:
- name - string, 用于具名插槽
用法:
1 、基本使用和默认值
//父组件
<div>
    <child-com>只有子组件有插槽我就显示</child-com>
</div>

//子组件child-com
<div>
    <slot>我是插槽默认值</slot>
</div>

//页面显示
只有子组件有插槽我就显示
2 、具名插槽
v-slot:插槽名 可以简写为 #插槽名
动态插槽名: v-slot:[dynamicSlotName]
1 2 3 4 5 6 7 8 9 10 11 12 13 14 15 16 17 18 19 20 21 22 23 24 | //父组件<div> <child-com> <template v-slot:header>头部1111</template> <template #center>中间222</template> <template #footer>底部333</template> </child-com></div>//子组件child-com<div> <div class="top"> 上边显示: <slot name="header"></slot> </div> <div class="center"> 中间显示: <slot name="center"></slot> </div> <div class="bottom"> 底部显示: <slot name="footer"></slot> </div></div>//页面显示 上边显示:头部1111 中间显示:中间222 底部显示:底部333 |
3 、作用域插槽
子组件的数据可以在父组件中使用
使用场景:
当一个组件被用来渲染一个数组元素时,我们使用插槽,并且希望插槽中没有显示每项的内容;
1 2 3 4 5 6 7 8 9 10 11 12 13 14 15 16 17 18 19 20 21 22 23 24 25 26 27 28 29 30 31 32 33 34 35 36 37 38 39 40 41 | //父组件<div> <child-com> <template #title="scope"> <h1>{{ scope.msg }}</h1> </template> <template v-slot:default="{ row, index }"> <span>{{ index }}、</span> <span>{{ row.name }}</span> - <span>{{ row.age }}</span> </template> </child-com></div>//子组件child-com<div> <slot :msg="data.msg" name="title"></slot> <div v-for="(item, index) in data.list" :key="index"> <slot :row="item" :index="index"></slot> </div></div>import { reactive } from 'vue';const data = reactive({ msg: 'hello world', list: [ { name: 'jane', age: 12 }, { name: 'xiaoming', age: 18 } ]});//页面显示hello world0、jane - 121、xiaoming - 18 |
teleport (vue 内置组件)
功能:能够将我们的模板或者组件移动到相应的 DOM 元素中
属性:
- to - string, 必须是有效的目标元素,例如:body、#some-id、.some-class
- disabled - boolean, 为 true 表示移动到 to 指定的目标元素, false 表示不移动,
用法:
1 2 3 4 5 6 7 | <teleport to="body"> <div class="model"></div></teleport><teleport to="#app"> <child-component name="hero"></child-component></teleport> |
注意事项:
- 被移动的组件不会影响传值
- 在同一目标上使用多个 teleport,实际上是一个追加的过程
- 如果在组件上动态切换 disabled 的值,并不会导致其销毁和重新创建
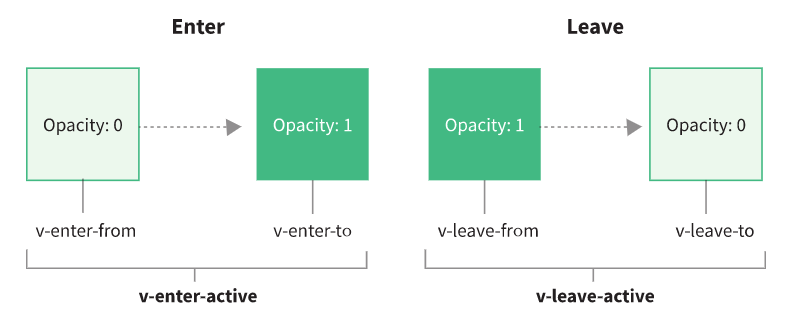
transition (vue 内置组件)
复习 css:
缩写: transition: property duration timing-function delay;
- transition-property
- transition-duration
- transition-timing-function: linear|ease|ease-in|ease-out|ease-in-out|cubic-bezier(n,n,n,n);
- transition-delay
属性
-
name - string 用于自动生成 CSS 过渡类名
-
appear - boolean 是否在初始渲染时使用过渡。默认为 false。
-
css - boolean 是否使用 CSS 过渡类。默认为 true。如果设置为 false,将只通过组件事件触发注册的 JavaScript 钩子
-
type - string 指定过渡事件类型。可选值 "transition" 和 "animation"。默认自动检测出持续时间长的为过渡事件类型。
-
mode - string 控制离开/进入过渡的时间序列。有效的模式有 "out-in" 和 "in-out"
- 为了解决两个元素相互显示时,会同时执行过渡
css 过渡 和 css 动画
1 2 3 4 5 6 7 8 9 10 11 12 13 14 15 16 17 18 19 20 21 22 23 24 25 26 27 28 29 30 31 32 33 34 35 36 37 38 39 40 41 42 43 44 45 46 47 48 49 50 51 52 53 54 55 56 | //html<div id="demo"> <button @click="show = !show"> Toggle </button> <transition name="fade"> <p v-if="show">hello</p> </transition></div>//css过渡.fade-enter-active,.fade-leave-active { transition: all 1s ease;}.fade-enter-active,.fade-leave-active { transition: all 1s;}.fade-enter-from { transform: translateY(200px); opacity: 0;}.fade-leave-to { transform: translateX(200px); opacity: 0;}//css动画.fade-enter-active { animation: bounce-in 1s;}.fade-leave-active { animation: bounce-in 1s reverse;}@keyframes bounce-in { 0% { transform: scale(0); } 50% { transform: scale(1.25); } 100% { transform: scale(1); }}使用 三方库 animate.css//安装 版本记录 4.1.1npm install animate.css --save//引入import 'animate.css'; |
自定义过渡类名:
enter-from-class
enter-active-class
enter-to-class
leave-from-class
leave-active-class
leave-to-class
使用:
1 2 3 4 5 6 | <transition enter-active-class="animate__animated animate__tada" leave-active-class="animate__animated animate__bounce"> <div v-show="flag">hello world</div></transition> |
transition 的 JavaScript 钩子
1 2 3 4 5 6 7 8 9 10 11 12 13 | <transition @before-enter="beforeEnter" @enter="enter" @after-enter="afterEnter" @enter-cancelled="enterCancelled" @before-leave="beforeLeave" @leave="leave" @after-leave="afterLeave" @leave-cancelled="leaveCancelled" :css="false"> <!-- ... --></transition> |
本文来自博客园,作者:zhupan,转载请注明原文链接:https://www.cnblogs.com/zhupanpan/p/17462602.html


【推荐】国内首个AI IDE,深度理解中文开发场景,立即下载体验Trae
【推荐】编程新体验,更懂你的AI,立即体验豆包MarsCode编程助手
【推荐】抖音旗下AI助手豆包,你的智能百科全书,全免费不限次数
【推荐】轻量又高性能的 SSH 工具 IShell:AI 加持,快人一步
· DeepSeek 开源周回顾「GitHub 热点速览」
· 物流快递公司核心技术能力-地址解析分单基础技术分享
· .NET 10首个预览版发布:重大改进与新特性概览!
· AI与.NET技术实操系列(二):开始使用ML.NET
· 单线程的Redis速度为什么快?