通过PHP前端后台交互/通过ajax前端后台交互/php基础传输数据应用/简单的留言版/简单的注册账户/简单的登录页/
前 言
PHP
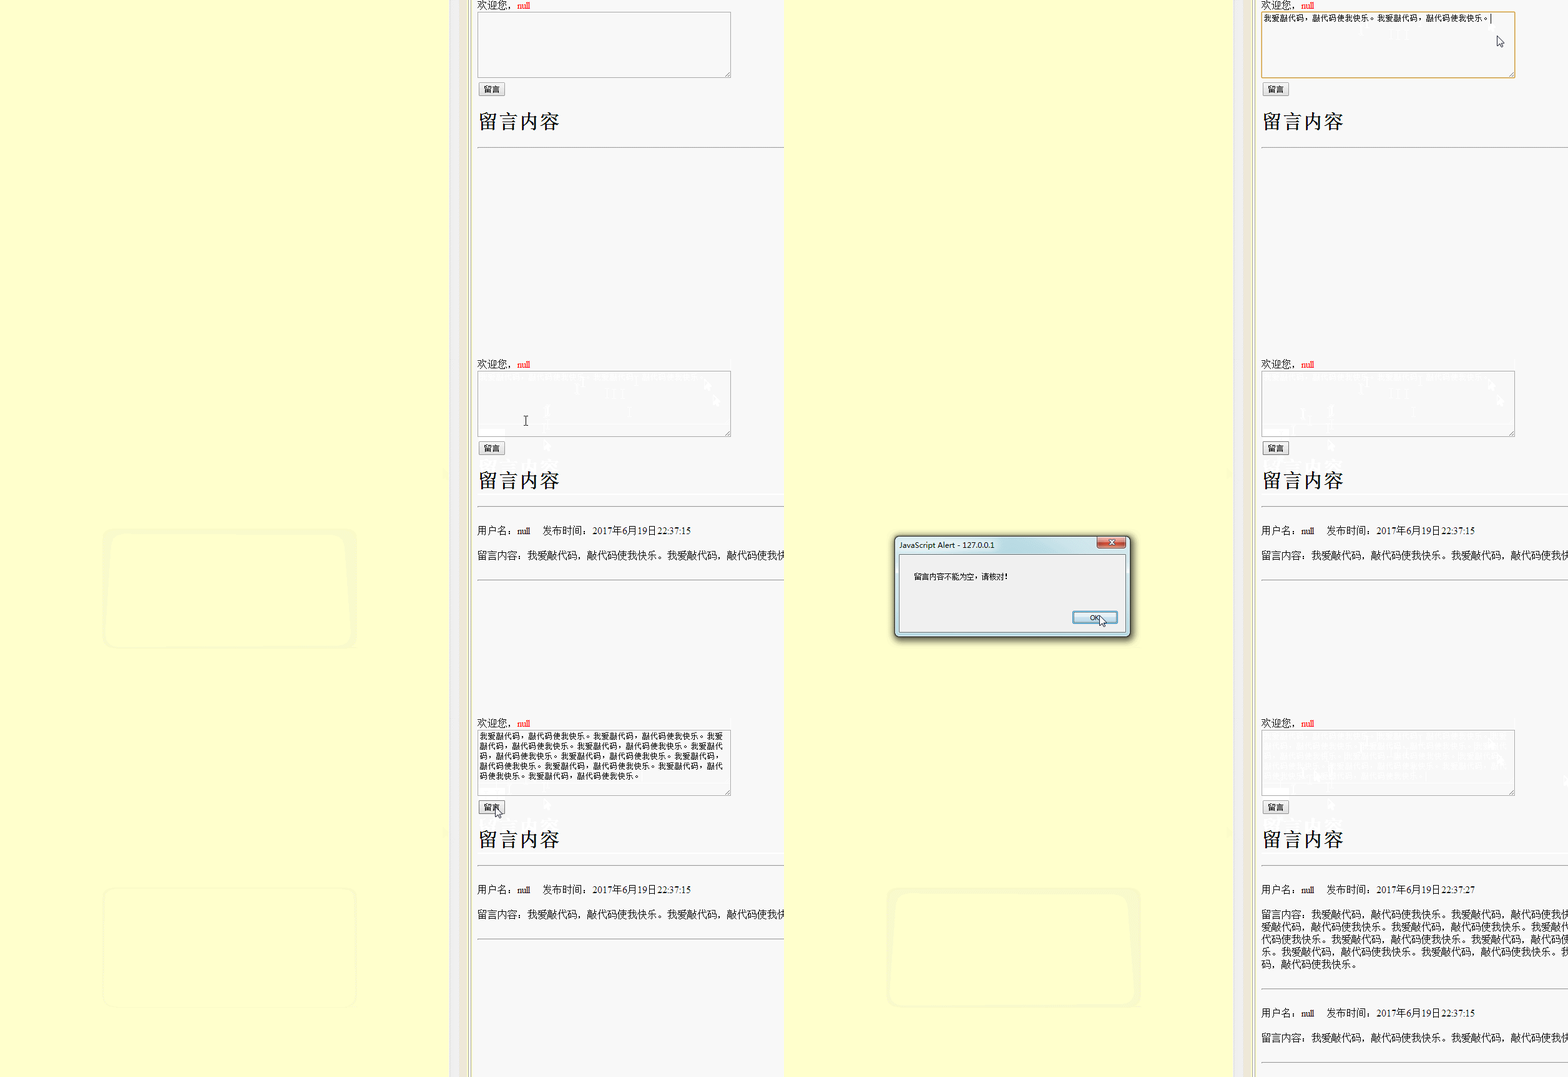
通过上一篇博客,注册账号与登录页面--前后台数据交互 跳转转到index主页,接下来进入主页留言板功能,通过ajax向后台传输数据,同时发表留言。
具体的内容分析如下:
① PHP中的数据传输-->>--在主页先添加基础HTML5基本框架,通过form表单提交数据
>>由主页传输给主页后台-->>主页后台经过转码保存实例化的文件
②主页后台通过判断(是否保存文件)使用输出语句输出true或false,前台通过ajax中的post中的function函数判断
前端通过判断ture和false,通过if语句刷新页面。
③内容添加是通过js函数getData(),函数自动调用添加。当然由前台添加时也是通过一个show后台传输数据。
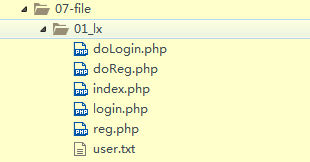
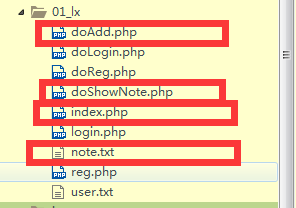
总共总共8个文件:
其中07_file与libs同一级别 代码植入请看具体内容。

↑ 注册账号与登录页面--前后台数据交互 ↑ 本篇增加与需要修改index文件
↑ 插件
代码注释里面有很详细的解析,如有需要请仔细阅读。(希望可以帮助到你)
| 1、 注册账号与登录页面效果图 |

| 2、 主页留言板效果图 |

新的代码:

1 <!DOCTYPE html> 2 <html> 3 <head> 4 <meta charset="UTF-8"> 5 <title></title> 6 <style type="text/css"> 7 #note{ 8 width: 400px; 9 height:100px; 10 } 11 </style> 12 </head> 13 <body> 14 <div id="div1"></div> 15 <textarea name="note" id="note"></textarea> 16 <br /> 17 <input type="button" id="submit" value="留言" /> 18 19 <h1>留言内容</h1> 20 <hr> 21 <div id="liuyanban"> 22 23 </div> 24 </body> 25 26 27 <script src="../../libs/jquery-3.1.1.js"></script> 28 <script> 29 $(function(){ 30 //↓只执行函数直接调用getData,触发ajax中的post函数,具体内容往下看。 31 getData(); 32 33 //↓主页面的红字(账户名的获取) 34 var userName = '<?php echo isset($_GET["name"])?$_GET["name"]:"null"; ?>'; 35 // ↓一个if判断,当用户名为空也就是直接打开index页面返回登录页面login.php 36 // if(userName=="null"){ 37 // location = "login.php"; 38 // } //↑为了方便观看,我已关闭,这部分可以省略。 39 40 //↓主页最上放的 欢迎您,红色的字。 41 $("#div1").html("欢迎您,<span style='color:red;'>"+userName+"</span>"); 42 43 //↓通过JQuery语言,捕捉id为submit,绑定click事件,函数为function里面的内容。 44 $("#submit").on("click",function(){ 45 //↓捕捉id为note的内容为定义变量 nateval。也就是文本框里面的内容 46 var noteVal = $("#note").val(); 47 //if判断文本框里面的内容不能为空,为空return 48 if(noteVal==""){ 49 alert("留言内容不能为空,请核对!"); 50 return; 51 } 52 //调用getTime函数给变量time。 53 var time = getTime(); 54 55 // 对象 56 var note = { 57 "userName":userName, 58 "time":time, 59 "noteVal":noteVal 60 } 61 62 //ajax向页面 doAdd.php 发送数据,并输出结果(取决于所返回的内容) 63 $.post("doAdd.php",note,function(data){ 64 if(data=="true"){ 65 alert("留言内容提交成功!"); 66 //刷新页面 67 location.reload(true); 68 69 }else{ 70 alert("留言失败!原因不明!"); 71 } 72 }); 73 }); 74 }); 75 //搭建一个getData函数,当调用的时候才执行。 76 function getData(){ 77 //输出来自请求页面 doShowNote.php 的结果 78 $.post("doShowNote.php",function(data){ 79 //↓ 把形参用[;]分隔为一个个字符串数组。 80 var arr = data.split("[;]"); 81 //↓ 删除最后一个空数组 82 arr.pop(); 83 //↓ 控制台打印,观看字符串数据的样式。 84 console.log(arr); 85 //↓ for循环把每次note.txt文件更新的数据从下往上排列出来 86 for (var i=0;i< arr.length;i++) { 87 //↓ 取得当前的第i+1个数组。 88 var thisNote = $.parseJSON(arr[i]); 89 //↓ 排列的样式。 90 var div = "<br/><div id='div"+i+"'>用户名:"+thisNote.userName+" 发布时间:"+thisNote.time+"<br/><br/> 留言内容:"+thisNote.noteVal+"</div><br/><hr>" 91 //↓ 从id为liuyanban的前端插入排列的样式 92 $("#liuyanban").prepend(div); 93 } 94 }) 95 } 96 97 98 99 //↓获得时间 100 function getTime(){ 101 var today = new Date(); 102 var year = today.getFullYear(); 103 var month = today.getMonth(); 104 var date1 = today.getDate(); 105 var hours = today.getHours(); 106 var minutes = today.getMinutes()<10?"0"+today.getMinutes():today.getMinutes(); 107 var seconds = today.getSeconds()<10?"0"+today.getSeconds():today.getSeconds(); 108 var dateTime = year+"年"+(month+1)+"月"+date1+"日"+hours+":"+minutes+":"+seconds; 109 return dateTime; 110 } 111 112 113 114 115 116 </script> 117 </html>

 1 <?php
 2
 3     header("Content-Type:text/html;charset=utf-8");
 4
 5     //↓ 获得主页传输过来的用户名(字符串内容)
 6     $userName = $_POST["userName"];
 7     //↓ 获得主页传输过来的时间(字符串内容)
 8     $time = $_POST["time"];
 9     //↓ 获得主页传输过来的文本框内容。(字符串内容)
10     $noteVal = $_POST["noteVal"];
11     //↓ 通过关联数组定义每个从前端传输过来的字符串,添加key值,定义为变量arr
12     $arr = ["userName"=>$userName,"time"=>$time,"noteVal"=>$noteVal];
13     //↓ 对变量进行 JSON 编码
14     $str = json_encode($arr);
15     //↓ 将一个字符串写入文件note.txt,字符串后面加入一个[;],作用用来分隔每个字符串。FILE_APPEND为追加数据。
16     $num = file_put_contents("note.txt", $str."[;]",FILE_APPEND);
17     //↓ if判断,echo输出内容为后台返回tada形参的值。
18     if($num>0){
19         echo "true";
20     }else{
21         echo "false";
22     }

1 <?php
2
3     header("Content-Type:text/html;charset=utf-8");
4     //file_get_contents将note.txt文件读入一个字符串,
5     //↓并且通过echo向前台data形参输出返回值。
6     echo file_get_contents("note.txt");
↑第三个虽然少但是必不可少。
note.txt由文件doAdd.php自动在文件夹01_lx中生成。
下面重复上一篇的代码如果不想跳转页面直接点开看就可以,里面有详细解析。

1 <!DOCTYPE html> 2 <html> 3 <head> 4 <meta charset="UTF-8"> 5 <title>用户登录</title> 6 <link rel="stylesheet" type="text/css" href="../../libs/bootstrap.css"/> 7 <style type="text/css"> 8 body{ 9 margin: 0px; 10 padding: 0px; 11 background-color: #CCCCCC; 12 } 13 .panel{ 14 width: 380px; 15 height: 280px; 16 position: absolute; 17 left: 50%; 18 margin-left: -190px; 19 top: 50%; 20 margin-top: -140px; 21 } 22 .form-horizontal{ 23 padding: 10px 20px; 24 } 25 .btns{ 26 display: flex; 27 justify-content: center; 28 } 29 </style> 30 </head> 31 32 <!--简单的样式表--> 33 <body> 34 <div class="panel panel-primary"> 35 <div class="panel-heading"> 36 <div class="panel-title">用户登录</div> 37 </div> 38 <div class="panel-body"> 39 <form class="form-horizontal"> 40 <div class="form-group"> 41 <label>用户名</label> 42 <input type="text" class="form-control" name="userName"/> 43 </div> 44 <div class="form-group"> 45 <label>密码</label> 46 <input type="password" class="form-control" name="pwd"/> 47 </div> 48 49 <div class="form-group btns"> 50 <input type="button" class="btn btn-primary" value="登录系统" id="submit"/> 51 52 <a type="button" class="btn btn-success" href="reg.php"/>注册账号</a> 53 </div> 54 55 </form> 56 </div> 57 </div> 58 </body> 59 60 <script src="../../libs/jquery-3.1.1.js"></script> 61 <script type="text/javascript"> 62 $(function(){ 63 //↓定位id:submit事件绑定,click点击时候触犯function函数 64 $("#submit").on("click",function(){ 65 //↓创建一个变量str = 选取form表单,通过serialize()创建以标准 URL 编码表示的文本字符串 66 var str = $("form").serialize(); 67 //↓打印出来看看是什么个样子的,传输给后台才好操作。 68 console.log(str); //具体样子:userName=value&pwd=value 69 /*通过ajax中的post方法,给后台doLogin.php传输数据,给变量str(url文件类型)添加名字“formData”, 70 * 函数function是接受后台返回的默认值也就是echo输出的值*/ 71 $.post("doLogin.php",{"formData":str},function(data){ 72 //↓打印后台echo输出的值,查看类型 73 //↑console.log(data); 74 75 //↓判断函数如果返回的是true,则通过location打开新的页面,同是在页面后面加?name+你输入的用户名,用来给主页传值(主页获得用户名) 76 if(data=="true"){ 77 location = "index.php?name="+$("input[name='userName']").val(); 78 //↓传回其他输出则弹出"用户名或密码错误!!!"窗口 79 }else{ 80 alert("用户名或密码错误!!!"); 81 } 82 }); 83 }); 84 }); 85 </script> 86 </html>

 1 <?php
 2
 3     header("Content-Type:text/html;charset=utf-8");
 4
 5     //↓定义str一个变量,通过post方法获得前台传输过来的数据。$_POST["fieldname"]
 6     $str = $_POST["formData"];
 7
 8     //↓打印从前台收到的数据,通过打印传输会前台,具体内容通过形参data表示
 9     //echo $str;
10     //↑打印$str时↓(下方)必须全部注释,输出的具体样子:userName=value&pwd=value
11
12 /*    php中的数组,先通过数组explode方法-把数据内容通过$分为数组,
13     ↓再定义第一个数组内容(用户名的value)为$userName。["userName=value","pwd=value"]*/
14     list($userName) = explode("&", $str);
15
16 /*    php中的数组,先通过数组explode方法-把数据内容通过$分为数组,
17     ↓再定义二个数组内容(用户名的value)为$userName。["userName=value","pwd=value"]*/
18     list(,$pwd) = explode("&", $str);
19
20     //定义一个变量users,通过php中的文件函数file_get_contents,读取01_lx文件下的user.txt文件内容中的字符串。
21     $users = file_get_contents("user.txt");//这一步就是从文件中读取账号,密码。
22     //↑具体的文件内容大概:userName=111&pwd=111&rePwd=111[;]userName=222&pwd=222&rePwd=222[;]
23     //↑通过上面的文件内容可以知道每个账号密码后面都有一个[;]
24
25     //↓定义一个变量userArr,通过explode函数把用变量users内容用[;]分为数组 ["userName=value","pwd=value"]
26     $userArr = explode("[;]", $users);
27
28     //通过foreach遍历整个$userArr数组
29     foreach ($userArr as $user) {
30
31         //每一组$user分别为userName=value(111)&pwd=value(111)&rePwd=value(111)
32         //↓每一组都分别再通过explode函数分为数组,定义变量$realName为第一个数组名。
33         list($realName) = explode("&", $user);//具体内容为$realName=userName=value(111)
34         //↓每一组都分别再通过explode函数分为数组,定义变量$realPwd为第二个数组名。
35         list(,$realPwd) = explode("&", $user);//具体内容为$realPwd=pwd=value(111)
36         //↓每一组都分别判断一次,当变量$userName==变量$realName同时满足变量$pwd==变量$realPwd
37         if($userName==$realName&&$pwd==$realPwd){
38         //php中的输出echo 内容为true
39             echo "true";
40             die();
41         }
42     }
43     //↓如果账户或密码没有输入则,返回false
44     echo "false";

1 <!DOCTYPE html> 2 <html> 3 <head> 4 <meta charset="UTF-8"> 5 <title>用户注册</title> 6 <link rel="stylesheet" type="text/css" href="../../libs/bootstrap.css"/> 7 <style type="text/css"> 8 body{ 9 margin: 0px; 10 padding: 0px; 11 background-color: #CCCCCC; 12 } 13 .panel{ 14 width: 380px; 15 height: 350px; 16 position: absolute; 17 left: 50%; 18 margin-left: -190px; 19 top: 50%; 20 margin-top: -175px; 21 } 22 .form-horizontal{ 23 padding: 10px 20px; 24 } 25 .btns{ 26 display: flex; 27 justify-content: center; 28 } 29 </style> 30 </head> 31 32 33 <body> 34 <div class="panel panel-primary"> 35 <div class="panel-heading"> 36 <div class="panel-title">用户注册</div> 37 </div> 38 <div class="panel-body"> 39 <form class="form-horizontal"> 40 <div class="form-group"> 41 <label>用户名</label> 42 <input type="text" class="form-control" name="userName"/> 43 </div> 44 <div class="form-group"> 45 <label>密码</label> 46 <input type="password" class="form-control" name="pwd" /> 47 </div> 48 <div class="form-group"> 49 <label>确认密码</label> 50 <input type="password" class="form-control" name="rePwd" /> 51 </div> 52 53 <div class="form-group btns"> 54 <input type="button" class="btn btn-primary" value="确定注册" id="submit"/> 55 56 <a type="button" class="btn btn-success" href="login.php"/>返回登录</a> 57 </div> 58 59 </form> 60 </div> 61 </div> 62 </body> 63 64 <script src="../../libs/jquery-3.1.1.js"></script> 65 //↑jquery插入代码 66 <script type="text/javascript"> 67 $(function(){ 68 //↓捕捉idsubmit绑定click事件,function为发生事件时的函数。 69 $("#submit").on("click",function(){ 70 //↓创建一个变量str,选取form表单,通过serialize()创建以标准 URL 编码表示的文本字符串 71 var str = $("form").serialize(); 72 //↓打印出来看看是什么个样子的,传输给后台才好操作。 73 console.log(str); 74 75 /*↓通过ajax中的post方法,给后台doReg.php传输数据,给变量str(url文件类型)添加名字“formData”, 76 函数function是接受后台返回的默认值也就是echo输出的值*/ 77 $.post("doReg.php",{"formData":str},function(data){ 78 //↓打印后台echo输出的值,查看类型 79 //↑console.log(data); 80 81 //↓判断函数如果返回的是true,则弹窗提示创建成功,通过location跳转到login.php(登录页面)。 82 if(data=="true"){ 83 alert("注册成功!即将跳转登陆页!"); 84 location = "login.php"; 85 //返回其他值,则弹窗提示 "注册失败!因为啥我不知道!" 86 }else{ 87 alert("注册失败!因为啥我不知道!"); 88 } 89 }); 90 }); 91 }); 92 </script> 93 </html>

 1 <?php
 2
 3     header("Content-Type:text/html;charset=utf-8");
 4
 5     /*↓定义str一个变量,通过post方法获得前台传输过来的数据,
 6             并且在每个数据后方加入一个[;]——>用以分隔每个新数据*/
 7     $str = $_POST["formData"]."[;]";
 8
 9     //定义一个变量$num,通过php中的文件函数file_put_contents把每个str数据追加到01_lx文件下面的"user.txt"文件中。
10     $num = file_put_contents("user.txt", $str,FILE_APPEND);//user.txt文件没有的话会创建新的user.txt文件
11     //↑FILE_APPEND是追加到文件中,保证每个数据都会追加到"user.txt"文件中。
12
13     //↓简单的判断,不做过多的阐述。
14     if($num>0){
15         //输出语句,内容为后台返回前台$.post中的function的形参。
16         echo "true";
17     }else{
18         //输出语句,内容为后台返回前台$.post中的function的形参。
19         echo "false";
20     }
use.txt由文件doReg.php自动在文件夹01_lx中生成。

 1 <!DOCTYPE html>
 2 <html lang="zh">
 3 <head>
 4     <meta charset="UTF-8" />
 5     <meta name="viewport" content="width=device-width, initial-scale=1.0" />
 6     <meta http-equiv="X-UA-Compatible" content="ie=edge" />
 7     <title>Document</title>
 8 </head>
 9 <body>
10     欢迎您,<span style='color:red;'><?php echo $_GET["name"]; ?></span><br>
11     我是主页!
12
13 </body>
14 </html>
反思,复盘,每天收获一点---------------------期待更好的自己。


