
七、Ceph之对象存储RadosGW使用
1、RadosGW对象存储说明
RadosGW 是对象存储(OSS,Object Storage Service)的一种实现方式,RADOS 网关也称为Ceph对象网关、RADOSGW、RGW,是一种服务,使客户端能够利用标准对象存储API 来访问Ceph集群,它支持AWS S3 和Swift API,rgw 运行于librados 之上,在ceph 0.8 版本之后使用Civetweb的web 服务器来响应api 请求,可以使用nginx 或或者apache 替代,客户端基于http/https协议通过RESTful API 与rgw 通信,而rgw 则使用librados 与ceph 集群通信,rgw 客户端通过s3 或者swift api 使用rgw 用户进行身份验证,然后rgw 网关代表用户利用cephx 与ceph存储进行身份验证。
S3 由Amazon 于2006 年推出,全称为Simple Storage Service,S3 定义了对象存储,是对象存储事实上的标准,从某种意义上说,S3 就是对象存储,对象存储就是S3,它对象存储市场的霸主,后续的对象存储都是对S3 的模仿。
1)通过对象存储将数据存储为对象,每个对象除了包含数据,还包含数据自身的元数据。
2)对象通过Object ID 来检索,无法通过普通文件系统的方式通过文件路径及文件名称操作来直接访问对象,只能通过API 来访问,或者第三方客户端(实际上也是对API 的封装)。
3)对象存储中的对象不整理到目录树中,而是存储在扁平的命名空间中,Amazon S3 将这个扁平命名空间称为bucket,而swift 则将其称为容器。
4)无论是bucket 还是容器,都不能嵌套。
5)bucket 需要被授权才能访问到,一个帐户可以对多个bucket 授权,而权限可以不同。
6)方便横向扩展、快速检索数据。
7)不支持客户端挂载,且需要客户端在访问的时候指定文件名称。
8)不是很适用于文件过于频繁修改及删除的场景。
ceph 使用bucket 作为存储桶(存储空间),实现对象数据的存储和多用户隔离,数据存储在bucket 中,用户的权限也是针对bucket 进行授权,可以设置用户对不同的bucket 拥有不通的权限,以实现权限管理
bucket 特性:
1)存储空间是您用于存储对象(Object)的容器,所有的对象都必须隶属于某个存储空间,可以设置和修改存储空间属性用来控制地域、访问权限、生命周期等,这些属性设置直接作用于该存储空间内所有对象,因此您可以通过灵活创建不同的存储空间来完成不同的管理功能。
2)同一个存储空间的内部是扁平的,没有文件系统的目录等概念,所有的对象都直接隶属于其对应的存储空间。
3)每个用户可以拥有多个存储空间
4)存储空间的名称在OSS 范围内必须是全局唯一的,一旦创建之后无法修改名称。
5)存储空间内部的对象数目没有限制。
bucket 命名规范:
1)只能包括小写字母、数字和短横线(-)。
2)必须以小写字母或者数字开头和结尾。
3)长度必须在3-63 字节之间
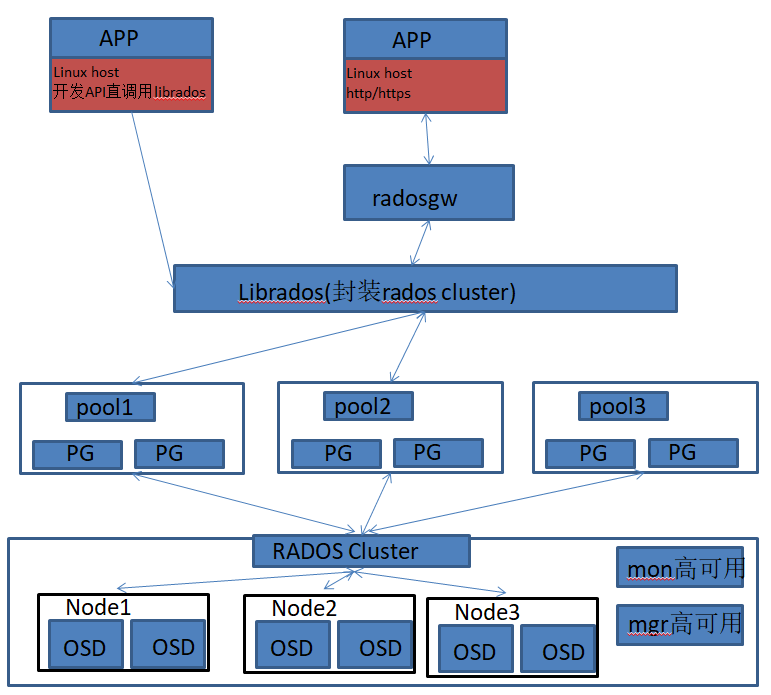
Radosgw的架构图
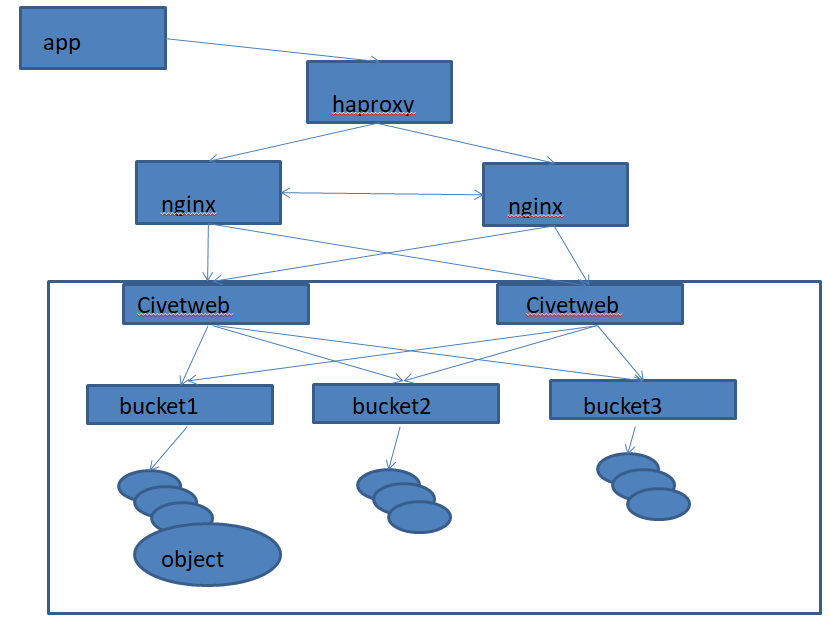
Radosgw的逻辑图

1)Amazon S3:提供了user、bucket 和object 分别表示用户、存储桶和对象,其中bucket 隶属于user,可以针对user 设置不同bucket 的名称空间的访问权限,而且不同用户允许访问相同的bucket。
2)OpenStack Swift:提供了user、container 和object 分别对应于用户、存储桶和对象,不过它还额外为user 提供了父级组件account,用于表示一个项目或租户,因此一个account 中可包含一到多个user,它们可共享使用同一组container,并为container 提供名称空间。
3)RadosGW:提供了user、subuser、bucket 和object,其中的user 对应于S3 的user,而subuser则对应于Swift 的user,不过user 和subuser 都不支持为bucket 提供名称空间,因此,不同用户的存储桶也不允许同名;不过,自Jewel 版本起,RadosGW 引入了tenant(租户)用于为user 和bucket 提供名称空间,但它是个可选组件,RadosGW 基于ACL 为不同的用户设置不同的权限控制,如:
Read 读加执行权限
Write 写权限
Readwrite 只读
full-control 全部控制权限
radosgw是部署在ceph-mgr1和ceph-mgr2上
4.2自定义radosgw的端口
配置文件可以在ceph deploy 服务器修改然后统一推送,或者单独修改每个radosgw 服务器的配置为同一配置。
修改默认端口7480为8080端口,在ceph-deploy上配置,并推送个其它所有节点。
ceph-deploy上修改ceph.conf文件
[global]
fsid = d1f2683e-ac8d-4a02-8b94-9f7517d32c50
public_network = 192.168.1.0/24
cluster_network = 192.168.88.0/24
mon_initial_members = ceph-mon1
mon_host = 192.168.1.203
auth_cluster_required = cephx
auth_service_required = cephx
auth_client_required = cephx

#增加以下内容,client.rgw后面为主机名
[client.rgw.ceph-rgw2]
rgw_host = ceph-rgw2
rgw_frontends = civetweb port=8080
[client.rgw.ceph-rgw1]
rgw_host = ceph-rgw1
rgw_frontends = civetweb port=8080
将配置文件推送到集群其它节点中
# 推送完成之后,所有节点的/etc/ceph/ceph.conf配置文件将和上面一致
cephadmin@ceph-deploy:~/ceph-cluster$ ceph-deploy --overwrite-conf config push ceph-mgr{1..2}
cephadmin@ceph-deploy:~/ceph-cluster$ ceph-deploy --overwrite-conf config push ceph-mon{1..3}
cephadmin@ceph-deploy:~/ceph-cluster$ ceph-deploy --overwrite-conf config push ceph-node{1..4}
重启前查看radosgw的端口为7480
root@ceph-mgr2:~# ss -antlp|grep 7480
LISTEN   0         128                  0.0.0.0:7480             0.0.0.0:*       users:(("radosgw",pid=13832,fd=74))
LISTEN   0         128                     [::]:7480                [::]:*       users:(("radosgw",pid=13832,fd=75))
重启radosgw服务
root@ceph-mgr1:~# ps -ef|grep radosgw
ceph     13551     1  0 15:19 ?        00:00:58 /usr/bin/radosgw -f --cluster ceph --name client.rgw.ceph-rgw1 --setuser ceph --setgroup ceph

root@ceph-mgr2:~# ps -ef|grep radosgw
ceph     13832     1  0 15:19 ?        00:00:55 /usr/bin/radosgw -f --cluster ceph --name client.rgw.ceph-rgw2 --setuser ceph --setgroup ceph


root@ceph-mgr1:~# systemctl restart ceph-radosgw@rgw.ceph-rgw1
root@ceph-mgr2:~# systemctl restart ceph-radosgw@rgw.ceph-rgw2
#查看radosgw的端口该为了8080
root@ceph-mgr2:~# ss -antlp|grep 8080
LISTEN   0         128                  0.0.0.0:8080             0.0.0.0:*       users:(("radosgw",pid=15954,fd=69))
验证
cephadmin@ceph-deploy:~/ceph-cluster$ curl 192.168.1.201:8080
<?xml version="1.0" encoding="UTF-8"?><ListAllMyBucketsResult xmlns="http://s3.amazonaws.com/doc/2006-03-01/"><Owner><ID>anonymous</ID><DisplayName></DisplayName></Owner><Buckets></Buckets></ListAllMyBucketsResult>

cephadmin@ceph-deploy:~/ceph-cluster$ curl 192.168.1.201:8080
<?xml version="1.0" encoding="UTF-8"?><ListAllMyBucketsResult xmlns="http://s3.amazonaws.com/doc/2006-03-01/"><Owner><ID>anonymous</ID><DisplayName></DisplayName></Owner><Buckets></Buckets></ListAllMyBucketsResult>
4.3 启用radosgw的ssl配置
仅在ceph-mgr1上配置
在ceph-mgr1上配置自签名证书
root@ceph-mgr1:/etc/ceph/certs#  openssl genrsa -out civetweb.key 2048
Generating RSA private key, 2048 bit long modulus (2 primes)
.........+++++
............+++++
e is 65537 (0x010001)
root@ceph-mgr1:/etc/ceph/certs# openssl req -new -x509 -key civetweb.key -out civetweb.crt -subj "/CN=rgw.zhrx.com"
Can't load /root/.rnd into RNG
140555313983936:error:2406F079:random number generator:RAND_load_file:Cannot open file:../crypto/rand/randfile.c:88:Filename=/root/.rnd
root@ceph-mgr1:/etc/ceph/certs# cat civetweb.key civetweb.crt > civetweb.pem
root@ceph-mgr1:/etc/ceph/certs# tree
.
├── civetweb.crt
├── civetweb.key
└── civetweb.pem

0 directories, 3 files
注意:在生产案例中ceph-mgr1和ceph-mgr2都要配置,并且所有节点的ceph.conf的配置文件都必须一样
root@ceph-mgr1:/etc/ceph/certs# vim /etc/ceph/ceph.conf
[global]
fsid = d1f2683e-ac8d-4a02-8b94-9f7517d32c50
public_network = 192.168.1.0/24
cluster_network = 192.168.88.0/24
mon_initial_members = ceph-mon1
mon_host = 192.168.1.203
auth_cluster_required = cephx
auth_service_required = cephx
auth_client_required = cephx

#增加以下内容,client.rgw后面为主机名
[client.rgw.ceph-rgw2]
rgw_host = ceph-rgw2
rgw_frontends = civetweb port=8080
[client.rgw.ceph-rgw1]
rgw_host = ceph-rgw1
rgw_frontends = "civetweb port=8080+8443s ssl_certificate=/etc/ceph/certs/civetweb.pem"
在ceph-mgr1上重启radosgw
root@ceph-mgr1:/etc/ceph/certs# ps -ef|grep radosgw
ceph      4865     1  0 16:30 ?        00:00:02 /usr/bin/radosgw -f --cluster ceph --name client.rgw.ceph-rgw1 --setuser ceph --setgroup ceph
root      5555  2150  0 16:43 pts/0    00:00:00 grep --color=auto radosgw
root@ceph-mgr1:/etc/ceph/certs# systemctl restart ceph-radosgw@rgw.ceph-rgw1.service
在ceph-mgr1上验证端口
root@ceph-mgr1:/etc/ceph/certs# ss -antlp|grep 8443
LISTEN   0         128                 0.0.0.0:8443             0.0.0.0:*        users:(("radosgw",pid=5611,fd=64))
验证
cephadmin@ceph-deploy:~/ceph-cluster$ curl 192.168.1.201:8080
<?xml version="1.0" encoding="UTF-8"?><ListAllMyBucketsResult xmlns="http://s3.amazonaws.com/doc/2006-03-01/"><Owner><ID>anonymous</ID><DisplayName></DisplayName></Owner><Buckets></Buckets></ListAllMyBucketsResult>cephadmin@ceph-deploy:~/ceph-cluster$
cephadmin@ceph-deploy:~/ceph-cluster$
cephadmin@ceph-deploy:~/ceph-cluster$ curl -k https://192.168.1.201:8443
<?xml version="1.0" encoding="UTF-8"?><ListAllMyBucketsResult xmlns="http://s3.amazonaws.com/doc/2006-03-01/"><Owner><ID>anonymous</ID><DisplayName></DisplayName></Owner><Buckets></Buckets></ListAllMyBucketsRe
#创建日志目录
root@ceph-mgr1:/etc/ceph/certs# mkdir /var/log/radosgw
root@ceph-mgr1:/etc/ceph/certs# chown ceph.ceph /var/log/radosgw

#修改ceph-mgr1的ceph.conf配置
root@ceph-mgr1:/etc/ceph/certs# vim /etc/ceph/ceph.conf
[global]
fsid = d1f2683e-ac8d-4a02-8b94-9f7517d32c50
public_network = 192.168.1.0/24
cluster_network = 192.168.88.0/24
mon_initial_members = ceph-mon1
mon_host = 192.168.1.203
auth_cluster_required = cephx
auth_service_required = cephx
auth_client_required = cephx

#增加以下内容,client.rgw后面为主机名
[client.rgw.ceph-rgw2]
rgw_host = ceph-rgw2
rgw_frontends = civetweb port=8080
[client.rgw.ceph-rgw1]
rgw_host = ceph-rgw1
rgw_frontends = "civetweb port=8080+8443s ssl_certificate=/etc/ceph/certs/civetweb.pem request_timeout_ms=3000 error_log_file=/var/log/radosgw/civetweb.error.log access_log_file=/var/log/radosgw/civetweb.access.log num_threads=100"
重启ceph-mgr1上radosgw
root@ceph-mgr1:/etc/ceph/certs# ps -ef|grep radosgw
ceph     18459     1  0 23:41 ?        00:00:01 /usr/bin/radosgw -f --cluster ceph --name client.rgw.ceph-rgw1 --setuser ceph --setgroup ceph

root@ceph-mgr1:/etc/ceph/certs# systemctl restart ceph-radosgw@rgw.ceph-rgw1.service
访问测试:
cephadmin@ceph-deploy:~/ceph-cluster$ curl -k https://192.168.1.201:8443
cephadmin@ceph-deploy:~/ceph-cluster$ curl -k https://192.168.1.201:8443
cephadmin@ceph-deploy:~/ceph-cluster$ curl -k https://192.168.1.201:8443

#在ceph-mgr1上查看访问日志
root@ceph-mgr1:/etc/ceph/certs# tail -10 /var/log/radosgw/civetweb.access.log
192.168.1.200 - - [04/Apr/2022:16:48:56 +0800] "GET / HTTP/1.1" 200 413 - curl/7.58.0
192.168.1.200 - - [04/Apr/2022:16:49:01 +0800] "GET / HTTP/1.1" 200 413 - curl/7.58.0
192.168.1.200 - - [04/Apr/2022:16:49:02 +0800] "GET / HTTP/1.1" 200 413 - curl/7.58.0
5.1、创建radosgw用户
cephadmin@ceph-deploy:~/ceph-cluster$ radosgw-admin user create --uid=radosgwadmin --display-name='radosgwadmin'
{
    "user_id": "radosgwadmin",
    "display_name": "radosgwadmin",
    "email": "",
    "suspended": 0,
    "max_buckets": 1000,
    "subusers": [],
    "keys": [
        {
            "user": "radosgwadmin",
            "access_key": "JENGPGFNGO63XOHLB03X",
            "secret_key": "EbfvXpE15YQ1D8teS40TottEu5GDUnj1m8WjHIxw"
        }
    ],
    "swift_keys": [],
    "caps": [],
    "op_mask": "read, write, delete",
    "default_placement": "",
    "default_storage_class": "",
    "placement_tags": [],
    "bucket_quota": {
        "enabled": false,
        "check_on_raw": false,
        "max_size": -1,
        "max_size_kb": 0,
        "max_objects": -1
    },
    "user_quota": {
        "enabled": false,
        "check_on_raw": false,
        "max_size": -1,
        "max_size_kb": 0,
        "max_objects": -1
    },
    "temp_url_keys": [],
    "type": "rgw",
    "mfa_ids": []
}


#使用下面命令查看已创建的账户信息
cephadmin@ceph-deploy:~/ceph-cluster$ radosgw-admin user info --uid=radosgwadmin --display-name='radosgwadmin'
root@ceph-client:~# apt install -y s3cmd
root@ceph-client:~# s3cmd --configure

Enter new values or accept defaults in brackets with Enter.
Refer to user manual for detailed description of all options.

Access key and Secret key are your identifiers for Amazon S3. Leave them empty for using the env variables.
Access Key: JENGPGFNGO63XOHLB03X                                    # 粘贴服务端生成的Access Key
Secret Key: EbfvXpE15YQ1D8teS40TottEu5GDUnj1m8WjHIxw    # 粘贴服务端生成的Secret Key
Default Region [US]:                                                               # 直接回车即可

Use "s3.amazonaws.com" for S3 Endpoint and not modify it to the target Amazon S3.
S3 Endpoint [s3.amazonaws.com]: 192.168.1.201:8080            # 输入对象存储的IP地址,可以为域名和radosgw的VIP

Use "%(bucket)s.s3.amazonaws.com" to the target Amazon S3. "%(bucket)s" and "%(location)s" vars can be used
if the target S3 system supports dns based buckets.
DNS-style bucket+hostname:port template for accessing a bucket [%(bucket)s.s3.amazonaws.com]: 192.168.1.201:8080/%(bucket)        # 输入对象存储的bucket地址

Encryption password is used to protect your files from reading
by unauthorized persons while in transfer to S3
Encryption password:                                                            # 空密码回车
Path to GPG program [/usr/bin/gpg]:                                      # /usr/bin/gpg命令路径 回车

When using secure HTTPS protocol all communication with Amazon S3
servers is protected from 3rd party eavesdropping. This method is
slower than plain HTTP, and can only be proxied with Python 2.7 or newer
Use HTTPS protocol [Yes]: No                                                 # 是否使用https,选no

On some networks all internet access must go through a HTTP proxy.
Try setting it here if you can't connect to S3 directly
HTTP Proxy server name:                                                       # haproxy 留空回车

New settings:
  Access Key: JENGPGFNGO63XOHLB03X
  Secret Key: EbfvXpE15YQ1D8teS40TottEu5GDUnj1m8WjHIxw
  Default Region: US
  S3 Endpoint: 192.168.1.201:8080
  DNS-style bucket+hostname:port template for accessing a bucket: 192.168.1.201:8080/%(bucket)
  Encryption password:
  Path to GPG program: /usr/bin/gpg
  Use HTTPS protocol: False
  HTTP Proxy server name:
  HTTP Proxy server port: 0

Test access with supplied credentials? [Y/n] y                           #测试通过会提示保存
Please wait, attempting to list all buckets...
Success. Your access key and secret key worked fine :-)

Now verifying that encryption works...
Not configured. Never mind.

Save settings? [y/N] y                                                         # y 要保存配置文件
Configuration saved to '/root/.s3cfg'                                     # 最后配置文件保存的位置/root.s3cfg
# 创建my-bucket桶
root@ceph-client:~# s3cmd mb s3://my-bucket
Bucket 's3://my-bucket/' created

# 查看所有的桶
root@ceph-client:~# s3cmd ls
2022-04-04 08:59  s3://my-bucket

# 向指定桶中上传/etc/hosts/文件
root@ceph-client:~# s3cmd put /etc/hosts s3://my-bucket
upload: '/etc/hosts' -> 's3://my-bucket/hosts'  [1 of 1]
 486 of 486   100% in    1s   275.83 B/s  done

# 向指定目录下载文件
root@ceph-client:~# s3cmd get s3://my-bucket/hosts /tmp/
download: 's3://my-bucket/hosts' -> '/tmp/hosts'  [1 of 1]
 486 of 486   100% in    0s     9.38 kB/s  done

# 显示my-bucket中的文件
root@ceph-client:~# s3cmd ls s3://my-bucket
2022-04-04 08:59       486   s3://my-bucket/hosts

# 删除my-bucket中的hosts文件
root@ceph-client:~# s3cmd del s3://my-bucket/hosts
delete: 's3://my-bucket/hosts'
root@ceph-client:~# s3cmd ls s3://my-bucket
root@ceph-client:~#

# 删除my-bucket
root@ceph-client:~# s3cmd rb s3://my-bucket
Bucket 's3://my-bucket/' removed
root@ceph-client:~# s3cmd ls
root@ceph-client:~#

#注意:修改bucket存储的信息,就是重新上传修改后的信息

 浙公网安备 33010602011771号