
导入zookeeper源码并启动
- 为了更好的阅读源码,所以还是导入源码去debug比较方便;高版本的代码没什么好说的,是maven项目导入还是很方便的;我这里用的是低版本zookeeper3.4.5。我这里把它改成了maven项目。
一、导入源码
- 低版本的源码本身不是maven项目,不过可以自己改。
- 先建一个空的maven项目,然后拷贝源码和依赖的lib
- 然后就是pom.xml添加依赖


<dependencies>


        <dependency>
            <groupId>io.netty</groupId>
            <artifactId>netty-all</artifactId>
            <version>3.2.2.Final</version>
            <scope>system</scope>
            <systemPath>${basedir}/dependencies/netty-3.2.2.Final.jar</systemPath>
        </dependency>

        <dependency>
            <groupId>junit</groupId>
            <artifactId>junit</artifactId>
            <version>4.8.1</version>
            <scope>system</scope>
            <systemPath>${basedir}/dependencies/junit-4.8.1.jar</systemPath>
        </dependency>


        <dependency>
            <groupId>com.puppycrawl.tools</groupId>
            <artifactId>checkstyle</artifactId>
            <version>5.0</version>
            <scope>system</scope>
            <systemPath>${basedir}/dependencies/checkstyle-5.0.jar</systemPath>
        </dependency>

        <dependency>
            <groupId>jline</groupId>
            <artifactId>jline</artifactId>
            <version>0.9.94</version>
            <scope>system</scope>
            <systemPath>${basedir}/dependencies/jline-0.9.94.jar</systemPath>
        </dependency>

        <dependency>
            <groupId>log4j</groupId>
            <artifactId>log4j</artifactId>
            <version>1.2.15</version>
            <scope>system</scope>
            <systemPath>${basedir}/dependencies/log4j-1.2.15.jar</systemPath>
        </dependency>

        <dependency>
            <groupId>org.mockito</groupId>
            <artifactId>mockito-all</artifactId>
            <version>1.8.2</version>
            <scope>system</scope>
            <systemPath>${basedir}/dependencies/mockito-all-1.8.2.jar</systemPath>
        </dependency>

        <dependency>
            <groupId>org.slf4j</groupId>
            <artifactId>slf4j-api</artifactId>
            <version>1.6.1</version>
            <scope>system</scope>
            <systemPath>${basedir}/dependencies/slf4j-api-1.6.1.jar</systemPath>
        </dependency>

        <dependency>
            <groupId>org.slf4j</groupId>
            <artifactId>slf4j-log4j12</artifactId>
            <version>1.6.1</version>
            <scope>system</scope>
            <systemPath>${basedir}/dependencies/slf4j-log4j12-1.6.1.jar</systemPath>
        </dependency>

</dependencies>
- 点击重新导入maven依赖

二、运行源码
- 增加配置文件zoo.cfg,这个复制下zoo_sample.cfg文件,增加dataDir配置即可。
- 启动类是QuorumPeerMain.java,如果此时直接运行main方法会运行失败找不到配置。
 log4j:WARN No appenders could be found for logger (org.apache.zookeeper.server.DatadirCleanupManager).
log4j:WARN Please initialize the log4j system properly.
Usage: ZooKeeperServerMain configfile | port datadir [ticktime] [maxcnxns]
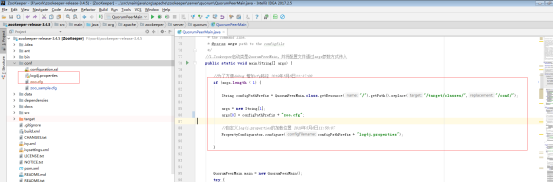
所以我在代码里加了zoo.cfg和log4j.properties的位置:
//为了方便debug 增加cfg路径 2019年5月6日11:47:08
if (args.length < 1) {

    String configPathPrefix = QuorumPeerMain.class.getResource("/").getPath().replace("/target/classes/","/conf/");

    args = new String[1];
    args[0] = configPathPrefix + "zoo.cfg";

    //自定义log4j.properties的加载位置 2019年5月6日11:58:07
    PropertyConfigurator.configure(configPathPrefix + "log4j.properties");

}
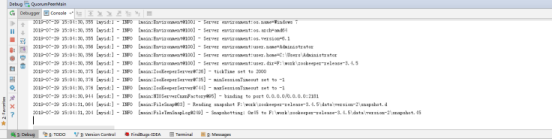
- 现在是启动成功的了


【推荐】国内首个AI IDE,深度理解中文开发场景,立即下载体验Trae
【推荐】编程新体验,更懂你的AI,立即体验豆包MarsCode编程助手
【推荐】抖音旗下AI助手豆包,你的智能百科全书,全免费不限次数
【推荐】轻量又高性能的 SSH 工具 IShell:AI 加持,快人一步
· go语言实现终端里的倒计时
· 如何编写易于单元测试的代码
· 10年+ .NET Coder 心语,封装的思维:从隐藏、稳定开始理解其本质意义
· .NET Core 中如何实现缓存的预热?
· 从 HTTP 原因短语缺失研究 HTTP/2 和 HTTP/3 的设计差异
· 分享一个免费、快速、无限量使用的满血 DeepSeek R1 模型,支持深度思考和联网搜索!
· 基于 Docker 搭建 FRP 内网穿透开源项目(很简单哒)
· ollama系列01:轻松3步本地部署deepseek,普通电脑可用
· 25岁的心里话
· 按钮权限的设计及实现