elk搭建和采集nginx日志
准备安装包
- JDK(一般用jdk1.8及以上的)
- 官网下载安装包;es+logstash+kibana https://www.elastic.co/cn/products/elastic-stack
- nginx下载 https://nginx.org/en/download.html 安装文档 https://nginx.org/en/docs/install.html
- 我自己的安装包下载地址,里面有es+logstash+kibana(7.4.2版本) 还有nginx以及nginx需要的依赖zlib等等都有;https://sourceforge.net/projects/generic-software/files/elk/ ;https://sourceforge.net/projects/generic-software/files/php/
安装nginx
- 安装nginx其实没啥好说的,有好几种方式安装。这里只说下采用源码安装的方式,这个要麻烦点。
- 首先
configure,后面是一般需要的参数。pcre、zlib、openssl可以从https://sourceforge.net/projects/generic-software/files/php/ 找到。
./configure --prefix=/usr/local/nginx --with-pcre=/home/zzq/software/elk/pcre-8.41 --with-zlib=/home/zzq/software/elk/zlib-1.2.11 --with-http_ssl_module --with-openssl=/home/zzq/software/elk/openssl-1.0.2q
- 然后就是安装了
make && make install
- 安装完成后打开
conf/nginx.conf,取消注释日志输出格式;
    log_format  main  '$remote_addr - $remote_user [$time_local] "$request" '
                      '$status $body_bytes_sent "$http_referer" '
                      '"$http_user_agent" "$http_x_forwarded_for"';

    access_log  logs/access.log  main;
- 注意要开防火墙端口哦,包括后面所安装的程序,需要从外部访问的都要开哦
sudo firewall-cmd --permanent --zone=public --add-port=80/tcp
sudo firewall-cmd --reload
- 然后启动nginx,能访问就好了。
安装elasticSearch
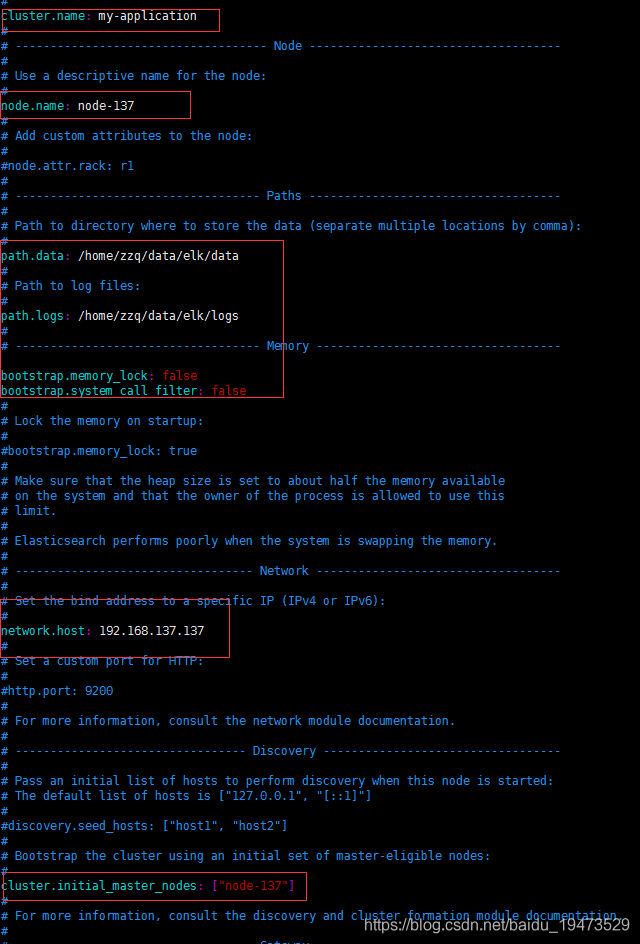
- 解压,修改
config/elasticsearch.yml文件,需要修改的基本配置就这几个。

- 启动es ,注意高版本的es不能用root启动
./bin/elasticsearch
如果需要后台运行可以加-d
./bin/elasticsearch -d
启动es可能抛出的异常
[2019-10-25T13:58:31,795][ERROR][o.e.b.Bootstrap          ] [node131] node validation exception
[4] bootstrap checks failed
[1]: max file descriptors [4096] for elasticsearch process is too low, increase to at least [65536]
[2]: max number of threads [1024] for user [zzq] is too low, increase to at least [4096]
[3]: max virtual memory areas vm.max_map_count [65530] is too low, increase to at least [262144]
[4]: system call filters failed to install; check the logs and fix your configuration or disable system call filters at your own risk
[2019-10-25T13:58:31,827][INFO ][o.e.n.Node               ] [node131] stopping ...
- 有4个错误;第一个是文件描述符太低;解决方案:
  echo "* soft nofile 65536" >> /etc/security/limits.conf
  echo "* hard nofile 131072" >> /etc/security/limits.conf
- 第二个是最大线程数太少;解决方案(zzq是我的用户名,这里不填用户名不能填*):
  echo "zzq soft nproc 4096" >> /etc/security/limits.conf
  echo "zzq hard nproc 4096" >> /etc/security/limits.conf
  ulimit -u  4096
- 第三个是最大虚拟内存区域太低;解决方案:
  sysctl -w vm.max_map_count=262144
  echo "vm.max_map_count=262144" >> /etc/sysctl.conf
  sysctl -p
- 第四个请检查日志并修复配置或禁用系统调用筛选器;解决方案
vim config/elasticsearch.yml增加:
bootstrap.memory_lock: false
bootstrap.system_call_filter: false
- 测试是否启动成功
curl -XGET '192.168.137.137:9200/?pretty'

安装logstash
- 解压;新建配置文件
vim logstash-nginx-access-log.conf
input {
    file {
        path => ["/usr/local/nginx/logs/access.log"] # 日志路径
        type => "nginx_access"
        start_position => "beginning"
    }
}

filter {
  grok {
    match => {
      "message" => '%{IPORHOST:remote_ip} - %{DATA:user_name} \[%{HTTPDATE:time}\] "%{WORD:request_action} %{DATA:request} HTTP/%{NUMBER:http_version}" %{NUMBER:response} %{NUMBER:bytes} "%{DATA:referrer}" "%{DATA:agent}"'
    }
  }

  date {
    match => [ "time", "dd/MMM/YYYY:HH:mm:ss Z" ]
    locale => en
  }}

output {
  elasticsearch {
        hosts => ["192.168.137.137:9200"]  #es
        index => "logstash-nginx-access-log" # 索引
    }
stdout{
         codec => rubydebug  #控制台打印日志
	}
}
- 启动
nohup bin/logstash -f logstash-nginx-access-log.conf &

安装kibana
- 解压;编辑
vi config/kibana.yml

如果请求超时的话可以增加一些请求超时时间:
elasticsearch.requestTimeout: 50000
- 启动
./bin/kibana;

- 访问http://192.168.137.137:5601/

- 新建索引 Management-> Index Patterns -> Create index pattern 输入
logstash-nginx-access-log;创建这个索引。 - 到Discover界面就能看到这个索引的日志情况
- 我访问了nginx

- logstash打印的日志

- 再看Discover,就有一些统计数据了

- 我访问了nginx
总结
- elk还是挺方便,采集数据,做统计这些;注意外部需要访问的开端口;其他功能我自己还没用,就不误人子弟了;文章如果有错误的地方,请批评指正。


【推荐】国内首个AI IDE,深度理解中文开发场景,立即下载体验Trae
【推荐】编程新体验,更懂你的AI,立即体验豆包MarsCode编程助手
【推荐】抖音旗下AI助手豆包,你的智能百科全书,全免费不限次数
【推荐】轻量又高性能的 SSH 工具 IShell:AI 加持,快人一步
· go语言实现终端里的倒计时
· 如何编写易于单元测试的代码
· 10年+ .NET Coder 心语,封装的思维:从隐藏、稳定开始理解其本质意义
· .NET Core 中如何实现缓存的预热?
· 从 HTTP 原因短语缺失研究 HTTP/2 和 HTTP/3 的设计差异
· 分享一个免费、快速、无限量使用的满血 DeepSeek R1 模型,支持深度思考和联网搜索!
· 基于 Docker 搭建 FRP 内网穿透开源项目(很简单哒)
· ollama系列01:轻松3步本地部署deepseek,普通电脑可用
· 25岁的心里话
· 按钮权限的设计及实现