Spring学习笔记(二)———在IOC容器中装配Bea之Spring配置概述
1、目录
2、Spring配置概述
2.1、Spring容器高层视图
(1) 要使Spring容器在应用中启动,必须满足以下三方面的条件:
· Spring的架包都放在了应用程序的类路径下
· 应用程序为Spring提供了完备的Bean配置信息
· Bean的类都放到应用程序的类路径下
(2)Spring启动时读取程序的Bean配置信息,而它由下面四方面组成:
Bean的实现类
Bean的属性信息,如数据源的连接数,用户名,密码等
Bean的依赖关系
Bean的行为配置
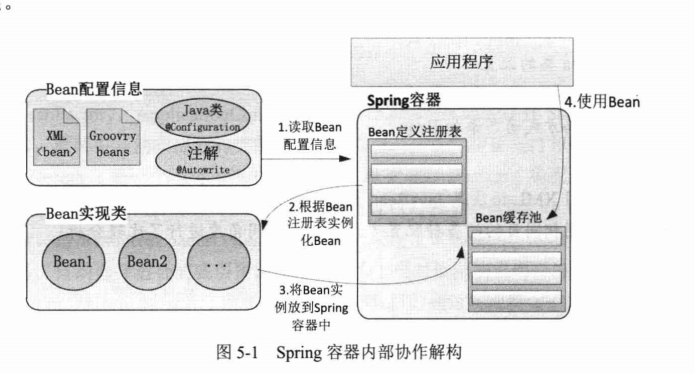
(3)Spring容器内部协作图解

说明:Bean配置信息首先定义了Bean的实现以及依赖关系,Spring容器根据各种形式的Bean配置信息在容器内部建立Bean定义注册表;然后根据注册表加载、实例化Bean,并建立Bean与Bean之间的依赖关系,最后将这些准备就绪的Bean放到Bean缓存池中。以供外层的应用程序调用。
3、Bean的四种配置方式
同一功用的商品的多种品牌供给性是市场健康的基本要素。对于Spring来说,为实现Bean信息的定义,它提供了四种选项(你可以点击下面链接查看它们的详细的使用方式):
①基于XML 文件,
②基于注解,
③基于Java类以及,
⑤基于 Groovy动态语言
不同的配置在“质”是基本相同的,只存在“型”的区别,而XML的配置方式是最基础,最传统的。
下面对四种方式进行简介
(1)基于XML的配置
从Spring2.0开始,Spring采用了Schema格式的配置,让不同类型的配置拥有自己的命名空间,使得配置文件更具有扩展性。下面是Spring XML配置的部分截图:

(2)基于注解的配置
Spring从2.0引入基于注解的配置方式,在2.5得到完善,在4.0是进一步增强。通过 @Component以及其衍生注解——@Service、@Controller、@Repository,并配合 @Autowired 就可以很好的使用基于注解的配置进行Bean的定义和注入。
在使用注解之前需要在Spring的配置文件中加入自动包扫描
<?xml version="1.0" encoding="UTF-8" ?>
<beans xmlns="http://www.springframework.org/schema/beans"
    xmlns:xsi="http://www.w3.org/2001/XMLSchema-instance"
    <!--声明命名空间-->
    xmlns:context="http://www.springframework.org/schema/context"
    xsi:schemaLocation="http://www.springframework.org/schema/beans
         http://www.springframework.org/schema/beans/spring-beans.xsd
        <!--声明标准命名空间-->
         http://www.springframework.org/schema/context
         http://www.springframework.org/schema/context/spring-context.xsd"
         >
   <!--扫描需要的包,Spring容器会扫描这个包下的所有类,从而获取Bean的定义信息-->
   <context:component-scan base-package="com.springtest.service"/>

</beans>
一个被注解为Service的类
package com.springtest.service

import org.springframework.stereotype.Service;

@Service  //标识服务层(业务层)组件
public class UserService {
    public void add(){
        System.out.println("panpan456");
    }
}
(3)基于java类的配置
JavaConfig是Spring的一个子项目,它旨在通过Java类的方式提供Bean的定义信息,在SpringBoot中已经完全采用了Java类的配置方式。Java类的配置方式就是声明一个Java类来配置bean。
它主要使用 @Configuration 和 @Bean 来注解类(@Configuration)和方法(@Bean),任何POJO标注了@Configuration后就可以为Spring容器提供Bean的定义信息。在类方法上标注了 @Bean 就相当于定义了一个Bean。这种方式比在XML文件中通过<bean>提供的配置更加简单。
声明一个Java类,专用于配置bean:
package com.springtest.javaconfig

import org.springframework.context.annotation.Bean;
import org.springframework.context.annotation.ComponentScan;
import org.springframework.context.annotation.Configuration;

@Configuration
@ComponentScan(basePackages="spring.createBean.javaClass")
//或者@ComponentScan(basePackageClasses = UserDao.class)
public class SpringBeansConfig {

    /**
     * 配置Bean时,在该方法上使用@Bean注解
     * @return
     */
    @Bean
    public UserDao getUserDao() {
        return new UserDao();
    }
}
@Configuration:这个注解其实就是把我们当前的这个类,声明为一个配置文件,它就相当于我们的xml配置文件,跟它的作用是一样的,只不过用类的方式来进行展现;
@ComponentScan(basePackages="包路径"):这个注解其实就是去扫描我们的包路径,对我们需要扫描的包进行扫描,如果需要扫描多个包,之间用逗号隔开即可;除此之外,还可以指定某一个具体的类,例如:@ComponentScan(basePackageClasses
= UserDao.class);
@Bean:这个注解其实更好理解,它就相当于xml中的<bean>,我们之前通过<bean>标签将它注入到容器中,现在只需要在你所需要注入的资源上面加上@Bean注解,就可以注入到Spring容器中。
(4)基于Goovy DSL的配置
Groovy是一种基于JVM(Java虚拟机)的敏捷开发语言,它结合了Python、Ruby和Smalltalk的许多强大的特性,Groovy 代码能够与 Java 代码很好地结合,也能用于扩展现有代码。由于其运行在 JVM 上的特性,Groovy 可以使用其他 Java 语言编写的库。

import com.smart.groovy.LogDao
import com.smart.groovy.DbUserDao
import com.smart.groovy.LogonService
import com.smart.groovy.XmlUserDao
import org.springframework.core.io.ClassPathResource

beans {
    xmlns context: "http://www.springframework.org/schema/context"    //导入命名空间

    context.'component-scan'('base-package': "com.smart.groovy") {
        'exclude-filter'('type': "aspectj", 'expression': "com.smart.xml.*")
    }

    def stream;
    def config = new Properties();
    try{
        stream = new ClassPathResource('conf/app-conf.properties').inputStream
        config.load(stream);
    }finally {
        if(stream!=null)
        stream.close()
    }

    if( config.get("dataProvider") == "db"){
        userDao(DbUserDao)
    }else{
        userDao(XmlUserDao)
    }

    logDao(LogDao){
        bean->
            bean.scope = "prototype"
            bean.initMethod="init"
            bean.destroyMethod="destory"
            bean.lazyInit =true
    }

    logonService(LogonService,userDao){
        logDao = ref("logDao")
        mailService = ref("mailService")
    }

}
参考资料:
3.《精通Spring4.x 企业应用开发实战》


