Linux学习笔记(四)——磁盘和文件系统
管理磁盘和文件系统
介绍了基本的文件和目录管理之后,接下来就是磁盘和文件系统的管理。如何分区磁盘和创建文件系统呢?
添加磁盘并进行分区、创建并挂载文件系统
1、确认系统中的磁盘命令——fdisk
fdisk -l [磁盘设备]
[root@localhost ~]# fdisk -l  ==>查看目前系统内的所有分区 (这里显示的结果与在交互模式下P命令是相同的,后面讲)

Disk /dev/hda: 21.4 GB, 21474836480 bytes   ==>磁盘的文件名与容量
255 heads, 63 sectors/track, 2610 cylinders  ==>磁头、扇区与柱面大小
Units = cylinders of 16065 * 512 = 8225280 bytes   ==>每个柱面的大小

   Device Boot      Start         End      Blocks   Id  System
/dev/hda1   *           1          13      104391   83  Linux
/dev/hda2              14        1288    10241437+  83  Linux
/dev/hda3            1289        1925     5116702+  83  Linux
/dev/hda4            1926        2610     5502262+   5  Extended
/dev/hda5            1926        1989      514048+  82  Linux swap / Solaris
上述各字段的含义:
Device:分区的设备文件名称 Boot:是否是引导分区,即开机区,若是,则用“*”标识
Start :开始柱面,即该分区在硬盘中的起始位置 End :结束柱面,即该分区在硬盘中的结束位置
Blocks:分区的大小,以Blocks(块)为单位,默认的块大小为1024字节,即1KB
Id:分区类型的ID标记号,对于EXT3分区为83,LVM分区为8e System:分区类型,即磁盘分区内的系统
2、规划硬盘中的分区——fdisk
fdisk [磁盘设备]
使用此命令可进入交互操纵,您可以在下面的交互操纵里面胡作非为,但是切记离开时必须按q命令,不能按w
#找出系统中所在根目录所在磁盘,并查阅该硬盘内的相关信息
[root@localhost ~]# df /   <==重点找出磁盘文件名而已
文件系统               1K-块        已用     可用 已用% 挂载点
/dev/hda2              9920624   2968604   6439952  32% /
[root@localhost ~]# fdisk /dev/hda  ==>进入交互操纵模式,注意这里不要写具体的数字

The number of cylinders for this disk is set to 2610.
There is nothing wrong with that, but this is larger than 1024,
and could in certain setups cause problems with:
1) software that runs at boot time (e.g., old versions of LILO)
2) booting and partitioning software from other OSs
   (e.g., DOS FDISK, OS/2 FDISK)

Command (m for help): m   <==等待输入,m是命令菜单
Command action
   a   toggle a bootable flag
   b   edit bsd disklabel
   c   toggle the dos compatibility flag
   d   delete a partition   ==>删除一个分区
   l   list known partition types  ==>创建逻辑分区
   m   print this menu
   n   add a new partition  ==>增加一个分区
   o   create a new empty DOS partition table
   p   print the partition table   ==>在屏幕上显示分区表
   q   quit without saving changes   ==>不存储,直接离开fdisk程序
   s   create a new empty Sun disklabel
   t   change a partition's system id  变更分区类型
   u   change display/entry units
   v   verify the partition table
   w   write table to disk and exit   ==>将刚才的操作写入分区表,慎重操作
   x   extra functionality (experts only)
常见操作有:创建主分区、创建扩展分区(将硬盘的所有剩余空间作为扩展分区)、创建逻辑分区、改变分区的系统代码、保存分区表信息、用partprobe探测硬盘分区变化
下面举出几例做测试,离开时不保存:
 Command (m for help): p  ==>查看磁盘分区表,和终端命令模式下的fdisk -l 作用相同

Disk /dev/hda: 21.4 GB, 21474836480 bytes
255 heads, 63 sectors/track, 2610 cylinders
Units = cylinders of 16065 * 512 = 8225280 bytes

   Device Boot      Start         End      Blocks   Id  System
/dev/hda1   *           1          13      104391   83  Linux
/dev/hda2              14        1288    10241437+  83  Linux
/dev/hda3            1289        1925     5116702+  83  Linux
/dev/hda4            1926        2610     5502262+   5  Extended
/dev/hda5            1926        1989      514048+  82  Linux swap / Solaris

Command (m for help): d
Partition number (1-5): 4   ==>删除第4个分区

Command (m for help): d    ==>删除第3个分区
Partition number (1-4): 3

Command (m for help): p  ==>再次显示时观察下面只显示了前两个分区,第5个没显示

Disk /dev/hda: 21.4 GB, 21474836480 bytes
255 heads, 63 sectors/track, 2610 cylinders
Units = cylinders of 16065 * 512 = 8225280 bytes

   Device Boot      Start         End      Blocks   Id  System
/dev/hda1   *           1          13      104391   83  Linux
/dev/hda2              14        1288    10241437+  83  Linux

Command (m for help): n  ==>创建一个分区
Command action
   e   extended
   p   primary partition (1-4)
p  ==>选择创建的分区类型为主分区
Partition number (1-4): 4 ==>选择4号做主分区
First cylinder (1289-2610, default 1289):
Using default value 1289   ==>起始柱面若直接按enter键就是使用默认值
Last cylinder or +size or +sizeM or +sizeK (1289-2610, default 2610): +512M

Command (m for help): p  ==>再次查看分区表,发现多了一个刚从建立的分区4

Disk /dev/hda: 21.4 GB, 21474836480 bytes
255 heads, 63 sectors/track, 2610 cylinders
Units = cylinders of 16065 * 512 = 8225280 bytes

   Device Boot      Start         End      Blocks   Id  System
/dev/hda1   *           1          13      104391   83  Linux
/dev/hda2              14        1288    10241437+  83  Linux
/dev/hda4            1289        1351      506047+  83  Linux

Command (m for help): n  ==>再建一个分区
Command action
   e   extended
   p   primary partition (1-4)
e   ==>建立扩展分区
Selected partition 3  ==>这个是系统主动选择的分区
First cylinder (1352-2610, default 1352):
Using default value 1352
Last cylinder or +size or +sizeM or +sizeK (1352-2610, default 2610):
Using default value 2610

Command (m for help): p

Disk /dev/hda: 21.4 GB, 21474836480 bytes
255 heads, 63 sectors/track, 2610 cylinders
Units = cylinders of 16065 * 512 = 8225280 bytes

   Device Boot      Start         End      Blocks   Id  System
/dev/hda1   *           1          13      104391   83  Linux
/dev/hda2              14        1288    10241437+  83  Linux
/dev/hda3            1352        2610    10112917+   5  Extended  ==>看,刚新建的扩展分区
/dev/hda4            1289        1351      506047+  83  Linux

Partition table entries are not in disk order

Command (m for help): n  ==>再多建几个分区玩玩,反正后面不保存就行了,,呵呵
First cylinder (1352-2610, default 1352):
Using default value 1352
Last cylinder or +size or +sizeM or +sizeK (1352-2610, default 2610): +2084
Value out of range.
Last cylinder or +size or +sizeM or +sizeK (1352-2610, default 2610): +2084M

Command (m for help): n   ==>有没有发现,最后建立2个分区的时候根本没有询问我们要建立是主分区还是扩展分区,为啥?因为分区已经超过4了,您别无选择,只能是扩展分区了。。。
First cylinder (1606-2610, default 1606):
Using default value 1606
Last cylinder or +size or +sizeM or +sizeK (1606-2610, default 2610):
Using default value 2610

Command (m for help): p

Disk /dev/hda: 21.4 GB, 21474836480 bytes
255 heads, 63 sectors/track, 2610 cylinders
Units = cylinders of 16065 * 512 = 8225280 bytes

   Device Boot      Start         End      Blocks   Id  System
/dev/hda1   *           1          13      104391   83  Linux
/dev/hda2              14        1288    10241437+  83  Linux
/dev/hda3            1352        2610    10112917+   5  Extended
/dev/hda4            1289        1351      506047+  83  Linux
/dev/hda5            1352        1605     2040223+  83  Linux  ==>这是后面又新建的2个分区
/dev/hda6            1606        2610     8072631   83  Linux

Partition table entries are not in disk order

Command (m for help): q  ==>这里一定要按q啊,因为我刚才仅仅是演示操作,还破坏性的删除了2个分区,你要是真要分区,那就要按w保存了。

[root@localhost ~]#
磁盘分好区后,要更新下内核,否则您使用fdisk -l 可能看不到分区后的变化,只有重启才可以。但是使用partprobe强制让内核重新找一次分区表就行了。
[root@localhost ~]# partprobe [/dev/hda ] <==强制让内核重新找一次分区表,则可以立刻看出分区的变化
注意:普通用户没有权限进行硬盘分区,只有root用户可以,但最好是在单用户模式下比较安全,此外,在进行分区的时候,若该硬盘某个分区正在使用当中,则很有可能系统内核会无法加载硬盘的分区表,解决的方法就是将该使用中的分区给卸载,然后再重新分区一次,重新写入分区表。
3、在分区中创建文件系统——mkfs,mkswap
(1)、mkfs
用途:make filesystem,创建文件系统,即格式化
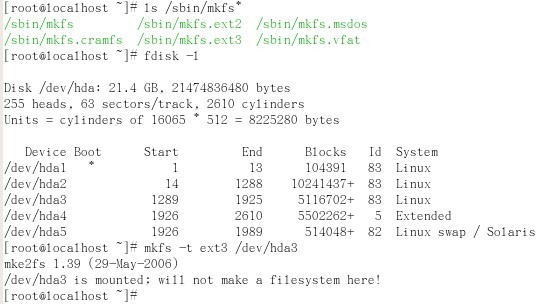
格式:mkfs -t 文件系统类型 分区设备 (-t选项表示可以接受的文件系统格式,如ext3,ext2,vfat等,通常情况下不需要加次选项,因为系统可自动判断使用的是什么文件系统)

上述由于设备/dev/hda3已经挂载了,所我无法再挂载,但可以卸载后再挂载,不做演示。
(2)、mkswap
用途:make swap ,创建文件系统交换系统
格式:mkswap 分区设备
[root@localhost ~]# mkswap /dev/hda5   ==>格式化交换分区
Setting up swapspace version 1, size = 526381 kB
[root@localhost ~]# swapon /dev/hda5  ==>启用交换分区
[root@localhost ~]# free | grep -i swap   ==>查看交换空间
Swap:       514040          0     514040
[root@localhost ~]# swapoff /dev/hda5  ==>停用交换空间
[root@localhost ~]#  free | grep -i swap
Swap:            0          0          0
[root@localhost ~]#
4、挂载、卸载文件系统——mount,umount
(1)mount
用途:挂载文件系统、ISO镜像到指定文件夹
格式: mount [ -t 类型 ] 存储设备 挂载点目录 (”-t 类型“的选项通常可以省略,大多数Linux系统能够自动识别对应的文件系统类型)
mount -o loop ISO镜像文件 挂载点目录
(2)umount
umount 挂载点目录
(3)查看已挂载分区的使用情况(df -hT)
[root@localhost ~]# df -hT   ==>查看现有已挂在分区使用情况
文件系统      类型    容量  已用 可用 已用% 挂载点
/dev/hda2     ext3    9.5G  2.9G  6.2G  32% /
/dev/hda3     ext3    4.8G  195M  4.3G   5% /home
/dev/hda1     ext3     99M   11M   83M  12% /boot
tmpfs        tmpfs    506M     0  506M   0% /dev/shm
[root@localhost ~]# mount /dev/hda3 /home/jzhou  ==>将设备/dev/hda3挂载到目录/home/jzhou下
[root@localhost ~]# df -hT   ==>再次查看挂载情况
文件系统      类型    容量  已用 可用 已用% 挂载点
/dev/hda2     ext3    9.5G  2.9G  6.2G  32% /
/dev/hda3     ext3    4.8G  195M  4.3G   5% /home
/dev/hda1     ext3     99M   11M   83M  12% /boot
tmpfs        tmpfs    506M     0  506M   0% /dev/shm
/dev/hda3     ext3    4.8G  195M  4.3G   5% /home/jzhou   ==>看,这里多了一个挂载点
[root@localhost ~]# umount /dev/hda3  ==>卸载刚才的挂载
[root@localhost ~]# df -hT    ==>再次查看没有了,已成功卸载
文件系统      类型    容量  已用 可用 已用% 挂载点
/dev/hda2     ext3    9.5G  2.9G  6.2G  32% /
/dev/hda3     ext3    4.8G  195M  4.3G   5% /home
/dev/hda1     ext3     99M   11M   83M  12% /boot
tmpfs        tmpfs    506M     0  506M   0% /dev/shm
[root@localhost ~]#
另外光驱和镜像的挂载只是略有不同,语法其实是一样的,光盘设备一般是/dev/cdrom或者/dev/hdc,镜像嘛,很明显是iso格式的压缩包,挂载镜像时要加 -o loop选项,具体用法网上很多。
5、设置文件系统自动挂载——修改配置文件
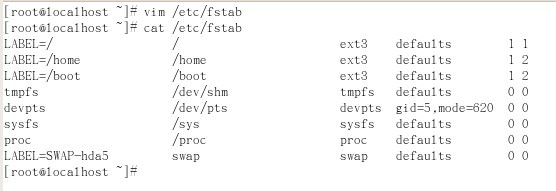
系统中的“/etc/fstab”文件可以视为mount命令的配置文件,它包含了需要开机后自动挂载的文件系统目录。

查看一下这个文件的内容如上,其中各个字段的含义如下(前三个字段很重要):
第一个字段:设备位置
第二个字段:挂载点目录
第三个字段:文件系统类型
第四个字段:挂载参数,即mount命令“-o”选项后面可使用的参数
第五个字段:表示文件系统是否需要dump备份(dump是一个备份工具),一般设为1时表示需要,设为0时将被dump所忽略
第六字段:该数字用于决定在系统启动时进行磁盘检查的顺序,0不进行检查,1优先,2其次。对于根分区应设为1,其它分区设为2
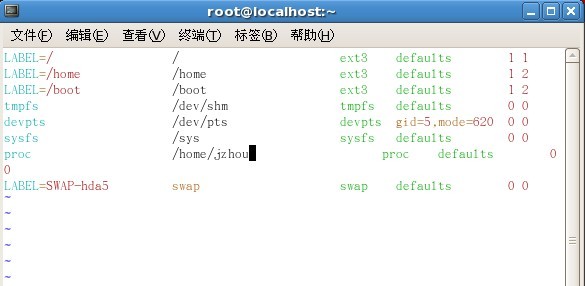
设置自动挂载示例:即每次重新开机后,能自动完成挂载。
进入vim 编辑内容,将设备proc的挂载点由/proc改为/home/jzhou,并保存退出:

则再次启动时,会自动挂载到相应目录,上述是演示,之后我又改回来了。
说明:

|
功能 |
物理卷管理 |
卷组管理 |
逻辑卷管理 |
|
Scan 扫描 |
pvscan |
vgscan |
lvscan |
|
Create 建立 |
pvcreate |
vgcreate |
lvcreate |
|
Display 显示 |
pvdisplay |
vgdisplay |
lvdisplay |
|
Remove 删除 |
pvremove |
vgremove |
lvremove |
|
Extend 扩展 |
vgextend |
lvextend |


