

Vue组件的使用
Vue组件简述
组件化开发是Vue的开发模式,组件是Vue的重要组成部分。
vue私有组件的使用分三步
1.导入:import Left from '@/components/Left.vue'
2.注册:components: { Left }
3.使用:<Left/>
1 2 3 4 5 6 7 8 9 10 11 12 13 14 15 16 | <template> <div id="app"> <h1>Hello Vue Component</h1> <Left/> </div></template><script>import Left from '@/components/Left.vue'export default { components: { Left }};</script> |
Vue全局组件的使用
在main.js文件中
1.导入import Left from '@/components/Left.vue'
2.注册Vue.component('MyLeft', Left)
1 2 3 4 5 6 7 | import Left from '@/components/Left.vue'import Right from '@/components/Right.vue'Vue.config.productionTip = falseVue.component('MyLeft', Left)Vue.component('MyRight',Right) |
Props自定义属性
使用props的优势:提高组件的复用性。
在自定义组件中,使用props给自定义组件定义自定义属性。
另外、如果对传入的属性有格外要求,则需要使用props对象定义,如果没有要求,则使用props数组定义。
1 2 3 4 5 6 7 8 9 10 11 12 13 14 15 16 17 18 19 20 21 22 23 24 25 26 27 28 29 | <script>export default { // 组件的自定义属性,简单的方式 // 可以在外面使用时,可以自定义设置,传输 // props是一个数组 // props: ['customInitValue'], // 如果要对自定义属性设置默认值,那么就需要用下面这种对象的方式进行定义 props: { customInitValue: { // 设置自定义属性的默认值 default: 0, // 设置自定义属性的类型 type: Number, // 这个属性是必填项,自定义组件要传这个值 required: true } }, data() { return { count: 0, // 自定义属性是只读的,如果需要对自定义属性的值做修改,可以把它设置到data属性中 customInitCount: this.customInitValue }; },};</script> |
自定义属性的使用
1 2 3 4 | //传递的是字符串属性<Counter customInitValue="3"></Counter>//使用v-bind:传递的是数字<Counter :customInitValue="12"></Counter> |
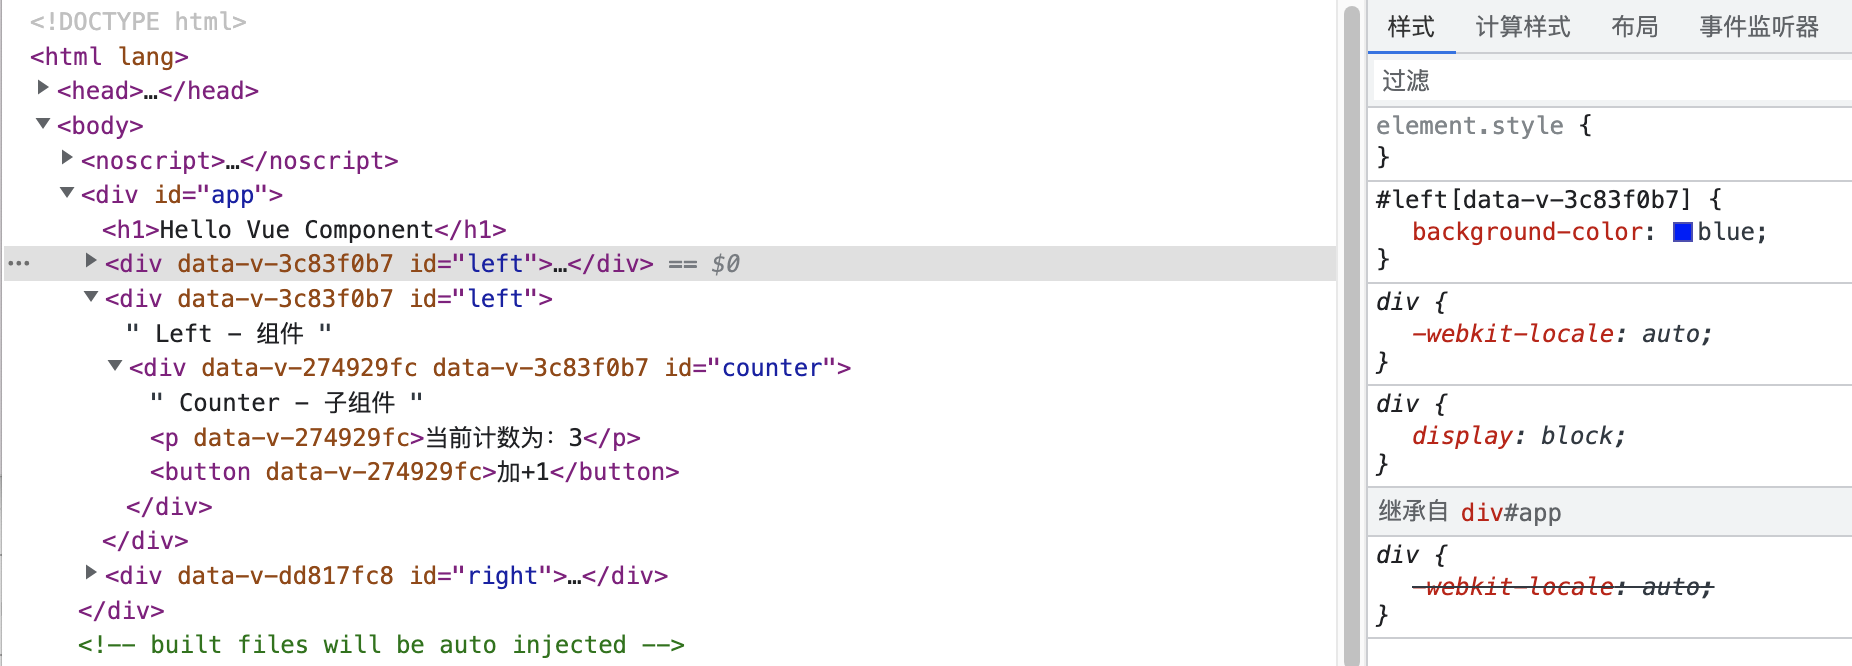
Vue组件的style样式冲突
因为Vue项目是单页面应用,所有项目里定义的所有组件最终都是放在一个index.html下,如果在组件内对h2标签添加css样式,等编译到项目后会对整个index.html页面整个范围内进行修饰。
解决方法:
通过给style标签添加scoped修饰,Vue会在编译完成的标签中自动给当前组件下的所有标签添加
data-v-001这样的属性,然后在添加样式时是自动改成标签+属性选择器的形式设置。这样可以保证组件内的style修饰只作用到当前的组件内。
1 2 3 4 5 | <style lang="less" scoped>#counter { background-color: beige;}</style> |
1 2 3 4 5 6 7 8 9 10 11 | #right { background-color: brown; // 使用场景:项目UI中使用了第三方库的UI组件,开发中要自定义修改第三方库组件的样式,又不能直接拿第三库的源码修改,可以通过/deep/深层修改 // 使用/deep/ p修饰的样式 编译器最终会转成[data-v-001] p{}父子选择器的形式 /deep/ p { background-color: pink; }}</style> |
Vue项目运行流程
1.在main.js项目入口,通过Vue实例将根组件实例替换到index.html的占位标签上
2.因为浏览器是无法解析vue文件的,所以在运行Vue项目之前,会先通过webpack进行编译,将vue文件编译成普通的js文件,添加到index.html中,浏览器就可以去解析了。编译工具为:
1 | vue-template-compiler |
3.创建组件实例
每一个组件本质上是一个构造函数<template>
1 2 3 4 5 | <div id="left"> Left - 组件 <Counter v-bind:customInitValue="3"></Counter> </div></template> |
1 | <MyLeft></MyLeft> |
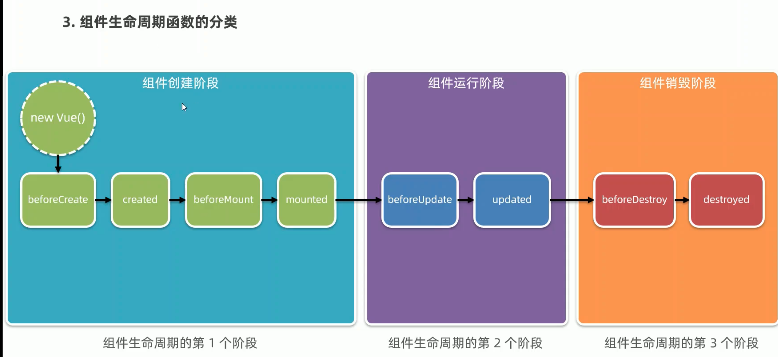
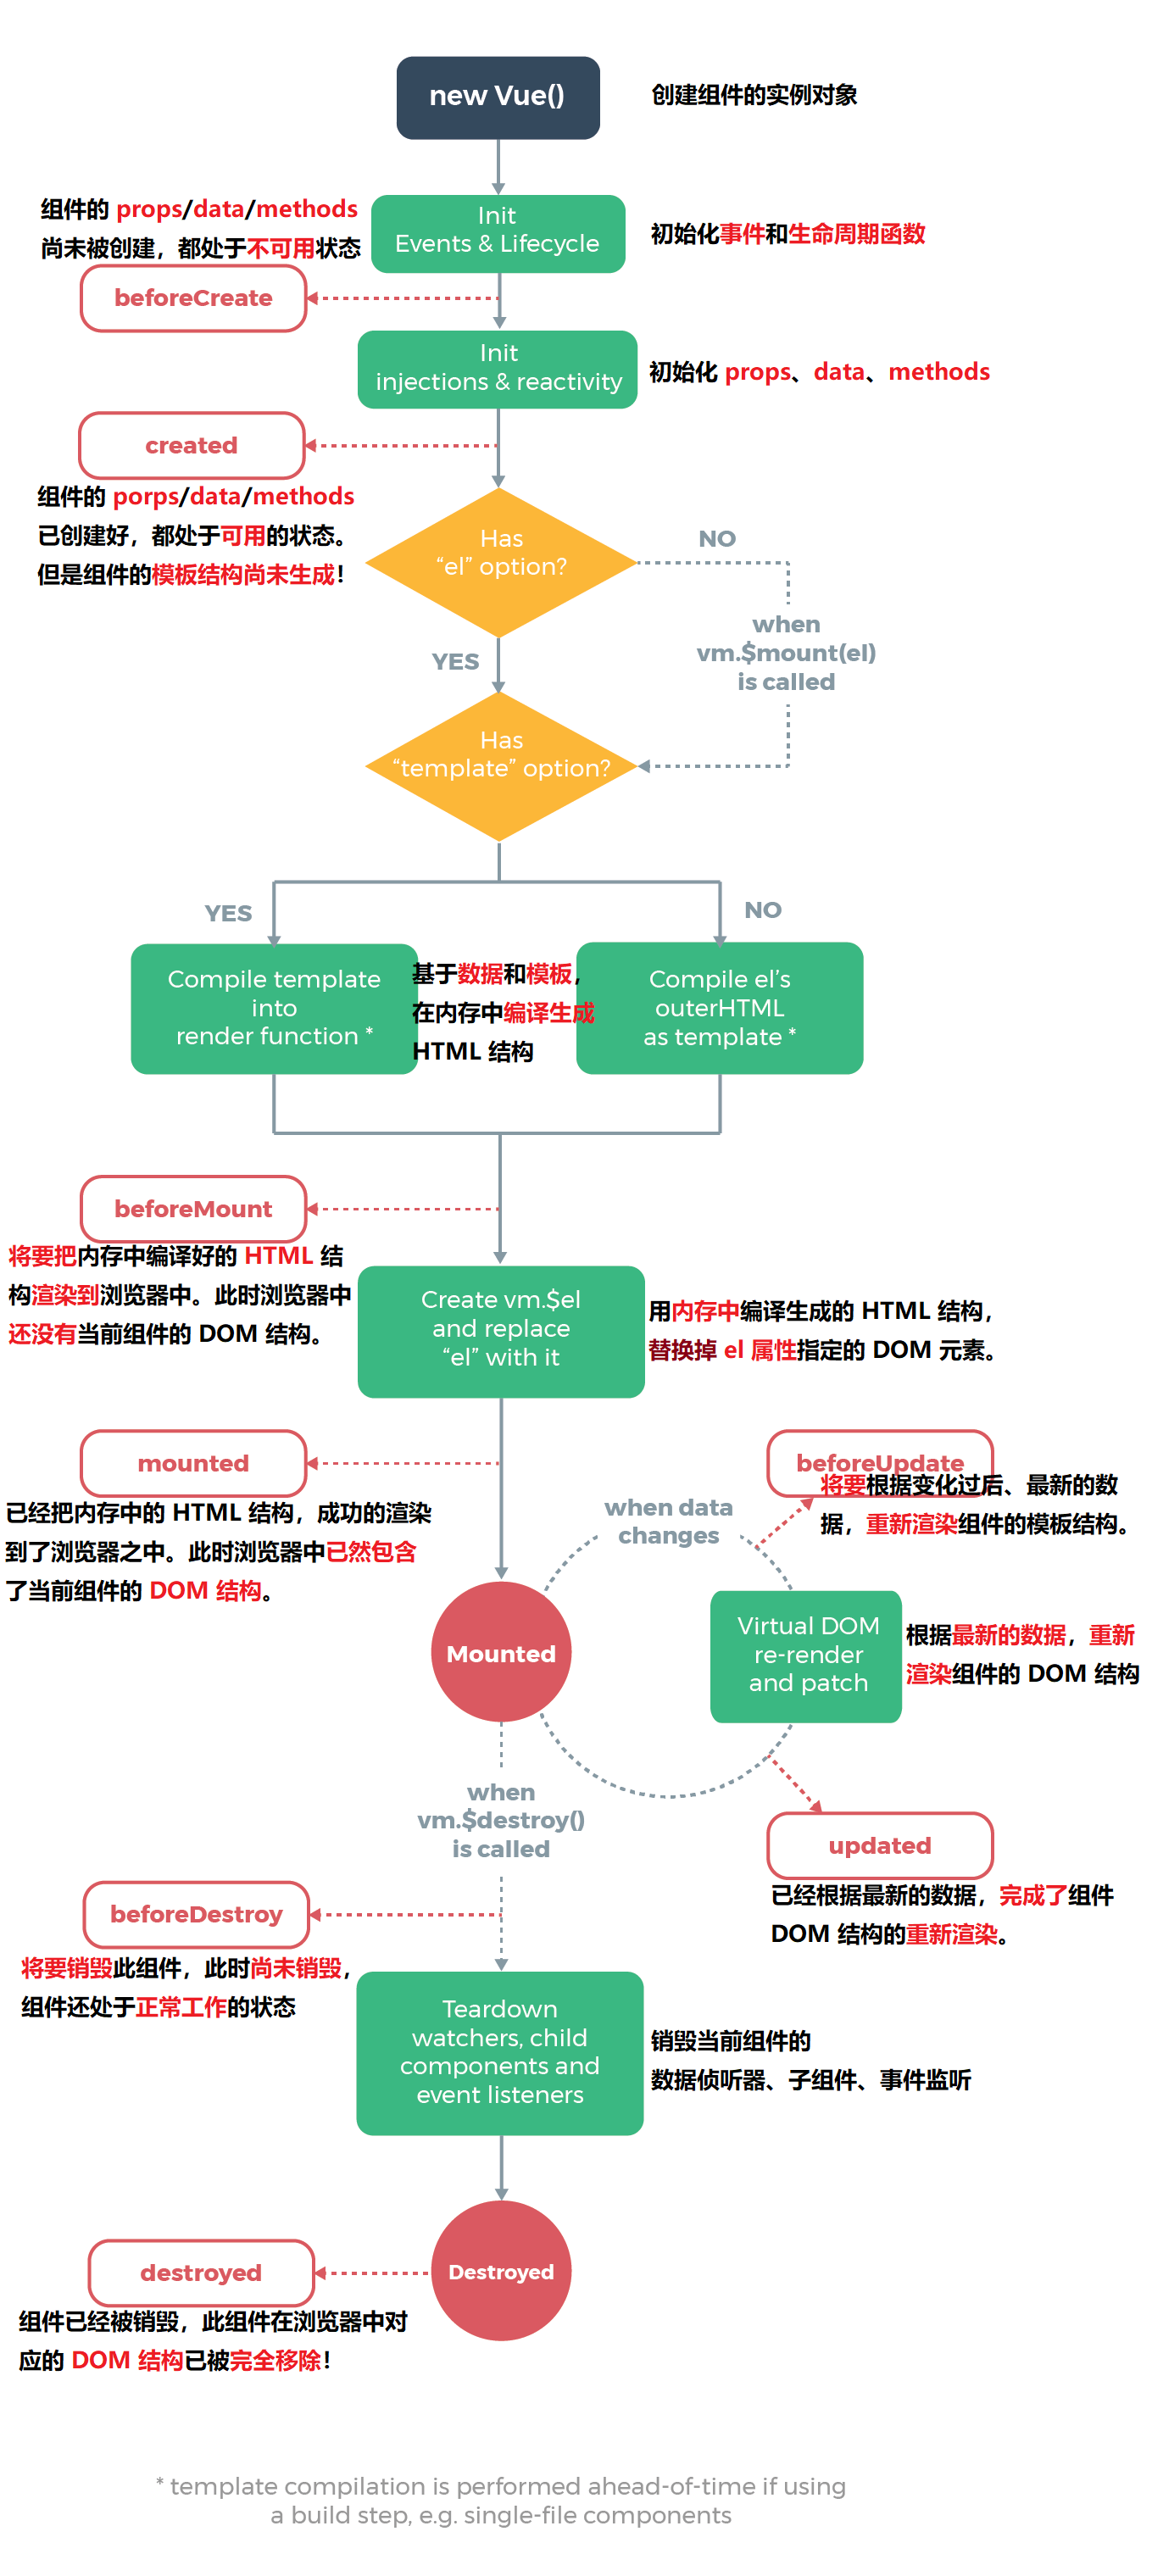
组件的生命周期
重要的生命周期函数
组件创建阶段
created: props, data, methods初始化完成
mounted: 内存中的html结构已经渲染到了Dom中。
组件运行阶段
当数据发送变化时,就会触发更新周期函数
beforeUpdata: 数据改变,DOM结构没变
updated: 数据和DOM结构都改变了
组件之间的数据共享
父向子:自定义属性。
子向父:自定义事件。
兄弟传值:eventBus。
父组件向子组件传值
1.子组件定义props
2.父组件使用子组件,并给自定义属性设置值
注意:如果父组件向子组件传递一个对象,其实传递的是对象的引用。验证方式是在子组件接收的对象上,使用.语法修改这个引用的属性,会发现连同外部的父组件中的信息一起改变了。
子组件向父组件传值
子组件发送自定义事件this.$emit('numchanged', this.count)
1 2 3 4 5 6 7 8 9 10 11 12 13 14 15 16 17 18 19 20 21 22 | <template> <div> 当前计数:{{count}} <button @click="increat">+1</button> </div></template><script>export default { data() { return { count: 0 }; }, methods: { increat() { this.count += 1 this.$emit('numchanged', this.count) } },};</script> |
父组件处理自定义事件
1 | <Child @numchanged="handleChildChange"></Child> |
兄弟组件EventBus通信
1.创建EventBus模块,使用一个空vue实例用来作为发送消息,接收消息的通道
1 2 3 | import Vue from 'vue'export default new Vue() |
2.Left组件通过EventBus通道,发送消息bus.$emit('sendMsg', this.message)<template>
1 2 3 4 5 6 7 8 9 10 11 12 13 14 15 16 17 18 19 20 21 22 | <div id="left"> <button @click="sendMsg">发送好诗给Right组件</button> </div></template><script>import bus from '../event/EventBus'export default { components: { Counter }, data() { return { message: '黑云压城城欲摧, 甲光向日金鳞开' }; }, methods: { sendMsg() { bus.$emit('sendMsg', this.message) } },};</script> |
1 2 3 4 5 6 7 8 9 10 11 12 13 14 15 16 17 18 19 20 21 22 23 | <template> <div id="right"> Right 子组件 {{reciveMsg}} </div></template><script>import bus from '../event/EventBus'export default { data() { return { reciveMsg: '' }; }, created() { bus.$on('sendMsg', (val) => { this.reciveMsg = val }) }};</script> |
Ref引用
在html开发中,经常会通过浏览器提供的API操作DOM,在Vue中也提供了一种途径用来操作DOM
这种不是调用document.getElementById()这样,而是通过设置ref引用属性来设置的。
在Vue实例中,有一个内置的属性$refs, 里面保存了当前组件实例中所有的refs, 组件中的标签定义的ref都被收集在了这里。
组件内部标签的refs
1 2 3 4 5 6 7 8 9 10 11 12 13 14 15 16 17 18 19 | <template> <div> <h2>引用组件</h2> <hr> <p ref="pRef">鹅鹅鹅,曲项向天歌</p> <button @click="changeColor">点击变色</button> </div></template><script>export default { methods: { changeColor() { console.log(this); this.$refs.pRef.style.color = 'red' } },};</script> |
组件内部的子组件
1 2 3 4 5 6 7 8 9 10 11 12 13 | <template> <div id="app"> <h1>Hello Vue Component</h1> <h2>Child组件的计数为:{{supCount}}</h2> <button @click="resetZero">将计数重置为0</button> <hr> <input v-if="visibelInput" @blur="hideInput" ref="iptRef" type="text"> <button v-else @click="showInput" >请输入文字</button> <hr> <!-- 3.使用组件 --> <Child ref="child" @numchanged="handleChildChange"></Child> </div></template> |
this.$nextTick是实例对象中内置的方法,它的回调方法是在下一个回调周期开始时调用
1 2 3 4 5 6 7 8 9 10 11 12 13 14 15 16 17 18 19 | methods: { handleChildChange(val) { console.log(val); this.supCount = val }, resetZero() { console.log(this); this.$refs.child.count = 0 }, showInput() { this.visibelInput = true this.$nextTick(()=>{ this.$refs.iptRef.focus() }) }, hideInput() { this.visibelInput = false } } |
动态占位组件component
vue内置组件component, 是一个组件占位符,通过属性is可以动态替换不同的组件
1 | <component :is="comName"></component> |
当同一个位置的组件被来回切换时,组件默认是在隐藏时销毁,出现时创建。如果想要保存上一次组件的操作状态,可以把component组件包到KeepAlive标签内,这样在组件切换时,只会进入后台处于失活状态,进入前台激活状态。
KeepAlive标签内部默认所有的组件都被缓存,可以使用include或exclude表示哪几个组件包含或不包含。
1 2 3 | <KeepAlive include="Left,Right"> <component :is="comName"></component></KeepAlive> |
组件进入后台,前台时对应生命周期方法
1 2 3 4 5 6 7 8 9 10 11 12 13 14 15 16 17 18 19 20 21 22 23 | export default { name: 'VueAdvancedComponentDeomLeft', data() { return { count: 0 }; }, methods: { }, created() { console.log('被创建',this); }, destroyed() { console.log('被销毁',this); }, deactivated() { console.log('被缓存,进入后台',this); }, activated() { console.log('被激活,进入前台',this); }}; |
组件的名称
组件的创建名称,在浏览器调试时用
1 2 3 | export default { name: 'VueAdvancedComponentDeomApp', } |
组件的注册名称,用于组件开发时用
1 2 3 4 5 6 7 8 9 10 | <script>import Left from '@/components/Left/Left.vue'import Right from '@/components/Right/Right.vue'export default { name: 'VueAdvancedComponentDeomApp', components: { Left, Right }, |
slot插槽
slot插槽是Vue为组件封装者提供的能力,它可以让组件中需要用户自定义灵活填充的部分使用slot占位,供外部自定义传入。
有自定义名字的插槽叫:具名插槽
无自定义名字的插槽叫:默认插槽
当定义一个复杂组件时,里面会有多个插槽,这是默认插槽是没有意义的。真正使用的是具名插槽。
1 2 3 4 5 6 7 8 9 10 11 12 13 14 15 16 17 18 | <template> <div class="container"> 插槽Left组件 <hr> <!-- 没有设置name的插槽叫默认插槽, 在组件中没有指定v-slot:name的插槽内容默认会放置到默认插槽中 --> <slot> </slot> <hr> <!-- 设置了name的插槽叫做具名插槽 --> <slot name="second"> <h6>插槽后备内容second:当外部没有给这个插槽设置值时,会展示默认展示这块</h6> </slot> <slot name="third"> <h6>插槽后备内容third:当外部没有给这个插槽设置值时,会展示默认展示这块</h6> </slot> </div></template> |
插槽组件的使用
使用组件中的某个插槽时,可以通过
<template v-slot:second>
<template #third>
这两种方式
1 2 3 4 5 6 7 8 9 10 11 12 13 14 15 16 | <SlotLeft> <!-- slot定义时有一个name属性,如果不设置默认叫default --> <!-- 在外部使用这个标签时,可以选择将插槽内容根据v-slot:name放到那个slot定义中 --> <!-- v-slot:name使用时,外面要使用template虚拟组件进行包裹,template虚拟组件并没有真实的内容 --> <template v-slot:second> <p>second插槽组件子内容</p> </template> <!-- v-slot:标志的简写是# --> <template #third> </template> <p>默认添加到默认插槽位置中</p> </SlotLeft> |
如果插槽中既包含名称,又包含了属性,那么这个插槽叫作用域插槽
作用域插槽的传值类型是:子传父
1 2 3 4 5 6 7 8 9 10 11 12 13 14 15 16 17 18 19 20 | <template> <div class="article-container"> <slot name="body" msg="hello vue.js" :user="userInfo"> 文章的内容 </slot> </div></template><script>export default { data() { return { userInfo: { name: 'Jack', age: 30 } }; },};</script> |
接收插槽传递过来的对象:v-slot:body="scope"
1 2 3 4 5 6 | <Article> <template v-slot:body="scope"> <p>桃花潭水深千尺, 不及汪伦送我情</p> <p>{{ scope }}</p> </template> </Article> |
自定义指令
1.私有自定义指令
2.公共自定义指令
私有自定义指令
1 2 3 4 5 6 7 8 9 10 11 12 13 14 15 16 17 18 19 20 21 22 23 24 25 26 27 28 29 30 31 32 33 34 35 36 37 38 39 40 41 42 43 44 | <template> <div class="article-container"> <p v-color>文章描述</p> <p v-color="'blue'">私有自定义指令传参</p> </div></template><script>export default { // 私有自定义指令 directives: { // color: { // // 当指令第一次被绑定到元素上面时,会执行bind函数, 其他都不再调用 // // binding是私有自定义指令的传参 // bind(el, binding) { // console.log(el); // el.style.color = 'red' // console.log(binding); // el.style.color = binding.value // }, // // Dom每次更新的时候调用 // update(el, binding) { // console.log(el); // el.style.color = 'red' // console.log(binding); // el.style.color = binding.value // } // } // 如果自定义指令中的bind方法和update方法的实现一样,那么可以使用color: function(){}形式,统一实现。 color(el, bingding) { console.log(el); el.style.color = 'red' console.log(binding); el.style.color = binding.value } }};</script> |
全局自定义指令
1 2 3 4 5 6 7 8 9 10 11 12 | Vue.directive('color', { bind(el, binding) { el.style.color = binding.value }, update(el, binding) { el.style.color = binding.value }})Vue.directive('color', (el, binding) { el.style.color = binding.value}) |


· 分享4款.NET开源、免费、实用的商城系统
· Obsidian + DeepSeek:免费 AI 助力你的知识管理,让你的笔记飞起来!
· 全程不用写代码,我用AI程序员写了一个飞机大战
· MongoDB 8.0这个新功能碉堡了,比商业数据库还牛
· 白话解读 Dapr 1.15:你的「微服务管家」又秀新绝活了