

webpack与其常见loader加载器使用方式
1 2 3 4 5 6 7 8 9 10 11 | zhoufeideMacBook-Pro-2:webpack-demo zhoufei$ npm run dev> webpack-demo@1.0.0 dev> webpackasset main.js 325 KiB [emitted] (name: main)runtime modules 937 bytes 4 modulescacheable modules 283 KiB ./src/index.js 136 bytes [built] [code generated] ./node_modules/jquery/dist/jquery.js 283 KiB [built] [code generated]webpack 5.42.1 compiled successfully in 281 ms |
底层实际运行的是 webpack工具, webpack对整个项目进行处理,瘦身,混淆,向下兼容,性能优化。最终生成了资源asset main.js, 产物放置在dist文件夹下面
1 2 3 | cacheable modules 283 KiB./src/index.js 136 bytes [built] [code generated]./node_modules/jquery/dist/jquery.js 283 KiB [built] [code generated] |
里面即包含了自定义的index.js代码,也包含了引用的第三方库jquery的代码。
1 2 3 4 5 | entry: path.join(__dirname, "./src/index123.js"), //自定义webpack的打包入口output: { path: path.join(__dirname, "./dist"), //自定义webpack的打包导出目录 filename: 'bundle.js' //自定义webpack的打包导出文件名} |
1 | npm i webpack-dev-server@3.11.2 -D |
对webpack.config.js配置文件修改dev脚本,增加server子命令
1 2 3 | "scripts": {+ "dev": "webpack serve" }, |
安装webpack-dev-server服务,会在本地开通一个http服务器,用来监听源代码的改动,一旦修改就会自动执行webpack编译,生成编译产物,只需要刷新页面就可以看到修改的效果。
1 2 3 4 5 6 7 | zhoufeideMacBook-Pro-2:webpack-demo zhoufei$ npm run dev> webpack-demo@1.0.0 dev> webpack serve[webpack-cli] Unable to load '@webpack-cli/serve' command[webpack-cli] TypeError: options.forEach is not a function |
报错,应该是webpack-cli之前的版本比较低,通过安装最新版本的webpack-cli解决
1 | npm install webpack-cli -D |
1 2 3 4 5 6 7 8 9 10 11 12 13 14 15 16 17 18 19 20 21 22 23 24 | zhoufeideMacBook-Pro-2:webpack-demo zhoufei$ npm run dev> webpack-demo@1.0.0 dev> webpack serveℹ 「wds」: Project is running at http://localhost:8080/ℹ 「wds」: webpack output is served from /ℹ 「wds」: Content not from webpack is served from /Users/zhoufei/Documents/Vue/webpack-demoℹ 「wdm」: asset bundle.js 650 KiB [emitted] (name: main)runtime modules 1.25 KiB 6 modulescacheable modules 581 KiB modules by path ./node_modules/webpack-dev-server/client/ 20.9 KiB 10 modules modules by path ./node_modules/html-entities/lib/*.js 61 KiB 5 modules modules by path ./node_modules/url/ 37.4 KiB 3 modules modules by path ./node_modules/querystring/*.js 4.51 KiB ./node_modules/querystring/index.js 127 bytes [built] [code generated] ./node_modules/querystring/decode.js 2.34 KiB [built] [code generated] ./node_modules/querystring/encode.js 2.04 KiB [built] [code generated] modules by path ./node_modules/webpack/hot/ 1.42 KiB ./node_modules/webpack/hot/emitter.js 75 bytes [built] [code generated] ./node_modules/webpack/hot/log.js 1.34 KiB [built] [code generated]./node_modules/webpack/hot/ sync nonrecursive ^\.\/log$ 170 bytes [built] [code generated]webpack 5.42.1 compiled successfully in 463 msℹ 「wdm」: Compiled successfully. |
首先,在项目的根目录创建一个http服务器,让http服务器管理当前项目。
1 | 「wds」: Project is running at http://localhost:8080/ |
然后,webpack打包,将产物放到了服务器根节点/, 也就是项目的根目录 的内存中,而非硬盘上,所以在本地目录是看不到产物的产生。放在内存中的目的是访问速度快,因为在编辑过程中是频繁保存的。
1 | <script src="/bundle.js"></script> |
然后, 打开服务器地址中的src目录,注意浏览器在打开一个目录时,默认展示这个目录下面的index.html页面。
1 | http://localhost:8080/src/ |
解决http://localhost:8080访问时展示的是项目目录而非index.html首页的问题
1 | npm i html-webpack-plugin@5.3.2 -D |
webpack.config.js文件修改
1 2 3 4 5 6 7 8 9 10 11 12 13 14 | //导入插件,得出一个构造函数const HtmlPlugin = require('html-webpack-plugin')//创建插件实例对象const htmlplugin = new HtmlPlugin({ template: './src/index.html', //copy文件路径源 filename: './index.html' //copy文件路径目标})module.exports = { plugins: [ htmlplugin //添加htmlplugin插件对象,webpack在运行前,读取这个插件实例并运行 ]} |
执行npm run dev重启后,在地址http://localhost:8080/就可以看到index.html首页了。

1 | <script defer="" src="bundle.js"></script> |
这些配置webpack, html-webpack-plugin如果使用Vue-Cli工具是可以自动配置的。
1 2 3 4 5 | devServer: { open: true, //首次打包成功后,默认打开浏览器, port: 8888, //设置使用的端口,http如果使用的80端口,默认是可以忽略的 host: '127.0.0.1', //指定运行的主机地址 } |
1 2 3 4 5 6 7 8 9 10 11 | import $ from 'jquery'//webpack的打包入口是这里,所以将index.css从这里引入就可以被打包进去//ES6中,一切皆模块,所以使用import导入import './css/index.css'$(function () { $('li:odd').css('background-color','red') $('li:even').css('background-color','green')}) |
执行npm run dev打包报错,提示没有安装css加载器
1 2 3 4 5 6 7 8 9 10 11 12 13 14 15 16 17 | ℹ 「wdm」: Compiling...✖ 「wdm」: asset bundle.js 651 KiB [emitted] (name: main)asset ./index.html 688 bytes [emitted]cached modules 294 KiB [cached] 32 modulesruntime modules 1.25 KiB 6 modules./src/css/index.css 30 bytes [built] [code generated] [1 error]ERROR in ./src/css/index.css 1:3Module parse failed: Unexpected token (1:3)You may need an appropriate loader to handle this file type, currently no loaders are configured to process this file. See https://webpack.js.org/concepts#loaders> li {| list-style: none;| } @ ./src/index123.js 5:0-24webpack 5.42.1 compiled with 1 error in 47 msℹ 「wdm」: Failed to compile. |
安装css模块加载器loader
1 | npm i style-loader@3.0.0 css-loader@5.2.6 -D |
在webpack.config.js配置文件中,把加载器匹配规则在里面设置好
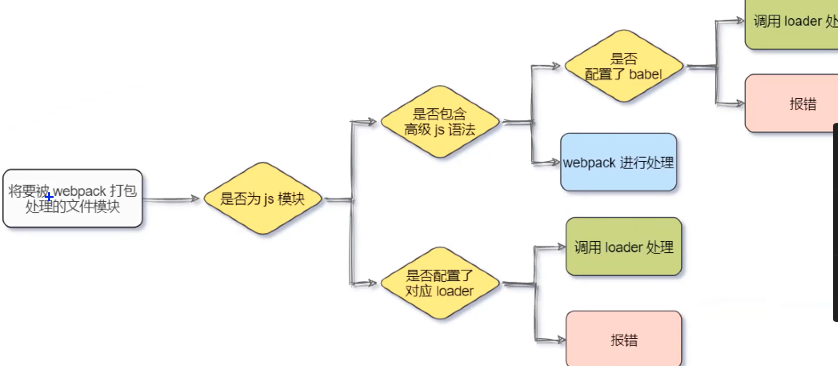
1 2 3 4 5 6 7 8 9 10 | module.exports = { module: { //非js模块: webpack默认处理的模块是js结尾的。如果碰到其他模块,就查询这个key, 查询它们有没有对应的加载器,然后把这个模块交给对应的加载器 rules: [ //test: 要匹配的文件类型, //use: 要调用的loader,其中use数组的顺序是固定的,调用顺序是从后往前 {test: /\.css$/, use:['style-loader', 'css-loader']} ] }} |
webpack打包工具以webpack.config.js中entry声明的入口文件index.js为入口,去处理模块。
1 | npm i less-loader@10.0.1 less@4.1.1 -D |
1 2 3 4 5 6 7 8 9 10 11 12 13 | //文件:index.lesshtml, body, ul { margin: 0; padding: 0; li { margin: 0; padding: 0; line-height: 30px; padding-left: 20px; font-size: 12px; }} |
1 2 3 4 | //文件:index.js//导入less类型模块import './css/index.less' |
在webpack.config.js配置文件中添加less-loader加载器模块的匹配规则,让webpack打包时使用less-loader进行处理less结尾的文件
1 2 3 4 5 6 7 8 9 10 11 12 13 | //文件:webpack.config.jsmodule.exports = { module: { //非js模块: webpack默认处理的模块是js结尾的。如果碰到其他模块,就查询这个key, 查询它们有没有对应的加载器,然后把这个模块交给对应的加载器 rules: [ //use数组中的处理顺序是从后向前,逐个处理并将处理结果传递到后面进行处理 //less库 是less-loader库加载器的内部依赖项,所以需要安装单不需要添加到处理规则中 {test: /\.less$/, use:['style-loader', 'css-loader', 'less-loader']}, ] }} |
然后npm run dev重启生效
1 | npm i url-loader@4.1.1 file-loader@6.2.0 -D |
在webpack.config.js配置的入口文件中使用jquery加载图片模块并动态设置到img标签上
1 2 3 4 5 6 | //文件:index.js//导入图片类型模块import img from './images/cat.jpeg'$('.box').attr('src',img) |
在webpack.config.js中添加url-loader加载器规则匹配,并设置limit最大字节数控制,当小于这个限制时,webpack会自动转成base64优化图片加载
1 2 3 4 5 6 7 8 9 10 11 12 | module.exports = { module: { //非js模块: webpack默认处理的模块是js结尾的。如果碰到其他模块,就查询这个key, 查询它们有没有对应的加载器,然后把这个模块交给对应的加载器 rules: [ //file-loader库 是url-loader加载器的内部依赖项,所以需要安装 //如果匹配的use加载器只有一个时,可以直接写成字符串,或者写成数组也可以 //limit参数为最大值设置,单位是字节,当大于这个限制时,图片使用网络请求获取,当小于这个3500字节时,图片会被转成base64随网页标签一起返回 {test: /\.png|jpg|jpeg|gif$/, use:'url-loader?limit=3500'}, ] }} |
然后npm run dev重启项目,生效。
1 2 3 4 5 6 7 8 9 10 11 12 13 14 15 16 | import $ from 'jquery'//webpack的打包入口是这里,所以将index.css从这里引入就可以被打包进去//ES6中,一切皆模块,所以使用import导入import './css/index.css'//导入less类型模块import './css/index.less'//导入图片类型模块import img from './images/cat.jpeg'$('.box').attr('src',img)$(function () { $('li:odd').css('background-color','red') $('li:even').css('background-color','green')}) |
1 | npm i babel-loader@8.2.2 @babel-core@7.14.6 @babel/plugin-proposal-decorators@7.14.5 -D |
在webpack.config.js配置的入口文件中添加js高级语法@info装饰器语法
1 2 3 4 5 6 7 8 9 10 11 | function info(target) { //为对象添加静态属性 target.info = 'Person info'}//使用一个webpack默认不支持的高级语法,装饰器,此时webpack会查询是否有其他rules中结尾为js的laoder加载器可以处理这个高级语法@infoclass Person {}console.log(Person.info); |
在webpack.config.js配置文件中添加babel-loader加载器,用来处理js中webpack无法处理的高级js语法。同时设置exclude,排除/node_modules/目录下的第三方包,只处理自己项目中的js文件
1 2 3 4 5 6 7 8 9 10 | module.exports = { module: { //非js模块: webpack默认处理的模块是js结尾的。如果碰到其他模块,就查询这个key, 查询它们有没有对应的加载器,然后把这个模块交给对应的加载器 rules: [ //js结尾文件中,webpack默认不能处理的高级语法走下面匹配的loader加载器 //exclude排除/node_modules/目录下的第三方包 {test: /\.js$/, use:'babel-loader', exclude: /node_modules/}, ] }} |
创建并配置babel.config.js, babel的配置文件,用于说明有哪些插件可以供babel-loader加载器使用。
1 2 3 4 5 6 7 8 | //插件的插件//babel-loader插件在加载时,会读取babel.config.js配置文件,查询是否有它需要的插件要加载//这里通过plugin-proposal-decorators来处理js的高级语法“装饰器”语法module.exports = { plugins: [ ['@babel/plugin-proposal-decorators', {legacy: true}] ]} |
然后npm run dev重启服务。
1 2 3 | "scripts": { "build": "webpack --mode production" }, |
产物导出优化
1 2 3 4 5 6 7 8 9 10 11 12 13 14 15 | module.exports = { output: { path: path.join(__dirname, "./dist"), //自定义webpack的打包导出目录 filename: 'js/bundle.js' //自定义webpack的打包导出文件名 }, module: { //非js模块: webpack默认处理的模块是js结尾的。如果碰到其他模块,就查询这个key, 查询它们有没有对应的加载器,然后把这个模块交给对应的加载器 rules: [ //file-loader库 是url-loader加载器的内部依赖项,所以需要安装 //如果匹配的use加载器只有一个时,可以直接写成字符串,或者写成数组也可以 //limit参数为最大值设置,单位是字节,当大于这个限制时,图片使用网络请求获取,当小于这个3500字节时,图片会被转成base64随网页标签一起返回 {test: /\.png|jpg|jpeg|gif$/, use:'url-loader?limit=3500&outputPath=images'}, ] }} |
添加clean-webpack-plugin插件,使打包前自动删除dist目录
1 | npm i clean-webpack-plugin -D |
修改webpack.config.js配置文件,将插件实例配置到插件plugins项下
1 2 3 4 5 6 7 8 | const {CleanWebpackPlugin} = require('clean-webpack-plugin')module.exports = { plugins: [ new CleanWebpackPlugin(), ],} |
解决浏览器中js报错展示的行不对应源码真实行号的问题
1 2 3 4 5 6 7 8 9 10 11 12 | module.exports = { //开发阶段 //在开发阶段打开这个设置,可以在浏览器的js报错定位到源码的对应行数,点击能直接跳到源码。 //如果不设置的话:浏览器的js报错定位是webpack打包对应的内存包的行数,点击查看跳的是内存结果bundle.js包 devtool: 'eval-source-map', //开发阶段,即展示源码行号,又可以跳到源码 // //生产阶段,建议使用nosources-source-map或者关闭该配置 // devtool: 'nosources-source-map', //生产阶段,可以展示源码行号,但不能跳到源码 // devtool: 'source-map', //生产阶段,即展示源码行号,又可以跳到源码,不建议这样配置 mode: "development", //mode: development, production 开发模式与生产模式配置} |
使用@符号导入模块
1 2 3 4 5 6 7 8 9 | module.exports = { resolve: { //告诉webpack,@符号表示src这一层目录, 开始时推荐使用“@/images/logo.jpj”来导入模块 alias: { "@": path.join(__dirname, './src/') } }} |


· 分享4款.NET开源、免费、实用的商城系统
· Obsidian + DeepSeek:免费 AI 助力你的知识管理,让你的笔记飞起来!
· 全程不用写代码,我用AI程序员写了一个飞机大战
· MongoDB 8.0这个新功能碉堡了,比商业数据库还牛
· 白话解读 Dapr 1.15:你的「微服务管家」又秀新绝活了