FPGA 日积月累
Nios II 13.1中,使用Qsys生成的cpu中断号默认为-1,因此中断无法注册。解决方法:手动修改中断模块的tcl文件如下:
add_interface interrupt_sender interrupt end
set_interface_property interrupt_sender associatedAddressablePoint "avalon_slave "
set_interface_property interrupt_sender associatedClock clock
set_interface_property interrupt_sender associatedReset reset
set_interface_property interrupt_sender bridgedReceiverOffset ""
set_interface_property interrupt_sender bridgesToReceiver ""
set_interface_property interrupt_sender ENABLED true
set_interface_property interrupt_sender EXPORT_OF ""
set_interface_property interrupt_sender PORT_NAME_MAP ""
set_interface_property interrupt_sender CMSIS_SVD_VARIABLES ""
之后重新生成CPU即可
1. Quartus 中 Modelsim-Altera 设置的问题
在Quartus II 13.1中, 需要选定好可执行程序的位置,要注意描述的是路径!而非程序
设置结果默认D:\altera\13.1\modelsim_ase\win32aloem,需要在最后加斜线,D:\altera\13.1\modelsim_ase\win32aloem\ 如果最后的“\”没有的话系统无法运行。
2 Modelsim-Altera 仿真过程中无法读取RAM出事话文件*.hex或者*.mif
需要把初始化文件和仿真文件放在同一个路径下。
3. Quartus 远程登录
在lisence里面的网卡后面加上几个字母TS_OK即可
如下
FEATURE quartus alterad 2035.12 permanent uncounted 295142B536B3 \
HOSTID=002618e3e3b6 TS_OK SIGN="0C8D 31B5 AD64 E1C4 C6F9 1540 5072 \
C53D 386C 7A5E 09F0 6FE0 EBAB A42C C139 015B 44B1 D3E6 8F4B \
CD45 FAFF B30C 77BE FA54 955D 022F 0663 87C2 26B0 7305"
4. 网表文件的生成
4.1、基本概念
QuartusII的qxp文件为QuartusII Exported Partition,用于创建综合或者PAR之后的网表文件。
QuartusII的vqm文件为verilog quartusII mapping,只能保存综合后,PAR前的综合结果。
4.2、qxp文件生成
1. 在quartusII的Project Navigator中选中欲创建qxp的module文件,右击,选择“Design Partition > Set as Design Partition”。
2. 综合整个工程,想出PAR后的qxp就需要编译整个工程。
3. 点击菜单“Process”,选择“Start > Start Partition Merge”,以创建完整的module网表。
4. 点击菜单“Project”,选择“Export Design Partition”。
5. 在弹出窗口中选择想要的层次和网表选项,即可导出qxp文件。
注:使用时,仍需右击选择“Set as Design Partition”,否则,有时候会出错,只是有时候而已哦。
通过RTL查看器看到的qxp模块是空的,但PAR后即可看到里面的东东了。
4.3、vqm文件生成
1. 创建以相应module为顶层的工程。
2. 点击菜单“Process”,选择“Start > Start VQM Writer”,即可得到vqm文件。
注:有的器件不支持vqm哦,此时只能用qxp了。
5. WARNING: Couldn't compute FAST_CWD pointer. Please report this problem to the public mailing list cygwin@cygwin.com"
解决方法:Updating Cygwin for Quartus II 13.1 on Windows 8.1
There is a compatibility issue that causes old versions of Cygwin to fail to run on Windows 8.1. This affects all of Altera’s tools that use Cygwin, such as Altera Monitor Program and Nios II EDS. To solve this issue, the Cygwin that is installed with Quartus II must be updated as follows:
- Download the patch at ftp://ftp.altera.com/up/pub/Cygwin_Patch/cygwin_patch.zip
- Extract the contents of cygwin_patch.zip to your Quartus II install directory, overwriting existing files. Both 32-bit and 64-bit versions of Cygwin are included in the zip file; extract both of these versions to your Quartus II install folder. The default path to the Quartus II install folder is “C:\altera\13.1\quartus”.
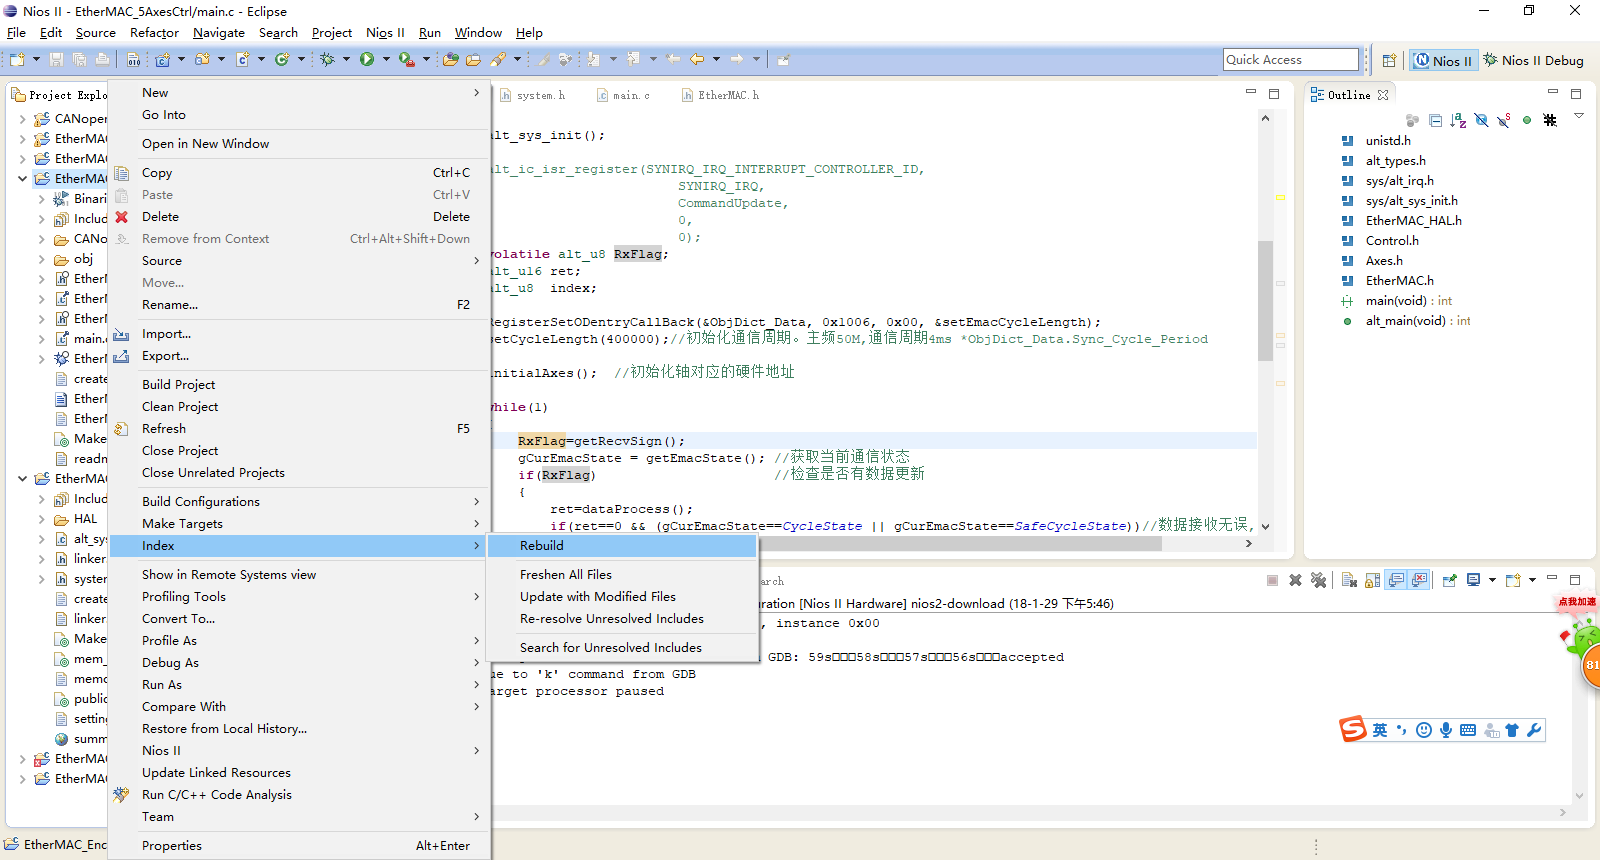
6. NIOS II EDS中出现TYPE 'XXXX_BASE' COULD NOT BE RESOLVED;不识别“system.h”“io.h”等系统头文件(只是错误警告,实际不影响编译和执行)
选中project——右键——Index——rebuild(此方案不行只能重新建立工程)


