gRPC之java语言的简单Demo
RPC是什么
说到RPC(Remote Process Communication,远程过程调用)就不得不说到进程间通信(Inter-process Communication,简称IPC),IPC是指多个进程之间传送数据或信号的一些技术或方法。
而IPC又分为本地过程调用(LPC)和远程过程调用(RPC),这两者的区别就是 LPC的调用可以共享内存空间,比较方便;而RPC的调用双方则不在同一个主机中,无法像LPC那样方便。
1、常见的序列化协议有:
基于文本(text)的:XML、JSON
基于二进制(binary)的: Protocol Buffer、Thrift等

2、常见的传输协议有:
传输层的: TCP(基于Socket)、UDP
应用层的:HTTP1.1、HTTP2.0
而RPC框架中,通常使用的序列化协议包括Protocol Buffer、Thrift等,传输协议则常用TCP、HTTP2.0等。
更多的内容可以参考博客:
gRPC框架
上面简单介绍了RPC机制的作用,现如今已经出现了许多优秀的RPC框架,比如:gRPC、Dubbo、Thrift等。这些框架在 序列化协议和传输协议两部分都有不同的选择,各有优劣。不过,没必要全部都去学习一遍,可以简单尝试一种,大概了解运行机制即可。
下面是以gRPC的简单使用为例,了解gRPC的运行过程和用法。
gRPC使用的序列化协议是 Protocol Buffer,使用的传输协议是 HTTP2.0协议。

需要清楚的是,
gRPC的通信方式需要先确定好proto文件,这个proto文件中定义了远程api的具体服务接口、api方法的参数类型/返回值类型;
然后,将该proto文件编译为 java类文件,这些类文件包含的就是 client端 和 server端都遵循的 远程调用api的定义内容。
接着,client端 和 server端按照gRPC框架的方式来进行通信即可。
gRPC的java示例
具体步骤如下【参考源码】:
1、创建一个maven项目,创建src/main/proto目录,在其中添加定义好的远程API接口hello.proto文件,如下:
// 使用该proto文件可以定义交互的服务接口,基于该文件编译成的源文件可以分别复制到 client端和server端,便于两者使用 syntax = "proto3"; // 定义语法类型 package hello; // 定义作用域 option java_multiple_files = false; // 表示下面的message不需要编译成多个java文件 option java_outer_classname = "HelloMessage"; // 表示下面的message编译成的java类文件的名字 option java_package = "grpc"; //指定该proto文件编译成的java源文件的包名 service Hello { // 定义服务 rpc sayHello(HelloRequest) returns(HelloResponse) {} } message HelloRequest { // 定义请求的消息体 string name = 1; } message HelloResponse { // 定义回复的消息体 string message = 1; }
2、在pom.xml文件中添加gRPC依赖与插件,参考
依赖为: <dependencies> <dependency> <groupId>io.grpc</groupId> <artifactId>grpc-netty-shaded</artifactId> <version>1.31.1</version> </dependency> <dependency> <groupId>io.grpc</groupId> <artifactId>grpc-protobuf</artifactId> <version>1.31.1</version> </dependency> <dependency> <groupId>io.grpc</groupId> <artifactId>grpc-stub</artifactId> <version>1.31.1</version> </dependency> <dependency> <groupId>org.apache.tomcat</groupId> <artifactId>annotations-api</artifactId> <version>6.0.53</version> <scope>provided</scope> </dependency> </dependencies> 插件为: <build> <extensions> <extension> <groupId>kr.motd.maven</groupId> <artifactId>os-maven-plugin</artifactId> <version>1.6.2</version> </extension> </extensions> <plugins> <plugin> <groupId>org.xolstice.maven.plugins</groupId> <artifactId>protobuf-maven-plugin</artifactId> <version>0.6.1</version> <configuration> <protocArtifact>com.google.protobuf:protoc:3.12.0:exe:${os.detected.classifier}</protocArtifact> <pluginId>grpc-java</pluginId> <pluginArtifact>io.grpc:protoc-gen-grpc-java:1.31.1:exe:${os.detected.classifier}</pluginArtifact> </configuration> <executions> <execution> <goals> <goal>compile</goal> <goal>compile-custom</goal> </goals> </execution> </executions> </plugin> <plugin> <groupId>org.apache.maven.plugins</groupId> <artifactId>maven-compiler-plugin</artifactId> <version>3.1</version> <configuration> <source>1.8</source> <target>1.8</target> <encoding>utf-8</encoding> </configuration> </plugin> </plugins> </build>
3、执行 mvn clean compile 命令,然后在生成的 target/generated-sources/ptotobuf 文件夹中找到 服务接口对应的类文件 和 接口参数/返回值对应的类文件。
将这两个文件分别复制到client端 和 server端的java源文件中。
4、编写server端代码,如下:
public class ServerDemo { // 定义一个Server对象,监听端口来获取rpc请求,以进行下面的处理 private Server server; //使用main方法来测试server端 public static void main(String[] args) throws IOException, InterruptedException { final ServerDemo serverDemo = new ServerDemo(); //启动server serverDemo.start(); //block 一直到退出程序 serverDemo.blockUntilShutdown(); } /** * 启动一个Server实例,监听client端的请求并处理 * @throws IOException */ private void start() throws IOException { //server运行在的端口号 int port = 50051; // 给server添加监听端口号,添加 包含业务处理逻辑的类,然后启动 server = ServerBuilder.forPort(port) .addService(new HelloImpl()) .build() .start(); } /** * 阻塞server直到关闭程序 * @throws InterruptedException */ private void blockUntilShutdown() throws InterruptedException { if (server != null) { server.awaitTermination(); } } /** * proto文件被编译后,在生成的HelloGrpc的抽象内部类HelloImplBase中包含了 proto中定义的服务接口的简单实现 * 该HelloImpl类需要重写这些方法,添加需要的处理逻辑 */ static class HelloImpl extends HelloGrpc.HelloImplBase { // proto文件中的sayHello服务接口被编译后,在生成的HelloGrpc的抽象内部类HelloImplBase中有一个简单的实现 // 因此,在server端需要重写这个方法,添加上相应的逻辑 @Override public void sayHello(HelloMessage.HelloRequest req, StreamObserver<HelloMessage.HelloResponse> responseObserver) { HelloMessage.HelloResponse reply = HelloMessage.HelloResponse.newBuilder().setMessage("(server端的sayHello()方法处理结果) Hello," + req.getName()).build(); // 调用onNext()方法来通知gRPC框架把reply 从server端 发送回 client端 responseObserver.onNext(reply); // 表示完成调用 responseObserver.onCompleted(); } } }
5、编写client端代码,如下:
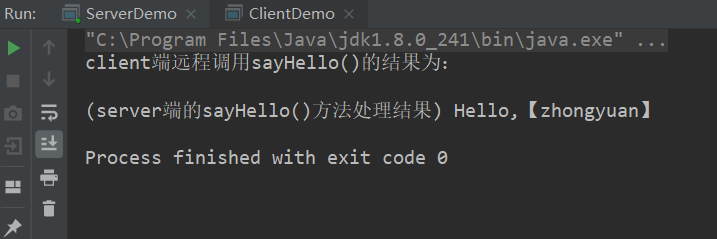
public class ClientDemo { //使用main方法来测试client端 public static void main(String[] args) throws Exception { ClientDemo clientDemo = new ClientDemo(); try { //基于gRPC远程调用对应的方法 clientDemo.remoteCall("【zhongyuan】"); } finally { } } /** * 基于gRPC框架的使用步骤,进行远程调用 * @param name */ public void remoteCall(String name) { HelloMessage.HelloRequest request = HelloMessage.HelloRequest.newBuilder().setName(name).build(); HelloMessage.HelloResponse response; try { // 基于访问地址 创建通道 Channel channel = ManagedChannelBuilder.forAddress("localhost", 50051).usePlaintext().build(); // 利用通道 创建一个桩(Stub)对象 HelloGrpc.HelloBlockingStub blockingStub = HelloGrpc.newBlockingStub(channel); //通过桩对象来调用远程方法 response = blockingStub.sayHello(request); } catch (StatusRuntimeException e) { return; } System.out.println("client端远程调用sayHello()的结果为:\n\n" + response.getMessage()); } }
6、接下来,先运行server端main()函数,再运行client端的main()函数,即可测试rpc远程调用结果,如下:

源码详见:https://github.com/zhongyuanzhao000/gRPC-demo
参考:
grpc官网:https://grpc.io/docs/languages/java/quickstart/
grpc官方文档中文版:http://doc.oschina.net/grpc?t=60134
grpc-java仓库:https://github.com/grpc/grpc-java
博客:
https://blog.csdn.net/sunsun314/article/details/73780169

