
WebAssembly环境搭建
Environment:Ubuntu 16.06 + emscripten
URL: https://emscripten.org/docs/getting_started/downloads.html#linux
1. Installation emsdk
# Get the emsdk repo
git clone https://github.com/emscripten-core/emsdk.git

# Enter that directory
cd emsdk

# Fetch the latest version of the emsdk (not needed the first time you clone)
git pull

# Download and install the latest SDK tools.
./emsdk install latest

# Make the "latest" SDK "active" for the current user. (writes .emscripten file)
./emsdk activate latest

# Activate PATH and other environment variables in the current terminal
source ./emsdk_env.sh
2. Emsdk install targets
./emsdk install 1.38.45
3. Updating the SDK
# Fetch the latest registry of available tools.
./emsdk update

# Download and install the latest SDK tools.
./emsdk install latest

# Set up the compiler configuration to point to the "latest" SDK.
./emsdk activate latest

# Activate PATH and other environment variables in the current terminal
source ./emsdk_env.sh
4. windows /cenos 7部署流程:
下载代码
git clone https://github.com/emscripten-core/emsdk.git
cd emsdk
安装依赖,添加环境变量
# 安装依赖项,这个过程比较长,会下载并自动安装node、Java、python等环境包,耐心等待
emsdk install latest   //centos 环境: ./emsdk install latest
# 激活上一步下载的环境变量临时,一旦关闭cmd窗口,环境变量就失效了。
emsdk activate latest  //centos 环境: ./emsdk activate latest

# 把emsdk加到环境变量中,方便后续执行命令
emsdk_env.bat  //centos 环境: source ./emsdk_env.sh
编译代码
#include <stdio.h>

int main() {
  printf("hello world.");
  return 0;
}
编译为js
emcc test.c
执行后,会在当前cmd所在目录下生成a.out.js 和 a.out.wasm
编译为html格式的demo文件
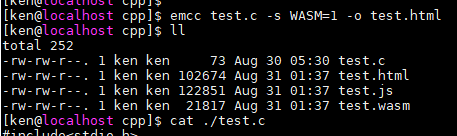
emcc test.c -s WASM=1 -o test.html
编译后产生如下文件:
将html文件发布到web容器中,或者使用下面命令发布(本文使用httpd)
python -m http.server
# 也可以使用下面的命令,直接打开默认浏览器运行
emrun test.html
本地浏览器访问http://192.168.1.126/test.html 显示如下:

