鸿蒙NEXT开发案例:转盘
【1】引言(完整代码在最后面)
在鸿蒙NEXT系统中,开发一个有趣且实用的转盘应用不仅可以提升用户体验,还能展示鸿蒙系统的强大功能。本文将详细介绍如何使用鸿蒙NEXT系统开发一个转盘应用,涵盖从组件定义到用户交互的完整过程。
【2】环境准备
电脑系统:windows 10
开发工具:DevEco Studio NEXT Beta1 Build Version: 5.0.3.806
工程版本:API 12
真机:mate60 pro
语言:ArkTS、ArkUI
【3】难点分析
1. 扇形路径的计算
难点:创建扇形的路径需要精确计算起始点、结束点和弧线参数。尤其是涉及到三角函数的使用,初学者可能会对如何将角度转换为坐标感到困惑。
解决方案:可以通过绘制简单的示意图来帮助理解扇形的构造,并在代码中添加详细注释,解释每一步的计算过程。
2. 动态角度计算
难点:在转盘旋转时,需要根据单元格的比例动态计算每个单元格的角度和旋转角度。这涉及到累加和比例计算,可能会导致逻辑错误。
解决方案:使用数组的 reduce 方法来计算总比例,并在计算每个单元格的角度时,确保逻辑清晰。可以通过单元测试来验证每个单元格的角度是否正确。
3. 动画效果的实现
难点:实现转盘的旋转动画需要对动画的持续时间、曲线和结束后的状态进行管理。初学者可能会对如何控制动画的流畅性和效果感到困惑。
解决方案:可以参考鸿蒙NEXT的动画文档,了解不同的动画效果和参数设置。通过逐步调试,观察动画效果并进行调整。
4. 用户交互的处理
难点:处理用户点击事件,尤其是在动画进行时,如何禁用按钮以防止重复点击,可能会导致状态管理的复杂性。
解决方案:在按钮的点击事件中,使用状态变量(如 isAnimating)来控制按钮的可用性,并在动画结束后恢复按钮的状态。
5. 组件的状态管理
难点:在多个组件之间传递状态(如当前选中的单元格、转盘的角度等)可能会导致状态管理混乱。
解决方案:使用状态管理工具(如 @State 和 @Trace)来确保状态的统一管理,并在需要的地方进行状态更新,保持组件之间的解耦。
【完整代码】
import { CounterComponent, CounterType } from '@kit.ArkUI'; // 导入计数器组件和计数器类型
// 定义扇形组件
@Component
struct Sector {
@Prop radius: number; // 扇形的半径
@Prop angle: number; // 扇形的角度
@Prop color: string; // 扇形的颜色
// 创建扇形路径的函数
createSectorPath(radius: number, angle: number): string {
const centerX = radius / 2; // 计算扇形中心的X坐标
const centerY = radius / 2; // 计算扇形中心的Y坐标
const startX = centerX; // 扇形起始点的X坐标
const startY = centerY - radius; // 扇形起始点的Y坐标
const halfAngle = angle / 4; // 计算半个角度
// 计算扇形结束点1的坐标
const endX1 = centerX + radius * Math.cos((halfAngle * Math.PI) / 180);
const endY1 = centerY - radius * Math.sin((halfAngle * Math.PI) / 180);
// 计算扇形结束点2的坐标
const endX2 = centerX + radius * Math.cos((-halfAngle * Math.PI) / 180);
const endY2 = centerY - radius * Math.sin((-halfAngle * Math.PI) / 180);
// 判断是否为大弧
const largeArcFlag = angle / 2 > 180 ? 1 : 0;
const sweepFlag = 1; // 设置弧线方向为顺时针
// 生成SVG路径命令
const pathCommands =
`M${startX} ${startY} A${radius} ${radius} 0 ${largeArcFlag} ${sweepFlag} ${endX1} ${endY1} L${centerX} ${centerY} L${endX2} ${endY2} A${radius} ${radius} 0 ${largeArcFlag} ${1 -
sweepFlag} ${startX} ${startY} Z`;
return pathCommands; // 返回路径命令
}
// 构建扇形组件
build() {
Stack() {
// 创建第一个扇形路径
Path()
.width(`${this.radius}px`) // 设置宽度为半径
.height(`${this.radius}px`) // 设置高度为半径
.commands(this.createSectorPath(this.radius, this.angle)) // 设置路径命令
.fillOpacity(1) // 设置填充透明度
.fill(this.color) // 设置填充颜色
.strokeWidth(0) // 设置边框宽度为0
.rotate({ angle: this.angle / 4 - 90 }); // 旋转扇形
// 创建第二个扇形路径
Path()
.width(`${this.radius}px`) // 设置宽度为半径
.height(`${this.radius}px`) // 设置高度为半径
.commands(this.createSectorPath(this.radius, this.angle)) // 设置路径命令
.fillOpacity(1) // 设置填充透明度
.fill(this.color) // 设置填充颜色
.strokeWidth(0) // 设置边框宽度为0
.rotate({ angle: 180 - (this.angle / 4 - 90) }); // 旋转扇形
}
}
}
// 定义单元格类
@ObservedV2
class Cell {
@Trace angle: number = 0; // 扇形的角度
@Trace title: string; // 当前格子的标题
@Trace color: string; // 背景颜色
@Trace rotate: number = 0; // 在转盘要旋转的角度
angleStart: number = 0; // 轮盘所在区间的起始
angleEnd: number = 0; // 轮盘所在区间的结束
proportion: number = 0; // 所占比例
// 构造函数
constructor(proportion: number, title: string, color: string) {
this.proportion = proportion; // 设置比例
this.title = title; // 设置标题
this.color = color; // 设置颜色
}
}
// 定义转盘组件
@Entry
@Component
struct Wheel {
@State cells: Cell[] = []; // 存储单元格的数组
@State wheelWidth: number = 600; // 转盘的宽度
@State currentAngle: number = 0; // 当前转盘的角度
@State selectedName: string = ""; // 选中的名称
isAnimating: boolean = false; // 动画状态
colorIndex: number = 0; // 颜色索引
colorPalette: string[] = [ // 颜色调色板
"#26c2ff",
"#978efe",
"#c389fe",
"#ff85bd",
"#ff7051",
"#fea800",
"#ffcf18",
"#a9c92a"
];
// 组件即将出现时调用
aboutToAppear(): void {
// 初始化单元格
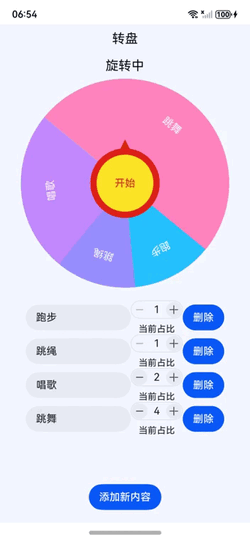
this.cells.push(new Cell(1, "跑步", this.colorPalette[this.colorIndex++ % this.colorPalette.length]));
this.cells.push(new Cell(2, "跳绳", this.colorPalette[this.colorIndex++ % this.colorPalette.length]));
this.cells.push(new Cell(1, "唱歌", this.colorPalette[this.colorIndex++ % this.colorPalette.length]));
this.cells.push(new Cell(4, "跳舞", this.colorPalette[this.colorIndex++ % this.colorPalette.length]));
this.calculateAngles(); // 计算角度
}
// 计算每个单元格的角度
private calculateAngles() {
// 根据比例计算总比例
const totalProportion = this.cells.reduce((sum, cell) => sum + cell.proportion, 0);
this.cells.forEach(cell => {
cell.angle = (cell.proportion * 360) / totalProportion; // 计算每个单元格的角度
});
let cumulativeAngle = 0; // 累计角度
this.cells.forEach(cell => {
cell.angleStart = cumulativeAngle; // 设置起始角度
cumulativeAngle += cell.angle; // 更新累计角度
cell.angleEnd = cumulativeAngle; // 设置结束角度
cell.rotate = cumulativeAngle - (cell.angle / 2); // 计算旋转角度
});
}
// 构建转盘组件
build() {
Column() {
Row() {
Text('转盘').fontSize(20).fontColor("#0b0e15"); // 显示转盘标题
}.width('100%').height(44).justifyContent(FlexAlign.Center); // 设置行的宽度和高度
// 显示当前状态
Text(this.isAnimating ? '旋转中' : `${this.selectedName}`).fontSize(20).fontColor("#0b0e15").height(40);
Stack() {
Stack() {
// 遍历每个单元格并绘制扇形
ForEach(this.cells, (cell: Cell) => {
Stack() {
Sector({ radius: lpx2px(this.wheelWidth) / 2, angle: cell.angle, color: cell.color }); // 创建扇形
Text(cell.title).fontColor(Color.White).margin({ bottom: `${this.wheelWidth / 1.4}lpx` }); // 显示单元格标题
}.width('100%').height('100%').rotate({ angle: cell.rotate }); // 设置宽度和高度,并旋转
});
}
.borderRadius('50%') // 设置圆角
.backgroundColor(Color.Gray) // 设置背景颜色
.width(`${this.wheelWidth}lpx`) // 设置转盘宽度
.height(`${this.wheelWidth}lpx`) // 设置转盘高度
.rotate({ angle: this.currentAngle }); // 旋转转盘
// 创建指针
Polygon({ width: 20, height: 10 })
.points([[0, 0], [10, -20], [20, 0]]) // 设置指针的点
.fill("#d72b0b") // 设置指针颜色
.height(20) // 设置指针高度
.margin({ bottom: '140lpx' }); // 设置指针底部边距
// 创建开始按钮
Button('开始')
.fontColor("#c53a2c") // 设置按钮字体颜色
.borderWidth(10) // 设置按钮边框宽度
.borderColor("#dd2218") // 设置按钮边框颜色
.backgroundColor("#fde427") // 设置按钮背景颜色
.width('200lpx') // 设置按钮宽度
.height('200lpx') // 设置按钮高度
.borderRadius('50%') // 设置按钮为圆形
.clickEffect({ level: ClickEffectLevel.LIGHT }) // 设置点击效果
.onClick(() => { // 点击按钮时的回调函数
if (this.isAnimating) { // 如果正在动画中,返回
return;
}
this.selectedName = ""; // 清空选中的名称
this.isAnimating = true; // 设置动画状态为正在动画
animateTo({ // 开始动画
duration: 5000, // 动画持续时间为5000毫秒
curve: Curve.EaseInOut, // 动画曲线为缓入缓出
onFinish: () => { // 动画完成后的回调
this.currentAngle %= 360; // 保持当前角度在0到360之间
for (const cell of this.cells) { // 遍历每个单元格
// 检查当前角度是否在单元格的角度范围内
if (360 - this.currentAngle >= cell.angleStart && 360 - this.currentAngle <= cell.angleEnd) {
this.selectedName = cell.title; // 设置选中的名称为当前单元格的标题
break; // 找到后退出循环
}
}
this.isAnimating = false; // 设置动画状态为未动画
},
}, () => { // 动画进行中的回调
this.currentAngle += (360 * 5 + Math.floor(Math.random() * 360)); // 更新当前角度,增加随机旋转
});
});
}
// 创建滚动区域
Scroll() {
Column() {
// 遍历每个单元格,创建输入框和计数器
ForEach(this.cells, (item: Cell, index: number) => {
Row() {
// 创建文本输入框,显示单元格标题
TextInput({ text: item.title })
.layoutWeight(1) // 设置输入框占据剩余空间
.onChange((value) => { // 输入框内容变化时的回调
item.title = value; // 更新单元格标题
});
// 创建计数器组件
CounterComponent({
options: {
type: CounterType.COMPACT, // 设置计数器类型为紧凑型
numberOptions: {
label: `当前占比`, // 设置计数器标签
value: item.proportion, // 设置计数器初始值
min: 1, // 设置最小值
max: 100, // 设置最大值
step: 1, // 设置步长
onChange: (value: number) => { // 计数器值变化时的回调
item.proportion = value; // 更新单元格的比例
this.calculateAngles(); // 重新计算角度
}
}
}
});
// 创建删除按钮
Button('删除').onClick(() => {
this.cells.splice(index, 1); // 从单元格数组中删除当前单元格
this.calculateAngles(); // 重新计算角度
});
}.width('100%').justifyContent(FlexAlign.SpaceBetween) // 设置行的宽度和内容对齐方式
.padding({ left: 40, right: 40 }); // 设置左右内边距
});
}.layoutWeight(1); // 设置滚动区域占据剩余空间
}.layoutWeight(1) // 设置滚动区域占据剩余空间
.margin({ top: 20, bottom: 20 }) // 设置上下外边距
.align(Alignment.Top); // 设置对齐方式为顶部对齐
// 创建添加新内容按钮
Button('添加新内容').onClick(() => {
// 向单元格数组中添加新单元格
this.cells.push(new Cell(1, "新内容", this.colorPalette[this.colorIndex++ % this.colorPalette.length]));
this.calculateAngles(); // 重新计算角度
}).margin({ top: 20, bottom: 20 }); // 设置按钮的上下外边距
}
.height('100%') // 设置组件高度为100%
.width('100%') // 设置组件宽度为100%
.backgroundColor("#f5f8ff"); // 设置组件背景颜色
}
}

 浙公网安备 33010602011771号