docker之swarm容器部署及运维
1、概念
Docker Swarm 是 Docker 的集群管理工具。它将 Docker 主机池转变为单个虚拟 Docker 主机。 Docker Swarm 提供了标准的 Docker API,所有任何已经与 Docker 守护程序通信的工具都可以使用 Swarm 轻松地扩展到多个主机。
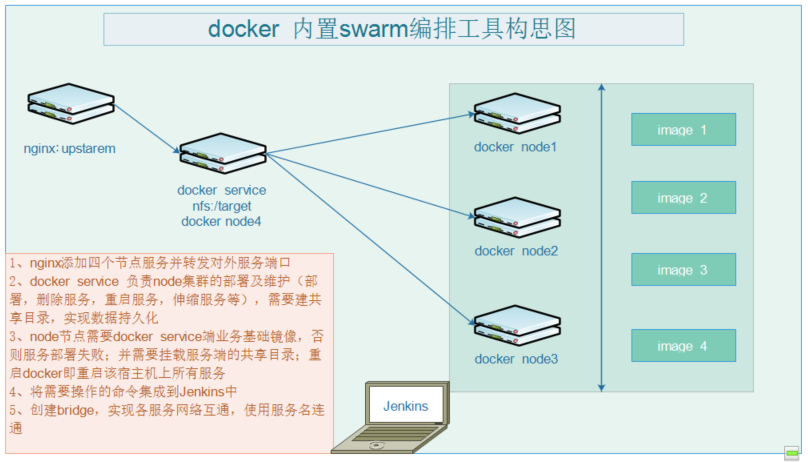
2、拓扑图

3、部署docker
tar xf docker-20.10.5.tgz
cp docker/* /usr/bin/

vi /etc/systemd/system/docker.service
[Unit]
Description=Docker Application Container Engine
Documentation=https://docs.docker.com
After=network-online.target firewalld.service
Wants=network-online.target

[Service]
Type=notify
# the default is not to use systemd for cgroups because the delegate issues still
# exists and systemd currently does not support the cgroup feature set required
# for containers run by docker
ExecStart=/usr/bin/dockerd --selinux-enabled=false --insecure-registry=127.0.0.1
ExecReload=/bin/kill -s HUP $MAINPID
# Having non-zero Limit*s causes performance problems due to accounting overhead
# in the kernel. We recommend using cgroups to do container-local accounting.
LimitNOFILE=infinity
LimitNPROC=infinity
LimitCORE=infinity
# Uncomment TasksMax if your systemd version supports it.
# Only systemd 226 and above support this version.
#TasksMax=infinity
TimeoutStartSec=0
# set delegate yes so that systemd does not reset the cgroups of docker containers
Delegate=yes
# kill only the docker process, not all processes in the cgroup
KillMode=process
# restart the docker process if it exits prematurely
Restart=on-failure
StartLimitBurst=3
StartLimitInterval=60s

[Install]
WantedBy=multi-user.target

此处的--insecure-registry=127.0.0.1(此处改成你私服ip)
设置是针对有搭建了自己私服Harbor时允许docker进行不安全的访问,否则访问将会被拒绝。

chmod +x /etc/systemd/system/docker.service
systemctl daemon-reload
systemctl restart docker
systemctl enable docker.service
systemctl status docker
4、创建swarm集群管理
docker swarm init --advertise-addr 192.168.132.89(管理ip)

查看关联命令
docker swarm join-token worker
5、查看node服务
docker node ls
6、给集群命名并记录
docker node ls
docker node update --label-add ng-node=node1 ID

获取配置信息(ip及node名称)
docker inspect kj15q6np0pkgopvb8z7nn4p3h kj69dros9jbxbqsts8szhr7cc odjyiaqyli4aidp809oz1bqzp |grep -nE "Labels|Addr" -C 2

192.168.132.90 node1
192.168.132.91 node2
192.168.132.89 node3
7、创建bridge网络(实现容器服务互访)
docker network create \
--driver overlay \
--subnet 10.0.8.0/24 \
springcloud-overlay
8、docker service创建集群服务
创建服务
docker service create --name tomcat1 tomcat:latest
创建服务并指定端口
docker service create --name tomcat1 --publish 8080:8080 –v/webapps:/usr/local/tomcat/webapps tomcat:latest
创建服务并指定端口和挂载数据目录
docker service create --name tomcat_llplan --publish 8080:8080 --mount type=bind,src=/target,dst=/usr/tomcat/webapps   zhjtomcat:V8080
创建服务并指定端口和挂载数据目录并指定网络
docker service create --name tomcat_llplan --publish 8080:8080 \
 --mount type=bind,src=/target,dst=/usr/tomcat/webapps  \
 --network springcloud-overlay  zhjtomcat:V8080
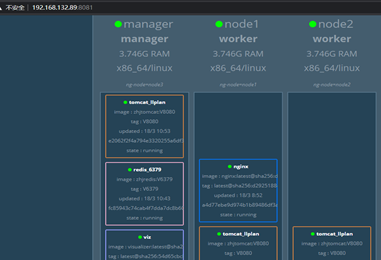
9、swarm图形化监控
docker pull dockersamples/visualizer:latest
docker service create \
--name=viz \
--publish=8081:8080/tcp \
--constraint=node.role==manager \
--mount=type=bind,src=/var/run/docker.sock,dst=/var/run/docker.sock \
dockersamples/visualizer:latest

10、查看容器服务状态
docker service ls
查看运行在那个节点上
docker service ps ID
11、查看容器服务配置详情
docker service ls
docker service inspect ID
12、容器pods伸缩
docker service ls
docker service scale <ID>=数量
13、重启指定容器服务
指定服务ID,重启所有容器
docker service ls
docker service update --force ID
14、日志检查
检查docker启动日志
docker logs -f  CONTAINER ID
journalctl -u docker.service
systemctl status docker –l
journalctl -xe
宿主机上查看容器应用日志
docker ps
docker exec CONTAINER ID  tail -f   /usr/tomcat/logs/catalina.out

