
脚手架工具
常用的脚手架工具
Create React App
Vue CLI
Angular CLI
Next.js
Nuxt.js
Express Generator
Create React Native App
Electron Forge
Vite可用于构建 vite React等项目。
Yemon
安装yarnnpm install -g yarn

不同的generator生成不同的项目
不需要所有文件,只需要类似babel或者readme.md,若生成node项目,部分需要使用命令yo node:cligenerator子集的生成器
可以通过配置对应的镜像来提高下载速度,例如node_sass
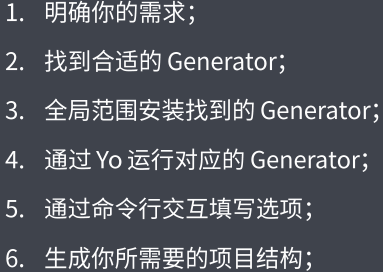
Yemon的使用过程
用Yeoman来开发自己的脚手架-自定义generator
创建Generator模块本质上就是一个npm模块
1.创建文件夹,命名generator-
2.初始化package.json
3.安装yeoman-generator基类,里面有生成器函数还有工具函数
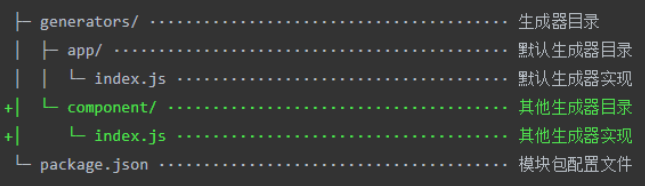
4.创建文件,文件目录结构如下所示:
最简单的yeoman生成器的实现-实现写入一个名为temp.txt的文件内容,内容为随机数
// 此文件作为 Generator 的核心入口
// 需要导出一个继承自 Yeoman Generator 的类型
// Yeoman Generator 在工作时会自动调用我们在此类型中定义的一些生命周期方法
// 我们在这些方法中可以通过调用父类提供的一些工具方法实现一些功能,例如文件写入
const Generator = require('yeoman-generator')
module.exports = class extends Generator{
	writing(){
		//Yeoman 自动在生成文件阶段调用此方法
		   // // 我们这里尝试往项目目录中写入文件
		 this.fs.write(
		   this.destinationPath('temp.txt'), //文件路径
		   Math.random().toString()   //文件内容
		 )
	}
}
在generators/app/index.js,之后用npm link链接到全局,新建一个文件夹,命令行输入yo sample即可在文件夹中生成temp.txt文件
根据模板创建文件
写在上述writing方法中,模板文件内部可以使用 EJS 模板标记输出数据
    // // 通过模板方式写入文件到目标目录

    // // 模板文件路径
     const tmpl = this.templatePath('foo.txt')
    // // 输出目标路径
     const output = this.destinationPath('foo.txt')
    // // 模板数据上下文
     const context = { title: 'Hello zce~', success: false }

     this.fs.copyTpl(tmpl, output, context)//fs中带的渲染模板的方法copyTpl
用命令行交互的方式将内容写入文件
prompting () {
    // Yeoman 在询问用户环节会自动调用此方法
    // 在此方法中可以调用父类的 prompt() 方法发出对用户的命令行询问
    return this.prompt([
      {
        type: 'input',
        name: 'name',
        message: 'Your project name',
        default: this.appname // appname 为项目生成目录名称
      }
    ])
    .then(answers => {
      // answers => { name: 'user input value' }
      this.answers = answers
    })
  }
  writing(){
      // 模板文件路径
    const tmpl = this.templatePath('bar.html')
    // 输出目标路径
    const output = this.destinationPath('bar.html')
    // 模板数据上下文
    const context = this.answers

    this.fs.copyTpl(tmpl, output, context)
  }
创建自定义Vue Generator
批量写入文件放到template文件夹下,然后在可能发生变化的地方通过模板引擎挖坑,示例是都挖坑了name属性,重点是把每一个文件的目录路径定义上,要想有多条输入需要this.prompt()方法的数组参数中添加特定功能的对象
  writing () {
    // 把每一个文件都通过模板转换到目标路径

    const templates = [
      '.browserslistrc',
      '.editorconfig',
      '.env.development',
      '.env.production',
      '.eslintrc.js',
      '.gitignore',
      'babel.config.js',
      'package.json',
      'postcss.config.js',
      'README.md',
      'public/favicon.ico',
      'public/index.html',
      'src/App.vue',
      'src/main.js',
      'src/router.js',
      'src/assets/logo.png',
      'src/components/HelloWorld.vue',
      'src/store/actions.js',
      'src/store/getters.js',
      'src/store/index.js',
      'src/store/mutations.js',
      'src/store/state.js',
      'src/utils/request.js',
      'src/views/About.vue',
      'src/views/Home.vue'
    ]

    templates.forEach(item => {
      // item => 每个文件路径
      this.fs.copyTpl(
        this.templatePath(item),
        this.destinationPath(item),
        this.answers
      )
    })
  }
发布generator
1.首先将包发布到git仓库
新建.gitignore文件来添加让node_modules忽略的命令
echo node_modules > .gitignore
2.yarn pulish --registry=https://registry.yarnpkg.com
不能使用淘宝镜像源,需要修改
3.添加yemon-generator关键词,yemon官方就会发现你的包。
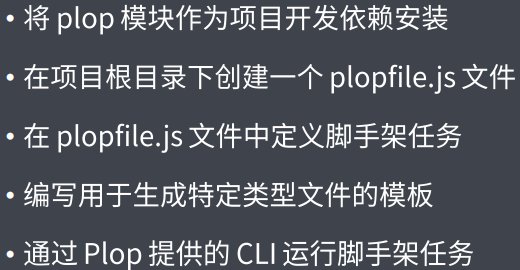
plop脚手架工具
创建项目中特定类型的工具
// Plop 入口文件,需要导出一个函数
// 此函数接收一个 plop 对象,用于创建生成器任务

module.exports = plop => {
  plop.setGenerator('component', {//generator名
    description: 'create a component',
    prompts: [
      {
        type: 'input',
        name: 'name',
        message: 'component name',
        default: 'MyComponent'
      }
    ],
    actions: [
      {
        type: 'add', // 代表添加文件
        path: 'src/components/{{name}}/{{name}}.js',//代表添加到哪里
        templateFile: 'plop-templates/component.hbs'//代表模板文件路径
      },
      {
        type: 'add', // 代表添加文件
        path: 'src/components/{{name}}/{{name}}.css',
        templateFile: 'plop-templates/component.css.hbs'
      },
      {
        type: 'add', // 代表添加文件
        path: 'src/components/{{name}}/{{name}}.test.js',
        templateFile: 'plop-templates/component.test.hbs'
      }
    ]
  })
}
yarn plop component命令来启动
小型脚手架工具的实现
1.package.json中的bin字段用于指定cli应用的入口文件
2.Node CLI应用入口文件必须要有文件头
#!/user/bin/env node
3.yarn link到全局 输入文件夹名命令即可启动
#!/usr/bin/env node

// Node CLI 应用入口文件必须要有这样的文件头
// 如果是 Linux 或者 macOS 系统下还需要修改此文件的读写权限为 755
// 具体就是通过 chmod 755 cli.js 实现修改

// 脚手架的工作过程:
// 1. 通过命令行交互询问用户问题
// 2. 根据用户回答的结果生成文件

const fs = require('fs')
const path = require('path')
const inquirer = require('inquirer')
const ejs = require('ejs')

inquirer.prompt([
  {
    type: 'input',
    name: 'name',
    message: 'Project name?'
  }
])
.then(anwsers => {
  // console.log(anwsers)
  // 根据用户回答的结果生成文件

  // 模板目录
  const tmplDir = path.join(__dirname, 'templates')
  // 目标目录
  const destDir = process.cwd()

  // 将模板下的文件全部转换到目标目录
  fs.readdir(tmplDir, (err, files) => {
    if (err) throw err
    files.forEach(file => {
      // 通过模板引擎渲染文件
      ejs.renderFile(path.join(tmplDir, file), anwsers, (err, result) => {
        if (err) throw err

        // 将结果写入目标文件路径
        fs.writeFileSync(path.join(destDir, file), result)
      })
    })
  })
})
