
前端可视化echarts和three
canvas画一条直线
  const canvas = document.getElementById('canvas')
  const ctx = canvas.getContext('2d')

  ctx.beginPath()//绘制都用beginPath和closePath包裹
  ctx.lineWidth = 4
  ctx.strokeStyle = 'orange'
  // 起点  终点  中间点
  ctx.moveTo(100, 100)
  ctx.lineTo(300, 300)
  ctx.lineTo(500, 200)
  ctx.stroke()//添上才能显示出来
  ctx.closePath()
canvas绘制实心空心文字
  // 实心文字 描边文字
  ctx.fillStyle = 'orange'
  ctx.strokeStyle = "hotpink"
  ctx.font = 'bold 60px 微软雅黑'
  ctx.fillText('拉勾教育', 100, 100, 100)
  ctx.strokeText('前端', 100, 240)

  // 对齐属性设置
  ctx.textAlign = 'center' // left right start end center
  ctx.textBaseline = "middle"  // top bottom middle
  ctx.fillText('拉勾教育', 450, 300)
canvas实现动画及碰撞检测
实现动画的原理时不停地改变物体的x,y值,记得每次都要有清空画布的操作,碰撞检测原理就是物体的坐标减去物体一半的宽度小于等于0或者物体的坐标加上物体一半的宽度大于等于画布的宽度时,让坐标的变化速度值取反
  const canvas = document.getElementById('canvas')
  const ctx = canvas.getContext('2d')

  canvas.style.width = canvas.width + 'px'
  canvas.style.height = canvas.height + 'px'
  canvas.width = canvas.width * 1.5
  canvas.height = canvas.height * 1.5

  const drawCircle = (x, y, r) => {
    ctx.beginPath()
    ctx.fillStyle = 'orange'
    ctx.arc(x, y, r, 0, Math.PI * 2)
    ctx.fill()
    ctx.closePath()
  }

  // 配置属性
  const wd = canvas.clientWidth * 1.5
  const ht = canvas.clientHeight * 1.5
  let x = y = 100
  const r = 20
  let xSpeed = 6
  let ySpeed = 4

  drawCircle(x, y, r)

  setInterval(() => {
    ctx.clearRect(0, 0, wd, ht)  // 清空画布
    if (x - r <= 0 || x + r >= wd) {
      xSpeed = -xSpeed
    }

    if (y - r <= 0 || y + r >= ht) {
      ySpeed = -ySpeed
    }
    x += xSpeedjiang
    y += ySpeed
    drawCircle(x, y, r)
  }, 20)
将一个会变颜色,不同大小,不同速率走的球写成一个类,然后遍历添加
  const canvas = document.getElementById('canvas')
  const ctx = canvas.getContext('2d')

  canvas.style.width = canvas.width + 'px'
  canvas.style.height = canvas.height + 'px'
  canvas.width = canvas.width * 1.5
  canvas.height = canvas.height * 1.5

  class Ball {
    constructor(canvas) {
      this.canvas = canvas
      this.ctx = this.canvas.getContext('2d')
      this.wd = this.canvas.clientWidth * 1.5
      this.ht = this.canvas.clientHeight * 1.5
      this.r = Math.random() * 40 + 10
      this.x = Math.random() * (this.wd - (this.r * 2)) + this.r
      this.y = Math.random() * (this.ht - (this.r * 2)) + this.r
      this.color = '#' + parseInt(Math.random() * 0xFFFFFF).toString(16)
      this.xSpeed = Math.random() * 4 + 6
      this.ySpeed = Math.random() * 6 + 4
      this.init()
    }

    init() {
      this.run()
      this.draw()
    }

    draw() {
      this.ctx.beginPath()
      this.ctx.fillStyle = this.color
      this.ctx.arc(this.x, this.y, this.r, 0, 2 * Math.PI)
      this.ctx.fill()
      this.ctx.closePath()
    }

    run() {
      if (this.x - this.r <= 0 || this.x + this.r >= this.wd) {
        this.xSpeed = -this.xSpeed
      }
      if (this.y - this.r <= 0 || this.y + this.r >= this.ht) {
        this.ySpeed = -this.ySpeed
      }
      this.x += this.xSpeed
      this.y += this.ySpeed
    }
  }

  let ballArr = []
  for (let i = 0; i < 100; i++) {
    let ball = new Ball(canvas)
    ballArr.push(ball)
  }

  // 动画
  setInterval(() => {
    ctx.clearRect(0, 0, canvas.clientWidth * 1.5, canvas.clientHeight * 1.5)
    for (let i = 0; i < ballArr.length; i++) {
      let ball = ballArr[i]
      ball.init()
    }
  }, 15)
canva实现每个圆连线并且能够添加文字的思路
将绘制文字和绘制线的方法添加到球的类中,
然后在定时器中循环遍历ball数组,先画线,然后再画球
动态设置rem全局实现
在public中的index下添加
  <title>可视化插件封装</title>
  <script>
    document.documentElement.style.fontSize = document.documentElement.clientWidth / 10 + 'px'
    window.addEventListener('resize', () => {
      document.documentElement.style.fontSize = document.documentElement.clientWidth / 10 + 'px'
    })
  </script>
动画函数从0到指定值方法的实现
export default function myAnimation(param) {
  let current = 0
  let looped
  const ctx = this.ctx
  const _canvas = this._canvas
  const callback = param.render
  const successCb = param.success;
  (function looping() {
    looped = requestAnimationFrame(looping)
    if (current < param.percent) {
      ctx.clearRect(0, 0, _canvas.width, _canvas.height)
      current = current + 4 > param.percent ? param.percent : current + 4
      callback(current)
    } else {
      window.cancelAnimationFrame(looping)
      looped = null
      successCb && successCb()
    }
  })()
}
函数调用
myAnimation.call(this, {
          percent: 100,
          render: (current) => {
            console.log(current)
          }
        })
svg绘制图形
1.D3.js底层采用svg来完成图像的绘制
<script src="./d3.min.js"></script>
  // 01 d3 获取元素
    console.log(d3.select('#box p'))
    console.log(d3.selectAll('#box p'))

    // 02 获取元素属性
    console.log(+d3.select('rect').attr('width') === 300)

    // 03 设置属性
    // d3.select('rect')
    //   .attr('transform', 'translate(100, 100)')

    // 04 添加删除元素
    d3.select('svg').append('rect')
      .attr('x', 100)
      .attr('y', '200')
      .attr('width', '200')
      .attr('height', '100')
      .attr('fill', 'lightblue')
	  .text('拉勾教育')

    // 05 删除元素
    d3.selectAll('rect').remove()
D3数据绑定
const data = [
{ cx: 100, cy: 100, r: 10, fill: 'orange' },
{ cx: 130, cy: 140, r: 20, fill: 'seagreen' },
{ cx: 230, cy: 240, r: 19, fill: 'lightblue' },
]
d3.select('svg').selectAll('circle')
.data(data)
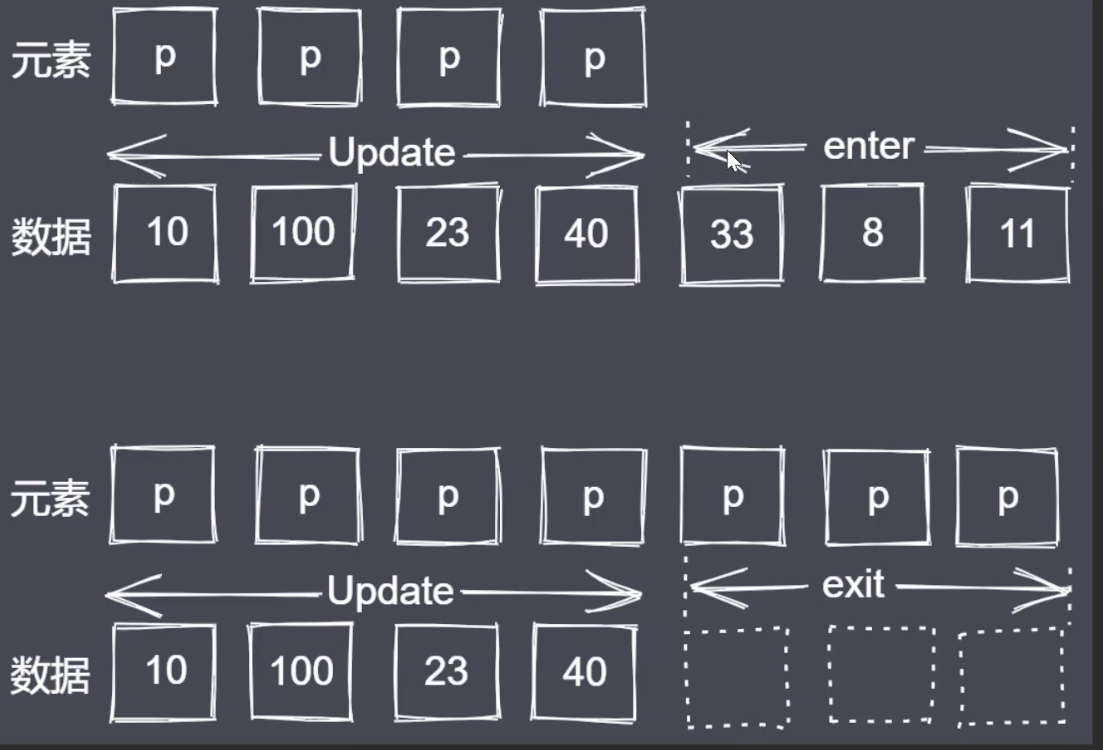
.enter()//没有circle,添加circle
.append('circle')//必加
.attr('cx', d => d.cx)
.attr('cy', d => d.cy)
.attr('r', d => d.r)
.attr('fill', d => d.fill)
// update(数据和元素<svg,circle>一一对应) enter (有数据但是没有元素) exit (有元素没有数据)
线性比例尺映射关系
输入输出连续
若数据中有一个特别大,有一个过于小就会导致小的看不见,大的看不完,所有需要把数据映射在一个范围,就是比例尺
    // 定义线性比例尺
    const linear = d3.scaleLinear()
      .domain([0, d3.max(data)])
      .range([0, 300])
	//线性比例尺的使用是在数据data表示高度或者坐标的时候将将data作为linear的参数即linear(data)
序列比例尺
输入输出离散,相等间隔
      .domain([1, 2, 3, 4])//输入
      .range([0, 100])//输出
D3绘制坐标轴
  // 定义坐标刻度生成器
    const xAxis = d3.axisBottom(xScale)
    // 绘制X轴具体的刻度内容
    d3.select('svg').append('g')
      .call(xAxis)
      .attr('transform', `translate(0, ${height - margin.bottom})`)
      .attr('font-size', 14)
D3过渡
   // transition duration delay ease
    // 初始状态  结束状态
    circle.attr('cx', 100).attr('cy', 100)

    // 结束状态
    circle.transition()
      .duration(3000)
      .delay(1000)
      .ease(d3.easeBounce)
      .attr('cx', 500)
      .attr('cy', 300)
D3交互
svg可以直接添加事件监听,对其进行类操作样式
添加提示框,显示柱状图数据,有过渡效果
	//这是一个让元素缓慢平滑动画的类
   class EaseObj {
      constructor(target) {
        this.target = target
        this.pos = { x: width / 2, y: height / 2 }
        this.endPos = { x: 0, y: 0 }
        this._play = false
        this.fm = 0
        this.speed = 0.1
      }
      set animate(value) {
        if (value !== this._play) {
          if (value) {
            this.render()
          } else {
            this.cancel()
          }
          this._play = value
        }
      }

      render() {
        const { pos, endPos, speed, target } = this
        pos.x += (endPos.x - pos.x) * speed
        pos.y += (endPos.y - pos.y) * speed
        target.style('left', `${pos.x}px`)
          .style('top', `${pos.y}px`)

        this.fm = requestAnimationFrame(() => {
          this.render()
        })
      }

      cancel() {
        cancelAnimationFrame(this.fm)
      }
    }

    // 10 定义提示框元素
    const tip = d3.select('body').append('div').attr('id', 'tip')
    // 11 鼠标移上
    rects.on('mouseover', ({ clientX, clientY }, data) => {
      tip.style('left', `${clientX}px`)
        .style('top', `${clientY}px`)
        .style('display', 'block')
        .html(`
          <p>此项平均值:${data}</p>
        `)
    })

    const tipObj = new EaseObj(tip)
    rects.on('mousemove', ({ clientX, clientY }, data) => {
      tipObj.endPos = { x: clientX, y: clientY }
      tipObj.animate = true
    })

    rects.on('mouseout', () => {
      tipObj.animate = false
      tip.style('display', 'none')
    })
webGL和Three.js
场景显示呈现舞台,相机眼睛,透视相机似人的眼睛,渲染器决定内容如何呈现至屏幕,材质,threejs中面是由三个点构造而成
光源操作初始在场景中
const scene = new THREE.Scene();
const camera = new THREE.PerspectiveCamera( 75, window.innerWidth / window.innerHeight, 0.1, 1000 );//视角,所在元素的纵横比,相机距近截面(屏幕)的距离,相机距远截面距离
  const renderer = new THREE.WebGLRenderer({
      antialias: true//让物体更平滑
    })
    renderer.setClearColor(0xffffff)
    renderer.setSize(window.innerWidth, window.innerHeight)

    document.body.appendChild(renderer.domElement)

    const geometry = new THREE.BoxGeometry(1, 1, 1)
    const material = new THREE.MeshBasicMaterial({
      color: 0x285b41,
      wireframe: true//线条渲染
    })

    const cube = new THREE.Mesh(geometry, material)
    scene.add(cube)//将几何体添加到场景中
    camera.position.z = 4//默认相机和物体都会渲染到中心点(0,0,0)位置,屏幕上看不到物体,移动相机位置可看到物体

    function animate() {

      requestAnimationFrame(animate)
      cube.rotation.y += 0.01
      cube.rotation.x += 0.01//做动画
      renderer.render(scene, camera)//渲染到屏幕上
    }

    animate()
相机控制来看为物体四周
材质外部内部贴图来看物体内外部
    // 定义全局变量
    let scene, camera, geometry, mesh, renderer, controls

    // 初始化渲染器
    function initRenderer() {
      renderer = new THREE.WebGLRenderer({ antialias: true })
      renderer.setSize(window.innerWidth, window.innerHeight)
      renderer.setPixelRatio(window.devicePixelRatio)
      document.body.appendChild(renderer.domElement)
    }

    // 初始化场景
    function initScene() {
      scene = new THREE.Scene()
      const axesHelper = new THREE.AxesHelper(100)//用于简单模拟3个坐标轴的对象.
      scene.add(axesHelper)
	  // const directionalLight = new THREE.DirectionalLight('red')

      // const ambientLight = new THREE.AmbientLight('orange')

      // const pointLight = new THREE.PointLight('green')

      // const spotLight = new THREE.SpotLight('lightblue')

      const hemisphereLight = new THREE.HemisphereLight('red')

      hemisphereLight.position.set(0, 30, 0)
      scene.add(hemisphereLight)
    }

    // 初始化相机
    function initCamera() {
      camera = new THREE.PerspectiveCamera(45, window.innerWidth / window.innerHeight, 1, 1000)
      camera.position.set(0, 0, 15)
      controls = new THREE.TrackballControls(camera, renderer.domElement)//控制器,控制物体旋转
    }

    // 初始化模型
    function initMesh() {
      geometry = new THREE.BoxGeometry(2, 2, 2)
      // material = new THREE.MeshNormalMaterial()//把法向量映射到RGB颜色的材质
      const texture = new THREE.TextureLoader().load('img/crate.gif')//加载器,加载文件
      material = new THREE.MeshBasicMaterial({
        map: texture,
        side: THREE.DoubleSide//控制贴图里外都加上
      })//立即使用加载器制造纹理进行材质创建
      mesh = new THREE.Mesh(geometry, material)
      scene.add(mesh)
    }

    // 初始化动画
    function animate() {
      requestAnimationFrame(animate)
      controls.update()//必有,让物体能够从多角度观察
      renderer.render(scene, camera)
    }

    // 定义初始化方法
    function init() {
      initRenderer()
      initScene()
      initCamera()
      initMesh()
      animate()
    }

    init()
精灵材质及交互
应用全景看房点击精灵图(箭头)时场景切换到指定位置
光线投射Raycaster
光线投射用于进行鼠标拾取(在三维空间中计算鼠标移动过什么物体)
    const raycaster = new THREE.Raycaster()
    const mouse = new THREE.Vector2()

    function onMouseMove(event) {

      // 将鼠标位置归一化为设备坐标。x 和 y 方向的取值范围是 (-1 to +1)

      mouse.x = (event.clientX / window.innerWidth) * 2 - 1;
      mouse.y = - (event.clientY / window.innerHeight) * 2 + 1;

    }

    window.addEventListener('mousemove', onMouseMove, false)

    window.addEventListener('click', function () {
      // 计算物体和射线的焦点
      const intersects = raycaster.intersectObjects([mesh])//mesh是想要点击有操作的物体
      if (intersects.length > 0) {
        mesh.rotation.x += 0.1
      }
    }, false)
全景看房的实现
- 全景图片进行拼凑
function initMesh() {

      // 前面
      const geometryF = new THREE.PlaneGeometry(4, 4)
      const materialF = new THREE.MeshBasicMaterial({
        map: new THREE.TextureLoader().load('img/0_f.jpg'),
        side: THREE.DoubleSide
      })
      const meshF = new THREE.Mesh(geometryF, materialF)
      meshF.rotation.y = 180 * Math.PI / 180
      meshF.position.z = 2
      scene.add(meshF)

      // 后面
      const geometryB = new THREE.PlaneGeometry(4, 4)
      const materialB = new THREE.MeshBasicMaterial({
        map: new THREE.TextureLoader().load('img/0_b.jpg'),
        side: THREE.DoubleSide
      })
      const meshB = new THREE.Mesh(geometryB, materialB)
      // meshB.rotation.y = 180 * Math.PI / 180
      meshB.position.z = -2
      scene.add(meshB)

      // 左侧
      const geometryL = new THREE.PlaneGeometry(4, 4)
      const materialL = new THREE.MeshBasicMaterial({
        map: new THREE.TextureLoader().load('img/0_l.jpg'),
        side: THREE.DoubleSide
      })
      const meshL = new THREE.Mesh(geometryL, materialL)
      meshL.rotation.y = (-90) * Math.PI / 180
      meshL.position.x = 2
      scene.add(meshL)

      // 右侧
      const geometryR = new THREE.PlaneGeometry(4, 4)
      const materialR = new THREE.MeshBasicMaterial({
        map: new THREE.TextureLoader().load('img/0_r.jpg'),
        side: THREE.DoubleSide
      })
      const meshR = new THREE.Mesh(geometryR, materialR)
      meshR.rotation.y = (90) * Math.PI / 180
      meshR.position.x = -2
      scene.add(meshR)

      // 上面
      const geometryU = new THREE.PlaneGeometry(4, 4)
      const materialU = new THREE.MeshBasicMaterial({
        map: new THREE.TextureLoader().load('img/0_u.jpg'),
        side: THREE.DoubleSide
      })
      const meshU = new THREE.Mesh(geometryU, materialU)
      meshU.rotation.x = (90) * Math.PI / 180
      meshU.rotation.z = (180) * Math.PI / 180
      meshU.position.y = 2
      scene.add(meshU)

      // 下面
      const geometryD = new THREE.PlaneGeometry(4, 4)
      const materialD = new THREE.MeshBasicMaterial({
        map: new THREE.TextureLoader().load('img/0_d.jpg'),
        side: THREE.DoubleSide
      })
      const meshD = new THREE.Mesh(geometryD, materialD)
      meshD.rotation.x = (-90) * Math.PI / 180
      meshD.rotation.z = (180) * Math.PI / 180
      meshD.position.y = -2
      scene.add(meshD)
    }
- 相机视角直接进入到内部
      controls = new THREE.TrackballControls(camera, renderer.domElement)
      controls.maxDistance = 2//六面体宽度为4,所以最大选择2
      controls.minDistance = 0
3.利用精灵材质引入地面标记,固定在地面
 new THREE.TextureLoader().load('img/icon.png', (texture) => {
        const spriteMaterial = new THREE.SpriteMaterial({
          map: texture
        })
        spriteArrow = new THREE.Sprite(spriteMaterial)
        spriteArrow.scale.set(0.1, 0.1, 0.1)
        spriteArrow.position.set(0.5, -1, -1.5)
        scene.add(spriteArrow)
      })
4.点击精灵图时视角往前拉,进入另一个立方体看里面内容
使用Raycaster类,让mouse获取到当前位置信息
    // 鼠标点击
    function mouseClickEvent(ev) {
      ev.preventDefault();
      // 射线捕获
      raycaster.setFromCamera(mouse, camera)

      const intersects = raycaster.intersectObjects([spriteArrow])

      if (intersects.length > 0) {
        changeScene()
      }
    }

    window.addEventListener('click', mouseClickEvent, false)
    function changeScene() {
      // 创建六个面
      const sixBox = createPlane(2)
      const timer = setInterval(() => {
        camera.fov -= 1//视角变小
        camera.updateProjectionMatrix()//让相机能不
        if (camera.fov == 20) {
          clearInterval(timer)
          camera.fov = 45
          camera.updateProjectionMatrix()
          for (let i = 0; i < 6; i++) {
            scene.remove(sixPlane[i])
          }//将之前绘制的6个面清除
          sixPlane = sixBox
          for (let i = 0; i < 6; i++) {
            scene.add(sixPlane[i])//添加新绘制的6个面
          }
          spriteArrow.visible = false
        }
      }, 50)
    }
