最是人间(西湖美景)三月天,春雨如酒柳如烟。已经三月底了,再过几天就入职两周年了。好快啊!
发现好好的写文章,真的很费时间。可能还是自己太水了,很简单的东西写出来还是要花很长时间。
前言
* 公司的一款设备使用了单片机+串口蓝牙模块,主机采用安卓端,主从设备双方开发人员对于蓝牙自动重连有不同的理解,提出当前的蓝牙模块无法实现自动重连,决定重新更换能够自动重连的蓝牙模块。因此需要我查找对应的硬件设备或是查找对应的解决方案。

* 以前做毕设及刚毕业那会,为了学习使用NRF51822/52830,了解和使用过一段时间的蓝牙,也是用安卓实现了简单的数据对传,但是由于不是工作关系,所以探究的不是很深,后来就放弃了。但是记忆中,蓝牙重连的实现好像不是很复杂,或者说,不是像他们说的,必须要更换特定的硬件才能实现,我认为在逻辑层就能。
* 现在重新开始走一遍安卓和蓝牙的连接流程,争取实现安卓与硬件设备间的蓝牙透传功能,然后探究一下重连机制的实现,验证一下我的想法,同时查找相关资料。
一:硬件说明
因为是测试安卓的开发流程,所以主要还是安卓端。硬件端我使用的是CH582M蓝牙芯片。
理论上来说,程序支持任意的蓝牙4.0以上的模块或是完整的程序的相关蓝牙芯片(对于经典蓝牙可能需要稍作修改,但是我们不用经典蓝牙,所以此处不做关心),UUID那里使用获取到的即可,但实际上我没有测其他的蓝牙模块。
1:CH582M芯片
-
芯片简介:
- CH583 是集成 BLE 无线通讯的 32 位 RISC 微控制器。片上集成 2Mbps 低功耗蓝牙 BLE 通讯模块、2 个全速 USB 主机和设备控制器及收发器、2 个 SPI、4 个串口、ADC、触摸按键检测模块、RTC 等丰富的外设资源。
- 芯片手册
- 沁恒官网
- 程序编写环境:需要使用MounRiverStudio软件:MounRiverStudio
- 烧写软件:WCHISPTool
- 芯片使用教程:教程
实际上,我使用的是如下教程中的资料:
- CH582M开发教程
- 开发板也是这家的,自带串口
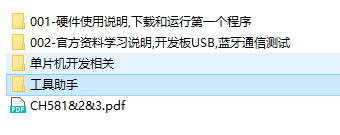
- 其开发资料下载链接 LearnCH581-2-3 ,里面有我们所需要的的demo程序。下载Git中的资料,有详细的入门步骤和开发例程以及需要的安卓测试软件。可以按照教程打开【BLE_UART】例子进行编译和下载尝试。
- windows端使用串口调试助手【UartAssist】,或是下载包中的串口助手。
- 下载后的文件夹如下:
2:安卓端
-
使用的软件环境:
- 使用【AndroidStudio】环境。
- 使用沁恒电子提供的【ble调试助手】测试软件,程序为上面下载的Git文件包中的【工具助手】文件夹下的BLEAssist.apk。
- 蓝牙使用【FastBle开源库】。
-
FastBle 简介:
- FastBle是安卓端关于蓝牙的集成封装库
- 支持与外围BLE设备进行扫描、连接、读、写、通知订阅与取消等基本操作
- 支持获取信号强度、设置最大传输单元
- 支持自定义扫描规则
- 支持多设备连接
- 支持重连机制
- 支持配置超时机制
-
FastBle参考网址:
二:蓝牙
1:简介
- 蓝牙技术是一种无线数据和语音通信开放的全球规范,它是基于低成本的近距离无线连接,为固定和移动设备建立通信环境的一种特殊的近距离无线技术连接。
- 蓝牙是基于2.4Ghz频段的近距离无线连接技术,目前分为经典蓝牙和低功耗蓝牙。蓝牙版本已经迭代到最新的5.4版本。
2:蓝牙相关资料
蓝牙技术联盟中文网:是蓝牙标准联盟的官网,里面有丰富详尽的资料。
另外,也可以通过其他中文网站进行简单学习,如 总览蓝牙协议
3:需要了解的相关知识
以下是需要了解的安卓蓝牙开发的相关知识和蓝牙操作流程,不熟悉的可以自行查找相关资料。
- 经典蓝牙与低功耗蓝牙
- 蓝牙协议栈
- 蓝牙的主从模式及对应支持的广播、扫描、连接、数据收发等方式
- 蓝牙的UUID,以及 【服务UUID】 和 【特性UUID】
- 【特性UUID】的属性,如【订阅通知】、【读】、【写】等属性
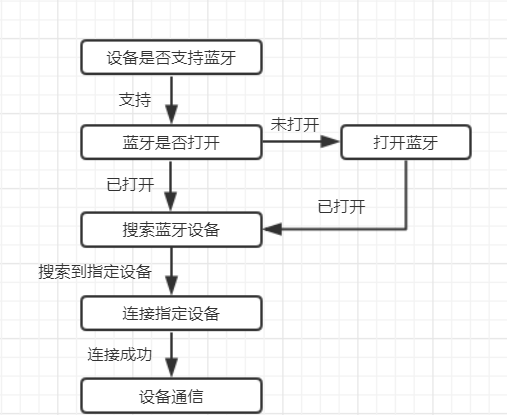
- 蓝牙的连接和操作流程图:
三:开发过程
step1:CH582M程序下载和连接测试:
-
注意:关于CH582M的入门使用可以参考下载文件夹中的教程,不再赘述。
-
由于是验证蓝牙的使用,所以用官方提供的透传例程就可以。此处选择 【BLE_UART】demo,位于上面下载的Git文件包的 【LearnCH582M\单片机开发相关\CH583EVT\EVT\EXAM\BLE\BLE_UART】文件夹下。
-
首先,编译此demo,然后使用【WCHISPTool】软件烧写到芯片上。
-
将MicroUSB线插到 【串口1】一端,打开【UartAssist】并正确连接到CH582M开发板上,波特率选115200,其他默认。
-
打开安卓端【ble调试助手】,点击搜索。
-
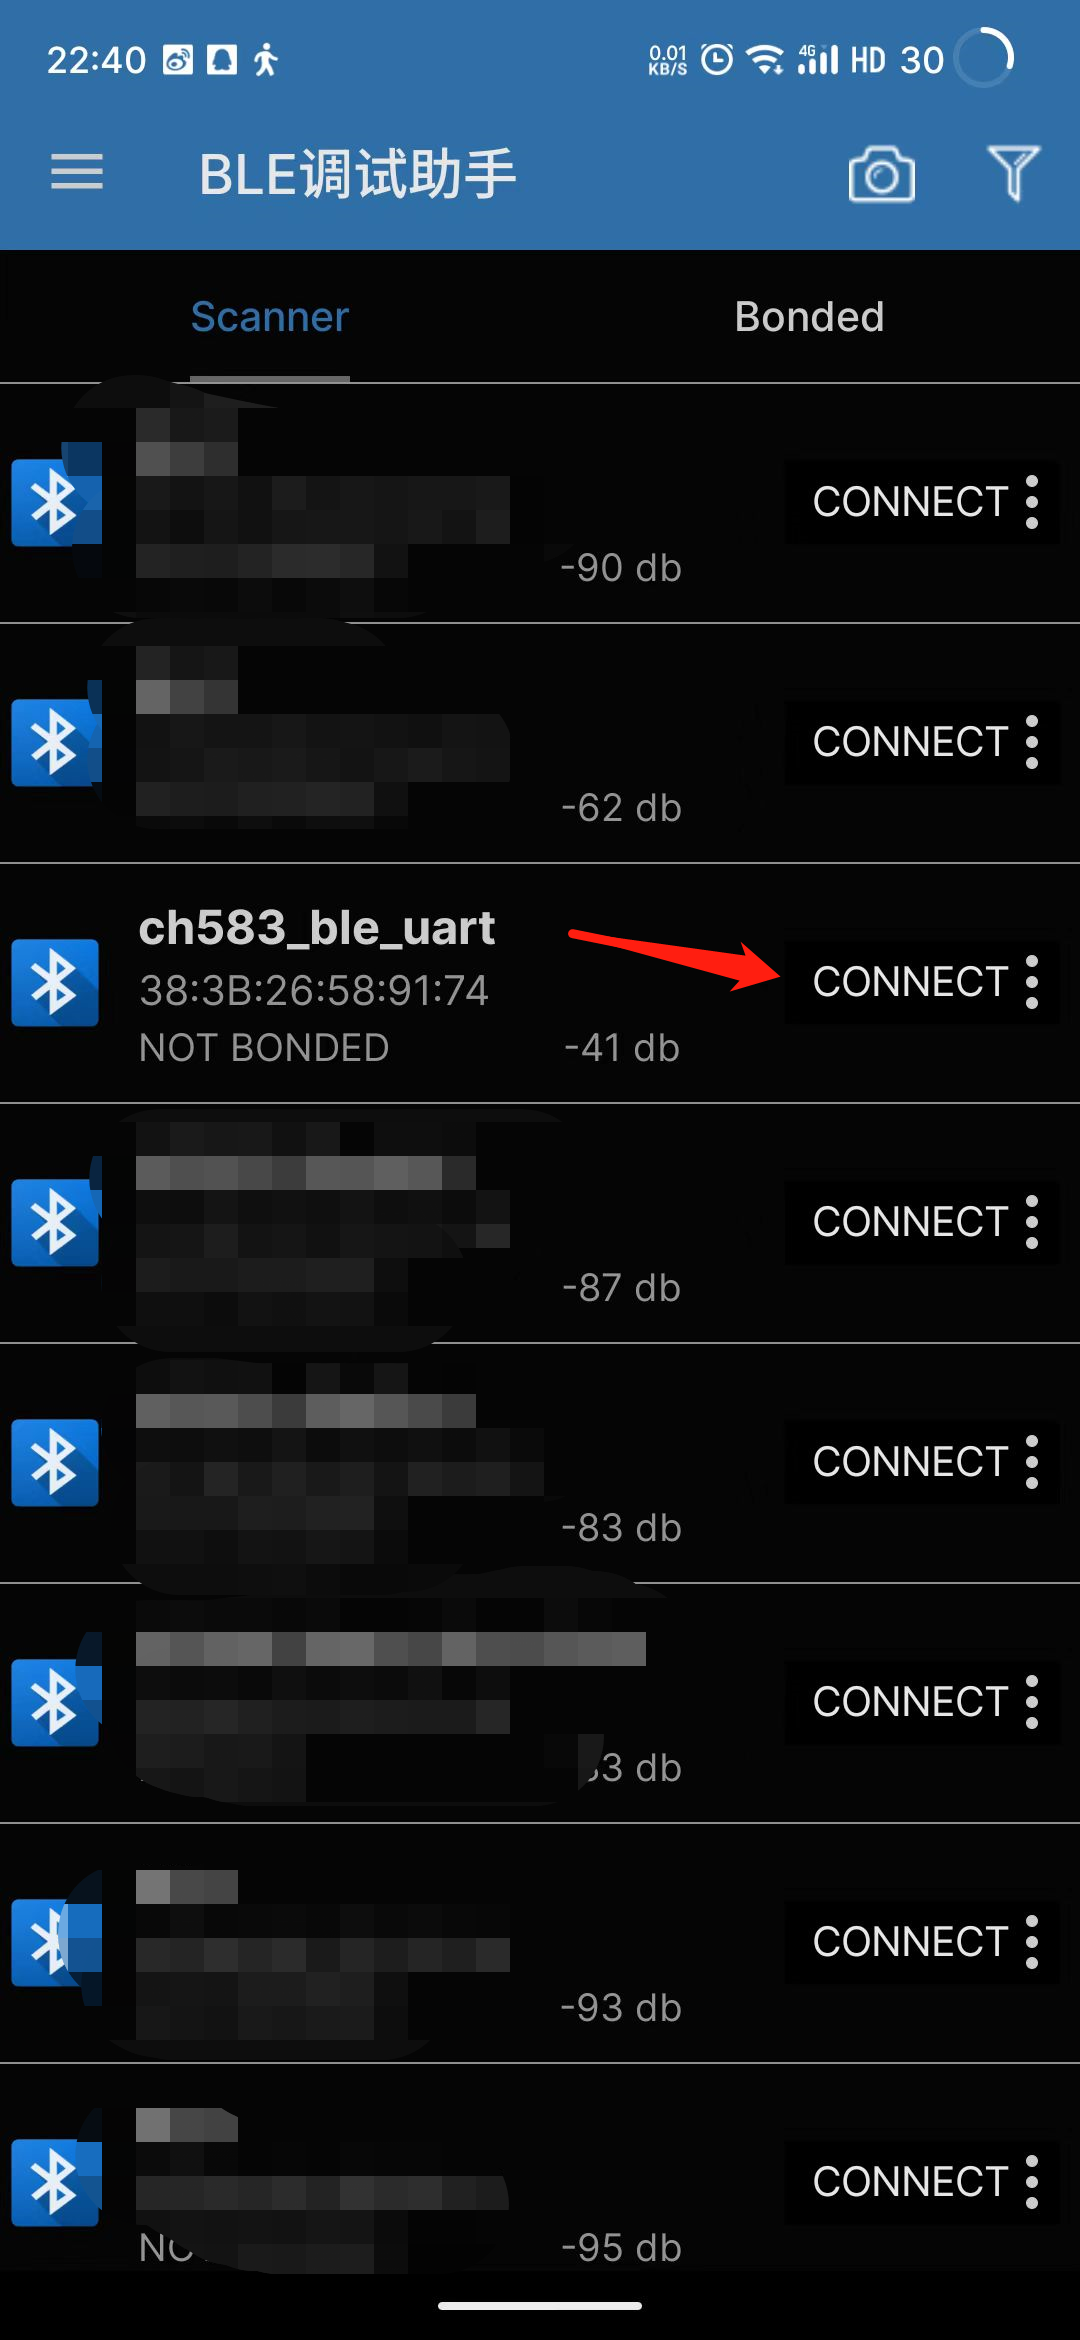
搜索到CH582M的蓝牙,名称为【ch583_ble_uart】,可自行在程序中按照规则更改。点击右侧的【CONNECT】进行连接:
-
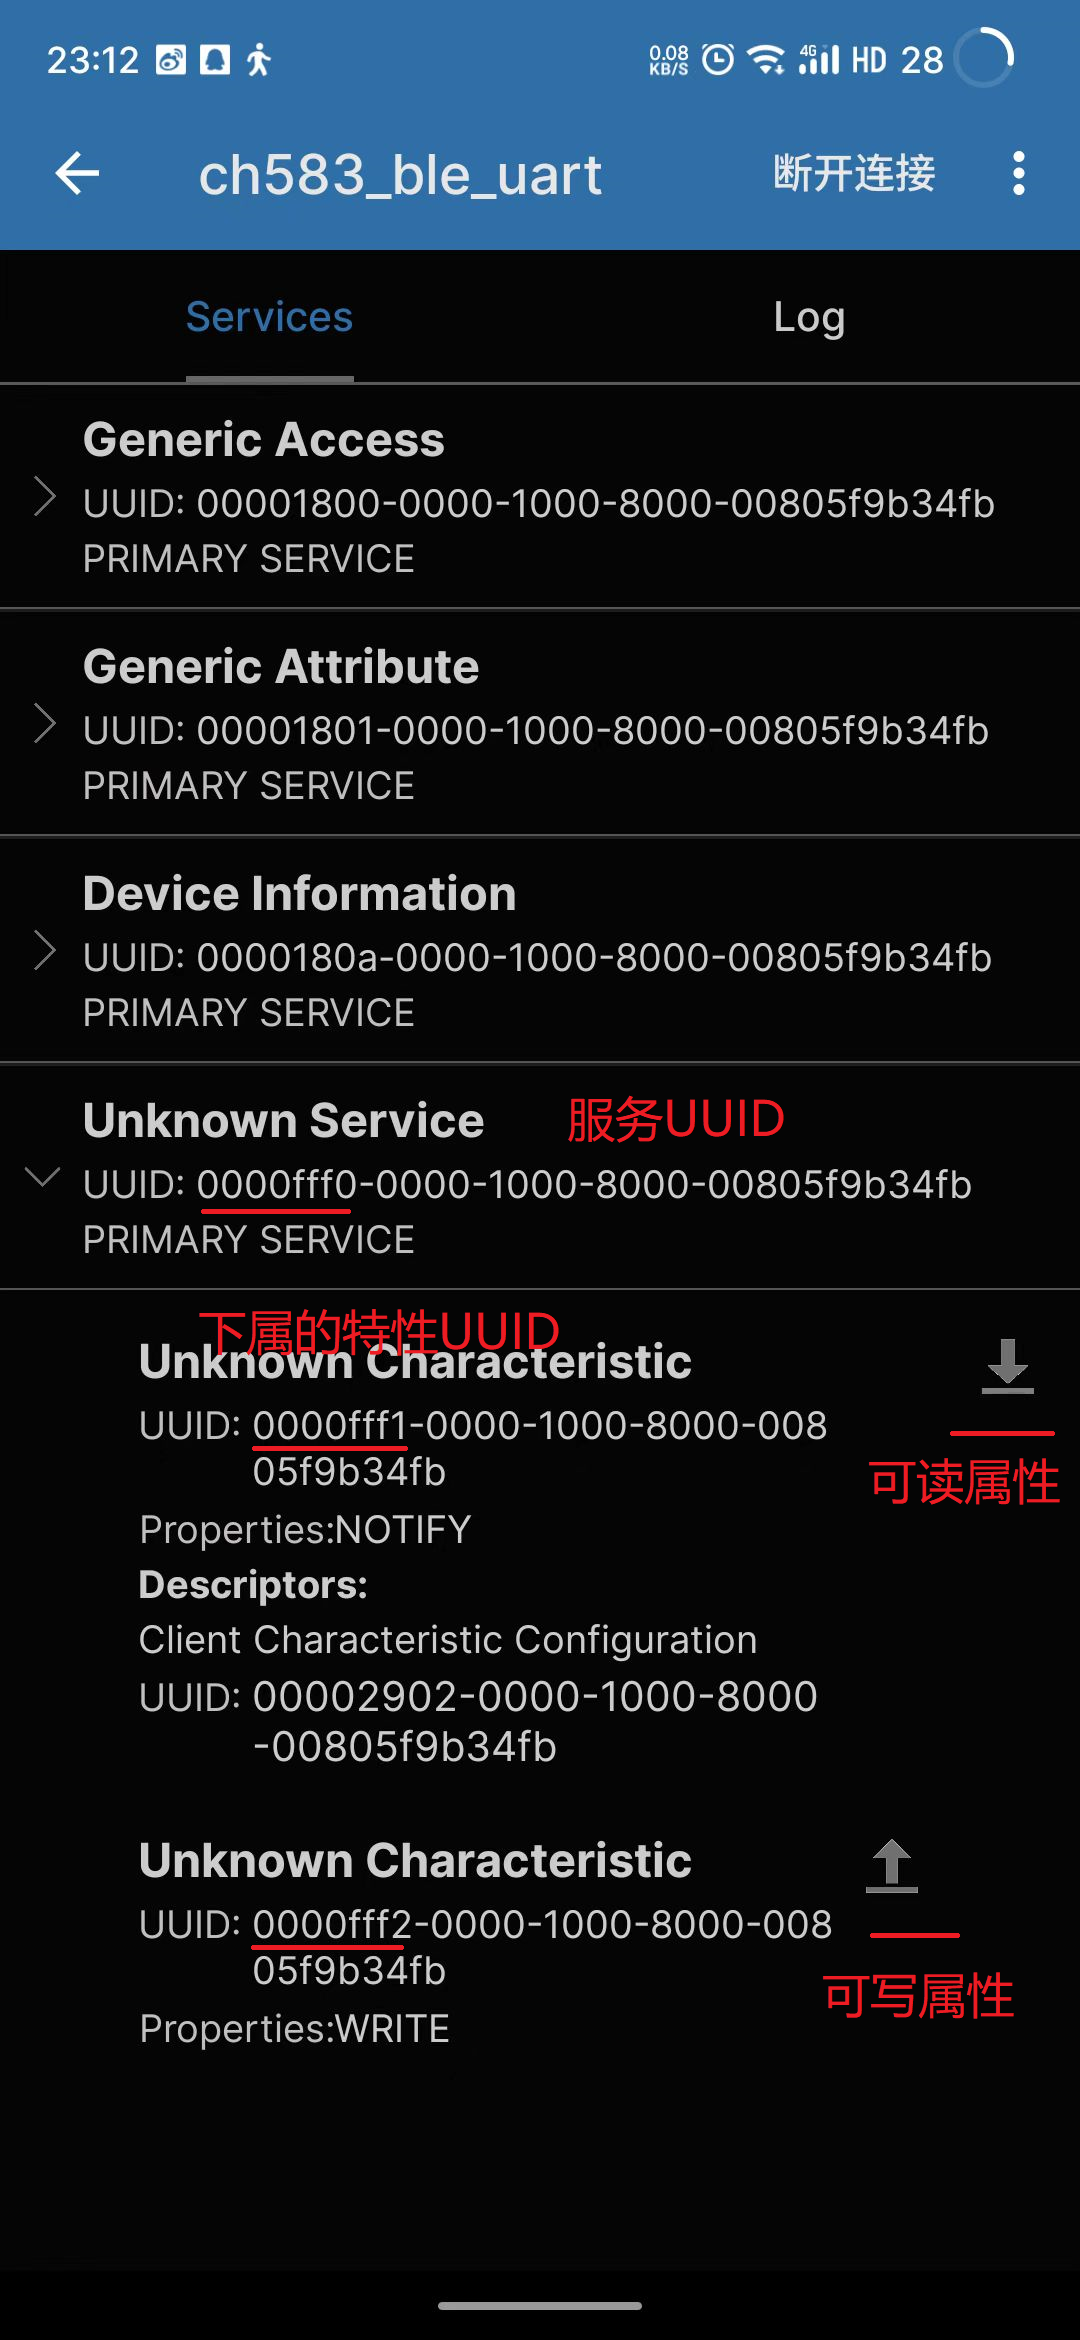
连接后就能看到当前连接设备的所有【服务UUID】,点击对应的列表,会显示当前服务UUID下的【特性UUID】:
-
上图中划线处可以看到,服务UUID为 【0000fff0】,其下属的可读属性的特性UUID为【0000fff1】,可写属性的UUID为【0000fff2】。
-
在 CH582M程序的【APP->ble_uart_service_16bit.c】中的 【ble_uart GATT Profile Service UUID】部分可以看到:
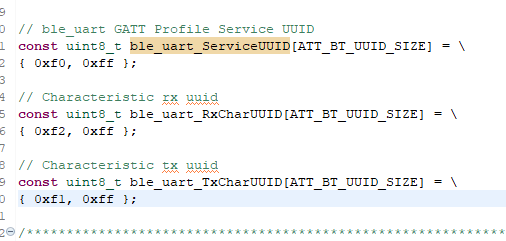
对应的正是上面的三个UUID。 -
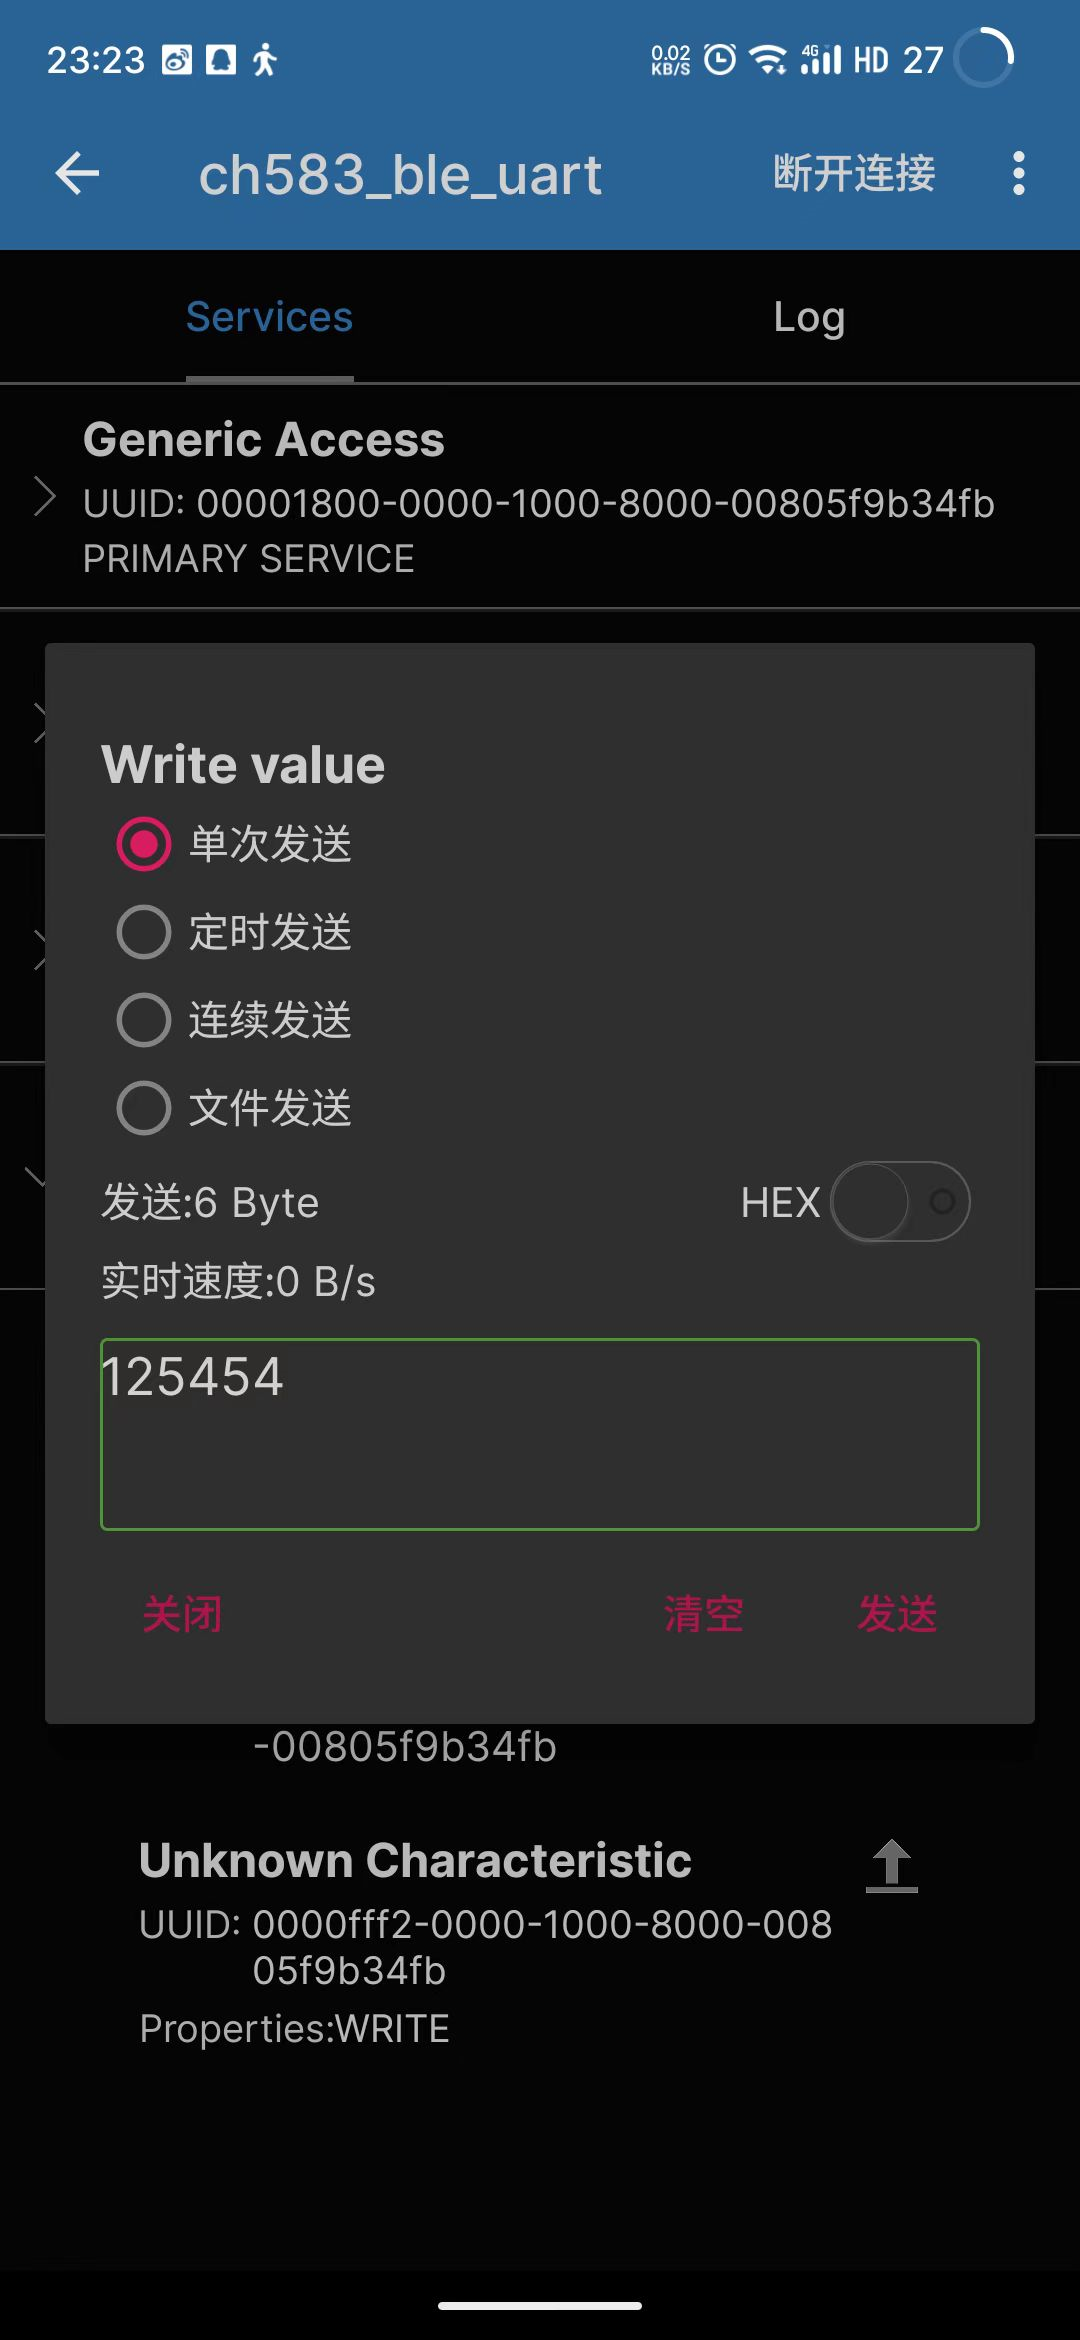
点击安卓的 可写属性 图标,跳出写数据界面:
-
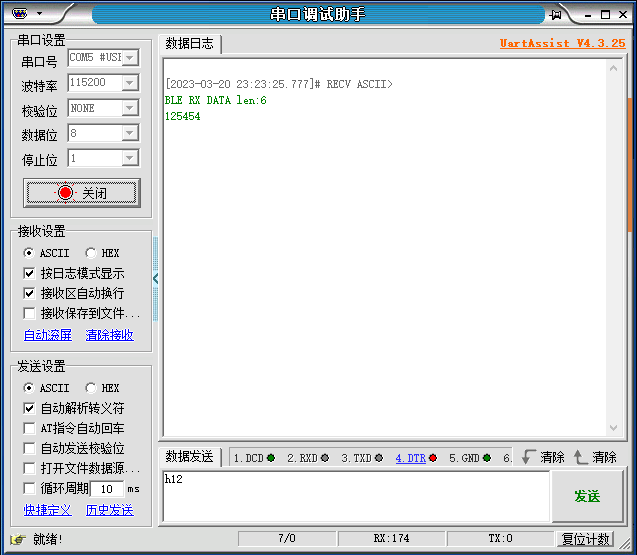
我们在文本框中随便输入几个字符,选择单次发送,点击【发送】,在windows端的串口调试软件上可以看到有数据输出:
-
实际上,默认程序只会输出第一行,即收到了几个数据,收到的数据是什么没有打印。我们可以在CH582M的程序的【peripheral.c】的on_bleuartServiceEvt()函数的 BLE_UART_EVT_BLE_DATA_RECIEVED 查看,发现它只有输出长度的提示。我们可以在里面加入输出蓝牙发送的数据的程序。程序增加后如下:
case BLE_UART_EVT_BLE_DATA_RECIEVED:
     PRINT("BLE RX DATA len:%d\r\n",p_evt->data.length);
     uint8_t sendbuf[50] ={0};
     for(int i = 0;i<p_evt->data.length;i++){//复制p_evt->data.length规定的长度避免后面的值造成乱码
          sendbuf[i]=p_evt->data.p_data[i];
        }
     PRINT(sendbuf);//输出显示
     PRINT("\r\n");
- 于是,我们实现了使用已有程序的整个连接测试过程(目前只实现【安卓端的写入->蓝牙发送给CH582M->CH582M蓝牙接收->串口发送给win】这一流程,反向还没有实现,实际上测试发现,串口发送数据给CH582M,安卓不论是读取还是通知都没有响应,推测是CH582M的串口读取然后发送给蓝牙写出 这一步骤的问题。可以理解的是,只要实现了安卓蓝牙写入,那么安卓实现数据读取从而实现蓝牙透传也是没问题的。但由于时间关系,没有详细探究,后面有时间再研究一下)。
- 因此,总结一下,步骤就和上面的安卓连接流程图一样,【打开蓝牙->搜索蓝牙->连接目标设备->对特定的UUID进行读写实现通讯->完成关闭蓝牙】 这么几步。当然,本文主要用于探索重连,即在连接目标设备与主动断开之间进行重连判断。
step2:开始编写安卓程序
说明
- 对于想要入门安卓开发的,可以查找相关教程资源进行学习,比如:
安卓入门开发教程 - 此处对于安卓开发的基础环境不再赘述。(java是一门入门相对简单的编程语言,以前我还写过安卓小游戏。跟着任意一个教程走一遍,基本的功能就能写出来,后面可以根据兴趣爱好分流。)
- 另外,程序是之前写好的,写的时候命名和逻辑都很随意,功能也很简单,也可能有不少BUG,此处不再修改。
开始
以下程序已放置在 Gitee 上,可以自行下载编译。
0:权限和库等
安卓6.0以上使用蓝牙需要很多权限,所以需要是授权。
在【AndroidManifest.xml】中添加如下的代码来获取权限:
    <uses-permission android:name="android.permission.ACCESS_COARSE_LOCATION" />
    <uses-permission android:name="android.permission.ACCESS_FINE_LOCATION" />
    <uses-permission android:name="android.permission.BLUETOOTH" />
    <uses-permission android:name="android.permission.BLUETOOTH_ADMIN" />
添加 Fastble库:
在 【build.gradle】的 dependencies{}中添加FastBle的包并等待其下载完毕
implementation 'com.github.Jasonchenlijian:FastBle:2.4.0'
1:定义一下需要的功能:
* 一个用于显示扫描到的蓝牙的【ListView】控件
* 一个用于显示文本信息的【TextView】控件
* 一个用于输入传输文本信息的【EditText】控件
* 几个按钮【Button】,分别用于开启和关闭蓝牙扫描、连接和断开蓝牙、发送数据。几个相反状态的按钮可以集成在一个上,此处为了演示,每个功能一个按钮。
2:绘图,在 AndroidStudio中新建一个空白程序,在【active_main.xml】中拖拽上述几个控件。如图:
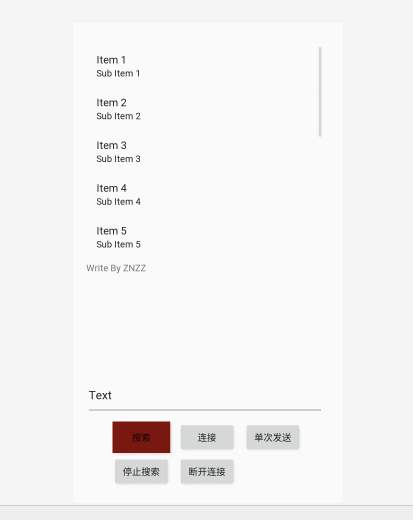
对其分别命名。关于控件的位置,可以自行处理,比如使用【layout】或是其他定位方法,使位置保证在合适的地方。
完成后,【active_main.xml】文件内容如下:
<?xml version="1.0" encoding="utf-8"?>
<android.support.constraint.ConstraintLayout xmlns:android="http://schemas.android.com/apk/res/android"
    xmlns:app="http://schemas.android.com/apk/res-auto"
    xmlns:tools="http://schemas.android.com/tools"
    android:layout_width="match_parent"
    android:layout_height="match_parent"
    tools:context=".MainActivity">

    <TextView
        android:id="@+id/text1"
        android:layout_width="360dp"
        android:layout_height="173dp"
        android:text="Write By ZNZZ "
        app:layout_constraintBottom_toBottomOf="parent"
        app:layout_constraintHorizontal_bias="0.392"
        app:layout_constraintLeft_toLeftOf="parent"
        app:layout_constraintRight_toRightOf="parent"
        app:layout_constraintTop_toTopOf="parent"
        app:layout_constraintVertical_bias="0.65" />

    <Button
        android:id="@+id/button1"
        android:layout_width="wrap_content"
        android:layout_height="wrap_content"
        android:layout_marginLeft="60dp"
        android:layout_marginBottom="76dp"
        android:background="#781811"
        android:text="@string/button1"
        app:layout_constraintBottom_toBottomOf="parent"

        app:layout_constraintLeft_toLeftOf="parent" />

    <Button
        android:id="@+id/button2"
        android:layout_width="wrap_content"
        android:layout_height="wrap_content"
        android:layout_marginLeft="12dp"
        android:text="@string/button2"
        app:layout_constraintBaseline_toBaselineOf="@+id/button1"
        app:layout_constraintLeft_toRightOf="@+id/button1"
        app:layout_constraintTop_toBottomOf="@+id/button1" />

    <Button

        android:id="@+id/button3"
        android:layout_width="wrap_content"
        android:layout_height="wrap_content"
        android:layout_marginLeft="12dp"
        android:text="单次发送"
        app:layout_constraintBaseline_toBaselineOf="@+id/button2"
        app:layout_constraintLeft_toRightOf="@+id/button2"
        app:layout_constraintTop_toBottomOf="@+id/button2" />

    <ListView
        android:id="@+id/listview"
        android:layout_width="359dp"
        android:layout_height="326dp"
        tools:ignore="MissingConstraints"
        tools:layout_editor_absoluteX="20dp"
        tools:layout_editor_absoluteY="37dp"

        />

    <Button
        android:id="@+id/button"
        android:layout_width="wrap_content"
        android:layout_height="wrap_content"
        android:layout_marginTop="4dp"
        android:text="停止搜索"
        app:layout_constraintLeft_toLeftOf="@+id/button1"
        app:layout_constraintTop_toBottomOf="@+id/button1" />

    <Button
        android:id="@+id/button4"
        android:layout_width="wrap_content"
        android:layout_height="wrap_content"
        android:text="断开连接"
        app:layout_constraintBaseline_toBaselineOf="@+id/button"
        app:layout_constraintLeft_toLeftOf="@+id/button2" />

    <EditText
        android:id="@+id/editText"
        android:layout_width="362dp"
        android:layout_height="62dp"
        android:ems="10"
        android:inputType="textPersonName"
        android:text="Text"
        app:layout_constraintLeft_toLeftOf="@+id/text1"
        app:layout_constraintTop_toBottomOf="@+id/text1" />

</android.support.constraint.ConstraintLayout>
3:绑定上述控件
在【MainActivity】中定义并绑定这几个控件。
一开始,我们可以将除了【扫描】之外的按钮控件都设为失能状态。
buttonXXX.setEnabled(false);
然后,创建这几个按键的点击回调函数。
        buttonXXX.setOnClickListener(new View.OnClickListener() {
            @Override
            public void onClick(View v) {
            }
        });
后面,就要根据需要创建不同的类了
4:创建【ListView】的显示处理类
因为listView使用上较按钮等控件更加复杂一些,所以我们将对它的处理集成在一个类中,方便调试和使用。
定义为 MyListViewShowClass 类,实现如下几个方法:
- 初始化方法,用于传递所需的上下文和其他必要资源
- 【添加】和【清除】方法
- 其他根据需要添加
最终代码如下:
class MyListViewShowClass{
    private ArrayAdapter<String> arrayAdapter;
    private ListView MylistView;
    private Context context;
    private List<String> listdata = new ArrayList<String>();//用来给ListView显示使用,顺序需要和bleDeviceListData一致
    public  List<BleDevice > bleDeviceListData = new ArrayList<BleDevice >();//用来存储蓝牙扫描结果,要和listdata顺序保持一致,方便实用
    private TextView textView;
    public int ListViewTouchedNum = 0;
    public int ListVierTouchedFlg = 0;
    public int ListViewShowUUIDFlg = 0;

    public void ListViewInit( Context context1,  ListView listView1,TextView textView1){
        //初始化,将需要的控件传递进来并绑定到本地
        context =       context1;
        MylistView =    listView1;
        textView =      textView1;
        arrayAdapter = new ArrayAdapter<String>
                (context1, R.layout.support_simple_spinner_dropdown_item, listdata);//实例化一个适配器
        MylistView.setAdapter(arrayAdapter);//将适配器绑定给listView控件


        MylistView.setOnItemClickListener(new AdapterView.OnItemClickListener() {
            //listVier 点击回调事件
            @Override
            public void onItemClick(AdapterView<?> adapterView, View view, int i, long l) {
                //listView的点击回调函数
                ListViewTouchedNum = i;//用于记录点击了第几个listV结尾,供【连接】按钮使用
                ListVierTouchedFlg= 1;//用于记录是否点击过。因为是测试程序,所以就用简单的方法实现。实际上可以传递【连接】按键进来,进行更有逻辑的配置
                if(ListViewShowUUIDFlg == 0) {
                    textView.setText("touch:" + "i" + "\n");
                    textView.append(listdata.get(i) + "\n" + bleDeviceListData.get(i).getName() + "\n" + bleDeviceListData.get(i).getMac());
                    char atest[] = listdata.get(i).toCharArray();//返回点击了第几行
                    System.out.println("ListTouch:" + i + " nameLength:" + atest.length);
                }else{
                    textView.setText("UUID View: "+ i);
                }
            }
        });


    }


    public void clean(){
        //清空listView
        bleDeviceListData.clear();
        listdata.clear();
        MylistView.setAdapter(arrayAdapter);
    }

    public void add(BleDevice bleDevice){
        //添加显示内容到listView,传递值为扫描得到的bleDevice
        String nameString = bleDevice.getName();
        String macString = bleDevice.getMac();
        String keyString = bleDevice.getKey();
        for(int i=0;i<bleDeviceListData.size();i++){  //用于排除重复项
            if(nameString.equals(bleDeviceListData.get(i).getName())){
                return ;
            }
        }

        bleDeviceListData.add(bleDevice);//用于保存扫描到的bleDevice
        listdata.add(bleDevice.getName());//用于给listView显示
        MylistView.setAdapter(arrayAdapter);
    }

    public void addUUID(List<BluetoothGattService> bleDeviceGattList){
        //用于连接后显示UUID。此处只做了显示第一层的 服务UUID的处理,第二层的按同样原理也可以添加上,此处不做处理
        ListViewShowUUIDFlg = 1;
        clean();//先清空
        for(BluetoothGattService service : bleDeviceGattList){
            listdata.add("UUID:"+service.getUuid().toString().substring(0,8) + "  "+service.getType());//UUID只显示前8个字节
        }
        MylistView.setAdapter(arrayAdapter);
    }
}
5:创建蓝牙处理相关的类
此处将蓝牙处理相关的函数也封装在一个类中,方便理解和使用。
定义为 BleDealClass 类,内部放的函数基本上都是用于调用 FastBle 的,个别根据需要添加了所需的方法。
内部也有用于初始化的方法,用于传递所需的资源。由于写的时候是根据需要添加的,所以初始化方法加了两个。
最终的类内容如下:
class BleDealClass {
//将蓝牙处理放到一个类中进行调用
//目前只测试了一主一从的连接方式,一主多从的方式暂未测试。
public BleDevice bleDevice;
public boolean bleIsSupport;
public boolean bleIsEnable;
public boolean bleIsScaning;
public boolean bleDisconnecteType;//断连类型
private MyListViewShowClass myListViewShowClass;
private char nameArray[];
private TextView textView;
private Button buttonSearch ,buttonConnect,buttonDisConnect,buttonStopScarch,buttonSendOneTime;
private BluetoothGatt bleDeviceGatt ;
private List<BluetoothGattService> bleDeviceGattList;
//用于断连后开启定时扫描并重练的定时器
private final Timer timer = new Timer();
private TimerTask task;
private int TimerCount = 0;
public String ServiceUUID = "0000fff0-0000-1000-8000-00805f9b34fb"; //服务UUID
public String CharacteristicUUID_Read = "0000fff1-0000-1000-8000-00805f9b34fb"; //特性UUID中的读属性
public String CharacteristicUUID_Write = "0000fff2-0000-1000-8000-00805f9b34fb"; //特性UUID中的写属性
public void bleButtonInit( Button buttonSearch1 ,
Button buttonConnect1,
Button buttonDisConnect1,
Button buttonStopScarch1,
Button buttonSendOneTime1
){//用于传递几个按键,方便全局操控
buttonSearch =buttonSearch1 ;
buttonConnect = buttonConnect1;
buttonDisConnect = buttonDisConnect1;
buttonStopScarch = buttonStopScarch1;
buttonSendOneTime = buttonSendOneTime1;
}
public void bleInit(Application aplication ,MyListViewShowClass myListViewShowClass1 ){
//初始化蓝牙,很多参数使用默认即可,也可自行修改
BleManager.getInstance().init(aplication);
BleManager.getInstance()
.enableLog(true)
.setReConnectCount(1, 5000)
.setOperateTimeout(5000);
myListViewShowClass = myListViewShowClass1;
}
public boolean isSupportBle(){
//判断是否支持BLE
return BleManager.getInstance().isSupportBle();
}
public boolean isBlueEnable(){
//判断蓝牙是否已经打开
return BleManager.getInstance().isBlueEnable();
}
public void enableBluetooth(){
//通过蓝牙适配器直接打开蓝牙
/*方法是异步的,打开蓝牙需要一段时间,调用此方法后,
蓝牙不会立刻就处于开启状态。如果使用此方法后紧接者就需要进行扫描,
建议维护一个阻塞线程,内部每隔一段时间查询蓝牙是否处于开启状态,
外部显示等待UI引导用户等待,直至开启成功。*/
BleManager.getInstance().enableBluetooth();
}
public void BleScanRuleConfigFun(UUID[] serviceUuids,
String names,
String mac,
boolean isAutoConnect,
int timeout){
//配置扫描规则
BleScanRuleConfig scanRuleConfig = new BleScanRuleConfig.Builder()
.setServiceUuids(serviceUuids) // 只扫描指定的服务的设备,可选
.setDeviceName(true, names) // 只扫描指定广播名的设备,可选
.setDeviceMac(mac) // 只扫描指定mac的设备,可选
.setAutoConnect(isAutoConnect) // 连接时的autoConnect参数,可选,默认false
.setScanTimeOut(timeout) // 扫描超时时间,可选,默认10秒
.build();
BleManager.getInstance().initScanRule(scanRuleConfig);
}
public void cancelScan(){
//取消上面的扫描
BleManager.getInstance().cancelScan();
bleIsScaning = false;
}
public void bleScan(final TextView textView1){
textView =textView1;
//开始扫描
/* onScanStarted(boolean success): 会回到主线程,参数表示本次扫描动作是否开启成功。由于蓝牙没有打开,上一次扫描没有结束等原因,会造成扫描开启失败。
onLeScan(BleDevice bleDevice):扫描过程中所有被扫描到的结果回调。由于扫描及过滤的过程是在工作线程中的,此方法也处于工作线程中。同一个设备会在不同的时间,携带自身不同的状态(比如信号强度等),出现在这个回调方法中,出现次数取决于周围的设备量及外围设备的广播间隔。
onScanning(BleDevice bleDevice):扫描过程中的所有过滤后的结果回调。与onLeScan区别之处在于:它会回到主线程;同一个设备只会出现一次;出现的设备是经过扫描过滤规则过滤后的设备。
onScanFinished(List<BleDevice> scanResultList):本次扫描时段内所有被扫描且过滤后的设备集合。它会回到主线程,相当于onScanning设备之和。
*/
BleManager.getInstance().scan(new BleScanCallback() {
@Override
public void onScanStarted(boolean success) {
bleIsScaning = true;
textView.setText("Ble Was Started!");
}
@Override
public void onLeScan(BleDevice bleDevice) {
//textView.append(bleDevice.getName() +"\n"+ bleDevice.getMac()+"\n"+bleDevice.getKey()+"\n");
bleDisconnecteType=false;
String nameString = bleDevice.getName();
String macString = bleDevice.getMac();
String keyString = bleDevice.getKey();
if(nameString!=null) {//注意,此处不判断空指针的话,会有空指针导致程序崩溃,所以需要排除空指针
nameArray = nameString.toCharArray();
myListViewShowClass.add(bleDevice);
System.out.println(nameString + ":\n" + macString + "\n" + keyString + "\n");
}
buttonConnect.setEnabled(true);
}
@Override
public void onScanning(BleDevice bleDevice) {
textView.setText("Ble Was onScanning!");
}
@Override
public void onScanFinished(List<BleDevice> scanResultList) {
}
});
}
public void bleConnect(final BleDevice bleDevice1){
//连接事件
bleDevice = bleDevice1;//这个需要连接的bleDevice很关键。实际上,可以将它保存下来,下次开机直接调用,以实现只需要一次配对,以后开机都不需要配对了。
//对于一主多从,也可以用同样的方法记录保存更多的蓝牙设备。不过我没有测试。
BleManager.getInstance().connect(bleDevice, new BleGattCallback() {
@Override
public void onStartConnect() {
System.out.println("ble onStartConnect() ");
textView.setText("ble onStartConnect!");
}
@Override
public void onConnectFail(BleDevice bleDevice, BleException exception) {
System.out.println("ble onConnectFail() ");
textView.setText("ble onConnectFail!");
}
@Override
public void onConnectSuccess(BleDevice bleDevice, BluetoothGatt gatt, int status) {
System.out.println("ble onConnectSuccess() ");
textView.setText("ble onConnectSuccess!\n");
//连接成功,几个按键设为可控
buttonConnect.setEnabled(false);
buttonDisConnect.setEnabled(true);
buttonSendOneTime.setEnabled(true);
//连接成功,获取UUID
//蓝牙的UUID分为服务UUID和特征UUID,属于包含关系,每个服务UUID下可以包含多个特征UUID
bleDeviceGatt = BleManager.getInstance().getBluetoothGatt(bleDevice);//获取已经连接上的bleDevice的GATT
bleDeviceGattList = bleDeviceGatt.getServices();//从GATT中获取列表
int i = 0;
for(BluetoothGattService service : bleDeviceGattList){
//System.out.println(service);
System.out.println("UUID:"+i+"; "+service.getUuid().toString());//显示服务UUID
List<BluetoothGattCharacteristic> characteristicList= service.getCharacteristics();
for(BluetoothGattCharacteristic characteristicListDevice:characteristicList){//其实此处可以加一层逻辑,在listView中将特性UUID也显示出来,但需要增加代码,就不敲了
System.out.println("getCharacteristicsUUID:"+characteristicListDevice.getUuid());//从服务UUID中获取特征UUID,读写属性都在特征UUID这一层面
System.out.println("Property: "+characteristicListDevice.getProperties());
}
i++;
}
myListViewShowClass.addUUID(bleDeviceGattList);
}
@Override
public void onDisConnected(boolean isActiveDisConnected, BleDevice device, BluetoothGatt gatt, int status) {
//断连回调函数,只对应 bleConnect 连接后的断连
System.out.println("ble onDisConnected() ");
textView.setText("ble onDisConnected!");
buttonConnect.setEnabled(true);
buttonDisConnect.setEnabled(false);
buttonSendOneTime.setEnabled(false);
if(bleDisconnecteType == false){//不是主动点击按钮断联的,需要重连
//开始扫描定时器操作
if(bleDevice.getName() != null){//不为空
bleDisconnectedScanTimer();
bleTimerStart(5000);
}
}
}
});
}
public void bleDisconnecte(){
//主动断开连接
if(BleManager.getInstance().isConnected(bleDevice)){
BleManager.getInstance().disconnect(bleDevice);
buttonConnect.setEnabled(false);
buttonDisConnect.setEnabled(true);
buttonSendOneTime.setEnabled(true);
bleDisconnecteType = true;//主动断连
textView.setText("ble onDisConnected!");
}else{
textView.setText("No Device Connected!");
}
}
public void bleWrite(final String data){
if(data.length()>19)data.substring(0,19);//大于20字节要分包或是设置MTU,此处测试,只截取,不做其他处理,
byte sendData[] =data.getBytes();
//ble写函数,实质上就是对连接上的 bleDevice 设备的 服务UUID 下的 写特征UUID 写入 sendData 数据,所以最关键的就是获取到对应的UUID。因为我们主机和从机
//是可以事先定好UUID的,所以我们此处的UUID是事先写好的,可以根据程序需要自行获取对应设备的UUID,然后根据Property属性来判断是否可以读写
BleManager.getInstance().write(
bleDevice,
ServiceUUID,
CharacteristicUUID_Write,
sendData,
new BleWriteCallback() {
@Override
public void onWriteSuccess(int current, int total, byte[] justWrite) {
textView.setText("Write OK!:"+data);
System.out.println("Write OK!:"+data);
}
@Override
public void onWriteFailure(BleException exception) {
textView.setText("onWriteFailure!");
System.out.println("onWriteFailure!");
}
}
);
}
public void bleNotify(){
//notify 订阅属性,即蓝牙收到的主动通知的回调函数
//此处没调通,应该是是CH582M那边的问题
BleManager.getInstance().notify(
bleDevice,
ServiceUUID,
CharacteristicUUID_Read,
new BleNotifyCallback() {
@Override
public void onNotifySuccess() {
System.out.println("onNotifySuccess");
textView.setText("onNotifySuccess");
}
@Override
public void onNotifyFailure(BleException exception) {
System.out.println("onNotifyFailure");
textView.setText("onNotifyFailure");
}
@Override
public void onCharacteristicChanged(byte[] data) {
System.out.println(data);
//textView.setText("GetDaata:"+data);
}
}
);
}
public void bleRead(){
//ble主动读操作
//此处没调通,应该是是CH582M那边的问题
BleManager.getInstance().read(
bleDevice,
ServiceUUID,
CharacteristicUUID_Read,
new BleReadCallback() {
@Override
public void onReadSuccess(byte[] data) {
System.out.println("onReadSuccess!Get datalength:"+data.length);
textView.setText("onReadSuccess!Get datalength:"+data.length);
}
@Override
public void onReadFailure(BleException exception) {
System.out.println("onReadFailure");
textView.setText("onReadFailure");
}
}
);
}
public void bleDisconnectedScanTimer(){
//定义一个用于自动重连的扫描定时器
//只测试了一主一从的方式,一主多从没有测试。
task = new TimerTask() {
@Override
public void run() {
//BleManager.getInstance().cancelScan();//不要随随便便的取消扫描,会导致崩溃!
System.out.println("Count:"+TimerCount);
textView.setText("Count:"+TimerCount);
//扫描配置,配置为之前连上的bleDevice的参数,这样就可以只扫描是否有目标设备了,不会返回其他的
//下面的可选,就是可以将不需要的注释掉,需要的填上所需的值
BleScanRuleConfig scanRuleConfig = new BleScanRuleConfig.Builder()
//.setServiceUuids(bleDevice.) // 只扫描指定的服务的设备,可选
.setDeviceName(true, bleDevice.getName()) // 只扫描指定广播名的设备,可选
.setDeviceMac(bleDevice.getMac()) // 只扫描指定mac的设备,可选
.setAutoConnect(true) // 连接时的autoConnect参数,可选,默认false
.setScanTimeOut(10000) // 扫描超时时间,可选,默认10秒;小于等于0表示不限制扫描时间
.build();
BleManager.getInstance().initScanRule(scanRuleConfig);
BleManager.getInstance().scanAndConnect(new BleScanAndConnectCallback() {
//scanAndConnect:此方法就是扫描到符合的设备然后自动连接,不用主动调用connect方法。
//另外,这个连接后的断连回调在本方法中,不会渠道上面connect的断连方法中
@Override
public void onScanFinished(BleDevice scanResult) {
//scanAndConnect方法扫描成功的回调函数
if(BleManager.getInstance().isConnected(bleDevice)) {
//此处主动判断一次是否连接成功,不成功就再扫描。其实后面发现下面有个onConnectSuccess回调...
System.out.println("onTimerScanFinished");
textView.setText("onTimerScanFinished");
buttonConnect.setEnabled(false);
buttonDisConnect.setEnabled(true);
buttonSendOneTime.setEnabled(true);
}else{
System.out.println("onTimerScanFinished ButNotConnected");
textView.setText("onTimerScanFinished ButNotConnected");
if(bleDisconnecteType == false){//不是主动点击按钮断联的
//开始扫描定时器操作
if(bleDevice.getName() != null){//不为空
bleDisconnectedScanTimer();
bleTimerStart(10000);//加长重连时间
}
}
}
}
@Override
public void onStartConnect() {
System.out.println("onTimerStartConnect");
textView.setText("onTimerStartConnect");
}
@Override
public void onConnectFail(BleDevice bleDevice, BleException exception) {
System.out.println("onTimerConnectFail");
textView.setText("onTimerConnectFail");
}
@Override
public void onConnectSuccess(BleDevice bleDevice, BluetoothGatt gatt, int status) {
System.out.println("onTimerConnectSuccess");
textView.setText("onTimerConnectSuccess");
buttonConnect.setEnabled(false);
buttonDisConnect.setEnabled(true);
buttonSendOneTime.setEnabled(true);
}
@Override
public void onDisConnected(boolean isActiveDisConnected, BleDevice device, BluetoothGatt gatt, int status) {
System.out.println("onTimerDisConnected");
textView.setText("onTimerDisConnected");
buttonConnect.setEnabled(true);
buttonDisConnect.setEnabled(false);
buttonSendOneTime.setEnabled(false);
if(bleDisconnecteType == false){//不是主动点击按钮断联的
//开始扫描定时器操作
if(bleDevice.getName() != null){//不为空
bleDisconnectedScanTimer();
bleTimerStart(5000);
}
}
}
@Override
public void onScanStarted(boolean success) {
System.out.println("onTimerScanStarted");
textView.setText("onTimerScanStarted");
}
@Override
public void onScanning(BleDevice bleDevice) {
System.out.println("onTimerScanning");
textView.setText("onTimerScanning");
}
});
}
};
}
public void bleTimerStart(int delaytime){
timer.schedule(task, delaytime);//只填一个参数就是只执行一次
}
public void bleTimerStop(){
//timer.cancel();
}
public void bleTimerClean(){
timer.purge();
}
}
6:完善主程序的运行
首先是按照蓝牙流程,判断是否支持蓝牙,和蓝牙是否已经打开。然后就是完善各个按键的功能和状态:
public class MainActivity extends AppCompatActivity {
    private Button buttonSearch ,buttonConnect,buttonDisConnect,buttonStopScarch,buttonSendOneTime;
    private TextView text1InforShow;
    private ListView listView1;
    private EditText editText;
    final  MyListViewShowClass myListViewShowClass = new MyListViewShowClass();//创建新的 MyListViewShowClass()实例
    final BleDealClass  bleDealClass = new BleDealClass();//创建新的 BleDealClass()实例
    @Override
    protected void onCreate(Bundle savedInstanceState) {

        super.onCreate(savedInstanceState);
        setContentView(R.layout.activity_main);

        buttonSearch=(Button)findViewById(R.id.button1);
        buttonStopScarch = (Button)findViewById(R.id.button);
        buttonConnect=(Button)findViewById(R.id.button2);
        buttonDisConnect=(Button)findViewById(R.id.button4);
        text1InforShow=(TextView)findViewById(R.id.text1);
        listView1 = (ListView)findViewById(R.id.listview);
        buttonSendOneTime = (Button)findViewById(R.id.button3);
        editText = (EditText)findViewById(R.id.editText);

        //先将几个按键设为失能
        buttonSearch.setEnabled(false);
        buttonStopScarch.setEnabled(false);
        buttonConnect.setEnabled(false);
        buttonDisConnect.setEnabled(false);
        buttonSendOneTime.setEnabled(false);

        myListViewShowClass.ListViewInit(MainActivity.this,listView1,text1InforShow);//初始化绑定控件

        bleDealClass.bleButtonInit(buttonSearch ,buttonConnect,buttonDisConnect,buttonStopScarch,buttonSendOneTime);
        bleDealClass.bleInit(getApplication(),myListViewShowClass); //初始化蓝牙

        if(!bleDealClass.isSupportBle()){ //判断是否支持BLE
            text1InforShow.setText("Device Not Suppot Ble!\n");
            bleDealClass.bleIsSupport = false;
        }else{
            bleDealClass.bleIsSupport = true;
            if(!bleDealClass.isBlueEnable()){//判断是否开启BLE
                text1InforShow.setText("Device's Ble Not Opend!\n");
                bleDealClass.bleIsEnable = false;
            }else{
                bleDealClass.bleIsEnable = true;
            }
        }

        if(bleDealClass.bleIsEnable == true && bleDealClass.bleIsSupport == true){  //若是支持蓝牙且蓝牙已开启,则打开扫描按键,允许扫描
            buttonSearch.setEnabled(true);
            text1InforShow.append("Device's Support Ble And it had Opend!\n");
        }else{
            if(bleDealClass.bleIsEnable == false && bleDealClass.bleIsSupport == true){
                text1InforShow.setText("Device's Ble Not Opend! Now will Open the Ble!\n");
                bleDealClass.enableBluetooth();
            }
        }
        buttonSearch.setOnClickListener(new View.OnClickListener() {
            //搜索按钮的点击事件
            @Override
            public void onClick(View v) {
                if(bleDealClass.bleIsScaning == true){//已经开启扫描了,先关闭
                    bleDealClass.cancelScan();
                }
                myListViewShowClass.clean();//清空列表
                text1InforShow.append("Now Start Scan Ble!");
                bleDealClass.bleScan(text1InforShow);
                buttonStopScarch.setEnabled(true);
                buttonSearch.setEnabled(false);
                bleDealClass.bleDisconnecteType=false;//清除标志位
            }
        });
        buttonStopScarch.setOnClickListener(new View.OnClickListener() {
            //取消扫描的点击事件
            @Override
            public void onClick(View view) {
                if(bleDealClass.bleIsScaning == true){
                    text1InforShow.setText("Now Stop Scan Ble!");
                    bleDealClass.cancelScan();
                    bleDealClass.bleIsScaning = false;
                    buttonStopScarch.setEnabled(false);
                    buttonSearch.setEnabled(true);
                    buttonDisConnect.setEnabled(false);
                    buttonSendOneTime.setEnabled(false);


                }

            }
        });
        buttonConnect.setOnClickListener(new View.OnClickListener() {
            //连接的点击事件
            @Override
            public void onClick(View view) {
                if(myListViewShowClass.ListVierTouchedFlg == 1){
                    text1InforShow.setText("开始连接蓝牙 "+myListViewShowClass.ListViewTouchedNum+"\n");
                    text1InforShow.append("Name: "+myListViewShowClass.bleDeviceListData.get(myListViewShowClass.ListViewTouchedNum).getName()+"\n"+
                                    "Mac: "+myListViewShowClass.bleDeviceListData.get(myListViewShowClass.ListViewTouchedNum).getMac()+"\n"+
                                    "Key: "+myListViewShowClass.bleDeviceListData.get(myListViewShowClass.ListViewTouchedNum).getKey()+"\n"+
                                    "Device: "+myListViewShowClass.bleDeviceListData.get(myListViewShowClass.ListViewTouchedNum).getDevice()+"\n"+
                                    "Rssi: "+myListViewShowClass.bleDeviceListData.get(myListViewShowClass.ListViewTouchedNum).getRssi()+"\n"+
                                    "ScanRecord: "+myListViewShowClass.bleDeviceListData.get(myListViewShowClass.ListViewTouchedNum).getScanRecord()
                            );
                    bleDealClass.cancelScan();//取消继续扫描
                    bleDealClass.bleConnect(myListViewShowClass.bleDeviceListData.get(myListViewShowClass.ListViewTouchedNum));//开始连接

                }else{
                    text1InforShow.setText("Please slect a bleDevice From ListView!");
                }
            }
        });

        buttonDisConnect.setOnClickListener(new View.OnClickListener() {
            //主动断开连接
            @Override
            public void onClick(View view) {
                bleDealClass.bleDisconnecte();
                bleDealClass.bleDisconnecteType=true;//是主动断开的
                myListViewShowClass.ListVierTouchedFlg = 0;

            }
        });

        buttonSendOneTime.setOnClickListener(new View.OnClickListener() {
            //单次发送按键点击事件
            @Override
            public void onClick(View view) {
                String SendData;
                SendData=editText.getText().toString();//获取字符串
                if(SendData.length()<1){
                    SendData = "0";
                }
                bleDealClass.bleWrite(SendData);//发送字符串。此处可以做其他处理,比如发送类型、发送分包、数据格式化等
            }
        });
    }
}
7:程序逻辑
- 首先判断是否支持和开启了蓝牙。
- 然后点击 稻苗按键,里面会调用 bleDealClass.bleScan() ,开启扫描。
- 扫描得到的蓝牙列表会在 bleDealClass.bleScan()方法内部的 onLeScan()回调中进行显示,并保存在bleDeviceListData 列表中。
- 点击对应的列表,会触发 MyListViewShowClass类中的 ListViewInit()方法中的 setOnItemClickListener 点击回调函数,内部会保存点击得到的所在行数,然后用于在 bleDeviceListData 获取对应的bleDevice。
- 扫描完成后,点击连接按钮,触发bleDealClass.bleConnect()方法,连接上面点击listView得到的bleDevice。
- 连接成功后,触发 bleConnect()事件内部的onConnectSuccess()回调,来显示UUID。
- 此时,点击 发送 按钮,会从文本框中获取字符,并调用 bleWrite()方法发送给CH582M。
- 此时,若是断开连接(拔掉CH582M的供电),会触发与bleConnect()内部的onDisConnected()回调,内部会调用bleDisconnectedScanTimer()来定义一个单次定时器,用来触发扫描,定时长度由bleTimerStart()定义。
- 定时器到达后,会触发内部的 TimerTask()事件,开启 scanAndConnect()方法扫描并连接。连接后触发 onConnectSuccess()回调。此时再断连,会触发TimerTask()方法内部的onDisConnected()方法,内部做了和之前的断连一样的开启定时器的操作。
8:重连探索
以上,就是蓝牙连接和断连后重连的整个过程。可以看到,我目前使用的是断连事件触发定时器进行周期性扫描实现重连的。
我翻阅了一些资料,也咨询了一些有经验的人,都是表示,对于低功耗蓝牙ble,除非自行修改底层,不然是很难实现底层支持的自动重连的。而像HID或是蓝牙耳机那种自动重连的,都属于独立于ble协议的其他协议,比如耳机的重连一般属于2.0以下的经典蓝牙才有的,有些也是手机系统底层做的支持。
所以对于ble蓝牙,主动搜索实现断线重连是主要的方法。而对于实现退出软件或是关机后记录已连接的设备,可以自行保存配对连接过的设备信息,下次打开软件后调用;也可以尝试深入了解以下蓝牙的安卓底层,看有没有系统自带的保存方案。
四:结束
因为本次主要是探索安卓端的开发,所以对于CH582M的开发未做过多介绍,有兴趣的可以自行深入了解。而且数据的接收也没有实现。但想来是CH582M端的问题,当然,也有可能是调用方式不对。后面有时间再解决吧。
-
本文水平有限,内容很多词语由于知识水平问题不严谨或很离谱,但主要作为记录作用,希望以后的自己和路过的大神对必要的错误提出批评与指点,对可笑的错误请指出来,我会改正的。
-
另外,转载使用请注明作者和出处,不要删除文档中的关于作者的注释。
随梦,随心,随愿,恒执念,为梦执战,执战苍天! ------------------执念执战




【推荐】国内首个AI IDE,深度理解中文开发场景,立即下载体验Trae
【推荐】编程新体验,更懂你的AI,立即体验豆包MarsCode编程助手
【推荐】抖音旗下AI助手豆包,你的智能百科全书,全免费不限次数
【推荐】轻量又高性能的 SSH 工具 IShell:AI 加持,快人一步
· 分享一个免费、快速、无限量使用的满血 DeepSeek R1 模型,支持深度思考和联网搜索!
· 基于 Docker 搭建 FRP 内网穿透开源项目(很简单哒)
· ollama系列1:轻松3步本地部署deepseek,普通电脑可用
· 按钮权限的设计及实现
· 【杂谈】分布式事务——高大上的无用知识?