10分钟快速上车短视频风口:基于uniapp框架创建自己的仿抖音短视APP

在今年也就是第48次发布的《中国互联网络发展状况统计报告》有这样一个数据,21年的上半年以来,我国我国网民规模达10.11亿,其中短视频用户达8.88亿。碎片化的生活场景下,短视频成为人们获取信息的重要渠道之一。可以看到这10亿互联网用户中,有接近九成都是短视频APP的用户。同时,截止2021年3月,中国短视频人均单日使用时长超过了两小时。在这一数据支撑下,国民对于短视频的粘性还在进一步上升。而5G时代的逐步铺开也是另一个短视频利好的因素。

        面对短视频的风口,不少人想要成为内容提供者,也有不少人跃跃欲试想要推出自己的短视频APP程序成为下一个抖音,今天就以uniapp框架下的短视频插件实例分享如何快速实现基础功能的仿抖音短视频插件。


 技术实现


效果预览


 项目实践

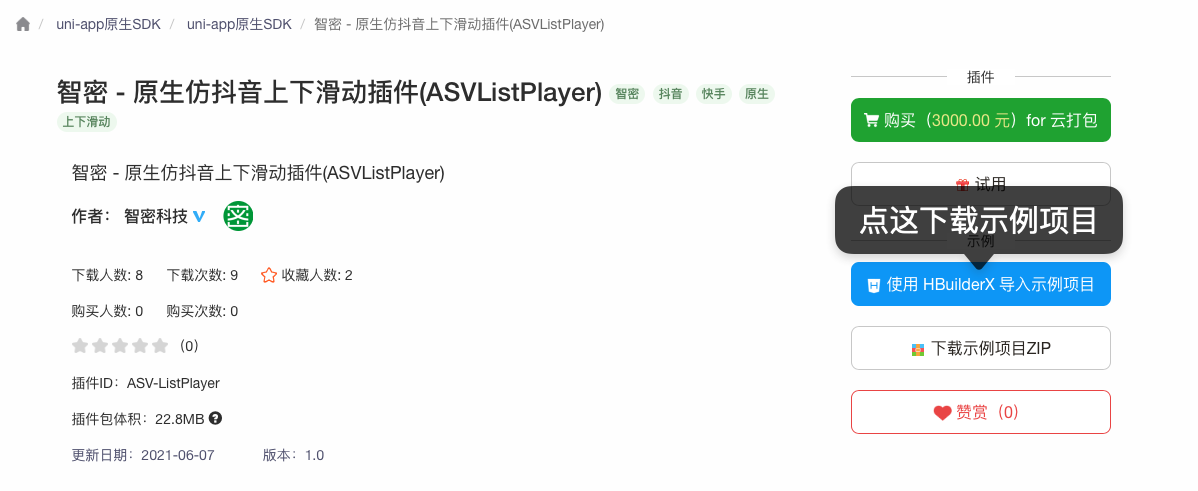
首先需要开发者提前准备好“技术实现”部分的环境并登录到DCloud中。此时打开智密原生仿抖音上下滑动插件的详情页(仿抖音短视频插件-原生控制视频上下滑动-智密科技 - DCloud 插件市场

image.png

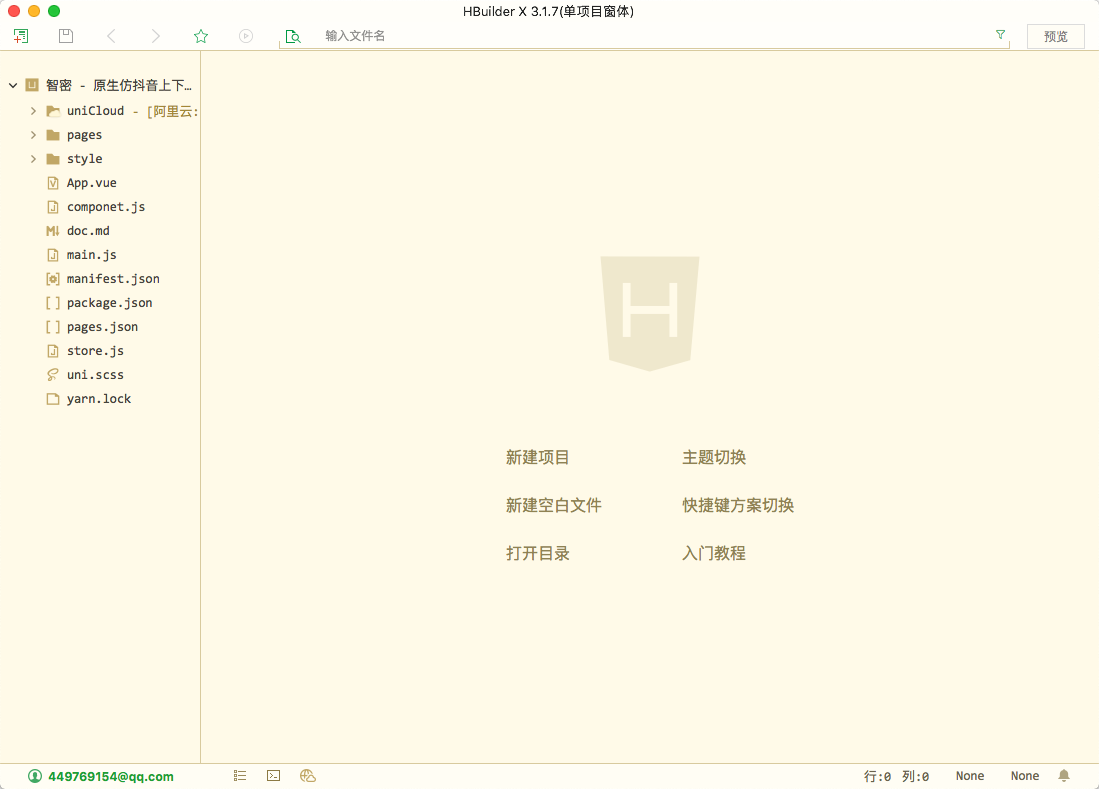
 点击导入之后,系统将会自动打开hbx,并且提示新建导入项目,导入成功之后开发者将会看到这样的一个目录结构,这我们就创建完成基础项目。

image.png

试用插件

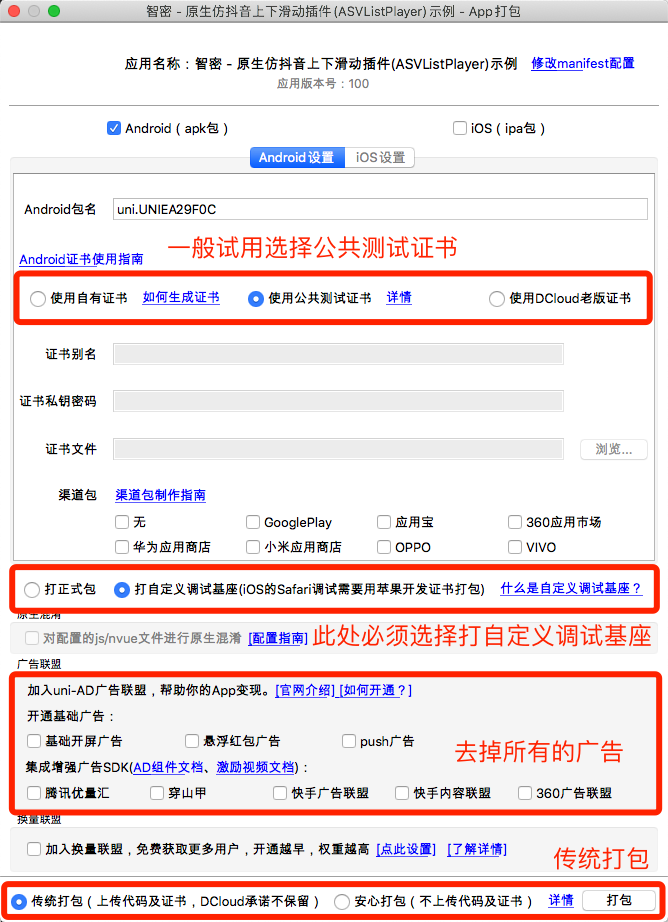
创建完成项目之后,根据uniapp的官方要求,我们并不能直接使用插件,我们还需要先申请试用,然后打包自定义基座才可以使用。

image.png

点击确认申请试用之后,我们还需要回到hbx中选择云端插件并且打包自定义基座,运行的时候我们也需要选择自定义基座,具体操作如下:

image.png

image.png


image.png


image.png

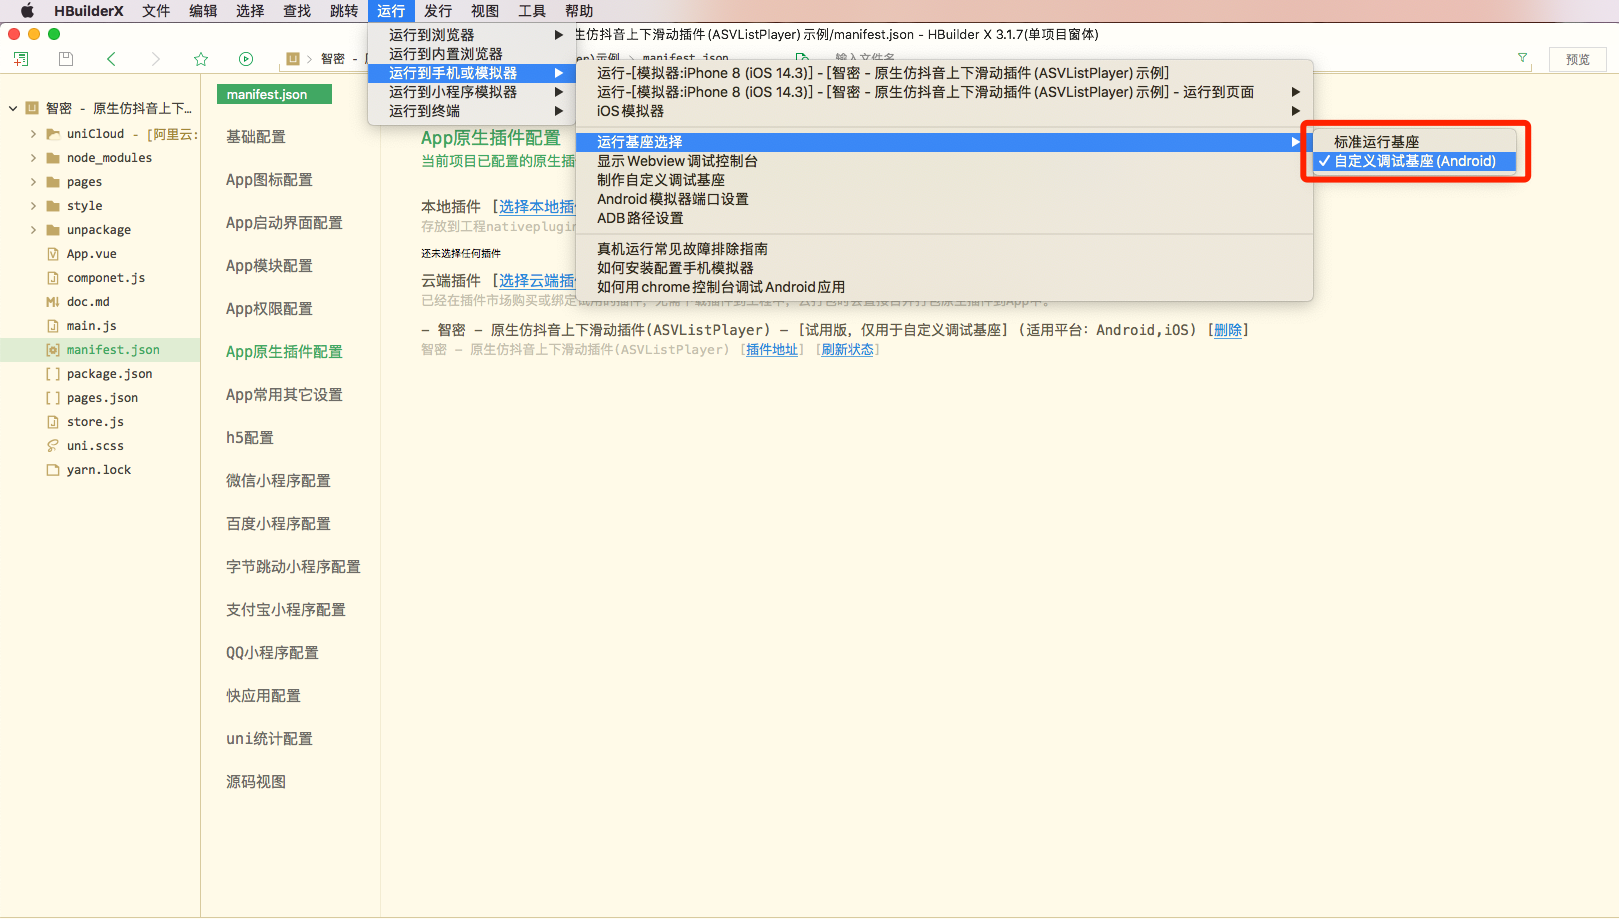
至此我们完成了打包自定义基座以及以自定义基座运行的方式了,接下来我们开始进入代码实战阶段。


代码实战

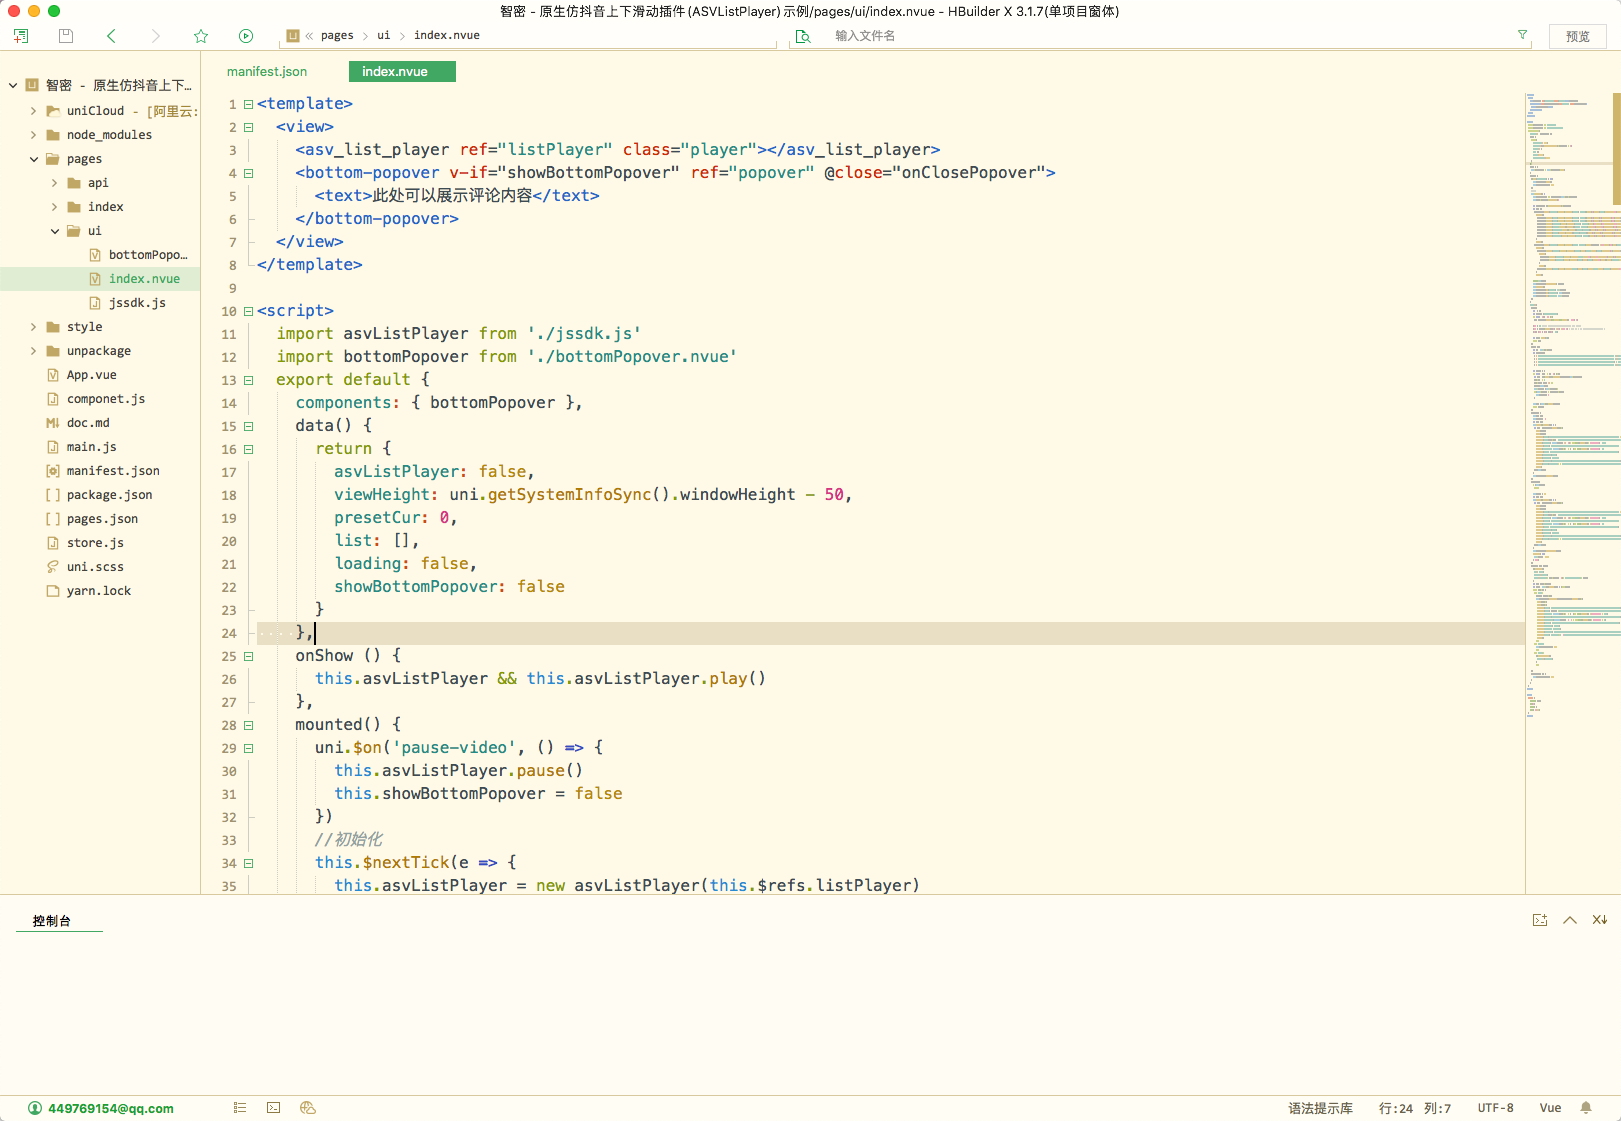
首先我们先看一下demo,demo中提供的/pages/ui/index.nvue是ui展示界面,这里我们可以来分析一下代码情况,笔者划分几个部分给大家分析一下。

image.png


界面控件 

<view>
  <asv_list_player ref="listPlayer" class="player"></asv_list_player>
  <bottom-popover v-if="showBottomPopover" ref="popover" @close="onClosePopover">
    <text>此处可以展示评论内容</text>
  </bottom-popover>
</view>

 在这里asv_list_player是展示短视频的主体,用于接受界面控件配置数据以及承载视频播放,上下滑动视频的控件,而bottom-popover是demo内部自带的底部弹出覆盖层,用于展示弹窗业务逻辑。

初始化控件

mounted() {
  uni.$on('pause-video', () => {
    this.asvListPlayer.pause()
    this.showBottomPopover = false
  })
  this.$nextTick(e => {
    // 创建jssdk示例
    this.asvListPlayer = new asvListPlayer(this.$refs.listPlayer)
    this.$refs.listPlayer.setScaleMode(0)

    let screenWidth = uni.getSystemInfoSync().screenWidth
    // 这里开始是初始化界面布局信息
    let views = [
      asvListPlayer.getView('rightBox').isLayer().position(['right', 'bottom']).width(60).height('auto').marginRight(15).marginBottom(15)
      .children([
        asvListPlayer.getView('head').isImage().position(['right', 'bottom']).width(50).height(50).marginBottom(245).radius(30).toJSON(),
        asvListPlayer.getView('like').isImage().position(['right', 'bottom']).width(50).height(45).marginBottom(185).radius(0).toJSON(),
        asvListPlayer.getView('likeText').isText().position(['right', 'bottom']).width(50).height(20).marginBottom(165).textAlign('center').fontSize(14).toJSON(),
        asvListPlayer.getView('commit').isImage().position(['right', 'bottom']).width(50).height(50).marginBottom(111).radius(0).toJSON(),
        asvListPlayer.getView('commitText').isText().position(['right', 'bottom']).width(50).height(20).marginBottom(90).textAlign('center').fontSize(14).toJSON(),
        asvListPlayer.getView('share').isImage().position(['right', 'bottom']).width(50).height(50).marginBottom(38).radius(0).toJSON(),
        asvListPlayer.getView('shareText').isText().position(['right', 'bottom']).width(50).height(20).marginBottom(15).textAlign('center').fontSize(14).toJSON(),
      ])
      .toJSON(),
      asvListPlayer.getView('titleBox').isLayer().position(['left', 'bottom']).width(screenWidth * 0.6).height(100).bgc('#55000000').marginLeft(15).marginBottom(15).radius(10)
      .children([
        asvListPlayer.getView('userBox').isLayer().position(['left']).width('100%').height('auto').marginLeft(10).marginTop(10)
        .children([
          asvListPlayer.getView('userIcon').isImage().position('left').width(15).height(15).marginTop(3).radius(10).toJSON(),
          asvListPlayer.getView('userName').isText().position('left').width('100%').height(20).lines(2).color('#ffffff').marginLeft(20).toJSON(),
        ])
        .toJSON(),
        asvListPlayer.getView('title').isText().position('left').width('100%').height('auto').color('#ffffff').marginLeft(10).marginTop(35).marginBottom(10).fontSize(14).marginRight(10).toJSON(),
      ])
      .toJSON(),
    ]
    this.asvListPlayer.setViewConfig({ views })
    // 这是初始化视频数据
    this.onRefresh();
    // 这是初始化控件的监听器
    this.asvListPlayer.on('onClick', this.onClick)
    this.asvListPlayer.on('onLoadMore', this.onLoadMore)
    this.asvListPlayer.on('onRefresh', this.onRefresh)
  })
}

在demo中提供的mounted函数中,主要划分为3个阶段,对于3个阶段的代码注释我已经写在其中了。主要的流程是先使用用new asvListPlayer(this.$refs.listPlayer)的方式初始化仿抖音控件,然后通过提供的asvListPlayer.getView的方法构建界面布局对象,this.asvListPlayer.setViewConfig将布局信息绑定到控件中,然后通过初始化视频数据和初始化控件监听器完成业务逻辑。


初始化视频数据

上面我们提到demo用的是this.onRefresh()初始化视频数据,现在我们上俩段代码解析一下控件初始化视频数据都需要执行那些操作。

onRefresh() {
  this.list = []
  this.presetCur = 0
  var datas = []
  this.genData().forEach(item => {
    let data = asvListPlayer.getItem(item.i)
    .video(item.v)
    .cover(item.c)
    .bindImage('head', 'https://ss2.bdstatic.com/70cFvnSh_Q1YnxGkpoWK1HF6hhy/it/u=3533321036,2623280788&fm=15&gp=0.jpg', true)
    .bindImage('like', item.like ? 'https://files.qiadoo.com/CareBoBo/Common/2021/05/17/c94c1a75-094a-482a-9acf-f1eefbd24792.png':'https://files.qiadoo.com/CareBoBo/Common/2021/05/17/5a17a78c-f923-41f3-8916-271b4d5d528f.png')
    .bindText('likeText', parseInt((item.i * 1 + 1) * (new Date().getTime()) / 1000000000000) + '.4w')
    .bindImage('commit', 'https://files.qiadoo.com/CareBoBo/Common/2021/05/17/003910f2-92cf-40c5-9d8a-870401be6e41.png')
    .bindText('commitText', parseInt((item.i * 1 + 1) * (new Date().getTime()) / 10000000000) + '')
    .bindImage('share', 'https://files.qiadoo.com/CareBoBo/Common/2021/05/17/353edf1a-c2f1-481a-87fc-b9d5df98fb9e.png')
    .bindText('shareText', '分享')
    .bindText('userName', `UserName`)
    .bindImage('userIcon', 'https://files.qiadoo.com/CareBoBo/Common/2021/05/17/89898f94-c3b8-4e14-9d06-7ccb1f27d3ab.png')
    .bindText('title', `这是第${item.i * 1}个视频,悄悄是离别的笙箫,沉默是今晚的康桥,再别康桥,再见我终将逝去的青春,愿一切安好,愿你永远都在。`)
    .toJSON()
    datas.push(data)
  })
  this.asvListPlayer.loadDatas(datas)
}
点击并拖拽以移动
genData () {
  let len = this.list.length
  let presetDatas = [
    { v: 'http://txfile-30121.sz.gfp.tencent-cloud.com/1603991410685_8240447_29b1d0770d6cdf43a1dd1fd3a992f96f.mp4', c: 'http://txfile-30121.sz.gfp.tencent-cloud.com/1604043258739_635757_8fd725d85d2b42ad1a8d878ef286d0bf.png' },
    { v: 'http://txfile-30121.sz.gfp.tencent-cloud.com/1611758544058_4702548_5047449b104091e5dd3acfa00ed7eb99.mp4', c: 'http://txfile-30121.sz.gfp.tencent-cloud.com/1611758623279_1481920_89d5f27064f39fee56e663b050d28d8c.png' },
    { v: 'http://txfile-30121.sz.gfp.tencent-cloud.com/1604048716240_10046019_6566a337a503919c68f36a9fad9537b0.mp4', c: 'http://txfile-30121.sz.gfp.tencent-cloud.com/1604048732088_557815_c24e7f6276e650174494aa805fd7e45f.jpg' },
    { v: 'http://txfile-30121.sz.gfp.tencent-cloud.com/1604048722437_2185711_6da27ea482ecb28c549250d09c5abdf1.mp4', c: 'http://txfile-30121.sz.gfp.tencent-cloud.com/1604048734024_824230_198eb706d2052ddea6c2814adfe8d798.jpg' },
  ]
  let newDatas = []
  for (let i = len; i < len + 10; i++) {
    let item = JSON.parse(JSON.stringify(presetDatas[this.presetCur]))
    item.i = i + ''
    item.like = item.i % 3 === 0
    newDatas.push(item)
    this.presetCur = this.presetCur + 1
    if (this.presetCur >= presetDatas.length) {
      this.presetCur = 0
    }
  }
  this.list = this.list.concat(newDatas)
  return newDatas
},


结合俩段代码我们可以看到,onRefresh函数通过getItem的方法,将获取到的ajax数据构建成为视频对象,然后通过loadDatas方法传入给控件,使得控件可以正常渲染视频,这里我们主要就来看看genData方法。

genData方法采用一个非常简单的方式构造假的ajax数据,这样我们改造起来方便很多,我们只需要把他改成promise的形式,然后通过axios异步获取数据之后重新构造即可,废话不多说,我们直接po出来俩个函数的改造结果。

async onRefresh() {
  uni.showLoading()
  this.list = []
  this.presetCur = 0
  var datas = []
  // 这里注意我没有用try catch,因为我直接用我本地服务器测试的
  let ajaxDatas = await this.genData()
  ajaxDatas.forEach(item => {
    let data = asvListPlayer.getItem(item.i)
    .video(item.v)
    .cover(item.c)
    .bindImage('head', 'https://ss2.bdstatic.com/70cFvnSh_Q1YnxGkpoWK1HF6hhy/it/u=3533321036,2623280788&fm=15&gp=0.jpg', true)
    .bindImage('like', item.like ? 'https://files.qiadoo.com/CareBoBo/Common/2021/05/17/c94c1a75-094a-482a-9acf-f1eefbd24792.png':'https://files.qiadoo.com/CareBoBo/Common/2021/05/17/5a17a78c-f923-41f3-8916-271b4d5d528f.png')
    .bindText('likeText', parseInt((item.i * 1 + 1) * (new Date().getTime()) / 1000000000000) + '.4w')
    .bindImage('commit', 'https://files.qiadoo.com/CareBoBo/Common/2021/05/17/003910f2-92cf-40c5-9d8a-870401be6e41.png')
    .bindText('commitText', parseInt((item.i * 1 + 1) * (new Date().getTime()) / 10000000000) + '')
    .bindImage('share', 'https://files.qiadoo.com/CareBoBo/Common/2021/05/17/353edf1a-c2f1-481a-87fc-b9d5df98fb9e.png')
    .bindText('shareText', '分享')
    .bindText('userName', `UserName`)
    .bindImage('userIcon', 'https://files.qiadoo.com/CareBoBo/Common/2021/05/17/89898f94-c3b8-4e14-9d06-7ccb1f27d3ab.png')
    .bindText('title', `这是第${item.i * 1}个视频,悄悄是离别的笙箫,沉默是今晚的康桥,再别康桥,再见我终将逝去的青春,愿一切安好,愿你永远都在。`)
    .toJSON()
    datas.push(data)
  })
  this.asvListPlayer.loadDatas(datas)
  uni.hideLoading()
}
点击并拖拽以移动
async genData () {
  return new Promise(resolve => {
      let list = await new axios({
        url: 'http://192.168.0.25:8080/api/getVideoList',
      type: 'post'
    })
    // 这里axios会包一层data,所以需要这样处理
    list = list.data
    let retList = []
    list.forEach(item => {
        retList.push({ 
        v: item.videoUrl, 
        c: item.coverUrl,
        i: item.id,
        like: item.likes
      })
    })
    resolve(retList)
  })
},

这里通过给俩个方法加上async/await,以及给genData加上Promise返回,这样我们就可以无痛的改造让demo支持ajax获取视频数据,对于分页获取,也就是onLoadMore的改造也是如此。

监听控件点击

mounted () {
    this.asvListPlayer.on('onClick', this.onClick)
}
点击并拖拽以移动
onClick({ type, data }) {
  uni.showToast({
    icon: 'none',
    position: 'bottom',
    title: '您点击了第' + (data.position + 1) + '个视频的控件,控件名为:' + data.id
  })
  let index = data.position
  let [item] = this.list.filter((R,I) => I === index)
  switch (data.id) {
    case 'like':
      item.like = !item.like
      this.asvListPlayer.setItemData(index,asvListPlayer.getItem(item.i)
                                     .video(item.v)
                                     .cover(item.c)
                                     .bindImage('head', 'https://ss2.bdstatic.com/70cFvnSh_Q1YnxGkpoWK1HF6hhy/it/u=3533321036,2623280788&fm=15&gp=0.jpg', true)
                                     .bindImage('like', item.like ? 'https://files.qiadoo.com/CareBoBo/Common/2021/05/17/c94c1a75-094a-482a-9acf-f1eefbd24792.png':'https://files.qiadoo.com/CareBoBo/Common/2021/05/17/5a17a78c-f923-41f3-8916-271b4d5d528f.png')
                                     .bindText('likeText', parseInt((item.i * 1 + 1) * (new Date().getTime()) / 1000000000000) + '.4w')
                                     .bindImage('commit', 'https://files.qiadoo.com/CareBoBo/Common/2021/05/17/003910f2-92cf-40c5-9d8a-870401be6e41.png')
                                     .bindText('commitText', parseInt((item.i * 1 + 1) * (new Date().getTime()) / 10000000000) + '')
                                     .bindImage('share', 'https://files.qiadoo.com/CareBoBo/Common/2021/05/17/353edf1a-c2f1-481a-87fc-b9d5df98fb9e.png')
                                     .bindText('shareText', '分享66')
                                     .bindText('userName', `UserName`)
                                     .bindImage('userIcon', 'https://files.qiadoo.com/CareBoBo/Common/2021/05/17/89898f94-c3b8-4e14-9d06-7ccb1f27d3ab.png')
                                     .bindText('title', `这是第${item.i * 1}个视频,悄悄是离别的笙箫,沉默是今晚的康桥,再别康桥,再见我终将逝去的青春,愿一切安好,愿你永远都在。`)
                                     .toJSON())
      break
    case 'commit':
      this.showBottomPopover = true
      break
    case 'share':
      uni.showActionSheet({
        itemList: ['分享到微信']
      })
      break
  }
}


在这里的话,控件用的是事件回调的方式,通过onClick返回事件信息,data.id就是我们setViewConfig的时候传入的asvListPlayer.getView('head')这里的字符串,也就是唯一id,我们可以通过id判断用户点击了什么,从而响应对应的事件,甚至是通过setItemData刷新视频的控件布局视频,比如点赞成功之类的。


为了方便我这里本地接口还是复制黏贴官方demo提供的链接地址,大家有需要的可以自己用实际数据测试,测试下感觉流畅度还是蛮ok的,但是要注意以下几点。

  1. 因为这用了自定义原生控件,因此必须使用nvue界面布局
  2. 在使用.bindText('commitText', '666')绑定文字的时候,传入的必须是String类型,一开始我传入Number就直接渲染不出来了
  3. 视频不能使用m3u8这种,最好是使用mp4,毕竟mp4才是标准的移动视频格式。


posted @ 2021-12-18 22:33  智密科技  阅读(1177)  评论(0编辑  收藏  举报