转载:https://blog.kuangstudy.com/index.php/archives/520/
一.什么是依赖注入(DI)
-
依赖注入(Dependency Injection,DI)。
-
依赖 : 指Bean对象的创建依赖于容器 . Bean对象的依赖资源 .
-
注入 : 指Bean对象所依赖的资源 , 由容器来设置和装配 .
1.依赖注入的三种方式:
-
构造器注入:前面已经说过
-
Set方式注入
-
拓展方式注入
2.Set方式注入
依赖注入:
-
依赖:bean对象的创建依赖于容器
-
注入:bean对象中的所有属性,由容器注入!
(1)项目搭建:
复杂类型Adress类
 1 public class Address {
 2
 3     private String address;
 4
 5     public String getAddress() {
 6         return address;
 7     }
 8
 9     public void setAddress(String address) {
10         this.address = address;
11     }
12
13     @Override
14     public String toString() {
15         return "Address{" +
16                 "address='" + address + '\'' +
17                 '}';
18     }
19 }
真实对象Student类
 1 public class Student {
 2
 3     private String name;
 4     private Address address;
 5     private String[] books;
 6     private List<String> hobbys;
 7     private Map<String, String> card;
 8     private Set<String> games;
 9     private String wife;
10     private Properties info;
11
12     public String getName() {
13         return name;
14     }
15
16     public void setName(String name) {
17         this.name = name;
18     }
19
20     public Address getAddress() {
21         return address;
22     }
23
24     public void setAddress(Address address) {
25         this.address = address;
26     }
27
28     public String[] getBooks() {
29         return books;
30     }
31
32     public void setBooks(String[] books) {
33         this.books = books;
34     }
35
36     public List<String> getHobbys() {
37         return hobbys;
38     }
39
40     public void setHobbys(List<String> hobbys) {
41         this.hobbys = hobbys;
42     }
43
44     public Map<String, String> getCard() {
45         return card;
46     }
47
48     public void setCard(Map<String, String> card) {
49         this.card = card;
50     }
51
52     public Set<String> getGames() {
53         return games;
54     }
55
56     public void setGames(Set<String> games) {
57         this.games = games;
58     }
59
60     public String getWife() {
61         return wife;
62     }
63
64     public void setWife(String wife) {
65         this.wife = wife;
66     }
67
68     public Properties getInfo() {
69         return info;
70     }
71
72     public void setInfo(Properties info) {
73         this.info = info;
74     }
75
76     @Override
77     public String toString() {
78         return "Student{" +
79                 "name='" + name + '\'' +
80                 ", address=" + address.toString() +
81                 ", books=" + Arrays.toString(books) +
82                 ", hobbys=" + hobbys +
83                 ", card=" + card +
84                 ", games=" + games +
85                 ", wife='" + wife + '\'' +
86                 ", info=" + info +
87                 '}';
88     }
89
90 }
beans.xml
<?xml version="1.0" encoding="UTF-8"?>
<beans xmlns="http://www.springframework.org/schema/beans"
       xmlns:xsi="http://www.w3.org/2001/XMLSchema-instance"
       xsi:schemaLocation="http://www.springframework.org/schema/beans
        https://www.springframework.org/schema/beans/spring-beans.xsd">

    <bean id="address" class="ustc.wzh.pojo.Address"></bean>

    <bean id="student" class="ustc.wzh.pojo.Student">
        <!--1.普通值注入,value-->
        <property name="name" value="小王"></property>
    </bean>


</beans>
测试类MyTest.java
 1 public class MyTest {
 2
 3     public static void main(String[] args) {
 4         ApplicationContext context = new ClassPathXmlApplicationContext("beans.xml");
 5
 6         Student student = (Student) context.getBean("student");
 7
 8         System.out.println(student.getAddress());
 9     }
10 }
(2)注入详解
 1 <?xml version="1.0" encoding="UTF-8"?>
 2 <beans xmlns="http://www.springframework.org/schema/beans"
 3        xmlns:xsi="http://www.w3.org/2001/XMLSchema-instance"
 4        xsi:schemaLocation="http://www.springframework.org/schema/beans
 5         https://www.springframework.org/schema/beans/spring-beans.xsd">
 6
 7     <bean id="address" class="ustc.wzh.pojo.Address">
 8         <property name="address" value="合肥"></property>
 9     </bean>
10
11     <bean id="student" class="ustc.wzh.pojo.Student">
12         <!--1.普通值注入,value-->
13         <property name="name" value="小王"></property>
14         <!--2.Bean对象注入,ref-->
15         <property name="address" ref="address"></property>
16         <!--3.数组注入,array,value-->
17         <property name="books">
18             <array>
19                 <value>语文</value>
20                 <value>数学</value>
21                 <value>英语</value>
22                 <value>科学</value>
23             </array>
24         </property>
25         <!--4.list注入,list,value-->
26         <property name="hobbys">
27             <list>
28                 <value>写代码</value>
29                 <value>看动漫</value>
30                 <value>看电影</value>
31                 <value>打篮球</value>
32             </list>
33         </property>
34         <!--5.map注入,map,entry,key,value-->
35         <property name="card">
36             <map>
37                 <entry key="身份证" value="12131231321"></entry>
38                 <entry key="学生证" value="45644654646"></entry>
39                 <entry key="银行卡" value="79797979797"></entry>
40             </map>
41         </property>
42         <!--6.set注入,set,value-->
43         <property name="games">
44             <set>
45                 <value>LOL</value>
46                 <value>COC</value>
47                 <value>BOB</value>
48             </set>
49         </property>
50         <!--7.null注入,null(注意空值“”和null不同)-->
51         <property name="wife">
52             <null></null>
53         </property>
54         <!--8.Properties注入,props,prop,key-->
55         <property name="info">
56             <props>
57                 <prop key="学号">123456789</prop>
58                 <prop key="性别">男</prop>
59                 <prop key="姓名">小王</prop>
60             </props>
61         </property>
62     </bean>
63
64
65 </beans>
3.拓展方式注入
两种方式:
-
p命名空间注入:用于属性注入,有无参构造函数
-
导入约束 : xmlns:p="http://www.springframework.org/schema/p"
-
c命名空间注入:有参构造函数注入
-
导入约束 : xmlns:c="http://www.springframework.org/schema/c"
userbeans.xml
<?xml version="1.0" encoding="UTF-8"?>
<beans xmlns="http://www.springframework.org/schema/beans"
       xmlns:xsi="http://www.w3.org/2001/XMLSchema-instance"
       xmlns:p="http://www.springframework.org/schema/p"
       xmlns:c="http://www.springframework.org/schema/c"
       xsi:schemaLocation="http://www.springframework.org/schema/beans
        https://www.springframework.org/schema/beans/spring-beans.xsd">


    <!--P(属性: properties)命名空间 , 属性依然要设置set方法-->
    <bean id="user" class="ustc.wzh.pojo.User" p:name="小王" p:age="24"></bean>

    <!--C(构造: Constructor)命名空间 , 属性依然要设置set方法-->
    <bean id="user2" class="ustc.wzh.pojo.User" c:name="小王" c:age="18"/>

</beans>
二.Bean的作用域
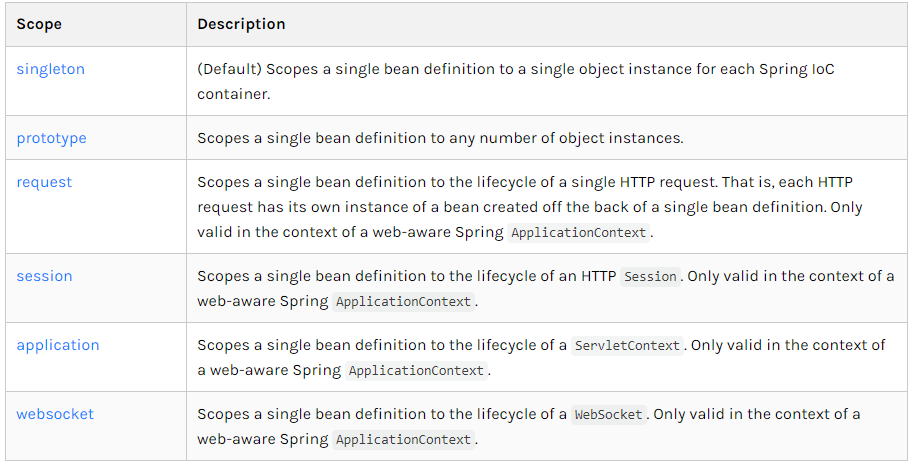
1.六种作用域

2.Singleton单例模式(默认就是单例)
- 当一个bean的作用域为Singleton,那么Spring IoC容器中只会存在一个共享的bean实例,并且所有对bean的请求,只要id与该bean定义相匹配,则只会返回bean的同一实例。Singleton是单例类型,就是在创建起容器时就同时自动创建了一个bean的对象,不管你是否使用,他都存在了,每次获取到的对象都是同一个对象。注意,Singleton作用域是Spring中的缺省作用域。要在XML中将bean定义成singleton,可以这样配置:
1 <bean id="ServiceImpl" class="cn.csdn.service.ServiceImpl" scope="singleton">
@Test
public void test03(){
    ApplicationContext context = new ClassPathXmlApplicationContext("applicationContext.xml");
    User user = (User) context.getBean("user");
    User user2 = (User) context.getBean("user");
    System.out.println(user==user2);  //true
}
3.Prototype原型模式
- 当一个bean的作用域为Prototype,表示一个bean定义对应多个对象实例。Prototype作用域的bean会导致在每次对该bean请求(将其注入到另一个bean中,或者以程序的方式调用容器的getBean()方法)时都会创建一个新的bean实例。Prototype是原型类型,它在我们创建容器的时候并没有实例化,而是当我们获取bean的时候才会去创建一个对象,而且我们每次获取到的对象都不是同一个对象。根据经验,对有状态的bean应该使用prototype作用域,而对无状态的bean则应该使用singleton作用域。在XML中将bean定义成prototype,可以这样配置:创建多个对象
<bean id="account" class="com.foo.DefaultAccount" scope="prototype"/>
4.其余的request、session、application这些都只能在web开发中使用到!


