
Flink
Flink
流处理与批处理最大不同在于数据传输方式:
- 流处理:一条数据被处理完成后序列化到缓存,然后传输到下一个节点处理(一条一条)
- 批处理:数据处理完成后缓存到内存,缓存写满后持久化硬盘,所有数据处理完成后再传输到下一个节点(一批一批)
Flink以固定的缓存块为单位进行网络数据传输,用户可以通过缓存块超时值指定缓存块的传输时机。
如果缓存块的超时值为0,则Flink的数据传输方式类似前面所说的流处理系统的标准模型,此时系统可以获得最低的处理延迟
如果缓存块的超时值为无限大,则Flink的数据传输方式类似前面所说的批处理系统的标准模型,此时系统可以获得最高的吞吐量
开发环境
需要 maven 依赖 org.apache.flink.flink-java / flink-streaming-java / flink-clients 等包用于开发依赖。
如果需要日志,还要添加 slf4j 的依赖和配置
mvn
<dependency>
  <groupId>org.apache.flink</groupId>
  <artifactId>flink-java</artifactId>
  <version>1.16.1</version>
  <scope>provided</scope>
</dependency>
<dependency>
  <groupId>org.apache.flink</groupId>
  <artifactId>flink-streaming-java_2.12</artifactId>
  <version>1.16.1</version>
  <scope>provided</scope>
</dependency>
<dependency>
  <groupId>org.apache.flink</groupId>
  <artifactId>flink-scala_2.12</artifactId>
  <version>1.16.1</version>
  <scope>provided</scope>
</dependency>
<dependency>
  <groupId>org.apache.flink</groupId>
  <artifactId>flink-streaming-scala_2.12</artifactId>
  <version>1.16.1</version>
  <scope>provided</scope>
</dependency>
<dependency>
    <groupId>org.apache.flink</groupId>
    <artifactId>flink-clients_2.12</artifactId>
    <version>1.16.1</version>
</dependency>
开发流程:
- 获得执行环境
- 加载/创建初始化数据
- 指定操作数据的transaction算子
- 指定数据目的地
- 调用 execute() 触发执行程序(flink是延迟计算的,只有调用execute才会真正触发)
例子:Streaming WordCount,通过Socket实时产生一些单词,使用flink实时接收数据,对指定窗口时间内数据进行聚合统计
流处理 word count
package org.example.bigdata.scala

import org.apache.flink.streaming.api.scala.StreamExecutionEnvironment
import org.apache.flink.streaming.api.windowing.time.Time

object SocketWindowWordCountScala {
  def main(args: Array[String]): Unit = {
    // 获取运行环境
    val env = StreamExecutionEnvironment.getExecutionEnvironment

    // 连接 socket 获取输入数据
    val text = env.socketTextStream("localhost", 9001)

    // 处理数据
    // 注意:此处必须添加隐式转化代码,否则 flatmap 方法报错
    import org.apache.flink.api.scala._
    val wordCount = text.flatMap(_.split(" "))  // 按照空格分割
      .map((_, 1))                                      // 转化为 (_, 1) 格式
      .keyBy(tup => tup._1)                             // 根据第一列分组
      .timeWindow(Time.seconds(2))             // 时间窗口为2秒
      //.sum(1)
      .reduce((t1, t2) => (t1._1, t1._2 + t2._2))        // 聚合操作

    // 使用一个线程打印
    wordCount.print().setParallelism(1)

    // 执行程序
    env.execute("job name")
  }
}
批处理 word count
 package org.example.bigdata.scala

import org.apache.flink.api.scala.ExecutionEnvironment

object BatchWordCountScala {
  def main(args: Array[String]): Unit = {

    val env = ExecutionEnvironment.getExecutionEnvironment
    // 需要 hadoop-client 的mvn依赖,否则无法访问 hdfs
    val text = env.readTextFile("hdfs://hostname:9000/hello.txt")

    import org.apache.flink.api.scala._
    val wordCount = text.flatMap(_.split(" "))
      .map((_, 1))
      .groupBy(0)
      .sum(1)
      .setParallelism(1)        // 设置并行度为1保证所有数据写入一个文件,方便查看结果,默认并行度为cpu核数

    wordCount.writeAsCsv("hdfs://hostname:9000/hello.txt", "\n"/*行分隔符*/, " "/*列分隔符*/)
    env.execute("JobName")
  }
}
maven 打包配置
 <build>
    <plugins>
        <!-- 编译插件 -->
        <plugin>
            <groupId>org.apache.maven.plugins</groupId>
            <artifactId>maven-compiler-plugin</artifactId>
            <version>3.6.0</version>
            <configuration>
                <source>1.8</source>
                <target>1.8</target>
                <encoding>UTF-8</encoding>
            </configuration>
        </plugin>
        <!-- scala编译插件 -->
        <plugin>
            <groupId>net.alchim31.maven</groupId>
            <artifactId>scala-maven-plugin</artifactId>
            <version>3.1.6</version>
            <configuration>
                <scalaCompatVersion>2.12</scalaCompatVersion>
                <scalaVersion>2.12.11</scalaVersion>
                <encoding>UTF-8</encoding>
            </configuration>
            <executions>
                <execution>
                    <id>compile-scala</id>
                    <phase>compile</phase>
                    <goals>
                        <goal>add-source</goal>
                        <goal>compile</goal>
                    </goals>
                </execution>
                <execution>
                    <id>test-compile-scala</id>
                    <phase>test-compile</phase>
                    <goals>
                        <goal>add-source</goal>
                        <goal>testCompile</goal>
                    </goals>
                </execution>
            </executions>
        </plugin>
        <!-- 打jar包插件(会包含所有依赖) -->
        <plugin>
            <groupId>org.apache.maven.plugins</groupId>
            <artifactId>maven-assembly-plugin</artifactId>
            <version>2.6</version>
            <configuration>
                <descriptorRefs>
                    <descriptorRef>jar-with-dependencies</descriptorRef>
                </descriptorRefs>
                <archive>
                    <manifest>
                        <!-- 可以设置jar包的入口类(可选) -->
                        <mainClass></mainClass>
                    </manifest>
                </archive>
            </configuration>
            <executions>
                <execution>
                    <id>make-assembly</id>
                    <phase>package</phase>
                    <goals>
                        <goal>single</goal>
                    </goals>
                </execution>
            </executions>
        </plugin>
    </plugins>
</build>
安装
单独的flink集群
主从架构,依赖 jdk 和 ssh免密登录,节点的配置文件一致
# conf/flink-conf.yaml
jobmanager.rpc.address: Address  # 指定本节点别名或IP
# conf/master 指定master节点
MasterServer:8081# conf/worders 指定从节点
SlaveAddress01
SlaveAddress02通过 bin/start-cluster.sh 在主节点启动集群,通过8081端口访问 web UI
ON YARN
使用客户端方式直接向hadoop集群提交任务,无需单独启动flink进程,依赖 Hadoop 2.4.1 及以上。两种部署方式,建议使用第二种,任务间是相互隔离的。
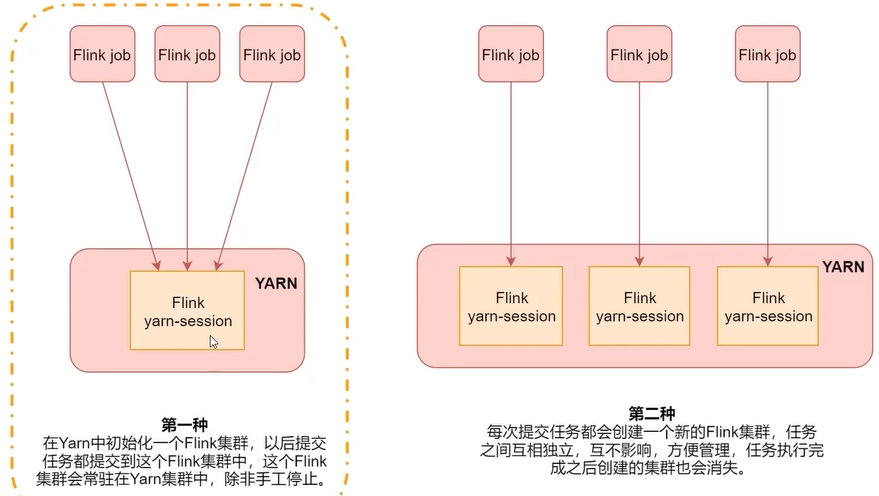
方式一
- 在HADOOP集群节点上解压 flink
- 创建一个长时间运行的 Flink 集群,通过环境变量
export HADOOP_CLASSPATH=`${HADOOP_HOME}/bin/hadoop classpath`找到hadoop
通过命令bin/yarn-session.sh -jm 1024m -tm 1024m -d在后台创建一个主从节点内存都为1024M的flink集群 - 使用 flink run 命令提交命令
提交自带案例bin/flink run examples/batch/WordCount.jar会自动到yarn集群中寻找flink并执行
方式二
先配置环境变量 HADOOP_CLASSPATH,执行 bin/flink run -m yarn-cluster -c jar包入口类 -yjm 1024 -ytm 1024 examples/batch/WordCount.jar -p 并行度 创建零时Flink集群并提交任务,在Yarn中主从节点内存都是1024,默认查找本机 /tmp/.yarn-properties-root 中节点信息。使用 yarn-session.sh 中参数时要加上前缀y。
将任务通过 mvn clean package -DskipTests 进行打包,然后提交
关闭任务
使用 yarn application -kill ID 停止flink集群,或者在 web UI 中关闭,或者 bin/flink cancel -yid flink任务id
查看已停止任务日志
修改 config/flink.yml 文件,指定
jobmanager.archive.fs.dir: hdfs://hadoop-server:9000/flink-history-jobs/
historyserver.web.address: 192.168.56.121
historyserver.web.port: 8082
historyserver.archive.fs.dir: hdfs://hadoop-server:9000/flink-history-jobs/
historyserver.archive.fs.refresh-interval: 1000
通过 bin/historyserver.sh start 启动历史日志进程,使用 HADOOP_HOME/bin/mapred --daemon start historyserver 启动yarn历史进程
Flink 核心 API
4种api
- SQL
- Table API
- DataStream / DataSet API
- Stateful Stream Processing
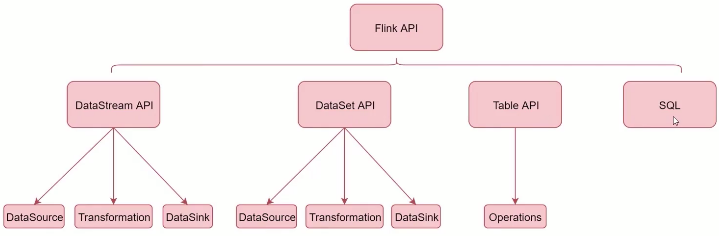
DataStream API
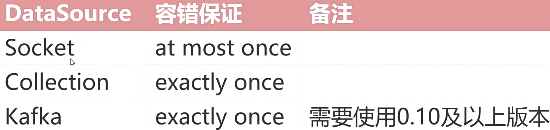
- DataSource
内置基于socket、Collection的数据源,也有一批Connectors,可读取第三方数据源
- Transformation
- DataSink
可通过 writeAsText() 写入文件,也可通过 print() 打印,也可写入第三方组件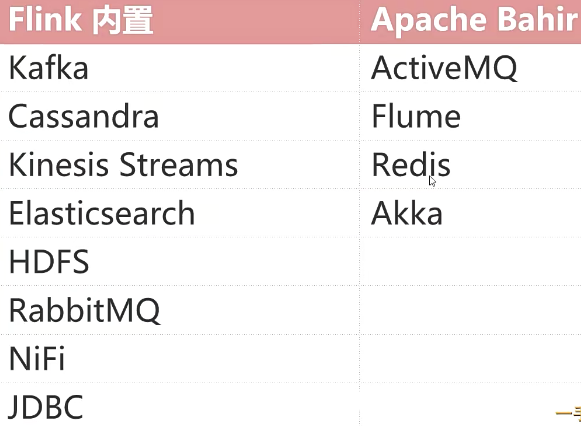
import org.apache.flink.api.scala._
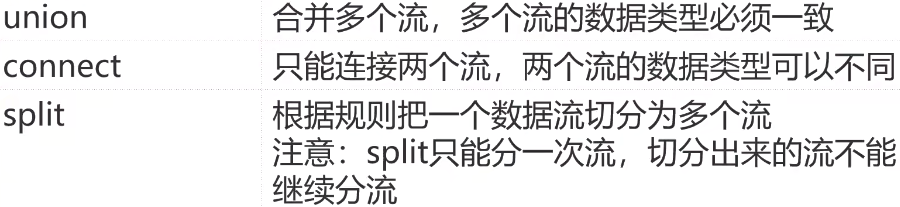
/************** union *****************/
// 通过集合获得数据源,一般用于测试
val val1 = env.fromCollection(Array(1, 2, 3, 4, 5))
val val2 = env.fromCollection(Array(6,7,8,9,10))
// 合并流,多种数据源的数据类型必须一致,处理规则也一致
val unionStream = val1.union(val2)
/******************** connect ******************/
// 两个流的数据类型不同,将两种格式数据统一成一种格式
val val1 = env.fromElements("user:tom,age:18")
val val2 = env.fromElements("user:jack age:20")
// 连接2个流,注意:只能是两个
val connectStream = val1.connect(val2)
connectStream.map(new CoMapFunction[String /*第一个流的数据类型*/, String /*第二个流的数据类型*/, String /*数据的返回类型*/] {
override def map1(in1: String): String = {
in1.replace(",", "-")
}
override def map2(in2: String): String = {
in2.replace(" ", "-")
}
})
/********************* 将一个流分割,此api支持多重分割 ************************/
val text = env.fromCollection(Array(1,2,3,4,5,6,7))
// 按照数据奇偶性分流数据
// 先定义两个sideoutput保存切分出的数据
val outputTag1 = new OutputTag[Int]("even")
val outputTag2 = new OutputTag[Int]("odd")
// process 属于flink种低级api
val outputStream = text.process(new ProcessFunction[Int, Int] {
override def processElement(value: Int, context: ProcessFunction[Int, Int]#Context, collector: Collector[Int]): Unit = {
if (value % 2 == 0) {
context.output(outputTag1, value)
} else {
context.output(outputTag2, value)
}
}
})
val evenStream = outputStream.getSideOutput(outputTag1)
evenStream.print().setParallelism(1)
env.execute("Socket Word Count")
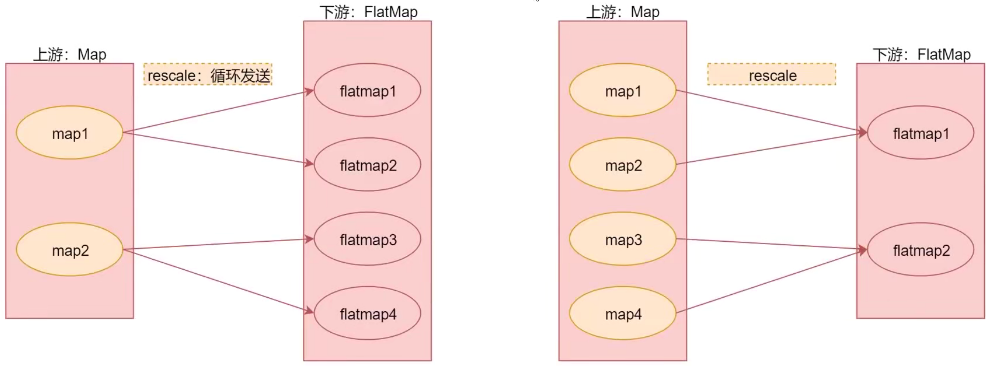
分区
分区算子指定如何将上游数据分发到下游分区: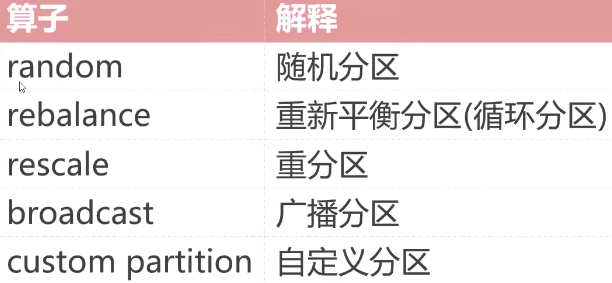
val text = env.fromCollection(Array(1,2,3,4,5,6,7))

text.shuffle   // 随机分区
text.rebalance // 轮流给各个子分区传输值,可处理数据倾斜,全量重分区
text.rescale   // 上游分区和下游分区相绑定,与rebalance类似
text.broadcast // 上游数据分发给下游所有分区 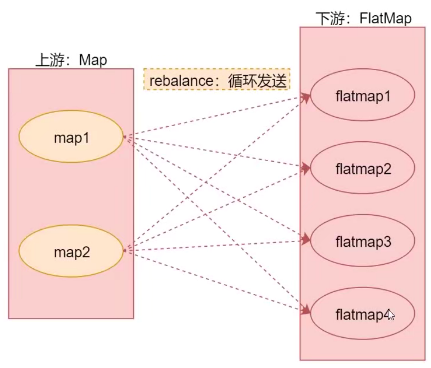
Flink 写入 redis
先添加依赖
<!-- https://mvnrepository.com/artifact/org.apache.bahir/flink-connector-redis -->
<dependency>
    <groupId>org.apache.bahir</groupId>
    <artifactId>flink-connector-redis_2.12</artifactId>
    <version>1.1.0</version>
</dependency>
package org.example.bigdata.scala
import org.apache.flink.streaming.api.scala.{StreamExecutionEnvironment}
import org.apache.flink.streaming.connectors.redis.RedisSink
import org.apache.flink.streaming.connectors.redis.common.config.FlinkJedisPoolConfig
import org.apache.flink.streaming.connectors.redis.common.mapper.{RedisCommand, RedisCommandDescription, RedisMapper}
import org.apache.flink.api.scala._
object SocketWordCountScala {
def main(args: Array[String]): Unit = {
val env = StreamExecutionEnvironment.getExecutionEnvironment
val text = env.fromCollection(Array(1,2,3,4,5,6,7))
val data = text.map(i => ("redis_list_name", i.toString))
// 添加 redis sink
val config = new FlinkJedisPoolConfig.Builder().setHost("localhost").setPort(9000).build()
val redisSink = new RedisSink[(String, String)](config, new MyRedisMapper)
data.addSink(redisSink)
env.execute("Socket Word Count")
}
class MyRedisMapper extends RedisMapper[(String, String)] {
// 具体操作命令
override def getCommandDescription: RedisCommandDescription = {
new RedisCommandDescription(RedisCommand.LPUSH)
}
// 获取key
override def getKeyFromData(t: (String, String)): String = {
t._1
}
// 获取 value
override def getValueFromData(t: (String, String)): String = {
t._2
}
}
}DataSet API
- DataSource
常用基于集合 fromCollection(Collection) 进行测试,基于文件 readTextFile(path) 读取hdfs文件进行批处理 - Transformation
与 DataStream 类似
注意其中 mapPartition 是处理每个分区的数据,使用在其中打开数据库链接,实现每个分区中创建一次链接
注意:如果调用 count collect print,则最后无需指定env.execute() - DataSink
最常用writeAsText()writeAsCSV()写入hadoop,print() 进行打印
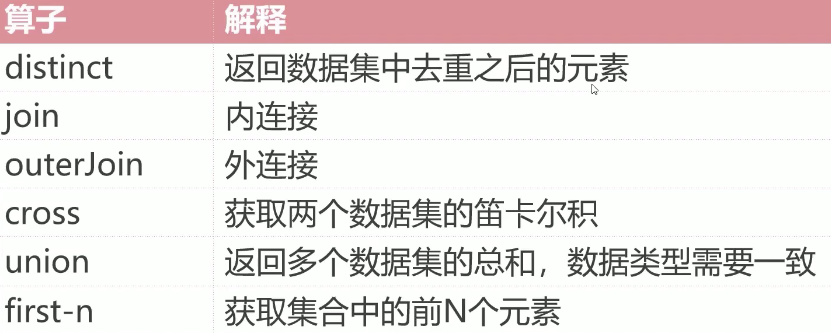
outJoin 分左连接、右连接、全连接3种情况
object BatchJoinScala {
  def main(args: Array[String]): Unit = {
    val env = ExecutionEnvironment.getExecutionEnvironment
    val text1 = env.fromCollection(Array((1, "jack"), (2, "tom"), (3, "jerry")))
    val text2 = env.fromCollection(Array((1, "bj"), (2, "sh"), (4, "sz")))

    text1.join(text2)
      // 此处实现了类似 on fieldA=fieldB
      .where(0/*leftKey*/)
      .equalTo(0/*rightKey*/){(first, second) => {
        (first._1, first._2, second._2)
      }}.print()
      //    (1, jack, bj)
      //    (2, tom, sh)

    // text1.fullOuterJoin(text2)
    text1.leftOuterJoin(text2)
      .where(0)
      .equalTo(0){(first, second) => {
        if (second==null) {
          (first._1, first._2, "null")
        } else {
          (first._1, first._2, second._2)
        }
      }}.print()
    // (3,jerry,null)
    // (1,jack,bj)
    // (2,tom,sh)
  }
}
Table API & SQL
开发依赖:
<!-- https://mvnrepository.com/artifact/org.apache.flink/flink-table-api-java-bridge -->
<dependency>
    <groupId>org.apache.flink</groupId>
    <artifactId>flink-table-api-java-bridge</artifactId>
    <version>1.16.1</version>
    <scope>provided</scope>
</dependency>
<!-- https://mvnrepository.com/artifact/org.apache.flink/flink-table-api-scala-bridge -->
<dependency>
    <groupId>org.apache.flink</groupId>
    <artifactId>flink-table-api-scala-bridge_2.12</artifactId>
    <version>1.16.1</version>
</dependency>

<!-- 用于支持在本地IDE种运行 -->
<!-- https://mvnrepository.com/artifact/org.apache.flink/flink-table-planner-blink -->
<dependency>
    <groupId>org.apache.flink</groupId>
    <artifactId>flink-table-planner-blink_2.12</artifactId>
    <version>1.13.6</version>
    <scope>test</scope>
</dependency>
其核心是Table,可作为输入和输出,可以和 DataStream DataSet 进行转换
package org.example.bigdata.scala

import org.apache.flink.table.api.{EnvironmentSettings, TableEnvironment}
import org.apache.flink.table.api._

object TableAPIAndSQLOpScala {
  def main(args: Array[String]): Unit = {
    val sSettings = EnvironmentSettings.newInstance().inStreamingMode().build()
    val sTableEnv = TableEnvironment.create(sSettings)

    // 创建输入表
    val sqlCreateTable =
      """
        |create table myTable(
        | id int,
        | name string,
        |) with (
        | 'connector.type' = 'filesystem',
        | 'connector.path' = 'D:\\tmp.csv',
        | 'format.type' = 'csv'
        |)
        |""".stripMargin
    sTableEnv.executeSql(sqlCreateTable)

    // 使用 tableAPI 实现数据查询和过滤
    val result = sTableEnv.from("myTable")
      .select($"id", $"name")
      .filter($"id" > 1)

    // 使用 SQL 进行查询和过滤
    val result2 = sTableEnv.sqlQuery(
      """
        |select id,name from myTable where id > 1
        |""".stripMargin)

    result.execute().print()

    // 创建输出表
    sTableEnv.executeSql(
      """
        |create table saveTable(
        |  id int,
        |  name string
        |) with (
        | 'connector.type' = 'filesystem',
        | 'connector.path' = 'D:\\data\\res',
        | 'format.type' = 'csv'
        |)
        |""".stripMargin)
    // 将查询结果保存到输出表
    result2.executeInsert("saveTable")
  }
}
DataStream转换为Table
package org.example.bigdata.scala

import org.apache.flink.streaming.api.scala.StreamExecutionEnvironment
import org.apache.flink.table.api.EnvironmentSettings
import org.apache.flink.table.api.bridge.scala.StreamTableEnvironment
import org.apache.flink.api.scala._
import org.apache.flink.table.api._

object DatastreamToTableScala {
  def main(args: Array[String]): Unit = {
    val ssEnv = StreamExecutionEnvironment.getExecutionEnvironment
    val ssSettings = EnvironmentSettings.newInstance().inStreamingMode().build()
    val ssTableEnv = StreamTableEnvironment.create(ssEnv, ssSettings)

    val stream = ssEnv.fromCollection(Array((1, "jack"), (2, "tom"), (3, "jerry")))

    // 此处 ‘id 和 $"id"一样
    ssTableEnv.createTemporaryView("myTable", stream, 'id, 'name)
    ssTableEnv.sqlQuery("select * from myTable where id > 1").execute().print()

    val table = ssTableEnv.fromDataStream(stream, $"id", $"name")
    table.select('id, 'name)
      .filter($"id" > 1)
      .execute()
      .print()
  }
}
流式查询结果Table会动态更新,因此转换动态查询的DataStream要对表的更新进行编码。将Table转换为DataStream方式:
- Append Mode:仅适用于动态表仅由INSERT 一种操作修改时,之前添加的数据不会被更新
- Retract Mode:使用一个Boolean标识编码INSERT和DELETE操作
package org.example.bigdata.scala
import org.apache.flink.streaming.api.scala.StreamExecutionEnvironment
import org.apache.flink.table.api.EnvironmentSettings
import org.apache.flink.table.api.bridge.scala.StreamTableEnvironment
import org.apache.flink.types.Row
import org.apache.flink.api.scala._
object TableToDatastream {
def main(args: Array[String]): Unit = {
val ssEnv = StreamExecutionEnvironment.getExecutionEnvironment
val ssSettings = EnvironmentSettings.newInstance().inStreamingMode().build()
val ssTableEnv = StreamTableEnvironment.create(ssEnv, ssSettings)
// 创建输入表
ssTableEnv.executeSql("""
|create table myTable(
| id int,
| name string,
|) with (
| 'connector.type' = 'filesystem',
| 'connector.path' = 'D:\\tmp.csv',
| 'format.type' = 'csv'
|)
|""".stripMargin)
// 获取table
val table = ssTableEnv.from("myTable")
// 只有增加操作,使用 toAppendStream
val appStream = ssTableEnv.toAppendStream[Row](table)
appStream.map(row => (row.getField(0).toString.toInt, row.getField(1).toString.toInt)).print()
val retStream = ssTableEnv.toRetractStream[Row](table)
retStream.map(tup => {
val flag = tup._1
val row = tup._2
val id = row.getField(0).toString.toInt
val name = row.getField(1).toString
(flag,id,name)
}).print()
// 注意:将table转换为DataStream后,要调用StreamExecutionEnvironment种execute方法
ssEnv.execute()
}
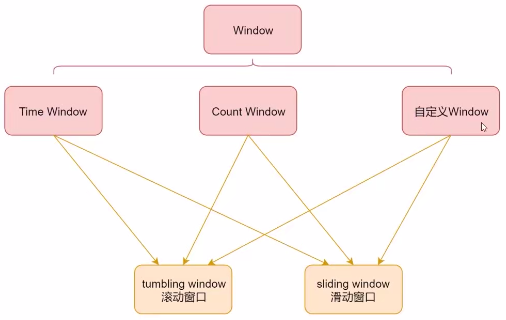
}Window & Time
window 是flink中将无界数据切割为有界数据的手段,
按照驱动方式划分:
- 时间驱动的 Time Window
- 数据驱动的 Count Window。
按移动方式划分:
- tumbling window 滚动窗口,没有重叠
- sliding window 滑动窗口,有重叠
timeWindow(Time.seconds(10))                  // 滚动窗口大小为10秒,聚合每10秒的数据
timeWindow(Time.seconds(10), Time.seconds(5)) // 滑动窗口大小为10秒,滑动间隔为5秒,每隔5秒计算前10秒的数据

countWindow(5)    // 滚动窗口大小为5
countWindow(5, 1) // 滑动窗口大小为5,滑动间隔为1,每新增1个元素则计算一次前5个
// TimeWindow 滚动窗口
    text.flatMap(_.split(" "))
      .map((_, 1))
      .keyBy(tup => tup._1)
      // 窗口大小为 5
      .timeWindow(Time.seconds(5))
      .sum(1)
      .print()

    // TimeWindow 滑动窗口
    text.flatMap(_.split(" "))
      .map((_, 1))
      .keyBy(tup => tup._1)
      // 窗口大小 5,每隔2秒滑动一次
      .timeWindow(Time.seconds(5), Time.seconds(2))
      .sum(1)
      .print()

    /*
     * 这里使用了keyBy 对数据分组,当分组对应的数据窗口达到5个元素,窗口被触发
     */
    // CountWindow 滚动窗口
    text.flatMap(_.split(" "))
      .map((_, 1))
      .keyBy(tup => tup._1)
      // 窗口大小 5
      .countWindow(5)
      .sum(1)
      .print()

    // CountWindow 滑动窗口
    text.flatMap(_.split(" "))
      .map((_, 1))
      .keyBy(tup => tup._1)
      // 窗口大小 5,每新增1个元素就更新一次
      .countWindow(5, 1)
      .sum(1)
      .print()

    // 自定义滚动 timeWindow 窗口
    text.flatMap(_.split(" "))
      .map((_, 1))
      .keyBy(tup => tup._1)
      // timeWindow
      .window(TumblingProcessingTimeWindows.of(Time.seconds(10)))
      .sum(1)
      .print()
window 还可以根据是否使用了 keytBy 操作细分
- 基于key的window,在调用 keyBy() 后可调用带有All的方法和 window() timeWindow() countWindow() 等不带有All的方法
- 不基于key的window,再调用 keyBy() 前只能调用 timeWindowAll() countWindowAll() 等带有All的方法
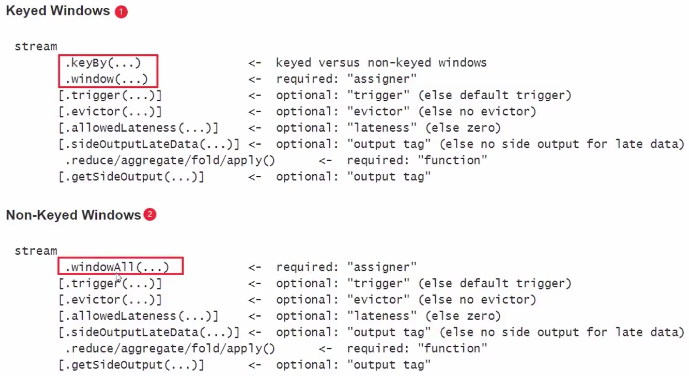
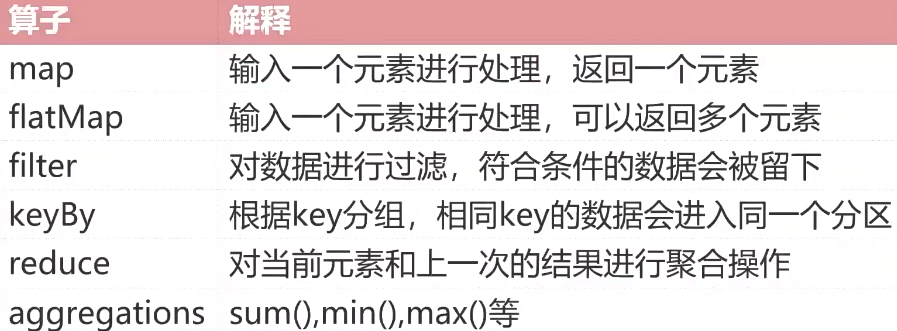
增量聚合 & 全量聚合
- 增量聚合:窗口每增加一条数据就计算一次,如 reduce() aggregate() sum() min() max()
- 全量聚合:属于窗口的数据到齐后才开始聚合计算,如 apply() process()
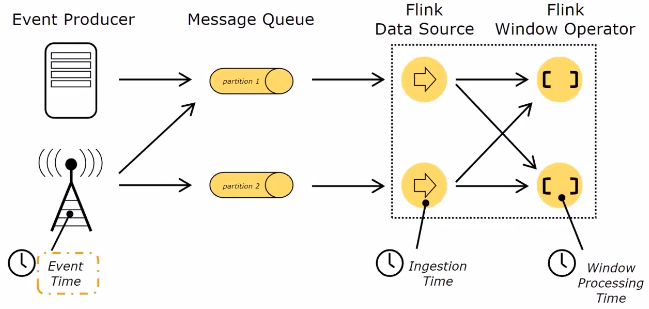
Time
- Event Time:事件产生时间,由事件中时间戳描述(1.12起,用这个为默认时间)
- Ingestion Time:事件进入Flink时间
- Processing Time:事件被处理时当前系统时间(更早版本使用此默认时间)
WaterMark
见 大数据经典论文解读 - 流式计算 - MillWhell - Dataflow - 某某人8265 - 博客园 (cnblogs.com) 低水位
window的设定无关数据本身,而是系统定义好的。输入数据根据自身的EventTime,将数据划分到不同window中,触发条件:
- Watermark >= window_end_time
- [window_start_time, window_end_time) 区间内有数据
package org.example.bigdata.scala

import org.apache.flink.api.common.eventtime.{SerializableTimestampAssigner, WatermarkStrategy}
import org.apache.flink.streaming.api.scala.StreamExecutionEnvironment
import org.apache.flink.api.scala._
import org.apache.flink.streaming.api.scala.function.WindowFunction
import org.apache.flink.streaming.api.windowing.assigners.TumblingEventTimeWindows
import org.apache.flink.streaming.api.windowing.time.Time
import org.apache.flink.streaming.api.windowing.windows.TimeWindow
import org.apache.flink.util.Collector

import java.text.SimpleDateFormat
import java.time.Duration
import scala.collection.mutable.ArrayBuffer
import scala.util.Sorting


object WatermarkOp {
  def main(args: Array[String]): Unit = {
    val env = StreamExecutionEnvironment.getExecutionEnvironment
    env.setParallelism(1)
    // 设置周期性自动产生watermark,默认值为200毫秒
    env.getConfig.setAutoWatermarkInterval(200)

    val text = env.socketTextStream("localhost", 9000)
    // 数据转化为tuple格式,第一列为具体数据,第二列为数据产生的时间戳
    val tupStream = text.map(line => {
      val arr = line.split(',')
      (arr(0), arr(1).toLong)
    })

    // 分配/提取 时间戳和watermark
    val watermarkStream = tupStream.assignTimestampsAndWatermarks(
      // 最大运行乱序时间为 10 秒
      WatermarkStrategy.forBoundedOutOfOrderness(Duration.ofSeconds(10)
      ).withTimestampAssigner(new SerializableTimestampAssigner[(String, Long)] {
          // 当前最大时间戳
          var currentMaxTimestamp = 0L
          private val format = new SimpleDateFormat("yyyy-MM-dd HH:mm:ss")
          // 从数据流抽取时间戳
          override def extractTimestamp(t: (String, Long), l: Long): Long = {
            currentMaxTimestamp = Math.max(currentMaxTimestamp, t._2)
            // 计算当前watermark,用于观察,没实际作用
            val currentWatermark = currentMaxTimestamp - 10000L
            println("eventTime: %s; currentMaxTimestamp: %s; currentWatermark: %s"
              .format(format.format(t._2), format.format(currentMaxTimestamp), format.format(currentWatermark)))
            t._2 // <=== 重要的只有这一句,用于选择 EventTime
          }
        })
    )

    watermarkStream.keyBy(tup => tup._1)
      // 按照消息的 EventTime 分配滚动窗口
      .window(TumblingEventTimeWindows.of(Time.seconds(3)))
      // 使用全量聚合处理 window 中数据
      .apply(new WindowFunction[(String, Long), String /*输出数据格式*/, String/*分组类型,即 keyBy 函数的返回*/,TimeWindow] {
        private val format = new SimpleDateFormat("yyyy-MM-dd HH:mm:ss")

        override def apply(key: String, window: TimeWindow, input: Iterable[(String, Long)], out: Collector[String]): Unit = {
          val arrBuf = ArrayBuffer[Long]()
          input.foreach(tup => {arrBuf.append(tup._2)})
          val arr = arrBuf.toArray
          // 将数据按照时间戳排序
          Sorting.quickSort(arr)
          val result = "key: %s; arr.length: %d; window: [ %s : %s ]; first: %s; last: %s".format(
            key, arr.length, format.format(window.getStart), format.format(window.getEnd),
            format.format(arr.head), format.format(arr.last))
          out.collect(result)
        }
      }).print()
    env.execute()
  }
}
// 在终端输入:
001,1790820682000
001,1790820686000
001,1790820692000
001,1790820693000
001,1790820694000
001,1790820695000
001,1790820696000
001,1790820697000
001,1790820699000
001,1790820691000 // 乱序数据
001,1790820703000
// 得到:
eventTime: 2026-10-01 10:11:22; currentMaxTimestamp: 2026-10-01 10:11:22; currentWatermark: 2026-10-01 10:11:12
eventTime: 2026-10-01 10:11:26; currentMaxTimestamp: 2026-10-01 10:11:26; currentWatermark: 2026-10-01 10:11:16
eventTime: 2026-10-01 10:11:32; currentMaxTimestamp: 2026-10-01 10:11:32; currentWatermark: 2026-10-01 10:11:22
eventTime: 2026-10-01 10:11:33; currentMaxTimestamp: 2026-10-01 10:11:33; currentWatermark: 2026-10-01 10:11:23
eventTime: 2026-10-01 10:11:34; currentMaxTimestamp: 2026-10-01 10:11:34; currentWatermark: 2026-10-01 10:11:24
key: 001; arr.length: 1; window: [ 2026-10-01 10:11:21 : 2026-10-01 10:11:24 ]; first: 2026-10-01 10:11:22; last: 2026-10-01 10:11:22
eventTime: 2026-10-01 10:11:35; currentMaxTimestamp: 2026-10-01 10:11:35; currentWatermark: 2026-10-01 10:11:25
eventTime: 2026-10-01 10:11:36; currentMaxTimestamp: 2026-10-01 10:11:36; currentWatermark: 2026-10-01 10:11:26
eventTime: 2026-10-01 10:11:37; currentMaxTimestamp: 2026-10-01 10:11:37; currentWatermark: 2026-10-01 10:11:27
key: 001; arr.length: 1; window: [ 2026-10-01 10:11:24 : 2026-10-01 10:11:27 ]; first: 2026-10-01 10:11:26; last: 2026-10-01 10:11:26
eventTime: 2026-10-01 10:11:39; currentMaxTimestamp: 2026-10-01 10:11:39; currentWatermark: 2026-10-01 10:11:29
eventTime: 2026-10-01 10:11:31; currentMaxTimestamp: 2026-10-01 10:11:39; currentWatermark: 2026-10-01 10:11:29 // 这行输出对应乱序数据,可见当前最大时间戳和Watermark都没变
// 因为在指定的10秒内,所以可以处理这条乱序数据
eventTime: 2026-10-01 10:11:43; currentMaxTimestamp: 2026-10-01 10:11:43; currentWatermark: 2026-10-01 10:11:33
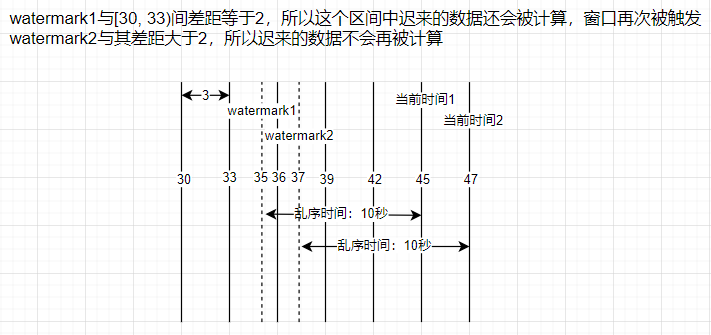
key: 001; arr.length: 2; window: [ 2026-10-01 10:11:30 : 2026-10-01 10:11:33 ]; first: 2026-10-01 10:11:31; last: 2026-10-01 10:11:32延迟数据的处理方式
- 丢弃(默认)
当 EventTime < Watermark 时丢弃数据 allowedLateness指定允许数据延迟时间
   watermarkStream.keyBy(tup => tup._1)
      .window(TumblingEventTimeWindows.of(Time.seconds(3)))
      // 允许数据迟到 2 秒
      .allowedLateness(Time.seconds(2))
窗口触发后,迟到的数据会再次触发这个窗口。数据所属的窗口的 window_end_time 要大于等于 Watermark-延时
- sideOutputLateData 收集迟到的数据
    val outputTag = new OutputTag[(String, Long)]("late-data") {}

    watermarkStream.keyBy(tup => tup._1)
      .window(TumblingEventTimeWindows.of(Time.seconds(3)))
      .sideOutputLateData(outputTag)
      ....

    val sideOutput = watermarkStream.getSideOutput(outputTag)
    sideOutput.print() // 可以输出到kafka、redis等介质中
window的触发时机:
- 第一次触发:watermark >= window_end_time
- 再有迟到的数据,如果满足 watermark < window_end_time + allowedLateness
并行度
一个flink任务由多个组件组成(DataSource、Transformation、DataSink),一个组件由多个并行的实例(线程)执行,一个组件并行实例(线程)数就是该组件的并行度。
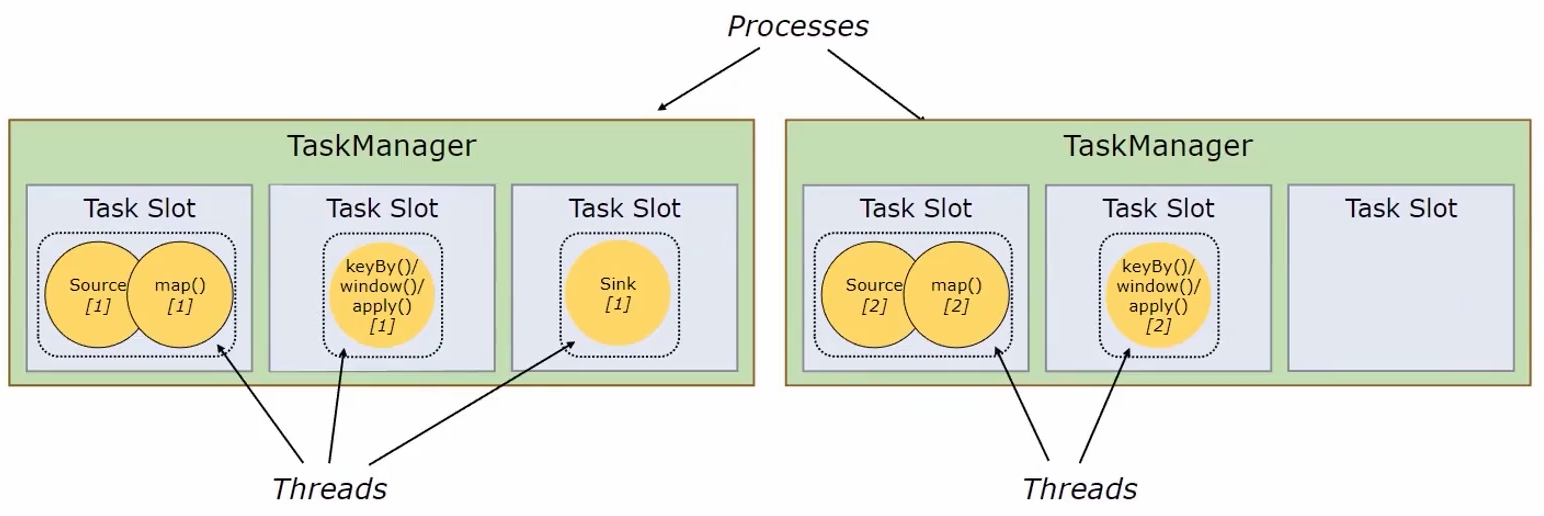
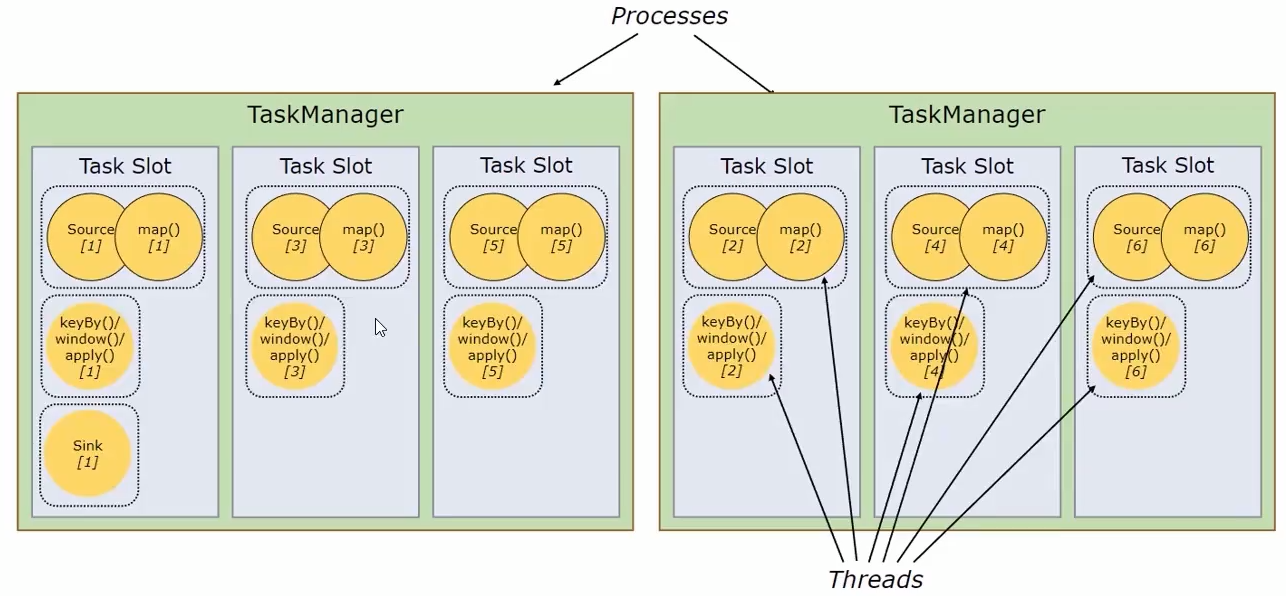
flink的TaskManager为集群提供slot,slot数量与cpu数成正比。TaskManager就是集群的一个从节点,slot就是其具有的并发执行能力,执行一些组件或算子。
通过配置文件 flink-conf.yaml 的 task manager.numberOfTaskSlots:3 指定每个节点拥有的slot数量
并行度设置
设置方法优先级由高至低为:
- 算子层面
直接在组件上调用setParallelism()方法即可 - 执行环境层面
在执行环境变量上调用env.setParallelism() - 客户端层面
在提交任务时通过 -p 参数动态指定 - 系统层面
在 flink-conf.yaml 文件中通过 parallelism.default 属性设置执行环境默认并行度
多并行度下Watermark应用
可通过代码 env.setParallelism(1) 设置并行度,多并行度下,每个分区都有一个单独的Watermark,每个分区也在不同的条件下分别触发窗口。
Flink Kafka-Connector
Kafka的Partition机制和Flink的并行度可以深度结合。
使用时需要添加mvn依赖:
<dependency>
    <groupId>org.apache.flink</groupId>
    <artifactId>flink-connector-kafka</artifactId>
    <version>1.17.0</version>
</dependency>
<dependency>
    <groupId>org.apache.flink</groupId>
    <artifactId>flink-connector-base</artifactId>
    <version>1.17.0</version>
</dependency>
flink 读取 kafka 数据
package org.example.bigdata.scala.stream

import org.apache.flink.api.common.serialization.SimpleStringSchema
import org.apache.flink.streaming.api.scala.StreamExecutionEnvironment
import org.apache.flink.streaming.connectors.kafka.FlinkKafkaConsumer
import org.apache.flink.api.scala._

import java.util.Properties

object KafkaSource {
  def main(args: Array[String]): Unit = {
    val env = StreamExecutionEnvironment.getExecutionEnvironment

    val topic = "topic01"
    val prop = new Properties()
    prop.setProperty("bootstrap.servers", "hostname01:9092,hostname02:9092")
    prop.setProperty("group.id", "group01")
    val kafkaConsumer = new FlinkKafkaConsumer[String](topic, new SimpleStringSchema(), prop)

    // 默认消费策略,不设置这行也有同样的效果
    kafkaConsumer.setStartFromGroupOffsets()

    // 指定kafka作为source
    val text = env.addSource(kafkaConsumer)

    // 将读取的数据打印到控制台
    text
//      .map()
//      .reduce()
      .print()
    env.execute()
  }
}
Kafka Consumer 消费策略
- kafkaConsumer.setStartFromGroupOffsets()
根据 group.id 对应保存的 offset 开始消费,读取不到则根据 kafka 中 auto.offset.reset 读取 - kafkaConsumer.setStartFromEarliest()
- kafkaConsumer.setStartFromLatest()
从最早或最迟的记录开始消费,忽略 offset - kafkaConsumer.setStartFromTimestamp()
从指定时间戳开始消费 - kafkaConsumer.setStartFromSpecificOffsets()
手动指定topic与对应的分区数、起始位置
Kafka Consumer 的容错
主要使用 checkpoint 实现,根据配置周期性的基于流中各个算子任务的State生成快照并持久化。
开启CheckPoint时Consumer会定期将kafka的offset信息和其他算子任务的State信息一起保存。当Job失败重启时Flink从最近一次Checkpoint恢复数据并重新消费Kafka数据。
// 周期性 5 秒一次保存快照
env.enableCheckpointing(5000)
// 设置模式为.EXACTLY_ONCE (这是默认值) ,还可以设置为AT_LEAST_ONCE
env.getCheckpointConfig.setCheckpointingMode(CheckpointingMode.EXACTLY_ONCE)
// 确保两次Checkpoint之间有至少多少 ms的间隔(checkpoint最小间隔)
env.getCheckpointConfig.setMinPauseBetweenCheckpoints(500)
// Checkpoint必须在一分钟内完成,或者被丢弃(checkpoint的超时时间)
env.getCheckpointConfig.setCheckpointTimeout(60000)
// 同一时间只允许执行一个Checkpoint
env.getCheckpointConfig.setMaxConcurrentCheckpoints(1)
// 表示一旦Flink处理程序被cancel后,会保留Checkpoint数据,以便根据实际需要恢复到指定的Checkpoint
env.getCheckpointConfig.enableExternalizedCheckpoints(CheckpointConfig.ExternalizedCheckpointCleanup.RETAIN_ON_CANCELLATION)
env.setStateBackend(new RocksDBStateBackend("hdfs://hostname:9000/flink/checkpoints"),ture/*指定递增*/)
提供了3种保存方式
- MemoryStateBackend(不建议生产环境使用)
- FsStateBackend
- RocksDBStateBackend(推荐)
需要依赖:
<dependency>
    <groupId>org.apache.flink</groupId>
    <artifactId>flink-statebackend-rocksdb</artifactId>
    <version>1.17.0</version>
    <scope>provided</scope>
</dependency>
Kafka Consumer Offset 自动提交
根据Job是否开启checkpoint来进行区分:
- 关闭时,通过 enable.auto.commit 和 auto.commit.interval.ms 控制
- 开启时,执行CheckPoint时才会提交offset
savepoint
生产机制与checkpoint类似,但是需要用户手动生成或删除。生成或恢复的代价相比之下要高一些,适合用于升级Flink版本、修改任务图等工作。
Kafka Producer
package org.example.bigdata.scala.stream

import org.apache.flink.api.common.serialization.SimpleStringSchema
import org.apache.flink.streaming.api.scala.StreamExecutionEnvironment
import org.apache.flink.streaming.connectors.kafka.FlinkKafkaProducer
import org.apache.flink.streaming.connectors.kafka.internals.KafkaSerializationSchemaWrapper
import org.apache.flink.streaming.connectors.kafka.partitioner.FlinkFixedPartitioner

import java.util.Properties

object KafkaSink {
  def main(args: Array[String]): Unit = {
    val env = StreamExecutionEnvironment.getExecutionEnvironment

    val prop = new Properties()
    prop.setProperty("bootstrap.servers", "hostname01:9092,hostname02:9092")
    // 指定 kafka 作为sink
    val kafkaSink = new FlinkKafkaProducer[String](
      "topic01",
      new KafkaSerializationSchemaWrapper[String](
        "topic01",  // 写入主题名称
        null,  // 通过自定义分区器将数据写入指定topic的具体分区中,为null时随机写入分区,默认FlinkFixedPartitioner[]()将所有数据写入一个分区
        false, // 写数据时是否带时间戳,如果写入,在下一个flink的watermark的extractTimestamp()消费数据时,其时间戳参数可直接使用
        new SimpleStringSchema()
      ),
      prop,
      FlinkKafkaProducer.Semantic.EXACTLY_ONCE
    )
    val text = env.socketTextStream("hostname", 9000)
    text.addSink(kafkaSink)
    env.execute()
  }
}
通过semantic参数指定三种不同语义:
- Semantic.EXACTLY_ONCE(开启checkpoint机制后才可使用)
- Semantic.AT_LEAST_ONCE(默认)
- Semantic.NONE
flink默认事务超时时间为1小时,kafka默认事务超时时间为15分钟。
生产者超时时间大于消费超时时间,无法保证 EXACTLY_ONCE 语义


【推荐】国内首个AI IDE,深度理解中文开发场景,立即下载体验Trae
【推荐】编程新体验,更懂你的AI,立即体验豆包MarsCode编程助手
【推荐】抖音旗下AI助手豆包,你的智能百科全书,全免费不限次数
【推荐】轻量又高性能的 SSH 工具 IShell:AI 加持,快人一步
· TypeScript + Deepseek 打造卜卦网站:技术与玄学的结合
· Manus的开源复刻OpenManus初探
· AI 智能体引爆开源社区「GitHub 热点速览」
· 从HTTP原因短语缺失研究HTTP/2和HTTP/3的设计差异
· 三行代码完成国际化适配,妙~啊~