


MyBatis 重点知识归纳
一、MyBatis 简介
【1】MyBatis 是支持定制化 SQL,存储过程以及高级映射的优秀持久化框架。
【2】MyBatis 避免了几乎所有的 JDBC 代码和手动设置参数以及获取查询结果集。
【3】MyBatis 可以使用简单的 XML 或者注解用于配置和原始映射,将接口和 Java 的 POJO 映射成数据库中的记录。
二、为什么要是用 MyBatis
【1】MyBatis 是一个半自动的持久化框架。
【2】JDBC 缺点:SQL 夹在代码块里,耦合度高导致硬编码内伤。维护不易且实际开发中 SQL 是有变化的,频繁修改很常见。
【3】 Hibernate 和 JPA:复杂的 SQL 对于 Hibernate 而言很难处理,内部自动生成 SQL 不易特殊优化,基于全映射全自动框架,大量字段的 POJO 进行映射会比较困难,降低性能。
【4】对开发者而言,核心 SQL 还是掌握在自己手中比较好,方便优化。
【5】SQL 和 Java 编码分开,功能边界清晰,一个专注业务,一个专注数据库。
MyBatis 是面向接口编程的,所以每一个接口都对应一个 xml 映射文件书写 SQL 语句,接口的全类名对应 xml 的namespace,接口的方法名对应 xml 的 id。但是我们要获取实体类对象需要通过 session 的 getMapper(接口.class)
三、Mybatis配置文件用properties引入外部配置文件
在 MyBatis 配置文件中可以使用 properties 来引入外部 properties配置文件的内容:
<properties resource="dbconfig.properties"></properties>
四、settings 标签
这是 MyBatis 中极为重要的调整设置,他们会改变 MyBatis 的运行行为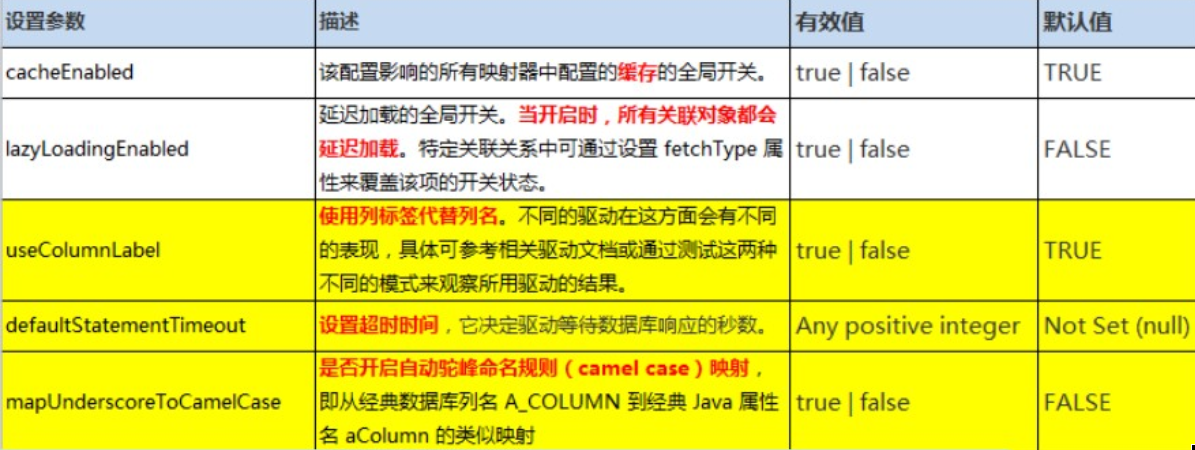
例如:驼峰命名(数据库中字段LAST_NAME,通过对象中的 lastName)。mybatis-config.xml中配置如下:
1 <settings>
2     <setting name="mapUnderscoreToCamelCase" value="true"></setting>
3 </settings>
五、mapper 映射配置
将写好的 SQL映射文件(EmployeeMapper.xml)一定注册到全局配置文件(mybatis-config.xml)中
 1 <!-- mappers:将sql映射注册到全局配置中 -->
 2 <mappers>
 3     <!--
 4         mapper:注册一个sql映射
 5             注册配置文件
 6             resource:引用类路径下的sql映射文件
 7                 mybatis/mapper/EmployeeMapper.xml
 8             url:引用网路路径或者磁盘路径下的sql映射文件
 9                 file:///var/mappers/AuthorMapper.xml
10
11             注册接口
12             class:引用(注册)接口,
13                 1、有sql映射文件,映射文件名必须和接口同名,并且放在与接口同一目录下;
14                 2、没有sql映射文件,所有的sql都是利用注解写在接口上;
15                 推荐:
16                     比较重要的,复杂的Dao接口我们来写sql映射文件
17                     不重要,简单的Dao接口为了开发快速可以使用注解;
18     -->
19     <!-- <mapper resource="mybatis/mapper/EmployeeMapper.xml"/> -->
20     <!-- <mapper class="com.atguigu.mybatis.dao.EmployeeMapperAnnotation"/> -->
21
22     <!-- 批量注册: -->
23     <package name="com.atguigu.mybatis.dao"/>
24 </mappers>
六、Mysql 获取自增主键的值
Mybatis 允许增删改直接定义以下类型返回值 Integer、Long(表示成功的个数)、Boolean、void;
1 <!--mysql支持自增主键,自增主键值的获取,mybatis也是利用statement.getGenreatedKeys();
2     useGeneratedKeys="true";使用自增主键获取主键值策略
3     keyProperty;指定对应的主键属性,也就是mybatis获取到主键值以后,将这个值封装给javaBean的哪个属性
4 -->
5 <insert id="addEmp" parameterType="com.atguigu.mybatis.bean.Employee"
6     useGeneratedKeys="true" keyProperty="id" databaseId="mysql">
7     insert into tbl_employee(last_name,email,gender)
8     values(#{lastName},#{email},#{gender})
9 </insert>
七、Oracle 不支持自增
Oracle 使用序列来模拟自增;获取非自增主键的值,每次插入的数据的主键是从序列中拿到的值;如何获取到这个值。
 1 <insert id="addEmp" databaseId="oracle" parameterType="com.atguigu.mybatis.bean.Employee">
 2     <!--
 3     keyProperty:查出的主键值封装给javaBean的哪个属性
 4     order="BEFORE":当前sql在插入sql之前运行
 5            AFTER:当前sql在插入sql之后运行
 6     resultType:查出的数据的返回值类型
 7
 8     BEFORE运行顺序:
 9         先运行selectKey查询id的sql;查出id值封装给javaBean的id属性
10         在运行插入的sql;就可以取出id属性对应的值
11      -->
12     <selectKey keyProperty="id" order="BEFORE" resultType="Integer">
13         <!-- 编写查询主键的sql语句 -->
14         select EMPLOYEES_SEQ.nextval from dual
15     </selectKey>
16
17     <!-- 插入时的主键是从序列中拿到的 -->
18     insert into employees(EMPLOYEE_ID,LAST_NAME,EMAIL)
19     values(#{id},#{lastName},#{email<!-- ,jdbcType=NULL -->})
20 </insert>
八、参数说明
【1】单个参数:Mybatis 不会做特殊处理,#{参数名/任意名}:取出参数值。
【2】多个参数:Mybatis 会做特殊处理。多个参数会被封装成 一个 Map,key:param1...paramN,或者参数的索引(0,1,2....)也可以,value:传入的参数值,#{} 就是从 map 中获取指定的 key 的值;
【命名参数】:明确指定封装参数时 map 的 key;@Param("id"),多个参数会被封装成 一个 Map,key:使用 @Param 注解指定的值;value:参数值; #{指定的key}取出对应的参数值;
public Employee getEmpByIdAndLastName(@Param("id")Integer id,@Param("lastName")String lastName);
POJO:如果多个参数正好是我们业务逻辑的数据模型,我们就可以直接传入 pojo; #{属性名}:取出传入的 pojo 的属性值;
Map:如果多个参数不是业务模型中的数据,没有对应的 pojo,不经常使用,为了方便,我们也可以传入map;#{key}:取出map 中对应的值;
TO:如果多个参数不是业务模型中的数据,但是经常要使用,推荐来编写一个TO(Transfer Object)数据传输对象;
1 Page{
2     int index;
3     int size;
4 }
九、 #{} 和 ${} 区别
都可以获取 Map 中的值或者 pojo 对象属性的值
1 select * from tbl_employee where id=${id} and last_name=#{lastName}
2 Preparing: select * from tbl_employee where id=2 and last_name=?
区别:【1】#{}:是以预编译的形式,将参数设置到 sql 语句中;PreparedStatement;防止 sql 注入;
【2】${}:取出的值直接拼装在 sql 语句中;会有安全问题;
【3】大多情况下,我们去参数的值都应该去使用 #{};
【4】原生 jdbc 不支持占位符的地方我们就可以使用 ${} 进行取值,比如分表、排序。。。;按照年份分表拆分;
select * from ${year}_salary where xxx;
select * from tbl_employee order by ${f_name} ${order}
十、#{} 更丰富的用法
规定参数的一些规则: javaType、jdbcType、 mode(存储过程)、numericScale、resultMap、typeHandler、jdbcTypeName、expression(未来准备支持的功能);
JdbcType 通常需要在某种特定的条件下被设置:
【1】 在我们数据为 null 的时候,有些数据库可能不能识别 Mybatis对 null的默认处理。比如Oracle(报错);
【2】Oracle 报:JdbcType OTHER:无效的类型;因为 Mybatis 对所有的 null 都映射的是原生 Jdbc 的 OTHER 类型,oracle 不能正确处理;
【3】由于全局配置中:jdbcTypeForNull=OTHER;oracle不支持;两种办法
1)、修改 xml 语句,也是最常用的方法:#{email,jdbcType=VARCHAR};
2)、修改 MyBatis 配置文件:
<setting name="jdbcTypeForNull" value="NULL"/>
十一、多条记录封装一个 map
Map<Integer,Employee>:键是这条记录的主键,值是记录封装后的 javaBean;@MapKey:告诉 Mybatis 封装这个 map 的时候使用哪个属性作为 map 的 key;
1 @MapKey("lastName")
2 public Map<String, Employee> getEmpByLastNameLikeReturnMap(String lastName);
EmployeeMapper.xml 中
1  <!--public Map<Integer, Employee> getEmpByLastNameLikeReturnMap(String lastName);  -->
2  <select id="getEmpByLastNameLikeReturnMap" resultType="com.atguigu.mybatis.bean.Employee">
3      select * from tbl_employee where last_name like #{lastName}
4  </select>
十二、常用标签
【1】resultMap 标签使用(常用)
 1 <resultMap type="com.atguigu.mybatis.bean.Employee" id="MySimpleEmp">
 2   <!--指定主键列的封装规则
 3   id定义主键会底层有优化;
 4   column:指定哪一列
 5   property:指定对应的javaBean属性
 6   -->
 7   <id column="id" property="id"/>
 8   <!-- 定义普通列封装规则 -->
 9   <result column="last_name" property="lastName"/>
10   <!-- 其他不指定的列会自动封装:我们只要写resultMap就把全部的映射规则都写上。 -->
11   <result column="email" property="email"/>
12   <result column="gender" property="gender"/>
13 </resultMap>
14
15 <!-- resultMap:自定义结果集映射规则;  -->
16 <!-- public Employee getEmpById(Integer id); -->
17 <select id="getEmpById"  resultMap="MySimpleEmp">
18     select * from tbl_employee where id=#{id}
19 </select>
【2】查询 Employee 的同时查询员工对应的部门,Employee===Department 一个员工有与之对应的部门信息;
 1 <!-- 使用association定义关联的单个对象的封装规则;-->
 2 <resultMap type="com.atguigu.mybatis.bean.Employee" id="MyDifEmp2">
 3     <id column="id" property="id"/>
 4     <result column="last_name" property="lastName"/>
 5     <result column="gender" property="gender"/>
 6
 7     <!--  association可以指定联合的javaBean对象
 8     property="dept":指定哪个属性是联合的对象
 9     javaType:指定这个属性对象的类型[不能省略]
10     -->
11     <association property="dept" javaType="com.atguigu.mybatis.bean.Department">
12         <id column="did" property="id"/>
13         <result column="dept_name" property="departmentName"/>
14     </association>
15 </resultMap>
16
17 <!--  public Employee getEmpAndDept(Integer id);-->
18 <select id="getEmpAndDept" resultMap="MyDifEmp">
19     SELECT e.id id,e.last_name last_name,e.gender gender,e.d_id d_id,
20     d.id did,d.dept_name dept_name FROM tbl_employee e,tbl_dept d
21     WHERE e.d_id=d.id AND e.id=#{id}
22 </select>
也可以通过对象.属性获取
1 <!--联合查询:级联属性封装结果集-->
2 <resultMap type="com.atguigu.mybatis.bean.Employee" id="MyDifEmp">
3     <id column="id" property="id"/>
4     <result column="last_name" property="lastName"/>
5     <result column="gender" property="gender"/>
6     <result column="did" property="dept.id"/>
7     <result column="dept_name" property="dept.departmentName"/>
8 </resultMap>
【3】使用 association 进行分步查询,涉及到两个 mapper。EmployeeMapper.xml 文件如下:
 1 <!-- 使用association进行分步查询:
 2     1、先按照员工id查询员工信息
 3     2、根据查询员工信息中的d_id值去部门表查出部门信息
 4     3、部门设置到员工中;
 5  -->
 6
 7  <!--  id  last_name  email   gender    d_id   -->
 8  <resultMap type="com.atguigu.mybatis.bean.Employee" id="MyEmpByStep">
 9     <id column="id" property="id"/>
10     <result column="last_name" property="lastName"/>
11     <result column="email" property="email"/>
12     <result column="gender" property="gender"/>
13     <!-- association定义关联对象的封装规则
14         select:表明当前属性是调用select指定的方法查出的结果
15         column:指定将哪一列的值传给这个方法
16
17         流程:使用select指定的方法(传入column指定的这列参数的值)查出对象,并封装给property指定的属性
18      -->
19     <association property="dept"
20         select="com.atguigu.mybatis.dao.DepartmentMapper.getDeptById"
21         column="d_id">
22     </association>
23  </resultMap>
24  <!--  public Employee getEmpByIdStep(Integer id);-->
25  <select id="getEmpByIdStep" resultMap="MyEmpByStep">
26     select * from tbl_employee where id=#{id}
27  </select>
DepatermentMapper.xml 文件
1 <mapper namespace="com.atguigu.mybatis.dao.DepartmentMapper">
2     <!--public Department getDeptById(Integer id);  -->
3     <select id="getDeptById" resultType="com.atguigu.mybatis.bean.Department">
4         select id,dept_name departmentName from tbl_dept where id=#{id}
5     </select>
6 </mapper>
十三、 可以使用延迟加载(懒加载)
(按需加载) Employee 中的 Dept 对象:不开启懒加载时,我们每次查询 Employee 对象的时候,都将全部信息查询出来。开启后部门信息在我们使用的时候再去查询;开启懒加载只需要在分段查询的基础之上加上两个配置:mybatis-config.xml中添加如下:
1 <settings>
2     <!--显示的指定每个我们需要更改的配置的值,即使他是默认的。防止版本更新带来的问题  -->
3     <setting name="lazyLoadingEnabled" value="true"/>
4     <setting name="aggressiveLazyLoading" value="false"/>
5 </settings>
十四、关联查询
查询部门的时候将部门对应的所有员工信息也查询出来:DepartmentMapper.xml 内容如下:
 1 <!--嵌套结果集的方式,使用collection标签定义关联的集合类型的属性封装规则  -->
 2 <resultMap type="com.atguigu.mybatis.bean.Department" id="MyDept">
 3     <id column="did" property="id"/>
 4     <result column="dept_name" property="departmentName"/>
 5     <!--
 6         collection定义关联集合类型的属性的封装规则
 7         ofType:指定集合里面元素的类型
 8     -->
 9     <collection property="emps" ofType="com.atguigu.mybatis.bean.Employee">
10         <!-- 定义这个集合中元素的封装规则 -->
11         <id column="eid" property="id"/>
12         <result column="last_name" property="lastName"/>
13         <result column="email" property="email"/>
14         <result column="gender" property="gender"/>
15     </collection>
16 </resultMap>
17 <!-- public Department getDeptByIdPlus(Integer id); -->
18 <select id="getDeptByIdPlus" resultMap="MyDept">
19     SELECT d.id did,d.dept_name dept_name,
20             e.id eid,e.last_name last_name,e.email email,e.gender gender
21     FROM tbl_dept d
22     LEFT JOIN tbl_employee e
23     ON d.id=e.d_id
24     WHERE d.id=#{id}
25 </select>
十五、collection:分段查询
与单个对象分段查询一致:
 1     <!-- collection:分段查询 -->
 2 <resultMap type="com.atguigu.mybatis.bean.Department" id="MyDeptStep">
 3     <id column="id" property="id"/>
 4     <id column="dept_name" property="departmentName"/>
 5     <collection property="emps"
 6         select="com.atguigu.mybatis.dao.EmployeeMapperPlus.getEmpsByDeptId"
 7         column="{deptId=id}" fetchType="lazy"><!--也可以传递多个条件,通过key=value键值对-->
 8     </collection>
 9 </resultMap>
10 <!-- public Department getDeptByIdStep(Integer id); -->
11 <select id="getDeptByIdStep" resultMap="MyDeptStep">
12     select id,dept_name from tbl_dept where id=#{id}
13 </select>
EmployeeMapper.xml 中被关联内容:
1 <select id="getEmpsByDeptId" resultType="com.atguigu.mybatis.bean.Employee">
2     select * from tbl_employee where d_id=#{deptId}
3 </select>
十六、鉴别器
通过对返回值的判断,取相应的值:
 1 <!-- <discriminator javaType=""></discriminator>
 2     鉴别器:mybatis可以使用discriminator判断某列的值,然后根据某列的值改变封装行为
 3     封装Employee:
 4         如果查出的是女生:就把部门信息查询出来,否则不查询;
 5         如果是男生,把last_name这一列的值赋值给email;
 6  -->
 7  <resultMap type="com.atguigu.mybatis.bean.Employee" id="MyEmpDis">
 8     <id column="id" property="id"/>
 9     <result column="last_name" property="lastName"/>
10     <result column="email" property="email"/>
11     <result column="gender" property="gender"/>
12     <!--
13         column:指定判定的列名
14         javaType:列值对应的java类型  -->
15     <discriminator javaType="string" column="gender">
16         <!--女生  resultType:指定封装的结果类型;不能缺少。/resultMap-->
17         <case value="0" resultType="com.atguigu.mybatis.bean.Employee">
18             <association property="dept"
19                 select="com.atguigu.mybatis.dao.DepartmentMapper.getDeptById"
20                 column="d_id">
21             </association>
22         </case>
23         <!--男生 ;如果是男生,把last_name这一列的值赋值给email; -->
24         <case value="1" resultType="com.atguigu.mybatis.bean.Employee">
25             <id column="id" property="id"/>
26             <result column="last_name" property="lastName"/>
27             <result column="email" property="email"/>
28             <result column="gender" property="gender"/>
29         </case>
30     </discriminator>
31  </resultMap>
十七、动态SQL
【1】if 标签的使用:
 1 <select id="getEmpsByConditionIf" resultType="com.atguigu.mybatis.bean.Employee">
 2     select * from tbl_employee
 3     <!-- where 或者给where后面加上1=1,以后的条件都and xxx.
 4         mybatis使用where标签来将所有的查询条件包括在内。mybatis就会将where标签中拼装的sql,多出来的and或者or去掉
 5         where只会去掉第一个多出来的and或者or。-->
 6     <where>
 7         <!-- test:判断表达式(OGNL)
 8         c:if  test从参数中取值进行判断,遇见特殊符号应该去写转义字符:&&:
 9         -->
10         <if test="id != null">
11             id=#{id}
12         </if>
13         <if test="lastName!=null && lastName!=''">
14             and last_name like #{lastName}
15         </if>
16         <if test="email!=null and email.trim()!=''">
17             and email=#{email}
18         </if>
19         <!-- ognl会进行字符串与数字的转换判断  "0"==0 -->
20         <if test="gender==0 or gender==1">
21             and gender=#{gender}
22         </if>
23     </where>
24  </select>
【2】choose 标签的使用:
 1 <select id="getEmpsByConditionChoose" resultType="com.atguigu.mybatis.bean.Employee">
 2     select * from tbl_employee
 3     <where>
 4         <!-- 如果带了id就用id查,如果带了lastName就用lastName查;只会进入其中一个 -->
 5         <choose>
 6             <when test="id!=null">
 7                 id=#{id}
 8             </when>
 9             <when test="lastName!=null">
10                 last_name like #{lastName}
11             </when>
12             <when test="email!=null">
13                 email = #{email}
14             </when>
15             <otherwise>
16                 gender = 0
17             </otherwise>
18         </choose>
19     </where>
20  </select>
【3】更新表时,set 标签的使用,可以去除多以的逗号。或者使用 trim 标签:
 1 <update id="updateEmp">
 2     <!-- Set标签的使用 -->
 3     update tbl_employee
 4     <set>
 5         <if test="lastName!=null">
 6             last_name=#{lastName},
 7         </if>
 8         <if test="email!=null">
 9             email=#{email},
10         </if>
11         <if test="gender!=null">
12             gender=#{gender}
13         </if>
14     </set>
15     where id=#{id}
16     <!--
17     Trim:更新拼串
18     update tbl_employee
19         <trim prefix="set" suffixOverrides=",">
20         <if test="lastName!=null">
21             last_name=#{lastName},
22         </if>
23         <if test="email!=null">
24             email=#{email},
25         </if>
26         <if test="gender!=null">
27             gender=#{gender},
28         </if>
29         </trim>
30     where id=#{id}  -->
31  </update>
【4】foreach 标签的使用:
 1 <select id="getEmpsByConditionForeach" resultType="com.atguigu.mybatis.bean.Employee">
 2     select * from tbl_employee
 3     <!--
 4         collection:指定要遍历的集合:
 5             list类型的参数会特殊处理封装在map中,map的key就叫list
 6         item:将当前遍历出的元素赋值给指定的变量
 7         separator:每个元素之间的分隔符
 8         open:遍历出所有结果拼接一个开始的字符
 9         close:遍历出所有结果拼接一个结束的字符
10         index:索引。遍历list的时候是index就是索引,item就是当前值
11                       遍历map的时候index表示的就是map的key,item就是map的值
12
13         #{变量名}就能取出变量的值也就是当前遍历出的元素
14       -->
15     <foreach collection="ids" item="item_id" separator=","
16         open="where id in(" close=")">
17         #{item_id}
18     </foreach>
19  </select>
也可以用于批量存储
 1 <!-- 批量保存 -->
 2 <!--public void addEmps(@Param("emps")List<Employee> emps);  -->
 3 <!--MySQL下批量保存:可以foreach遍历   mysql支持values(),(),()语法Oracle不支持此语法-->
 4 <insert id="addEmps">
 5     insert into tbl_employee(
 6         <include refid="insertColumn"></include>
 7     )
 8     values
 9     <foreach collection="emps" item="emp" separator=",">
10         (#{emp.lastName},#{emp.email},#{emp.gender},#{emp.dept.id})
11     </foreach>
12 </insert>
十八、Oracle 中支持的批量插入方法
 1 <!-- Oracle数据库批量保存:
 2     Oracle不支持values(),(),()
 3     Oracle支持的批量方式
 4     1、多个insert放在begin - end里面
 5         begin
 6             insert into employees(employee_id,last_name,email)
 7             values(employees_seq.nextval,'test_001','test_001@atguigu.com');
 8             insert into employees(employee_id,last_name,email)
 9             values(employees_seq.nextval,'test_002','test_002@atguigu.com');
10         end;
11     2、利用中间表:
12         insert into employees(employee_id,last_name,email)
13                select employees_seq.nextval,lastName,email from(
14                   select 'test_a_01' lastName,'test_a_e01' email from dual
15                   union
16                   select 'test_a_02' lastName,'test_a_e02' email from dual
17                   union
18                   select 'test_a_03' lastName,'test_a_e03' email from dual
19            )
20      -->
21  <insert id="addEmps" databaseId="oracle">
22      <!-- oracle第一种批量方式 -->
23      <!-- <foreach collection="emps" item="emp" open="begin" close="end;">
24          insert into employees(employee_id,last_name,email)
25             values(employees_seq.nextval,#{emp.lastName},#{emp.email});
26           </foreach> -->
27
28      <!-- oracle第二种批量方式  -->
29      insert into employees(
30          <!-- 引用外部定义的sql -->
31          <include refid="insertColumn">
32              <property name="testColomn" value="abc"/>
33          </include>
34      )
35              <foreach collection="emps" item="emp" separator="union"
36                  open="select employees_seq.nextval,lastName,email from("
37                  close=")">
38                  select #{emp.lastName} lastName,#{emp.email} email from dual
39              </foreach>
40  </insert>
十九、常用标签 sql 标签使用(用来抽取公共的部分):
 1 <!--
 2 抽取可重用的sql片段。方便后面引用
 3 1、sql抽取:经常将要查询的列名,或者插入用的列名抽取出来方便引用
 4 2、include来引用已经抽取的sql:
 5 3、include还可以自定义一些property,sql标签内部就能使用自定义的属性
 6         include-property:取值的正确方式${prop},
 7         #{不能使用这种方式}
 8 -->
 9 <sql id="insertColumn">
10     <if test="_databaseId=='oracle'">
11         employee_id,last_name,email
12     </if>
13     <if test="_databaseId=='mysql'">
14         last_name,email,gender,d_id
15     </if>
16 </sql>
通过 include 标签,引用此标签:
1 <insert id="addEmps">
2     insert into tbl_employee(
3         <include refid="insertColumn"></include>
4     )
5     values
6     <foreach collection="emps" item="emp" separator=",">
7         (#{emp.lastName},#{emp.email},#{emp.gender},#{emp.dept.id})
8     </foreach>
9  </insert>
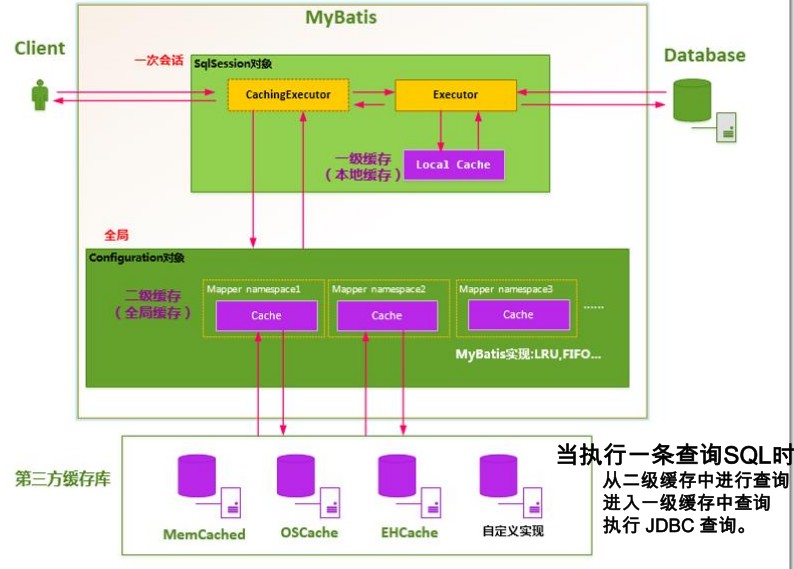
二十、缓存
一级缓存:(本地缓存):sqlSession 级别的缓存。一级缓存是一直开启的;SqlSession 级别的一个 Map 与数据库同一次会话期间查询到的数据会放在本地缓存中。以后如果需要获取相同的数据,直接从缓存中拿,没必要再去查询数据库;一级缓存失效情况(没有使用到当前一级缓存的情况,效果就是,还需要再向数据库发出查询):
【1】sqlSession 不同;
【2】sqlSession相同,查询条件不同。(当前一级缓存中还没有这个数据);
【3】sqlSession相同,两次查询之间执行了增删改操作(这次增删改可能对当前数据有影响);
【4】sqlSession相同,手动清除了一级缓存(缓存清空);
二级缓存:(全局缓存):基于 namespace 级别的缓存:一个 namespace 对应一个二级缓存:
工作机制:【1】一个会话,查询一条数据,这个数据就会被放在当前会话的一级缓存中;
【2】如果会话关闭;一级缓存中的数据会被保存到二级缓存中;新的会话查询信息,就可以参照二级缓存中的内容;
【3】sqlSession 会话中 EmployeeMapper 存储 Employee 对象的缓存;DepartmentMapper 存储 Department 对象的缓存;不同 namespace 查出的数据会放在自己对应的缓存中(map);
效果:数据会从二级缓存中获取,查出的数据都会被默认先放在一级缓存中。只有会话提交或者关闭以后,一级缓存中的数据才会转移到二级缓存中。
使用:【1】开启全局二级缓存配置:<setting name="cacheEnabled" value="true"/>
【2】去 mapper.xml 中配置使用二级缓存:<cache></cache>
<cache eviction="FIFO" flushInterval="60000" readOnly="false" size="1024"></cache>
【3】我们的 POJO 需要实现序列化接口;
二十一、缓存有关的设置/属性
【1】cacheEnabled=true:false:关闭缓存(二级缓存关闭)(一级缓存一直可用的)
<setting name="cacheEnabled" value="true"/>
【2】每个 select 标签都有 useCache="true":false:不使用缓存(一级缓存依然使用,二级缓存不使用)
【3】每个增删改标签的:flushCache="true":(一级二级都会清除);
增删改执行完成后就会清除缓存;flushCache="true":一级缓存就清空了;二级也会被清除;
查询标签默认:flushCache="false":如果 flushCache=true; 每次查询之后都会清空缓存;缓存是没有被使用的;
【4】sqlSession.clearCache(); 只是清除当前 session 的一级缓存;
【5】localCacheScope:本地缓存作用域:(一级缓存Session);当前会话的所有数据保存在会话缓存中;STATEMENT:可以禁用一级缓存;
二十二、第三方缓存整合
【1】导入第三方缓存包(ehcache-core-2.6.8.jar)即可;
【2】导入与第三方缓存整合的适配包(mybatis-ehcache-1.0.3.jar);官方有;
【3】mapper.xml 中使用自定义缓存
<cache type="org.mybatis.caches.ehcache.EhcacheCache"></cache>
【4】ehcache 使用需要 ehcache.xml文件
 1 <?xml version="1.0" encoding="UTF-8"?>
 2 <ehcache xmlns:xsi="http://www.w3.org/2001/XMLSchema-instance"
 3  xsi:noNamespaceSchemaLocation="../config/ehcache.xsd">
 4  <!-- 磁盘保存路径 -->
 5  <diskStore path="D:\44\ehcache" />
 6
 7  <defaultCache
 8    maxElementsInMemory="10000"
 9    maxElementsOnDisk="10000000"
10    eternal="false"
11    overflowToDisk="true"
12    timeToIdleSeconds="120"
13    timeToLiveSeconds="120"
14    diskExpiryThreadIntervalSeconds="120"
15    memoryStoreEvictionPolicy="LRU">
16  </defaultCache>
17 </ehcache>
18
19 <!--
20 属性说明:
21 l diskStore:指定数据在磁盘中的存储位置。
22 l defaultCache:当借助CacheManager.add("demoCache")创建Cache时,EhCache便会采用<defalutCache/>指定的的管理策略
23
24 以下属性是必须的:
25 l maxElementsInMemory - 在内存中缓存的element的最大数目
26 l maxElementsOnDisk - 在磁盘上缓存的element的最大数目,若是0表示无穷大
27 l eternal - 设定缓存的elements是否永远不过期。如果为true,则缓存的数据始终有效,如果为false那么还要根据timeToIdleSeconds,timeToLiveSeconds判断
28 l overflowToDisk - 设定当内存缓存溢出的时候是否将过期的element缓存到磁盘上
29
30 以下属性是可选的:
31 l timeToIdleSeconds - 当缓存在EhCache中的数据前后两次访问的时间超过timeToIdleSeconds的属性取值时,这些数据便会删除,默认值是0,也就是可闲置时间无穷大
32 l timeToLiveSeconds - 缓存element的有效生命期,默认是0.,也就是element存活时间无穷大
33  diskSpoolBufferSizeMB 这个参数设置DiskStore(磁盘缓存)的缓存区大小.默认是30MB.每个Cache都应该有自己的一个缓冲区.
34 l diskPersistent - 在VM重启的时候是否启用磁盘保存EhCache中的数据,默认是false。
35 l diskExpiryThreadIntervalSeconds - 磁盘缓存的清理线程运行间隔,默认是120秒。每个120s,相应的线程会进行一次EhCache中数据的清理工作
36 l memoryStoreEvictionPolicy - 当内存缓存达到最大,有新的element加入的时候, 移除缓存中element的策略。默认是LRU(最近最少使用),可选的有LFU(最不常使用)和FIFO(先进先出)
37  -->
二十三、Mybatis 使用缓存原理图
![]()
二十四、Spring 整合 MyBatis(除jar包外)
整理 application.xml 文件中整合部分代码,具体配置参考此文章:链接
 1 <!-- 整合mybatis
 2     目的:1、spring管理所有组件。mapper的实现类。
 3             service==>Dao   @Autowired:自动注入mapper;
 4         2、spring用来管理事务,spring声明式事务
 5 -->
 6 <!--创建出SqlSessionFactory对象  -->
 7 <bean id="sqlSessionFactoryBean" class="org.mybatis.spring.SqlSessionFactoryBean">
 8     <property name="dataSource" ref="dataSource"></property>
 9     <!-- configLocation指定全局配置文件的位置 -->
10     <property name="configLocation" value="classpath:mybatis-config.xml"></property>
11     <!--mapperLocations: 指定mapper文件的位置-->
12     <property name="mapperLocations" value="classpath:mybatis/mapper/*.xml"></property>
13 </bean>
14
15 <!--配置一个可以进行批量执行的sqlSession  -->
16 <bean id="sqlSession" class="org.mybatis.spring.SqlSessionTemplate">
17     <constructor-arg name="sqlSessionFactory" ref="sqlSessionFactoryBean"></constructor-arg>
18     <constructor-arg name="executorType" value="BATCH"></constructor-arg>
19 </bean>
20
21 <!-- 扫描所有的mapper接口的实现,让这些mapper能够自动注入;
22 base-package:指定mapper接口的包名
23  -->
24 <mybatis-spring:scan base-package="com.atguigu.mybatis.dao"/>
25 <!-- <bean class="org.mybatis.spring.mapper.MapperScannerConfigurer">
26     <property name="basePackage" value="com.atguigu.mybatis.dao"></property>
27 </bean> -->
二十五、了解知识点
【1】typeAliases:别名处理器:可以为Java类型起别名,别名不区分大小写。mybatis-config.xml中配置如下:
1 <!-- 1、typeAlias:为某个java类型起别名
2     type:指定要起别名的类型全类名;默认别名就是类名小写;employee
3     alias:指定新的别名-->
4 <typeAlias type="com.atguigu.mybatis.bean.Employee" alias="emp"/>
EmployeeMapper.xml 中配置 resultType 时就不用使用全类名。
1 <select id="getEmpById" resultType="emp">
2     select * from tbl_employee where id = #{id}
3 </select>
批量取别名:别名都是类名小写。
1 <!-- 2、package:为某个包下的所有类批量起别名
2     name:指定包名(为当前包以及下面所有的后代包的每一个类都起一个默认别名(类名小写),)
3 -->
4 <package name="com.atguigu.mybatis.bean"/>
批量取别名的问题,就是当一类包下有Employee,子包也包含Employee时会出现混乱,此问题可通过@Alias注解解决。
@Alias("emp")
public class Employee {
【2】environments 配置多个环境:default 指定使用某种环境。可以达到快速切换环境。environment:配置一个具体的环境信息;必须有两个标签;id代表当前环境的唯一标识
 1 <!-- transactionManager:事务管理器;
 2             type:事务管理器的类型;JDBC(JdbcTransactionFactory)|MANAGED(ManagedTransactionFactory)
 3                 自定义事务管理器:实现TransactionFactory接口.type指定为全类名
 4
 5         dataSource:数据源;
 6             type:数据源类型;UNPOOLED(UnpooledDataSourceFactory)
 7                         |POOLED(PooledDataSourceFactory)
 8                         |JNDI(JndiDataSourceFactory)
 9             自定义数据源:实现DataSourceFactory接口,type是全类名
10 -->
11 <environments default="dev_mysql">
12     <environment id="dev_mysql">
13         <transactionManager type="JDBC"></transactionManager>
14         <dataSource type="POOLED">
15             <property name="driver" value="${jdbc.driver}" />
16             <property name="url" value="${jdbc.url}" />
17             <property name="username" value="${jdbc.username}" />
18             <property name="password" value="${jdbc.password}" />
19         </dataSource>
20     </environment>
21
22     <environment id="dev_oracle">
23         <transactionManager type="JDBC" />
24         <dataSource type="POOLED">
25             <property name="driver" value="${orcl.driver}" />
26             <property name="url" value="${orcl.url}" />
27             <property name="username" value="${orcl.username}" />
28             <property name="password" value="${orcl.password}" />
29         </dataSource>
30     </environment>
31 </environments>
【3】databaseIdProvider:支持多数据库厂商。mybatis-config.xml中配置如下:
 1 <!-- type="DB_VENDOR":VendorDatabaseIdProvider
 2     作用就是得到数据库厂商的标识(驱动getDatabaseProductName()),mybatis就能根据数据库厂商标识来执行不同的sql;
 3     MySQL,Oracle,SQL Server,xxxx
 4 -->
 5 <databaseIdProvider type="DB_VENDOR">
 6     <!-- 为不同的数据库厂商起别名 -->
 7     <property name="MySQL" value="mysql"/>
 8     <property name="Oracle" value="oracle"/>
 9     <property name="SQL Server" value="sqlserver"/>
10 </databaseIdProvider>
在EmployeeMapper.xml中通过databaseId来与上面链接。
1 <select id="getEmpById" resultType="com.atguigu.mybatis.bean.Employee"
2     databaseId="mysql">
3     select * from tbl_employee where id = #{id}
4 </select>
【4】trim 标签的使用
 1 <select id="getEmpsByConditionTrim" resultType="com.atguigu.mybatis.bean.Employee">
 2     select * from tbl_employee
 3     <!-- 后面多出的and或者or where标签不能解决
 4     prefix="":前缀:trim标签体中是整个字符串拼串 后的结果。
 5             prefix给拼串后的整个字符串加一个前缀
 6     prefixOverrides="":
 7             前缀覆盖: 去掉整个字符串前面多余的字符
 8     suffix="":后缀
 9             suffix给拼串后的整个字符串加一个后缀
10     suffixOverrides=""
11             后缀覆盖:去掉整个字符串后面多余的字符
12
13     -->
14     <!-- 自定义字符串的截取规则 -->
15     <trim prefix="where" suffixOverrides="and">
16         <if test="id!=null">
17             id=#{id} and
18         </if>
19         <if test="lastName!=null && lastName!=""">
20             last_name like #{lastName} and
21         </if>
22         <if test="email!=null and email.trim()!=""">
23             email=#{email} and
24         </if>
25         <!-- ognl会进行字符串与数字的转换判断  "0"==0 -->
26         <if test="gender==0 or gender==1">
27             gender=#{gender}
28         </if>
29      </trim>
30  </select>
【5】内置参数 _parameter 和 _databaseid 的使用
 <!-- 两个内置参数:
不只是方法传递过来的参数可以被用来判断,取值。。。
mybatis默认还有两个内置参数:
_parameter:代表整个参数
    单个参数:_parameter就是这个参数
    多个参数:参数会被封装为一个map;_parameter就是代表这个map

_databaseId:如果配置了databaseIdProvider标签。
    _databaseId就是代表当前数据库的别名oracle
-->

<!--public List<Employee> getEmpsTestInnerParameter(Employee employee);  -->
<select id="getEmpsTestInnerParameter" resultType="com.atguigu.mybatis.bean.Employee">
    <!-- bind:可以将OGNL表达式的值绑定到一个变量中,方便后来引用这个变量的值 -->
    <bind name="_lastName" value="'%'+lastName+'%'"/>
    <if test="_databaseId=='mysql'">
        select * from tbl_employee
        <if test="_parameter!=null">
            where last_name like #{lastName}
        </if>
    </if>
    <if test="_databaseId=='oracle'">
        select * from employees
        <if test="_parameter!=null">
            where last_name like #{_parameter.lastName}
        </if>
    </if>
</select>
【6】bind 标签的使用
 1 <select id="getEmpsTestInnerParameter" resultType="com.atguigu.mybatis.bean.Employee">
 2     <!-- bind:可以将OGNL表达式的值绑定到一个变量中,方便后来引用这个变量的值 -->
 3     <bind name="_lastName" value="'%'+lastName+'%'"/>
 4     <if test="_databaseId=='mysql'">
 5         select * from tbl_employee
 6         <if test="_parameter!=null">
 7             where last_name like #{lastName}
 8         </if>
 9     </if>
10 </select>
