


Netty ByteBuf 详解
ByteBuf类:Netty的数据容器
ByteBuf 维护了两个不同的索引:① readerIndex:用于读取;② writerIndex:用于写入;起始位置都从0开始:
![]()
名称以 read或者 write开头的方法会更新 ByteBuf 对应的索引,而名称以 set或者 get开头的操作不会。 AbstractByteBuf.readByte 代码如下:
1 public byte readByte() {
2     checkReadableBytes0(1);
3     int i = readerIndex;
4     byte b = _getByte(i);
5     readerIndex = i + 1;// 这里更新了索引
6     return b;
7 }
AbstractByteBuf.getByte 代码如下:
1 public byte getByte(int index) {
2     checkIndex(index);
3     return _getByte(index);// 直接返回,没有更新索引
4 }
ByteBuf 的使用模式
【1】堆缓冲区:将数据存储在 JVM的堆空间。好处:提供快速分配和释放;场景:遗留数据处理;
1 public static void heapBuffer() {
2     ByteBuf heapBuf = BYTE_BUF_FROM_SOMEWHERE; //get reference form somewhere
3     if (heapBuf.hasArray()) { //检查 ByteBuf 是否有一个支撑数组
4         byte[] array = heapBuf.array();//如果有,则获取对该数组的引用
5         int offset = heapBuf.arrayOffset() + heapBuf.readerIndex();//计算第一个字节的偏移量
6         int length = heapBuf.readableBytes();//获得可读字节数
7         handleArray(array, offset, length);//使用数组、偏移量和长度作为参数调用你的方法
8     }
9 }
如果 hasArray()返回false,仍然去访问array()会抛出 UnsupportedOperationException。
【2】直接缓冲区:NIO在JDK1.4中引入的 ByteBuffer类允许JVM实现通过本地调用来分配内存。直接缓冲区的内容将驻留在常规的会被垃圾回收的堆之外。 如果数据包含在一个在堆上分配的缓冲区中,在通过套接字发送它之前,JVM会在内部把缓冲区复制到一个直接缓冲区中。
目的:避免在每次调用本地I/O操作之前(后)将缓冲区的内容复制到一个中间缓冲区(或者从中间缓冲区把内容复制到缓冲区)
缺点:直接缓冲区的分配和释放较堆缓冲区昂贵。
1 public static void directBuffer() {
2     ByteBuf directBuf = BYTE_BUF_FROM_SOMEWHERE; //get reference form somewhere
3     if (!directBuf.hasArray()) {//检查 ByteBuf 是否由数组支撑。如果不是,则这是一个直接缓冲区
4         int length = directBuf.readableBytes();//获取可读字节数
5         byte[] array = new byte[length];//分配一个新的数组来保存具有该长度的字节数据
6         directBuf.getBytes(directBuf.readerIndex(), array);//将字节复制到该数组
7         handleArray(array, 0, length);//使用数组、偏移量和长度作为参数调用你的方法
8     }
9 }
【3】复合缓冲区:为多个ByteBuf提供一个聚合视图,可以根据需要添加或者删除 ByteBuf实例。 CompositeByteBuf ByteBuf的子类,提供一个将多个缓冲区表示为单个合并缓冲区的虚拟表示。CompositeByteBuf中的 ByteBuf实例可能同时包含直接内存分配和非直接内存分配。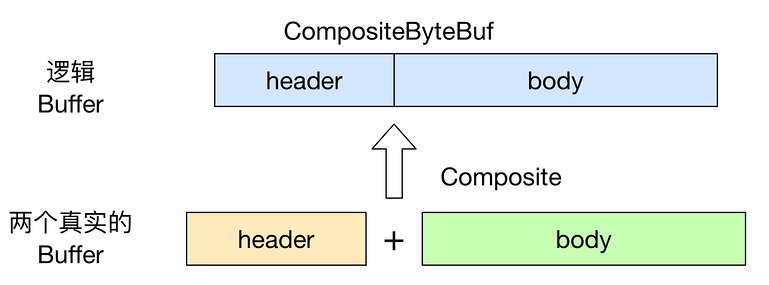
![]()
通过JDK的 ByteBuffer实现:创建一个包含两个 ByteBuffer的数组来保存消息组件
 1 public static void byteBufferComposite(ByteBuffer header, ByteBuffer body) {
 2     // Use an array to hold the message parts
 3     ByteBuffer[] message =  new ByteBuffer[]{ header, body };
 4     // Create a new ByteBuffer and use copy to merge the header and body
 5     ByteBuffer message2 =
 6             ByteBuffer.allocate(header.remaining() + body.remaining());
 7     message2.put(header);
 8     message2.put(body);
 9     message2.flip();
10 }
使用 CompositeByteBuf实现的复合缓冲区模式:
 1 public static void byteBufComposite() {
 2     CompositeByteBuf messageBuf = Unpooled.compositeBuffer();
 3     ByteBuf headerBuf = BYTE_BUF_FROM_SOMEWHERE; // can be backing or direct
 4     ByteBuf bodyBuf = BYTE_BUF_FROM_SOMEWHERE;   // can be backing or direct
 5     messageBuf.addComponents(headerBuf, bodyBuf);//将 ByteBuf 实例追加到 CompositeByteBuf
 6     //...
 7     //删除位于索引位置为 0(第一个组件)的 ByteBuf
 8     messageBuf.removeComponent(0); // remove the header
 9     //循环遍历所有的 ByteBuf 实例
10     for (ByteBuf buf : messageBuf) {
11         System.out.println(buf.toString());
12     }
13 }
因为 CompositeByteBuf可能不支持访问其支撑数组,访问 CompositeByteBuf中的数据类似于直接缓冲区的模式:
1 public static void byteBufCompositeArray() {
2     CompositeByteBuf compBuf = Unpooled.compositeBuffer();
3     int length = compBuf.readableBytes();//获得可读字节数
4     byte[] array = new byte[length];//分配一个具有可读字节数长度的新数组
5     compBuf.getBytes(compBuf.readerIndex(), array);//将字节读到该数组中
6     handleArray(array, 0, array.length);//使用偏移量和长度作为参数使用该数组
7 }
ByteBuf 字节级操作
ByteBuf 提供了许多超出基本读/写操作的方法用于修改数据。
【1】随机访问索引:第一个字节的索引 0, 最后一个字节的索引:capacity() - 1;
1 public static void byteBufRelativeAccess() {
2     ByteBuf buffer = BYTE_BUF_FROM_SOMEWHERE; //get reference form somewhere
3     for (int i = 0; i < buffer.capacity(); i++) {
4         byte b = buffer.getByte(i);
5         System.out.println((char) b);
6     }
7 }
【2】顺序访问索引:首先看下 ByteBuf的内部分段:
+-------------------+------------------+------------------+
| discardable bytes |  readable bytes  |  writable bytes  |
|                   |     (CONTENT)    |                  |
+-------------------+------------------+------------------+
|                   |                  |                  |
0      <=      readerIndex   <=   writerIndex    <=    capacity
After discardReadBytes():对可写分段的内容并没有任何保证,因为只是移动了可以读取的字节以及 writerIndex,并没有对所有可写入的字节进行擦除写。
+------------------+--------------------------------------+
|  readable bytes  |    writable bytes (got more space)   |
+------------------+--------------------------------------+
|                  |                                      |
readerIndex (0) <= writerIndex (decreased) <= capacity
可以看出,ByteBuf被读索引和写索引划分成了3个区域:
● 可丢弃字节:已经被读过的字节,调用 discardReadBytes() 丢弃并回收空间(丢弃字节部分变为可写)。初始大小是0,存储在readerIndex中,随着 read操作的执行而增加。
●可读字节:可读字节分段存储了实际数据。新分配的/包装的/复制的缓冲区的默认的 readerIndex值为0。任何 read或者 skip开头的操作都将检索或者跳过位于当前 readerIndex的数据,并且将它增加已读字节数。如果被调用的方法需要一个 ByteBuf参数作为写入的目标,并且没有指定目标索引参数,那么该目标缓冲区的 writerIndex也将被增加。如果尝试在缓冲区的可读字节数已经耗尽时从中读取数据,将抛出 IndexOutOfBoundsException 见下面代码
●可写字节:可写字节分段指一个未定义内容/写入就绪的内存区域。新分配的缓冲区的 writerIndex的默认值是0。任何 write开头的操作都将从当前的 writerIndex处开始写数据,并将它增加已经写入的字节数。
readBytes(ByteBuf dst) 代码
 1 public ByteBuf readBytes(ByteBuf dst) {
 2     readBytes(dst, dst.writableBytes());
 3     return this;
 4 }
 5 public ByteBuf readBytes(ByteBuf dst, int length) {
 6     if (checkBounds) {
 7         if (length > dst.writableBytes()) {
 8             throw new IndexOutOfBoundsException(String.format(
 9                     "length(%d) exceeds dst.writableBytes(%d) where dst is: %s", length, dst.writableBytes(), dst));
10         }
11     }
12     readBytes(dst, dst.writerIndex(), length);
13     dst.writerIndex(dst.writerIndex() + length);
14     return this;
15 }
如何读取所有可读字节:
1 public static void readAllData() {
2     ByteBuf buffer = BYTE_BUF_FROM_SOMEWHERE; //get reference form somewhere
3     while (buffer.isReadable()) {
4         System.out.println(buffer.readByte());
5     }
6 }
如何往可写字节分段写数据:
1 public static void write() {
2     // Fills the writable bytes of a buffer with random integers.
3     ByteBuf buffer = BYTE_BUF_FROM_SOMEWHERE; //get reference form somewhere
4     while (buffer.writableBytes() >= 4) {
5         buffer.writeInt(random.nextInt());
6     }
7 }

