

SpringBoot+Cxf开发webservice服务端接口
1、在pom.xml添加依赖

<dependency>
    <groupId>org.apache.cxf</groupId>
    <artifactId>cxf-rt-frontend-jaxws</artifactId>
    <version>3.1.6</version>
</dependency>
<dependency>
    <groupId>org.apache.cxf</groupId>
    <artifactId>cxf-rt-transports-http</artifactId>
    <version>3.1.6</version>
</dependency>
<dependency>
    <groupId>org.apache.cxf</groupId>
    <artifactId>cxf-spring-boot-starter-jaxws</artifactId>
    <version>3.3.4</version>
</dependency>
2、写一个HelloService接口
 1 package com.spring.first.webservice.service;
 2
 3 import javax.jws.WebMethod;
 4 import javax.jws.WebParam;
 5 import javax.jws.WebService;
 6
 7 @WebService(targetNamespace = "http://service.mq.primeton.com")
 8 public interface HelloService {
 9     @WebMethod
10     public  Object sayHello(@WebParam(name="content") String content);
11 }
3、写一个HelloServiceImpl
package com.spring.first.webservice.service.impl;

import com.spring.first.webservice.service.HelloService;
import org.springframework.stereotype.Service;

import javax.jws.WebService;

@Service
@WebService(serviceName = "HelloService",
targetNamespace = "http://service.mq.primeton.com", endpointInterface = "com.spring.first.webservice.service.HelloService")
public class HelloServiceImpl implements HelloService {
    @Override
    public Object sayHello(String content){

        return content;
    }
}
4、配置CxfConfig发布接口
package com.spring.first.webservice;
import com.spring.first.webservice.service.HelloService;
import org.apache.cxf.Bus;
import org.apache.cxf.bus.spring.SpringBus;
import org.apache.cxf.jaxws.EndpointImpl;
import org.apache.cxf.transport.servlet.CXFServlet;
import org.springframework.beans.factory.annotation.Autowired;
import org.springframework.boot.web.servlet.ServletRegistrationBean;
import org.springframework.context.annotation.Bean;
import org.springframework.context.annotation.Configuration;
import javax.xml.ws.Endpoint;

@Configuration
public class CxfConfig {
    @Autowired
    private HelloService helloService;

    @Autowired
    private Bus bus;

    @Bean(name= "cxfServlet")
    public ServletRegistrationBean dispatcherServlet(){
        return new ServletRegistrationBean(new CXFServlet(),"/webservicedemo/*");
    }

   @Bean(name=Bus.DEFAULT_BUS_ID)
    public SpringBus springBus(){
        return new SpringBus();
   }
    /**
     * 注册HelloService接口到webservice服务
     * @return
     * 浏览器访问地址   http://localhost:9090/webservicedemo?wsdl 得到客户端访问地址 http://localhost:9090/webservicedemo/webservicedemo?wsdl
     *
     */

    @Bean
    public Endpoint endpointHelloService(){
        EndpointImpl endpoint=new EndpointImpl(bus,helloService);
        endpoint.publish("/webservicedemo");
        return  endpoint;
    }

}
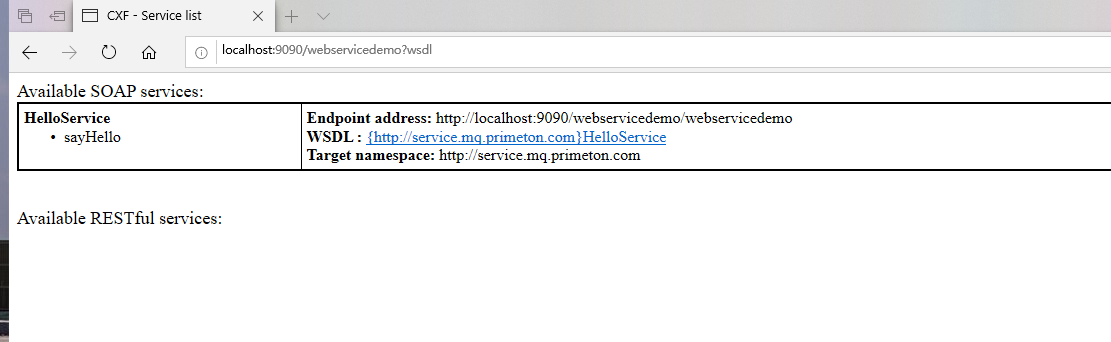
5、在浏览器输入地址 http://localhost:9090/webservicedemo?wsdl,得到如图信息
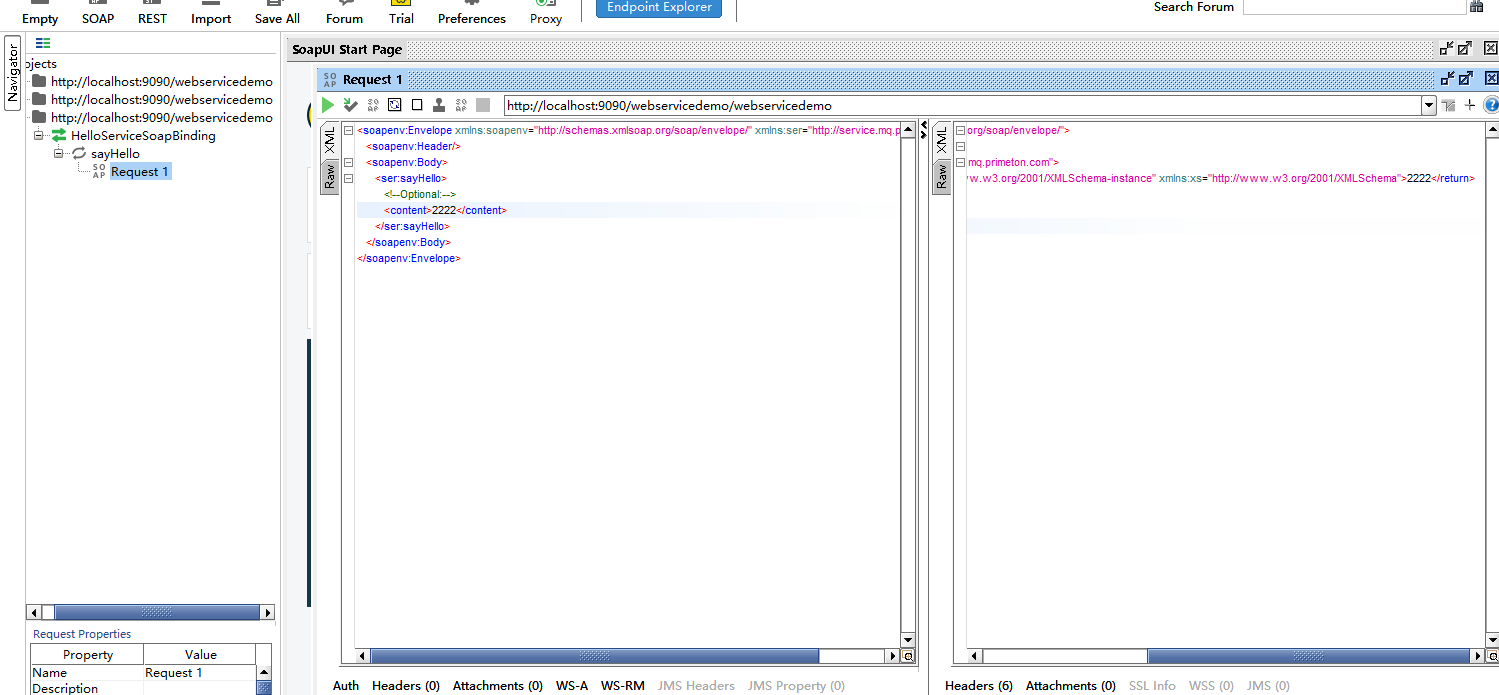
再在SoapUI工具测一下


【推荐】国内首个AI IDE,深度理解中文开发场景,立即下载体验Trae
【推荐】编程新体验,更懂你的AI,立即体验豆包MarsCode编程助手
【推荐】抖音旗下AI助手豆包,你的智能百科全书,全免费不限次数
【推荐】轻量又高性能的 SSH 工具 IShell:AI 加持,快人一步
· AI与.NET技术实操系列:基于图像分类模型对图像进行分类
· go语言实现终端里的倒计时
· 如何编写易于单元测试的代码
· 10年+ .NET Coder 心语,封装的思维:从隐藏、稳定开始理解其本质意义
· .NET Core 中如何实现缓存的预热?
· 25岁的心里话
· 闲置电脑爆改个人服务器(超详细) #公网映射 #Vmware虚拟网络编辑器
· 零经验选手,Compose 一天开发一款小游戏!
· 因为Apifox不支持离线,我果断选择了Apipost!
· 通过 API 将Deepseek响应流式内容输出到前端