haproxy安装:
haproxy安装:
tar zxf haproxy-1.4.24.tar.gz ##解压
yum install rpm-build -y ##安装rpm-build软件
如果找不到此包,可通过rpm -q prm-build找包
rpmbuild -tb haproxy-1.4.24.tar.gz ##源码编译,制作rpm包
yum install -y gcc pcre-devel ##如果编译失败,安装此包再次尝试编译
cd rpmbuild/RPMS/x86_64
rpm -qpl haproxy-1.4.24-1.x86_64.rpm
rpm -ivh haproxy-1.4.24-1.x86_64.rpm ##安装制作好的rpm包
cd haproxy-1.4.24/examples/
cp content-sw-sample.cfg /etc/haproxy/haproxy.cfg
find -name *.spec
cd /etc/haproxy/
安装完成
groupadd -g 200 haproxy
useradd -u 200 -g 200 -M haproxy
id haproxy
vim /etc/security/limits.conf

cd /etc/haproxy
vim haproxy.cfg ##编辑主配置文件
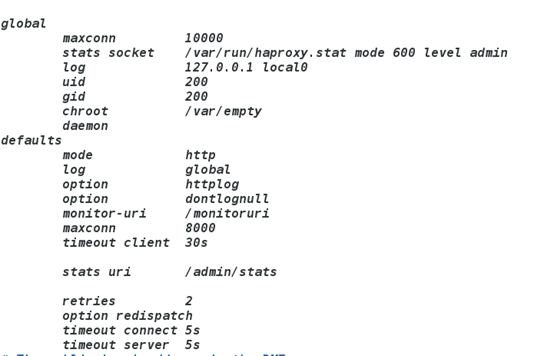

global
maxconn 10000 # 最大连接数
stats socket /var/run/haproxy.stat mode 600 level admin
log 127.0.0.1 local0 # 夲机日志
uid 200 # haproxy用户的uid
gid 200 # haproxy用户的gid
chroot /var/empty
daemon
defaults # 默认条件
mode http
log global
option httplog
option dontlognull
monitor-uri /monitoruri
maxconn 8000
timeout client 30s
stats uri /admin/stats
#retries 2
option redispatch
timeout connect 5s
timeout server 5s
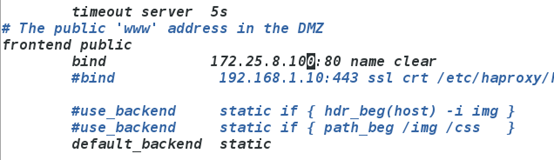
# The public 'www' address in the DMZ
frontend public
bind 172.25.8.1:80 name clear ##访问的地址
#bind 192.168.1.10:443 ssl crt /etc/haproxy/haproxy.pem
#use_backend static if { hdr_beg(host) -i img }
#use_backend static if { path_beg /img /css }
default_backend static ###默认后端设置为静态的
# The static backend backend for 'Host: img', /img and /css.
backend static
balance roundrobin # 负载均衡算法rr
server statsrv1 172.25.8.2:80 check inter 1000 ###添加两个后端
server statsrv2 172.25.8.3:80 check inter 1000
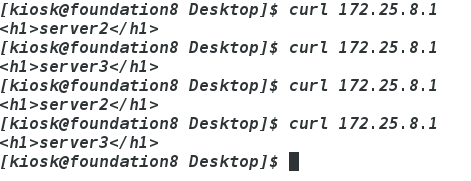
测试:
打开server2,3的http服务
在物理机中
curl 172.25.8.1
可能出现的报错:
由于此服务需要用到80端口,所以要确定80端口处于空闲状态,如果被占用会报错
如果仍然报错,可尝试以下命令:

添加图中所示策略


高可用:
在server4中同样添加haproxy服务(操作参考server1,这里不再赘述)
并在server1和server4中将主配置文件中bind地址改为:172.25.8.100:80
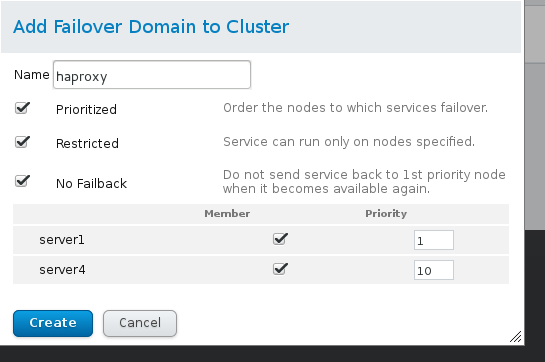
rhcs高可用编辑
Failover Domains
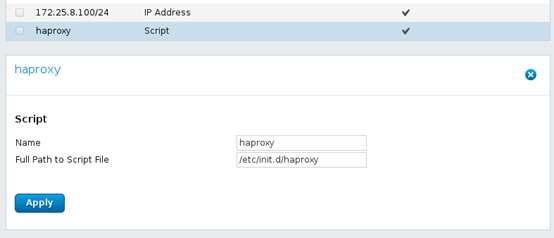
Resources
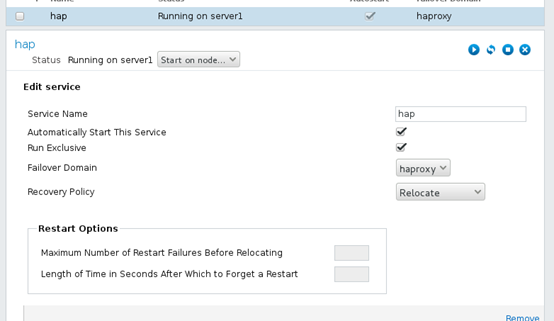
Service Groups
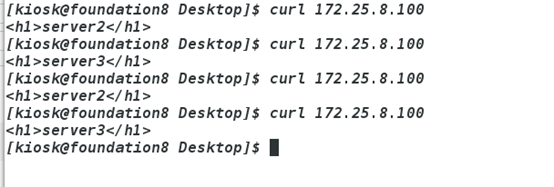
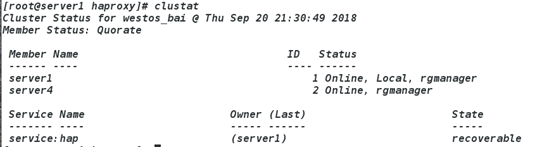
测试;
server4中clustat:
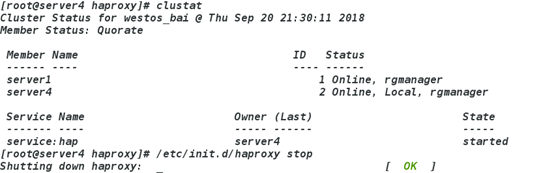
/etc/init.d/haproxy stop ##停止4上的服务
此时sercer1会自动接管
在物理机中:
curl 172.25.8.100