【ROS2】控制机械臂运动,打印机械臂末端位姿
参考:
- 机械臂的Gitbook: https://docs.elephantrobotics.com/docs/gitbook/2-serialproduct/2.2-320/2.2.2-PI.html
- Running ROS across multiple machines http://wiki.ros.org/ROS/Tutorials/MultipleMachines
- SLAM+语音机器人DIY系列:(五)树莓派3开发环境搭建——4.PC端与robot端ROS网络通信 https://www.cnblogs.com/hiram-zhang/p/10410168.html
- 在多台PC上进行ROS通讯(在多台远程机器人或电脑上运行ROS)-学习笔记 https://blog.51cto.com/u_12369060/5172376
- [基于ROS构建移动机器人]第二篇:设置ROS主从网络和远程开发环境 https://zhuanlan.zhihu.com/p/52005221/
思路:
- 目标:使用PC驱动Raspberry机械臂,并以10Hz的频率发布机械臂末端法兰盘相对于基座坐标系的坐标
- 方法:
1)PC上编写两个节点,分别为coordinate_publisher.py和actuate_robot.py,coordinate_publisher.py是ROS2的node,用来实时发布机械臂末端的位姿信息,而actuate_robot.py仅为了使用TCP/IP通讯控制机械臂运动。
2)Raspberry上运行两个消息接口,分别是Server.py和Server1.py,端口分别对应9000和9001.
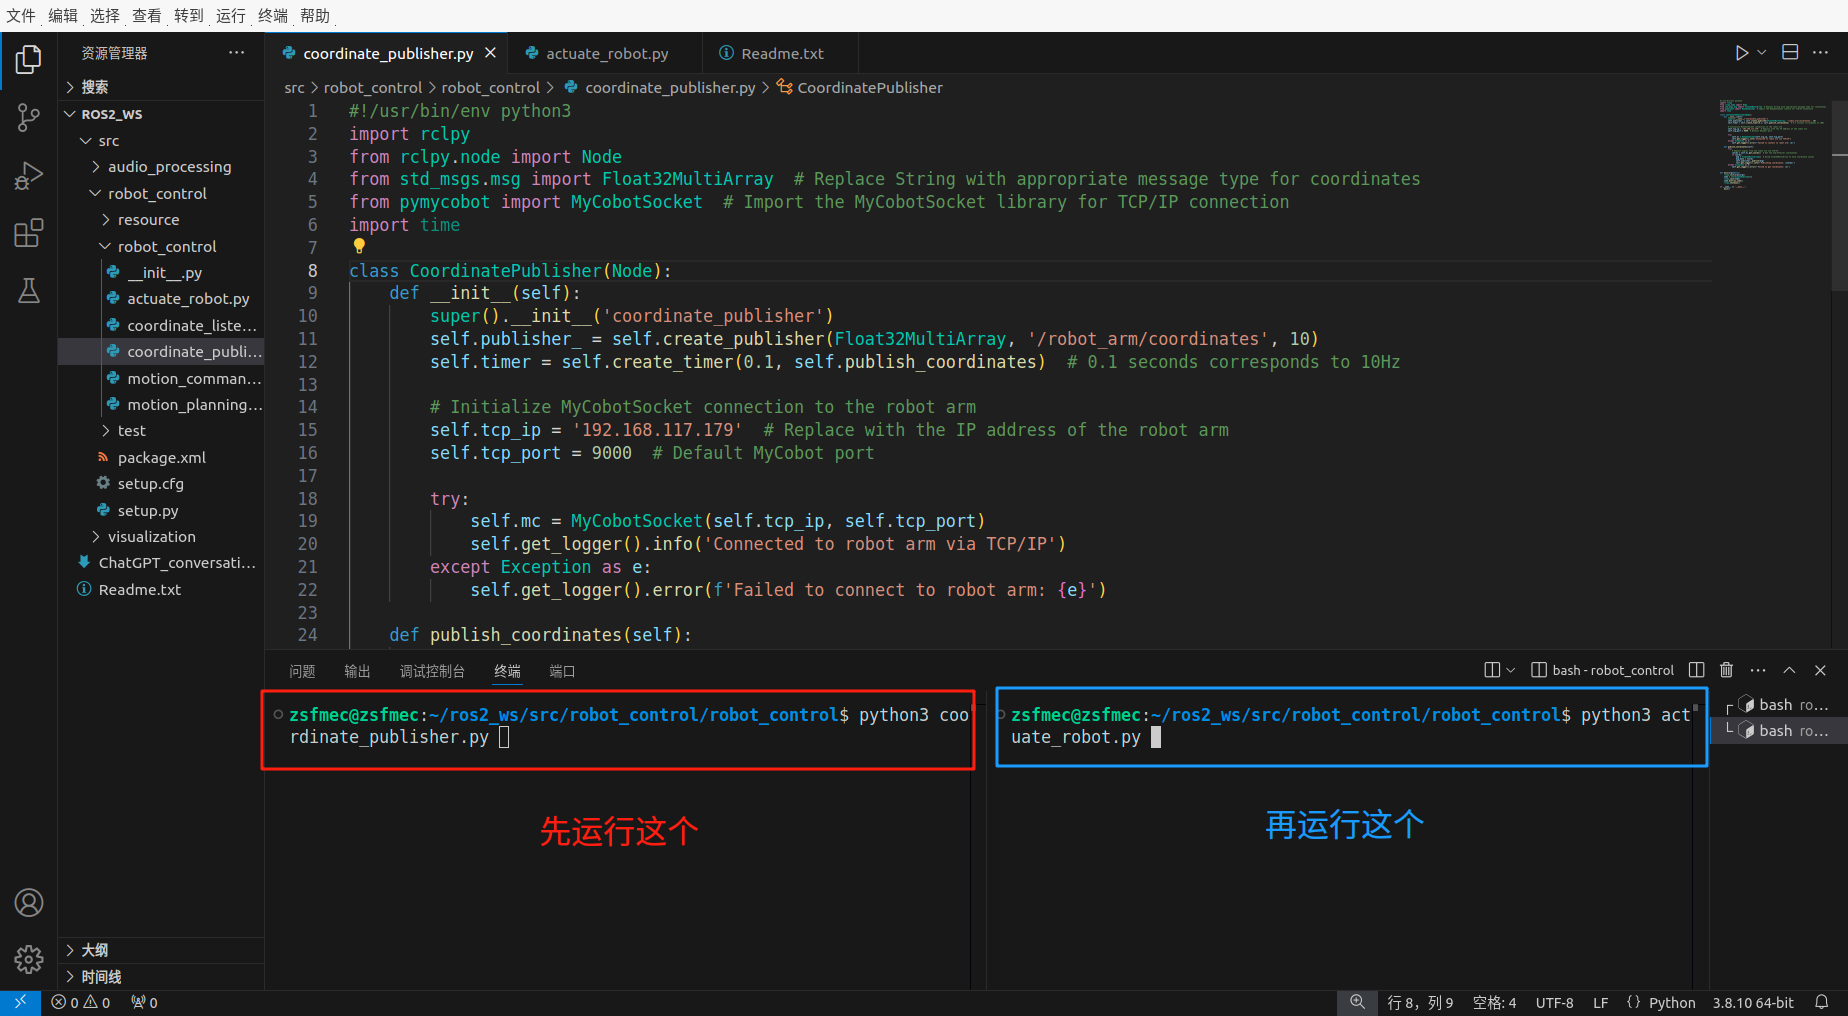
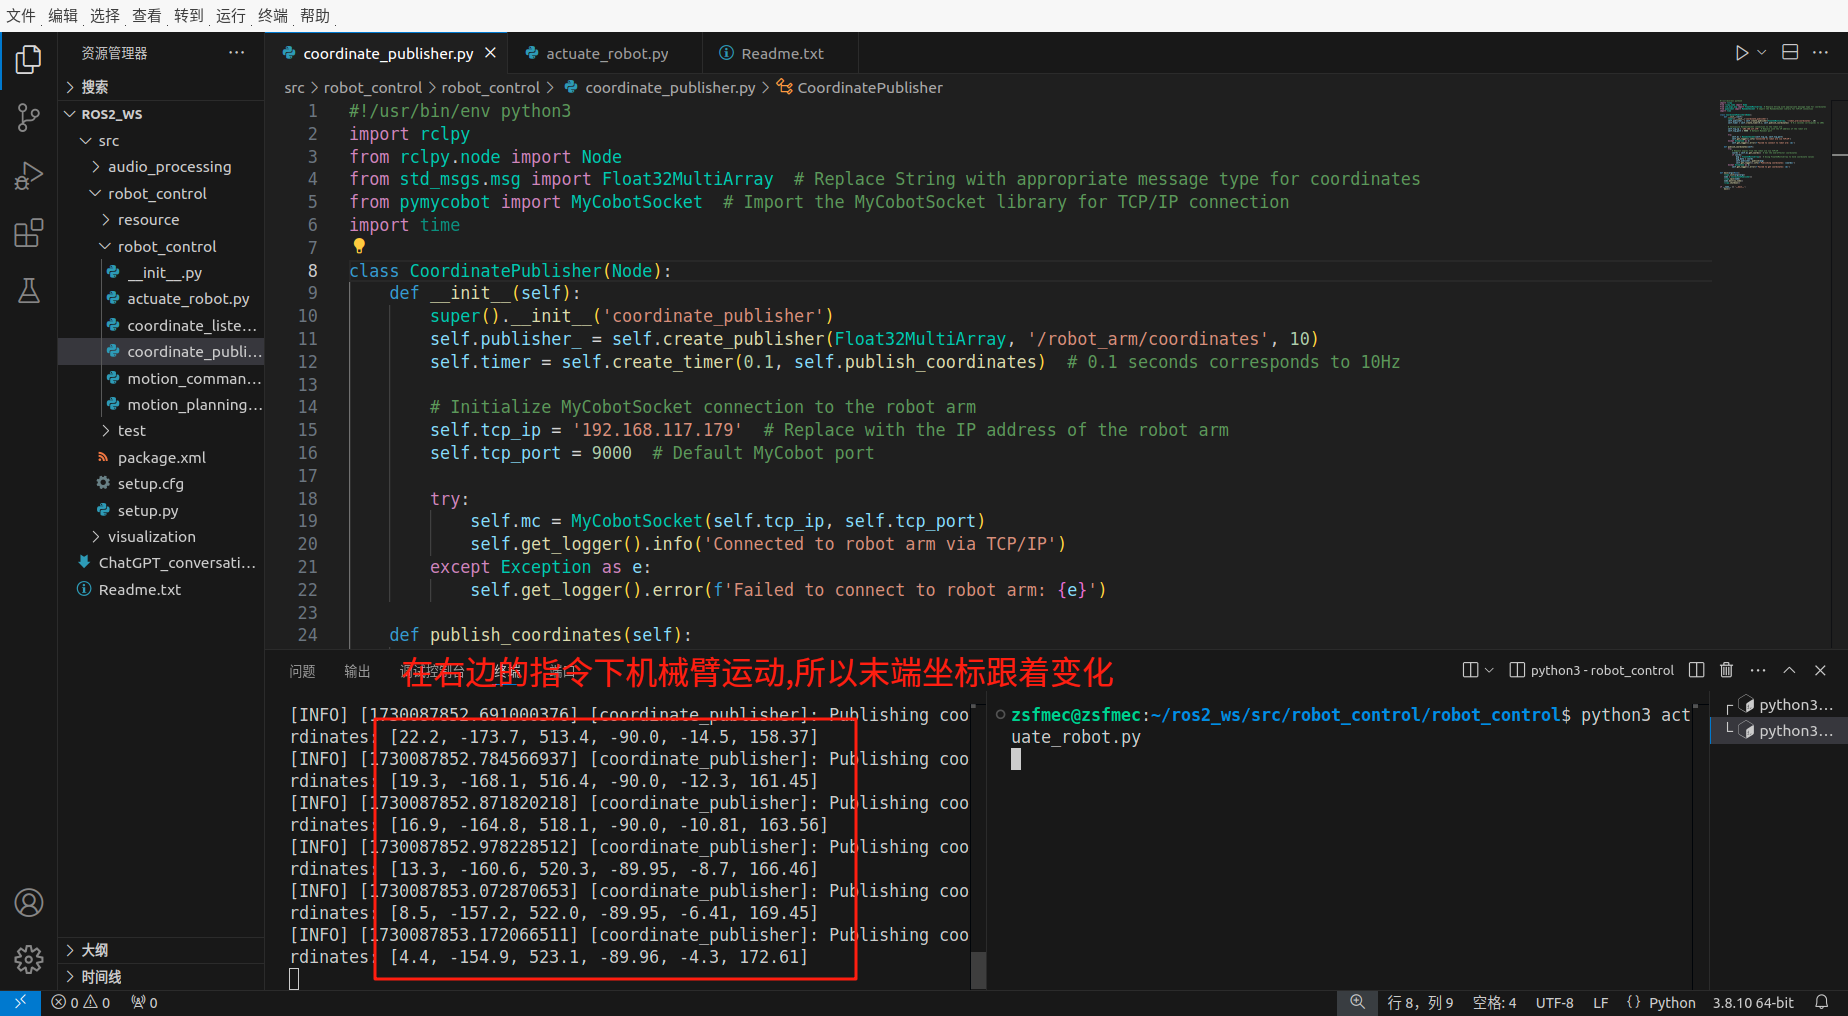
3)在PC上coordinate_publisher.py所在路径下打开终端, 依次运行python3 coordinate_publisher.py,新开一个终端运行python3 actuate_robot.py即可使python3 coordinate_publisher.py所在的终端在actuate_robot.py的指令下更新机械臂末端的位姿坐标。
示例代码:
README.md
------ Notes ------
Aim to control and monitor robot arm (MyCobot320pi2022) through PC. Both with Ubuntu 20.04 and ROS 2 Galactic installed.
The command comes from the MECHREV computer (PC), whose hostname is `zsfmec`. IP: 192.168.117.142, passcode:*******
The executor is Raspberry with hostname `er`. IP: 192.168.117.179, passcode: ***

------ Topic list defined in this packgae ------
1. /robot_arm/coordinates
2.
3.


------ Usage ------
1. Connect the two devices in the same WiFi: phone hotspot called: Redmi K40, passcode: zsf20220912
2. Raspberry: open the folder ~/Desktop/pymycobot/demo in terminal, and execute:
    `python3 Server.py`, press Enter
    open another terminal inside the folder ~/Desktop/pymycobot/demo, and execute:
    `python3 Server1.py`, press Enter
3. PC:
    open a terminal and run /home/zsfmec/ros2_ws/src/robot_control/robot_control/coordinate_publisher.py
    open another terminal and run /home/zsfmec/ros2_ws/src/robot_control/robot_control/actuate_robot.py

------ 我的笔记 ------
PC与MyCobot通讯可以参考我的CSDN的文章: https://blog.csdn.net/weixin_42776565/article/details/137049334
/home/zsfmec/ros2_ws/src/robot_control/robot_control/coordinate_publisher.py
#!/usr/bin/env python3
import rclpy
from rclpy.node import Node
from std_msgs.msg import Float32MultiArray  # Replace String with appropriate message type for coordinates
from pymycobot import MyCobotSocket  # Import the MyCobotSocket library for TCP/IP connection
import time

class CoordinatePublisher(Node):
    def __init__(self):
        super().__init__('coordinate_publisher')
        self.publisher_ = self.create_publisher(Float32MultiArray, '/robot_arm/coordinates', 10)
        self.timer = self.create_timer(0.1, self.publish_coordinates)  # 0.1 seconds corresponds to 10Hz

        # Initialize MyCobotSocket connection to the robot arm
        self.tcp_ip = '192.168.117.179'  # Replace with the IP address of the robot arm
        self.tcp_port = 9000  # Default MyCobot port

        try:
            self.mc = MyCobotSocket(self.tcp_ip, self.tcp_port)
            self.get_logger().info('Connected to robot arm via TCP/IP')
        except Exception as e:
            self.get_logger().error(f'Failed to connect to robot arm: {e}')

    def publish_coordinates(self):
        try:
            # Request angles from the robot arm via TCP/IP
            coords = self.mc.get_coords()  # Get the end-effector coordinates
            if coords:
                msg = Float32MultiArray()  # Using Float32MultiArray to hold coordinate values
                msg.data = coords
                self.publisher_.publish(msg)
                self.get_logger().info(f'Publishing coordinates: {coords}')
        except Exception as e:
            self.get_logger().error(f'Failed to get coordinates: {e}')


def main(args=None):
    rclpy.init(args=args)
    node = CoordinatePublisher()
    rclpy.spin(node)
    node.destroy_node()
    rclpy.shutdown()

if __name__ == '__main__':
    main()
/home/zsfmec/ros2_ws/src/robot_control/robot_control/actuate_robot.py
from pymycobot import MyCobotSocket
import time
# 其中"192.168.11.15"为机械臂IP,请自行输入你的机械臂IP
# 其中,9001是PC与Raspberry的消息接口,一个消息接口只可以同时单向传递一个消息,
# 如果需要同时向机械臂输入控制指令和返回末端位置,需要开两个消息接口,
# 每个消息接口以端口号进行区分,端口号默认是9000,如果我想要新开一个端口,
# 需要在机械臂系统文件夹复制得到一个Server2.py,端口号设置为9002即可
mc = MyCobotSocket("192.168.117.179",9001)

#连接正常就可以对机械臂进行控制操作
mc.send_angles([0,0,0,0,0,0],20)
time.sleep(3)
mc.send_angles([30,20,0,0,0,0],20)
time.sleep(3)
mc.send_angles([0,0,0,0,0,0],20)
time.sleep(3)
mc.send_angles([-30,-20,0,0,0,0],20)
time.sleep(3)
mc.send_angles([0,0,0,0,0,0],20)
time.sleep(3)
操作截图
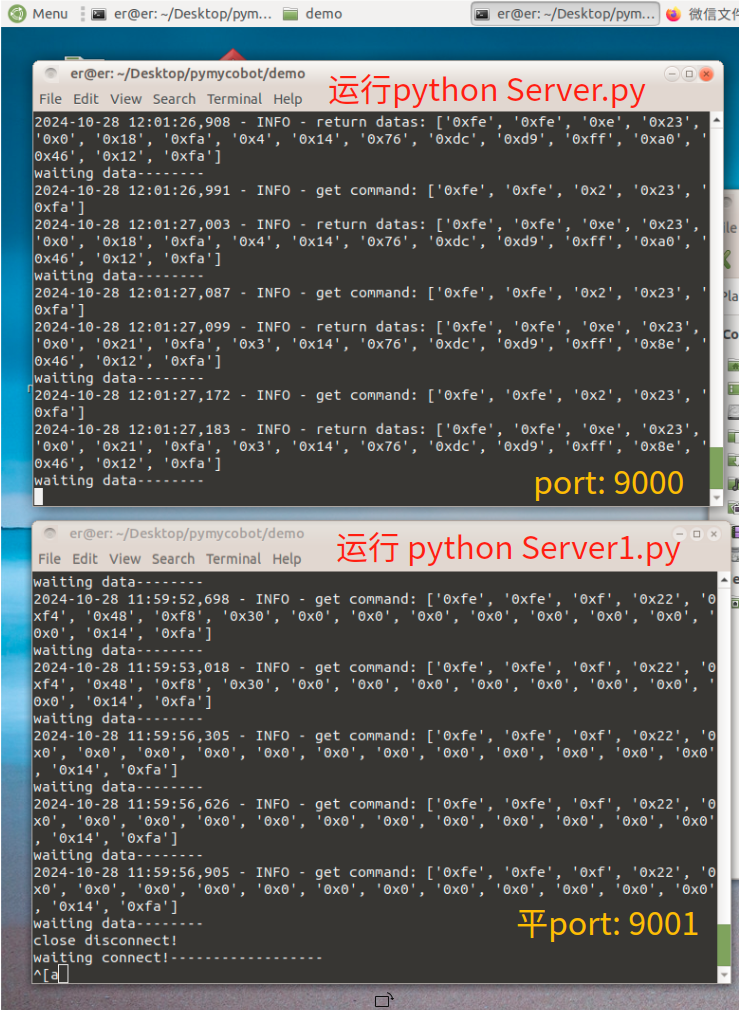
在树霉派上打开终端运行上面的Server.py (位于桌面pymycobot/demo文件夹下) 用来创建机械臂与PC的第一个消息接口,目的是传输机械臂末端位置坐标给PC.
在树霉派上打开另一个终端运行上面的server1.py用来创建机械臂与PC的第二个消息接口,目的是向树霉派传输来自PC的机械臂控制指令.

PC端操作步骤:

运行结果示例:


【推荐】国内首个AI IDE,深度理解中文开发场景,立即下载体验Trae
【推荐】编程新体验,更懂你的AI,立即体验豆包MarsCode编程助手
【推荐】抖音旗下AI助手豆包,你的智能百科全书,全免费不限次数
【推荐】轻量又高性能的 SSH 工具 IShell:AI 加持,快人一步
· TypeScript + Deepseek 打造卜卦网站:技术与玄学的结合
· 阿里巴巴 QwQ-32B真的超越了 DeepSeek R-1吗?
· 【译】Visual Studio 中新的强大生产力特性
· 【设计模式】告别冗长if-else语句:使用策略模式优化代码结构
· 10年+ .NET Coder 心语 ── 封装的思维:从隐藏、稳定开始理解其本质意义