技术实战:基于 MHA 方式实现 MySQL 的高可用(转)
转自:http://os.51cto.com/art/201307/401702_all.htm
MHA故障转移可以很好的帮我们解决从库数据的一致性问题,同时最大化挽回故障发生后的数据。本文分享了基于 MHA 方式实现 Mysql 的高可用的技术实战,希望对您有所帮助。
数据的重要性对于人们来说重要程度不说自明,在信息时代,数据有着比人们更大的力量,我们也知道最近的斯诺登事件,军事专家对于他掌握的数据给出的评价是,相当于美军十个重装甲师。
数据库的价值可见一斑,数据库的存在为人们提供了更快的查询,那么在一个web网站中如何做到数据库的高可用,保证持续提供服务,下面的实验是通过MHA的故障转移来实现。
实现原理:MHA是由日本Mysql专家用Perl写的一套Mysql故障切换方案以保障数据库的高可用性,它的功能是能在0-30s之内实现主Mysql故障转移(failover),
MHA故障转移可以很好的帮我们解决从库数据的一致性问题,同时最大化挽回故障发生后的数据。MHA里有两个角色一个是node节点 一个是manager节点,要实现这个MHA,必须最少要三台数据库服务器,一主多备,即一台充当master,一台充当master的备份机,另外一台 是从属机,这里实验为了实现更好的效果使用四台机器,需要说明的是一旦主服务器宕机,备份机即开始充当master提供服务,如果主服务器上线也不会再成 为master了,因为如果这样数据库的一致性就被改变了。
实验环境:vmware 9.0 RHEL5.5
实验所需软件包:http://mysql-master-ha.googlecode.com/files/mha4mysql-node-0.52-0.noarch.rpmhttp://mysql-master-ha.googlecode.com/files/mha4mysql-manager-0.52-0.noarch.rpm
实验大体步骤:
1 首先要保证虚拟机能够上网这里我在vmware里添加了第二块网卡 一块专门用于四台机器通信,一块配置上网
2 关闭selinux和配置IP地址和本地yum源
3 配置epel源
4 配置ssh公钥免登录环境
5 修改hostname
6 配置hosts文件
7 配置Mysql的主从同步关系并通过grant命令赋权
8 安装node包
9 在管理机安装manager包
10  编辑主配置文件
11 测试及排错
12 启动
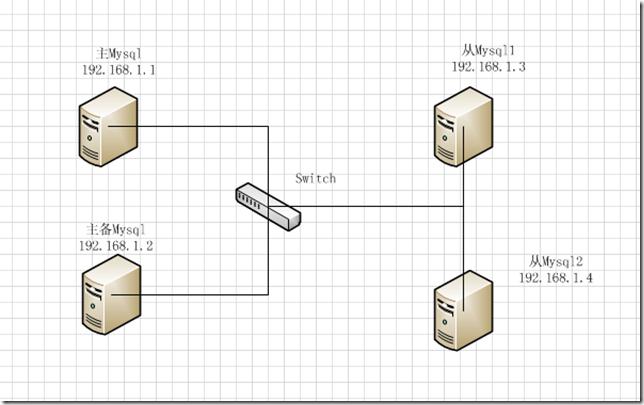
验拓扑图如下:
1 在配置好IP地址后检查selinux设置
2 在四台机器都配置epel源 这里我找了一个epel源
rpm –ivh http://dl.fedoraproject.org/pub/epel/5Server/i386/epel-release-5-4.noarch.rpm
3 建立ssh无密码登录环境
主Mysql
#ssh-keygen -t rsa
#ssh-copy-id -i .ssh/id_rsa.pub root@192.168.1.1 ----------------------为什么要在本机也要设置呢,因为manager节点安装在这上面,如不设置在下面ssh检查时会通不过。
#ssh-copy-id -i .ssh/id_rsa.pub root@192.168.1.2
#ssh-copy-id -i .ssh/id_rsa.pub root@192.168.1.3
#ssh-copy-id -i .ssh/id_rsa.pub root@192.168.1.4
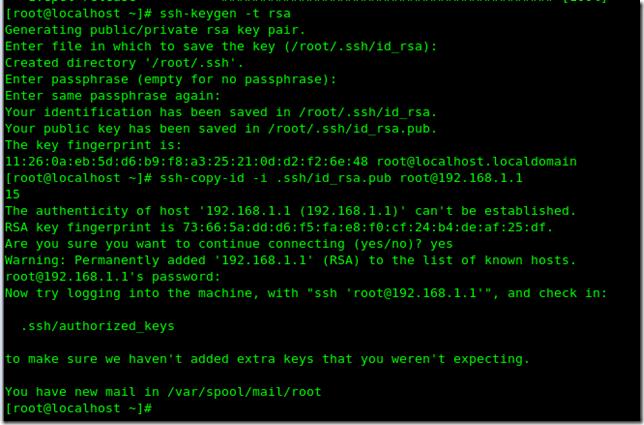
过程示意图(因其过程都一样,故只示范192.168.1.1)
主备Mysql
#ssh-keygen -t rsa
#ssh-copy-id -i .ssh/id_rsa.pub root@192.168.1.1
#ssh-copy-id -i .ssh/id_rsa.pub root@192.168.1.3
#ssh-copy-id -i .ssh/id_rsa.pub root@192.168.1.4
从Mysql1
#ssh-keygen -t rsa
#ssh-copy-id -i .ssh/id_rsa.pub root@192.168.1.1
#ssh-copy-id -i .ssh/id_rsa.pub root@192.168.1.2
#ssh-copy-id -i .ssh/id_rsa.pub root@192.168.1.4
从Mysql2
#ssh-keygen -t rsa
#ssh-copy-id -i .ssh/id_rsa.pub root@192.168.1.1
#ssh-copy-id -i .ssh/id_rsa.pub root@192.168.1.2
#ssh-copy-id -i .ssh/id_rsa.pub root@192.168.1.3
测试ssh登录
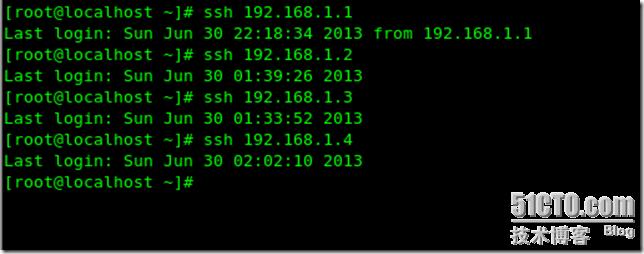
我们在主Mysql上测试一下:
结果测试成功 进入下一步操作
4 接下来步骤就是修改hostname了
为了保险起见 我想要从内存中和文件中修改,不重启系统(内存中位置 /etc/sysconfig/network)。
192.168.1.1 hostname为mastersql
192.168.1.2 hostname为backupsql
192.168.1.3 hostname为slavesql1
192.168.1.4 hostname为slavesql2
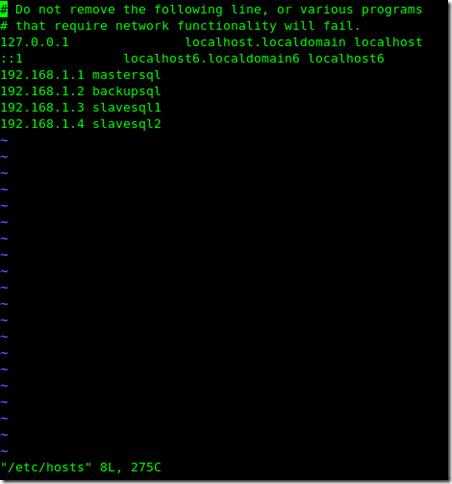
5 配置hosts文件
配置好后分别拷贝到其他三台机器上:
6 配置mysql主从关系
在四台系统通过yum安装mysql
yum –y install mysql-server
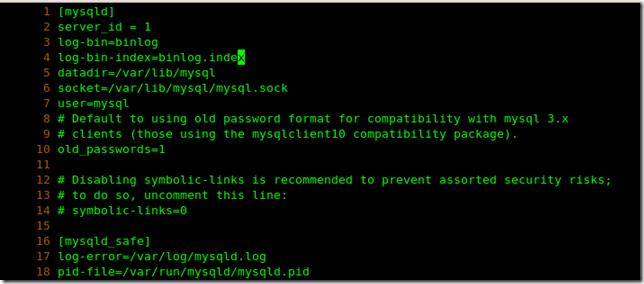
在mastersql:
vi /etc/my.cnf
在里面添加2 3 4 行 定义id和二进制目录:
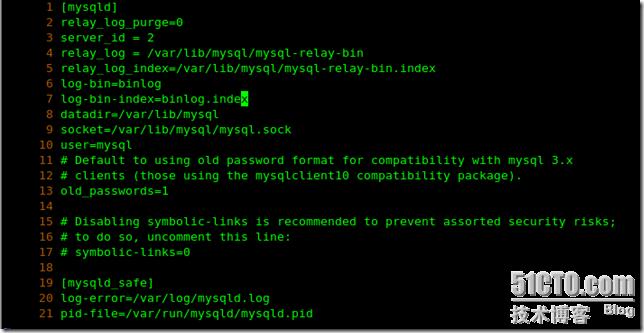
在backupsql
vi /etc/my.cnf
在里面添加2 3 4 5 6 7行
在slavesql1
vi /etc/my.cnf 不同的是第三行中的代码 其中意思是sql数据库是只读的:
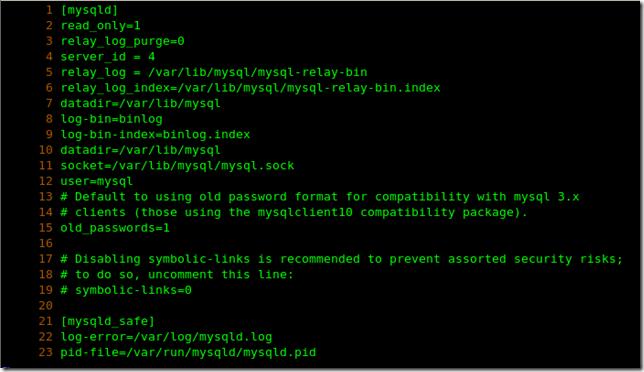
在slavesql2
vi /etc/my.cnf
配置好后重启下mysql服务重新加载配置文件:
service mysqld restart
在mastersql中:
mysql> GRANT replication slave ON *.* TO 'kyo'@'%' identified by '123';-------------------赋给用户有关操作权限
mysql> flush privileges;
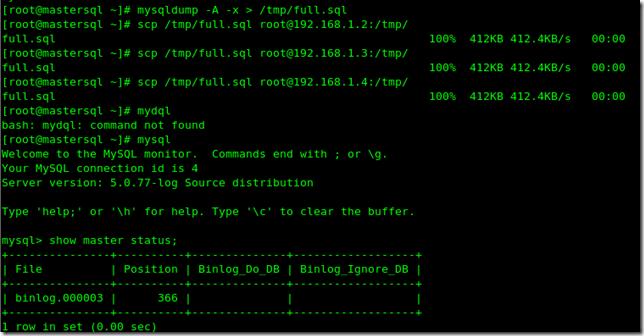
#mysqldump -A -x > /tmp/full.sql  #scp /tmp/full.sql root@192.168.1.2:/tmp/
#scp /tmp/full.sql root@192.168.1.3:/tmp/
#scp /tmp/full.sql root@192.168.1.4:/tmp/
mysql> show master status;------------------记住position号码(366)
分别在backupsql、slavesql1、slavesql2中做如下操作,这里以backupsql机为例:
只要看到Slave_IO_Running Slave_SQL_Running都为yes就可以了。
然后再就是赋权了,之前的一步赋权操作是权限是只有replication,MHA会在配置文件里要求能远程登录到数据库,所以要进行必要的赋权。
在四台机器中都做如下操作:
mysql> grant all privileges on *.* to 'root'@'mastersql' identified by '123';
mysql> flush privileges;
mysql> grant all privileges on *.* to 'root'@'backupsql' identified by '123';
mysql> flush privileges;
mysql> grant all privileges on *.* to 'root'@'slavesql1' identified by '123';
mysql> flush privileges;
mysql> grant all privileges on *.* to 'root'@'slavesql2' identified by '123';
mysql> flush privileges;
7 接下来就是开始正式安装MHA了,先安装节点包开始 四台机器都要安装!
yum install perl-DBD-MySQL -----------------MHA是perl编写的软件需要perl支持 之前yum安装mysql已经安装过了 如果没安装过需要安装这个依赖。
rpm -Uvh http://mysql-master-ha.googlecode.com/files/mha4mysql-node-0.52-0.noarch.rpm
8 节点配置完毕就开始配置管理节点了
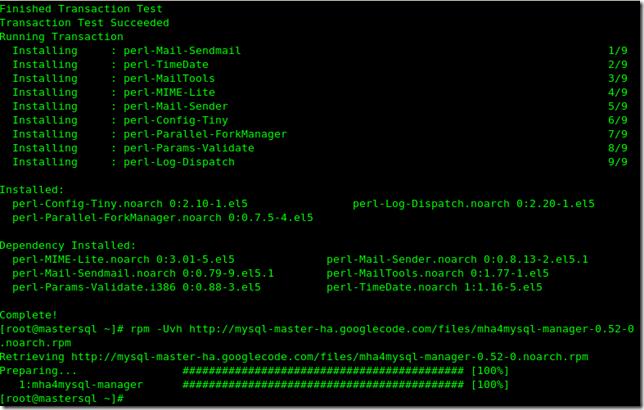
yum –y install perl-DBD-MySQL perl-Config-Tiny perl-Log-Dispatch perl-Parallel-ForkManager  -----------安装依赖包
rpm -Uvh http://mysql-master-ha.googlecode.com/files/mha4mysql-manager-0.52-0.noarch.rpm
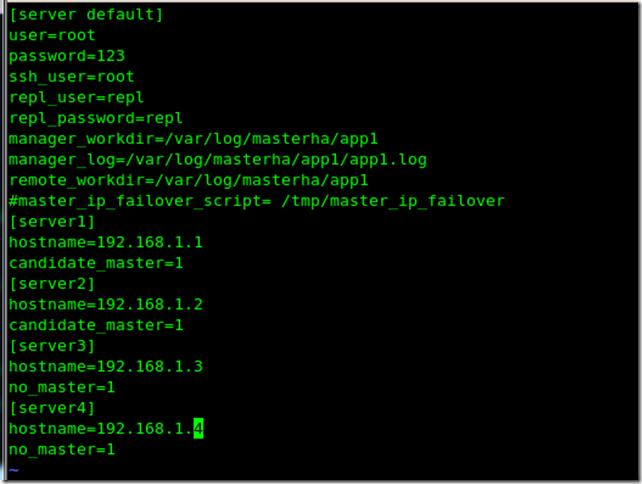
管理节点安装完毕后就应该去编辑主配文件了
vi /etc/app1.cnf 需要指出的是第二行第三行中之前提到的user和password是mysql中赋权的用户:
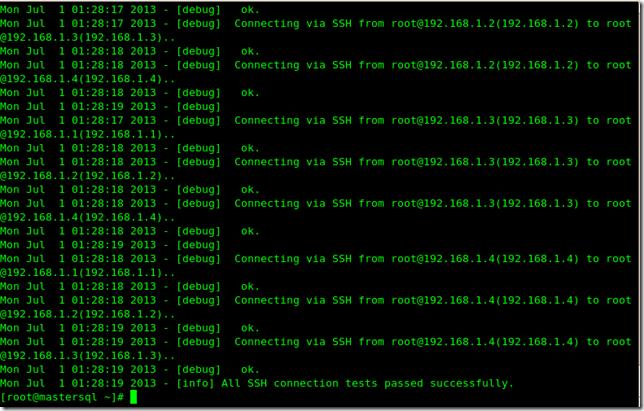
检查下SSH公钥免密码登录
masterha_check_ssh --conf=/etc/app1.cnf
之前的都看不到了 可以看到最后检测成功
再检查下MySQL复制
masterha_check_repl --conf=/etc/app1.cnf---------------------由于截图太小 直接贴出检测文字 可以看出 最后检测都成功(虽然有些警告信息,不用去管它)。
[root@mastersql ~]# masterha_check_repl --conf=/etc/app1.cnf
Mon Jul  1 02:08:33 2013 - [warning] Global configuration file /etc/masterha_default.cnf not found. Skipping.
Mon Jul  1 02:08:33 2013 - [info] Reading application default configurations from /etc/app1.cnf..
Mon Jul  1 02:08:33 2013 - [info] Reading server configurations from /etc/app1.cnf..
Mon Jul  1 02:08:33 2013 - [info] MHA::MasterMonitor version 0.52.
Mon Jul  1 02:08:33 2013 - [info] Dead Servers:
Mon Jul  1 02:08:33 2013 - [info] Alive Servers:
Mon Jul  1 02:08:33 2013 - [info]   192.168.1.1(192.168.1.1:3306)
Mon Jul  1 02:08:33 2013 - [info]   192.168.1.2(192.168.1.2:3306)
Mon Jul  1 02:08:33 2013 - [info]   192.168.1.3(192.168.1.3:3306)
Mon Jul  1 02:08:33 2013 - [info]   192.168.1.4(192.168.1.4:3306)
Mon Jul  1 02:08:33 2013 - [info] Alive Slaves:
Mon Jul  1 02:08:33 2013 - [info]   192.168.1.2(192.168.1.2:3306)  Version=5.0.77-log (oldest major version between slaves) log-bin:enabled
Mon Jul  1 02:08:33 2013 - [info]     Replicating from 192.168.1.1(192.168.1.1:3306)
Mon Jul  1 02:08:33 2013 - [info]     Primary candidate for the new Master (candidate_master is set)
Mon Jul  1 02:08:33 2013 - [info]   192.168.1.3(192.168.1.3:3306)  Version=5.0.77-log (oldest major version between slaves) log-bin:enabled
Mon Jul  1 02:08:33 2013 - [info]     Replicating from 192.168.1.1(192.168.1.1:3306)
Mon Jul  1 02:08:33 2013 - [info]     Not candidate for the new Master (no_master is set)
Mon Jul  1 02:08:33 2013 - [info]   192.168.1.4(192.168.1.4:3306)  Version=5.0.77-log (oldest major version between slaves) log-bin:enabled
Mon Jul  1 02:08:33 2013 - [info]     Replicating from 192.168.1.1(192.168.1.1:3306)
Mon Jul  1 02:08:33 2013 - [info]     Not candidate for the new Master (no_master is set)
Mon Jul  1 02:08:33 2013 - [info] Current Alive Master: 192.168.1.1(192.168.1.1:3306)
Mon Jul  1 02:08:33 2013 - [info] Checking slave configurations..
Mon Jul  1 02:08:33 2013 - [warning]  read_only=1 is not set on slave 192.168.1.2(192.168.1.2:3306).
Mon Jul  1 02:08:33 2013 - [warning]  relay_log_purge=0 is not set on slave 192.168.1.2(192.168.1.2:3306).
Mon Jul  1 02:08:33 2013 - [warning]  relay_log_purge=0 is not set on slave 192.168.1.3(192.168.1.3:3306).
Mon Jul  1 02:08:33 2013 - [warning]  relay_log_purge=0 is not set on slave 192.168.1.4(192.168.1.4:3306).
Mon Jul  1 02:08:33 2013 - [info] Checking replication filtering settings..
Mon Jul  1 02:08:33 2013 - [info]  binlog_do_db= , binlog_ignore_db=
Mon Jul  1 02:08:33 2013 - [info]  Replication filtering check ok.
Mon Jul  1 02:08:33 2013 - [info] Starting SSH connection tests..
Mon Jul  1 02:08:36 2013 - [info] All SSH connection tests passed successfully.
Mon Jul  1 02:08:36 2013 - [info] Checking MHA Node version..
Mon Jul  1 02:08:36 2013 - [info]  Version check ok.
Mon Jul  1 02:08:36 2013 - [info] Checking SSH publickey authentication and checking recovery script configurations on the current master..
Mon Jul  1 02:08:36 2013 - [info]   Executing command: save_binary_logs --command=test --start_file=binlog.000003 --start_pos=4 --
binlog_dir=/var/lib/mysql,/var/log/mysql --output_file=/var/log/masterha/app1/save_binary_logs_test --manager_version=0.52
Mon Jul  1 02:08:36 2013 - [info]   Connecting to root@192.168.1.1(192.168.1.1)..
  Creating /var/log/masterha/app1 if not exists..    ok.
  Checking output directory is accessible or not..
   ok.
  Binlog found at /var/lib/mysql, up to binlog.000003
Mon Jul  1 02:08:37 2013 - [info] Master setting check done.
Mon Jul  1 02:08:37 2013 - [info] Checking SSH publickey authentication and checking recovery script configurations on all alive slave servers..
Mon Jul  1 02:08:37 2013 - [info]   Executing command : apply_diff_relay_logs --command=test --slave_user=root --slave_host=192.168.1.2 --slave_ip=192.168.1.2 --slave_port=3306 --workdir=/var/log/masterha/app1 --target_version=5.0.77-log --manager_version=0.52 --relay_log_info=/var/lib/mysql/relay-log.info  --slave_pass=xxx
Mon Jul  1 02:08:37 2013 - [info]   Connecting to root@192.168.1.2(192.168.1.2)..
mysqlbinlog version is 3.2 (included in MySQL Client 5.0 or lower). This is not recommended. Consider upgrading MySQL Client to 5.1 or higher.
  Checking slave recovery environment settings..
  Opening /var/lib/mysql/relay-log.info ... ok.
  Relay log found at /var/lib/mysql, up to mysql-relay-bin.000002
  Temporary relay log file is /var/lib/mysql/mysql-relay-bin.000002
  Testing mysql connection and privileges.. done.
  Testing mysqlbinlog output.. done.
  Cleaning up test file(s).. done.
Mon Jul  1 02:08:37 2013 - [info]   Executing command : apply_diff_relay_logs --command=test --slave_user=root --slave_host=192.168.1.3 --slave_ip=192.168.1.3 --slave_port=3306 --workdir=/var/log/masterha/app1 --target_version=5.0.77-log --manager_version=0.52 --relay_log_info=/var/lib/mysql/relay-log.info  --slave_pass=xxx
Mon Jul  1 02:08:37 2013 - [info]   Connecting to root@192.168.1.3(192.168.1.3)..  mysqlbinlog version is 3.2 (included in MySQL Client 5.0 or lower). This is not recommended. Consider upgrading MySQL Client to 5.1 or higher.
  Checking slave recovery environment settings..
  Opening /var/lib/mysql/relay-log.info ... ok.
  Relay log found at /var/lib/mysql, up to mysql-relay-bin.000002
  Temporary relay log file is /var/lib/mysql/mysql-relay-bin.000002
  Testing mysql connection and privileges.. done.
  Testing mysqlbinlog output.. done.
  Cleaning up test file(s).. done.
Mon Jul  1 02:08:37 2013 - [info]   Executing command : apply_diff_relay_logs --command=test --slave_user=root --slave_host=192.168.1.4 --slave_ip=192.168.1.4 --slave_port=3306 --workdir=/var/log/masterha/app1 --target_version=5.0.77-log --manager_version=0.52 --relay_log_info=/var/lib/mysql/relay-log.info  --slave_pass=xxx
Mon Jul  1 02:08:37 2013 - [info]   Connecting to root@192.168.1.4(192.168.1.4)..
mysqlbinlog version is 3.2 (included in MySQL Client 5.0 or lower). This is not recommended. Consider upgrading MySQL Client to 5.1 or higher.
Creating directory /var/log/masterha/app1.. done.
  Checking slave recovery environment settings..
  Opening /var/lib/mysql/relay-log.info ... ok.
  Relay log found at /var/lib/mysql, up to mysql-relay-bin.000002
  Temporary relay log file is /var/lib/mysql/mysql-relay-bin.000002
  Testing mysql connection and privileges.. done.
  Testing mysqlbinlog output.. done.
  Cleaning up test file(s).. done.
Mon Jul  1 02:08:37 2013 - [info] Slaves settings check done.
Mon Jul  1 02:08:37 2013 - [info]
192.168.1.1 (current master)
+--192.168.1.2
+--192.168.1.3
+--192.168.1.4
Mon Jul  1 02:08:37 2013 - [info] Checking replication health on 192.168.1.2..
Mon Jul  1 02:08:37 2013 - [info]  ok.
Mon Jul  1 02:08:37 2013 - [info] Checking replication health on 192.168.1.3..
Mon Jul  1 02:08:37 2013 - [info]  ok.
Mon Jul  1 02:08:37 2013 - [info] Checking replication health on 192.168.1.4..
Mon Jul  1 02:08:37 2013 - [info]  ok.
Mon Jul  1 02:08:37 2013 - [warning] master_ip_failover_script is not defined.
Mon Jul  1 02:08:37 2013 - [warning] shutdown_script is not defined.
Mon Jul  1 02:08:37 2013 - [info] Got exit code 0 (Not master dead).
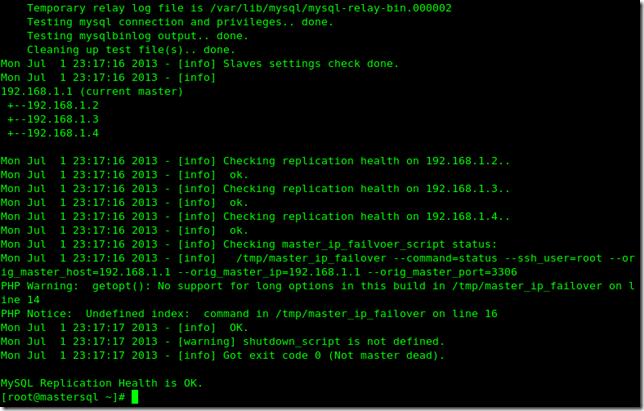
MySQL Replication Health is OK.
这时用虚拟机的话得要做个快照,因为下面我们要进行两个小实验 这个实验是不可逆的
开启MHA进程
这时我们模拟主Mysql宕机,看看数据库是否能够切换到备份机上
service mysqld stop
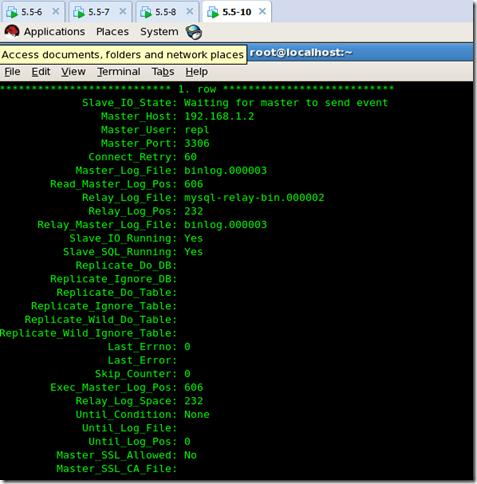
在从属机中
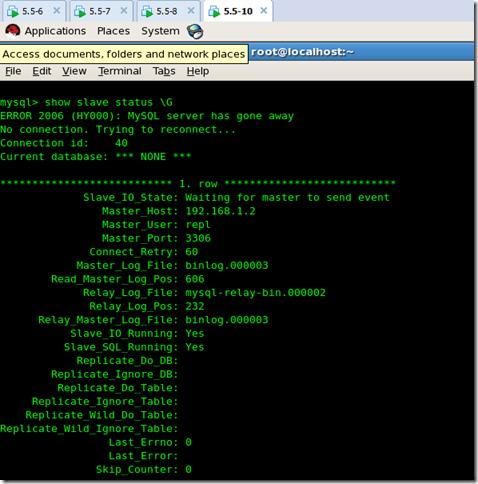
mysql>show slave status \G
1 通过脚本实现failover(故障转移)
2 通过keepalived实现虚拟IP 虚拟IP的地址随着master的改变而漂移
先来第一种方式
如果仔细看上面的开启进程中会注意到一个warning Mon Jul 1 02:08:37 2013 - [warning] master_ip_failover_script is not defined. 在/etc/app1.cnf中我们注释了这一行,现在在/etc/app1.cnf里开启这一行代码,然后在/tmp /master_ip_failover写入如下代码:
- #!/usr/bin/env php
- <?php
- $longopts = array(
- 'command:',
- 'ssh_user:',
- 'orig_master_host:',
- 'orig_master_ip:',
- 'orig_master_port:',
- 'new_master_host::',
- 'new_master_ip::',
- 'new_master_port::', );
- $options = getopt(null, $longopts);
- if ($options['command'] == 'start') {
- $params = array(
- 'ip' => $options['new_master_ip'],
- 'port' => $options['new_master_port'],
- );
- $string = '<?php return ' . var_export($params, true) . '; ?>';
- file_put_contents('config.php', $string, LOCK_EX); }
- exit(0);
- ?>
这是一段PHP代码 如果机器中没装php模块的话要执行 yum –y install php
之后赋给这个文件可执行权限 chmod +x /tmp/master_ip_failover,
- 再次检查后的截图 总之是检查OK了,这次再去把主Mysql服务器停止看看
- 再次运行MHA进程masterha_manager --conf=/etc/app1.cnf
然后停止mysql服务:
service mysqld stop
可以看到master的host成了192.168.1.2 实现了最短时间的故障转移:
2 keepalived实现方式
首先还原快照 实验原理已经明白 就是通过虚拟IP来管理master的状态
在mastersql和backupsql中都安装keepalived软件
tar -zvxf keepalived-1\[1\].1.17.tar.gz
yum -y install  kernel-devel
ln -s /usr/src/kernels/2.6.18-164.el5-i686/ /usr/src/linux
cd keepalived-1.1.17/
yum –y install openssl-*
./configure --prefix=/usr/local/keepalived
编译后看到三个yes才算成功 如果出现两个yes或者一个应该要检查下内核软连接做对了没有:
make
make install
cp /usr/local/keepalived/etc/rc.d/init.d/keepalived /etc/init.d/
cp /usr/local/keepalived/etc/sysconfig/keepalived /etc/sysconfig/
mkdir -pv /etc/keepalived
cp /usr/local/keepalived/etc/keepalived/keepalived.conf /etc/keepalived/
ln -s /usr/local/keepalived/sbin/keepalived /sbin/
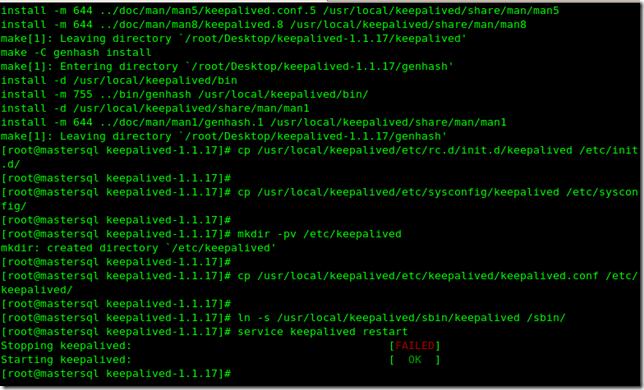
service keepalived restart
注意 这里如果下载的keepalived软件包不一样和kernel版本不一样 不要盲目复制粘贴该用tab命令补全就补全。
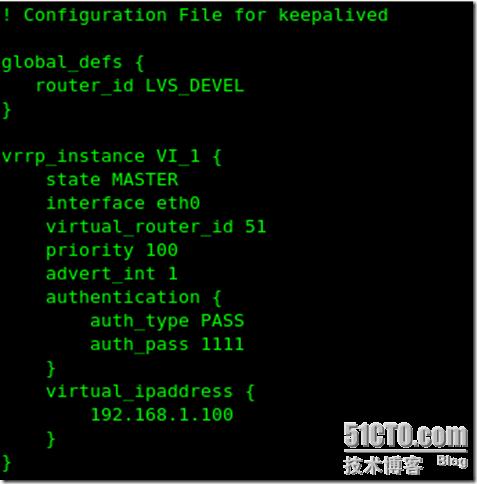
编辑mastersql的keepalived配置文件
vi /etc/keepalived/keepalived.conf 只编辑有效配置:
编辑backupsql的配置文件:
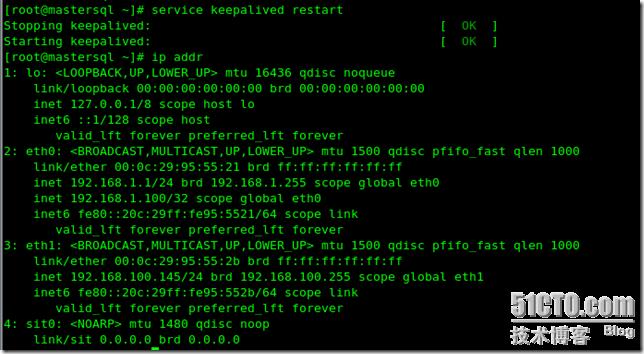
在mastersql上重启keepalived服务后看ip addr
可以看到eth0上有了另外一个IP 即虚拟IP
编辑脚本文件 大体意思是只要检测到mysql服务停止keepalived服务也停止 ,因为keepalived是通过组播方式告诉本网段自己还活着 当mysql服务停止后keepalived还依然运行 这时就需要停止keepalived让另一个主机获得虚拟IP,可以在后台运行这个脚本 也可以在keepalived配置文件加入这个脚本。
mastersql上keepalived配置如下:
interval 2 是每间隔两秒执行一次脚本 这个可以自己调节
脚本文件放置路径在/tmp/下 注意 这个也要被赋可执行权限!
开启MHA进程masterha_manager --conf=/etc/app1.cnf
一切都做好了只等停止mysql服务了 停止下试试
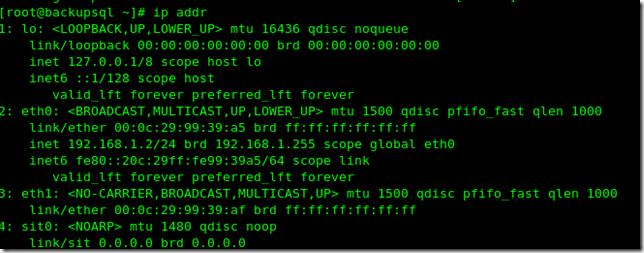
在backupsql上看ip addr:
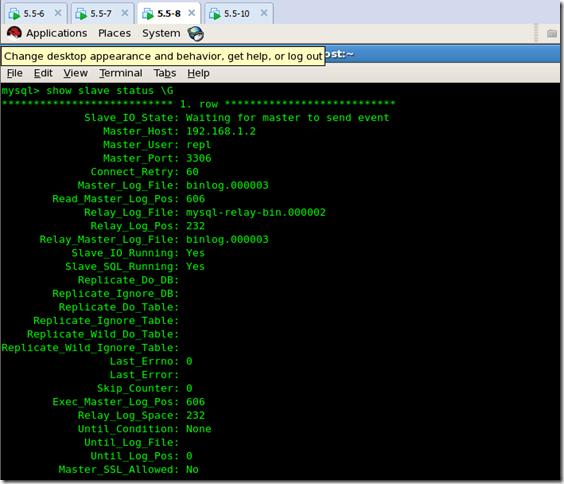
在另一台slavesql1上查看slave status:
成功切换到192.168.1.2 OK 实验完成。至此通过脚本和虚拟IP地址实现了高效率的故障转移,实现了mysql的真正的高可用!


