Spring学习笔记
spring全家桶:https://www.springcloud.cc/spring-reference.html
spring中文文档:http://c.biancheng.net/spring/
spring是一个轻量级的控制反转(IOC)和面向切面编程(AOP)的容器框架。
IOC本质:实质上是一种设计思想,DI(依赖注入)是实现ioc的一种方法。。没有ioc的程序中,使用面向对象编程,对象的创建于对象间的依赖关系完全硬编码在程序中,对象的创建由程序自己控制,控制反转后将对象的创建转移给第三方
注意:使用xml配置的Bean,Bean的定义信息是和实现分离的,采用注解的方式可以把二者合为一体。
定义:控制反转是一种通过描述(XML或注解)并通过第三方生产获取特定对象的方式,在spring中实现控制反转的是ioc容器,实现方法是依赖注入
1、由 Spring IoC 容器管理的对象称为 Bean,Bean 根据 Spring 配置文件中的信息创建。
Properties 配置文件主要以 key-value 键值对的形式存在,只能赋值,不能进行其他操作,适用于简单的属性配置。
2、ClassPathXmlApplicationContext 该类从类路径 ClassPath 中寻找指定的 XML 配置文件,并完成 ApplicationContext 的实例化工作
3、
通过set注入
导入pom依赖
    <dependencies>
        <!-- https://mvnrepository.com/artifact/org.springframework/spring-webmvc -->
        <dependency>
            <groupId>org.springframework</groupId>
            <artifactId>spring-webmvc</artifactId>
            <version>5.3.8</version>
        </dependency>
    </dependencies>
2、学生信息
package com.zheng.pojo;

public class Student {
    private String name;
    private int age;

    public void setName(String name) {
        this.name = name;
    }

    public void setAge(int age) {
        this.age = age;
    }

    public String getName() {
        return name;
    }

    public int getAge() {
        return age;
    }

    @Override
    public String toString() {
        return "Student{" +
                "name='" + name + '\'' +
                ", age=" + age +
                '}';
    }
}
3、xml配置文件
<?xml version="1.0" encoding="UTF-8"?>
<beans xmlns="http://www.springframework.org/schema/beans"
       xmlns:xsi="http://www.w3.org/2001/XMLSchema-instance"
       xsi:schemaLocation="http://www.springframework.org/schema/beans
   http://www.springframework.org/schema/beans/spring-beans-3.0.xsd">

    <bean id="student" class="com.zheng.pojo.Student">
        <property name="name" value="小红"></property>
        <property name="age" value="12"></property>
    </bean>


</beans>
4、测试
package com.zheng.pojo;

import org.springframework.context.ApplicationContext;
import org.springframework.context.support.ClassPathXmlApplicationContext;

public class StudentTest {
    public static void main(String[] args) {
        //获取容器
        ApplicationContext context = new ClassPathXmlApplicationContext("Beans.xml");

        Student st1 = (Student) context.getBean("student");
        System.out.println("姓名:" + st1.getName());
        System.out.println("年龄:" + st1.getAge());
        System.out.println(st1.toString());
    }
}

通过构造函数注入
    public Student(String name, int age) {
        this.name = name;
        this.age = age;
    }
xml文件
    <bean id="student1" class="com.zheng.pojo.Student">
        <constructor-arg name="name" value="小黑"></constructor-arg>
        <constructor-arg name="age" value="18"></constructor-arg>
    </bean>
测试
System.out.println("通过构造函数");
        Student st2 = (Student) context.getBean("student1");
        System.out.println(st2.toString());
结果

注意:

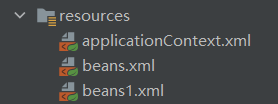
在application中导入其他配置
<?xml version="1.0" encoding="UTF-8"?>
<beans xmlns="http://www.springframework.org/schema/beans"
       xmlns:xsi="http://www.w3.org/2001/XMLSchema-instance"
       xsi:schemaLocation="http://www.springframework.org/schema/beans http://www.springframework.org/schema/beans/spring-beans.xsd">
    <import resource="beans.xml"/>
    <import resource="beans1.xml"/>

</beans>
获得容器方法
ApplicationContext context=new ClassPathXmlApplicationContext("applicationContext.xml");
依赖注入
构造函数注入
setter注入
复杂类型依赖注入
student
package com.zheng.dao;

import java.util.*;

public class Student {
    private String name;
    private Address address;
    private String[] books;
    private List<String> hobbys;
    private Map<String, String> card;
    private Set<String> games;
    private String wife;
    private Properties info;

    public String getName() {
        return name;
    }

    public void setName(String name) {
        this.name = name;
    }

    public Address getAddress() {
        return address;
    }

    public void setAddress(Address address) {
        this.address = address;
    }

    public String[] getBooks() {
        return books;
    }

    public void setBooks(String[] books) {
        this.books = books;
    }

    public List<String> getHobbys() {
        return hobbys;
    }

    public void setHobbys(List<String> hobbys) {
        this.hobbys = hobbys;
    }

    public Map<String, String> getCard() {
        return card;
    }

    public void setCard(Map<String, String> card) {
        this.card = card;
    }

    public Set<String> getGames() {
        return games;
    }

    public void setGames(Set<String> games) {
        this.games = games;
    }

    public String getWife() {
        return wife;
    }

    public void setWife(String wife) {
        this.wife = wife;
    }

    public Properties getInfo() {
        return info;
    }

    public void setInfo(Properties info) {
        this.info = info;
    }

    @Override
    public String toString() {
        return "Student{" +
                "name='" + name + '\'' +
                ", address=" + address +
                ", books=" + Arrays.toString(books) +
                ", hobbys=" + hobbys +
                ", card=" + card +
                ", games=" + games +
                ", wife='" + wife + '\'' +
                ", info=" + info +
                '}';
    }
}
address
package com.zheng.dao;

public class Address {
    private String address;

    public String getAddress() {
        return address;
    }

    public void setAddress(String address) {
        this.address = address;
    }

    @Override
    public String toString() {
        return "Address{" +
                "address='" + address + '\'' +
                '}';
    }
}
配置文件
<?xml version="1.0" encoding="UTF-8"?>
<beans xmlns="http://www.springframework.org/schema/beans"
       xmlns:xsi="http://www.w3.org/2001/XMLSchema-instance"
       xsi:schemaLocation="http://www.springframework.org/schema/beans http://www.springframework.org/schema/beans/spring-beans.xsd">
    <bean id="address" class="com.zheng.dao.Address">
        <property name="address" value="上海"></property>
    </bean>

    <bean id="student" class="com.zheng.dao.Student">
        <property name="name" value="小红"></property>

        <property name="address" ref="address"></property>

        <!--为数组注入值-->
        <property name="books">
            <array>
                <value>JAVA</value>
                <value>PHP</value>
                <value>C++</value>
            </array>
        </property>

        <!--为list集合注入值-->
        <property name="hobbys">
            <list>
                <value>足球</value>
                <value>篮球</value>
                <value>乒乓球</value>
            </list>
        </property>

        <!--map集合注入值-->
        <property name="card">
            <map>
                <entry key="身份证" value="234567655678987678"></entry>
                <entry key="信用卡" value="234567789087654678"></entry>
            </map>
        </property>

        <!--set注入-->
        <property name="games">
            <set>
                <value>和平精英</value>
                <value>明日之后</value>
                <value>王者荣耀</value>
            </set>
        </property>

        <!--注入空值-->
        <property name="wife">
            <null/>
        </property>

        <!--注入properties-->
        <property name="info">
            <props>
                <prop key="学号">B20180702224</prop>
                <prop key="姓名">张三</prop>
                <prop key="性别">男</prop>
                <prop key="年龄">18</prop>

            </props>
        </property>


    </bean>

</beans>
测试
import com.zheng.dao.Student;
import org.springframework.context.ApplicationContext;
import org.springframework.context.support.ClassPathXmlApplicationContext;

public class Mytest {
    public static void main(String[] args) {
       ApplicationContext context = new ClassPathXmlApplicationContext("beans.xml");
        Student student = (Student) context.getBean("student");
        System.out.println(student.toString());
    }
}


Bean的作用域
1)singleton
默认值,单例模式,表示在 Spring 容器中只有一个 Bean 实例,Bean 以单例的方式存在。
2)prototype
原型模式,表示每次通过 Spring 容器获取 Bean 时,容器都会创建一个 Bean 实例。
Bean的自动装配
- byName自动装配
    <bean id="cat" class="com.zheng.pojo.Cat"></bean>
    <bean id="dog" class="com.zheng.pojo.Dog"></bean>
    <!--
    byName:会自动在容器上下文中查找,和自己对象set方法后面的值对应的beanid
    -->
    <bean id="user" class="com.zheng.pojo.User" autowire="byName">
        <property name="name" value="小红"></property>

    </bean>
- byType自动装配
    <bean class="com.zheng.pojo.Cat"></bean>
    <bean  class="com.zheng.pojo.Dog"></bean>

    <!--
    byName:会自动在容器上下文中查找,和自己对象属性类型相同的bean
    -->
    <bean id="user" class="com.zheng.pojo.User" autowire="byType">
        <property name="name" value="小红"></property>
    </bean>
注解自动装配
1、导入约束context约束
2、配置注解支持 <context:annotation-config/>
<?xml version="1.0" encoding="UTF-8"?>
<beans xmlns="http://www.springframework.org/schema/beans"
       xmlns:xsi="http://www.w3.org/2001/XMLSchema-instance"
       xmlns:context="http://www.springframework.org/schema/context"
       xsi:schemaLocation="http://www.springframework.org/schema/beans
    http://www.springframework.org/schema/beans/spring-beans-3.0.xsd
    http://www.springframework.org/schema/context
            http://www.springframework.org/schema/context/spring-context.xsd">

    <!--开启注解的支持-->
    <context:annotation-config/>

</beans>
举例
- @Autowired
可以应用到 Bean 的属性变量、属性的 setter 方法、非 setter 方法及构造函数等,配合对应的注解处理器完成 Bean 的自动配置工作。默认按照 Bean 的类型进行装配。
@Qualifier
与 @Autowired 注解配合使用,会将默认的按 Bean 类型装配修改为按 Bean 的实例名称装配,Bean 的实例名称由 @Qualifier 注解的参数指定。
package com.zheng.pojo;

import org.springframework.beans.factory.annotation.Autowired;

public class User {
    @Autowired
    private  Dog dog;

    @Autowired
    private Cat cat;

    private String name;

    public Dog getDog() {
        return dog;
    }

    public void setDog(Dog dog) {
        this.dog = dog;
    }

    public Cat getCat() {
        return cat;
    }

    public void setCat(Cat cat) {
        this.cat = cat;
    }

    public String getName() {
        return name;
    }

    public void setName(String name) {
        this.name = name;
    }
}
xml配置
<?xml version="1.0" encoding="UTF-8"?>
<beans xmlns="http://www.springframework.org/schema/beans"
       xmlns:xsi="http://www.w3.org/2001/XMLSchema-instance"
       xmlns:context="http://www.springframework.org/schema/context"
       xsi:schemaLocation="http://www.springframework.org/schema/beans
    http://www.springframework.org/schema/beans/spring-beans-3.0.xsd
    http://www.springframework.org/schema/context
            http://www.springframework.org/schema/context/spring-context.xsd">

    <!--开启注解的支持-->
    <context:annotation-config/>

    <bean id="cat" class="com.zheng.pojo.Cat"></bean>
    <bean id="dog" class="com.zheng.pojo.Dog"></bean>

    <bean id="user" class="com.zheng.pojo.User"/>
</beans>
两者配合使用
    @Autowired
    @Qualifier("dog")
    private  Dog dog;
    <bean  class="com.zheng.pojo.Cat"></bean>
    <bean id="dog"  class="com.zheng.pojo.Dog"></bean>
二、spring注解开发
xml文件
<?xml version="1.0" encoding="UTF-8"?>
<beans xmlns="http://www.springframework.org/schema/beans"
       xmlns:context="http://www.springframework.org/schema/context"
       xmlns:xsi="http://www.w3.org/2001/XMLSchema-instance"
       xsi:schemaLocation="http://www.springframework.org/schema/beans http://www.springframework.org/schema/beans/spring-beans.xsd
                        http://www.springframework.org/schema/context http://www.springframework.org/schema/context/spring-context.xsd">

    <!--指定扫描下的包,这个包下的注解就会自动生效-->
    <context:component-scan base-package="com.zheng.pojo"/>

    <context:annotation-config/>

</beans>
实体类
package com.zheng.pojo;

import org.springframework.beans.factory.annotation.Value;
import org.springframework.stereotype.Component;
import org.springframework.stereotype.Controller;

@Component   //相当于== <bean id="student" class="com.zheng.pojo.Student"/>
public class Student {
    @Value("小红")  //相当于== <property name="name" value="小红"/>
    private String name;
    private int age;

    public String getName() {
        return name;
    }

    public void setName(String name) {
        this.name = name;
    }

    public int getAge() {
        return age;
    }

    public void setAge(int age) {
        this.age = age;
    }

    @Override
    public String toString() {
        return "Student{" +
                "name='" + name + '\'' +
                ", age=" + age +
                '}';
    }
}
测试
import com.zheng.pojo.Student;
import org.springframework.context.ApplicationContext;
import org.springframework.context.support.ClassPathXmlApplicationContext;

public class MyTest {
    public static void main(String[] args) {
        ApplicationContext context = new ClassPathXmlApplicationContext("ApplicationContext.xml");
        Student st1 = context.getBean("student", Student.class);//默认的实例名是类的小写
        System.out.println(st1.getName());

    }
}

衍生的注解(重点理解)
@Component有几个衍生注解,在web开发中,按照mvc三层架构
- dao【@Repository】
- service【@Service】
- controller【@Controller】
四个注解的功能一样,都是代表将某个类注册到spring中,装配Bean


