Spring--JdbcTemplate基本使用
JdbcTemplate是spring框架中提供的一个对象,是对原始繁琐的Jdbc API对象的简单封装。
spring框架为我们提供了很多的操作模板类。例如:操作关系型数据的JdbcTemplate和HibernateTemplate,
操作nosql数据库的RedisTemplate,操作消息队列的JmsTemplate等等。
02-JdbcTemplate基本使用-开发步骤(理解)
①导入spring-jdbc和spring-tx坐标

②创建数据库表和实体

③创建JdbcTemplate对象

④执行数据库操作
jdbcTemplate的使用必须搭配@ContextConfiguration("")注解来使用
@ContextConfiguration 获取配置文件的路径

@ContextConfiguration("classpath:放置在resources下的配置文件的名称")
@ContextConfiguration("classpath:applicationTestContext.xml")  // 指定加载的配置文件 必须是这样是这样来获取配置文件
<!--    导入spring的jar包-->
    <dependencies>
        <dependency>
            <groupId>org.springframework</groupId>
            <artifactId>spring-context</artifactId>
            <version>5.0.3.RELEASE</version>
        </dependency>
<!--导入test测试需要的jar包-->
        <dependency>
            <groupId>org.springframework</groupId>
            <artifactId>spring-test</artifactId>
            <version>5.0.5.RELEASE</version>
        </dependency>

        <dependency>
            <groupId>junit</groupId>
            <artifactId>junit</artifactId>
            <version>4.12</version>
        </dependency>

        <!-- 导入spring的 -->
        <dependency>
            <groupId>org.springframework</groupId>
            <artifactId>spring-jdbc</artifactId>
            <version>5.0.5.RELEASE</version>
        </dependency>
        <dependency>
            <groupId>org.springframework</groupId>
            <artifactId>spring-tx</artifactId>
            <version>5.0.5.RELEASE</version>
        </dependency>

<!-- 导入依赖的cp30连接池-->
        <dependency>
            <groupId>c3p0</groupId>
            <artifactId>c3p0</artifactId>
            <version>0.9.1.2</version>
        </dependency>
<!--导入mysql连接需要的jar包-->
        <dependency>
            <groupId>mysql</groupId>
            <artifactId>mysql-connector-java</artifactId>
            <version>5.1.32</version>
        </dependency>
        <dependency>
            <groupId>com.alibaba</groupId>
            <artifactId>druid</artifactId>
            <version>1.0.9</version>
        </dependency>

    </dependencies>
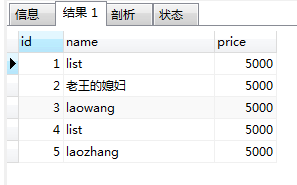
创建数据库表和实体

Acount实体Bean对象

/**
 * 建立数据库中account表的对应javaBean对象
 */


public class Account {
    private Integer id;
    private String name;
    private Integer price;

    public Account() {
    }

    public Integer getId() {
        return id;
    }

    public void setId(Integer id) {
        this.id = id;
    }

    public String getName() {
        return name;
    }

    public void setName(String name) {
        this.name = name;
    }

    public Integer getPrice() {
        return price;
    }

    public void setPrice(Integer price) {
        this.price = price;
    }

    public Account(Integer id, String name, Integer price) {
        this.id = id;
        this.name = name;
        this.price = price;
    }

    @Override
    public String toString() {
        return "Account{" +
                "id=" + id +
                ", name='" + name + '\'' +
                ", price=" + price +
                '}';
    }
}
创建JdbcTemplate对象
@Test
    //测试JdbcTemplate开发步骤
    public void test1() throws PropertyVetoException {
        //创建数据源对象
        ComboPooledDataSource dataSource = new ComboPooledDataSource();
        dataSource.setDriverClass("com.mysql.jdbc.Driver");
        dataSource.setJdbcUrl("jdbc:mysql://localhost:3306/test");
        dataSource.setUser("root");
        dataSource.setPassword("root");

        JdbcTemplate jdbcTemplate = new JdbcTemplate();
        //设置数据源对象  知道数据库在哪
        jdbcTemplate.setDataSource(dataSource);
        //执行操作
        int row = jdbcTemplate.update("insert into account values(?,?)", "tom", 5000);
        System.out.println(row);

    }
我们可以将JdbcTemplate的创建权交给Spring,将数据源DataSource的创建权也交给Spring,在Spring容器内部将数据源DataSource注入到JdbcTemplate模版对象中,然后通过Spring容器获得JdbcTemplate对象来执行操作。
<!--    配置数据源对象-->
    <bean id="dataS" class="com.mchange.v2.c3p0.ComboPooledDataSource">
        <property name="driverClass" value="com.mysql.jdbc.Driver"/>
        <property name="jdbcUrl" value="jdbc:mysq:///test_mybatis"/>
        <property name="user" value="zhao"/>
        <property name="password" value="123456"/>

    </bean>

    <!--jdbc模板对象-->
    <bean id="jdbcTemplate" class="org.springframework.jdbc.core.JdbcTemplate">  <!--将创建的数据库连接对象给jdbcTemplate模板对象,后续的数据库连接对象从jdbc模板对象中获取,只需要将jdbcTemplate注入到要使用的类中即可-->
        <property name="dataSource" ref="dataS"/>  <!--name 是指你的DataSource这个数据库连接对象  ref是你的上面设置的spring容器中的dataSource就是你的数据库的配置信息-->
    </bean>
jdbc.driver=com.mysql.jdbc.Driver
jdbc.url=jdbc:mysql://localhost:3306/test
jdbc.username=root
jdbc.password=root
配置文件修改为:
<?xml version="1.0" encoding="UTF-8"?>
<beans xmlns="http://www.springframework.org/schema/beans"
       xmlns:xsi="http://www.w3.org/2001/XMLSchema-instance"
       xmlns:context="http://www.springframework.org/schema/context"
       xsi:schemaLocation="
       http://www.springframework.org/schema/beans
       http://www.springframework.org/schema/beans/spring-beans.xsd
       http://www.springframework.org/schema/context
       http://www.springframework.org/schema/context/spring-context.xsd
">

<!--    定义实现类的配置-->
    <bean id="userDao" class="com.springTestOne.Dao.Impl.UserDaoImpl"></bean>

<!--    导入jdbc的配置文件-->
    <context:property-placeholder location="jdbc.properties"/>
    <!--数据源对象-->
    <bean id="dataS" class="com.mchange.v2.c3p0.ComboPooledDataSource">
<!--        <property name="driverClass" value="com.mysql.jdbc.Driver"/>-->
<!--        <property name="jdbcUrl" value="jdbc:mysql://localhost:3306/test_mybatis"/>-->
<!--        <property name="user" value="zhao"/>-->
<!--        <property name="password" value="123456"/>-->
        <property name="driverClass" value="${jdbc.driver}"/>  <!--引入jdbc的配置信息-->
        <property name="jdbcUrl" value="${jdbc.url}"/>
        <property name="user" value="${jdbc.username}"/>
        <property name="password" value="${jdbc.password}"/>
    </bean>
    <!--jdbc模板对象-->
    <bean id="jdbcTemplate" class="org.springframework.jdbc.core.JdbcTemplate">
        <property name="dataSource" ref="dataS"/>  <!--name 是指你的DataSource这个数据库连接对象  ref是你的上面设置的spring容器中的dataSource就是你的数据库的配置信息-->
    </bean>
</beans>
@RunWith(SpringJUnit4ClassRunner.class)
@ContextConfiguration("classpath:applicationTestContext.xml")  // 指定加载的配置文件 必须是这样是这样来获取配置文件
public class JdbcTestAccount {

    @Autowired
    private JdbcTemplate jdbcTemplate;


    /**
     * insert, update, delete 插入,更新,删除使用的都是jdbcTemplate.update() 方法
     */
    // 插入
    @Test
    public void InsertMethod(){
        int i = jdbcTemplate.update("insert into account(id,name,price) values (?,?,?)", 8, "老王媳妇", 78);
        System.out.println(i);  // 操作成功返回的受影响的行数
    }

    //更新
    @Test
    public void UpdateMethod(){
        int i = jdbcTemplate.update("update account set name=? where id=?", "老张", 5);
        System.out.println(i);
    }

    //删除
    @Test
    public void DeleteMethod(){
        int i = jdbcTemplate.update("delete from account where id=?", 6);
        System.out.println(i);
    }


}
@RunWith(SpringJUnit4ClassRunner.class)
@ContextConfiguration("classpath:applicationTestContext.xml")  // 指定加载的配置文件 必须是这样是这样来获取配置文件
public class JdbcTestAccount {

    @Autowired
    private JdbcTemplate jdbcTemplate;


    /**
     * 查询一个获取聚合查询使用jdbcTemplact.queryForObject()
     * 查询所有使用jdbcTemplat.query()
     */

    //查询一个对象信息,查询单个对象
    @Test
    public void queryForOne(){
        Account account = jdbcTemplate.queryForObject("select * from account where name = ?", new BeanPropertyRowMapper<Account>(Account.class), "laozhang");
        System.out.println(account);
    }

    //聚合查询 返回查询的获取的条数 返回一个数值
    @Test
    public void queryCont(){
        Long query = jdbcTemplate.queryForObject("select count(*) from account", Long.class);
        System.out.println(query);  //7
    }

    //查询所有,返回一个list集合
    @Test
    public void queryAll(){
        List<Account> accountList = jdbcTemplate.query("select * from account", new BeanPropertyRowMapper<Account>(Account.class));
        System.out.println(accountList);
    }
}
①导入spring-jdbc和spring-tx坐标
②创建数据库表和实体
③创建JdbcTemplate对象jk
JdbcTemplate jdbcTemplate = newJdbcTemplate();
 jdbcTemplate.setDataSource(dataSource);
④执行数据库操作
更新操作:

    jdbcTemplate.update (sql,params)

查询操作:

    jdbcTemplate.query (sql,Mapper,params)

jdbcTemplate.queryForObject(sql,Mapper,params)
jdbcTemplate模板的时候必须搭配@ContextConfiguration 注解 使用 否则会报下面的错误
Caused by: java.lang.IllegalStateException: Neither GenericXmlContextLoader nor AnnotationConfigContextLoader was able to load an ApplicationContext from [MergedContextConfiguration@4de8b406 testClass = JdbcTestAccount, locations = '{}', classes = '{}', contextInitializerClasses = '[]', activeProfiles = '{}', propertySourceLocations = '{}', propertySourceProperties = '{}', contextCustomizers = set[[empty]], contextLoader = 'org.springframework.test.context.support.DelegatingSmartContextLoader', parent = [null]].


