
Linux之NFS
NFS简介
NFS是Network File System的缩写及网络文件系统。NFS主要功能是通过局域网络让不同的主机系统之间可以共享文件或目录。
NFS系统和Windows网络共享、网络驱动器类似, 只不过windows用于局域网, NFS用于企业集群架构中, 如果是大型网站, 会用到更复杂的分布式文件系统FastDFS,glusterfs,HDFS,ceph
NFS应用
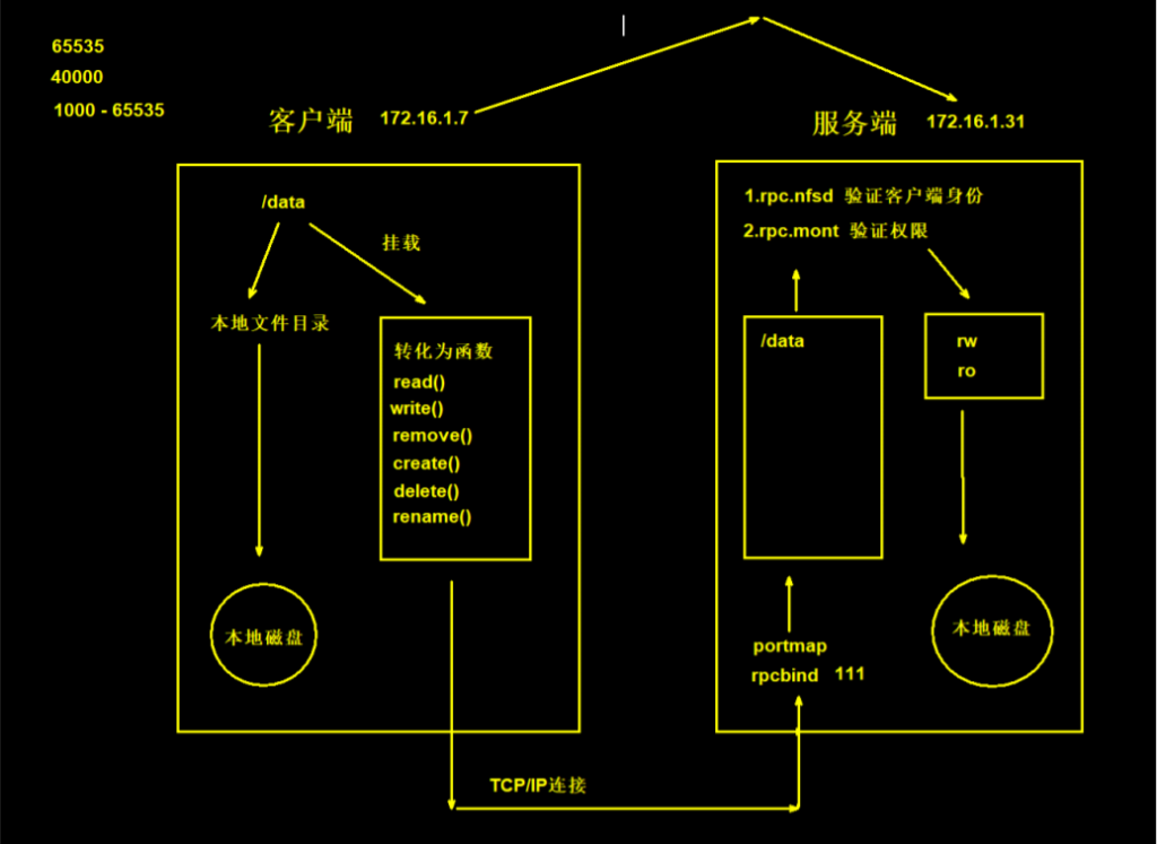
1、用户访问NFS客户端,将请求转化为函数
2、NFS通过TCP/IP连接服务端
3、NFS服务端接收请求,会先调用portmap进程进行端口映射
4、Rpc.nfsd进程用于判断NFS客户端能否连接服务端
5、Rpc.mount进程用于判断客户端对服务端的操作权限
6、如果通过权限验证,可以对服务端进行操作,修改或读取
NFS原理
NFS应用
服务端

1、安装NFS和rpcbind
[root@nfs ~]# yum install nfs-utils rpcbind -y

2、创建挂载点
[root@nfs ~]# mkdir -p /web/nfs{1..9}

3、配置挂载点
[root@nfs ~]# vim /etc/exports
格式:
[挂载点] [可以访问的IP]([权限])
/web/nfs1  172.16.1.0/20(rw,sync,all_squash)

4、关闭selinux和防火墙
[root@nfs ~]# setenforce 0
[root@nfs ~]# systemctl disable --now firewalld

5、启动Nfs和rpcbind服务
[root@nfs ~]# systemctl start nfs-server
[root@nfs ~]# systemctl start rpcbind

6、检查服务端是否正常
[root@nfs ~]# showmount -e [服务端的地址,默认是本机地址]

方式一:
[root@nfs ~]# showmount -e
Export list for nfs:
/web/nfsv1 172.16.1.0/20

方式二:
[root@nfs ~]# showmount -e 172.16.1.31
Export list for 172.16.1.31:
/web/nfs1 172.16.1.0/20

[root@nfs ~]# cat /var/lib/nfs/etab

7、给挂载点授权
[root@nfs ~]# chown -R nfsnobody.nfsnobody /web
客户端
1、安装NFS
[root@web01 opt]# yum install -y nfs-utils

2、创建目录
[root@web01 opt]# mkdir /opt/nfs/

3、挂载NFS
[root@web01 opt]# mount -t nfs 172.16.1.31:/web/nfs1  /opt/nfs/

4、测试NFS文件同步功能
NFS配置详解
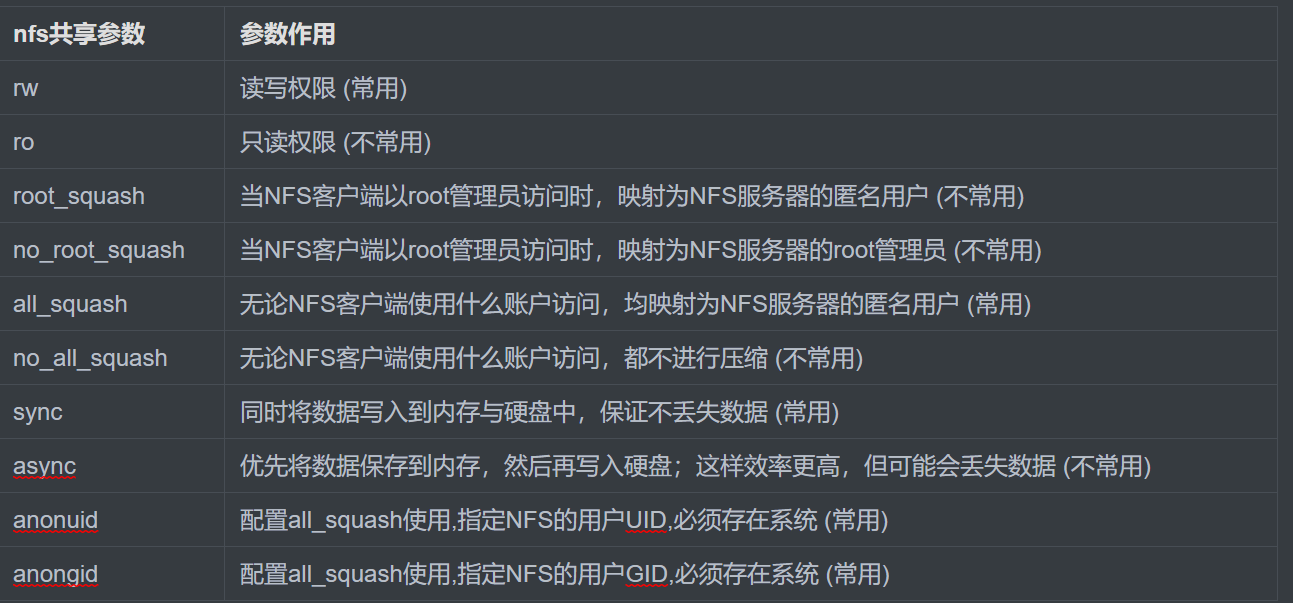
1、控制读写
rw、ro

2、控制文件权限
root_squash
no_root_squash
all_squash
no_all_squash

3、控制写模式
sync
async

4、控制用户
anonuid
anongid
统一用户
1、创建用户
[root@nfs nfs1]# groupadd www -g 666
[root@nfs nfs1]# useradd www -u 666 -g 666 -M -r -s /sbin/nologin

2、修改挂载点权限
[root@nfs nfs1]# chown -R www.www /web/

3、使用

搭建考试系统
搭建WEB服务
1、安装web软件
[root@web01 opt]# yum install httpd php php-devel -y

2、将代码放置于网站的根目录
[root@web01 opt]# cd /var/www/html/

# 上传代码

3、授权
[root@web01 html]# chown -R www.www /var/www/html

4、关闭selinux和防火墙
[root@web01 ~]# setenforce 0
[root@web01 ~]# systemctl disable --now firewalld

5、修改web软件的用户
[root@web01 html]# vim /etc/httpd/conf/httpd.conf
User www
Group www

6、启动web软件
[root@web01 html]# systemctl start httpd

7、测试

    1、上传

    2、访问

配合NFS实现文件共享
1、修改NFS配置文件
[root@nfs nfs1]# vim /etc/exports
/web/upload  172.16.1.0/20(rw,sync,all_squash,anonuid=666,anongid=666)

2、创建挂载点
[root@nfs nfs1]# mkdir /web/upload
[root@nfs nfs1]# chown www.www /web/upload

3、重启NFS
[root@nfs nfs1]# systemctl restart nfs-server rpcbind

4、客户端安装NFS软件
[root@web01 html]# yum install nfs-utils -y
[root@web02 html]# yum install nfs-utils -y
[root@web03 html]# yum install nfs-utils -y

5、挂载
[root@web01 html]# mount -t nfs 172.16.1.31:/web/upload /var/www/html/upload
[root@web02 html]# mount -t nfs 172.16.1.31:/web/upload /var/www/html/upload
[root@web03 html]# mount -t nfs 172.16.1.31:/web/upload /var/www/html/upload

6、测试
用web2上传,web3查看
NFS永久挂载
1、通过开机自启动脚本挂载
[root@web01 html]# vim /etc/rc.local
    /usr/bin/mount -t nfs 172.16.1.31:/web/upload /var/www/html/upload
[root@web01 html]# chmod +x /etc/rc.d/rc.local
2、通过/etc/fstab配置文件(配置前切记做快照)
[root@web02 ~]# vim /etc/fstab
# 挂载点                  挂载的目录            类型   设置默认权限    0 不备份 1 备份     0 不检查 1 检查
172.16.1.31:/web/upload  /var/www/html/upload   nfs       defaults          0                0
[root@web02 ~]# mount -a


【推荐】国内首个AI IDE,深度理解中文开发场景,立即下载体验Trae
【推荐】编程新体验,更懂你的AI,立即体验豆包MarsCode编程助手
【推荐】抖音旗下AI助手豆包,你的智能百科全书,全免费不限次数
【推荐】轻量又高性能的 SSH 工具 IShell:AI 加持,快人一步
· 10年+ .NET Coder 心语,封装的思维:从隐藏、稳定开始理解其本质意义
· .NET Core 中如何实现缓存的预热?
· 从 HTTP 原因短语缺失研究 HTTP/2 和 HTTP/3 的设计差异
· AI与.NET技术实操系列:向量存储与相似性搜索在 .NET 中的实现
· 基于Microsoft.Extensions.AI核心库实现RAG应用
· TypeScript + Deepseek 打造卜卦网站:技术与玄学的结合
· 阿里巴巴 QwQ-32B真的超越了 DeepSeek R-1吗?
· 【译】Visual Studio 中新的强大生产力特性
· 10年+ .NET Coder 心语 ── 封装的思维:从隐藏、稳定开始理解其本质意义
· 【设计模式】告别冗长if-else语句:使用策略模式优化代码结构