windows服务总结
一、创建windows服务项目
创建完成后结构,如:
其中,Program.cs代码:
using System;using System.Collections.Generic;using System.Linq;using System.ServiceProcess;using System.Text;namespace WindowsService1{ static class Program { /// <summary> /// 应用程序的主入口点。 /// </summary> static void Main() { ServiceBase[] ServicesToRun; ServicesToRun = new ServiceBase[] { new Service1() }; ServiceBase.Run(ServicesToRun); } }} |
Service1.cs代码:
using System;using System.Collections.Generic;using System.ComponentModel;using System.Data;using System.Diagnostics;using System.Linq;using System.ServiceProcess;using System.Text;namespace WindowsService1{ public partial class Service1 : ServiceBase { public Service1() { InitializeComponent(); } protected override void OnStart(string[] args) { } protected override void OnStop() { } }} |
此时,Service1.cs设计视图默认属性为:
二、配置windows服务,添加安装程序
(以上时默认初始化展示,为方便演示,下面将服务文件名Service1.cs改为XFKFinanceAccService.cs,服务名称也改成了XFKFinanceAccService)
回到XFKFinanceAccService.cs设计视图,空白处右键==》添加安装程序,如:
可以看到,在ProjectInstaller安装程序文件的设计视图里,有两个名为serviceInstaller1和serviceProcessInstaller1的组件,设置它们的属性,如:

三、编写windows服务代码
服务设置好以后,进入XFKFinanceAccService.cs代码视图,开始实现处理逻辑。
示例一:
using System;using System.Collections.Generic;using System.ComponentModel;using System.Configuration;using System.Data;using System.Diagnostics;using System.Linq;using System.ServiceProcess;using System.Text;using System.Threading;using XFKFinanceAccountsSys.BussinessLogic;using XFKFinanceAccountsSys.Common;namespace XFKFinanceAccountsSys.WindowsService{ public partial class XFKFinanceAccService : ServiceBase { DateTime lastDt = DateTime.Now.AddDays(-1); Thread thread = null; public XFKFinanceAccService() { InitializeComponent(); LogHelper.WriteLog("---初始化windows服务!!!"); } protected override void OnStart(string[] args) { LogHelper.WriteLog("---启动windows服务!!!"); thread = new Thread(new ThreadStart(AutoGenElapsed)); thread.IsBackground = true; thread.Start(); } protected override void OnStop() { LogHelper.WriteLog("Stop"); if (thread != null) { if (thread.ThreadState == System.Threading.ThreadState.Running) { thread.Abort(); } } } private void AutoGenElapsed() { LogHelper.WriteLog("---进入windows服务!!!"); while (true) { //服务开始处理时间 string startTime = ConfigurationManager.AppSettings["StartTime"]; //每次处理完间隔时间 int interval = int.Parse(ConfigurationManager.AppSettings["Interval"]); try { //一天执行一次 if (DateTime.Now.DayOfYear == lastDt.DayOfYear + 1) { //到达处理时间时,任务开始处理数据 if (DateTime.Now > Convert.ToDateTime(DateTime.Now.ToString("yyyy-MM-dd") + " " + startTime)) { /********** 处理逻辑主体 Begin***********/ /********** 处理逻辑主体 End***********/ //处理完后时间改为当前时间,下一次不再处理 lastDt = DateTime.Now; } } } catch (Exception ex) { LogHelper.WriteLog("error" + ex); } finally { Thread.Sleep(interval * 1000); } } } }} |
示例二(启用定时器):
using System;using System.Collections.Generic;using System.ComponentModel;using System.Configuration;using System.Data;using System.Diagnostics;using System.Linq;using System.ServiceProcess;using System.Text;using System.Threading;using XFKFinanceAccountsSys.BussinessLogic;using XFKFinanceAccountsSys.Common;namespace XFKFinanceAccountsSys.WindowsService{ public partial class XFKFinanceAccService : ServiceBase { DateTime lastDt = DateTime.Now.AddDays(-1); Thread thread = null; public XFKFinanceAccService() { InitializeComponent(); LogHelper.WriteLog("---初始化windows服务!!!"); //启用定时器 System.Timers.Timer timer = new System.Timers.Timer(); timer.Elapsed += timer_Elapsed; timer.Interval = 5000;//每5秒执行一次 timer.Enabled = true; } void timer_Elapsed(object sender, System.Timers.ElapsedEventArgs e) { LogHelper.WriteLog("---进入windows服务!!!"); //服务开始处理时间 string startTime = ConfigurationManager.AppSettings["StartTime"]; //每次处理完间隔时间 int interval = int.Parse(ConfigurationManager.AppSettings["Interval"]); try { //一天执行一次 if (DateTime.Now.DayOfYear == lastDt.DayOfYear + 1) { //到达处理时间时,任务开始处理数据 if (DateTime.Now > Convert.ToDateTime(DateTime.Now.ToString("yyyy-MM-dd") + " " + startTime)) { /********** 处理逻辑主体 Begin***********/ /********** 处理逻辑主体 End***********/ //处理完后时间改为当前时间,下一次不再处理 lastDt = DateTime.Now; } } } catch (Exception ex) { LogHelper.WriteLog("error" + ex); } finally { Thread.Sleep(interval * 1000); } } protected override void OnStart(string[] args) { LogHelper.WriteLog("---启动windows服务!!!"); } protected override void OnStop() { LogHelper.WriteLog("---停止windows服务!!!"); } }} |
在项目中加入配置文件App.config,需加入下面配置:
我们可以修改程序入口代码,以便可以将服务定制化,如:
using System;using System.Collections.Generic;using System.Data;using System.Linq;using System.ServiceProcess;using System.Text;using System.Windows.Forms;using XFKFinanceAccountsSys.BussinessLogic;using XFKFinanceAccountsSys.WindowsService.Model;namespace XFKFinanceAccountsSys.WindowsService{ static class Program { /// <summary> /// 应用程序的主入口点。 /// </summary> [STAThread] static void Main(string[] args) { Application.EnableVisualStyles(); Application.SetCompatibleTextRenderingDefault(false); string dataBaseXmlFile = System.AppDomain.CurrentDomain.BaseDirectory + "../../ConfigXml\\DataBase.xml"; XFK.AFX1.Common.DB.ORM.Setting.Instance().DatabaseMapFile = dataBaseXmlFile; if (args.Length > 0) { //如果入口参数不为空,则运行服务 if (args[0].ToLower() == "/s" || args[0].ToLower() == "-s") { ServiceBase[] ServicesToRun; ServicesToRun = new ServiceBase[] { new XFKFinanceAccService() }; ServiceBase.Run(ServicesToRun); } } else { //如果入口参数为空,则进入到服务操作界面 Application.Run(new OperationForm()); } } }} |
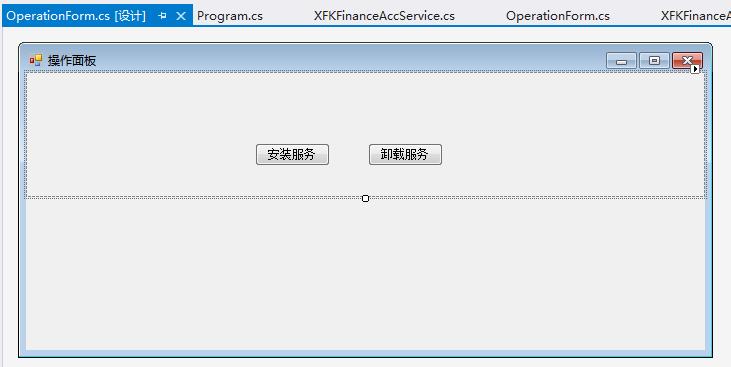
OperationForm窗口:
我们可以在这个winform窗体中增加需要的功能,如安装/卸载服务、查看/编辑数据等。
当然,我们也可以用DOS命令安装和卸载服务,如:
安装:
C:\WINDOWS\Microsoft.NET\Framework\v4.0.30319\InstallUtil.exe "E:\WORK\对账系统\XFKFinanceAccountsSys20170627\XFKFinanceAccountsSys.WindowsService\bin\Debug\XFKFinanceAccountsSys.WindowsService.exe"
卸载:
C:\WINDOWS\Microsoft.NET\Framework\v4.0.30319\InstallUtil.exe -U E:\WORK\对账系统\XFKFinanceAccountsSys20170627\XFKFinanceAccountsSys.WindowsService\bin\Debug\XFKFinanceAccountsSys.WindowsService.exe
参考资料:
http://www.cnblogs.com/xujie/p/5695673.html
http://blog.csdn.net/xiaoy_h/article/details/26090277(内存共享)


【推荐】国内首个AI IDE,深度理解中文开发场景,立即下载体验Trae
【推荐】编程新体验,更懂你的AI,立即体验豆包MarsCode编程助手
【推荐】抖音旗下AI助手豆包,你的智能百科全书,全免费不限次数
【推荐】轻量又高性能的 SSH 工具 IShell:AI 加持,快人一步
· AI与.NET技术实操系列:基于图像分类模型对图像进行分类
· go语言实现终端里的倒计时
· 如何编写易于单元测试的代码
· 10年+ .NET Coder 心语,封装的思维:从隐藏、稳定开始理解其本质意义
· .NET Core 中如何实现缓存的预热?
· 25岁的心里话
· 闲置电脑爆改个人服务器(超详细) #公网映射 #Vmware虚拟网络编辑器
· 基于 Docker 搭建 FRP 内网穿透开源项目(很简单哒)
· 零经验选手,Compose 一天开发一款小游戏!
· 通过 API 将Deepseek响应流式内容输出到前端