struts和spring整合
开发流程:
1)引jar包,可以在配置工程中设置用户libarary,然后直接引入。如果在web-inf/lib没有用户导入的lib文件,可以参考问题0的解决方案
需要的是struts_core,spring_core,struts_spring_web
//struts_core
Struts2.3.32core\commons-fileupload-1.3.2.jar
Struts2.3.32core\commons-io-2.2.jar
Struts2.3.32core\commons-lang3-3.2.jar
Struts2.3.32core\freemarker-2.3.22.jar
Struts2.3.32core\javassist-3.11.0.GA.jar
Struts2.3.32core\ognl-3.0.19.jar
Struts2.3.32core\struts2-core-2.3.32.jar
Struts2.3.32core\xwork-core-2.3.32.jar
//spring_core
spring3.2.9core\commons-logging-1.2.jar
spring3.2.9core\spring-beans-3.2.9.RELEASE.jar
spring3.2.9core\spring-context-3.2.9.RELEASE.jar
spring3.2.9core\spring-core-3.2.9.RELEASE.jar
spring3.2.9core\spring-expression-3.2.9.RELEASE.jar
//struts_spring_web
struts-spring-web\struts2-spring-plugin-2.3.32.jar
struts-spring-web\spring-web-3.2.9.RELEASE.jar
struts-spring-web\spring-webmvc-3.2.9.RELEASE.jar
2)开发entity/dao/service/action
3)配置Struts2
web.xml文件配置struts2
<filter>
        <filter-name>struts2</filter-name>
        <filter-class>
            org.apache.struts2.dispatcher.ng.filter.StrutsPrepareAndExecuteFilter
        </filter-class>
    </filter>
    <filter-mapping>
        <filter-name>struts2</filter-name>
        <url-pattern>/*</url-pattern>
    </filter-mapping>
<!-- struts.xml文件    -->
<?xml version="1.0" encoding="UTF-8" ?>

<!DOCTYPE struts PUBLIC
    "-//Apache Software Foundation//DTD Struts Configuration 2.1.7//EN"
    "http://struts.apache.org/dtds/struts-2.1.dtd">

<struts>
    <package name="Userpkg" extends="struts-default" >
        <action name="save" class="userAction" method="saveUser">
            <result name="success">/index.jsp</result>
        </action>
    </package>
</struts>
4)配置bean-dao.xml/bean-service.xml/bean-action.xml文件
 <!-- 所有DAO类的配置 -->
        <bean id="userDao" class="com.huitong.Dao.impl.UserDao"></bean>

<?xml version="1.0" encoding="UTF-8"?>
<beans xmlns="http://www.springframework.org/schema/beans"
    xmlns:xsi="http://www.w3.org/2001/XMLSchema-instance"
    xmlns:p="http://www.springframework.org/schema/p"
    xmlns:context="http://www.springframework.org/schema/context"
    xsi:schemaLocation="
        http://www.springframework.org/schema/beans
        http://www.springframework.org/schema/beans/spring-beans.xsd
        http://www.springframework.org/schema/context
        http://www.springframework.org/schema/context/spring-context.xsd">

        <!-- 所有Service类的配置 -->
        <bean id="userService" class="com.huitong.service.impl.UserService">
            <property name="userDao" ref="userDao"></property>
        </bean>

</beans>
bean-action.xml

<?xml version="1.0" encoding="UTF-8"?>
<beans xmlns="http://www.springframework.org/schema/beans"
    xmlns:xsi="http://www.w3.org/2001/XMLSchema-instance"
    xmlns:p="http://www.springframework.org/schema/p"
    xmlns:context="http://www.springframework.org/schema/context"
    xsi:schemaLocation="
        http://www.springframework.org/schema/beans
        http://www.springframework.org/schema/beans/spring-beans.xsd
        http://www.springframework.org/schema/context
        http://www.springframework.org/schema/context/spring-context.xsd">

        <!-- 所有Action类的配置 -->
        <bean id="userAction" class="com.huitong.action.UserAction">
            <property name="userService" ref="userService"></property>
        </bean>

</beans>
5)在web.xml文件中配置spring
<!-- 2 配置spring -->
    <context-param>
    <param-name>contextConfigLocation</param-name>
    <param-value>/WEB-INF/classes/bean-*.xml</param-value>
    </context-param>

    <listener>
     <listener-class>org.springframework.web.context.ContextLoaderListener</listener-class>
    </listener>
最后可以测试了,应该是可以通过的
struts2.3.32,spring3.2.9进行整合,
出现问题0:MyEclipse 使用 User Library 不自动部署到 WEB-INF/lib
在项目上右键进入Properties,选择Deployment Assembly,再点击Add...,如下图所示:
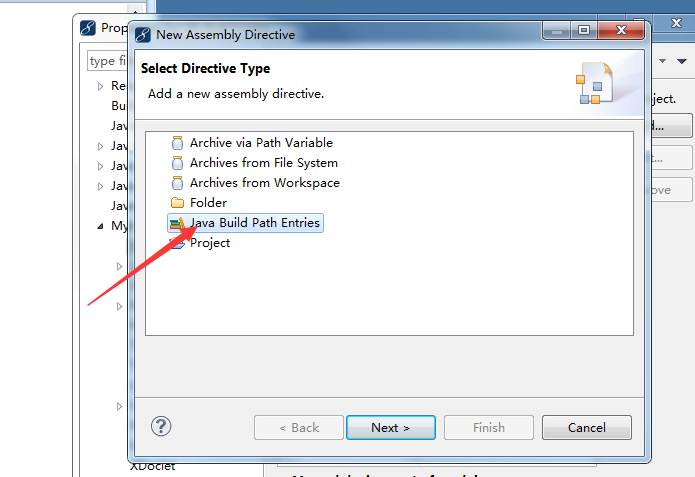
2.然后在弹出的窗口中,选择Java Build Path Entries,点击Next,如下图所示:
3.选择你要你引入的UserLibrary,点击Finish即可
出现问题1:java.lang.ClassNotFoundException: org.springframework.web.servlet.DispatcherServlet
解决办法:导包,spring-webmvc-3.2.9.RELEASE.jar
如果觉得有用,想赞助一下请移步赞助页面:赞助一下


【推荐】国内首个AI IDE,深度理解中文开发场景,立即下载体验Trae
【推荐】编程新体验,更懂你的AI,立即体验豆包MarsCode编程助手
【推荐】抖音旗下AI助手豆包,你的智能百科全书,全免费不限次数
【推荐】轻量又高性能的 SSH 工具 IShell:AI 加持,快人一步
· AI与.NET技术实操系列(二):开始使用ML.NET
· 记一次.NET内存居高不下排查解决与启示
· 探究高空视频全景AR技术的实现原理
· 理解Rust引用及其生命周期标识(上)
· 浏览器原生「磁吸」效果!Anchor Positioning 锚点定位神器解析
· 全程不用写代码,我用AI程序员写了一个飞机大战
· DeepSeek 开源周回顾「GitHub 热点速览」
· 记一次.NET内存居高不下排查解决与启示
· MongoDB 8.0这个新功能碉堡了,比商业数据库还牛
· .NET10 - 预览版1新功能体验(一)
2016-04-29 django1.8读书笔记模版高级进阶