树莓派4 64bit 编译安装QT5.13.2 和 Redis Desktop Manager 2020.1-dev
未经授权,严禁转载
文章很长,关键步骤不多,写的详细只是记录下解决问题的思路
[2020-6-22 更新 解决 eglfs问题,使得 egldevice、 gbm 、X11 全为yes]
2017年的时候我发表过一篇树莓派 编译安装Python3.5 + PyQT5.8 + Eric6 的文章 链接在此,由于当时搞完了再写的,回忆过程中有些遗漏,导致留言里抱怨问题太多……这次特地边搞边-写……
之前上一篇已经交代了系统已经编译安装了Python 3.8.3 和Vscode ,VSCode 网上教程一堆,几步搞定,不多说,安装后显示为Code - OSS (headmelted)
编译安装 redis6.0 也比较简单,很顺利没有太多麻烦,这里不赘述。
说明下,其实我所有的命令都是在root下完成,全部用的proxychain4 代理下载的,真实命令只有 p4 apt install xxxxx , 这里为了严谨没有直接这么写
64bit beta 没有预装QT,于是
sudo apt-get install qt5-default qtcreator qtdeclarative5-dev qtmultimedia5-dev libqt5sql5-mysql
命令一顿撸,安装启动后正常,版本qt5.11 , QTcreator4.8,继续,在pi用户的downlaods 目录下:
git clone --recursive https://github.com/uglide/RedisDesktopManager.git -b 2020 rdm2020 && cd ./rdm2020
下载后,用Qtcreator 打开src中的工程文件,发现问题很多,缺模块,一顿操作补充模块,发现插件版本又不对……算了,按照官方要求,直接上Qt5.13 编译安装Qt5.13 全程用了4小时,大家要有心理准备 , 下载源码:
wget http://download.qt.io/archive/qt/5.13/5.13.2/single/qt-everywhere-src-5.13.2.tar.xz
国外有一篇写编译qt5.12的文章,微雪也有一篇,很多人都看过,都是在32位系统下的,64位系统有很多不同,
先下载树莓派的配置文件
我是直接 访问 https://github.com/oniongarlic/qt-raspberrypi-configuration 打包下载解压后
把里面的 linux-rpi4-v3d-g++ 文件夹放到 qt-everywhere-src-5.13.2/qtbase/mkspecs 目录里
按照这样编译不了的,报错: 不支持参数 -mfpu=crypto-neon-fp-armv8
因为 arm 开发文档里面有写 相关链接
Note
The -mfpu option is only valid with the armv8a-arm-none-eabi target. It is not possible to override the default FPU for the aarch64-arm-none-eabi target. However, you can prevent the use of floating-point instructions or floating-point registers for the aarch64-arm-none-eabi target with the -mgeneral-regs-only option.
到 linux-rpi4-v3d-g++ 目录里,打开 qmake.conf 修改
QMAKE_CFLAGS += -march=armv8-a -mtune=cortex-a72
保存,安装依赖
apt install build-essential libfontconfig1-dev libdbus-1-dev libfreetype6-dev libicu-dev libinput-dev libxkbcommon-dev libsqlite3-dev libssl-dev libpng-dev libjpeg-dev libglib2.0-dev libraspberrypi-dev
这样子编译会出现错误以及其他七七八八的问题:
Note: The following modules are not being compiled in this configuration:
    3dcore
    3drender
    …………
在终端下运行:raspi-config 在 Advanced Options -> GL Driver -> GL 2 选择此项,继续补充依赖:
apt-get install bison libgles2-mesa-devmesa-utils libegl1-mesa libegl1-mesa-dev libgbm-dev libgbm1 libgl1-mesa-dev libgl1-mesa-dri libgl1-mesa-glx libglu1-mesa libglu1-mesa-dev libbluetooth-dev bluetooth blueman bluez libusb-dev libdbus-1-dev bluez-hcidump bluez-tools libclang-dev llvm-7 clang-7
ln -s /usr/lib/llvm-7/bin/llvm-config /usr/bin/llvm-config
建立llvm-config是为了configure时候编译QTdoc要用,或者通过改环境变量也可以,具体可参考官方说明 链接
现在再 到 qt-everywhere-src-5.13.2 中运行:(没有skip 全部组件都装上)
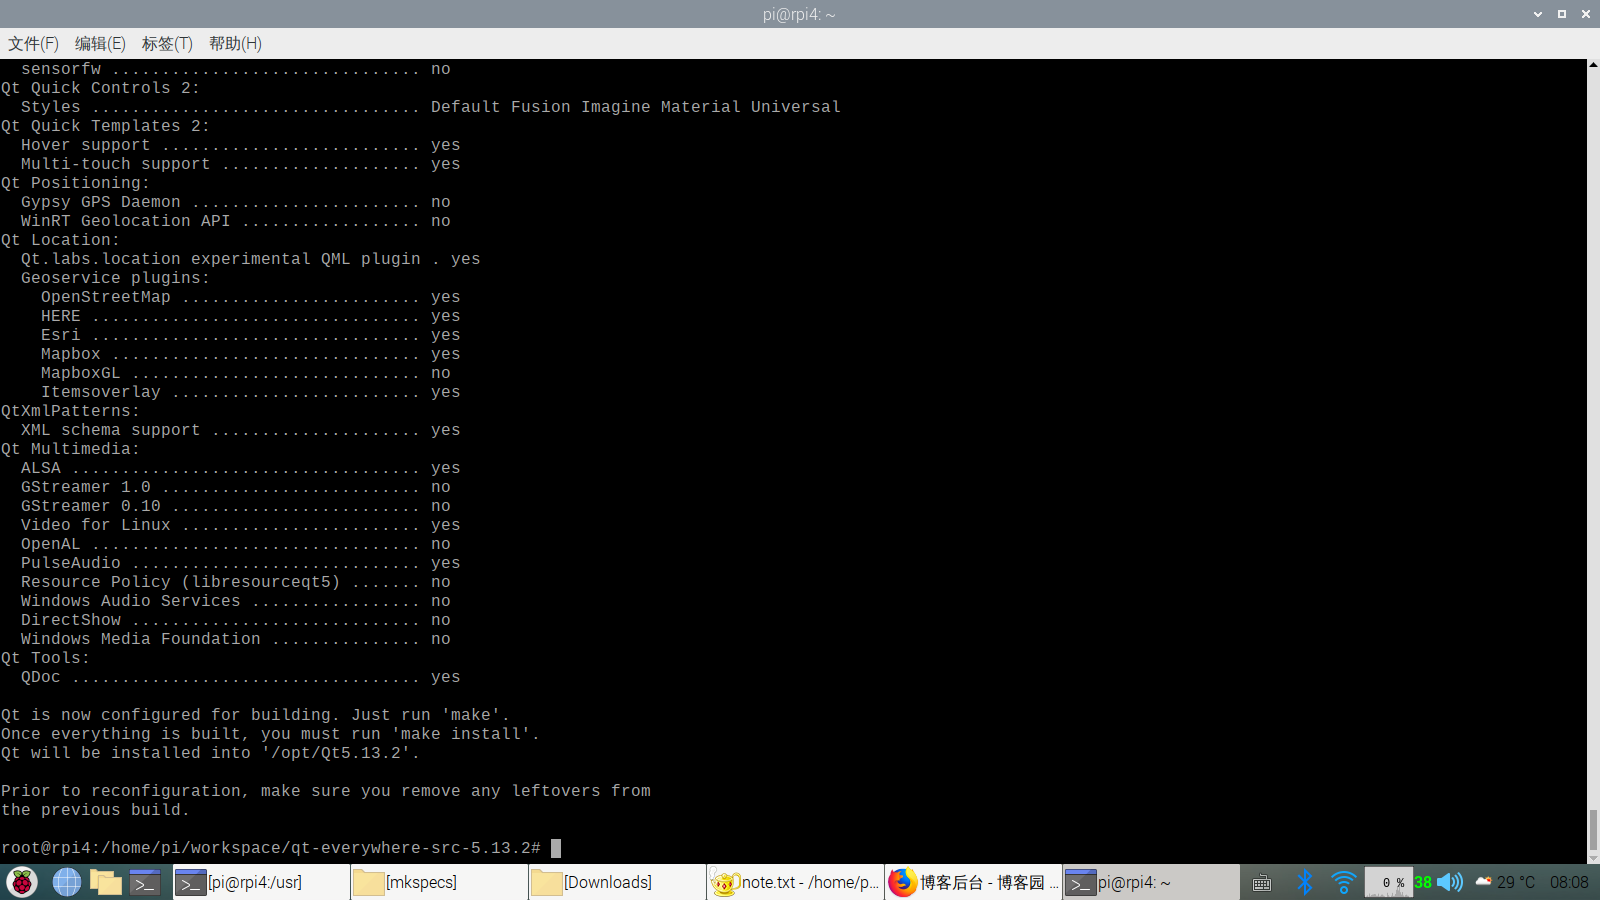
./configure -platform linux-rpi4-v3d-g++ -v -opengl es2 -eglfs -no-gtk -opensource -confirm-license -release -reduce-exports -force-pkg-config -qt-pcre -no-pch -ssl -tslib -evdev -system-freetype -fontconfig -glib -prefix /opt/Qt5.13.2 -qpa eglfs -recheck-all

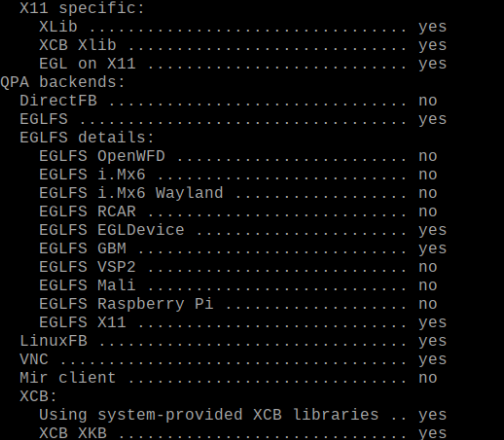
这里注意,EGLFS Details 里面看了下 :
QPA backends:
  DirectFB ............................... no
  EGLFS .................................. yes
  EGLFS details:
    EGLFS OpenWFD ........................ no
    EGLFS i.Mx6 .......................... no
    EGLFS i.Mx6 Wayland .................. no
    EGLFS RCAR ........................... no
    EGLFS EGLDevice ...................... no
    EGLFS GBM ............................ no
    EGLFS VSP2 ........................... no
    EGLFS Mali ........................... no
    EGLFS Raspberry Pi ................... no
    EGLFS X11 ............................ yes
EGLDevice 和 GBM 要求应该是YES的,这里是NO,但是去config.log日志里面看了下:
executing config test egl-egldevice
+ cd /home/pi/workspace/qt-everywhere-src-5.13.2/config.tests/egl-egldevice && /home/pi/workspace/qt-everywhere-src-5.13.2/qtbase/bin/qmake "CONFIG -= qt debug_and_release app_bundle lib_bundle" "CONFIG += shared warn_off console single_arch" 'QMAKE_USE += egl' 'QMAKE_LIBS_EGL = /usr/lib/aarch64-linux-gnu/libEGL.so' /home/pi/workspace/qt-everywhere-src-5.13.2/config.tests/egl-egldevice
+ cd /home/pi/workspace/qt-everywhere-src-5.13.2/config.tests/egl-egldevice && MAKEFLAGS= /usr/bin/make clean && MAKEFLAGS= /usr/bin/make
> rm -f main.o
> rm -f *~ core *.core
> g++ -c -pipe -march=armv8-a -mtune=cortex-a72 -O2 -w -fPIC  -I. -I/home/pi/workspace/qt-everywhere-src-5.13.2/qtbase/mkspecs/linux-rpi4-v3d-g++ -o main.o main.cpp
> g++ -Wl,-O1 -o egl-egldevice main.o   /usr/lib/aarch64-linux-gnu/libEGL.so
test config.qtbase_gui.tests.egl-egldevice succeeded
looking for library gbm
Trying source 0 (type pkgConfig) of library gbm ...
+ /usr/bin/pkg-config --exists --silence-errors gbm
+ /usr/bin/pkg-config --modversion gbm
> 19.3.2
+ /usr/bin/pkg-config --libs-only-L gbm
+ /usr/bin/pkg-config --libs-only-l gbm
> -lgbm
+ /usr/bin/pkg-config --cflags gbm
+ cd /home/pi/workspace/qt-everywhere-src-5.13.2/config.tests/gbm && /home/pi/workspace/qt-everywhere-src-5.13.2/qtbase/bin/qmake "CONFIG -= qt debug_and_release app_bundle lib_bundle" "CONFIG += shared warn_off console single_arch" 'QMAKE_USE += gbm' 'QMAKE_LIBS_GBM = /usr/lib/aarch64-linux-gnu/libgbm.so' /home/pi/workspace/qt-everywhere-src-5.13.2/config.tests/gbm
+ cd /home/pi/workspace/qt-everywhere-src-5.13.2/config.tests/gbm && MAKEFLAGS= /usr/bin/make clean && MAKEFLAGS= /usr/bin/make
> rm -f main.o
> rm -f *~ core *.core
> g++ -c -pipe -march=armv8-a -mtune=cortex-a72 -O2 -w -fPIC  -I. -I/home/pi/workspace/qt-everywhere-src-5.13.2/qtbase/mkspecs/linux-rpi4-v3d-g++ -o main.o main.cpp
> g++ -Wl,-O1 -o gbm main.o   /usr/lib/aarch64-linux-gnu/libgbm.so
 => source accepted.
test config.qtbase_gui.libraries.gbm succeeded
都是SUCCESS 这就有点莫名其妙了……(PS: 按照找个模式继续装完,实践过用也可以,不设参数没问题,但是qpa_platform 设置为 eglfs 会出现字体很小看不见七七八八问题)
——————————————————————
6-22号,解决了这个问题:
编译QT5.13错误不明显,但是那天我编译QT5.14.2出了提示webengine不能用,于是我直接download了qt5.14的webengine模块,解压后目录下运行qmake检查时候可以展示详细的错误。
对比qt官方: https://wiki.qt.io/QtPDF_Build_Instructions
要求的yes项目补齐依赖:
apt install libfontconfig1-dev libfreetype6-dev libx11-dev libxext-dev libxfixes-dev libxi-dev libxrender-dev libxcb1-dev libx11-xcb-dev libxcb-glx0-dev libxkbcommon-x11-dev libxcb-keysyms1-dev libxcb-image0-dev libxcb-shm0-dev libxcb-icccm4-dev libxcb-sync0-dev libxcb-xfixes0-dev libxcb-shape0-dev libxcb-randr0-dev libxcb-render-util0-dev
以及关键的两个缺失:
apt install ninja-build libdrm-dev
到qt5.13目录下清理之前的configure缓存
rm -rf config.cache
重新细微修改了下configure后,测试这两个已经yes了:
./configure -platform linux-rpi4-v3d-g++ -v -opengl es2 -opensource -confirm-license -release -reduce-exports -qt-pcre -ssl -tslib -system-freetype -fontconfig -glib -prefix /opt/Qt5.13.2 -recheck-all

nice 很完美了,Qt5.14同理解决此问题
——————————————————————
开始编译, 由于我是8gb内存,就没搞交换内存等,而且有风扇吹,直接上-j 4
make -j 4
经过5个小时的漫长等待,如果没有报错就可以进行下一步了
后面install时候发现还有坑,这里先补一些依赖
apt install libxcb-xfixes0-dev
make install
后续还会提示一些七七八八问题,遇到一个解决一个:
/usr/bin/ld: 找不到 -lclip2tri
/usr/bin/ld: 找不到 -lpoly2tri
/usr/bin/ld: 找不到 -lclipper
主要是这6个第三方依赖的问题:
qt-everywhere-src-5.13.2/qtlocation/src/3rdparty/clip2tri
qt-everywhere-src-5.13.2/qtlocation/src/3rdparty/clipper
qt-everywhere-src-5.13.2/qtlocation/src/3rdparty/poly2tri
qt-everywhere-src-5.13.2/qtvirtualkeyboard/src/plugins/openwnn/3rdparty/openwnn
qt-everywhere-src-5.13.2/qtvirtualkeyboard/src/plugins/pinyin/3rdparty/pinyin
qt-everywhere-src-5.13.2//qtvirtualkeyboard/src/plugins/tcime/3rdparty/tcime
遇到就去这些目录里面,make 一下:然后再make install,此过程历时1个多小时
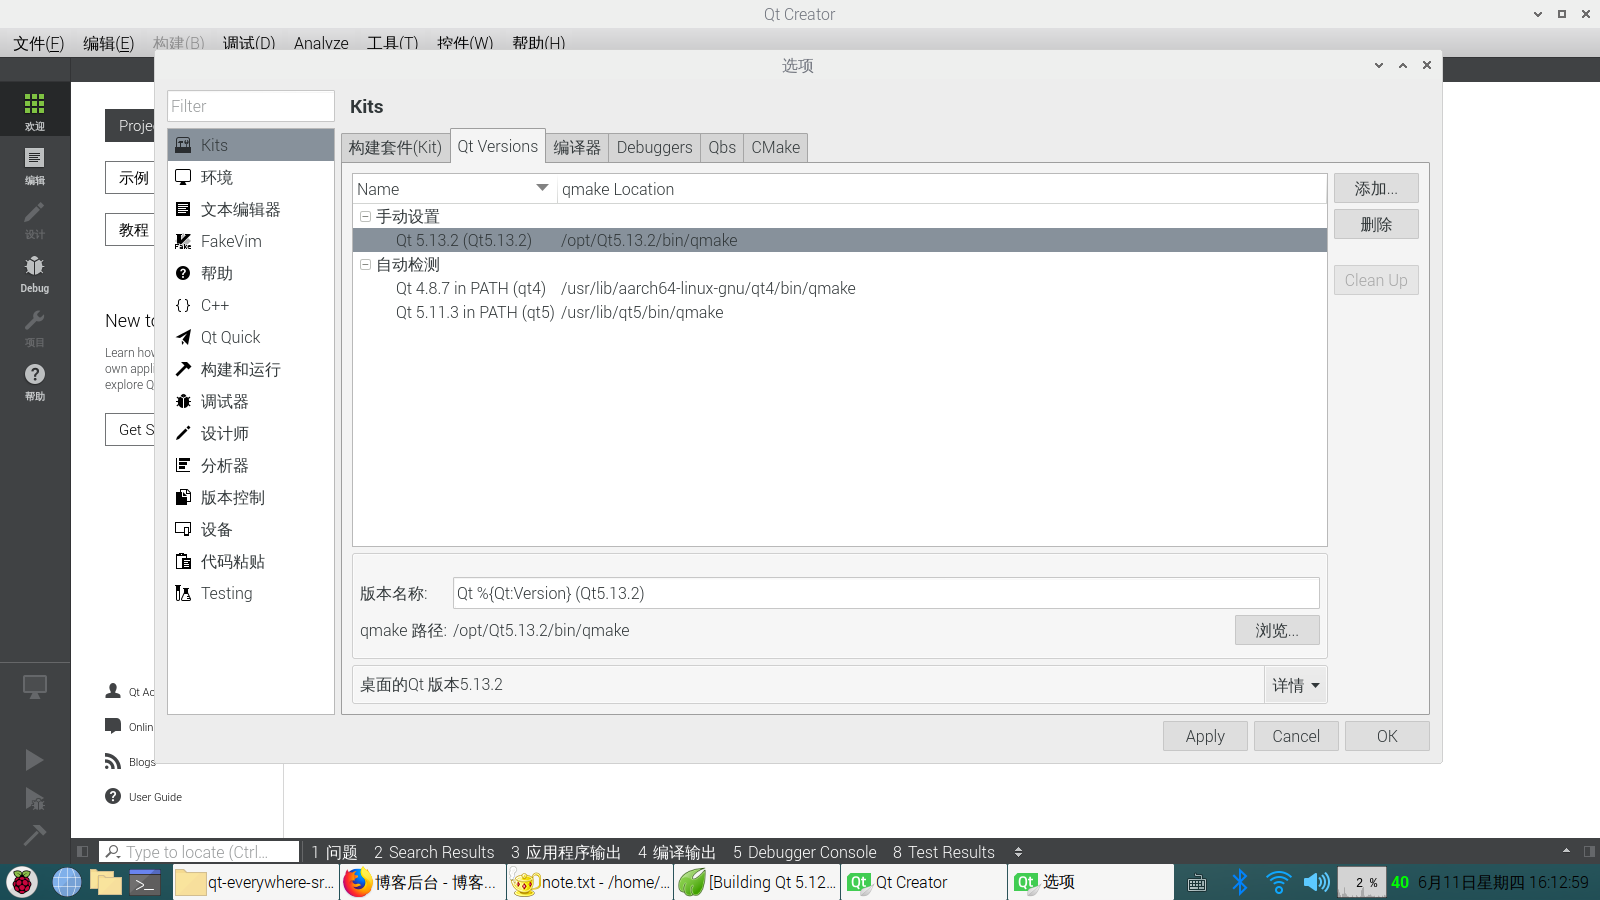
最终没有再报错结束,这时候打开 QTcreator 打开 工具 -> 选项 Kits 中 QtVersion手工设置 路径,同时Kits中也添加一个设置,如图


这时候再打开之前的rdm2020目录中src目录,选择工程文件,选择自己的环境Qt5.13.2,然后
再rdm2020中新建 build-rdm-default-Debug 、build-rdm-default-Release 、build-rdm-default-Profile、以及 /bin/linux/release 目录
按照要求 要
pip3 install -r src/py/requirements.txt
但是可能有些不一定能装上,这边我缺的不多,直接运行以下内容,这里只是简单过了下
pip3 install bitstring cbor msg

apt install python3-pandas
修改配置others/resource 中的文件 qt.conf

[Paths]
Libraries=/opt/Qt5.13.2/lib
Plugins=/opt/Qt5.13.2/plugins
Qml2Imports=/opt/Qt5.13.2/qml
以及 src/resources/rdm.sh 修改为
#!/bin/bash
DIR=$(dirname "$(readlink -f "$0")")
export LD_LIBRARY_PATH="$DIR/../Qt5.13.2/lib":$LD_LIBRARY_PATH
$DIR/rdm
选择 - 工具 - 外部 - QT语言家 - 发布翻译,生成 翻译的qm文件
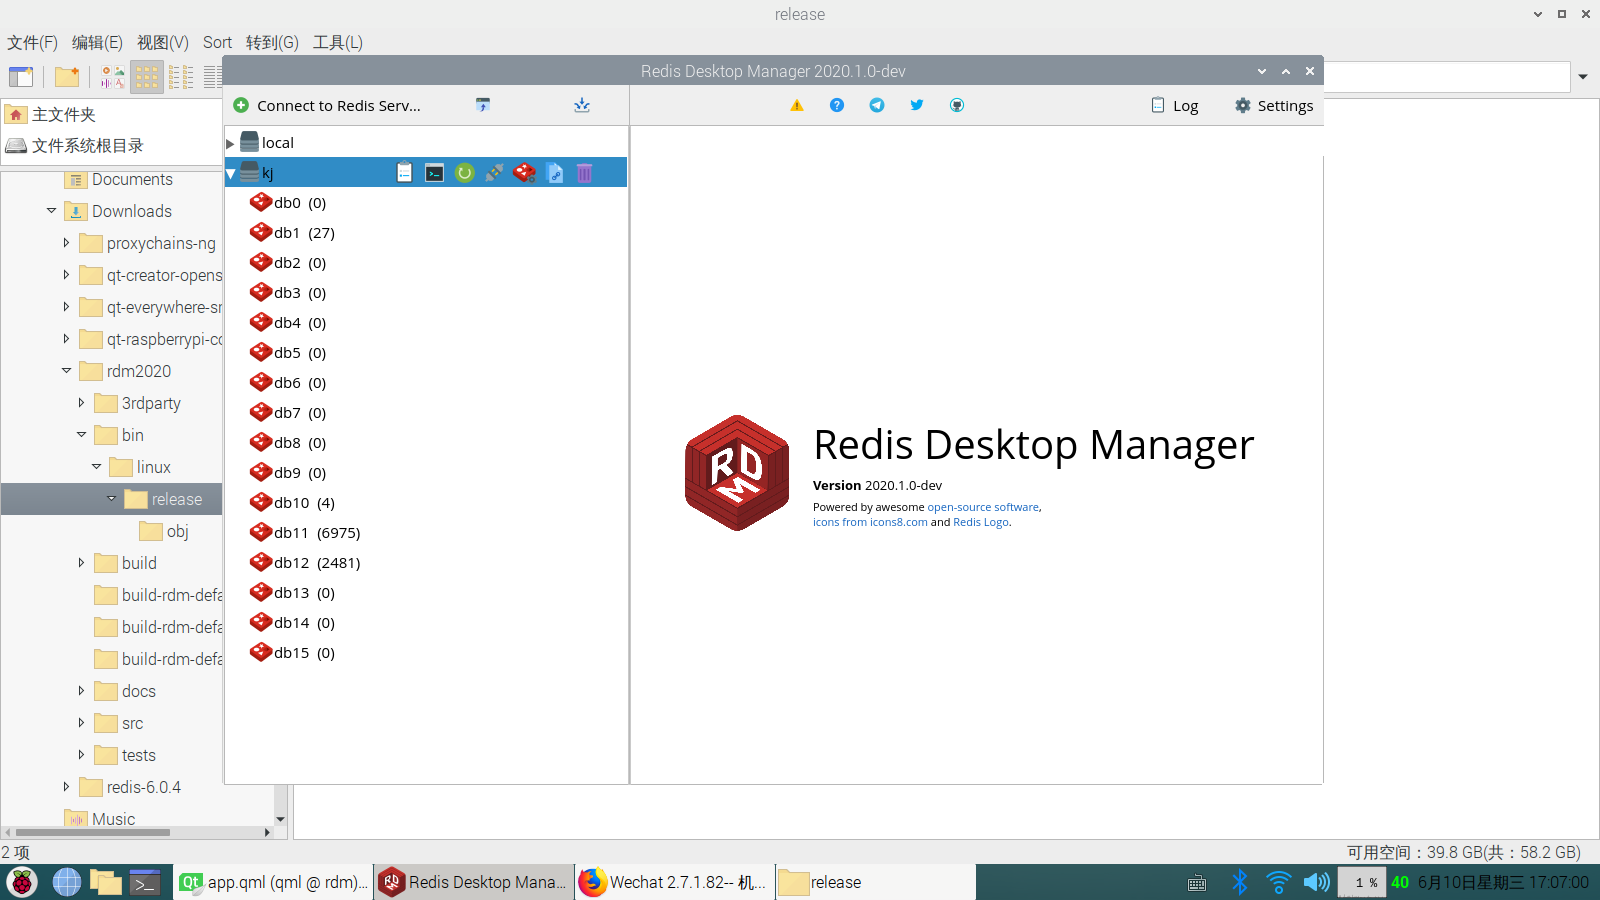
选择 构建 - 构建项目“rdm" 不会太久,10来分钟后,完成,警告不用管,不报错就行,点击运行如图

这里补充一点:
修改了下 src/modules/updater/updater.cpp 文件,注释以下代码,不想让它每次都去访问升级地址:
/* manager->get(QNetworkRequest(updateUrl));*/
去/src/qml/apptoolbar.qml把一些基本上不用按钮关闭显示:
        BetterButton {
            visible: false
            implicitWidth: 40
            iconSource: "qrc:/images/alert.svg"
            tooltip: qsTranslate("RDM","Report issue")
            onClicked: Qt.openUrlExternally("https://github.com/uglide/RedisDesktopManager/issues")
        }

        BetterButton {
            visible: false
            implicitWidth: 40
            iconSource: "qrc:/images/help.svg"
            tooltip: qsTranslate("RDM","Documentation")
            onClicked: Qt.openUrlExternally("http://docs.redisdesktop.com/en/latest/")
        }

        BetterButton {
            visible: false
            implicitWidth: 40
            iconSource: "qrc:/images/telegram.svg"
            tooltip: qsTranslate("RDM","Join Telegram Chat")
            onClicked: Qt.openUrlExternally("https://*.**/RedisDesktopManager")
        }

        BetterButton {
            visible: false
            implicitWidth: 40
            iconSource: "qrc:/images/twi.svg"
            tooltip: qsTranslate("RDM","Follow")
            onClicked: Qt.openUrlExternally("https://twitter.com/RedisDesktop")
        }

        BetterButton {
            visible: false
            implicitWidth: 40
            iconSource: "qrc:/images/github.svg"
            tooltip: qsTranslate("RDM","Star on GitHub!")
            onClicked: Qt.openUrlExternally("https://github.com/uglide/RedisDesktopManager")
        }
以下问题已解决:之前编译的问题,系统后来重新装过后,没有继续装qt5-default,按照安装流程重新编译了一遍,安装完只有Qt5.13.2 设置编译后一切功能正常。
我这边发现无法切换语言和字体,选择后重新启动还是原来一样,别的没问题,修改源代码app/app.cpp 以及 翻译 .ts 文件名规则,还是不行,debug显示 加载load() 为 True 没问题,有待解决:
  QTranslator translator;

  if (translator.load(QLocale(), "rdm", ".",QLatin1String(":/translations",".qm"))){
      qDebug() << "Load translations file for locale:" << locale;
      QCoreApplication::installTranslator(&translator);
  }else {
      qDebug() << "Load translations failed:";

  }
  /* QTranslator* translator = new QTranslator((QObject*)this);

  if (translator->load(QString(":/translations/rdm_") + locale)) {
    qDebug() << "Load translations file for locale:" << locale;
    QCoreApplication::installTranslator(translator);
  } else {
    qDebug() << "Load translations failed:" << QString(":/translations/rdm_") + locale;
    delete translator;
  }

  */
}
具体有其他问题可以留言
:)


