
pytorch实现图像算子层
目录:Sobel算子、通过插值和池化实现上下采样、通过卷积和转置卷积实现上下采样、图像划分为patches以及展成向量。
一、Sobel边缘提取算子的实现:需要注意的是,torch.nn 的网络层处理图像通常都要求4维 tensor (batch, channel, height, width),如果维度不够需要扩展,作为图像 plot 的时候还需把维度压缩回去。

import cv2
import matplotlib.pyplot as plt
import numpy as np
import torch
import torch.nn as nn

def get_sobel(in_chan, out_chan):
    # 纵向算子和横向算子
    filter_x = np.array([
            [1, 0, -1],
            [2, 0, -2],
            [1, 0, -1],
        ]).astype(np.float32)
    filter_y = np.array([
            [1, 2, 1],
            [0, 0, 0],
            [-1, -2, -1],
        ]).astype(np.float32)
    # torch.nn 进行卷积需要4维tensor,在 batch 和 channel 需要扩展维度
    filter_x = filter_x.reshape((1, 1, 3, 3))
    # 然后在扩展的维度上复制参数
    filter_x = np.repeat(filter_x, in_chan, axis=1)
    filter_x = np.repeat(filter_x, out_chan, axis=0)

    filter_y = filter_y.reshape((1, 1, 3, 3))
    filter_y = np.repeat(filter_y, in_chan, axis=1)
    filter_y = np.repeat(filter_y, out_chan, axis=0)

    # 通过构造的 np.array 构造 torch.tensor
    filter_x = torch.from_numpy(filter_x)
    filter_y = torch.from_numpy(filter_y)
    filter_x = nn.Parameter(filter_x, requires_grad=False)
    filter_y = nn.Parameter(filter_y, requires_grad=False)
    conv_x = nn.Conv2d(in_chan, out_chan, kernel_size=3, stride=1, padding=1, bias=False)
    conv_x.weight = filter_x
    conv_y = nn.Conv2d(in_chan, out_chan, kernel_size=3, stride=1, padding=1, bias=False)
    conv_y.weight = filter_y
#     sobel_x = nn.Sequential(conv_x, nn.BatchNorm2d(out_chan))
#     sobel_y = nn.Sequential(conv_y, nn.BatchNorm2d(out_chan))
    sobel_x = nn.Sequential(conv_x)
    sobel_y = nn.Sequential(conv_y)
    return sobel_x, sobel_y

def run_sobel(conv_x, conv_y, data):
    # 两个方向的sobel算子计算结果
    g_x = conv_x(data)
    g_y = conv_y(data)
    g = torch.sqrt(torch.pow(g_x, 2) + torch.pow(g_y, 2))
    return torch.sigmoid(g) * data
读取图像,执行算子程序,并且绘图。cv2(opencv-python)通过cv2.imread() 读取的图像的色彩空间为BGR,而 PIL.Image.imread() 读取的图像为RGB,相比较更为便于使用,计算出的灰度图像也更直观,通常BGR编码还需要转换为RGB,否则可视化出来的色彩肉眼看不出灰度。并且 cv2读取的图像为3通道,Image读取的图像为4通道。都需要在编程中留意。
from PIL import Image
# ----show origin picture
# img_c = cv2.imread("./cecilia.png")  # (511, 509, 3)
img_c = Image.open('./cecilia.png')  # (511, 409, 4)
plt.figure(0)
plt.imshow(img_c)

# input and output are the type of np.uint8, though process with type of np.array
def apply_sobel_iouint8(imgo):
    # ----trans to narray
    imgo = np.asarray(imgo)  # (511, 509, 3)
    # 执行卷积的 tensor 维度是 (channels, height, width)
    imgo = imgo.transpose(2,0,1)
    # 需要扩展 batch 维度
    imgo = imgo[np.newaxis, :,:,:]  # (1, 511, 509, 3)
    imgo = imgo.astype(np.float32)
    imgo = torch.tensor(imgo)
    # s1, s2 = get_sobel(4, 4)  # PIL.Image has 4 channels, while cv2.imread has 3 channels
    # run sobel opts
    imgo = run_sobel(s1, s2, imgo)
    # ---- trans to uint8 again
    # 去掉多余的 batch维度
    imgo = np.asarray(imgo.squeeze())
    # 图像的维度是 (height, width, channels)
    imgo = imgo.transpose(1,2,0)
    return imgo.astype(np.uint8)


# ---- show edge picture
img_e = apply_sobel_iouint8(img_c)
plt.figure(1)
# plt.imshow(img_e)
plt.imshow(img_e, cmap=plt.cm.gray)
plt.axis('off')
二、上采样下采样的实现(MaxPool2d and functional.interpolate)
img_c = Image.open('./cecilia.png')
img_d = np.asarray(img_c)  # (height, width, channel)
img_d = img_d.transpose(2, 0, 1)  # (channel, height, width)

# # Error "max_pool2d" not implemented for 'Byte'
# # 利用了from_array函数,该函数是浅拷贝,新数据与原数据格式相同,而orch.from_numpy默认为torch.uint8
# img_d = torch.from_numpy(img_d)

img_d = torch.from_numpy(img_d).float()

print("shape before MaxPool: ", img_d.shape)

layer_maxp = nn.MaxPool2d(kernel_size=2)  # 2倍池化,压缩1/2
img_p = layer_maxp(img_d)

print("shape after  MaxPool: ", img_p.shape)

# plt.figure(2)
# plt.imshow(img_c)

# nn.interpolate for 2 axes need the dimsions of (batch, channel, height, width)
img_p = img_p[np.newaxis, :,:,:]
img_i = nn.functional.interpolate(img_p, scale_factor=(2, 2), mode='bilinear')
print("shape after interpolate: ", img_i.shape)
三、上采样下采样的实现(Conv2d and ConvTranspose2d)
# ---- 反复上下采样 through conv and convt----
def get4dtensor_from_img(img_path):
    img_c = Image.open(img_path)
    img_d = np.asarray(img_c)  # (height, width, channel)
    img_d = img_d.transpose(2, 0, 1)  # (channel, height, width)
    img_d = img_d[np.newaxis, :,:,:]
    img_d = torch.from_numpy(img_d).float()
    return img_d

img_data = get4dtensor_from_img('./cecilia.png')
print("origin image shape:", img_data.shape)
# down sample by 1x1conv 长宽缩小到原来的一半(面积1/4)
conv_k1s2 = nn.Conv2d(4, 4, kernel_size=1, stride=2, padding=1)
img_down = conv_k1s2(img_data)
print("shape after down sample:", img_down.shape)
# up sample by 1x1conv 长宽扩大到原来的2倍(面积4倍)
convt_k2s1 = nn.ConvTranspose2d(4, 4, kernel_size=1, stride=2, padding=1, bias=False)
img_up = convt_k2s1(img_down)
print("shape after down sample:", img_up.shape)

img_show_data = img_data.squeeze().detach().numpy().transpose(1,2,0).astype(np.uint8)
img_show_conv = img_down.squeeze().detach().numpy().transpose(1,2,0).astype(np.uint8)
img_show_convt = img_up.squeeze().detach().numpy().transpose(1,2,0).astype(np.uint8)
img_diff = img_up - img_data
img_show_diff = img_diff.squeeze().detach().numpy().transpose(1,2,0).astype(np.uint8)

plt.figure(4)
img_titles = ['origin', 'after conv', 'after convt', 'diff']
img_shows = [img_show_data, img_show_conv, img_show_convt, img_show_diff]
for i, item in enumerate(img_shows):
    plt.subplot(2,2,i+1)
    plt.imshow(item)
    plt.title(img_titles[i])
    plt.axis('off')
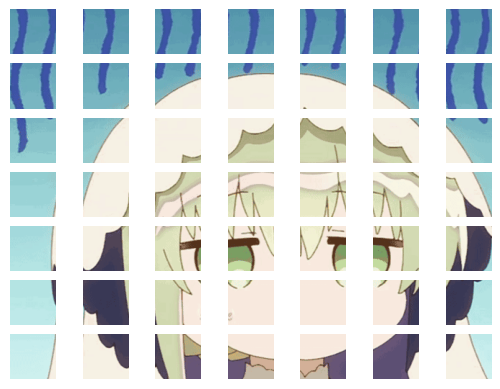
四、图像划分为patches
import numpy as np
from PIL import Image
import matplotlib.pyplot as plt
# ----show origin picture
# img_c = cv2.imread("./cecilia.png")  # (511, 509, 3)
img_c = Image.open('./cecilia.png')  # (511, 409, 4)

plt.figure(0)
# plt.imshow(img_c)
# plt.show()

# input img_c
def img2patches(img):
    img_np = np.asarray(img)
    P_WID = 64
    P_HGT = 64
    h, w, c = img_np.shape
    p_h = h // P_HGT
    p_w = w // P_WID
    print("split into:", p_h, " rows and ", p_w, "columns.")
    plt.figure(1)
    for i in range(p_h):
        for j in range(p_w):
            # print("show:", 1+i+j)
            plt.subplot(p_h, p_w, 1+i*p_h+j)
            plt.imshow(img_np[i*P_HGT:(i+1)*P_HGT, j*P_WID:(j+1)*P_WID,:].astype(np.uint8))
       plt.axis('off')
    plt.show()
img2patches(img_c)
得到结果如下:
将patches展为一维向量,主要通过transpose和reshape实现:
# 把图像划分为batch个patch的矩阵(行优先),得到 batch height width channel
def img2patches_vector(img):
    img_np = np.asarray(img)
    P_WID = 64
    P_HGT = 64
    h, w, c = img_np.shape
    p_h = h // P_HGT
    p_w = w // P_WID
    print("split into:", p_h, " rows and ", p_w, "columns.")
    # plt.figure(1)
    res = np.zeros((p_h*p_w, P_HGT, P_WID, c))  # L h w c
    for i in range(p_h):
        for j in range(p_w):
            # print("show:", 1+i+j)
            res[i*p_h+j, :,:, :] = img_np[i*P_HGT:(i+1)*P_HGT, j*P_WID:(j+1)*P_WID,:]
    return res.transpose(0, 3, 1,2)

# 把 patches矩阵每行首尾相接转换为一个列向量,最后转置为行向量
def convert_mtx2vec(lchw):
    l, c, h, w = lchw.shape
    return lchw.transpose(0,3,2,1).reshape(l*w,h,c).transpose(1,0,2)

img_vec = convert_mtx2vec(img2patches_vector(img_c))
plt.figure(2)
plt.imshow(img_vec.astype(np.uint8))
# plt.imshow(img_cv.transpose(0,3,2,1).reshape(w,l*h,c).astype(np.uint8))
plt.axis('off')
plt.show()
得到结果如下:


【推荐】国内首个AI IDE,深度理解中文开发场景,立即下载体验Trae
【推荐】编程新体验,更懂你的AI,立即体验豆包MarsCode编程助手
【推荐】抖音旗下AI助手豆包,你的智能百科全书,全免费不限次数
【推荐】轻量又高性能的 SSH 工具 IShell:AI 加持,快人一步
· 地球OL攻略 —— 某应届生求职总结
· 周边上新:园子的第一款马克杯温暖上架
· Open-Sora 2.0 重磅开源!
· 提示词工程——AI应用必不可少的技术
· .NET周刊【3月第1期 2025-03-02】
2022-08-15 使用python的requests爬取原神观测枢的内容