图像处理-阈值化与形态学操作
相关概念:
图像处理(Image Processing)对输入的图像作某种变换,输出仍然是图像,不涉及或者很少涉及图像内容的分析。例如:图像增强、图像去噪、图像压缩、图像恢复、二值图像处理,以及基于阈值的图像分割等等。
计算机图形学(computer grapgics):计算机视觉的相反问题,重在合成图像,是确定的算法。
模式识别(pattern recognition):研究各类模式的分类,cv的重要基础之一。
图像分析:对图像内容进行分析,提取有意义的特征,以便于后续的处理。
计算机视觉(CV, Computer Vision):对图像分析得到的特征进行分析,提取场景的语义表示,让计算机具有人眼和人脑的能力。
图像大小:
数字图像中,图像可以看成由像素矩阵中的像素(pixel)组成,每个像素灰度级至少要6bit(单色图像)表示,一般用8bit(彩色图像)。
图像大小计算,一张分辨率为640×480的32位色彩的图像,文件大小为:
单位Bit:640×480×32=9830400
单位byte:640×480×32÷8=1228800B
单位KB:640×480×32÷8÷1024=1200KB
单位MB:640×480×32÷8÷1024÷1024=1.171875MB
图像处理方法可以分为两大类:空域法包括邻域处理法,例如gradient algorithm, laplacian operattor, smoothing operator, convolution algorithm,和点处理法,例如grey processing. 另一大类为变换域法,会对图像进行正交变换,然后施行各种处理,例如滤波、数据压缩、特征提取等等。
def show_picture(file_path):
    img_c = cv2.imread(file_path)
    img_c_stat = os.stat(file_path)
    print("分辨率:", img_c.shape)
    print(f'File Size in Bytes is {img_c_stat.st_size}')

    # img_g = cv2.imread(file_path, 0)
    # cv2.imwrite("./img-input/diana-221116-gray.png", img_g)
    img_g = cv2.imread("./img-input/diana-221116-gray.png")
    img_g_stat = os.stat("./img-input/diana-221116-gray.png")
    print("分辨率:", img_g.shape)
    print(f'File Size in Bytes is {img_g_stat.st_size}')
图像的放缩和图像金字塔:
图像金字塔是一种经典的图像多尺寸描述方法,它将降采样和平滑滤波结合在一起,对图像进行多尺度表示。图像金字塔由不同尺寸的图像叠加而成,通常每一层的尺寸都是上一层的一半。通常用于高效的图像分析。
意义在于:我们在对图像进行处理时,大多是要着眼于图像中有意义的部分,而同一幅图像中可能含有不同尺度下“有意义”的信息,为了充分利用这些图像信息,就需要对图像进行多尺度描述了。
上采样:先对图像进行高斯平滑,然后再进行降采样(将图像尺寸行和列方向缩减一半)。
下采样:先对图像进行升采样(将图像尺寸行和列方向增大一倍),然后再进行高斯平滑。
Example:进行下采样和上采样,然后绘制出图像[下采样,原图,上采样]
import cv2
import numpy as np
from PIL import Image
import matplotlib.pyplot as plt
file_path_s = "./img-input/diana-221116-square.png"

def pyr_up_down():
    img = cv2.imread(file_path_s)
    r1 = cv2.pyrUp(img)
    r3 = cv2.pyrDown(img)
    titles = ["down_up", "img", "up_down"]
    images = [r3, img, r1]

    res_m, res_n = 0, 0
    for img_item in images:
        res_n += img_item.shape[1]
        res_m = res_m if res_m >= img_item.shape[0] else img_item.shape[0]
    channel_num = 3
    res = np.zeros((res_m, res_n, channel_num))

    col_ind = 0
    for img_item in images:
        res[0:img_item.shape[0], col_ind: col_ind+img_item.shape[1]] = cv2.cvtColor(img_item, cv2.COLOR_BGR2RGB)
        col_ind += img_item.shape[1]

    plt.figure(0)
    res = Image.fromarray(res.astype('uint8'))
    plt.imshow(res)
    plt.title("all size images")
    plt.xticks([])
    plt.yticks([])
    plt.show()

参考:
https://blog.csdn.net/woainishifu/article/details/62888228。
https://blog.csdn.net/qq_35294564/article/details/81232123。
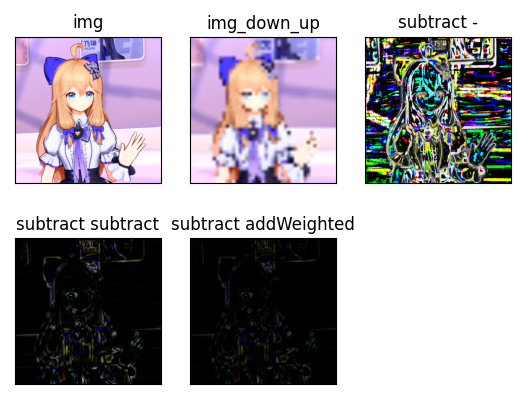
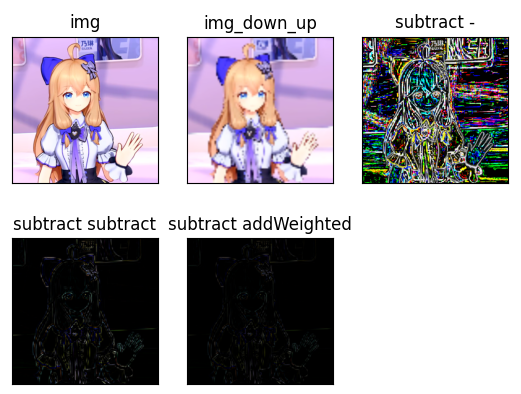
图像resize为不同尺度大小的图像,在用resize复原,各操作一次,然后做差观察其区别:
def down_resize_subtract(r):
    img = cv2.imread(file_path_s)
    i_m, i_n = img.shape[0], img.shape[1]
    # 缩小到原来的1/r
    img_down = cv2.resize(img, dsize=(i_m//r, i_n//r))
    # 放大到原来
    img_down_up = cv2.resize(img_down, dsize=(i_m, i_n))
    # 第一种相减方式
    img_sub_1 = img - img_down_up
    # 第二种相减方式
    img_sub_2 = cv2.subtract(img, img_down_up, dtype=cv2.CV_8UC3)
    # 第三种相减方式
    img_sub_3 = cv2.addWeighted(img, 0.5, img_down_up, -0.5, 0, dtype=cv2.CV_8UC3)
    images = [img, img_down_up, img_sub_1, img_sub_2, img_sub_3]
    titles = ["img", "img_down_up", "subtract -", "subtract subtract", "subtract addWeighted"]
    n = len(titles)
    plt.figure(0)
    for i in range(n):
        # print(images[i].shape)
        plt.subplot(2, 3, i+1)
        plt.imshow(cv2.cvtColor(images[i], cv2.COLOR_BGR2RGB))
        plt.title(titles[i])
        plt.xticks([])
        plt.yticks([])
    plt.savefig("img-output/diana-221116-size-by-"+str(r)+".png")
    print("resize by ", r, "end")
16倍的结果:从结果可见,直接用'-'运算符进行相减,其结果为一个很酷炫的画;subtract函数相减,能体现出大致轮廓;addWeighted相减最为精准,只剩略微的几条线了。
8倍的结果:
基本概念:
参考blog:https://blog.csdn.net/Pierce_KK/article/details/100518667。
亮度(Brightness/Luminance):像素的RGB对应值越大亮度越大,越小越暗。增加亮度:对RGB同时进行缩放即可。亮度是图像表达的基本量,可以不必再考虑成像原理。如果RGB值完全相等,就是灰度图像,三原色不同深浅的组合,组成了各种色彩。如果像素的颜色由16位二进制值表示,就是16位图,可以表达65535种颜色。
对比度(Contrast):图像的对比度与亮度有关, 它是图像中像素亮度的局部变化,被定义为物体亮度的平均值与背景亮度的比值。
饱和度(Saturation):颜色的纯度或强度,指颜色中灰色含量的高低,例如饱和度最低的时候,就是灰图了。
曝光度:曝光量越大,画面越亮。高光可以被认为图像中亮度很高的区域,而且这些区域中仍然包含很多细节。如果我们增加曝光,那么这些区域将变得非常明亮以至于它们将完全失去细节,导致变成完全白色。
锐度:反映图像平面清晰度和图像边缘锐利程度。高锐度使得画面的视觉效果变得清晰,由于对比的提高又会将一些原本并不讨好的主要细节进行放大。锐化是补偿图像的轮廓,增强图像的边缘及灰度跳变的部分,使图像变得清晰,分为空间域处理和频域处理两类。
图像的读取、色彩空间和灰度
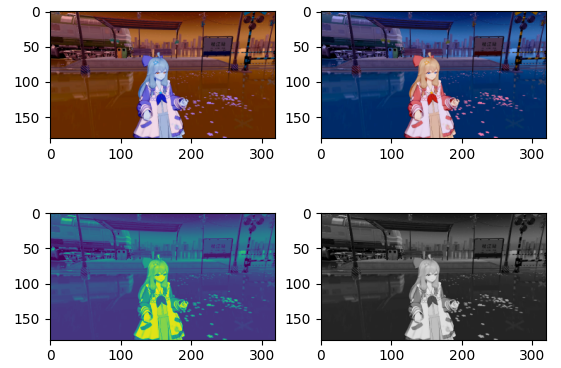
import cv2
import numpy as np
import matplotlib.pyplot as plt
def img_show():
    # 原图
    img = cv2.imread("img-input/station-320-180.png", cv2.IMREAD_COLOR)
    img_source = cv2.cvtColor(img, cv2.COLOR_BGR2RGB)
    # 灰度图
    img_gray = cv2.cvtColor(img, cv2.COLOR_BGR2GRAY)
    img_gray_source = cv2.cvtColor(img_gray, cv2.COLOR_BGR2RGB)
    images = [img, img_source, img_gray, img_gray_source]
    for i in range(4):
        plt.subplot(2, 2, i+1)
        plt.imshow(images[i])
    plt.savefig("img-output/colorspace_gray.png")
    plt.show()
if __name__ == '__main__':
    img_show()
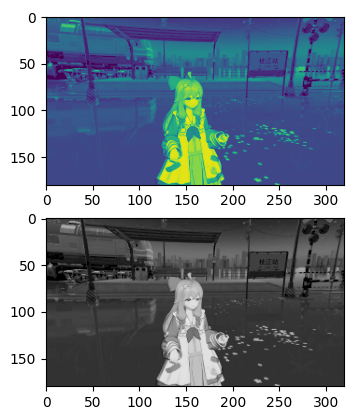
result:第一行是原图,第二行是灰度图,第一列是BGR色彩空间,第二列是RGB色彩空间。可见,要得到灰度图,要进行两次转换。
除此之外,也可以直接读取图片为灰度图,但由于默认BGR colorspace,仍然需要进行一次转换,转换为RGB色彩空间:
    img = cv2.imread("img-input/station-320-180.png", 0)
    rows, cols = img.shape
    source = cv2.cvtColor(img, cv2.COLOR_BGR2RGB)
    images = [img, source]
    for i in range(2):
        plt.subplot(2, 1, i+1)
        plt.imshow(images[i])
    plt.show()
result:两张二维图像,没有色彩通道这一维度,1. 默认的BGR,转换为RGB便是常见的灰度图。
阈值Image Thresholding:
简单的阈值操作是,For every pixel, the same threshold value is applied. If the pixel value is smaller than the threshold, it is set to 0, otherwise it is set to a maximum value.
二值化(binarization)或阈值化(threshold):旨在提取图像中的目标物体,将背景以及噪声区分开来。通常会设定一个阈值T,通过T将图像的像素划分为两类:大于T的像素群和小于T的像素群。
案例如下,需要注意的是,以下案例是在RGB空间的灰度图上进行thresholding操作的。
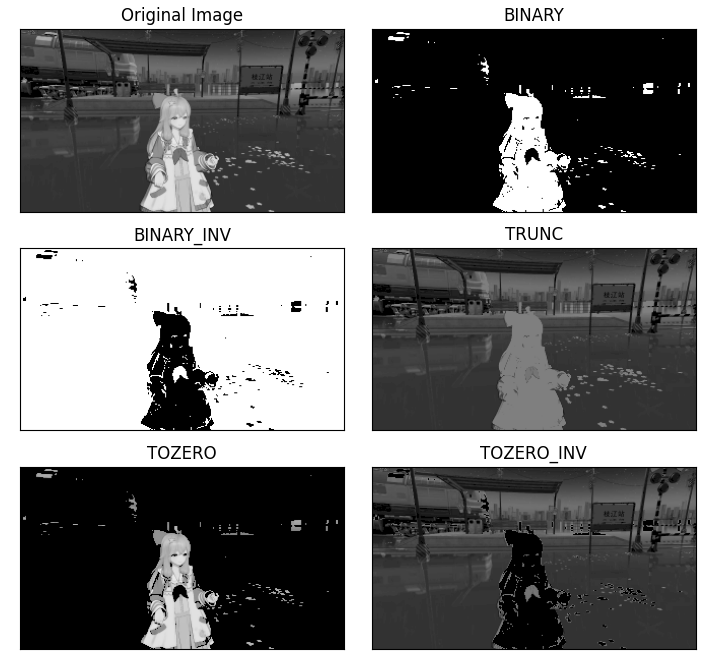
def thresholding_apply():
    img = cv2.imread("img-input/station-320-180.png", 0)
    rows, cols = img.shape
    img = cv2.cvtColor(img, cv2.COLOR_BGR2RGB)
    ret, thresh1 = cv2.threshold(img, 127, 255, cv2.THRESH_BINARY)
    ret, thresh2 = cv2.threshold(img, 127, 255, cv2.THRESH_BINARY_INV)
    ret, thresh3 = cv2.threshold(img, 127, 255, cv2.THRESH_TRUNC)
    ret, thresh4 = cv2.threshold(img, 127, 255, cv2.THRESH_TOZERO)
    ret, thresh5 = cv2.threshold(img, 127, 255, cv2.THRESH_TOZERO_INV)
    images = [img, thresh1, thresh2, thresh3, thresh4, thresh5]
    titles = ['Original Image','BINARY','BINARY_INV','TRUNC','TOZERO','TOZERO_INV']
    for i in range(6):
        plt.subplot(3, 2, i+1)
        plt.title(titles[i])
        plt.xticks([])
        plt.yticks([])
        plt.imshow(images[i])
    plt.savefig("img-output/thresholding_rgb.png")
    plt.show()
if __name__ == '__main__':
    thresholding_apply()
result:原图为灰度图,binary是把像素值小于127的置为0,大于127置为1,binary_inv则相反。tozero是大于127的不变,小于127置为0,tozero_inv则相反。trunc则是小于127不变,大于127渐变。
稍微复杂的阈值操作暂略。
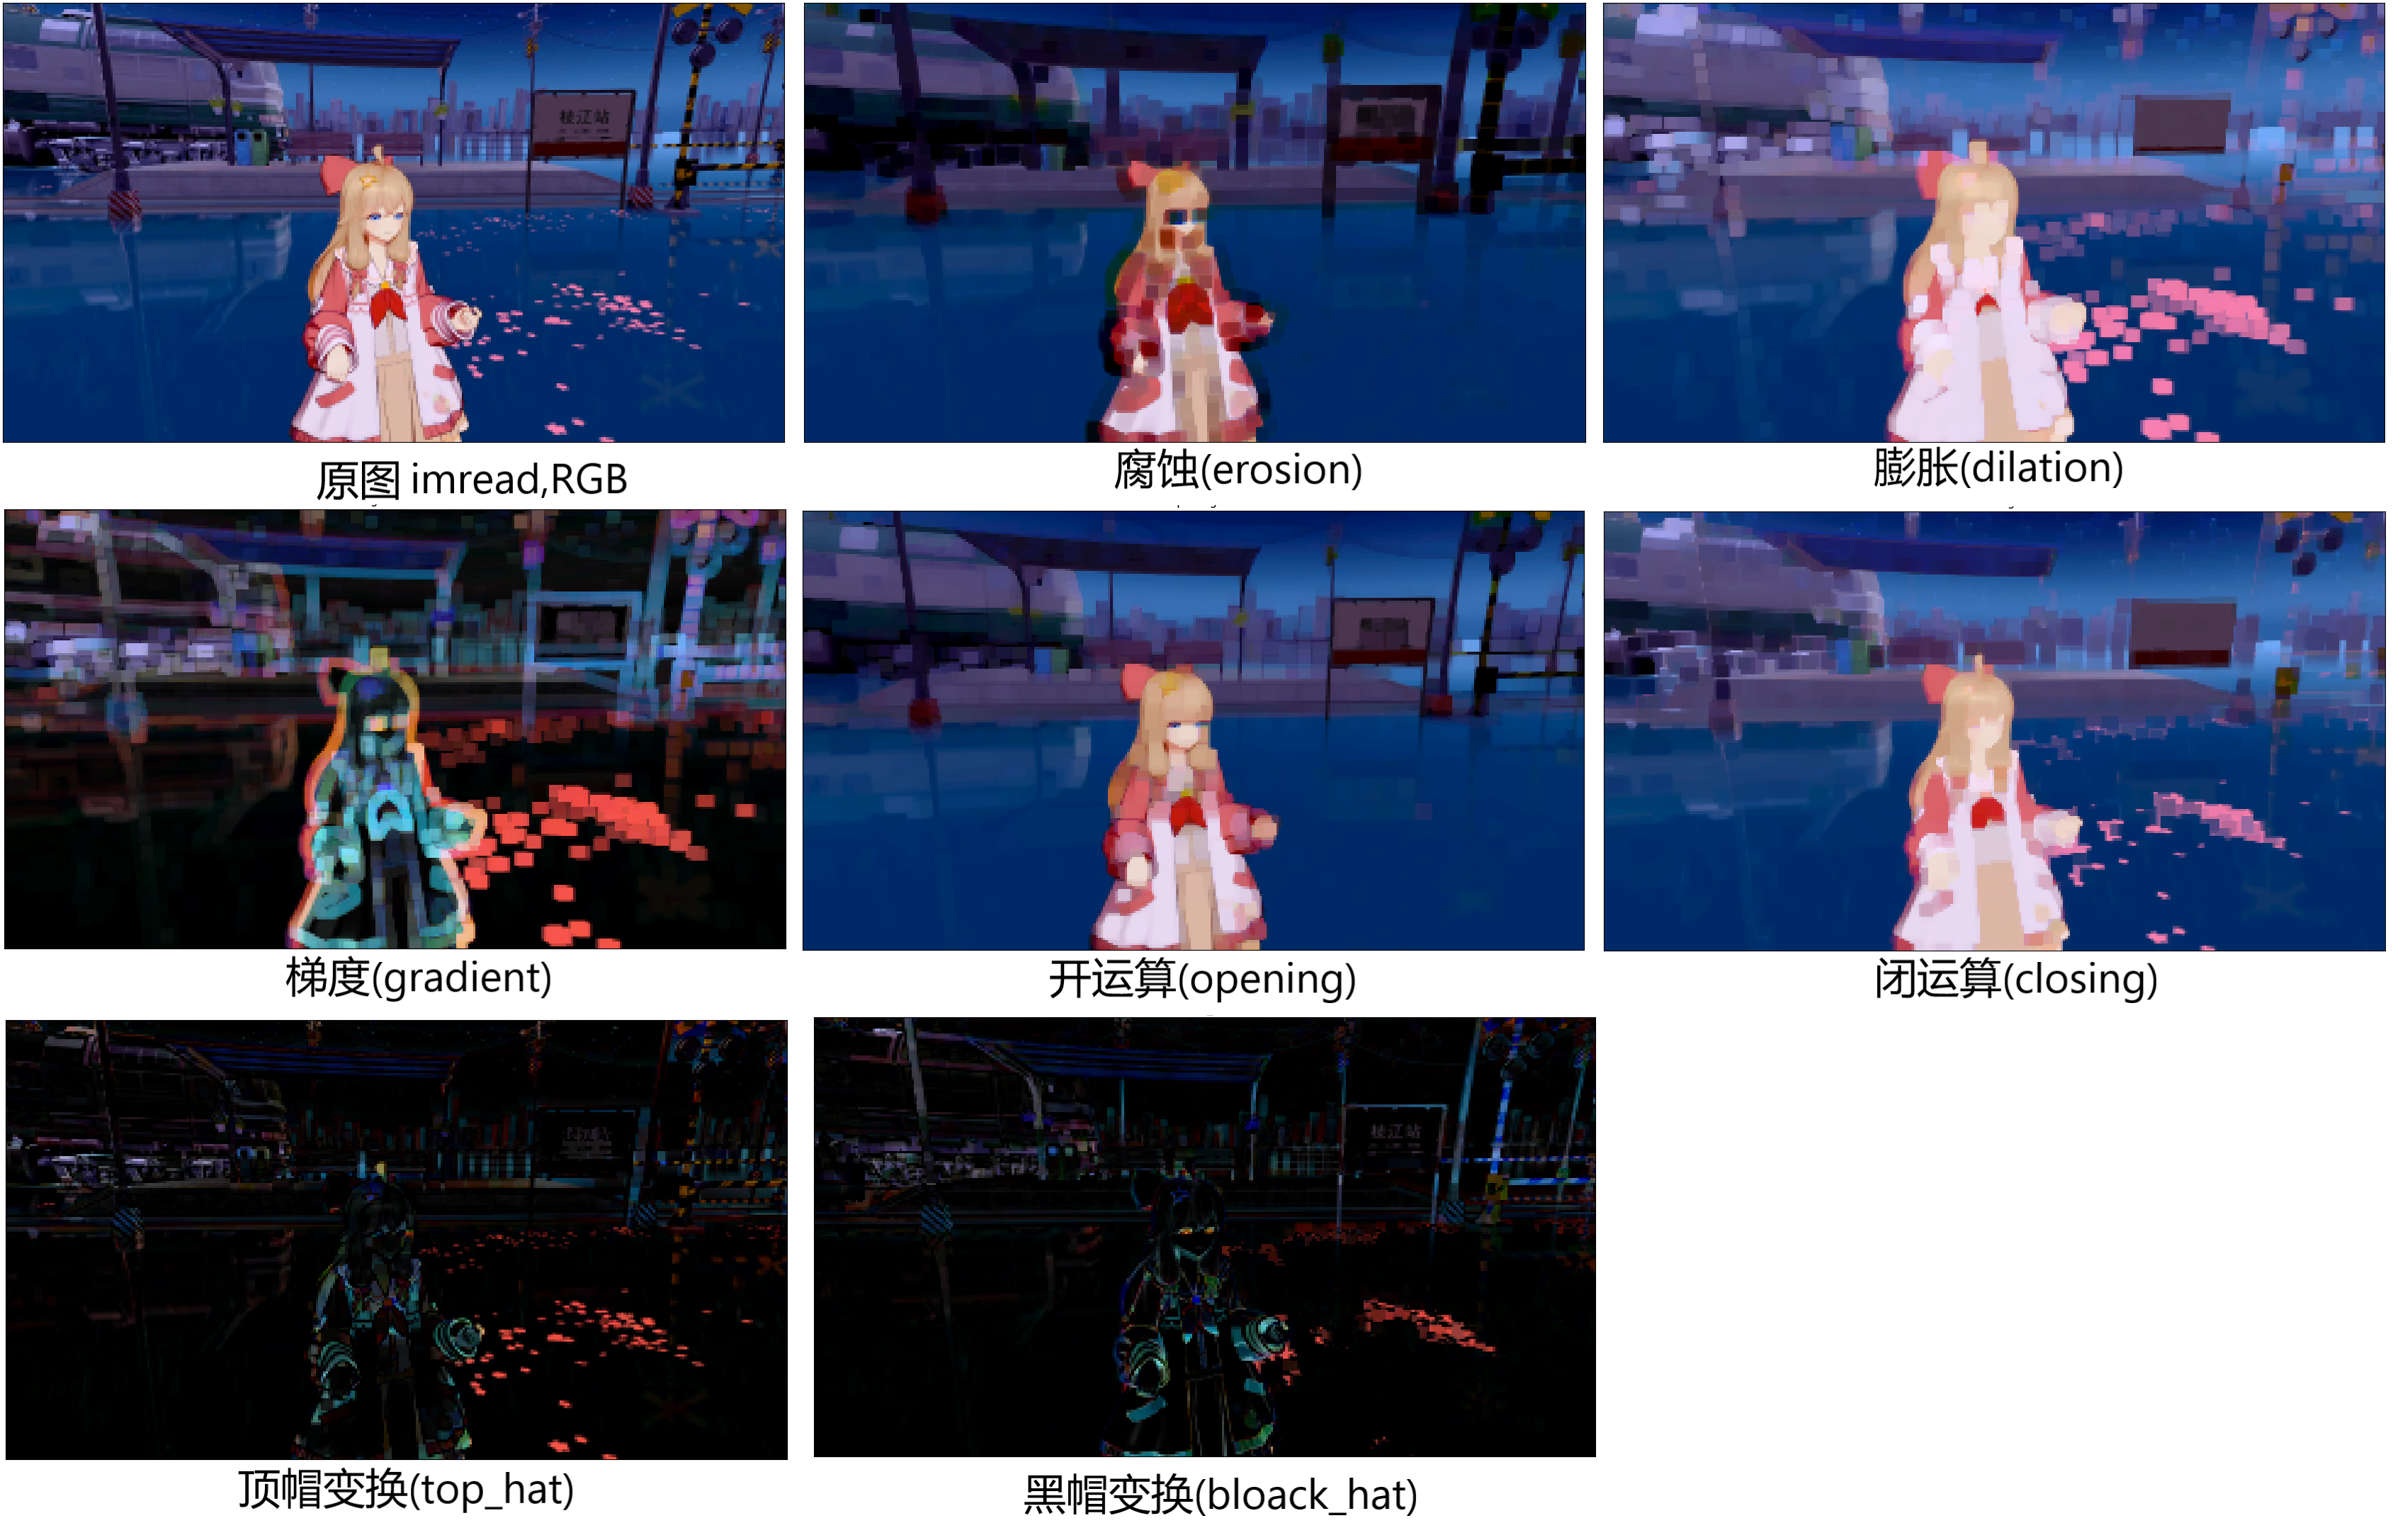
图像的形态学操作(Morphological operations):Morphological transformations are some simple operations based on the image shape. It is normally performed on binary images. It needs two inputs, one is our original image, second one is called structuring element or kernel which decides the nature of operation.
参考:https://docs.opencv.org/4.x/d9/d61/tutorial_py_morphological_ops.html
腐蚀(erosion)和膨胀(dilation)和梯度(gradient)、开运算和闭运算(Opening and Closing)、顶帽运算和黑帽运算(Top Hat and Black Hat)。
腐蚀是
Opening is just another name of erosion followed by dilation. It is useful in removing noise.
Closing is reverse of Opening, Dilation followed by Erosion. It is useful in closing small holes inside the foreground objects, or small black points on the object.
Gradient is the difference between dilation and erosion of an image.
Top hat is the difference between input image and Opening of the image.
Black hat is the difference between the closing of the input image and input image.
案例如下(下列案例均为RGB空间的彩色图的处理结果):
    img = cv2.imread("img-input/station-320-180.png")
    img = cv2.cvtColor(img, cv2.COLOR_BGR2RGB)
    res = None
    kernel = np.ones((5, 5), np.uint8)
    if opt == 'erosion':
        res = cv2.erode(img, kernel, iterations=1)
    if opt == 'dilation':
        res = cv2.dilate(img, kernel, iterations=1)
    if opt == 'gradient':
        res = cv2.morphologyEx(img, cv2.MORPH_GRADIENT, kernel)
    if opt == 'opening':
        res = cv2.morphologyEx(img, cv2.MORPH_OPEN, kernel)
    if opt == 'closing':
        res = cv2.morphologyEx(img, cv2.MORPH_CLOSE, kernel)
    if opt == 'top_hat':
        res = cv2.morphologyEx(img, cv2.MORPH_TOPHAT, kernel)
    if opt == 'black_hat':
        res = cv2.morphologyEx(img, cv2.MORPH_BLACKHAT, kernel)
    plt.imshow(res)
    plt.show()
results: