centos7下安装samba服务器
samba笔记: http://services.linuxpanda.tech/%E7%BD%91%E7%BB%9C%E6%96%87%E4%BB%B6%E5%85%B1%E4%BA%AB/samba.html
文章参考:https://wiki.archlinux.org/index.php/Samba_(%E7%AE%80%E4%BD%93%E4%B8%AD%E6%96%87)
1.samba简介
Samba是在Linux和UNIX系统上实现SMB协议的一个免费软件,由服务器及客户端程序构成。SMB(Server Messages Block,信息服务块)是一种在局域网上共享文件和打印机的一种通信协议,它为局域网内的不同计算机之间提供文件及打印机等资源的共享服务。SMB协议是客户机/服务器型协议,客户机通过该协议可以访问服务器上的共享文件系统、打印机及其他资源。通过设置“NetBIOS over TCP/IP”使得Samba不但能与局域网络主机分享资源,还能与全世界的电脑分享资源。
2.环境介绍
os:centos7
samba: 4.4.4
3.安装samba
[root@mail samba]# yum -y install samba samba-client samba-swat
4.启动samba
[root@mail samba]# systemctl enable smb
Created symlink from /etc/systemd/system/multi-user.target.wants/smb.service to /usr/lib/systemd/system/smb.service.
[root@mail samba]# systemctl enable nmb
Created symlink from /etc/systemd/system/multi-user.target.wants/nmb.service to /usr/lib/systemd/system/nmb.service.
[root@mail samba]# systemctl start smb
[root@mail samba]# systemctl start nmb
[root@mail samba]#
5.查看smb,nmb占用端口信息
[root@mail samba]# netstat -tunlp | grep  mb
tcp        0      0 0.0.0.0:139             0.0.0.0:*               LISTEN      57979/smbd
tcp        0      0 0.0.0.0:445             0.0.0.0:*               LISTEN      57979/smbd
tcp6       0      0 :::139                  :::*                    LISTEN      57979/smbd
tcp6       0      0 :::445                  :::*                    LISTEN      57979/smbd
udp        0      0 192.168.122.255:137     0.0.0.0:*                           58003/nmbd
udp        0      0 192.168.122.1:137       0.0.0.0:*                           58003/nmbd
udp        0      0 192.168.137.255:137     0.0.0.0:*                           58003/nmbd
udp        0      0 192.168.137.101:137     0.0.0.0:*                           58003/nmbd
udp        0      0 0.0.0.0:137             0.0.0.0:*                           58003/nmbd
udp        0      0 192.168.122.255:138     0.0.0.0:*                           58003/nmbd
udp        0      0 192.168.122.1:138       0.0.0.0:*                           58003/nmbd
udp        0      0 192.168.137.255:138     0.0.0.0:*                           58003/nmbd
udp        0      0 192.168.137.101:138     0.0.0.0:*                           58003/nmbd
udp        0      0 0.0.0.0:138             0.0.0.0:*                           58003/nmbd
6.编辑 /etc/samba/smb.conf
[root@mail samba]# vim /etc/samba/smb.conf
添加如下内容
[tools]
    comment = Public Stuff
    path = /share/test
    read only = No
    guest ok = Yes
7.创建指定共享的目录
[root@mail samba]# mkdir -pv /share/test
mkdir: created directory ‘/share/test’
[root@mail samba]# chown -R nobody.nobody /share/test      #这里使用了nobody的,如果对权限有要求,可以使用smbpasswd -a 添加一个用户(用户必须系统存在),使用setfacl添加权限即可。
8.测试配置文件正确性
[root@mail samba]# testparm
Load smb config files from /etc/samba/smb.conf
rlimit_max: increasing rlimit_max (1024) to minimum Windows limit (16384)
Processing section "[homes]"
Processing section "[printers]"
Processing section "[print$]"
Processing section "[tools]"
Loaded services file OK.
Server role: ROLE_STANDALONE

Press enter to see a dump of your service definitions
回车
# Global parameters
[global]
    workgroup = SAMBA
    printcap name = cups
    security = USER
    idmap config * : backend = tdb
    cups options = raw


[homes]
    comment = Home Directories
    browseable = No
    inherit acls = Yes
    read only = No
    valid users = %S %D%w%S


[printers]
    comment = All Printers
    path = /var/tmp
    browseable = No
    printable = Yes
    create mask = 0600


[print$]
    comment = Printer Drivers
    path = /var/lib/samba/drivers
    create mask = 0664
    directory mask = 0775
    write list = root


[tools]
    comment = Public Stuff
    path = /share/test
    guest ok = Yes
    read only = No
9.访问共享文件
9.1Windows平台可以直接在资源管理器输入\\192.168.137.100\tools即可访问 其中192.168.137.100为samba服务器的地址, tools为共享名称
9.2Linux平台可以使用
[root@mail samba]# smbclient //192.168.137.101/tools
Enter root's password:
session setup failed: NT_STATUS_LOGON_FAILURE
[root@mail samba]# smbpasswd -a root
New SMB password:
Retype new SMB password:
Added user root.
[root@mail samba]# smbclient //192.168.137.101/tools
Enter root's password:
Domain=[SAMBA] OS=[Windows 6.1] Server=[Samba 4.4.4]
smb: \> ls
  .                                   D        0  Mon Feb 20 23:05:52 2017
  ..                                  D        0  Mon Feb 20 23:05:52 2017

        38770180 blocks of size 1024. 33408000 blocks available
smb: \>
10. 挂载windows上共享的目录
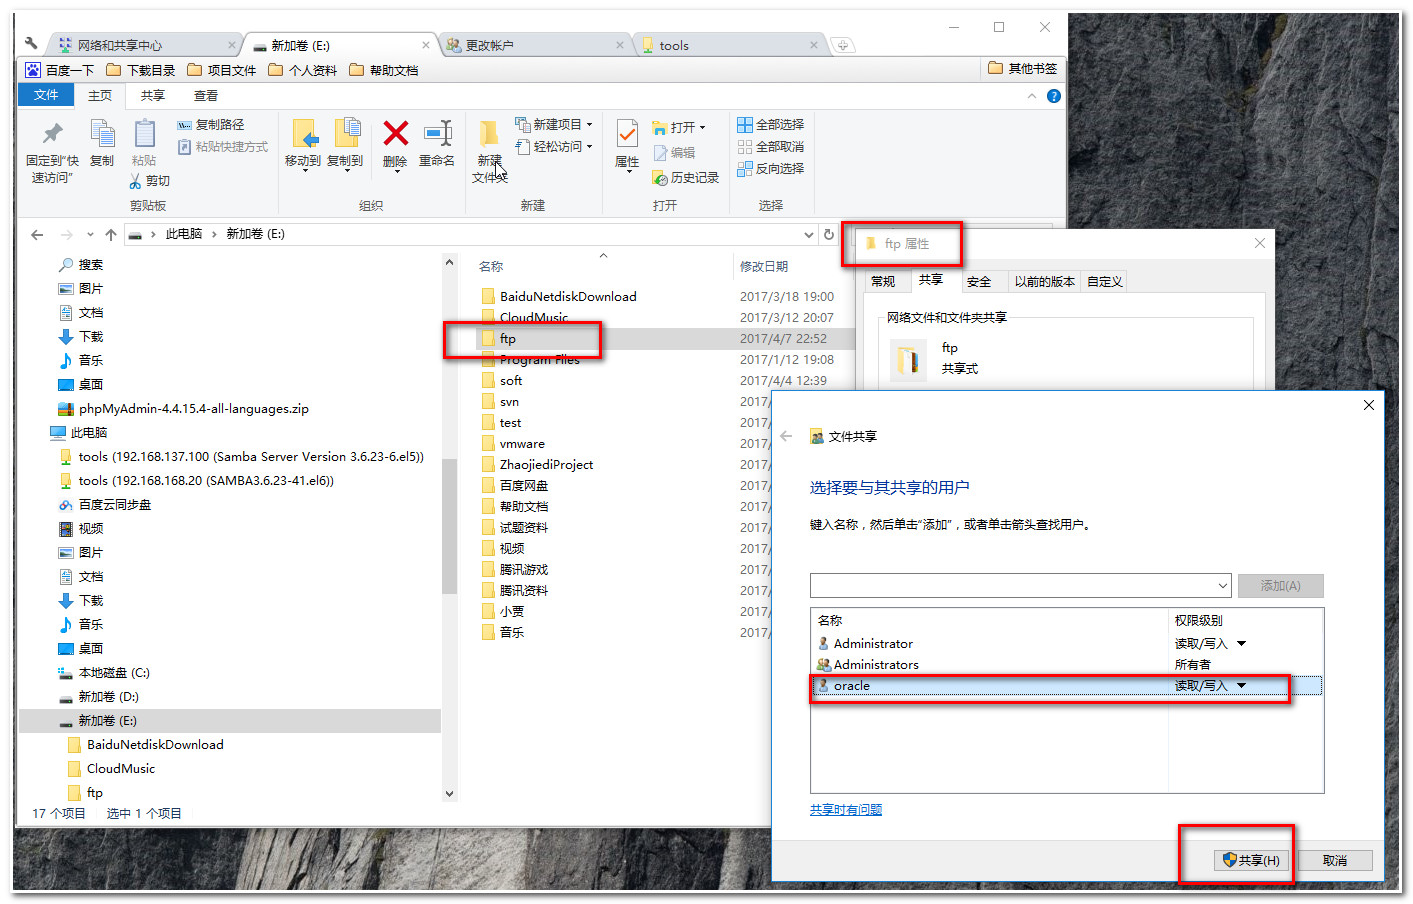
10.1在window上我们创建一个共享

上面我们把window机器上的目录名为ftp的目录共享给了window的另一个用户oracle,权限为读写的。
10.2 linux 使用认证文件(cerdentials)挂着windows共享目录
[root@localhost samba]# smbclient //192.168.40.1/ftp -U oracle     #这里先使用smbclient测试下我们的用户和密码的正确性
Enter oracle's password:
session request to 192.168.40.1 failed (Called name not present)
Domain=[DESKTOP-TN5P2FR] OS=[Windows 10 Enterprise 2016 LTSB 14393] Server=[Windows 10 Enterprise 2016 LTSB 6.3]
smb: \> ls                 #查看
  .                                   D        0  Fri Apr  7 22:52:52 2017
  ..                                  D        0  Fri Apr  7 22:52:52 2017
  anaconda-ks.cfg                     A     1395  Sun Mar 19 10:15:42 2017
  boot                                D        0  Mon Jan 23 17:42:30 2017
  boot.iso                            A 6199291904  Mon Jan 23 18:22:43 2017
  VSCodeSetup-1.8.0.exe               A 33999136  Sat Feb 25 17:54:31 2017
        59608 blocks of size 8388608. 26965 blocks available
smb: \> quit          #退出

[root@localhost samba]# vim 192.168.4.150.pwd             #创建一个认证文件
[root@localhost samba]# cat 192.168.4.150.pwd             #检查认证文件内容,使用man 8  mount.cifs 获取详细信息
username=oracle
password=oracle
[root@localhost samba]# chmod 700 192.168.4.150.pwd       #修改这个认证文件的权限

[root@localhost samba]# mount.cifs //192.168.40.1/ftp /mnt/winftp -o credentials=/etc/samba/192.168.4.150.pwd   #挂着windows共享
[root@localhost samba]# tail -n 1 /etc/mtab >> /etc/fstab  #把mtab的最后一行追加到fstab中
[root@localhost samba]# cat /etc/fstab                     #查看fstab

#
# /etc/fstab
# Created by anaconda on Mon Jan 23 14:39:48 2017
#
# Accessible filesystems, by reference, are maintained under '/dev/disk'
# See man pages fstab(5), findfs(8), mount(8) and/or blkid(8) for more info
#
/dev/mapper/VolGroup-lv_root /                       ext4    defaults        1 1
UUID=5c3d4278-fa8d-4626-9546-67c0c26831b5 /boot                   ext4    defaults        1 2
/dev/mapper/VolGroup-lv_swap swap                    swap    defaults        0 0
tmpfs                   /dev/shm                tmpfs   defaults        0 0
devpts                  /dev/pts                devpts  gid=5,mode=620  0 0
sysfs                   /sys                    sysfs   defaults        0 0
proc                    /proc                   proc    defaults        0 0
/dev/sr0 /mnt/cdrom iso9660 ro 0 0
//192.168.40.1/ftp /mnt/winftp cifs rw 0 0
[root@localhost samba]# vim /etc/fstab    #编辑
[root@localhost samba]# cat /etc/fstab    #检查

#
# /etc/fstab
# Created by anaconda on Mon Jan 23 14:39:48 2017
#
# Accessible filesystems, by reference, are maintained under '/dev/disk'
# See man pages fstab(5), findfs(8), mount(8) and/or blkid(8) for more info
#
/dev/mapper/VolGroup-lv_root /                       ext4    defaults        1 1
UUID=5c3d4278-fa8d-4626-9546-67c0c26831b5 /boot                   ext4    defaults        1 2
/dev/mapper/VolGroup-lv_swap swap                    swap    defaults        0 0
tmpfs                   /dev/shm                tmpfs   defaults        0 0
devpts                  /dev/pts                devpts  gid=5,mode=620  0 0
sysfs                   /sys                    sysfs   defaults        0 0
proc                    /proc                   proc    defaults        0 0
/dev/sr0 /mnt/cdrom iso9660 ro 0 0
//192.168.40.1/ftp /mnt/winftp cifs credentials=/etc/samba/192.168.4.150.pwd  0 0
[root@localhost samba]# umount /mnt/winftp/      #卸载我们手工添加的
[root@localhost samba]# mount -a                 #挂载所有
[root@localhost samba]# mount                    #查看
/dev/mapper/VolGroup-lv_root on / type ext4 (rw)
proc on /proc type proc (rw)
sysfs on /sys type sysfs (rw)
devpts on /dev/pts type devpts (rw,gid=5,mode=620)
tmpfs on /dev/shm type tmpfs (rw,rootcontext="system_u:object_r:tmpfs_t:s0")
/dev/sda1 on /boot type ext4 (rw)
/dev/sr0 on /mnt/cdrom type iso9660 (ro)
none on /proc/sys/fs/binfmt_misc type binfmt_misc (rw)
sunrpc on /var/lib/nfs/rpc_pipefs type rpc_pipefs (rw)
//192.168.40.1/ftp on /mnt/winftp type cifs (rw)
11 搭建基于web的配置环境
11.1 设置swat的访问主机
[root@localhost xinetd.d]# vim /etc/xinetd.d/swat   #编辑swat文件, 修改only_from 为我们要基于web管理的主机ip或者一个网段即可。
[root@localhost xinetd.d]# cat /etc/xinetd.d/swat
# default: off
# description: SWAT is the Samba Web Admin Tool. Use swat \
#           to configure your Samba server. To use SWAT, \
#           connect to port 901 with your favorite web browser.
service swat
{
    disable    = no
    port        = 901
    socket_type    = stream
    wait         = no
    only_from     = 192.168.40.1
    user        = root
    server        = /usr/sbin/swat
    log_on_failure    += USERID
}
11.2 激活swat 并启动xinet.d
[root@localhost xinetd.d]# chkconfig  swat on    #激活swat
[root@localhost xinetd.d]# service xinetd restart   #重启xinetd,
Stopping xinetd:                                           [  OK  ]
Starting xinetd:                                           [  OK  ]
[root@localhost xinetd.d]# netstat -tlnp | grep 901   #查看901端口信息
tcp        0      0 :::901                      :::*                        LISTEN      4744/xinetd
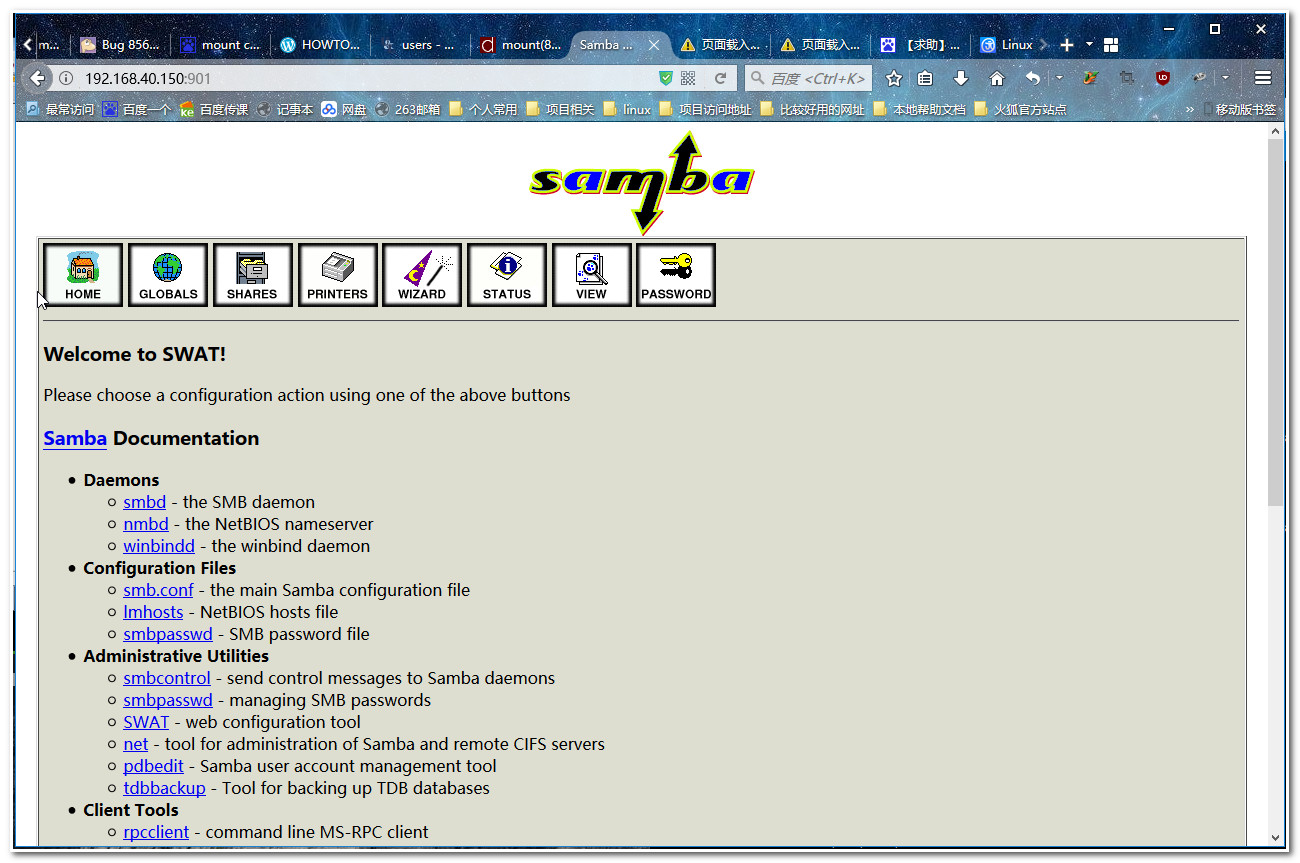
11.3 测试web配置

posted on 2017-02-20 23:18 LinuxPanda 阅读(7981) 评论(5) 编辑 收藏 举报

