
SpringMVC学习记录
SpringMVC学习记录
1、HelloWorld
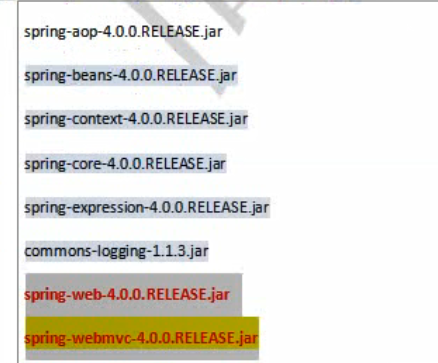
1、新建web工程,添加jar包
2、配置web.xml配置springmvc核心控制器(DispatcherServlet):作用是加载springmvc的配置文件,核心控制器自动加载默认位置配置文件,默认位置为web-inf下,默认名称为***-servlet.xml
<!DOCTYPE web-app PUBLIC
        "-//Sun Microsystems, Inc.//DTD Web Application 2.3//EN"
        "http://java.sun.com/dtd/web-app_2_3.dtd" >

<web-app>
    <display-name>Archetype Created Web Application</display-name>
    <!--配置核心控制器-->
    <filter>
        <filter-name>characterEncodingFilter</filter-name>
        <filter-class>org.springframework.web.filter.CharacterEncodingFilter</filter-class>
        <init-param>
            <param-name>encoding</param-name>
            <param-value>UTF-8</param-value>
        </init-param>
        <init-param>
            <param-name>forceEncoding</param-name>
            <param-value>true</param-value>
        </init-param>
    </filter>
    <filter>
        <filter-name>HiddenHttpMethodFilter</filter-name>
        <filter-class>org.springframework.web.filter.HiddenHttpMethodFilter</filter-class>
    </filter>
    <filter-mapping>
        <filter-name>characterEncodingFilter</filter-name>
        <url-pattern>/*</url-pattern>
    </filter-mapping>
    <filter-mapping>
        <filter-name>HiddenHttpMethodFilter</filter-name>
        <url-pattern>/*</url-pattern>
    </filter-mapping>

    <servlet>
        <servlet-name>springMVC</servlet-name>
        <servlet-class>org.springframework.web.servlet.DispatcherServlet</servlet-class>
    </servlet>
    <servlet-mapping>
        <servlet-name>springMVC</servlet-name>
        <url-pattern>/</url-pattern>
    </servlet-mapping>

</web-app>
springMVC-servlet.xml
<?xml version="1.0" encoding="UTF-8"?>
<beans xmlns="http://www.springframework.org/schema/beans"
       xmlns:xsi="http://www.w3.org/2001/XMLSchema-instance"
       xmlns:context="http://www.springframework.org/schema/context"
       xsi:schemaLocation="http://www.springframework.org/schema/beans http://www.springframework.org/schema/beans/spring-beans.xsd
                            http://www.springframework.org/schema/context  http://www.springframework.org/schema/context/spring-context.xsd">
    <!--扫描组件,将加上@Controller的类作为控制层-->
    <context:component-scan base-package="com.zhaojianhui"></context:component-scan>
    <!--配置视图解析器-->
    <bean id="viewResolver" class="org.springframework.web.servlet.view.InternalResourceViewResolver">
        <property name="prefix" value="/WEB-INF/view/"></property>
        <property name="suffix" value=".jsp"></property>
    </bean>

</beans>
3、创建一个pojo
@Controller
public class Test {
    @RequestMapping(value = "hello",method = RequestMethod.GET)//value设置请求路径,method用于约束请求类型
    public String hello() {
        System.out.println("111");
        return "success";
    }
}
4、编写jsp测试代码
<%@ page language="java" pageEncoding="UTF-8" %>
<html>
<body>
<h2>Hello World!</h2>
<a href="hello">测试springmvc</a>
</body>
</html>
5、测试post请求
@RequestMapping(value = "hello",method = RequestMethod.POST)
    public String hello1() {
        System.out.println("POST");
        return "success";
    }
<form action="hello" method="post">
    <input type="submit" value="提交"/>
</form>
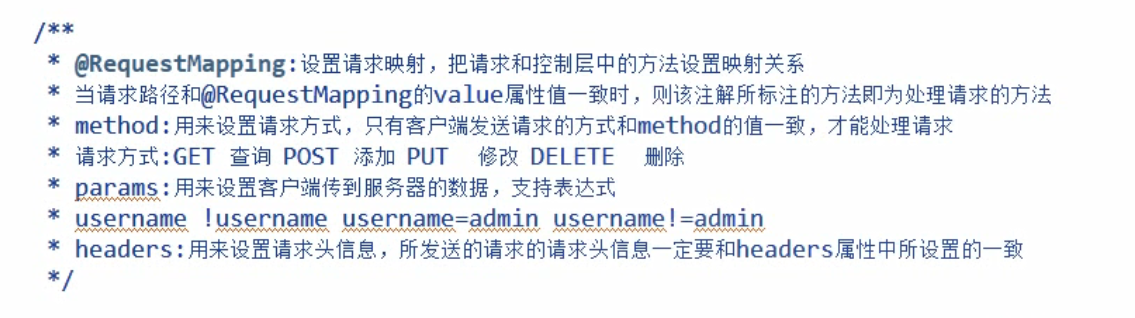
@RequestMapping解析:

占位符与占位符里值的获取示例(@pathvariable注解):
//占位符
    @RequestMapping(value = "/test/{id}/{name}")
    public String hello2(@PathVariable("id") Integer id, @PathVariable("name") String name) {
        System.out.println("id" + id + ",name:" + name);
        return "success";
    }
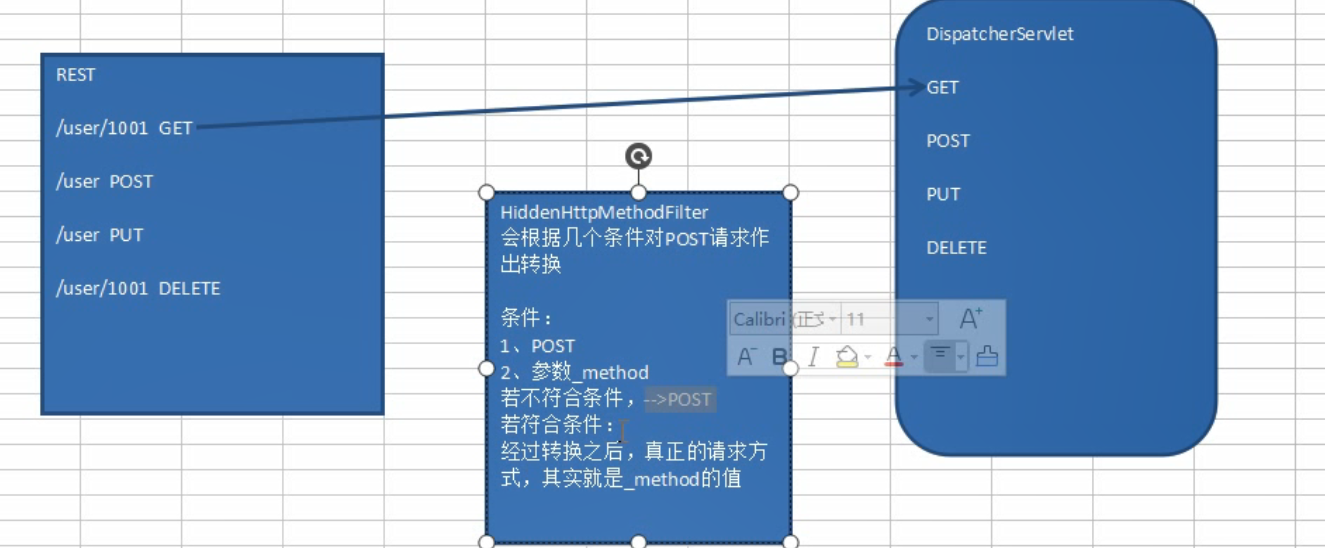
Rest形式的url及转换原理示意图:
Rest风格增删改查示例代码:
@Controller
public class RestController {
    @RequestMapping(value = "/testRest/{id}",method = RequestMethod.GET)
    public String getById(@PathVariable("id") Integer id) {
        System.out.println("id=" + id);
        return "success";


    }
    @RequestMapping(value = "/testRest",method = RequestMethod.POST)
    public String insert() {
        System.out.println("POST");
        return "success";


    }
    @ResponseBody
    @RequestMapping(value = "/testRest",method = RequestMethod.PUT)
    public String update() {
        System.out.println("PUT");
        return "success";

    }
    @ResponseBody
    @RequestMapping(value = "/testRest/{id}",method = RequestMethod.DELETE)
    public String delete(@PathVariable("id") Integer id) {
        System.out.println("DELETE,id="+id);
        return "success";

    }

}
<%--
  Created by IntelliJ IDEA.
  User: Administrator
  Date: 2020/8/12 0012
  Time: 上午 10:26
  To change this template use File | Settings | File Templates.
--%>
<%@ page contentType="text/html;charset=UTF-8" language="java" %>
<html>
<head>
    <title>rest风格url示例</title>
</head>
<body>
<a href="testRest/1001">测试get</a>
<br/>
<form action="testRest" method="POST">
    <input type="submit" value="测试post"/>
</form>
<br/>
<form action="testRest" method="POST">
    <input type="hidden" name="_method" value="PUT">
    <input type="submit" value="测试PUT"/>
</form>
<br/>
<form action="testRest/1001" method="POST">
    <input type="hidden" name="_method" value="DELETE">
    <input type="submit" value="测试DELETE"/>
</form>

</body>
</html>
Springmvc获取客户端数据示例代码:
@Controller
public class ParamController {
    /**
     * 获取客户端传递数据方式:
     * 1、在处理请求的方法中,加入对应的形参,保证形参参数名和传递数据的参数名一致
     * @RequestParam(value = "username",required = false,defaultValue = "1")
     * 上面这个注解第一个参数value是用于指定客户端传来的数据参数名,将其赋值给username,
     * 第二个参数required用于设置是否必须有这个传递数据参数值,第三个参数设置默认时的传递值(如果接收到的传递值为null时),
     * 可用于分页或模糊查询中
     * @param username
     * @param password
     * @return
     */
    @RequestMapping("/param")
    public String param(@RequestParam(value = "username",required = false,defaultValue = "1") String username, String password) {
        System.out.println("user=" + username + ",password=" + password);
        return "success";
    }
    /**
     * @RequestHeader:在处理请求的方法上,获取请求头信息,用法同@RequestParam
     * @CookieValue:在处理请求的方法上,获取cookie信息,用法同@RequestParam
     */
}
<%--
  Created by IntelliJ IDEA.
  User: Administrator
  Date: 2020/8/12 0012
  Time: 上午 11:40
  To change this template use File | Settings | File Templates.
--%>
<%@ page contentType="text/html;charset=UTF-8" language="java" %>
<html>
<head>
    <title>param参数传递</title>
</head>
<body>
<form action="param" method="post">
    username:<input type="text" name="username"/><br/>
    password:<input type="text" name="password"/>
    <input type="submit" value="提交"/>
</form>

</body>
</html>
使用pojo获取客户端数据:
 @RequestMapping("/param")
    public String param(User user) {
        System.out.println("user=" + user);
        return "success";
    }
public class User {
    private String username;
    private String password;

    public String getUsername() {
        return username;
    }

    public void setUsername(String username) {
        this.username = username;
    }

    public String getPassword() {
        return password;
    }

    public void setPassword(String password) {
        this.password = password;
    }

    @Override
    public String toString() {
        return "User{" +
                "username='" + username + '\'' +
                ", password='" + password + '\'' +
                '}';
    }
}
如果属性之间存在级联关系,例如用户和归属地(**省**市),则前端代码可以像如下方式命名:

三种方式实现作用域放值:
1、ModelAndView(根源!):
<%@ page contentType="text/html;charset=UTF-8" language="java" isELIgnored="false" %>
<html>
<head>
    <title>HelloWorld</title>
</head>
<body>
hello!
<br/>
${username }
</body>
</html>
//往作用域放值的三种方式
    //1:ModelAndView
    @RequestMapping(value = "/param",method = RequestMethod.POST)
    public ModelAndView view() {
        ModelAndView mv = new ModelAndView();
        mv.addObject("username", "张三");
        mv.setViewName("success");
        return mv;
    }
2、Map集合
 //2:Map集合
    @RequestMapping(value = "/param",method = RequestMethod.POST)
    public String views(Map<String,Object> map) {
        map.put("username","admin")

        return "success";
    }
3、Model
    //3:Model
    @RequestMapping(value = "/param",method = RequestMethod.POST)
    public String views(Model model) {
        model.addAttribute("username","admins");

        return "success";
    }
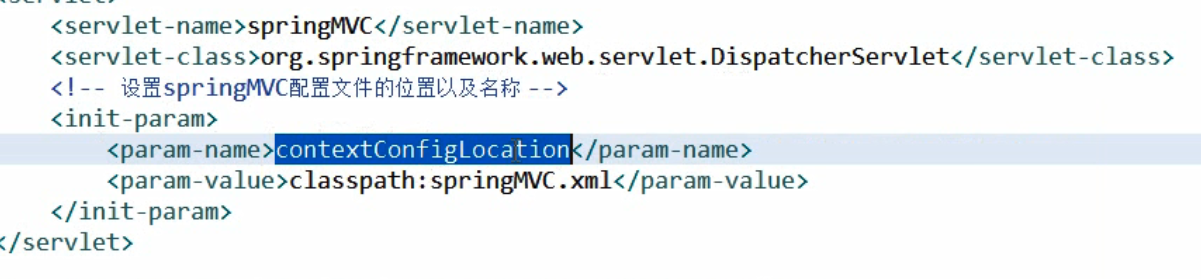
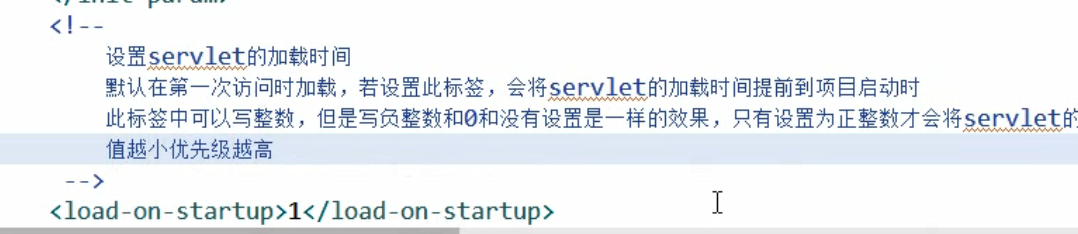
SpringMVC指定配置文件位置和名称、控制Servlet的加载时间
View视图类型
1、重定向
示例代码:
 @RequestMapping(value = "/param", method = RequestMethod.POST)
    public String views(Model model, String username) {
        System.out.println(username);
        model.addAttribute("username", "admins");

        //return "success";
        return "redirect:/index.jsp";//此处为重定向
    }
SpringMVC实现Rest风格CRUD示例代码:
前端部分:
1、list.jsp(展示所有信息)


<%--
  Created by IntelliJ IDEA.
  User: Administrator
  Date: 2020/8/13 0013
  Time: 下午 8:03
  To change this template use File | Settings | File Templates.
--%>
<%@ page contentType="text/html;charset=UTF-8" language="java" isELIgnored="false" %>
<%@ taglib uri="http://java.sun.com/jsp/jstl/core" prefix="c" %>
<c:set var="ctx" value="${pageContext.request.contextPath}"/>
<html>
<head>
    <title>展示员工信息</title>
    <link rel="stylesheet" type="text/css"
          href="${pageContext.request.contextPath}/bootstrap-3.3.7-dist/css/bootstrap.min.css">
    <script type="text/css" src="${ctx}/js/bootstrap.min.css"></script>
    <script type="text/javascript" src="${ctx}/bootstrap-3.3.7-dist/js/bootstrap.min.js"></script>
    <script type="text/javascript" src="${ctx}/js/jquery-3.4.1.min.js"></script>
    <script type="text/javascript">
        $(function () {
            $(".del").click(function () {
                if (confirm("确认删除吗?")) {
                    //将获得的form元素提交
                    $("form").attr("action", this.href).submit();
                    return false;
                }
                return false;//将超链接的默认行为取消
            });
        });
    </script>

</head>
<body>
<table class="table table-striped table-bordered table-hover">
    <tr>
        <th>ID</th>
        <th>LastName</th>
        <th>Gender</th>
        <th>DepartmentName</th>
        <th>Option(<a href="emp">添加</a> )</th>
    </tr>
    <c:forEach items="${emps}" var="emp">
        <tr>
            <td>${emp.id}</td>
            <td>${emp.lastName}</td>
            <td>${emp.gender==0?'女':'男'}</td>
            <td>${emp.department.departmentName}</td>
            <td>
                <a href="emp/${emp.id}">修改</a>
                <a class="del" href="emp/${emp.id}">删除</a>
            </td>
        </tr>
    </c:forEach>
</table>
<form method="post">
    <input type="hidden" name="_method" value="DELETE"/>
</form>

</body>
</html>
2、add.jsp(用于增加和修改信息)
<%--
  Created by IntelliJ IDEA.
  User: Administrator
  Date: 2020/8/14 0014
  Time: 上午 12:29
  To change this template use File | Settings | File Templates.
--%>
<%@ page contentType="text/html;charset=UTF-8" language="java" isELIgnored="false" %>
<%@ taglib uri="http://java.sun.com/jsp/jstl/core" prefix="c" %>
<%@ taglib prefix="form" uri="http://www.springframework.org/tags/form" %>
<c:set var="ctx" value="${pageContext.request.contextPath}"/>
<html>
<head>
    <title>添加页面</title>
    <link rel="stylesheet" type="text/css"
          href="${pageContext.request.contextPath}/bootstrap-3.3.7-dist/css/bootstrap.min.css">
    <script type="text/css" src="${ctx}/js/bootstrap.min.css"></script>
    <script type="text/javascript" src="${ctx}/bootstrap-3.3.7-dist/js/bootstrap.min.js"></script>
    <script type="text/javascript" src="${ctx}/js/jquery-3.4.1.min.js"></script>
</head>
<body>
<form:form action="${ctx}/emp" method="post" modelAttribute="emp">
    <c:if test="${empty emp.id}" var="flag"></c:if>
    <c:if test="${!flag}">
        <form:hidden path="id"/>
        <input type="hidden" name="_method" value="PUT"/>
    </c:if>
    <table class="table">
        <tr>
            <th colspan="2">
                <c:if test="${flag}">
                    添加员工信息
                </c:if>
                <c:if test="${!flag}">
                    修改员工信息
                </c:if>
            </th>
        </tr>
        <tr>
            <td>LastName</td>
            <td>
                <form:input path="lastName"/>
            </td>
        </tr>
        <tr>
            <td>Gender</td>
            <td>
                    <%--<input type="radio" name="gender" value="1"/>男
                    <input type="radio" name="gender" value="0"/>女--%>
                <form:radiobuttons path="gender" items="${genders}"/>
            </td>
        </tr>
        <tr>
            <td>DepartMent</td>
            <td>
                    <%-- <select name="department.id">
                         <option>--SELECT--</option>
                         <c:forEach items="${depts}" var="dept">
                             <option value="${dept.id}">${dept.departmentName}</option>

                         </c:forEach>


                     </select>--%>
                <form:select path="department.id" items="${depts}" itemLabel="departmentName"
                             itemValue="id"></form:select>
            </td>
        </tr>
        <tr>
            <td colspan="2">
                <c:if test="${flag}">
                    <input type="submit" value="添加"/>
                </c:if>
                <c:if test="${!flag}">
                    <input type="submit" value="修改"/>
                </c:if>
            </td>
        </tr>
    </table>
</form:form>
</body>
</html>
Json
1、Json有两种格式:Json对象、Json数组
SpringMVC处理Json默认使用jackson
2、操作json
<%@ page contentType="text/html;charset=UTF-8" language="java" isELIgnored="false" %>
<%@ taglib uri="http://java.sun.com/jsp/jstl/core" prefix="c" %>
<%@ taglib prefix="form" uri="http://www.springframework.org/tags/form" %>
<c:set var="ctx" value="${pageContext.request.contextPath}"/>
<html>
<head>
    <script type="text/javascript" src="${ctx}/js/jquery-3.4.1.min.js"></script>
    <link rel="stylesheet" type="text/css"
          href="${pageContext.request.contextPath}/bootstrap-3.3.7-dist/css/bootstrap.min.css">
    <script type="text/css" src="${ctx}/js/bootstrap.min.css"></script>
    <script type="text/javascript" src="${ctx}/bootstrap-3.3.7-dist/js/bootstrap.min.js"></script>
    <script type="text/javascript">
        $(function () {
            $("#btn").click(function () {

                $.ajax({
                    url: "json",
                    type: "GET",
                    /*data:{},*/
                    dataType: "json",
                    success: function (msg) {
                        //alert(msg);


                        /* for (var i in msg) {
                             var emp = msg[i];
                             alert("id=" + emp.id + ",lastname=" + emp.lastName + ",departname=" + emp.department.departmentName);

                         }*/
                        //回显数据
                        var tb = "<table class='table table-hover'>";
                        tb += "<tr><th>id</th><th>lastName</th><th>gender</th><th>department</th></tr>";
                        for (var i in msg){
                            var emp = msg[i];
                            tb+="<tr><td>"+emp.id+"</td><td>"+emp.lastName+"</td><td>"+emp.gender+"</td><td>"+emp.department.departmentName+"</td></tr>";
                        }
                        tb += "</table>";
                        $("body").append(tb);

                    }

                });

            });

        });
    </script>
</head>
<body>
<h2>Hello World!</h2>
<a href="hello">测试springmvc</a>

<form action="hello" method="post">
    <input type="submit" value="提交"/>
</form>

<a href="emps">员工信息</a>
<input id="btn" type="button" value="测试ajax"/>
<a href="json">测试json</a>
</body>
</html>
package com.zhaojianhui.controller;

import com.zhaojianhui.dao.EmployeeDao;
import com.zhaojianhui.pojo.Employee;
import org.springframework.beans.factory.annotation.Autowired;
import org.springframework.stereotype.Controller;
import org.springframework.web.bind.annotation.RequestMapping;
import org.springframework.web.bind.annotation.ResponseBody;

import java.util.Collection;

@Controller
public class JsonController {
    /**
     * springmvc处理json
     * 1、导包
     * 2、配置文件中开启mvc驱动
     * 3、加@ResponseBody注解
     * 4、将要转换为Json且要响应到客户端的数据,直接作为该方法的返回值返回
     */

    @Autowired
    private EmployeeDao empdao;

    /**
     * @return
     * @ResponseBody:
     */
    @RequestMapping("/json")
    @ResponseBody
    public Collection<Employee> tojson() {

        Collection<Employee> all = empdao.getAll();
        System.out.println(all);

        return all;
    }
}
pom依赖:
 <dependency>
      <groupId>com.fasterxml.jackson.core</groupId>
      <artifactId>jackson-databind</artifactId>
      <version>2.10.0</version>
    </dependency>
    <!-- https://mvnrepository.com/artifact/com.fasterxml.jackson.core/jackson-core -->
    <dependency>
      <groupId>com.fasterxml.jackson.core</groupId>
      <artifactId>jackson-core</artifactId>
      <version>2.10.0</version>
    </dependency>
    <!-- https://mvnrepository.com/artifact/com.fasterxml.jackson.core/jackson-annotations -->
    <dependency>
      <groupId>com.fasterxml.jackson.core</groupId>
      <artifactId>jackson-annotations</artifactId>
      <version>2.10.0</version>
    </dependency>
文件下载
package com.zhaojianhui.controller;

import org.springframework.http.HttpHeaders;
import org.springframework.http.HttpStatus;
import org.springframework.http.ResponseEntity;
import org.springframework.stereotype.Controller;
import org.springframework.web.bind.annotation.RequestMapping;

import javax.servlet.http.HttpSession;
import java.io.*;

@Controller
public class downloadController {
    @RequestMapping("/down")
    public ResponseEntity<byte[]> down(HttpSession httpSession) throws IOException {
        //获取下载文件路径
        String realPath = httpSession.getServletContext().getRealPath("img");//空为项目路径
        String finalapth = realPath + File.separator + "flower.jpg";
        InputStream is = null;
        ResponseEntity<byte[]> entity = null;
        try {
            is = new FileInputStream(finalapth);
            //获取输入流读取的文件所有字节数
            byte[] b = new byte[is.available()];
            is.read(b);
            //设置请求头
            HttpHeaders headers = new HttpHeaders();
            headers.add("Content-Disposition", "attachment; filename=a.jpg");
            //设置响应状态
            HttpStatus status = HttpStatus.OK;
            entity = new ResponseEntity<byte[]>(b, headers, status);
        } catch (Exception e) {
            e.printStackTrace();
        } finally {
            is.close();

        }


        return entity;
    }
}
<%--
  Created by IntelliJ IDEA.
  User: MrZhao
  Date: 2020/8/16
  Time: 18:25
  To change this template use File | Settings | File Templates.
--%>
<%@ page contentType="text/html;charset=UTF-8" language="java" %>
<html>
<head>
    <title>文件下载</title>
</head>
<body>
<a href="down">下载图片</a>

</body>
</html>
文件上传
1、pom依赖
 <dependency>
      <groupId>commons-io</groupId>
      <artifactId>commons-io</artifactId>
      <version>2.4</version>
    </dependency>
    <!-- https://mvnrepository.com/artifact/commons-fileupload/commons-fileupload -->
    <dependency>
      <groupId>commons-fileupload</groupId>
      <artifactId>commons-fileupload</artifactId>
      <version>1.3.3</version>
    </dependency>
2、Controller
 @RequestMapping(value = "/upload", method = RequestMethod.POST)
    public String up(String desc, MultipartFile uploadFile, HttpSession session) throws Exception {
        //获取上传文件名称
        String fileName = uploadFile.getOriginalFilename();
        String path = session.getServletContext().getRealPath("photo") + File.separator + fileName;
        //获取输入流
        InputStream is = uploadFile.getInputStream();
        File file = new File(path);
        OutputStream os = new FileOutputStream(file);
        int i = 0;
        byte[] b = new byte[1024];
        while ((i = is.read(b)) != -1) {
            os.write(b, 0, i);
        }
        os.close();
        is.close();

        //获取输出流


        return "success";

    }

    @RequestMapping(value = "/ups", method = RequestMethod.POST)
    public String ups(String desc, MultipartFile uploadFile, HttpSession session) throws Exception {
        //获取上传文件名称
        String fileName = uploadFile.getOriginalFilename();
        String finalName = UUID.randomUUID() + fileName.substring(fileName.lastIndexOf("."));
        String path = session.getServletContext().getRealPath("photo") + File.separator + finalName;
        File file = new File(path);
        uploadFile.transferTo(file);
        return "success";


    }
3、前端
<form action="ups" method="post" enctype="multipart/form-data">
    头像:<input type="file" name="uploadFile"/>
    描述:<input type="text" name="desc"/>
    <input type="submit" value="提交"/>
</form>
4、springmvc配置文件:
 <!--配置文件上传-->
    <bean id="multipartResolver" class="org.springframework.web.multipart.commons.CommonsMultipartResolver">
        <property name="defaultEncoding" value="UTF-8"></property>
    </bean>
多文件上传(2种方式):
 //多文件上传
    @RequestMapping(value = "/upload", method = RequestMethod.POST)
    public String up(String desc, MultipartFile[] uploadFile, HttpSession session) throws Exception {
        //获取上传文件名称
        for (int k = 0; k < uploadFile.length; k++) {
            String fileName = uploadFile[k].getOriginalFilename();
            String path = session.getServletContext().getRealPath("photo") + File.separator + fileName;
            //获取输入流
            InputStream is = uploadFile[k].getInputStream();
            File file = new File(path);
            OutputStream os = new FileOutputStream(file);
            int i = 0;
            byte[] b = new byte[1024];
            while ((i = is.read(b)) != -1) {
                os.write(b, 0, i);
            }
            os.close();
            is.close();
        }

        //获取输出流


        return "success";

    }
 //多文件上传
    @RequestMapping(value = "/upload", method = RequestMethod.POST)
    public String up(String desc, MultipartFile[] uploadFile, HttpSession session) throws Exception {
        //获取上传文件名称
        for (int k = 0; k < uploadFile.length; k++) {
            String fileName = uploadFile[k].getOriginalFilename();
            String finalName = UUID.randomUUID() + fileName.substring(fileName.lastIndexOf("."));
            String path = session.getServletContext().getRealPath("photo") + File.separator + finalName;
            File file = new File(path);
            uploadFile[k].transferTo(file);

            //获取输出流


        }
        return "success";

    }
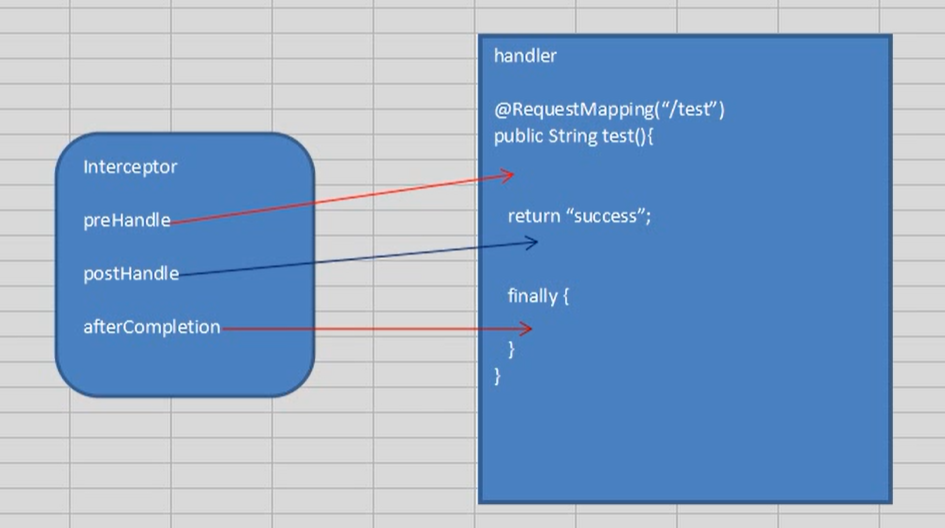
自定义拦截器
1、拦截器执行顺序概览图:
测试代码:
package com.zhaojianhui.inceptor;

import org.springframework.stereotype.Component;
import org.springframework.web.servlet.HandlerInterceptor;
import org.springframework.web.servlet.ModelAndView;

import javax.servlet.http.HttpServletRequest;
import javax.servlet.http.HttpServletResponse;
@Component
//拦截器
public class FirstInceptor implements HandlerInterceptor {

    @Override
    public boolean preHandle(HttpServletRequest request, HttpServletResponse response, Object handler) throws Exception {
        System.out.println("first:preHandle");
        return false;
    }

    @Override
    public void postHandle(HttpServletRequest request, HttpServletResponse response, Object handler, ModelAndView modelAndView) throws Exception {
        System.out.println("first:postHandle");
    }

    @Override
    public void afterCompletion(HttpServletRequest request, HttpServletResponse response, Object handler, Exception ex) throws Exception {
        System.out.println("first:afterCompletion");

    }
}
配置文件中的配置
<!--拦截器-->
    <mvc:interceptors>
        <!--默认拦截所有请求-->
        <bean class="com.zhaojianhui.inceptor.FirstInceptor"></bean>
        <!--<!–配置方式2:拦截器类加上@Component注解–>
        <ref bean="firstInceptor"/>-->
    </mvc:interceptors>

自定义拦截方式
   <!--设置自定义拦截方式-->
       <!-- <mvc:interceptor>
            <bean></bean>
            <mvc:mapping path=""/>
            <mvc:exclude-mapping path=""/>
        </mvc:interceptor>-->
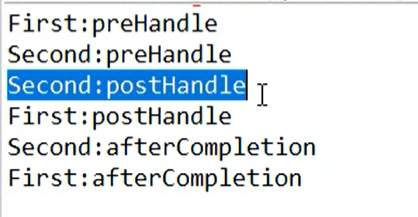
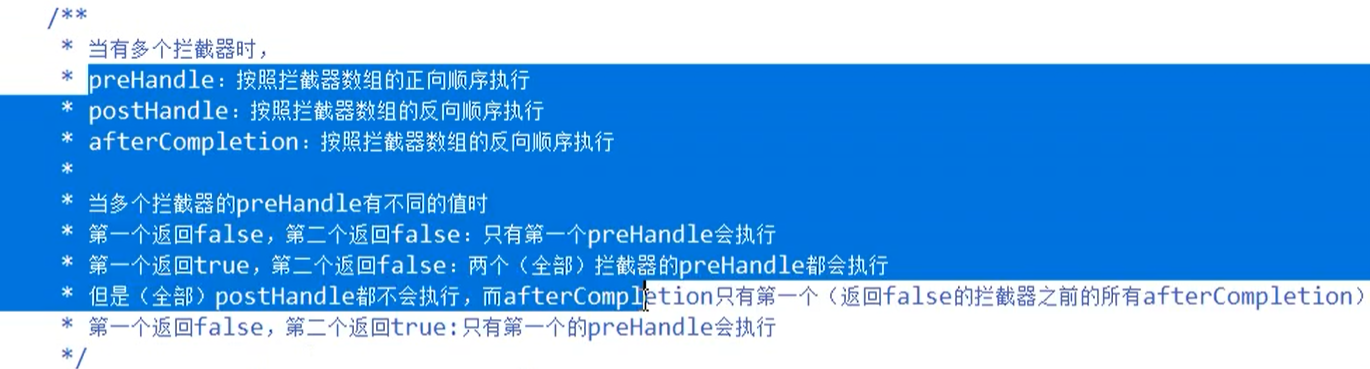
多个拦截器执行顺序:
SpringMVC的异常处理:
1、SpringMVC配置文件中添加:
 <!--异常处理-->
    <bean class="org.springframework.web.servlet.handler.SimpleMappingExceptionResolver">
        <property name="exceptionMappings">
            <props>
                <prop key="java.lang.NullPointerException">error</prop>
            </props>
        </property>
    </bean>
2、
<a href="exception">测试异常</a>
3、控制器
package com.zhaojianhui.controller;

import org.springframework.stereotype.Controller;
import org.springframework.web.bind.annotation.RequestMapping;
import org.springframework.web.bind.annotation.RequestMethod;

@Controller
public class ExceptionController {
    @RequestMapping(value = "exception", method = RequestMethod.GET)
    public String test() {
        String s = null;
        System.out.println(s.charAt(5));
        return "success";
    }
}
SpringMVC执行流程分析:

Spring和SpringMVC整合:
1、web.xml:
<!--默认web-info下applicationContext.xml-->
    <listener>
        <listener-class>org.springframework.web.context.ContextLoaderListener</listener-class>
    </listener>
    <!--如果不是默认位置或者名称则可以用下面方式指定位置和名称-->
    <context-param>
        <param-name>contextConfigLocation</param-name>
        <param-value>classpath:spring.xml</param-value>
    </context-param>
2、Spring配置文件中扫描:
<context:component-scan base-package="com.zhaojianhui">
        <context:exclude-filter type="annotation" expression="org.springframework.stereotype.Controller"/>
    </context:component-scan>
3、springmvc配置文件中扫描:
<context:component-scan base-package="com.zhaojianhui.controller"></context:component-scan>
