大数据Spark外部数据源
1 HBase 数据源
Spark可以从外部存储系统读取数据,比如RDBMs表中或者HBase表中读写数据,这也是企业
中常常使用,如下两个场景:
- 1)、要分析的数据存储在HBase表中,需要从其中读取数据数据分析
- 日志数据:电商网站的商家操作日志
- 订单数据:保险行业订单数据
- 2)、使用Spark进行离线分析以后,往往将报表结果保存到MySQL表中
- 网站基本分析(pv、uv。。。。。)
Spark可以从HBase表中读写(Read/Write)数据,底层采用TableInputFormat和
TableOutputFormat方式,与MapReduce与HBase集成完全一样,使用输入格式InputFormat和输出格式OutputFoamt。
1.1 HBase Sink
回 顾 MapReduce 向 HBase 表 中 写 入 数 据 , 使 用 TableReducer , 其 中 OutputFormat 为
TableOutputFormat,读取数据Key:ImmutableBytesWritable,Value:Put。
写 入 数 据 时 , 需 要 将 RDD 转 换 为 RDD[(ImmutableBytesWritable, Put)] 类 型 , 调 用
saveAsNewAPIHadoopFile方法数据保存至HBase表中。
HBase Client连接时,需要设置依赖Zookeeper地址相关信息及表的名称,通过Configuration
设置属性值进行传递。
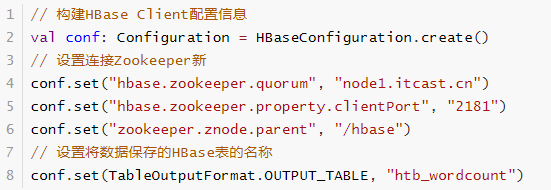
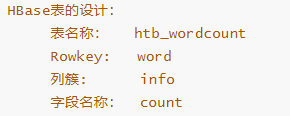
范例演示:将词频统计结果保存HBase表,表的设计
代码如下:
import org.apache.hadoop.conf.Configuration
import org.apache.hadoop.hbase.HBaseConfiguration
import org.apache.hadoop.hbase.client.Put
import org.apache.hadoop.hbase.io.ImmutableBytesWritable
import org.apache.hadoop.hbase.mapreduce.TableOutputFormat
import org.apache.hadoop.hbase.util.Bytes
import org.apache.spark.rdd.RDD
import org.apache.spark.{SparkConf, SparkContext}

/**
 * 将RDD数据保存至HBase表中
 */
object SparkWriteHBase {
  def main(args: Array[String]): Unit = {
    // 创建应用程序入口SparkContext实例对象
    val sc: SparkContext = {
      // 1.a 创建SparkConf对象,设置应用的配置信息
      val sparkConf: SparkConf = new SparkConf()
        .setAppName(this.getClass.getSimpleName.stripSuffix("$"))
        .setMaster("local[2]")
      // 1.b 传递SparkConf对象,构建Context实例
      new SparkContext(sparkConf)
    }
    sc.setLogLevel("WARN")
    // TODO: 1、构建RDD
    val list = List(("hadoop", 234), ("spark", 3454), ("hive", 343434), ("ml", 8765))
    val outputRDD: RDD[(String, Int)] = sc.parallelize(list, numSlices = 2)
    // TODO: 2、将数据写入到HBase表中, 使用saveAsNewAPIHadoopFile函数,要求RDD是(key, Value)
    // TODO: 组装RDD[(ImmutableBytesWritable, Put)]
    /**
     * HBase表的设计:
     * 表的名称:htb_wordcount
     * Rowkey: word
     * 列簇: info
     * 字段名称: count
     */
    val putsRDD: RDD[(ImmutableBytesWritable, Put)] = outputRDD.mapPartitions { iter =>
      iter.map { case (word, count) =>
        // 创建Put实例对象
        val put = new Put(Bytes.toBytes(word))
        // 添加列
        put.addColumn(
          // 实际项目中使用HBase时,插入数据,先将所有字段的值转为String,再使用Bytes转换为字节数组
          Bytes.toBytes("info"), Bytes.toBytes("cout"), Bytes.toBytes(count.toString)
        )
        // 返回二元组
        (new ImmutableBytesWritable(put.getRow), put)
      }
    }
    // 构建HBase Client配置信息
    val conf: Configuration = HBaseConfiguration.create()
    // 设置连接Zookeeper属性
    conf.set("hbase.zookeeper.quorum", "node1.oldlu.cn")
    conf.set("hbase.zookeeper.property.clientPort", "2181")
    conf.set("zookeeper.znode.parent", "/hbase")
    // 设置将数据保存的HBase表的名称
    conf.set(TableOutputFormat.OUTPUT_TABLE, "htb_wordcount")
    /*
    def saveAsNewAPIHadoopFile(
    path: String,// 保存的路径
    keyClass: Class[_], // Key类型
    valueClass: Class[_], // Value类型
    outputFormatClass: Class[_ <: NewOutputFormat[_, _]], // 输出格式OutputFormat实现
    conf: Configuration = self.context.hadoopConfiguration // 配置信息
    ): Unit
    */
    putsRDD.saveAsNewAPIHadoopFile(
      "datas/spark/htb-output-" + System.nanoTime(), //
      classOf[ImmutableBytesWritable], //
      classOf[Put], //
      classOf[TableOutputFormat[ImmutableBytesWritable]], //
      conf
    )
    // 应用程序运行结束,关闭资源
    sc.stop()
  }
}
运行完成以后,使用hbase shell查看数据:

1.2 HBase Source
回 顾 MapReduce 从 读 HBase 表 中 的 数 据 , 使 用 TableMapper , 其 中 InputFormat 为
TableInputFormat,读取数据Key:ImmutableBytesWritable,Value:Result。
从HBase表读取数据时,同样需要设置依赖Zookeeper地址信息和表的名称,使用Configuration
设置属性,形式如下: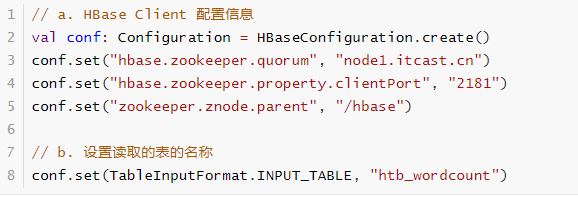
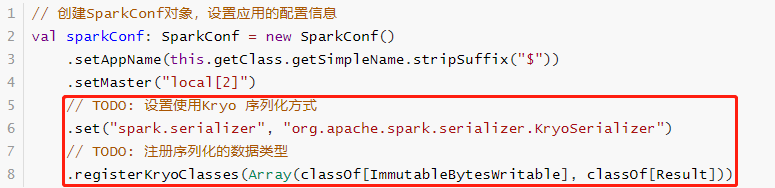
此外,读取的数据封装到RDD中,Key和Value类型分别为:ImmutableBytesWritable和Result,
不支持Java Serializable导致处理数据时报序列化异常。设置Spark Application使用Kryo序列化,性
能要比Java 序列化要好,创建SparkConf对象设置相关属性,如下所示:
范例演示:从HBase表读取词频统计结果,代码如下
import org.apache.hadoop.conf.Configuration
import org.apache.hadoop.hbase.{CellUtil, HBaseConfiguration}
import org.apache.hadoop.hbase.client.Result
import org.apache.hadoop.hbase.io.ImmutableBytesWritable
import org.apache.hadoop.hbase.mapreduce.TableInputFormat
import org.apache.hadoop.hbase.util.Bytes
import org.apache.spark.rdd.RDD
import org.apache.spark.{SparkConf, SparkContext}

/**
 * 从HBase 表中读取数据,封装到RDD数据集
 */
object SparkReadHBase {
  def main(args: Array[String]): Unit = {
    // 创建应用程序入口SparkContext实例对象
    val sc: SparkContext = {
      // 1.a 创建SparkConf对象,设置应用的配置信息
      val sparkConf: SparkConf = new SparkConf()
        .setAppName(this.getClass.getSimpleName.stripSuffix("$"))
        .setMaster("local[2]")
        // TODO: 设置使用Kryo 序列化方式
        .set("spark.serializer", "org.apache.spark.serializer.KryoSerializer")
        // TODO: 注册序列化的数据类型
        .registerKryoClasses(Array(classOf[ImmutableBytesWritable], classOf[Result]))
      // 1.b 传递SparkConf对象,构建Context实例
      new SparkContext(sparkConf)
    }
    sc.setLogLevel("WARN")
    // TODO: a. 读取HBase Client 配置信息
    val conf: Configuration = HBaseConfiguration.create()
    conf.set("hbase.zookeeper.quorum", "node1.oldlu.cn")
    conf.set("hbase.zookeeper.property.clientPort", "2181")
    conf.set("zookeeper.znode.parent", "/hbase")
    // TODO: b. 设置读取的表的名称
    conf.set(TableInputFormat.INPUT_TABLE, "htb_wordcount")
    /*
    def newAPIHadoopRDD[K, V, F <: NewInputFormat[K, V]](
    conf: Configuration = hadoopConfiguration,
    fClass: Class[F],
    kClass: Class[K],
    vClass: Class[V]
    ): RDD[(K, V)]
    */
    val resultRDD: RDD[(ImmutableBytesWritable, Result)] = sc.newAPIHadoopRDD(
      conf, //
      classOf[TableInputFormat], //
      classOf[ImmutableBytesWritable], //
      classOf[Result] //
    )
    println(s"Count = ${resultRDD.count()}")
    resultRDD
      .take(5)
      .foreach { case (rowKey, result) =>
        println(s"RowKey = ${Bytes.toString(rowKey.get())}")
        // HBase表中的每条数据封装在result对象中,解析获取每列的值
        result.rawCells().foreach { cell =>
          val cf = Bytes.toString(CellUtil.cloneFamily(cell))
          val column = Bytes.toString(CellUtil.cloneQualifier(cell))
          val value = Bytes.toString(CellUtil.cloneValue(cell))
          val version = cell.getTimestamp
          println(s"\t $cf:$column = $value, version = $version")
        }
      }
    // 应用程序运行结束,关闭资源
    sc.stop()
  }
}
运行结果:

2 MySQL 数据源
实际开发中常常将分析结果RDD保存至MySQL表中,使用foreachPartition函数;此外Spark
中提供JdbcRDD用于从MySQL表中读取数据。
调用RDD#foreachPartition函数将每个分区数据保存至MySQL表中,保存时考虑降低RDD分区
数目和批量插入,提升程序性能。
范例演示:将词频统计WordCount结果保存MySQL表tb_wordcount。
- 建表语句
USE db_test ;
CREATE TABLE `tb_wordcount` (
`count` varchar(100) CHARACTER SET utf8mb4 COLLATE utf8mb4_0900_ai_ci NOT NULL,
`word` varchar(100) NOT NULL,
PRIMARY KEY (`word`)
) ENGINE=InnoDB DEFAULT CHARSET=utf8mb4 COLLATE=utf8mb4_0900_ai_ci ;
- 演示代码
import java.sql.{Connection, DriverManager, PreparedStatement}
import org.apache.spark.rdd.RDD
import org.apache.spark.{SparkConf, SparkContext}

/**
 * 将词频统计结果保存到MySQL表中
 */
object SparkWriteMySQL {
  def main(args: Array[String]): Unit = {
    // 创建应用程序入口SparkContext实例对象
    val sc: SparkContext = {
      // 1.a 创建SparkConf对象,设置应用的配置信息
      val sparkConf: SparkConf = new SparkConf()
        .setAppName(this.getClass.getSimpleName.stripSuffix("$"))
        .setMaster("local[2]")
      // 1.b 传递SparkConf对象,构建Context实例
      new SparkContext(sparkConf)
    }
    sc.setLogLevel("WARN")
    // 1. 从HDFS读取文本数据,封装集合RDD
    val inputRDD: RDD[String] = sc.textFile("datas/wordcount/wordcount.data")
    // 2. 处理数据,调用RDD中函数
    val resultRDD: RDD[(String, Int)] = inputRDD
      // 3.a 每行数据分割为单词
      .flatMap(line => line.split("\\s+"))
      // 3.b 转换为二元组,表示每个单词出现一次
      .map(word => (word, 1))
      // 3.c 按照Key分组聚合
      .reduceByKey((tmp, item) => tmp + item)
    // 3. 输出结果RDD保存到MySQL数据库
    resultRDD
      // 对结果RDD保存到外部存储系统时,考虑降低RDD分区数目
      .coalesce(1)
      // 对分区数据操作
      .foreachPartition { iter => saveToMySQL(iter) }
    // 应用程序运行结束,关闭资源
    sc.stop()
  }

  /**
   * 将每个分区中的数据保存到MySQL表中
   *
   * @param datas 迭代器,封装RDD中每个分区的数据
   */
  def saveToMySQL(datas: Iterator[(String, Int)]): Unit = {
    // a. 加载驱动类
    Class.forName("com.mysql.cj.jdbc.Driver")
    // 声明变量
    var conn: Connection = null
    var pstmt: PreparedStatement = null
    try {
      // b. 获取连接
      conn = DriverManager.getConnection(
        "jdbc:mysql://node1.oldlu.cn:3306/?serverTimezone=UTC&characterEncoding=utf8&useUnic
          ode = true",
          "root", "123456"
          )
          // c. 获取PreparedStatement对象
          val insertSql = "INSERT INTO db_test.tb_wordcount (word, count) VALUES(?, ?)"
          pstmt = conn.prepareStatement (insertSql)
          conn.setAutoCommit (false)
          // d. 将分区中数据插入到表中,批量插入
          datas.foreach {case (word, count) =>
          pstmt.setString (1, word)
          pstmt.setLong (2, count.toLong)
          // 加入批次
          pstmt.addBatch ()
          }
          // TODO: 批量插入
          pstmt.executeBatch ()
          conn.commit ()
          } catch {
          case e: Exception => e.printStackTrace ()
          } finally {
          if (null != pstmt) pstmt.close ()
          if (null != conn) conn.close ()
          }
       }
}
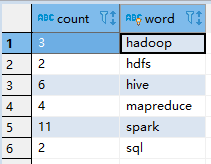
- 运行程序,查看数据库表的数据
3 SHC 操作Hbase基本使用
直到 2.3 版本开始, HBase 才提供了 Spark 的原生连接器, 所以如果需要使用 Spark 访问 HBase, 有两种选择
- 自己编写连接器, 通过
newApiHadoop来操作 HBase - 使用第三方的, 目前看来第三方最好的还是 Hortonworks 的 SHC(Spark HBase Connector)
使用 SHC 读取 HBase
- 安装 SHC 最新版
- MVN 配置
- 在
/Code/shc-master中执行mvn install --DskipTests

- Maven pom.xml -> Local repo 读取本地的 Maven 缓存 -> 远端仓库
- 如果想要使用 MVN 命令, 需要配置 Maven 到 Path 中, 同时需要确定有 JAVA_HOME 这个环境变量
- 编写代码
def catalog = s"""{
     |"table":{"namespace":"default", "name":"tbl_users"},
     |"rowkey":"id",
     |"columns":{
       |"id":{"cf":"rowkey", "col":"id", "type":"string"},
       |"username":{"cf":"default", "col":"username", "type":"string"}
     |}
   |}""".stripMargin

val spark = SparkSession.builder()
  .appName("shc test")
  .master("local[10]")
  .getOrCreate()

spark.read
  .option(HBaseTableCatalog.tableCatalog, catalog)
  .format("org.apache.spark.sql.execution.datasources.hbase")
  .load()
  .show()
使用 SHC 写入 HBase
    def catalogRead = s"""{
         |"table":{"namespace":"default", "name":"tbl_users_test"},
         |"rowkey":"id",
         |"columns":{
           |"id":{"cf":"rowkey", "col":"id", "type":"string"},
           |"username":{"cf":"default", "col":"username", "type":"string"}
         |}
       |}""".stripMargin

    val spark = SparkSession.builder()
      .appName("shc test")
      .master("local[10]")
      .getOrCreate()

    val readDF = spark.read
      .option(HBaseTableCatalog.tableCatalog, catalogRead)
      .format("org.apache.spark.sql.execution.datasources.hbase")
      .load()

    def catalogWrite = s"""{
         |"table":{"namespace":"default", "name":"tbl_users_test"},
         |"rowkey":"id",
         |"columns":{
           |"id":{"cf":"rowkey", "col":"id", "type":"string"},
           |"username":{"cf":"default", "col":"username", "type":"string"}
         |}
       |}""".stripMargin

    readDF.write
      .option(HBaseTableCatalog.tableCatalog, catalogWrite)
      .option(HBaseTableCatalog.newTable, "5")
      .format("org.apache.spark.sql.execution.datasources.hbase")
      .save()
这段程序如果在本机执行的话, 会出现一个异常
shc Pathname xx from xx is not a valid DFS filename
这个异常并不会影响数据的写入, 是因为本机的临时文件问题, 放在集群跑就没问题了
3.1 生成 JSON
因为直接使用字符串去拼接 JSON 格式的 Catalog 会非常麻烦, 所以我们可以通过 JSON 对象来简化这个步骤
- 根据 Catalog 的对象格式, 生成对应的样例类
- 创建样例类对象
- 通过 JSON4S 将样例类对象转为 JSON 字符串
- 访问和保存 HBase
object ShcJsonTest {

  def main(args: Array[String]): Unit = {
    val rowkeyField = "id"
    val columnFamily = "default"
    val tableName = "tbl_users"

    val columns: mutable.HashMap[String, HBaseField] = mutable.HashMap.empty[String, HBaseField]
    columns += rowkeyField -> HBaseField("rowkey", rowkeyField, "string")
    columns += "username" -> HBaseField(columnFamily, "username", "string")

    val hbaseCatalog = HBaseCatalog(HBaseTable("default", tableName), rowkeyField, columns.toMap)

    import org.json4s._
    import org.json4s.jackson.Serialization
    import org.json4s.jackson.Serialization.write
    implicit  val formats: AnyRef with Formats = Serialization.formats(NoTypeHints)

    val catalog = write(hbaseCatalog)

    val spark = SparkSession.builder()
      .appName("shc test")
      .master("local[10]")
      .getOrCreate()

    val readDF = spark.read
      .option(HBaseTableCatalog.tableCatalog, catalog)
      .format("org.apache.spark.sql.execution.datasources.hbase")
      .load()

    readDF.show()
  }

  case class HBaseCatalog(table: HBaseTable, rowkey: String, columns: Map[String, HBaseField])

  case class HBaseTable(namespace: String, name: String)

  case class HBaseField(cf: String, col: String, `type`: String)
}
同时, 可以将这个过程抽取为一个方法, 简化开发
object ShcJsonTest {

  def main(args: Array[String]): Unit = {
    val spark = SparkSession.builder()
      .appName("shc test")
      .master("local[10]")
      .getOrCreate()

    val readDF = spark.read
      .option(HBaseTableCatalog.tableCatalog, generateCatalog("id", "default", "tbl_users"))
      .format("org.apache.spark.sql.execution.datasources.hbase")
      .load()

    readDF.show()
  }

  def generateCatalog(rowkeyField: String, columnFamily: String, tableName: String): String = {
    val columns: mutable.HashMap[String, HBaseField] = mutable.HashMap.empty[String, HBaseField]
    columns += rowkeyField -> HBaseField("rowkey", rowkeyField, "string")
    columns += "username" -> HBaseField(columnFamily, "username", "string")

    val hbaseCatalog = HBaseCatalog(HBaseTable("default", tableName), rowkeyField, columns.toMap)

    import org.json4s._
    import org.json4s.jackson.Serialization
    import org.json4s.jackson.Serialization.write
    implicit  val formats: AnyRef with Formats = Serialization.formats(NoTypeHints)

    write(hbaseCatalog)
  }

  case class HBaseCatalog(table: HBaseTable, rowkey: String, columns: Map[String, HBaseField])

  case class HBaseTable(namespace: String, name: String)

  case class HBaseField(cf: String, col: String, `type`: String)
}
