

Java中的NIO
最近在研究Java中的IO,感觉这一块很重要,只要涉及到数据传输,不论是本地文件传输,还是远程的网络传输,基本离不开IO。
上一篇文章已经大致的总结了一下Java1.1的传统IO(Java中的IO),看了很多网上的文章,发现知识点很多,自己总结思考过的东西才更容易被消化,所以记录一下NIO相关知识。
1、引言
说到NIO就离不开Channel、Buffer、Selector三个定义,这也是区别于传统IO的地方。简单来说,传统的IO面向的是流处理,NIO面向的是缓冲区(块)处理,也就是下面即将讲到的Buffer。
2、Channel
2.1、Channel介绍
Channel是一个对象,作用于源节点和目标节点的连接,是数据传输的通道,一般和Buffer搭配使用。简单点说,Channel就是铁轨,Buffer就是跑在铁轨上的火车,货物(数据)放在火车上,与铁轨没有关系。
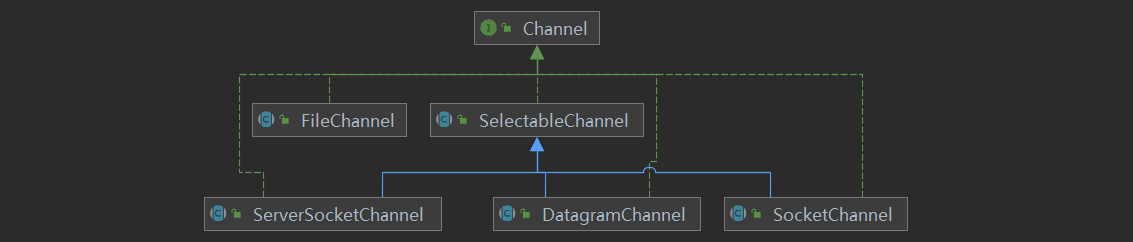
Channel的常用实现类有如下几种,用于文件IO的FileChannel和网络IO的SelectableChannel,其子类有DatagramChannel、SocketChannel、ServerSocketChannel等等。
2.2、获取Channel
简单举例一些常用场景,获取Channel的方式,主要分为文件IO和网络IO。
- 文件IO
1、从流中获取:
FileInputStream inputStream = new FileInputStream(file); FileChannel readChannel = inputStream.getChannel();
2、FileChannel静态方法open()
FileChannel readChannel = FileChannel.open(Paths.get(file.toURI()), StandardOpenOption.READ); FileChannel writeChannel = FileChannel.open(Paths.get(newFile.toURI()), StandardOpenOption.READ,StandardOpenOption.WRITE, StandardOpenOption.CREATE_NEW);
3、RandomAccessFile
RandomAccessFile file1 = new RandomAccessFile("filePath", "r"); FileChannel channel = file1.getChannel();
4、Files的静态方法
SeekableByteChannel channel = Files.newByteChannel(Paths.get("filePath"), StandardOpenOption.READ);
- 网络IO
1、SocketChannel
SocketChannel channel = SocketChannel.open(new InetSocketAddress("127.0.0.1", 8080));
2、ServerSocketChannel
ServerSocketChannel serverSocketChannel = ServerSocketChannel.open(); serverSocketChannel.bind(new InetSocketAddress(9090));
3、DatagramChannel
DatagramChannel datagramChannel = DatagramChannel.open(); datagramChannel.bind(new InetSocketAddress(9090));
2.3、代码示例
复制文件一般就三种方式,常规的Channel和Buffer、MappedByteBuffer直接内存映射、
2.3.1、Channel和Buffer复制文件
private static void copyFileByChannelAndBuffer(File file, File newFile) throws IOException { //从流中获取channel try (FileInputStream inputStream = new FileInputStream(file); FileChannel readChannel = inputStream.getChannel(); FileOutputStream outputStream = new FileOutputStream(newFile); FileChannel writeChannel = outputStream.getChannel()) { //分配capacity大小为2048的Buffer ByteBuffer buffer = ByteBuffer.allocate(2048); //循环从channel中获取数据 while (readChannel.read(buffer) != -1) { //因为buffer中实际存储的数据可能并不是满的,所以将limit置为当前position,再将position设置为0,方便读取从下标position-limit的数据 buffer.flip(); //写入数据到channel writeChannel.write(buffer); //因为read和write方法都会操作position,所以如果还需要操作读写,就得重置为初始状态,position为0,limit为capacity buffer.clear(); } } }
2.3.2、内存映射文件的方式复制文件
有如下三种方式读写数据,目前不清楚那种方式更优,网上有的文章说MappedByteBuffer可以类似于将整个文件读取到内存,实际内部也是按需加载到内存,不会占用很多内存。(这个涉及到堆外内存的)
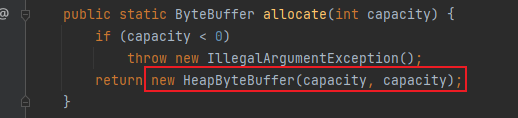
注:MappedByteBuffer映射的文件大小不能超过2G,超过会报错,如下图:

1、直接将ReadBuffer写入WriteBuffer
private static void copyFileByMappedByteBuffer(File file, File newFile) throws IOException { try (FileChannel readChannel = FileChannel.open(Paths.get(file.toURI()), StandardOpenOption.READ); FileChannel writeChannel = FileChannel.open(Paths.get(newFile.toURI()), StandardOpenOption.READ, StandardOpenOption.WRITE, StandardOpenOption.CREATE)) { MappedByteBuffer readBuffer = readChannel.map(FileChannel.MapMode.READ_ONLY, 0, readChannel.size()); MappedByteBuffer writeBuffer = writeChannel.map(FileChannel.MapMode.READ_WRITE, 0, readChannel.size()); readBufferAllToWriteBuffer(readBuffer, writeBuffer); } } private static void readBufferAllToWriteBuffer(MappedByteBuffer readBuffer, MappedByteBuffer writeBuffer) { //将buffer中的数据写入 writeBuffer.put(readBuffer); //保存到磁盘 writeBuffer.force(); }
2、创建一个中间缓存的数组,分批从ReadBuffer读取数据写入到WriteBuffer
private static void copyFileByMappedByteBuffer(File file, File newFile) throws IOException { try (FileChannel readChannel = FileChannel.open(Paths.get(file.toURI()), StandardOpenOption.READ); FileChannel writeChannel = FileChannel.open(Paths.get(newFile.toURI()), StandardOpenOption.READ, StandardOpenOption.WRITE, StandardOpenOption.CREATE)) { MappedByteBuffer readBuffer = readChannel.map(FileChannel.MapMode.READ_ONLY, 0, readChannel.size()); MappedByteBuffer writeBuffer = writeChannel.map(FileChannel.MapMode.READ_WRITE, 0, readChannel.size()); //分批复制 specificByteSizeToSave(file, readBuffer, writeBuffer); } } private static void specificByteSizeToSave(File file, MappedByteBuffer readBuffer, MappedByteBuffer writeBuffer) { //创建一个中间数组 int size = 2048; byte[] bytes = new byte[size]; long total = file.length(); //循环处理 for (long position = 0; position < total; ) { //计算可放入数组的实际数据长度,最大为数组长度 long length = Math.min(total - position, size); //将position-limit之间的数据放入数组 readBuffer.get(bytes, 0, (int) length); //写入数据 writeBuffer.put(bytes, 0, (int) length); //记录position的大小 position = position + length; } }
3、创建一个和文件大小相等的数组,一次性从ReadBuffer中取出数据放入WriteBuffer中
private static void copyFileByMappedByteBuffer(File file, File newFile) throws IOException { try (FileChannel readChannel = FileChannel.open(Paths.get(file.toURI()), StandardOpenOption.READ); FileChannel writeChannel = FileChannel.open(Paths.get(newFile.toURI()), StandardOpenOption.READ, StandardOpenOption.WRITE, StandardOpenOption.CREATE)) { MappedByteBuffer readBuffer = readChannel.map(FileChannel.MapMode.READ_ONLY, 0, readChannel.size()); MappedByteBuffer writeBuffer = writeChannel.map(FileChannel.MapMode.READ_WRITE, 0, readChannel.size()); allByteSizeToSave(file, readBuffer, writeBuffer); } } private static void allByteSizeToSave(File file, MappedByteBuffer readBuffer, MappedByteBuffer writeBuffer) { //循环将数据写入 byte[] bytes = new byte[(int) file.length()]; ByteBuffer buffer = readBuffer.get(bytes); //切换到读模式 buffer.flip(); //将buffer中的数据写入 writeBuffer.put(bytes); //保存到磁盘 writeBuffer.force(); //重置buffer buffer.clear(); }
2.3.3、transfer方式复制文件
两者没什么大区别,但是transferTo,对于文件大小有2G限制,对于socketChannel有8M的限制
1、transferTo
private static void copyFileByTransferTo(File file, File newFile) throws IOException { try (FileChannel readChannel = FileChannel.open(Paths.get(file.toURI()), StandardOpenOption.READ); FileChannel writeChannel = FileChannel.open(Paths.get(newFile.toURI()), StandardOpenOption.READ, StandardOpenOption.WRITE, StandardOpenOption.CREATE)) { readChannel.transferTo(0, readChannel.size(), writeChannel); } }
2、transferFrom
private static void copyFileByTransferFrom(File file, File newFile) throws IOException { try (FileChannel readChannel = FileChannel.open(Paths.get(file.toURI()), StandardOpenOption.READ); FileChannel writeChannel = FileChannel.open(Paths.get(newFile.toURI()), StandardOpenOption.READ, StandardOpenOption.WRITE, StandardOpenOption.CREATE)) { writeChannel.transferFrom(readChannel,0, readChannel.size()); } }
3、Buffer
3.1、Buffer介绍
Buffer顾名思义就是缓冲区,在Java NIO里就是存储数据的缓冲区。和Channel的铁轨进行类比,Buffer就是行驶在铁轨上装货物(数据)的火车。简单的描述就是,铁轨(Channel)连接两地(源节点和目标节点),火车(Buffer)装货物(Data)在铁轨上行驶,将数据在两地间运输。
Buffer的子类有ByteBuffer、CharBuffer、IntBuffer、DoubleBuffer等等。最常用和通用的是ByteBuffer,其下面主要有两个子类,一个是操作Java堆内存的HeapByteBuffer和操作本地内存的DirectByteBuffer,两者的区别在于是否由JVM进行内存管理。

3.2、Buffer的核心参数
Buffer类有四个属性,分别是capacity、position、limit和mark,如下图所示:

- capacity:是初始化Buffer时指定的缓冲区大小,即缓冲区的容量。
- position:表示正在操作(读/写)的数据所在的位置。
- limit:表示可操作的(读/写)的数据大小,limit之后的数据不能进行操作。
- mark:就是一个标识位,mark()就会保存当前position的值,reset()将mark记录的值赋给position。
Buffer的子类都是增加了一个数组来存储数据,不论是byte[]还是char[],所以capacity就是数组长度,position和limit都是数组下标,读写操作只能在position-limit之间进行,mark记录的是当前的position。
所以显然,mark<=position<=limit<=capactity的。
3.3、Buffer的核心方法
比较常用的方法有如下几种:
3.3.1、flip()
public final Buffer flip() { limit = position; position = 0; mark = -1; return this; }
读取Buffer中的数据前,需要调用该方法。因为初始值position为0,limit为capacity,每次写入一个字节,position就会加1,所以写完数据时,position的值就在数据的结尾处,真实的数据就是0-position之间的数据
flip()就是设置正确的position和limit值,方便操作position-limit中间的数据。
3.3.2、clear()
public final Buffer clear() { position = 0; limit = capacity; mark = -1; return this; }
往Buffer中写数据之前需要调用该方法,目的是让新的数据从0位置开始写入,这个方法没有清除实际数组中的数据,只是重置参数值,将其初始化。新写入的数据会把旧的数据覆盖掉,调用flip()后,每次取到的都是新写入的数据。
其子类(ByteBuffer、IntBuffer等等)一般都是增加了一个数组保存数据,比如ByteBuffer,主要的存取数据的方法就是get()和put(),get()是从Buffer中取数据,put是向Buffer中存数据。例如Channel的read()和write(),内部逻辑也是get()和put()。
3.4、代码示例
1、申请分配堆内存
//分配capacity大小为2048的Buffer ByteBuffer buffer = ByteBuffer.allocate(2048);
2、申请分配直接内存
ByteBuffer direct = ByteBuffer.allocateDirect(2048);

Channel和Buffer一般是一起搭配使用,代码示例同上面的Channel部分。
4、Selector
Selector是NIO一个核心的组件,称为选择器,也叫多路复用器。单个线程就可以管理多个NIO-Channel,根据Channel不同的状态(可接受、可读、可写)来进行不同的处理,实现多个网络连接的管理,可以说NIO的no-blocking全靠Selector。
4.1、SelectableChannel
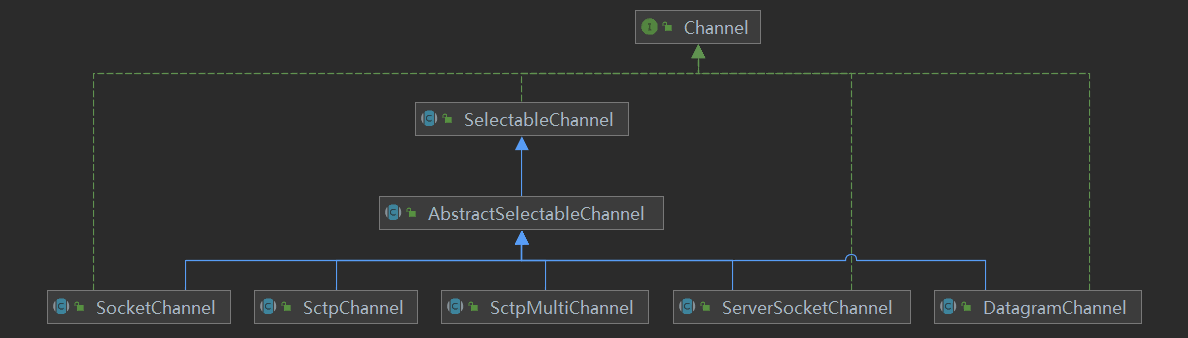
不是所有的Channel都能被Selector管理,只有实现了SelectableChannel的Channel才可以(FileChannel就不可以,所以NIO的文件IO其实都是阻塞进行的),SelectableChannel的子类如下:
TCP协议:ServerSocketChannel、SocketChannel;
UDP协议:DatagramChannel;
SCTP协议:SctpChannel、SctpMultiChannel;
NIO Pipe下的SinkChannel和SourceChannel
4.2 SelectionKey
SelectionKey也叫选择键,一种表示SelectableChannel在Selector中注册的令牌。每次SelectableChannel向Selector注册时,就会创建一个SelectionKey。
4.2.1、判断就绪的状态
1、判断可读
isReadable()
2、判断是否可写
isWritable()
3、判断Socket是否可连接
isConnectable()
4、判断Socket是否可接受
isAcceptable()
4.2.2、获取SelectableChannel
channel()返回一个SelectableChannel,可以根据实际强转为需要的Channel类型。
SocketChannel client = (SocketChannel) selectionKey.channel();
4.3、Selector关键参数/方法
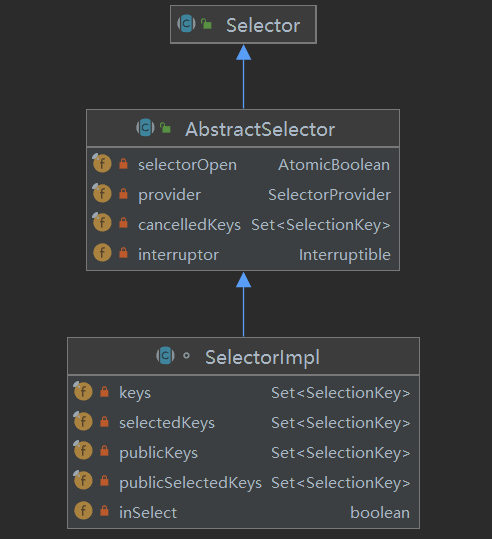
有三个存储SelectionKey的Set集合,keys:表示所有注册到这个Selector上的Channel的SelectionKey集合;
selectedKeys:表示IO操作准备就绪的Channel的SelectionKey集合,通过selectedKeys()获取;
cancelledKeys:表示被取消注册关系的Channle的SelectionKey集合;
4.3.1、获取Selector
通过静态方法获取Selector
Selector selector = Selector.open();
4.3.2、Channel注册
Channel的register()方法,通道注册到Selector,并指定“兴趣集”,Selector循环遍历Channel,检查其状态,当状态属于指定的“兴趣集”时,就返回SelectionKey,就是在Channel中选择满足条件的,所以叫选择器,区别于主动上报的“事件”。
socketChannel.register(selector, SelectionKey.OP_READ);
这个“兴趣集”包含四种状态,分别是:
//读操作 public static final int OP_READ = 1 << 0; //写操作 public static final int OP_WRITE = 1 << 2; //Socket连接操作 public static final int OP_CONNECT = 1 << 3; //Socket接受操作 public static final int OP_ACCEPT = 1 << 4;
tips:<<表示比特位左移操作,例如00000001,左移两位就是00000100,所以1<<3 = 2^3 = 8,读操作(1)、写操作(4)、连接操作(8)、接受操作(16)
兴趣集表示四种状态的和,例如可以传入9,那就可以拆分成1+8,表示读和连接操作,一般不会直接传入数据,可以采用以下的方式计算:
//采用+的方式 socketChannel.register(selector, SelectionKey.OP_READ + SelectionKey.OP_WRITE); //采用或(|)的方式(等同于相加) socketChannel.register(selector, SelectionKey.OP_READ | SelectionKey.OP_WRITE);
4.4、代码示例
下面代码演示服务端接受客户端发送的消息,并给客户端回应消息,先启动服务端,然后启动客户端发送消息。
4.4.1、服务端代码
package org.example; import java.io.File; import java.io.IOException; import java.net.InetSocketAddress; import java.nio.ByteBuffer; import java.nio.channels.*; import java.nio.charset.StandardCharsets; import java.nio.file.StandardOpenOption; import java.util.Iterator; public class SocketServer { public static void main(String[] args) throws IOException { //打开Socket通道 ServerSocketChannel server = ServerSocketChannel.open(); //设置为非阻塞 server.configureBlocking(false); //绑定连接 server.bind(new InetSocketAddress(8888)); //获取选择器 Selector selector = Selector.open(); //将通道注册到选择器,并监听指定的通道事件 server.register(selector, SelectionKey.OP_ACCEPT); //循环判断是否存在已经做好IO准备的SelectionKey集合 while (selector.select() > 0) { //遍历准备好的SelectionKey集合 Iterator<SelectionKey> iterator = selector.selectedKeys().iterator(); while (iterator.hasNext()) { SelectionKey selectionKey = iterator.next(); //根据不同的操作执行不同的逻辑 if (selectionKey.isAcceptable()) { //处于可接受状态的Channel要注册到Selector,在其变成其他状态后再处理 SocketChannel client = server.accept(); client.configureBlocking(false); client.register(selector, SelectionKey.OP_READ); } else if (selectionKey.isReadable()) { //获取本地文件的通道 File file = new File("D:\\serviceFile\\accept.txt"); //获取客户端可读的通道 try (SocketChannel client = (SocketChannel) selectionKey.channel(); FileChannel writeChannel = FileChannel.open(file.toPath(), StandardOpenOption.WRITE, StandardOpenOption.CREATE)) { ByteBuffer buffer = ByteBuffer.allocate(2048); //向本地文件写入数据 while (client.read(buffer) > 0) { buffer.flip(); writeChannel.write(buffer); buffer.clear(); } //服务端向客户端返回消息 String returnMsg = "已经收到文件!"; byte[] bytes = returnMsg.getBytes(StandardCharsets.UTF_8); ByteBuffer byteBuffer = ByteBuffer.allocate(bytes.length); byteBuffer.put(bytes); byteBuffer.flip(); client.write(byteBuffer); System.out.println(returnMsg); } } //移除已经处理过的Key iterator.remove(); } } server.close(); } }
4.4.2、客户端代码
package org.example; import java.io.IOException; import java.net.InetSocketAddress; import java.nio.ByteBuffer; import java.nio.channels.FileChannel; import java.nio.channels.SelectionKey; import java.nio.channels.Selector; import java.nio.channels.SocketChannel; import java.nio.charset.StandardCharsets; import java.nio.file.Paths; import java.util.Set; public class SocketClient { public static void main(String[] args) throws IOException { //打开目标地址和端口的Channel try (SocketChannel socketChannel = SocketChannel.open(new InetSocketAddress("127.0.0.1", 8888)); //本地文件的Channel FileChannel channel = FileChannel.open(Paths.get("D:\\clientFiles\\thisTest.txt"))) { //设置成非阻塞 socketChannel.configureBlocking(false); //获取选择器 Selector selector = Selector.open(); //当前Channel注册到Selector socketChannel.register(selector, SelectionKey.OP_READ); //创建一个1k的Buffer ByteBuffer byteBuffer = ByteBuffer.allocate(1024); //向SocketChannel写入数据 while (channel.read(byteBuffer) != -1) { byteBuffer.flip(); socketChannel.write(byteBuffer); byteBuffer.clear(); } //选择已经就绪的Channel while (selector.select() > 0) { //取出对应的SelectionKey集合 Set<SelectionKey> selectionKeys = selector.selectedKeys(); //循环处理集合 for (SelectionKey selectionKey : selectionKeys) { //判断状态是否可读 if (selectionKey.isReadable()) { //从SelectionKey获取SocketChannel try (SocketChannel client = (SocketChannel) selectionKey.channel()) { //复用上面的Buffer while (client.read(byteBuffer) > 0) { //切换到读模式 byteBuffer.flip(); byte[] bytes = new byte[byteBuffer.limit()]; byteBuffer.get(bytes); System.out.println(new String(bytes, StandardCharsets.UTF_8)); byteBuffer.clear(); } } } } break; } } } }
4.4.3、问题记录
问题:数据传输完成后,如果SocketClient主动断开连接,SocketServer代码中的Selector会一直重复出现可读事件。
解决方法:服务端需要主动关闭获取的客户端Channel,通过try resource的方式自动关闭或者调用close()显示关闭,代码如下:
SocketChannel client = (SocketChannel) selectionKey.channel(); client.close();


【推荐】国内首个AI IDE,深度理解中文开发场景,立即下载体验Trae
【推荐】编程新体验,更懂你的AI,立即体验豆包MarsCode编程助手
【推荐】抖音旗下AI助手豆包,你的智能百科全书,全免费不限次数
【推荐】轻量又高性能的 SSH 工具 IShell:AI 加持,快人一步
· 无需6万激活码!GitHub神秘组织3小时极速复刻Manus,手把手教你使用OpenManus搭建本
· Manus爆火,是硬核还是营销?
· 终于写完轮子一部分:tcp代理 了,记录一下
· 别再用vector<bool>了!Google高级工程师:这可能是STL最大的设计失误
· 单元测试从入门到精通