Nexus构建npm、yum、maven私有仓库
nuxus是什么
刚接触nuxus是因为主流技术maven,构建maven环境的时候一般都会用maven+nuxus。那就得先说一下maven是什么?
Maven是一个用于项目构建的工具,通过它便捷的管理项目的生命周期。即项目的jar包依赖,开发,测试,发布打包。
主要管理工作是:依赖管理,项目一键构建。maven项目不需要手动导入jar包,通过在pom.xml中添加依赖,引用依赖会自动从maven仓库下载jar包,方便快捷。
- 使用maven构建的项目,整个项目的体积小
- maven项目不需要手动导入jar包,通过在pom.xml中添加依赖,引用依赖会自动从maven仓库下载jar包,方便快捷。
- 项目一键构建:使用maven可以快速地对项目进行编译--测试--运行--打包--安装
- maven支持跨平台操作,可在window、linux、mac上使用
- maven遵循规范开发有利于提高大型团队的开发效率,降低项目的维护成本,属于主流技术,一般公司都会使用maven来构建项目

如上图所示nexus就是私有仓库的一种,架设在局域网中,可解决项目直接连接中央仓库获取依赖速度慢或者根本连不上的问题。那既然是仓库总不至于只能整合maven的是吧。当然不是

看图说话,nexus可以整合包括maven、npm、pupi、go、rpm、apt-get等常用的仓库,用官方的话说就是Single source of truth for all of your components, binaries, and build artifacts,并且还可以避免Maven / Java,npm,NuGet和PyPI组件的已知安全和许可证问题。是不是很强大,瞬间解决很多内网项目的困境。
官方地址
官方文档
安装
docker安装
docker pull sonatype/nexus3
mkdir /data/nexus-data && chown -R 200 /data/nexus-data
docker run -d -p 8081:8081 --name nexus -v /data/nexus-data:/nexus-data --restart=always sonatype/nexus3
curl -u admin:admin123 http://localhost:8081/service/metrics/ping   检测连通性,需要等待初始化完成,大概1分钟
http://:8081$ip
admin
admin123
服务器安装
1、下载nexus
useradd nexus
echo "123456" | passwd  --stdin  nexus
wget https://download.sonatype.com/nexus/3/latest-unix.tar.gz --no-check-certificate
下载地址
vim /etc/security/limits.conf
* soft nofile 65536
* hard nofile 65536

2、vim /home/nexus/nexus-3.15.2-01/bin/nexus.rc
run_as_user="nexus"
3、vim /home/nexus/nexus-3.15.2-01/bin/nexus (可选,neuxs用户下有java的环境变量即可)
INSTALL4J_JAVA_HOME="/usr/lib/jvm/java-1.8.0-openjdk-1.8.0.191.b12-1.el7_6.x86_64"
4、vim /home/nexus/nexus-3.15.2-01/etc/nexus-default.properties (可选,如果需要修改端口号)
application-port=8081 设置端口,如果有需要
5、添加到systemctl(可选,需要root权限)
vim /etc/systemd/system/nexus.service
########################
[Unit]
Description=nexus service
After=network.target

[Service]
Type=forking
LimitNOFILE=65536
ExecStart=/home/nexus/nexus-3.15.2-01/bin/nexus start
ExecStop=/home/nexus/nexus-3.15.2-01/bin/nexus stop
User=nexus
Restart=on-abort

[Install]
WantedBy=multi-user.target
#################################
systemctl daemon-reload
systemctl start nexus.service
6、打开UI验证
http://:8081$IP
用户名:admin
密码:admin123
7、修改数据目录(可选)
vim /home/nexus/nexus-3.15.2-01/bin/nexus.vmoptions

8、开启https
生成keystore文件
keytool -genkeypair\
-keystore /home/nexus/nexus-3.15.2-01/etc/ssl/keystore.jks\
-alias nexus\
-keypass nexus@123\
-storepass nexus@123\
-keyalg RSA\
-keysize 2048 \
-validity 5000 \
-dname "CN=*.test.com,OU=TEST,O=TEST,L=Shenzhen,ST=Guangdong,C=CN"\
-ext "SAN=IP:192.168.2.22"\
-ext "BC=ca:true"
vim /opt/sonatype-work/nexus3/etc/nexus.properties
nexus-args=${jetty.etc}/jetty.xml,${jetty.etc}/jetty-http.xml,${jetty.etc}/jetty-requestlog.xml,${jetty.etc}/jetty-https.xml

application-port-ssl=8443
vim /opt/nexus-3.5.0-02/etc/jetty/jetty-https.xml

systemctl enable nexus
systemctl restart nexus
整合NPM
配置npm仓库
创建存储空间


创建仓库

这三种分别是:
hosted(私有仓库):用于发布个人开发的npm组件
proxy(代理仓库):可以代理npm和淘宝镜像
group(组合仓库):对外公开的仓库,集合了hosted和proxy
创建私有仓库

创建代理仓库

创建组合仓库
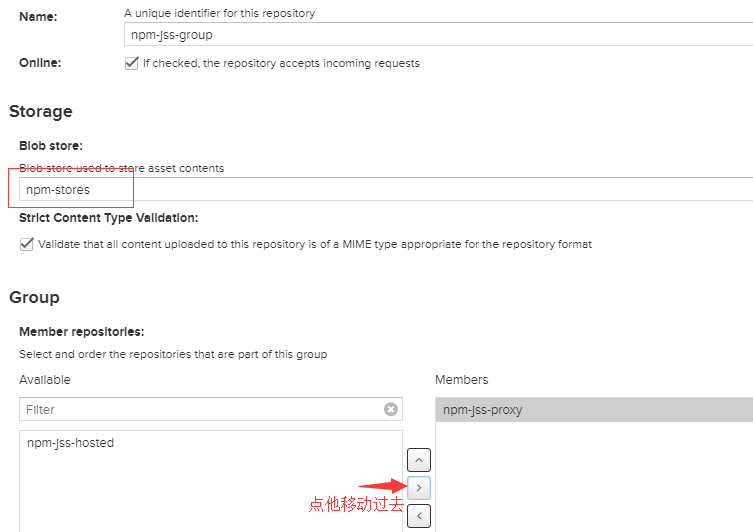
注意右边的框框,需要调优先级。如果私有仓库在上,用户下载npm包的时候会优先下载私有仓库中的,私有仓库没有再去代理仓库中下载。
创建用户
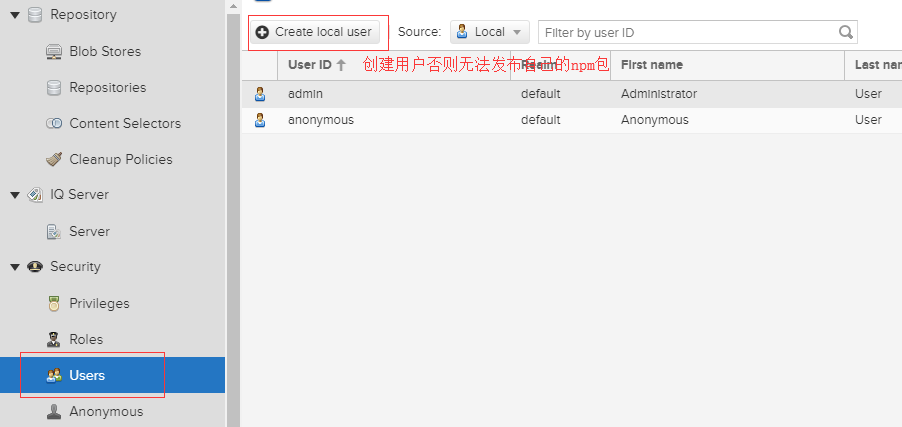
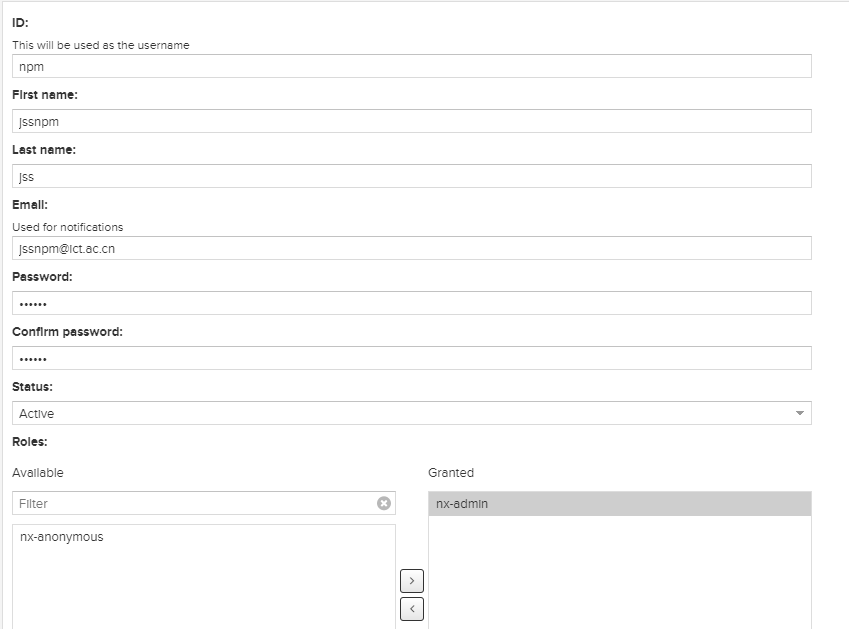

客户端使用
1、用户端设置npm的registry为group仓库

配置本地仓库源,有两种方法
- npm config set registry 刚才copy的group地址 //npm config set registry https://registry.npmjs.org/
- npm config set registry http://user:pass@:8081$ip/repository/npm-public/ //带验证的源
https://registry.npmjs.org/ //中央仓库
npm config list //查看npm配置
或者
- cd /home/nexus ;echo "刚才copy的group地址" > .npmrc
在客户端上,我们配置的私有仓库是group(组合仓库)地址,组合仓库包含了本地库hosted和代理库proxy,并设置了优先级。
执行npm install,如果本地库没有包的话,就去代理库里拉,然后放到group仓库中。
2、客户端发布自己的npm包到私服(执行的命令均在发布的模块根目录下)
npm login –registry=http://npm私服所在服务器的ip地址:8081/repository/npm-hosted/
输入用户名,密码
npm publish –registry=http://npm私服所在服务器的ip地址:8081/repository/npm-hosted/
将自己的只做的包放到hosted(本地库)上共享
查看
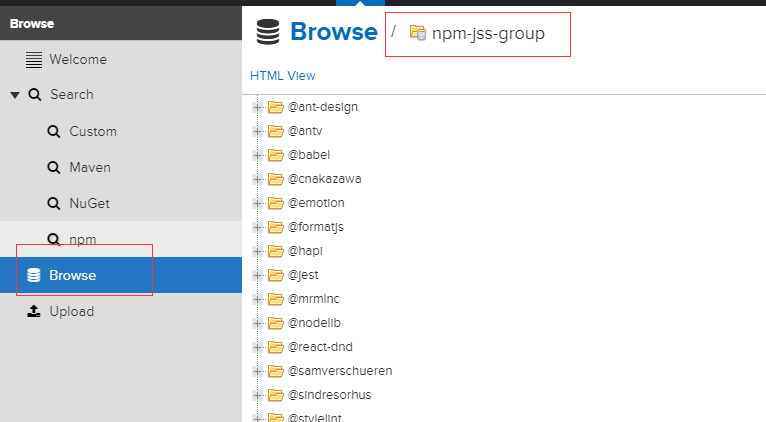
报错
npm ERR! code E401
npm ERR! Unable to authenticate, need: BASIC realm="Sonatype Nexus Repository Manager"
遇到这个报错,即使配了正确的用户名密码也会报错。
使用npm config list找到配置文件位置

vim /root/.npmrc
把文件里 _authToken的行全部删除
集成到jenkins
IQserver
我还纳闷呢,度娘一点IQserver的帖子都没有,翻翻官方,发现是要银子的。没得测试了,贴个文档有机会再说吧
官方文档
下载地址

yum库
配置yum私有库
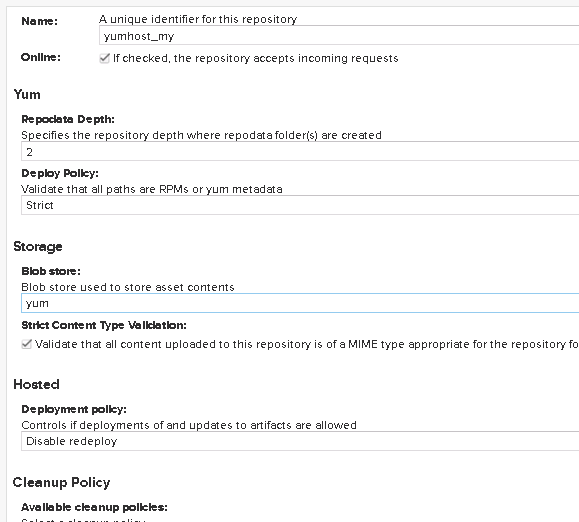
本地库host
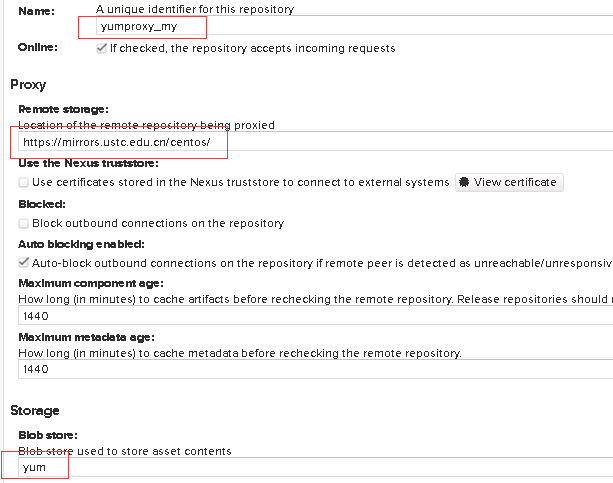
代理库proxy(https://mirrors.ustc.edu.cn/centos/)
group库
和npm的一样,把刚才创建的host和proxy都加入
复制私有库地址

编写nexus的repo放到/etc/yum.repos.d/
cd /etc/yum.repos.d/
mkdir bak
mv * bak
vim nexus.repo
注意$releasever/os/$basearch/不能少,官方介绍

大意是说必须遵守代理源的OS和x86_64体系结构
[nexus]
name=Nexus Repository
baseurl=http://10.60.1.93:8081/repository/yumgroup/$releasever/os/$basearch/
enabled=1
gpgcheck=0

#released updates
[updates]
name=CentOS-$releasever-Updates-163.com
#mirrorlist=http://mirrorlist.centos.org/?release=$releasever&arch=$basearch&repo=updates
baseurl=http://mirrors.163.com/centos/$releasever/updates/$basearch/
gpgcheck=1
gpgkey=http://mirrors.163.com/centos/RPM-GPG-KEY-CentOS-7

#additional packages that may be useful
[extras]
name=CentOS-$releasever-Extras-163.com
#mirrorlist=http://mirrorlist.centos.org/?release=$releasever&arch=$basearch&repo=extras
baseurl=http://mirrors.163.com/centos/$releasever/extras/$basearch/
gpgcheck=1
gpgkey=http://mirrors.163.com/centos/RPM-GPG-KEY-CentOS-7

#additional packages that extend functionality of existing packages
[centosplus]
name=CentOS-$releasever-Plus-163.com
baseurl=http://mirrors.163.com/centos/$releasever/centosplus/$basearch/
gpgcheck=1
enabled=0
gpgkey=http://mirrors.163.com/centos/RPM-GPG-KEY-CentOS-7
构建缓存
yum clean all
yum makecache
验证缓存
查看repo库建立的缓存,没有这个拉不到镜像

测试私有库
cd /etc/yum.repos.d/
mkdir bak
mv * bak
vim nexus.repo

[nexus]
name=Nexus Repository
baseurl=http://10.60.1.93:8081/repository/yumgroup/$releasever/os/$basearch/
enabled=1
gpgcheck=0
yum install -y lrzsz

配置kubenate镜像库
配置一个代理库,添加地址https://mirrors.aliyun.com/kubernetes/yum/repos/kubernetes-el7-x86_64

客户端配置代理库地址
[nexus]
name=Nexus Repository
baseurl=http://10.60.1.93:8081/repository/kube_ali/
enabled=1
gpgcheck=0
yum makecache
查看代理库,已建立缓存

客户端执行yum报错缺依赖包
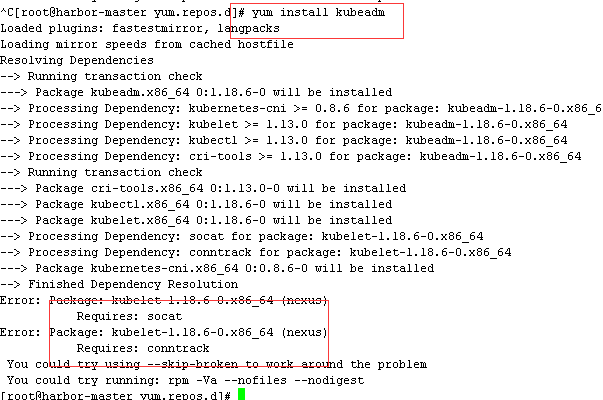
怀疑是索引的问题,重建一下索引,解决。
上传自己的rpm包
有个疑问,感觉host库的目录深度设置成0和2没啥区别,都传上去了?
单个包
i=conntrack-tools-1.4.4-7.el7.x86_64.rpm
ip=x.x.x.x
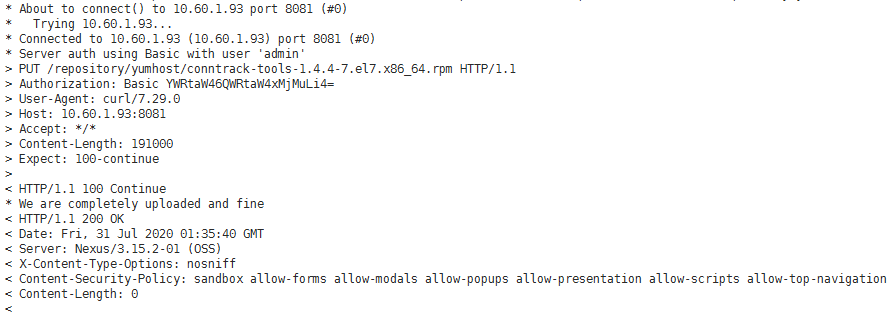
curl -v --user 'admin:admin123' --upload-file $i http://$ip:8081/repository/yumhost/$i
多个包
for i in `ls /root/upload/for_zbw/rpms`; do curl -v --user 'admin:admin123' --upload-file $i http://$ip:8081/repository/yumhost/$i; done
客户端执行,也没个success,只能查看host库里边有没有东西判断上传是否成功。


 浙公网安备 33010602011771号